Samsung LE40M71B Instrukcja obsługi
- Kategoria
- Telewizory LCD
- Typ
- Instrukcja obsługi

LCD TV
LE40M7
Owner’s Instructions
Before operating the unit,
please read this manual thoroughly,
and retain it for future reference.
ON-SCREEN MENUS
PC DISPLAY
PICTURE IN PICTURE (PIP)
TELETEXT
This device is a Class B digital apparatus.
Register your product at www.samsung.com/global/register
BN68-01047D-02
Contact SAMSUNG WORLD-WIDE
If you have any questions or comments relating to Samsung products,
please contact the SAMSUNG customer care centre.
Comment contacter Samsung dans le monde
Si vous avez des suggestions ou des questions concernant les produits Samsung, veuillez
contacter le Service Consommateurs Samsung.
Kontakt zu Samsung
Falls Sie Fragen oder Anregungen zu Samsung-Produkten haben, wenden Sie sich bitte an
den Samsung-Kundendienst.
Contact Samsung wereldwijd
Wanneer u suggesties of vragen heeft met betrekking tot Samsung producten, gelieve con-
tact op te nemen met de consumenten dienst van Samsung.
Contacte con SAMSUNG WORLD-WIDE
Si tiene alguna pregunta o comentario referente a nuestros productos,
por favor contacte con nuestro Servicio de Atención al Cliente
Contacte SAMSUNG GLOBAL
Se tem algumas dúvidas ou comentários sobre os produtos Samsung,
contacte por favor a nossa linha de apoio a clientes Samsung.
Contatta SAMSUNG WORLD-WIDE
Se avete commenti o domande sui prodotti Samsung, contattate il
Servizio Clienti Samsung.
Country
BELGIUM
CZECH REPUBLIC
DENMARK
FINLAND
FRANCE
GERMANY
HUNGARY
ITALIA
LUXEMBURG
NETHERLANDS
NORWAY
POLAND
PORTUGAL
RUSSIA
SLOVAKIA
SPAIN
SWEDEN
U.K
UKRAINE
Customer Care Center
02 201 2418
844 000 844
38 322 887
09 693 79 554
08 25 08 65 65 (€ 0,15/Min)
01805 - 121213 (€ 0,12/Min)
06 40 985 985
199 153 153
02 261 03 710
0900 20 200 88 (€ 0.10/Min)
231 627 22
0 801 801 881
80 8 200 128
8-800-200-0400
0850 123 989
902 10 11 30
08 585 367 87
0870 242 0303
8-800-502-0000
Web Site
www.samsung.com/be
www.samsung.com/cz
www.samsung.com/dk
www.samsung.com/fi
www.samsung.com/fr
www.samsung.de
www.samsung.com/hu
www.samsung.com/it
www.samsung.lu
www.samsung.com/nl
www.samsung.com/no
www.samsung.com/pl
www.samsung.com/pt
www.samsung.ru
www.samsung.com/sk
www.samsung.com/es
www.samsung.com/se
www.samsung.com/uk
www.samsung.com/ur
BN68-01047D-02Cover.indd 1 2006-07-07 �� 5:07:27

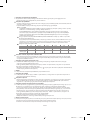
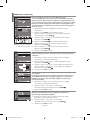
Precautions When Displaying a Still Image
A still image may cause permanent damage to the TV screen.
• Do not display a still image on the LCD panel for more than 2 hours as it can cause screen image retention.
This image retention is also known as "screen burn".
To avoid such image retention, reduce the degree of brightness and contrast of the screen when displaying a still image.
• Watching the LCD TV in 4:3 format for a long period of time may leave traces of borders displayed on the left, right and center of the screen caused
by the difference of light emission on the screen. Playing a DVD or a game console may cause a similar effect to the screen. Damages caused by
the above effect are not covered by the Warranty.
• Displaying still images from Video games and PC for longer than a certain period of time may produce partial after-images.
To prevent this effect, reduce the ‘brightness’ and ‘contrast’ when displaying still images.
Elővigyázatosság az állóképek megjelenítésével kapcsolatban.
Az állóképek a TV-képernyő maradandó károsodását okozhatják.
• Ne jelenítsen meg állóképeket az LCD-képernyőn 2 órát meghaladó időn túl, mert ilyenkor a megjelenített képek a képernyő „beégését” okozhatják.
Ezt a jelenséget „képernyőbeégésnek” is nevezik.
A képernyőbeégés elkerülése érdekében állókép megjelenítésekor csökkentse a kép fényerejét és kontrasztját.
• Az LCD TV huzamosabb ideig tartó, 4:3 képarányú módban történő használata esetén a kibocsátott fényerősség eltérése miatt a képernyő
közepén, valamint bal és jobb oldalán sávok alakulhatnak ki. DVD-filmek lejátszása és játékprogramok használata is hasonló jelenséget
okozhat. A garancia az ilyen esetekben keletkezett károkra nem terjed ki.
• Videojátékok vagy számítógépek állóképeinek bizonyos időt meghaladó megjelenítése következtében a képernyőn részleges utókép jelenhet meg.
A jelenség megelőzése érdekében állóképek megjelenítése esetén csökkentse a fényerőt és kontrasztot.
Środki ostrożności, które należy zachować przy odtwarzaniu nieruchomych obrazów.
Nieruchomy obraz może spowodować trwałe uszkodzenie ekranu telewizyjnego.
• Nieruchomych obrazów nie należy wyświetlać na ekranie LCD dłużej niż przez 2 godziny, gdyż może to spowodować utrwalenie obrazu na ekranie.
Zjawisko utrwalania obrazu określa się także mianem „wypalania ekranu”.
Aby uniknąć tego zjawiska, należy przy wyświetlaniu nieruchomych obrazów zmniejszyć jasność oraz kontrast ekranu.
• Oglądanie obrazu w formacie 4:3 na ekranie telewizora LCD przez długi okres czasu może powodować pozostawanie śladów krawędzi po środku
ekranu oraz po jego lewej i prawej stronie. Przyczyną tego zjawiska jest różnica w natężeniu emitowanego światła. Odtwarzanie płyty DVD lub
wyświetlanie obrazu z konsoli do gier może powodować powstawanie podobnego zjawiska. Wymienione powyżej objawy nie są objęte gwarancją.
• Wyświetlanie nieruchomych obrazów z konsoli do gier lub komputera przez długi okres czasu może powodować powstawanie obrazu szczątkowego.
Aby zapobiec powstawaniu tego zjawiska, należy przy wyświetlaniu nieruchomych obrazów zmniejszyć ‘jasność’ oraz ‘kontrast’.
Προφυλάξεις για την προβολή ακίνητης εικόνας
Η προβολή ακίνητης εικόνας πιθανόν να προκαλέσει ανεπανόρθωτη ζημιά στην οθόνη της τηλεόρασης.
• Μην προβάλλετε μια ακίνητη εικόνα στην οθόνη LCD για περισσότερο από 2 ώρες, καθώς αυτό μπορεί να προκαλέσει διατήρηση της εικόνας.
Αυτή η διατήρηση της εικόνας είναι γνωστή ως “κάψιμο της οθόνης”.
Για να αποφύγετε τη διατήρηση της εικόνας, μειώστε τη φωτεινότητα και την αντίθεση της οθόνης όταν προβάλλετε στατικές εικόνες.
•
Η χρήση της τηλεόρασης πλάσματος σε μορφή 4:3 για παρατεταμένο χρονικό διάστημα μπορεί να οδηγήσει στην εμφάνιση αχνών περιγραμμάτων στα αριστερά,
στα δεξιά και στο κέντρο της οθόνης, λόγω διαφοράς στην εκπομπή φωτός στην οθόνη. Η αναπαραγωγή ενός δίσκου DVD ή η σύνδεση μιας κονσόλας
παιχνιδιών ενδέχεται να προκαλέσει το ίδιο φαινόμενο στην οθόνη. Οι βλάβες που προκαλούνται από το παραπάνω φαινόμενο δεν καλύπτονται από την εγγύηση.
• Η προβολή στατικών εικόνων από βιντεοπαιχνίδια και υπολογιστές για μεγαλύτερο χρονικό διάστημα από το καθορισμένο, ενδέχεται να προκαλέσει μερικώς
εντυπωμένα είδωλα. Για να αποφύγετε αυτό το φαινόμενο, μειώστε τη φωτεινότητα και την αντίθεση όταν προβάλλετε στατικές εικόνες.
Предпазни мерки при показване на неподвижен образ
Неподвижният образ може да доведе до перманентна повреда на екрана на телевизора.
• Не показвайте неподвижен образ на течнокристалния екран за повече от часа, тъй като това може да доведе до запазване на образа.
Това запазване на образа се нарича още “прогаряне на екрана”.
За да избегнете такова запазване на образа, намалете яркостта и контраста на екрана, когато показвате неподвижен образ.
• Гледането на течнокристалния телевизор във формат 4:3 за продължителен период от време може да остави следи или рамки, показвани
отляво, отдясно и в центъра на екрана, предизвикани от разликата в светлинното излъчване на екрана. Изпълнение на DVD или игрова
конзола може да предизвика подобен ефект върху екрана. Повреди, предизвикани от горния ефект, не се покриват от Гаранцията.
• Показването на неподвижни образи на видео игри и компютър за по-дълъг период от време може да доведе до частични остатъчни изображения.
За да се предотврати този ефект, намалете яркостта и контраста на екрана, когато показвате неподвижен образ.
Bezpečnostné opatrenia pri zobrazení statického obrazu
Statický obraz môže spôsobiť trvalé poškodenie televíznej obrazovky.
• Statický obraz nezobrazujte na LCD paneli dlhšie ako 2 hodiny, pretože môže spôsobiť retenciu obrazu na obrazovke.
Táto retencia obrazu je známa aj ako “vypálenie obrazovky”.
Aby ste zabránili takejto retencii obrazu, pri zobrazovaní statických obrázkov znížte stupeň jasu a kontrastu obrazovky.
• Sledovanie LCD TV vo formáte 4:3 po dlhšiu dobu môže zanechať vľavo, vpravo a v strede obrazovky stopy po okrajoch, spôsobené
rozdielnym vyžarovaním svetla na obrazovke. Prehrávanie DVD alebo hranie hier môže na obrazovke spôsobiť podobný efekt. Poškodenia,
spôsobené vyššie uvedeným efektom, nie sú chránené zárukou.
• Zobrazenie statických obrázkov z videohier a PC dlhšie ako určitý čas, môže vytvárať čiastočné pretrvávajúce obrazy.
Aby ste predišli takémuto efektu, počas zobrazenia statických obrázkov znížte “jas” a “kontrast”.
Mjere opreza pri prikazivanju fotografije
Fotografija može uzrokovati trajna oštećenja na TV zaslonu.
• Ne prikazujte fotografiju na LCD zaslonu dulje od 2 sata jer to može uzrokovati zadržavanje slike na zaslonu.
Ovo zadržavanje slike je poznato i kao “efekt izgaranja zaslona”.
Kako biste izbjegli zadržavanje slike, smanjite stupanj svjetline i kontrasta zaslona tijekom prikazivanja fotografije.
• Gledanje LCD televizora u formatu 4:3 u dužem vremenskom periodu može dovesti do prikazivanja tragova obruba na lijevoj i desnoj strani
te središtu zaslona uzrokovanog razlikom emitiranja svjetla na zaslonu. Reprodukcija DVD-a ili igranje s igraćom konzolom može uzrokovati
sličan efekt na zaslonu. Pogreške uzrokovane gore navedenim efektom nisu pokrivene jamstvom.
• Prikazivanje fotografija iz video igrica i računala u duljem vremenskom periodu od predvi?enog može dovesti do parcijalnih zaostalih slika.
Kako bi to spriječili, smanjite ‘svjetlinu’ i ‘kontrast’ kod prikazivanja fotografija.
Opatření při zobrazení statického obrazu
Statický obraz může způsobit trvalé poškození obrazovky televizoru.
• Neponechávejte statický obraz na panelu LCD po dobu delší než 2 hodiny, mohlo by dojít ke zhoršení obrazu.
Toto zhoršení obrazovky se také označuje jako „vypálení obrazovky“.
Abyste zhoršení obrazu předešli, snižte při zobrazení statického obrazu nastavení jasu a kontrastu.
• Sledování televizoru LCD při formátu zobrazení 4:3 po dlouhou dobu může na pravém a levém okraji a ve středu obrazovky zanechat stopy
po okrajích způsobené rozdíly ve vyzařování světla. Podobný efekt může na obrazovce zanechat přehrávání DVD nebo používání herní
konzole. Na poškození způsobené výše uvedeným efektem se nevztahuje záruka.
• Zobrazení statického obrazu z videoher a PC po delší dobu může způsobit částečný efekt „afterimage“.
Tomuto efektu lze předejít snížením jasu a kontrastu při zobrazování statického obrazu.
© 2006 Samsung Electronics Co., Ltd. All rights reserved.
Donggu-Still.indd 1 2006-07-07 �� 5:07:35

English
English-1
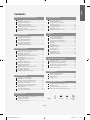
Contents
CONNECTING AND PREPARING YOUR TV
List of Parts....................................................................................... 2
Installing the Wall Mount Kit ................................................ 2
Viewing the Control Panel ......................................................... 3
Viewing the Connection Panel ................................................. 4
Viewing the Remote Control ..................................................... 6
Installing Batteries in the Remote Control ........................... 6
Switching On and Off .................................................................. 7
Placing Your Television in Standby Mode ............................. 7
Plug & Play ....................................................................................... 7
SETTING THE CHANNELS
Storing Channels Automatically .............................................. 8
Storing Channels Manually ........................................................ 8
Setting the Channel Manager .................................................. 9
Activating the Child Lock ...................................................... 10
Sorting the Stored Channels ..................................................... 10
Assigning Channels Names ....................................................... 11
Fine Tuning Channel Reception ............................................... 11
SETTING THE PICTURE
Using the LNA (Low Noise Amplifier) Feature .................... 12
Changing the Picture Standard ................................................ 12
Adjusting the Custom Picture................................................... 12
Changing the Colour Tone ......................................................... 13
Adjusting the Color Tone with the Preferred
Color Component .......................................................................... 13
Resetting the Picture Settings to the
Factory Defaults ............................................................................. 14
Changing the Picture Size .......................................................... 14
Changing the Auto Wide (4:3) .................................................. 14
Freezing the Current Picture ..................................................... 15
Digital Noise Reduction .............................................................. 15
DNIe Demo (Digital Natural Image engine) ........................ 15
Changing the Colour Space....................................................... 16
Changing the LCD 100Hz ........................................................... 16
Viewing the Picture In Picture (PIP) ........................................ 17
SETTING THE SOUND
Changing the Sound Standard ........................................... 18
Adjusting the Sound Settings ............................................. 18
Setting the TruSurround XT (SRS TSXT) ........................... 18
Adjusting the Volume Automatically ................................ 19
Selecting the Internal Mute .................................................. 19
Listening to the Sound of the Sub Picture...................... 19
Resetting the Sound Settings to the
Factory Defaults ........................................................................ 20
Connecting Headphones ...................................................... 20
Selecting the Sound Mode ................................................... 20
SETTING THE TIME
Setting and Displaying the Current Time ........................ 20
Setting the Sleep Timer.......................................................... 21
Switching the Television
On and Off Automatically ..................................................... 21
SETTING THE OTHERS
Choosing Your Language ...................................................... 22
Using Game Mode ................................................................... 22
Setting the Blue Screen Mode /
Selecting the Melody ............................................................. 23
Using the Energy Saving Feature ....................................... 23
Setting the Blue Eye ................................................................ 23
Selecting the Source ............................................................... 24
Editing the Input Source Names ........................................ 24
WISELINK
Using the WISELINK Function .............................................. 25
Using the WISELINK Menu .................................................... 26
Using the PHOTO (JPEG) List ................................................ 26
Viewing Photo File Information .......................................... 28
Selecting a Photo and Slide Show ..................................... 28
Rotating ....................................................................................... 29
Zooming-in ................................................................................. 30
Copying Image Files ................................................................ 31
Deleting Image Files................................................................ 31
Printing a Photo ........................................................................ 32
Using the MP3 List ................................................................... 32
Copying Music Files ................................................................. 33
Deleting Music Files ................................................................ 33
Using the Setup Menu ........................................................... 34
USING THE TELETEXT FEATURE
Teletext Decoder ...................................................................... 35
Displaying the Teletext Information .................................. 35
Selecting a Specific Teletext Page ...................................... 36
Using Fastext to Select a Teletext Page ............................ 36
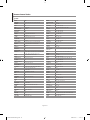
Setting Up Your Remote Control ........................................ 37
Remote Control Codes ........................................................... 39
SETTING THE PC
Setting up Your PC Software
(Based on Windows XP) ......................................................... 42
Display Modes ........................................................................... 42
Setting the PC ............................................................................ 43
RECOMMENDATIONS FOR USE
Using the Anti-Theft Kensington Lock ............................. 44
Troubleshooting:
Before Contacting Service Personnel ............................... 44
Technical and Environmental Specifications ................ 45
Symbol Press Important Note One-Touch
Button
English
BN68-01047B-01Eng.indd 1 2006-07-07 �� 8:06:14

English-2
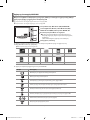
List of Parts
Please make sure the following items are included with your LCD TV.
If any items are missing, contact your dealer.
Remote Control & Batteries
(AAA x 2)
Power Cord Cover-Bottom Cleaning Cloth
Owner’s Instructions
Warranty card
Service Network Card
Safety Guide Registration Cards
Warranty card / Service Network Card / Safety Guide / Registration Cards (Not available in all locations)
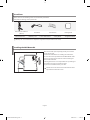
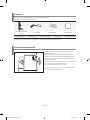
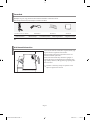
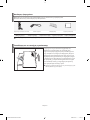
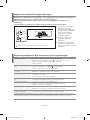
Wall mount items (sold separately) allow you to mount
the TV on the wall.
For detailed information on installing the wall mount,
see the instructions provided with the Wall Mount items.
Contact a technician for assistance when installing the
wall mounted bracket.
Samsung Electronics is not responsible for any damage to
the product or injury to yourself or others
if you elect to install the TV on your own.
Remove the stand and cover the bottom hole with a
cap and fasten with two screws.
Installing the Wall Mount Kit
BN68-01047B-01Eng.indd 2 2006-07-07 �� 6:49:50

English-3
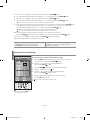
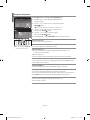
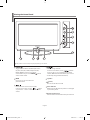
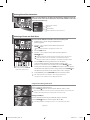
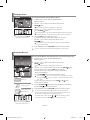
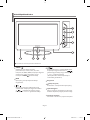
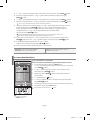
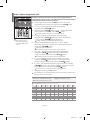
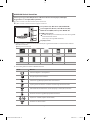
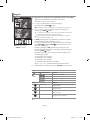
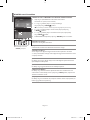
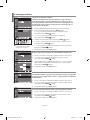
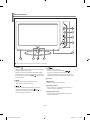
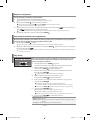
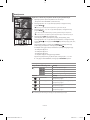
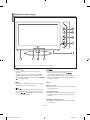
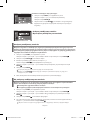
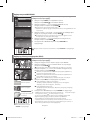
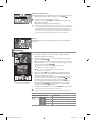
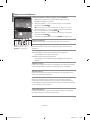
Viewing the Control Panel
SOURCE
Toggles between all the available input sources
(TV, Ext.1, Ext.2, AV, S-Video, Component, PC,
HDMI1, HDMI2). In the on-screen menu,
use this button as you use the ENTER
button
on the remote control.
MENU
Press to see an on-screen menu of
your TV’s features.
Press to decrease or increase the volume.
In the on-screen menu, use the buttons
as you use the 3 and 4 buttons on the remote
control.
Press to change channels.
In the on-screen menu, use the
buttons
as you use the and 5 buttons on the remote
control. (Without the Remote Control, you can turn
on the TV by using the Channel buttons.)
Speakers
(
Power)
Press to turn the TV on and off.
Power Indicator
Blinks and turns off when the power is on and lights
up in stand-by mode.
Remote Control Sensor
Aim the remote control towards this spot on the TV.
The product colour and shape may vary depending on the model.
BN68-01047B-01Eng.indd 3 2006-07-07 �� 6:49:52

English-4
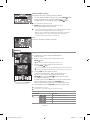
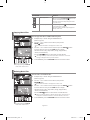
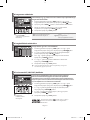
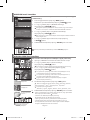
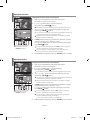
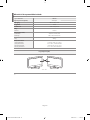
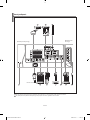
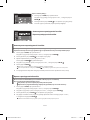
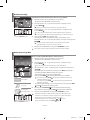
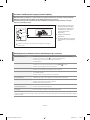
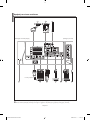
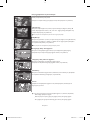
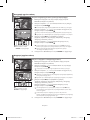
Viewing the Connection Panel
Power Input
Whenever you connect an external device to your TV, make sure that power on the unit is turned off.
When connecting an external device, match the colour of the connection terminal to the cable.
[Side Panel Jacks]
[Rear Panel Jacks]
BN68-01047B-01Eng.indd 4 2006-07-07 �� 6:49:53

English-5
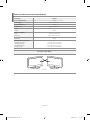
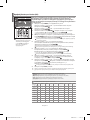
Connecting an Aerial or Cable Television Network
To view television channels correctly, a signal must be received by the set from one of the following sources:
- An outdoor aerial / A cable television network / A satellite network
Connecting HDMI/DVI
-
Supports connections between HDMI-connection-enabled AV devices (Set-Top Boxes, DVD players, AV receivers and digital TVs).
- No additional Audio connection is needed for an HDMI to HDMI connection.
What is HDMI?
- “High Definition Multimedia interface” allows the transmission of high definition digital video data and multiple
channels of digital audio ( 5.1 channels).
- The HDMI/DVI terminal supports DVI connection to an extended device with the appropriate cable (not supplied).
The difference between HDMI and DVI is that the HDMI device is smaller in size, has the HDCP
(High Bandwidth Digital Copy Protection) coding feature installed, and supports multi - channel digital audio.
You should use the DVI-to-HDMI cable or DVI-HDMI Adapter for the connection, and the “R - AUDIO - L” terminal
on DVI for sound output.
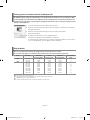
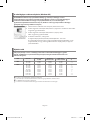
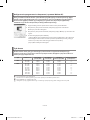
- When connecting this product via HDMI or DVI to a Set Top Box, DVD Player or Games Console etc, make sure that
it has been set to a compatible video output mode as shown in the table below.
Failure to observe this may result in picture distortion, image breakup or no picture.
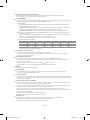
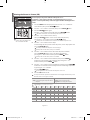
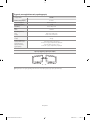
Supported modes for DVI or HDMI
- Do not attempt to connect the HDMI/DVI connector to a PC or Laptop Graphics Card.
(This will result in a blank screen being displayed)
Connecting Set-Top Box, VCR or DVD
-
Connect the VCR or DVD SCART cable to the SCART connector of the VCR or DVD.
- If you wish to connect both the Set-Top Box and VCR (or DVD), you should connect the Set-Top Box to the VCR (or DVD)
and connect the VCR (or DVD) to your set.
Connecting External A/V Devices
- Connect RCA or S-VIDEO cable to an appropriate external A/V device such as VCR, DVD or Camcorder.
- Connect RCA audio cables to “R - AUDIO - L” on the rear of your set and the other ends to corresponding audio out
connectors on the A/V device.
- Headphone may be connected to the headphone output ( ) on the rear of your set.
While the headphone is connected, the sound from the built-in speakers will be disabled.
SERVICE
- Service connection for qualified service engineer.
Connecting AUDIO
- Connect RCA audio cables to “R - AUDIO - L” on the rear of your set and the other ends to corresponding audio in
connectors on the Amplifier or DVD Home Theater.
Connecting Computer
-
Connect the D- Sub cable (optional) to “PC (PC IN)” on the rear of your set and the other end to the Video Card of your computer.
- Connect the stereo audio cable (optional) to “AUDIO (PC IN)” on the rear of your set and the other end to “Audio Out” of the
sound card on your computer.
Connecting Component Devices (DTV/DVD)
- Connect component video cables (optional) to component connector (“PR”, “PB”, “Y”) on the rear of your set and the other
ends to corresponding component video out connectors on the DTV or DVD.
- If you wish to connect both the Set-Top Box and DTV (or DVD), you should connect the Set-Top Box to the DTV (or DVD)
and connect the DTV (or DVD) to component connector (“PR”, “PB”, “Y”) on your set.
-
The PR, PB and Y connectors on your component devices (DTV or DVD) are sometimes labeled Y, B-Y and R-Y or Y, Cb and Cr.
- Connect RCA audio cables (optional) to “R - AUDIO - L” on the rear of your set and the other ends to corresponding audio
out connectors on the DTV or DVD.
- This LCD TV displays its optimum picture resolution in 720p mode.
- This LCD TV displays its maximum picture resolution in 1080i mode.
Kensington Lock
- The Kensington lock (optional) is a device used to physically fix the system when used in a public place.
- If you want to use a locking device, contact the dealer where you purchased the TV.
-
The place of the Kensington Lock may be different depending on its model.
50 Hz
60 Hz
Component
480i
X
X
O
480p
O
O
O
576i
X
X
O
576p
O
X
O
720p
O
O
O
1080i
O
O
O
BN68-01047B-01Eng.indd 5 2006-07-07 �� 6:49:54

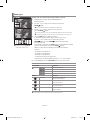
English-6
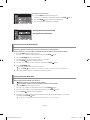
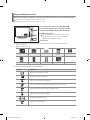
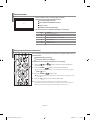
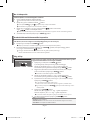
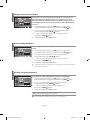
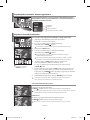
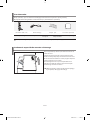
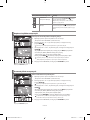
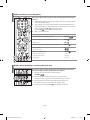
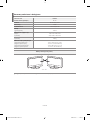
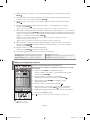
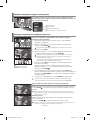
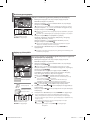
1. Lift the cover at the back of the remote control upward as shown in the figure.
2. Install two AAA size batteries.
Make sure to match the “+” and “–” ends of the batteries with the diagram inside the compartment.
3. Replace the cover.
Remove the batteries and store them in a cool, dry place if you won’t be using the remote control for a
long time. The remote control can be used up to about 23 feet from the TV.
(Assuming typical TV usage, the batteries last for about one year.)
If the remote control doesn’t work, check the following:
1. Is the TV power on?
2. Are the plus and minus ends of the batteries reversed?
3. Are the batteries drained?
4. Is there a power outage, or is the power cord unplugged?
5. Is there a special fluorescent light or neon sign nearby?
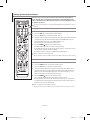
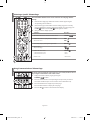
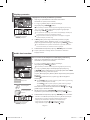
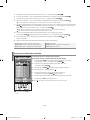
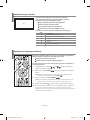
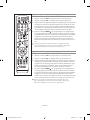
Installing Batteries in the Remote Control
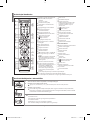
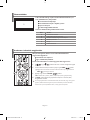
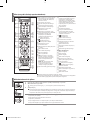
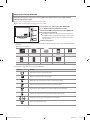
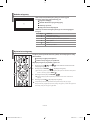
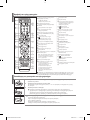
Selects a target device to be
controlled by the Samsung remote
control
(TV, DVD, STB, CABLE, VCR)
(Refer to page 37~41)
Television Standby button
Number buttons for direct
channel access
One/Two-digit channel selection
It display "Channel Manager"
on the screen.
Selects the TV mode directly
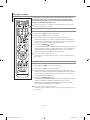
VCR/DVD Functions
Rewind, Stop, Play/Pause,
Fast/Forward
Volume increase
Volume decrease
Temporary sound switch-off
Menu display and
change confirmation
Picture-In-Picture On / Off
Picture effect selection
Sound effect selection
Sound mode selection
SRS TSXT selection
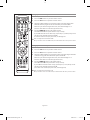
SET: Adjusts 5 separate devices - TV,
DVD, STB, CABLE, or VCR.
RESET: When your remote does not
work, change the batteries and press
the “RESET” button for 2-3 seconds
before use.
Available source selection
When pressing this button, a number of
buttons on the remote control (e.g.
Selects a target device, volume, channel and
MUTE buttons) light up for a few seconds
and then turn off to save power. This function
is to conveniently use the remote control at
night or when dark.
Previous channel
Automatic Power-off
This function enables you to load saved
photo (JPEG) and audio files (MP3)
and to view or play them on the TV.
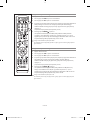
P : Next channel
P : Previous channel
Exit the OSD
Control the cursor in the menu
Use to see information on the
current broadcast
Picture size selection
Selects the PC mode directly
Picture freeze
Input source selection
Teletext Functions
Exit from the teletext display
Teletext index
Teletext hold
Teletext size selection
Teletext store
Teletext mode selection (LIST/FLOF)
Teletext sub page
P : Teletext next page
P : Teletext previous page
Teletext cancel
Teletext reveal
Alternately select Teletext, Double, or Mix.
Fastext topic selection
The performance of the remote control may be affected by bright light.
This is a special remote control for the visually impaired,
and has Braille points on the Power, Channel and Volume buttons.
Viewing the Remote Control
BN68-01047B-01Eng.indd 6 2006-07-07 �� 6:49:58

English-7
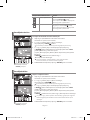
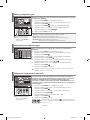
Switching On and Off
Your set can be placed in standby mode in order to reduce the power consumption. The standby mode can be useful
when you wish to interrupt viewing temporarily (during a meal, for example).
1. Press the POWER button on the remote control.
The screen is turned off and a red standby indicator appears on the front of your set.
2. To switch your set back on, simply press the POWER , numeric buttons (0~9) or channel
up/down ( / ) button again.
Do not leave your set in standby mode for long periods of time (when you are away on holiday, for example).
It is best to unplug the set from the mains and aerial.
Placing Your Television in Standby Mode
The mains lead is attached to the rear of your set.
1. Plug the mains lead into an appropriate socket.
The standby indicator lights up on the front of the set.
2. Press the button on the front of the set.
You also can press the POWER button or the
TV
( ) button on the remote control to turn the TV on.
The programme that you were watching last is reselected automatically.
3. Press the numeric button (0~9) or channel up/down ( / ) button on the remote control or
button on the right side of the set.
When you switch the set on for the very first time, you will be asked to choose language in which the menus are to be displayed.
4. To switch your set off, press the POWER button again.
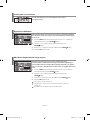
When the TV is initially powered on, several basic settings proceed
automatically and subsequently. The following settings are available.
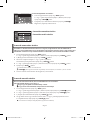
1. Press the POWER button on the remote control.
The message “Start Plug & Play” is displayed with “OK” selected.
2. Select the appropriate language by pressing the 5 or button.
Press the ENTER button to confirm your choice.
3. The message “Check antenna input.” is displayed with “OK” selected.
Press the ENTER button.
Please check that the antenna cable is connected correctly.
4. Select the appropriate country by pressing the 5 or button.
Press the ENTER button to confirm your choice.
5. The “Auto Store” menu is displayed with the “Start” selected.
Press the ENTER button.
The channel search will start and end automatically.
After all the available channels are stored, the “Clock Set” menu appears.
Press the
ENTER
button at any time to interrupt the memorization process.
6. Press the ENTER button.
Select the “Hour” or “Minute” by pressing the
3 or 4
button.
Set the “Hour” or “Minute” by pressing the
5 or
button.
You can also set the hour and minute by pressing the number buttons on the remote control.
7. Press the ENTER button to confirm your setting.
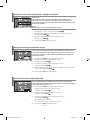
Plug & Play
Language: Select your language.
Country: Select your country.
Auto Store: Automatically scans for and stores channels available in the local area.
Clock Set: Sets the current time for the TV clock.
BN68-01047B-01Eng.indd 7 2006-07-07 �� 6:50:00

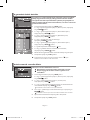
English-8
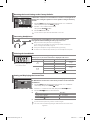
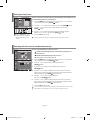
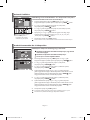
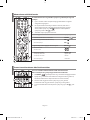
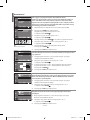
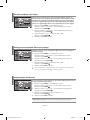
You can store up to 100 channels, including those received via cable networks.
When storing channels manually, you can choose:
Whether or not to store each of the channels found.
The programme number of each stored channel which you wish to identify.
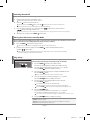
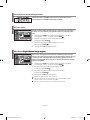
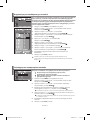
1. Press the MENU button to display the menu.
Press the 5 or button to select “Channel”, then press the ENTER button.
2. Press the 5 or button to select “Manual Store”, then press the ENTER button.
3. Press the ENTER button to select “Programme”.
4. To assign a programme number to a channel, find the correct number by pressing the 5 or button
and then press the ENTER button.
You can also set a programme number by pressing number buttons on the remote control.
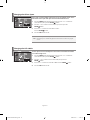
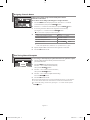
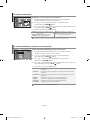
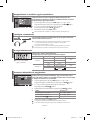
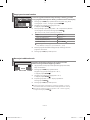
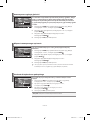
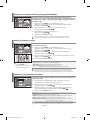
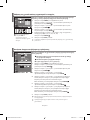
Storing Channels Manually
- Storing Channels Automatically
- Storing Channels Manually
If you want to reset this feature...
1. Press the MENU button to display the menu.
Press the 5 or
button
to select “Setup”, then press the
ENTER
button.
2. Press the ENTER button again, to select “Plug & Play”.
3. The message to “Start Plug & Play” is displayed.
You can scan for the frequency ranges available to you (and availability depends on your country). Automatically
allocated programme numbers may not correspond to actual or desired programme
numbers. However, you can sort numbers manually and clear any channels you do not wish to watch.
1. Press the MENU button to display the menu.
Press the 5 or button to select “Channel”, then press the ENTER button.
2. Press the ENTER button to select “Country”.
3. Select the appropriate country by pressing the 5 or button.
Press the ENTER button to confirm your choice.
4. Press the 5 or button to select “Auto Store”, then press the ENTER button.
5. Press the ENTER button.
The TV will begin memorizing all of the available channels.
Press the
ENTER
button at any time to interrupt the memorization process and return to the “Channel” menu.
6. After all the available channels are stored, the “Sort” menu appears.
Storing Channels Automatically
BN68-01047B-01Eng.indd 8 2006-07-07 �� 6:50:02

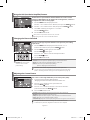
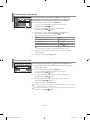
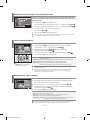
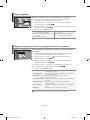
English-9
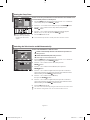
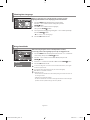
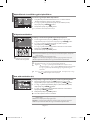
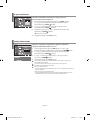
Programme: Selects a program number for the channel.
Colour System: Sets the colour supporting system.
Sound System: Sets the sound supporting system.
Channel: Selects a channel.
Search: Scans for the frequency value for the channel.
Store: Saves your settings.
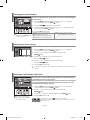
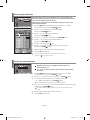
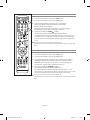
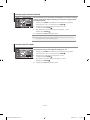
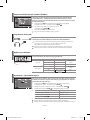
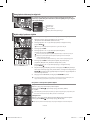
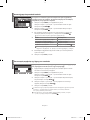
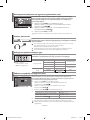
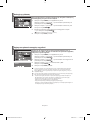
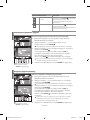
Set the channels according to your preference.
You can easily delete, add, or lock the channel you want.
1. Press the MENU button to display the menu. Press the 5 or button
to select “Channel”, then press the ENTER button.
2.
Press the 5 or button to select “Channel Manager”,
then press the ENTER button.
3.
Press the ENTER button again, to select “Channel Manager”.
4
.
Press the 4 button to select “ ” line.
5
.
Press the 5 or button to select the undesired channel,
then press the ENTER button to cancel.
6. Repeat steps 5 for each channel to be selected or canceled
7. Press the EXIT button to exit.
“ ”
is active when “Child Lock” is selected to “On”.
Setting the Channel Manager
You can select these options by
simply pressing the CH MGR but-
ton on the remote control.
5. Press the 5 or button to select “Colour System”, then press the ENTER button.
6. Select the colour standard required by pressing the 5 or button then, press the ENTER button.
7. Press the 5 or button to select “Sound System”, then press the ENTER button.
8. Select the sound standard required by pressing the 5 or button, then press the ENTER button.
If there is an abnormal sound or no sound, re-select the sound system required.
9.
If you know the number of the channel to be stored, press the 5 or button to select “Channel”. Press the ENTER button.
Select C (Air channel) or S (Cable channel) by pressing the 5 or button. Press the 4 button to select channel.
Select the required number by pressing the 5 or button and then press the ENTER button.
Channel mode: P (Programme mode), C (Air channel mode), S (Cable channel mode)
You can also set a channel number by pressing number buttons on the remote control.
10. If you do not know the channel numbers, press the 5 or button to select “Search”.
Press the ENTER button. Search by pressing the 5 or button and then press the ENTER button.
11. Press the 5 or button to select “Store”. Press the ENTER button to select “OK”.
12. Repeat steps 3 to 11 for each channel to be stored.
BN68-01047B-01Eng.indd 9 2006-07-07 �� 6:50:04

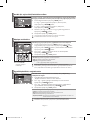
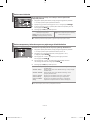
English-10
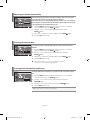
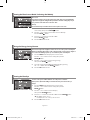
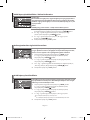
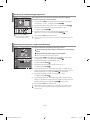
You can exchange the numbers of two channels, in order to:
Modify the numeric order in which the channels have been
automatically stored.
Give easily remembered numbers to the channels that you watch
most often.
1. Press the MENU button to display the menu. Press the 5 or button
to select “Channel”, then press the ENTER button.
2.
Press the 5 or button to select “Sort”, then press the
ENTER
button.
3.
Select channel number that you wish to change by pressing the
5 or button repeatedly. Press the ENTER button.
The selected channel number and name are moved to right side.
4.
Press the
5 or
button to move to the position in which you would like to change
and then press the
ENTER
button.
The selected channel is exchanged with the one previously stored to the chosen
number.
5.
Repeat steps 3 to 4 for another channel to be sorted.
6.
Press the EXIT button to exit.
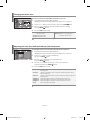
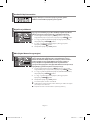
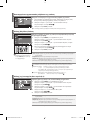
Sorting the Stored Channels
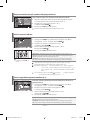
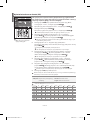
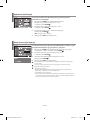
This feature allows you to prevent unauthorized users, such as children, from
watching unsuitable programmes by muting out video and audio. Child Lock can-
not be released using the buttons on the side.
Only the remote control can release the Child Lock setting, so keep the remote
control away from children.
1. Press the MENU button to display the menu. Press the 5 or button
to select “Channel”, then press the ENTER button.
2.
Press the 5 or button to select “Channel Manager”,
then press the ENTER button.
3.
Press the 5 or button to select “Child Lock”,
then press the ENTER button.
4.
Press the 5 or button to select “On”. Press the
ENTER
button.
5.
Press the 5 or button to select “Channel Manager”,
then press the ENTER button.
6
.
Press the 4 button to select “ ” line.
7
.
Press the 5 or button to select the channels you want to lock,
then press the ENTER button.
8. Repeat steps 7 for each channel to be locked or unlocked.
9. Press the EXIT button to exit.
Select “On” or “Off” in “Child Lock” to easily turn the channels which
selected on
“ ”
to be active or inactive.
Activating the Child Lock
BN68-01047B-01Eng.indd 10 2006-07-07 �� 6:50:06

English-11
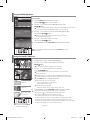
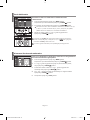
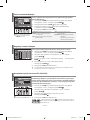
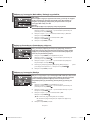
Use fine tuning to manually adjust a particular channel for optimal reception.
1. Use the number buttons to directly select the channel that
you want to fine tune.
2. Press the MENU button to display the menu.
Press the 5 or button to select “Channel”,
then press the ENTER button.
3. Press the 5 or button to select “Fine Tune”,
then press the ENTER button.
4. Press the 3 or 4 button to adjust the fine tuning.
Press the
ENTER
button.
5. Press the EXIT button to exit.
Fine tuned channels that have been saved are marked with an asterisk “*” on the right-hand
side of the channel number in the channel banner. And the channel number turns red.
To reset the fine-tuning, select “Reset” by pressing the 5 or button and then press the
ENTER button.
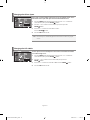
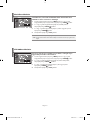
Fine Tuning Channel Reception
Channel names will be assigned automatically when channel
information is broadcast.
These names can be changed, allowing you to assign new names.
1. Press the MENU button to display the menu. Press the 5 or button
to select “Channel”, then press the ENTER button.
2.
Press the 5 or button to select “Name”, then press the
ENTER
button.
3.
If necessary, select the channel to be assigned to a new name by
pressing the
5 or
button. Press the ENTER button.
The selection bar is displayed around the name box.
4.
The characters available are :
Letters of the alphabet (A~Z) / Numbers (0~9) / Special characters (
-
, space)
5.
Repeat steps 3 to 4 for each channel to be assigned to a new name.
6.
Press the EXIT button to exit.
Assigning Channels Names
To...
Select a letter, number or symbol
Move on the next letter
Move back the previous letter
Confirm the name
Then...
Press the
5 or
button
Press the
4
button
Press the
3
button
Press the ENTER button
BN68-01047B-01Eng.indd 11 2006-07-07 �� 6:50:07

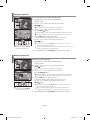
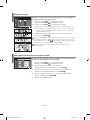
English-12
You can select the type of picture which best corresponds to your viewing
requirements.
1. Press the MENU button to display the menu. Press the 5 or
button to select “Picture”, then press the ENTER button.
2.
Press the ENTER button again, to select “Mode”.
Press the ENTER button again.
3.
Press the
5 or
button to select the desired picture effect.
Press the
ENTER
button.
4.
Press the EXIT button to exit.
Dynamic: Selects the picture for high-definition in a bright room.
Standard: Selects the picture for optimum display in a normal environment.
Movie: Selects the picture for comfortable display in a dark room.
Custom: Select to view your favorite display settings.
(Refer to “Adjusting the Custom Picture”)
You can also press the
P.MODE button on the remote
control to select one of the
picture settings.
The Picture mode must be adjusted separately for each input source.
You can return to the factory defaults picture settings by selecting the “Reset”.
(Refer to “Resetting the Picture Settings to the Factory Defaults” on page 14)
Changing the Picture Standard
Contrast: Adjusts the lightness and darkness between objects and the background.
Brightness: Adjusts the brightness of the whole screen.
Sharpness: Adjusts the outline of objects to either sharpen them or make them more dull.
Colour: Adjusts the colours, making them lighter or darker.
Tint (NTSC only):
Adjusts the colour of objects, making them more red or green for a more natural look.
Your set has several settings which allow you to control picture quality.
1. To select the desired picture effect, follow the
“Changing the Picture Standard” instructions number 1 to 4.
2.
Press the
5 or button
to select a particular item.
Press the
ENTER
button.
3.
Press the
3 or 4 button
to decrease or increase the value of a
particular item.
Press the ENTER button.
4.
Press the EXIT button to exit.
Adjusting the Custom Picture
The adjusted values are stored according to the selected Picture mode.
In PC Mode, Only “Contrast”, “Brightness” and “Colour” can be adjusted
This function is very useful in the situation that the TV is used in a weak
signal area. LNA amplifies the TV signal in the weak signal area, a low-noise
preamplifier boosts the incoming signal.
1. Press the MENU button to display the menu.
Press the 5 or button to select “Channel”, then press the ENTER button.
2.
Press the 5 or button to select “LNA”, then press the ENTER button.
3.
Select “Off“ or “On“ by pressing the 5 or button.
Press the ENTER button.
4.
Press the EXIT button to exit.
If the picture is noisy with the LNA set to On, select Off.
LNA setting must be set for each individual channel.
Using the LNA (Low Noise Amplifier) Feature
BN68-01047B-01Eng.indd 12 2006-07-07 �� 6:50:09

English-13
The adjusted values are stored according to the selected Picture mode.
You can select the most comfortable colour tone to your eyes.
1. To select the desired picture effect, follow the
“Changing the Picture Standard” instructions number 1 to 4 on page 12.
2.
Press the 5 or button to select “Colour Tone”, then press the ENTER button.
3.
Press the
5 or button
to select the desired colour tone setting.
Press the
ENTER
button.
4.
Press the EXIT button to exit.
Changing the Colour Tone
Cool2: Makes the colour temperature bluer
than “Cool1” menu.
Cool1: Makes whites bluish.
Normal: Keeps whites white.
Warm1: Makes whites reddish.
Warm2: Makes the colour temperature
redder than “Warm1” menu.
You can adjust a picture’s color tone with your preferred color component.
1. To select the desired picture effect, follow the
“Changing the Picture Standard” instructions number 1 to 4 on page 12.
2.
Press the 5 or button to select “Colour Manager”,
then press the ENTER button.
3.
Press the
5 or button
to select a particular item.
Press the
ENTER
button.
4.
Press the
3 or 4 button
to decrease or increase the value of a
particular item.
Press the ENTER button.
5.
Press the EXIT button to exit.
Adjusting the Color Tone with the Preferred Color Component
R Contrast:
Lightens or intensifies the red component of the border between objects and
the background.
G Contrast:
Lightens or intensifies the green component of the border between objects
and the background.
B Contrast:
Lightens or intensifies the blue component of the border between objects and
the background.
R Brightness:
Adjusts the brightness of the red component for the entire screen.
G Brightness:
Adjusts the brightness of the green component for the entire screen.
B Brightness:
Adjusts the brightness of the blue component for the entire screen.
Reset:
Resets all settings to the defaults.
You cannot select a "Colour Tone" in the "Colour Manager".
BN68-01047B-01Eng.indd 13 2006-07-07 �� 6:50:10

English-14
Auto Wide: Automatically adjusts the picture size to the "16:9" aspect ratio.
16:9: Adjusts the picture size to 16:9 appropriate for DVDs or wide broadcasting.
WIDE 4:3 : Magnify the size of the picture more than 4:3.
Zoom: Magnifies the 16:9 wide picture (in the vertical direction) to fit the screen size.
4:3: This is the default setting for a video movie or normal broadcasting.
You can select these options
by simply pressing the P.SIZE
button on the remote control.
Ajusts the display picture size to 4:3 appropriate for input signal
1. Press the MENU button to display the menu. Press the 5 or button to
select “Picture”, then press the ENTER button.
2. Press the 5 or button to select “Auto Wide (4:3)”, then press the
ENTER button.
3. Select the required option by pressing the 5 or button.
Press the
ENTER
button.
4.
Press the EXIT button to exit.
Changing the Auto Wide (4:3)
You can select the picture size which best corresponds to your
viewing requirements.
1. Press the MENU button to display the menu. Press the 5 or button to
select “Picture”, then press the ENTER button.
2. Press the 5 or button to select “Size”, then press
the ENTER button.
3. Select the required option by pressing the 5 or button.
Press the
ENTER
button.
4.
Press the EXIT button to exit.
Changing the Picture Size
These functions don’t work in PC mode.
You can return to the factory defaults picture settings.
1. To select the desired picture effect, follow the
“Changing the Picture Standard” instructions number 1 to 4 on page 12.
2. Press the 5 or button to select “Reset”, then press the
ENTER button.
3.
Press the EXIT button to exit.
The “Reset” will be set for each picture mode.
Resetting the Picture Settings to the Factory Defaults
16:9: Adjusts the picture size to 16:9 appropriate for DVDs or wide broadcasting.
WIDE 4:3 : Magnify the size of the picture more than 4:3.
Zoom: Magnifies the 16:9 wide picture (in the vertical direction) to fit the screen size.
4:3: This is the default setting for a video movie or normal broadcasting.
“Auto Wide” function is available only in "TV", "Ext1", "Ext2", "AV", and "S-Video" mode.
In PC Mode, only “16:9” and “4:3” mode can be adjusted.
Zoom : Select by pressing the 3 or 4 buttons. Use the 5 or button to move the
picture up and down. After selecting , use the 5 or button to magnify or
reduce the picture size in the vertical direction.
WIDE 4:3 : Move the screen up/down using the 5 or button after selecting the
by pressing the 4 or ENTER button.
BN68-01047B-01Eng.indd 14 2006-07-07 �� 6:50:12

English-15
If the broadcast signal received by your TV is weak, you can activate the Digital
Noise Reduction feature to help reduce any static and ghosting that may appear
on the screen.
1. Press the MENU button to display the menu. Press the 5 or button to
select “Picture”, then press the ENTER button.
2. Press the 5 or button to select “Digital NR”, then press the
ENTER button.
3.
Press the 5 or button to select “On” or “Off”. Press the
ENTER
button.
4. Press the EXIT button to exit.
Digital Noise Reduction
Samsung’s new technology brings you more detailed images with
contrast and white enhancement. A new image compensation algorithm gives
viewers brighter and clearer images. DNIe technology will match every signal to
your eyes. You can see how DNIe improves the picture by setting DNIe Demo mode
to On.
1. Press the MENU button to display the menu. Press the 5 or button to
select “Picture”, then press the ENTER button.
2. Press the 5 or button to select “DNIe Demo”, then press the
ENTER button.
3.
Press the 5 or button to select “On” or “Off”. Press the
ENTER
button.
4. Press the EXIT button to exit.
These functions don’t work in PC mode.
The DNle Demo is designed to show the difference between the regular and
DNIe pictures.
By default, the product displays the picture with DNle applied.
DNIe Demo (Digital Natural Image engine)
Press the STILL button to freeze a moving picture into a still one.
Press again to cancel.
Freezing the Current Picture
BN68-01047B-01Eng.indd 15 2006-07-07 �� 6:50:14

English-16
Colour space is a colour matrix composed of red, green, and blue colours. Select
your favorite colour space and experience the world of natural colour.
1. Press the MENU button to display the menu. Press the 5 or button to
select “Picture”, then press the ENTER button.
2. Press the 5 or button to select “Colour Space”, then press the
ENTER button.
3.
Press the 5 or button to select “Wide” or “Auto”.
Press the
ENTER
button.
4. Press the EXIT button to exit.
Changing the Colour Space
Wide : Wide Colour Space offers deep and rich colour tone.
Auto : Auto Colour Space automatically adjusts to natural colour tone based on program
sources.
You can experience more natural pictures and clearer texts without motion blur
even in fast moving scenes.
1. Press the MENU button to display the menu. Press the 5 or button to
select “Picture”, then press the ENTER button.
2. Press the 5 or button to select “LCD 100Hz”, then press the
ENTER button.
3.
Press the 5 or button to select “On” or “Off”. Press the
ENTER
button.
4. Press the EXIT button to exit.
Changing the LCD 100Hz
BN68-01047B-01Eng.indd 16 2006-07-07 �� 6:50:16

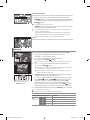
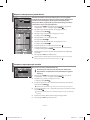
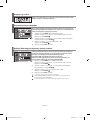
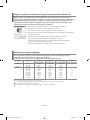
English-17
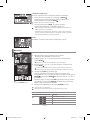
You can display a sub picture within the main picture of set
programme or video input. In this way, you can watch the picture of set pro-
gramme or video input from any connected equipment while watching the main
picture.
1. Press the MENU button to display the menu. Press the 5 or button to
select “Picture”, then press the ENTER button.
2.
Press the 5 or button to select “PIP”, then press the
ENTER
button.
3. Press the ENTER button again.
Press the 5 or button to select “On”, then press ENTER button.
If the PIP is activated, the size of the main picture turns to “16:9”.
4. Press the 5 or button to select “Source”,
then press ENTER button. Select a source of the sub picture by
pressing the 5 or button and press the ENTER button.
The sub picture can serve different source selections based on what the main picture is set to.
5. Press the 5 or button to select “Swap”.
To interchange the main picture and the sub picture, select “Swap” option and
press the ENTER button.
The main picture and the sub picture are interchanged.
I
f main picture is in “PC” mode, “Swap” is not available.
6. Press the 5 or button to select “Size” of the sub picture and then
press the ENTER button. Select a size of the sub picture by
pressing the 5 or button and then press the ENTER button.
If main picture is in “PC” mode, “Size” is not available.
7. Press the 5 or button to select “Position”, then press the ENTER
button. Select the position of the sub picture by pressing the 5 or
button and then press the ENTER button.
8. Press the 5 or button to select “Programme” and then press the ENTER
button. You can select the channel that you want to view through sub picture
by pressing the 5 or button.
Press the ENTER button.
The “Programme” can be active when the sub picture is set to TV.
9. Press the EXIT button to exit.
You may notice that the picture in the PIP window becomes slightly unnatural when you use
the main screen to view a game or karaoke.
Viewing the Picture In Picture (PIP)
Press the PIP button on the
remote control repeatedly to acti-
vate or deactivate the “PIP”.
PIP Settings
(O: PIP operates, X: PIP doesn’t operate)
Source: Used to select a source of the sub picture.
Swap: Used to interchange the main picture and the
sub picture.
Size: Used to select a size of the sub picture.
Position: Used to move the sub picture.
Programme: Used to Change the sub picture.
TV
Ext.1
Ext.2
AV
S-Video
Component
PC
HDMI1
HDMI2
TV
X
X
X
X
X
X
O
O
O
Ext.1
X
X
X
X
X
X
O
O
O
Ext.2
X
X
X
X
X
X
O
O
O
AV
X
X
X
X
X
X
O
O
O
S-Video
X
X
X
X
X
X
X
O
O
Component
X
X
X
X
X
X
X
O
O
PC
X
X
X
X
X
X
X
X
X
HDMI1
O
O
O
O
O
O
X
X
X
HDMI2
O
O
O
O
O
O
X
X
X
Sub
Main
BN68-01047B-01Eng.indd 17 2006-07-07 �� 6:50:17

English-18
You can select the type of the special sound effect to be used when watching a
given broadcast.
1. Press the MENU button to display the menu. Press the 5 or button to
select “Sound”, then press the ENTER button.
2. Press the ENTER button again, to select “Mode”.
3. Select the required sound effect by pressing the 5 or button repeatedly
and then press the ENTER button.
4. Press the EXIT button to exit.
Standard: Selects the normal sound mode.
Music: Emphasizes music over voices.
Movie: Provides live and full sound for movies.
Speech: Emphasizes voices over other sounds.
Custom: Selects your custom sound settings.
(Refer to “Adjusting the Sound Settings”)
Changing the Sound Standard
You can also select these options by
simply pressing the S.MODE button
on the remote control.
The sound settings can be adjusted to suit your personal preferences.
1. Press the MENU button to display the menu. Press the 5 or button to
select “Sound”, then press the ENTER button.
2. Press the 5 or button to select “Equalizer”, then press the
ENTER button.
3.
Press the
3 or 4 button
to select a particular item.
Press the
ENTER
button.
4. Press the 5 or button to reach the required setting.
Press the ENTER button.
5. Press the EXIT button to exit.
If you make any changes to these settings, the Sound Mode is automatically switched to
“Custom”.
Adjusting the Sound Settings
TruSurround XT is a patented SRS technology that solves the problem of playing
5.1 multichannel content over two speakers.
TruSurround delivers a compelling,virtual surround sound experience through any
two-speaker playback systems, including internal television speakers. It is fully
compatible with all multichannel formats.
1. Press the MENU button to display the menu. Press the 5 or button to
select “Sound”, then press the ENTER button.
2. Press the 5 or button to select “SRS TSXT”, then press the
ENTER button.
3.
Press the 5 or button to select “On” or “Off”. Press the
ENTER
button.
4. Press the EXIT button to exit.
Setting the TruSurround XT (SRS TSXT)
You can also set these options
simply by pressing the SRS but-
ton on remote control.
TruSurround XT, SRS and
symbol are trademarks of
SRS Labs, Inc. TruSurround XT technology is incorporated under license
from SRS Labs, Inc.
BN68-01047B-01Eng.indd 18 2006-07-07 �� 6:50:20
Strona się ładuje...
Strona się ładuje...
Strona się ładuje...
Strona się ładuje...
Strona się ładuje...
Strona się ładuje...
Strona się ładuje...
Strona się ładuje...
Strona się ładuje...
Strona się ładuje...
Strona się ładuje...
Strona się ładuje...
Strona się ładuje...
Strona się ładuje...
Strona się ładuje...
Strona się ładuje...
Strona się ładuje...
Strona się ładuje...
Strona się ładuje...
Strona się ładuje...
Strona się ładuje...
Strona się ładuje...
Strona się ładuje...
Strona się ładuje...
Strona się ładuje...
Strona się ładuje...
Strona się ładuje...
Strona się ładuje...
Strona się ładuje...
Strona się ładuje...
Strona się ładuje...
Strona się ładuje...
Strona się ładuje...
Strona się ładuje...
Strona się ładuje...
Strona się ładuje...
Strona się ładuje...
Strona się ładuje...
Strona się ładuje...
Strona się ładuje...
Strona się ładuje...
Strona się ładuje...
Strona się ładuje...
Strona się ładuje...
Strona się ładuje...
Strona się ładuje...
Strona się ładuje...
Strona się ładuje...
Strona się ładuje...
Strona się ładuje...
Strona się ładuje...
Strona się ładuje...
Strona się ładuje...
Strona się ładuje...
Strona się ładuje...
Strona się ładuje...
Strona się ładuje...
Strona się ładuje...
Strona się ładuje...
Strona się ładuje...
Strona się ładuje...
Strona się ładuje...
Strona się ładuje...
Strona się ładuje...
Strona się ładuje...
Strona się ładuje...
Strona się ładuje...
Strona się ładuje...
Strona się ładuje...
Strona się ładuje...
Strona się ładuje...
Strona się ładuje...
Strona się ładuje...
Strona się ładuje...
Strona się ładuje...
Strona się ładuje...
Strona się ładuje...
Strona się ładuje...
Strona się ładuje...
Strona się ładuje...
Strona się ładuje...
Strona się ładuje...
Strona się ładuje...
Strona się ładuje...
Strona się ładuje...
Strona się ładuje...
Strona się ładuje...
Strona się ładuje...
Strona się ładuje...
Strona się ładuje...
Strona się ładuje...
Strona się ładuje...
Strona się ładuje...
Strona się ładuje...
Strona się ładuje...
Strona się ładuje...
Strona się ładuje...
Strona się ładuje...
Strona się ładuje...
Strona się ładuje...
Strona się ładuje...
Strona się ładuje...
Strona się ładuje...
Strona się ładuje...
Strona się ładuje...
Strona się ładuje...
Strona się ładuje...
Strona się ładuje...
Strona się ładuje...
Strona się ładuje...
Strona się ładuje...
Strona się ładuje...
Strona się ładuje...
Strona się ładuje...
Strona się ładuje...
Strona się ładuje...
Strona się ładuje...
Strona się ładuje...
Strona się ładuje...
Strona się ładuje...
Strona się ładuje...
Strona się ładuje...
Strona się ładuje...
Strona się ładuje...
Strona się ładuje...
Strona się ładuje...
Strona się ładuje...
Strona się ładuje...
Strona się ładuje...
Strona się ładuje...
Strona się ładuje...
Strona się ładuje...
Strona się ładuje...
Strona się ładuje...
Strona się ładuje...
Strona się ładuje...
Strona się ładuje...
Strona się ładuje...
Strona się ładuje...
Strona się ładuje...
Strona się ładuje...
Strona się ładuje...
Strona się ładuje...
Strona się ładuje...
Strona się ładuje...
Strona się ładuje...
Strona się ładuje...
Strona się ładuje...
Strona się ładuje...
Strona się ładuje...
Strona się ładuje...
Strona się ładuje...
Strona się ładuje...
Strona się ładuje...
Strona się ładuje...
Strona się ładuje...
Strona się ładuje...
Strona się ładuje...
Strona się ładuje...
Strona się ładuje...
Strona się ładuje...
Strona się ładuje...
Strona się ładuje...
Strona się ładuje...
Strona się ładuje...
Strona się ładuje...
Strona się ładuje...
Strona się ładuje...
Strona się ładuje...
Strona się ładuje...
Strona się ładuje...
Strona się ładuje...
Strona się ładuje...
Strona się ładuje...
Strona się ładuje...
Strona się ładuje...
Strona się ładuje...
Strona się ładuje...
Strona się ładuje...
Strona się ładuje...
Strona się ładuje...
Strona się ładuje...
Strona się ładuje...
Strona się ładuje...
Strona się ładuje...
Strona się ładuje...
Strona się ładuje...
Strona się ładuje...
Strona się ładuje...
Strona się ładuje...
Strona się ładuje...
Strona się ładuje...
Strona się ładuje...
Strona się ładuje...
Strona się ładuje...
Strona się ładuje...
Strona się ładuje...
Strona się ładuje...
Strona się ładuje...
Strona się ładuje...
Strona się ładuje...
Strona się ładuje...
Strona się ładuje...
Strona się ładuje...
Strona się ładuje...
Strona się ładuje...
Strona się ładuje...
Strona się ładuje...
-
 1
1
-
 2
2
-
 3
3
-
 4
4
-
 5
5
-
 6
6
-
 7
7
-
 8
8
-
 9
9
-
 10
10
-
 11
11
-
 12
12
-
 13
13
-
 14
14
-
 15
15
-
 16
16
-
 17
17
-
 18
18
-
 19
19
-
 20
20
-
 21
21
-
 22
22
-
 23
23
-
 24
24
-
 25
25
-
 26
26
-
 27
27
-
 28
28
-
 29
29
-
 30
30
-
 31
31
-
 32
32
-
 33
33
-
 34
34
-
 35
35
-
 36
36
-
 37
37
-
 38
38
-
 39
39
-
 40
40
-
 41
41
-
 42
42
-
 43
43
-
 44
44
-
 45
45
-
 46
46
-
 47
47
-
 48
48
-
 49
49
-
 50
50
-
 51
51
-
 52
52
-
 53
53
-
 54
54
-
 55
55
-
 56
56
-
 57
57
-
 58
58
-
 59
59
-
 60
60
-
 61
61
-
 62
62
-
 63
63
-
 64
64
-
 65
65
-
 66
66
-
 67
67
-
 68
68
-
 69
69
-
 70
70
-
 71
71
-
 72
72
-
 73
73
-
 74
74
-
 75
75
-
 76
76
-
 77
77
-
 78
78
-
 79
79
-
 80
80
-
 81
81
-
 82
82
-
 83
83
-
 84
84
-
 85
85
-
 86
86
-
 87
87
-
 88
88
-
 89
89
-
 90
90
-
 91
91
-
 92
92
-
 93
93
-
 94
94
-
 95
95
-
 96
96
-
 97
97
-
 98
98
-
 99
99
-
 100
100
-
 101
101
-
 102
102
-
 103
103
-
 104
104
-
 105
105
-
 106
106
-
 107
107
-
 108
108
-
 109
109
-
 110
110
-
 111
111
-
 112
112
-
 113
113
-
 114
114
-
 115
115
-
 116
116
-
 117
117
-
 118
118
-
 119
119
-
 120
120
-
 121
121
-
 122
122
-
 123
123
-
 124
124
-
 125
125
-
 126
126
-
 127
127
-
 128
128
-
 129
129
-
 130
130
-
 131
131
-
 132
132
-
 133
133
-
 134
134
-
 135
135
-
 136
136
-
 137
137
-
 138
138
-
 139
139
-
 140
140
-
 141
141
-
 142
142
-
 143
143
-
 144
144
-
 145
145
-
 146
146
-
 147
147
-
 148
148
-
 149
149
-
 150
150
-
 151
151
-
 152
152
-
 153
153
-
 154
154
-
 155
155
-
 156
156
-
 157
157
-
 158
158
-
 159
159
-
 160
160
-
 161
161
-
 162
162
-
 163
163
-
 164
164
-
 165
165
-
 166
166
-
 167
167
-
 168
168
-
 169
169
-
 170
170
-
 171
171
-
 172
172
-
 173
173
-
 174
174
-
 175
175
-
 176
176
-
 177
177
-
 178
178
-
 179
179
-
 180
180
-
 181
181
-
 182
182
-
 183
183
-
 184
184
-
 185
185
-
 186
186
-
 187
187
-
 188
188
-
 189
189
-
 190
190
-
 191
191
-
 192
192
-
 193
193
-
 194
194
-
 195
195
-
 196
196
-
 197
197
-
 198
198
-
 199
199
-
 200
200
-
 201
201
-
 202
202
-
 203
203
-
 204
204
-
 205
205
-
 206
206
-
 207
207
-
 208
208
-
 209
209
-
 210
210
-
 211
211
-
 212
212
-
 213
213
-
 214
214
-
 215
215
-
 216
216
-
 217
217
-
 218
218
-
 219
219
-
 220
220
-
 221
221
-
 222
222
-
 223
223
-
 224
224
-
 225
225
-
 226
226
-
 227
227
-
 228
228


Samsung LE40M71B Instrukcja obsługi
- Kategoria
- Telewizory LCD
- Typ
- Instrukcja obsługi
w innych językach
- English: Samsung LE40M71B User manual
Powiązane artykuły
-
Samsung LE32R71W Instrukcja obsługi
-
-
Samsung LE22S8 Instrukcja obsługi
-
-
Samsung UE32T4002AK Instrukcja obsługi
-
Samsung LE32S62B Instrukcja obsługi
-
-
-
-
Samsung LE26B350F1W Instrukcja obsługi
Inne dokumenty
-
Philips SPA8210/12 Instrukcja obsługi
-
Panasonic TX-32A400E Instrukcja obsługi
-
JVC AV-29BH11EES Instrukcja obsługi
-
-
-
-
Silvercrest SFB. 10.1 A1 Instrukcja obsługi
-
Sony RMT-DSLR2 Instrukcja obsługi
-
State Industries 66 Instrukcja obsługi
-
Sony RM-V210T Instrukcja obsługi