
www.deltadore.com
TYXIA 6610
ON / OFF
230V~
ON
230V~
Récepteur radio pour lampe d’appoint
Wireless receiver for table lamp
Funkempfänger für Tischlampen
Ricevitore radio per lampada ausiliaria
Receptor radio para lámpara
de iluminación especial
Odbiornik radiowy do lampki nocnej
Radio-ontvanger voor bronlamp
100 W60 W
LED
60 W
6 max.
230 V~, 50 Hz, 0,5 A Max
Transfo
M
Hi-Fi
À Halogène 230V ou incandescente 230V / 230 V
halogen or 230 V incandescent bulbs
Halogen 230 V oder Glühlampe 230 V
Alogena 230V o incandescente 230V
Halógena 230V o incandescente 230V
Halogen 230 V lub żarówka 230 V
Halogeen 230 V of gloeilamp 230 V
Á Fluocompacte 230V à économie d’énergie
230V energy-saving compact fluorescent bulbs
Kompaktleuchtstofflampe 230 V
(Energiesparlampe)
Fluocompatta 230V a risparmio energetico
Fluocompacta 230V con ahorro de ener
gía
Żarówka kompaktowa energooszczędna 230 V
Energiezuinige fluocompactlamp 230 V
 Ampoule LED 230V
230V LED bulbs
LED-Lampe 230 V
Lampadina LED 230V
Bombilla LED 230V
Lampa LED 230 V
Led-lamp 230 V
2
1
7
1
1
2
3 4
9 mm
20 mm Max.
8
230V~
OFF
230V~
ON
5 6
2
2
1
L N
H03VVH2-F
FR
FR
EN
EN
DE
DE
IT
IT
ES
ES
PL
PL
NL
NL
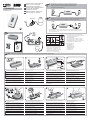
Ê Vérifiez que l’installation est hors tension.
Ouvrez le boîtier du récepteur.
Ê Check that the installation is switched off.
Open the receiver unit.
Ê Vergewissern Sie sich, dass das Gerät
ausgeschaltet ist. Gehäuse des
Empfängers öffnen.
Ê Assicurarsi che l’impianto sia fuori.
Aprire la scatola del ricevitore.
Ê Compruebe que la instalación está apagada.
Abra la caja del receptor.
Ê Sprawdź, czy zasilanie instalacji jest wyłączone.
Otwórz obudowę odbiornika.
Ê Contro
leer of de installatie is uitgeschakeld.
Open het kastje van de ontvanger.
Î Câblez les fils de la lampe et de
l’alimentation secteur.
Î Fit the wires of the lamp and mains supply.
Î Drähte der Lampe und des Netzkabels verk
abeln.
Î Cablare i fili della lampada e dell’alimentazione
di rete.
Î Realice el cableado de los hilos de la lámpara y
dela alimentación de red.
Î Podłącz przewody lampyi zasilania sieciowego.
Î Bekabel de draden van de lamp en de voeding
.
Ë Ôtez les passe-câbles.
Ë Remove the cable glands.
Ë Kabeldurchführungen entfernen.
Ë Rimuovere il passacavi.
Ë Retire los pasacables.
Ë Wyjmij przepust kablowy.
Ë Verwijder de ring.
Ï Placez les fils dans les che
mins de câbles.
Insérez les passe-câbles dans leur logement.
Ï Place the wires in the ducts. Insert the cable glands
into their housing.
Ï Drähte in Kabelkanäle einlegen. Kabeldurchführungen
wieder in das ents
prechende Fach einsetzen.
Ï Mettere i fili nelle canalette.
Inserire i passacavi in sede.
Ï Coloque los hilos en las canaletas de cableado.
Introduzca los pasacables en su sitio.
Ï Włóż przewody do koryt kablowych.
Włóż przepusty kablowe do gniazd.
Ï Plaats de kabels in de kabelgoten.
Plaats de ringen in hun behuizing.
Ì Câblez un fil de type H03VVH2-F 2 x 0,75 mm
2
.
Dénudez les fils à l’aide du gabarit de dénudage.
Ì Fit a cable of the type H03VVH2-F 2 x 0.75 mm2.
Strip the wires using the strip gauge
Ì Draht vom Typ H03VVH2-F 2 x 0,75 mm2 verkabeln.Drähte
mit Hilfe des A
bisolierwerkzeugs abisolieren.
Ì Cablare un filo tipologia H03VVH2-F 2 x 0,75 mm2.
Sguainare i fili con una spelacavi.
Ì
Realice el cableado del hilo tipo H03VVH2-F 2 x 0,75 mm2.
Pele el cable con la ayuda del dispositivo de pelado de cables.
Ì Podłącz przewód typu H03VVH2-F 2 x 0,75 mm2.
Za pomocą szablonu zdejmij izolację z przewodów.
Ì Bekabel een draad van het type H03VVH2-F 2 x 0,75 mm2.
Strip de kabel met behulp van het sjabloon voor
het kabelstrippen.
Ð Fermez le boîtier du récepteur et vissez les 4 vis.
Ð Close the receiver unit and tighten the four
screws.
Ð Empfängergehäuse schließen und die 4 Schrauben
eindrehen.
Ð Chiudere la scatola del ricevitore ed avvitare le 4 viti.
Ð Cierre la caja del receptor a atornille los cuatro tornillos.
Ð Zamknij obudowę odbiornika i wkręć 4 wkręty.
Ð Sluit de kast van de ontvanger en draai
de 4 schroeven aan.
Í Insérez les fils dans les passe-câbles.
Attention au sens de montage.
Í Insert the wires into the cable glands.
Ensure the wires are corr
ectly positioned.
Í Drähte in Kabeldurchführung einführen.
Montagerichtung beachten.
Í Inserire i fili nel passacavi.
Attenzione al senso di montaggio.
Í Introduzca los hilos en los pasacables.
Re
spete el sentido de montaje.
Í Wsuń przewody do przepustu kablowego.
Uwaga na kierunek montażu.
Í Steek de kabels door de ring.Let op de montagerichting.
Ñ Insérez les plots antidérapants.
Raccordez l’alimentation.
Ñ Fit the non-slip pads.
Reconnect the power
supply.
Ñ Anti-Rutsch-Pads anbringen.
An das Stromnetz anschließen.
Ñ Inserire i pannelli antiscivolo.
Collegare l’alimentazione.
Ñ Coloque los tacos antideslizantes.
Conecte la
alimentación.
Ñ Włó podkładki antypo lizgowe.
Podł cz zasilanie.
Ñ Plaats antislipschijfjes. Sluit de voeding aan.
230V~
L N
Mise en service / Activation / Inbetriebnahme / Messa in funzione / Puesta en servicio / Rozruch / Ingebruikname
Remplacement de l’interrupteur de la lampe / Replace the lamp switch /
Lampenschalter-Ersatz /Sostituzione dell’interruttore della lampada /
Cambio del interruptor de la lámpara /Wymiana wyłącznika lampki /
Vervangen van de lichtschakelaar /
Création d’une rallonge / Create an extension / Verlängerung / Creazione di una prolunga /
Crear una extensión / Wykonanie przedłużacza / Een uitbreiding maken /
Mettre l’interrupteur sur ON / Switch ON the switch / Schalten Sie den Schalter auf ON /
Mettere l’interruttore su ON / Ponga el interruptor en ON. / Ustaw wyłącznik w pozycji ON /
Zet de schakelaar op ON /
FR
EN
DE
IT
ES
PL
NL

• Degré de pollution : 2
• Tension de tenue aux chocs assignée : 2,5 kV
• Type de fonctionnement : S1 continu Service type S1
• Type d’interrupteur : 1 seul pôle
• Nombre de cycles de manœuvres : 100 000
• Coupure du circuit : Microcoupure μ
• Pollution
level: 2
• Rated impulse withstand voltage: 2.5 kV
• Operation type: S1 continuous duty service S1
• Switch type: 1 single pole
• Number of operating cycles: 100,000
• Circuit cut-off: brownout
• Verschmutzungsgrad 2
• Bemessung
sstoßspannung: 2,5 kV
• Betriebsart: S1 Dauerbetrieb S1
• Schaltertyp: einpolig
• Schaltspiele: 100.000
• Abschaltung: Mikroabschaltung
• Livello di inquinamento: 2
• Tensione di tenuta alle scariche a
impulso assegnata: 2,5 kV
• Tipo di funzionamento: S1 continuo Tipo di servizio S1
• Tipo d’interruttore: 1 solo polo
• Numero cicli di manovre: 100.000
• Interruzione circuito: Mi
cro-interruzzioni
• Grado de contaminación: 2
• Tensión de resistencia a impulsos asignada: 2,5 kV
• Tipo de funcionamiento: S1 continuo Servicio tipo S1
• Tipo de interruptor: 1 único pol
o
• Número de ciclos de maniobras: 100.000
• Corte del circuito: Micro-interrupción
• Stopień zanieczyszczenia: 2
• Wymagane napięcie udarowe wytrzymywane: 2,5 kV
• Rodzaj działania: S1 ciągły, rodzaj obsługi S1
• Rodzaj wyłącznika: 1-biegunowy
• Liczba cykli przełączeń: 100 000
• Rozłączanie obwodu: Mikro-włącznik
• Mate van vervuiling: 2
• Houdspanning aan schokken: 2,5 kV
• Werkingstype: S1 continue Servicetype S1
• Type schakelaar: 1 enkelpol
ig
• Aantal schakelingen: 100.000
• Onderbreking van het circuit: Micro-onderbreking
Ë Sur l’émetteur, envoyez l’ordre
d’association (voir sa notice).
Ë Send the association
command to the transmitter
(refer to the user guide).
Ë Geben Sie über den Sender
die Zuordnungsanweisung
(siehe entsprechende Anleitung).
Ë Sull’emettitore, inviate l’ordine
di associazione (vedere le
relative istruzioni).
Ë En el emisor, envíe la
orden de asociación (ver las
instrucciones).
Ë Wyślij polecenie przypisania
z nadajnika (patrz instrukcja
nadajnika).
Ë Verstuur het
verbindingscommando op de
zender (zie handleiding).
Ì Vérifiez que le voyant du
récepteur ne clignote plus.
Les produits sont associés.
Ì Make sure that the receiver
LED is no lon
ger flashing.
The products are associated.
Ì Achten Sie darauf, dass die
Kontrollleuchte am Empfänger
jetzt nicht mehr blinkt. Die Geräte
sind nun miteinander verbunden.
Ì Verificate che la spia del
ricevitore non lampeggi più.
I prodotti sono associati.
Ì Compruebe que el testigo
del receptor haya dejado de
parpadear.
Los productos se asocian.
Ì Sprawdź, czy lampka na
odbiorniku przestała migać.
Produkty zostały przypisane.
Ì Controleer of het controlelampje
van de ontv
anger niet meer
knippert. De producten zijn met
elkaar verbonden.
Association / Association / Einlernen / Associazione / Asociación / Przypisanie /
Verbinding
1 2
>3s
OFF
3
OK
>3s
FR
EN
DE
IT
ES
PL
NL
Exemple / Example / Beispiel /
Esempio / Ejemplo / przykład /
Voorbeeld
Exemple / Example / Beispiel /
Esempio / Ejemplo / przykład /
Voorbeeld
Ê Mettez l’installation sous tension.
Appuyez 3 secondes sur la touche
du récepteur jusqu’à ce que son
voyant clignote. Relâchez.
Ê Switch on the installation.
Press the receiver button for
3 seconds until its LED flashes.
Release.
Ê Setzen Sie die Anlage unter
Spannung. Drücken Sie 3 Sekunden
lang auf die Ta s te des Empfängers,
bis dessen Kontrolllampe blinkt.
Lassen Sie die Ta s te los.
Ê Mettete l’installazione sotto
tensione. Premete per 3 secondi il
tasto del ricevitore fino a quando l
a
sua spia lampeggia. Rilasciate.
Ê Ponga la instalación en tensión.
Pulse 3 segundos la tecla del
receptor hasta que el testigo
parpadee. Deje de pulsar.
Ê Podłącz instalację do prądu.
Przez 3 sekundy przytrzymaj
naciśnięty przycisk na odbiorniku,
aż do mignięcia lampki na nim. Puść.
Ê Zet de installatie onder sp
anning.
Druk gedurende 3 seconden op de
toets van de ontvanger tot het lampje
knippert. Laat de toets los.
Ê Maintenez appuyé 10 secondes :
- après 3 secondes, le voyant
clignote lentement.
- ap
rès 7 secondes, le voyant
clignote rapidement. Relâchez.
Ê Press and hold for 10 seconds :
- after 3 seconds, the LED flashes
slowly.
- after 7 seconds, the LED flashes
quickly. Release.
Ê
Halten Sie die Ta s te 10 Sekunden
lang gedrückt :
- nach 3 Sekunden blinkt die
Kontrollleuchte langsam.
- nach 7 Sekunden blinkt die
Kontrollleuchte schnell. Lassen Sie die
Ta s te los.
Ê Mantenete premuto per 10 secondi :
- do
po 3 secondi, la spia lampeggia
lentamente.
- dopo 7 secondi, la spia lampeggia
rapidamente. Rilasciate.
Ê Pulse durante 10 segundos :
- después de 3 segundos, el testigo
parp
adea lentamente.
- después de 7 segundos, el testigo
parpadea rápidamente. Deje de pulsar.
Ê Przytrzymaj naciśnięty przez 10
sekund przycisk :
- po 3 sekundach lampka miga wolno.
- po 7 sekundach lampka miga szybko.
Puść.
Ê Houd 10 seconden ingedrukt :
- na 3 seconden knippert het
controlelampje langzaam.
- na 7 seconde
n knippert het
controlelampje snel. Laat de toets los.
Ë Validez sur l’émetteur
(voir sa notice).
Ë Confirm on the transmitter
(refer to the user guide).
Ë Bestätigen Sie am Sender
(siehe ent
sprechende
Anleitung).
Ë Confermate sull’emettitore
(vedere le relative istruzioni).
Ë Valide en el emisor
(ver las instrucciones).
Ë Zatwierdź na nadajniku
(patrz jego instrukcja).
Ë Bevestig op de zender
(zie handleiding).
Ì Vé
rifiez que le voyant du
récepteur ne clignote plus.
Les produits ne sont plus
associés.
Ì Make sure that the receiver
LED has stopped flashing.
The products are no longer
associated.
Ì Achten Sie darauf,
dass die
Kontrollleuchte am Empfänger
jetzt nicht mehr blinkt.
Die Geräte sind nun nicht mehr
miteinander verbunden.
Ì Verificate che la spia del
ricevitore non lampeggi più.
I prodotti non sono più
associati.
Ì Compruebe que el testigo
del receptor ha dejado de
parpadear.
Los productos ya no están
asociados.
Ì Sprawdź, czy lampka na
odbiorniku przestała migać.
Produkty nie są już
przypisane.
Ì Controleer of het
controlelampje van de
ontvanger niet meer knippert.
De producten zij
n niet meer
met elkaar verbonden.
Effacer une association / Remove an association / Zuordnung löschen / Cancellare
un’associazione / Suprimir una asociación / Usuwanie przypisania / Een verbinding verwijderen
3s 7s
... ... ...
.. .. .. .. ..
1 2
>3s
OFF
3
>10s
OK
FR
EN
DE
IT
ES
PL
NL
OFF
7s 10s
... ... ...
.. .. .. .. ..
>20s
3s
RESET OK
Maintenez appuyée 20 secondes la touche du récepteur.
Après 3 secondes, le voyant clignote lentement.
Après 7 secondes, le voyant clignote rapidement.
Maintenez l’appui jusqu’à ce que le voyant s’éteign
e. Relâchez.
Hold down the receiver button for 20 seconds.
After 3 seconds, the LED flashes slowly.
After 7 seconds, the LED flashes quickly.
Press and hold the button until the LED goes out. Release.
Halten Sie die
Ta s te des Empfängers 20 Sekunden lang gedrückt.
Nach 3 Sekunden blinkt die Kontrollleuchte langsam.
Nach 7 Sekunden blinkt die Kontrollleuchte schnell.
Halten Sie die Ta s te so lange gedrückt, bis die Kontrollleuchte ausgeht. Lassen Sie die Ta s te l
os.
Mantenete premuto per 20 secondi il tasto del ricevitore.
Dopo 3 secondi, la spia lampeggia lentamente.
Dopo 7 secondi, la spia lampeggia rapidamente.
Mantenete la pressione fino a
quando la spia si spegne. Rilasciate.
Mantenga pulsada 20 segundos la tecla del receptor.
Después de 3 segundos, el testigo parpadea lentamente.
Después de 7 segundos, el testigo parpa
dea rápidamente.
Mantenga pulsado hasta que el indicador se apague. Deje de pulsar.
Przytrzymaj naciśnięty przycisk na odbiorniku przez około 20 sekund.
Po 3 sekundach lampka miga wolno.
Po 7 sekundach lampka miga szybko.
Przytrzymaj naciśnięty przycisk aż do zgaśnięcia lampki. Puść.
Houd de toets van de ontvanger 20 seconden ingedrukt.
Na 3 seconden knippert het controlelampje langzaam.
Na 7 sec
onden knippert het controlelampje snel.
Houd de toets ingedrukt tot het controlelampje uitgaat. Laat de toets los.
FR
EN
DE
IT
ES
PL
NL
Effacer toutes les associations / Remove all associations / Alle Zuordnungen
löschen / Cancellare tutte le associazioni / Borre todas las asociaciones /
Usuwanie
wszystkich przypisań / Alle koppelingen wissen
230 V~, 50 Hz - 2 VA
868,7 Õ 869,2 MHz - 100 m
16 max.
-10°C / +70°C
0°C / +40°C
IP IK
IP 40 - IK 04
77 x 37 x 27
Maximum power radio > 10 mW,
receiver category: 2
Important product information
(1 2 4)
FR
EN
DE
IT
ES
PL
NL
-
 1
1
-
 2
2


w innych językach
- español: DELTA DORE TYXIA 6610 Guía del usuario
- italiano: DELTA DORE TYXIA 6610 Guida utente
- Deutsch: DELTA DORE TYXIA 6610 Benutzerhandbuch
- français: DELTA DORE TYXIA 6610 Mode d'emploi
- English: DELTA DORE TYXIA 6610 User guide
- Nederlands: DELTA DORE TYXIA 6610 Gebruikershandleiding
Powiązane artykuły
-
DELTA DORE TYXIA 620 PACK Instrukcja obsługi
-
-
-
DELTA DORE Three channel system pack instrukcja
-
-
-
-
-
-
Inne dokumenty
-
 Systec Therm Tydom Pro Instrukcja obsługi
-
Philips Econic Instrukcja instalacji
-
-
-
Philips 575605 Instrukcja obsługi
-
Philips 67677 Instrukcja obsługi
-
-
