
1
2
3
4
5
L
230V~
2 VA
1
2
L
TYXIA 4850
L
L
230V~
300W
max.
RLC
10''
1'
5'
15'
30'
60'
TYXIA 4840
230 V~ (L + N)
1
2
3
4
5
L
230V~
2 VA
1
2
L
TYXIA 4850
L
L
230V~
300W
max.
RLC
10''
1'
5'
15'
30'
60'
TYXIA 4850
230 V~ (L)
TYXIA 4840/4850
= Class II
230 V~, 50 Hz
2 VA
868,7 - 869,2 MHz
100 Õ 300 m champ libre
16 max.
-10°C / +70°C
-10°C / +40°C
IP
IP 40
50 x 47 x 26 mm
Important product information (Ê Ë Í)
- 230 V~
Maximum power radio < 10 mW, receiver category: 2
>3s
>3s
OFF
... ... ...
1
2 3
.. .. ..... .. ..
... ... ...
.. .. ..... .. ..
... ... ...
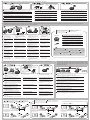
À Halogène 230V ou incandescente 230V / 230 V halogen or 230 V incandescent bulbs
Á Fluocompacte 230V à économie d’énergie / 230V energy-saving compact fl uorescent bulbs
 Ampoule LED 230V / 230V LED bulbs
à Halogène ou LED 12V TBT avec transformateur électronique AC ou DC / Very low voltage 12V halogen or
LED bulbs with AC or DC electronic transformer
Ä Halogène 12V TBT avec transformateur ferromagnétique ou torique / Very low voltage 12V halogen bulbs with
ferromagnetic or toroidal transformer
Raccordement / Connection / Anschließen / Collegamento / Conexión /Pod³¹czenie / Aansluiting
2
ON / OFF
FR
Marche temporisée
EN
Timed operation
DE
Timerbetrieb
IT
Funzionamento
temporizzato
ES
Marcha temporizada
PL
Działanie czasowe
NL
Timerfunctie
FR
Marche forcée
EN
Manual override
DE
Zwangsbetrieb
IT
Attivazione forzata
ES
Marcha forzada
PL
Start wymuszony
NL
Geforceerd aanzetten
FR
Préavis d’extinction
EN
Warning that lighting is
about to go off
DE
Abschaltwarnung
IT
Preavviso di spegnimento
ES
Preaviso de apagado
PL
Ostrze¿enie o zgaszeniu
NL
Uitschakelwaarschuwing
4 4
4 4
4
4
4 4
4 4
(1)
4 4
(2)
4 4
(3)
4 4
4 4
4 4
(2)
4 4
(3)
4 4
(1)
4 4
(1)
4 4
(2)
4 4
(3)
4 4
(1)
> 2s = 60'
4
(4)
30''
20''
ON
OFF
4 4
(1)
4 4
(2)
4 4
(3)
Fonctionnement /Operation / Funktionsweise / Funzionamento / Funcionamiento / Działanie / Werking
10" 60'
1
2
3
4
5
D
B
C
A
B
TYXIA
2600
TYXIA 2310 TYXIA 17xx ERX x000TYXIA 2600
A
B
TYXIA
2600
1
Choix de la fonction /
Function choice /
Funktionswahl /
Scelta della funzione /
Selección de función /
Wybór funkcji /
Functiekeuze
Commande fi laire locale /
Local hard-wired control /
Lokaler Schaltereingang /
Comando fi lare locale /
Mando fi lar local /
Lokalne sterowanie kablowe /
Lokale bedrade bediening
Entrée phase / Phase input /
Phaseneingang / Ingresso
fase / Entrada fase / Wejście
faza / Fase-ingang
Réglage minuterie / Timer setting /
Einstellung Timerzeit / Regolazione
temporizzazione / Ajuste temporizador /
Ustawienie czasu dzia³ania wy³¹cznika /
Timerregeling
Emetteurs radio / Wireless transmitters /
Funksender / Emettitori radio / Emisores radio
/ Nadajniki radiowe / Draadloze zenders
3
FR
Commande éclairage
EN
Lighting control
DE
Beleuchtungssteuerung
IT
Comando illuminazione
ES
Control iluminación
PL
Sterowanie oświetleniem
NL
Bediening verlichting
FR
Réglage variation (X%)
EN
Dimming setting (X%)
DE
Einstellung Dimmer (X %)
IT
Regolazione variazione (X%)
ES
Ajuste de la regulación (X %)
PL
Regulacja natê¿enia (X%)
NL
Dimregeling (X%)
4 4
4 4
4
(0 -> X%)
4
(0 -> X%)
Commander des lampes fl uocompactes / Controlling compact fl uorescent lights / Kompaktleuchtstoffl ampen steuern / Comandare le lampade fl uocompatte / Controlar
bombillas fl uocompactas / Sterowanie świetlówkami kompaktowymi / Fluocompactlampen bedienen
4
FR
Ê Appuyez 3 secondes sur la touche du récepteur jusqu’à ce que son voyant clignote. Relâchez.
Ë Appuyez brièvement sur la touche pour passer d’un clignotement à l’autre.
Ì Appuyez 3 secondes sur la touche du récepteur jusqu’à ce que son voyant ne clignote plus.
EN
Ê Press the receiver button for 3 seconds until its LED flashes. Release.
Ë Press the button briefly to change the flashing mode.
Ì Press the receiver button for 3 seconds until its LED stops flashing.
DE
Ê Drücken Sie 3 Sekunden lang auf die Taste des Empfängers, bis dessen Kontrolllampe blinkt.
Lassen Sie die Taste los.
Ë Drücken Sie kurz auf die Taste, um von einem Blinken zum nächsten zu wechseln.
Ì Drücken Sie 3 Sekunden lang auf die Taste des Empfängers, bis dessen Kontrolllampe nicht mehr
blinkt.
IT
Ê Premete per 3 secondi il tasto del ricevitore fino a quando la sua spia lampeggia. Rilasciate.
Ë Premete brevemente il tasto per passare da un lampeggiamento all’altro.
Ì Premete per 3 secondi il tasto del ricevitore fino a quando la sua spia non lampeggia più.
ES
Ê Pulse 3 segundos la tecla del receptor hasta que el testigo parpadee. Deje de pulsar.
Ë Pulse brevemente la tecla para pasar de un parpadeo a otro.
Ì Pulse 3 segundos la tecla del receptor hasta que el testigo deje de parpadear.
PL
Ê Przytrzymaj naciśniêty przycisk na odbiorniku przez 3 sekundy a¿ do migniêcia lampki na nim. Puśæ.
Zwolniæ.
Ë Naciśnij krótko przycisk, by przejśæ od jednego rodzaju migania do drugiego.
Ì Przez 3 sekundy przytrzymaj naciśniêty przycisk na odbiorniku a¿ lampka na nim przestanie migaæ.
NL
Ê Druk gedurende 3 seconden op de toets van de ontvanger tot het lampje knippert. Laat de toets los.
Ë Druk kort op de toets om van de ene naar de andere knipperfrequentie te schakelen.
Ì Druk gedurende 3 seconden op de toets van de ontvanger tot het lampje niet meer knippert.
Clignotement lent / Slow fl ashing /
Langsames blinken / Lampe-
ggiamento lento / Parpadeo
lento / Wolne miganie / Langzaam
knipperen
Clignotement rapide / Fast fl ashing
/ Schnelles blinken / Lampeggia-
mento rapido / Parpadeo rápido /
Szybkie miganie / Snel knipperen
Jaune / Yellow / Gelb /
Giallo / Amarillo /Zó³ty /
Geel /
Blanc / White /
Weiß / Bianco /
Blanco / Bia³y /
Wit
N
L
1
2
3
4
5
L
230V~
2 VA
1
2
L
TYXIA 4850
L
L
230V~
300W
max.
RLC
10''
1'
5'
15'
30'
60'
N
L
N
L
1
2
3
4
5
L
230V~
2 VA
1
2
L
TYXIA 4850
L
L
230V~
300W
max.
RLC
10''
1'
5'
15'
30'
60'
N
L
TYXIA 4840 TYXIA 4850
Jaune / Yellow / Gelb /
Giallo / Amarillo /Zó³ty /
Geel /
Blanc / White /
Weiß / Bianco /
Blanco / Bia³y /
Wit
Recommandé / Recommended / Empfohlen /
Consigliato / Recomendada / Zalecany /
Aanbevolen
Compatible / Compatible / Möglich /
Compatibile / Compatible /
Kompatybilny / Compatibel
TYXIA 4840
N
L
1
2
3
4
5
L
230V~
2 VA
1
2
L
TYXIA 4850
L
L
230V~
300W
max.
RLC
10''
1'
5'
15'
30'
60'
N
L
TYXIA 4850
C C
Vert / Green /
Grüne / Verde /
Zielony / Groen
Vert / Green /
Grüne / Verde /
Zielony / Groen
A
B
B
Présentation / Presentation / Beschreibung / Presentazione / Presentación /
Prezentacja / Voorstelling
1
FR
Tableau de compatibilité des éclairages /
EN
Lighting compatibility table /
DE
Kompatibilitätstabelle
der Beleuchtungsarten/
IT
Tabella di compatibilità delle illuminazioni /
ES
Tabla de compatibilidad de
iluminaciones /
PL
Tabela kompatybilności oświetlenia /
NL
Tabel compatibiliteit verlichting
300 WmaxTYXIA 4840
TYXIA 4850
200 Wmax
40 - 300 Wmax40-200 Wmax 40-100 Wmax
LEDLED
M
Hi-Fi
230 V~, 50 Hz
À Á Â Ã Ä
100 Wmax
NL
(1) : Timerfunctie activeren
bij commando “ON”.
(2) : Timerfunctie activeren
bij einde detectie.
(3) : Aanwezigheid fase ->
ON. Timerfunctie wordt bij
afvallen van de fase
geactiveerd.
(4) : Kortstondige onderbre-
king 30 sec. en 20 sec. tot
eindafschakeling.
PL
(1) : Dzia³anie czasowe po
poleceniu ON.
(2) : Dzia³anie czasowe po
zakoñczeniu detekcji.
(3) : Obecnośæ fazy -> ON.
Dzia³anie czasowe po
zaniku fazy na wejściu.
(4) : krótkie wy³¹czenie 30’’,
a nastêpnie 20’’ przed
wy³¹czeniem ostatecznym.
ES
(1) : Marcha temporizada
iniciada con control de
activación.
(2) : Marcha temporizada
iniciada en fin de detección.
(3) : Presencia Fase -> ON.
Marcha temporizada
iniciada tras la desacti-
vación de la fase.
(4) : Las luces parpadearan
( 30’’ y 20’’ antes del
apagado automático).
IT
(1) : Funzionamento temporiz-
zato avviato su comando ON.
(2) : Funzionamento temporiz-
zato avviato su fine rilevamento.
(3) : Presenza Fase -> ON.
Funzionamento temporizzato
avviato alla scomparsa della
fase.
(4) : prima dello spegnimento
finale breve interruzione di 30’’,
poi di 20’’.
DE
(1) : Timerbetrieb durch
«EIN» Befehl starten.
(2) : Timerbetrieb bei Ende
der Meldung starten.
(3) : Anwesenheit Phase ->
ON. Timerbetrieb wird bei
Abfall der Phase gestartet.
(4) : Kurze Unterbrechung
(30 Sek.) und 20 Sek. bis
Endabschaltung.
EN
(1) : Timed operation
initiated when ON is
actuated.
(2) : Timed operation
initiated at end of detection.
(3) : Phase Presence -> ON.
Timed operation runs when
the live is no longer present.
(4) : Lights go out for 30’’,
then 20’’ before they go out
completely.
FR
(1) : Marche temporisée
lancée sur commande ON.
(2) : Marche temporisée
lancée sur fin de détection.
(3) : Présence Phase -> ON.
Marche temporisée lancée
à la disparition de la phase.
(4) : Coupure brève 30’’,
puis 20’’ avant extinction
finale.
FR
Vérifiez que votre éclairage est adapté à la variation (dimmable, «gradable», variable).
Á Â Ã Pour les LED et lampes fluocompactes, il est préconisé d’utiliser le TYXIA 4840.
EN
Make sure that your lighting is compatible with the dimming system (dimmable, gradable, variable)
Á Â Ã TYXIA 4840 is recommended with LED and compact fluorescent lights.
DE
Vergewissern Sie sich, dass Ihre Beleuchtung für Dimmer geeignet ist (dimmbar, „gradable”).
Á Â Ã Für LED und Kompaktleuchtstofflampen wird der TYXIA 4840 empfohlen.
IT
Verificate che la vostra illuminazione sia adatta alla variazione (dimmerabile, “graduabile”, variabile).
Á Â Ã Per i LED e le lampade fluo-compatte, si raccomanda di utilizzare il TYXIA 4840.
ES
Compruebe en las características del fabricante de la iluminación, que ésta, es regulable
Á Â Ã Para los LED y las bombillas fluocompactas, se recomienda utilizar el TYXIA 4840.
PL
Sprawdź, czy mo¿na zastosowaæ ściemnianie do twojego oświetlenia (regulacja natê¿enia świat³a,
opcja ściemniania, regulacji świat³a).
Á Â Ã Dla lamp diodowych i kompaktowych świetlówek zaleca siê stosowanie TYXIA 4840.
NL
Controleer of de verlichting geschikt is om te worden gedimd (dimmable, dimbaar).
Á Â Ã Voor LED- compacte fluorecentielampen wordt het aanbevolen om TYXIA 4840 te gebruiken
8 ampoules max. / 8 light bulbs max. / 8 Lampen max. / max. 8 lampadine / 8 bombillas como
máximo. / Maks. 8 ¿arówek / Maximaal 8 lampen
A
Tout fi l non connecté doit être obligatoirement isolé (domino).
B
ATTENTION, les fi ls de commande ne sont pas isolés du
secteur.
Tout matériel raccordé doit être marqué CE et satisfaire aux
exigences des appareils basse tension ainsi qu’aux prescriptions
de montage.
Possibilité de rallonger, jusqu’à 10m, les fi ls de la commande locale
(à isoler du 230V).
C
Ne pas mettre sous tension avant d’avoir raccordé la charge.
A
Any unconnected wire must be insulated (connecting block).
B
IMPORTANT, the control wires are not mains-isolated.
Any equipment recorded must be marked CE and comply with the
requirements of low voltage devices as well as assembly
recommendations. Local control wires can be extended up to 10m
(insulate from 230 V).
C
Do not switch on before connecting the load.
A
Nicht verwendete Drähte müssen zwingend mit einer
Lüsterklemme verbunden werden.
B
ACHTUNG: Die Steuerdrähte sind nicht von der Stromnetzver-
sorgung getrennt.
Alle angeschlossenen Geräte müssen über die CE-Kennzeichnung
verfügen und den Ansprüchen der Niederspannungsgeräte- sowie
den Montagevorschriften entsprechen. Die Drähte des lokalen
Schaltereingangs können bis 10 m verlängert werden (von 230 V
isolieren).
C
Nicht unter Spannung setzen, bevor die Last angeschlossen ist.
A
Qualsiasi fi lo non collegato deve essere obbligatoriamente
isolato (nastro isolante).
B
ATTENZIONE, i fi li di comando non sono isolati dalla rete di
alimentazione. Ogni materiale collegato deve essere marcato CE e
soddisfare i requisiti delle apparecchiature a bassa tensione e le
prescrizioni di montaggio.
Possibilità di estendere, fi no a 10 m, i fi li del comando locale (da
isolare dal 230V).
C
Non mettere sotto tensione prima di avere collegato il carico.
A
Cualquier cable que no esté conectado se debe aislar
obligatoriamente (regleta).
B
ATENCIÓN, los hilos de control no están aislados de la red.
Todo el material conectado debe tener la marca CE y satisfacer las
exigencias de los dispositivos de baja tensión, así como de las
instrucciones de montaje. Posibilidad de alargar hasta 10 m los
hilos del control local (aislar de los 230V).
C
No encender antes de haber conectado la carga.
A
Ka¿dy niepod³¹czony kabel musi byæ obowi¹zkowo
zaizolowany (kostka).
B
UWAGA. Przewody sterowanie nie s¹ odizolowane od sieci.
Wszystkie pod³¹czane urz¹dzenia musz¹ nosiæ oznaczenie CE i
spe³niaæ wymagania dotycz¹ce urz¹dzeñ niskonapiêciowych oraz
wymagania dotycz¹ce monta¿u. Mo¿liwośæ wyd³u¿enia do 10 m
przewodów przy sterowaniu lokalnym (oddzieliæ od 230 V).
C
Nie pod³¹czaæ do pr¹du przed pod³¹czeniem obci¹¿enia.
A
Alle niet-aangesloten kabels moeten worden geïsoleerd
(aansluitsteentje).
B
OPGELET: de stuurkabels zijn niet geïsoleerd van het
elektriciteitsnet. Alle aangesloten apparatuur moet een CE-markering
hebben en voldoen aan de eisen voor laagspanningsapparatuur,
alsook de installatie-instructies.
Mogelijkheid om de kabels voor de lokale bediening te verlengen tot
10 m (te isoleren van de 230 V).
C
Niet onder spanning plaatsen voordat de belasting werd
aangesloten.
FR
EN
DE
IT
ES
PL
NL
Répéteur / Repeater /
Repeater / Ripetitore /
Repetidor / Przekaźnik /
Herhaler
Compatible /
Compatible /
Kompatibilität /
Compatibile /
Compatible /
Kompatybilne /
Compatibel
FR
Récepteurs variateurs d’éclairage +
minuterie
EN
Lighting dimmer receivers + timer
DE
Empfänger mit Dimmer + Zeitschaltuhr
IT
Ricevitori variatore d’illuminazione +
temporizzatore
ES
Receptores reguladores de iluminación +
temporizador
PL
Odbiorniki zmiany natężenia oświetlenia
+ czasomierz
NL
Dimmer ontvangers +
trappenhuisautomaat functie
TYXIA 4840 - 4850
www.deltadore.com

10s3s 7s
... ... ...
.. .. .... .. ..
>20s
OFF
RESET OK
> 10s
1 2 3
OFF
OK
3s
7s
... ... ...
.. .. .. .. ..
> 3s
1 2
OFF
ON
230V~
50 Hz
> 3s
> 3s
> 3s
OK
3
>3s
>3s
OFF
... ... ...
Min.
0%
100%
Max.
1 2 3
ON
230V~
50 Hz
4
Min.
0%
100%
Max.
2
>3s
OFF
3
>3s
... ... ...
1
ON
230V~
50 Hz
Exemple 1 / Example 1 / Beispiel 1 /
Esempio 1 / Ejemplo 1 / przyk³ad 1 /
Voorbeeld 1
Exemple 2 / Example 2 / Beispiel 2 /
Esempio 2 / Ejemplo 2 / przyk³ad 2 /
Voorbeeld 2
Association / Association / Einlernen / Associazione / Asociación / Przypisanie / Koppeling
FR
Ê Mettez l’installation sous tension. Appuyez 3 secondes
sur la touche du récepteur jusqu’à ce que son voyant clignote. Relâchez.
EN
Ê Switch on the installation. Press the receiver button for 3 seconds until
its LED flashes. Release
DE
Ê Setzen Sie die Anlage unter Spannung. Drücken Sie 3 Sekunden lang
auf die Taste des Empfängers, bis dessen Kontrolllampe blinkt. Lassen
Sie die Taste los.
IT
Ê Mettete l’installazione sotto tensione. Premete per 3 secondi il tasto del
ricevitore fino a quando la sua spia lampeggia. Rilasciate
ES
Ê Conecte la alimentación. Pulse 3 segundos la tecla del receptor hasta el
testigo parpadee. Deje de pulsar.
PL
Ê Pod³¹cz instalacjê do pr¹du. Przez 3 sekundy przytrzymaj naciśniêty
przycisk na odbiorniku, a¿ do migniêcia lampki na nim. Puśæ.
NL
Ê Zet de installatie onder spanning. Druk gedurende 3 seconden op de
toets van de ontvanger tot het lampje knippert. Laat de toets los.
Ë Sur l’émetteur, envoyez l’ordre d’association
(voir sa notice).
Ë Send the association command to the transmitter
(refer to the user guide).
Ë Geben Sie über den Sender die Zuordnungsanweisung
(siehe entsprechende Anleitung).
Ë Sull’emettitore, inviate l’ordine di associazione
(vedere le relative istruzioni).
Ë En el emisor, envíe la orden de asociación
(ver las instrucciones).
Ë Wyślij polecenie przypisania z nadajnika
(patrz instrukcja nadajnika).
Ë Verstuur het verbindingscommando op de zender
(zie handleiding).
Ì Vérifiez que le voyant du
récepteur ne clignote plus. Les produits sont associés.
Ì Make sure that the receiver LED has stopped flashing.
The products are associated.
Ì Achten Sie darauf, dass die Kontrollleuchte am Empfänger jetzt
nicht mehr blinkt. Die Geräte sind nun miteinander verbunden.
Ì Verificate che la spia del ricevitore non lampeggi più.
I prodotti sono associati.
Ì Compruebe que el testigo del receptor haya dejado de parpa-
dear. Los productos se asocian.
Ì Sprawdź, czy lampka na odbiorniku przesta³a migaæ.
Produkty zostały przypisane.
Ì Controleer of het controlelampje van de ontvanger niet meer
knippert. De producten zijn met elkaar verbonden.
Exemple 1 / Example 1 /
Beispiel 1 / Esempio 1 /
Ejemplo 1 / przyk³ad 1 /
Voorbeeld 1
Exemple 2 / Example 2 /
Beispiel 2 / Esempio 2 /
Ejemplo 2 / przyk³ad 2 /
Voorbeeld 2
FR
Maintenez appuyé 20 secondes :
- après 3 secondes, le voyant clignote lentement.
- après 7 secondes, le voyant clignote rapidement.
Maintenez l’appui jusqu’à ce que le voyant s’éteigne. Relâchez.
EN
Press and hold for 20 seconds:
- after 3 seconds, the LED flashes slowly.
- after 7 seconds, the LED flashes quickly.
Press and hold the button until the LED goes out. Release.
DE
Halten Sie die Taste 20 Sekunden lang gedrückt:
- Nach 3 Sekunden blinkt die Kontrollleuchte langsam.
- Nach 7 Sekunden blinkt die Kontrollleuchte schnell.
Halten Sie die Taste so lange gedrückt, bis die Kontrollleuchte ausgeht.
Lassen Sie die Taste los.
IT
Mantenete premuto per 20 secondi:
- dopo 3 secondi, la spia lampeggia lentamente.
- dopo 7 secondi, la spia lampeggia rapidamente.
Mantenete la pressione fino a quando la spia si spegne. Rilasciate.
ES
Mantenga pulsado 20 segundos:
- después de 3 segundos, el testigo parpadea lentamente.
- después de 7 segundos, el testigo parpadea rápidamente.
Mantenga pulsado hasta que el indicador se apague. Deje de pulsar.
PL
Przytrzymaj naciśniêty przez 20 sekund:
- po 3 sekundach lampka miga wolno.
- po 7 sekundach lampka miga szybko.
Przytrzymaæ naciśniêty przycisk a¿ do zgaśniêcia lampki. Puśæ.
NL
Houd 20 seconden ingedrukt:
- na 3 seconden knippert het controlelampje langzaam.
- na 7 seconden knippert het controlelampje snel.
Houd de toets ingedrukt tot het controlelampje uitgaat. Laat de toets
los.
Effacer toutes les associations / Remove all associations / Alle
Zuordnungen löschen / Cancellare tutte le associazioni / Borrar
todas las asociaciones /
Usuwanie wszystkich przypisañ / Alle
koppelingen wissen
8
Effacer une association / Remove an association / Zuordnung löschen / Cancellare un’associazione /
Borrar una asociación / Usuwanie przypisania / Een koppeling verwijderen
FR
Ê Maintenez appuyé 10 secondes :
- après 3 secondes, le voyant clignote
lentement.
- après 7 secondes, le voyant clignote
rapidement. Relâchez.
EN
Ê Press and hold for 10 seconds:
- after 3 seconds, the LED flashes slowly.
- after 7 seconds, the LED flashes quickly.
Release.
DE
Ê Halten Sie die Taste 10 Sekunden lang
gedrückt:
- Nach 3 Sekunden blinkt die Kontrollleuchte
langsam.
- Nach 7 Sekunden blinkt die Kontrollleuchte
schnell. Lassen Sie die Taste los.
IT
Ê Mantenete premuto per 10 secondi:
- dopo 3 secondi, la spia lampeggia
lentamente.
- dopo 7 secondi, la spia lampeggia
rapidamente. Rilasciate.
ES
Ê Mantenga pulsado 10 segundos:
- después de 3 segundos, el testigo
parpadea lentamente.
- después de 7 segundos, el testigo
parpadea rápidamente. Deje de pulsar.
PL
Ê Przytrzymaj naciśniêty przez 10 sekund:
- po 3 sekundach lampka miga wolno.
- po 7 sekundach lampka miga szybko.
Puśæ.
NL
Ê Houd 10 seconden ingedrukt:
- na 3 seconden knippert het controlelampje
langzaam.
- na 7 seconden knippert het controlelampje
snel. Laat de toets los.
Ë Validez sur l’émetteur
(voir sa notice).
Ë Confirm on the transmitter (refer
to the user guide).
Ë Bestätigen Sie am Sender (siehe
entsprechende Anleitung).
Ë Confermate sull’emettitore (ve-
dere le relative istruzioni).
Ë Valide en el emisor
(ver las instrucciones).
Ë Zatwierdź na nadajniku
(patrz jego instrukcja).
Ë Bevestig op de zender
(zie handleiding).
Ì Vérifiez que le voyant du
récepteur ne clignote plus.
Les produits ne sont plus associés.
Ì Make sure that the receiver LED
has stopped flashing. The products
are no longer associated.
Ì Achten Sie darauf, dass die
Kontrollleuchte am Empfänger
jetzt nicht mehr blinkt. Die Geräte
sind nun nicht mehr miteinander
verbunden.
Ì Verificate che la spia del
ricevitore non lampeggi più. I pro-
dotti non sono più associati.
Ì Compruebe que el testigo del
receptor haya dejado de parpa-
dear. Los productos ya no están
asociados.
Ì Sprawdź, czy lampka na
odbiorniku przesta³a migaæ. Pro-
dukty nie s¹ ju¿ przypisane.
Ì Controleer of het controlelampje
van de ontvanger niet meer knip-
pert. De producten zijn niet langer
met elkaar verbonden.
7
Réglage des valeurs Min. et Max. de la plage de variation / Setting the Min. and Max. dimming range values / Einstellung der Unter- und Obergrenze des Dimmbereichs /
Regolazione dei valori Min. e Max. dell’intervallo di variazione / Ajuste de los valores mín. y máx. del intervalo de regulación / Ustawienie wartości min i max dla zakresu
ściemniania / Instellen van de min. en max. waarden van het dimbereik
FR
Ê Appuyez 3 secondes
sur la touche du
récepteur jusqu’à ce
que son voyant
clignote. Relâchez.
EN
Ê Press the receiver
button for 3 seconds
until its LED flashes.
Release.
DE
Ê Drücken Sie 3
Sekunden lang auf die
Taste des Empfängers,
bis dessen Kontrolllam-
pe blinkt. Lassen Sie
die Taste los.
IT
Ê Premete per 3 secondi
il tasto del ricevitore
fino a quando la sua
spia lampeggia.
Rilasciate.
ES
Ê Pulse 3 segundos la
tecla del receptor hasta
el testigo parpadee.
Deje de pulsar.
PL
Ê Przez 3 sekundy
przytrzymaj naciśniêty
przycisk na odbiorniku,
a¿ do migniêcia lampki
na nim. Puśæ.
NL
Ê Druk gedurende 3
seconden op de toets
van de ontvanger tot
het lampje knippert.
Laat de toets los.
Ë Par appui prolongé sur
le bouton poussoir de la
commande filaire locale,
réglez le nouveau seuil Min.
ou Max.
Ë Set the new Min. and Max.
limit values by pressing and
holding the push button.
Ë Stellen Sie die neue Unter-
bzw. Obergrenze durch
längere Betätigung der
Drucktaste am lokalen ka-
belgebundenen Schalter ein.
Ë Effettuando una pressione
prolungata del pulsante
del comando filare locale,
regolate la nuova soglia Min.
o Max.
Ë Al dejar de pulsar la tecla
del control filar local, ajuste
el nuevo umbral mín. o máx.
Ë Naciskaj¹c d³u¿ej przycisk
lokalnego sterowania ustaw
nowy próg min i max..
Ë Stel de nieuwe min. of max.
grens in door lang op de
drukknop van de lokale
draadbediening te drukken.
Ì Enregistrez le seuil en
appuyant 3 secondes sur
la touche du récepteur
jusqu’à ce que son voyant
ne clignote plus.
Ì Press the receiver button
for 3 seconds until its LED
stops flashing to record the
limit values.
Ì Drücken Sie zur Speicherung
des neuen Werts 3 Se-
kunden lang auf die Taste
des Empfängers, bis dessen
Kontrolllampe nicht mehr
blinkt.
Ì Registrate la soglia
premendo per 3 secondi
il tasto del ricevitore fino
a quando la sua spia non
lampeggia più.
Ì Guarde el umbral pulsando
3 segundos la tecla del re-
ceptor hasta que el testigo
deje de parpadear.
Ì Zapisz próg przytrzymuj¹c
naciśniêty przez 3 sekundy
przycisk na odbiorniku, a¿
lampka na nim przestanie
migaæ.
Ì Registreer de gren-
swaarde door gedurende 3
seconden op de toets van
de ontvanger te drukken
tot het lampje niet meer
knippert.
Utilisation /Use/ Einsatz/ Utilizzo/ Utilización/ Zastosowanie/ Gebruik
9
FR
Si le phénomène de scintillement persiste, câblez
le TYXIA CR1W (ref 6353001 voir sa notice).
EN
If the lights are flickering, wire the TYXIA CR1W
(ref 6353001, refer to the user guide).
DE
Tritt das Flimmern weiterhin auf, muss der TYXIA
CR1W (Best.-Nr. 6353001, siehe entsprechende
Anleitung) verkabelt werden.
IT
Se il fenomeno di sfarfallio permane, cablare il
TYXIA CR1W (rif. 6353001 vedere le relative
istruzioni).
ES
Si el parpadeo continúa, cablee el TYXIA CR1W
(ref. 6353001, ver sus instrucciones).
PL
Je¿eli zjawisko migotania wystêpuje nadal,
okablowaæ TYXIA CR1W (nr kat. 6353001 patrz
jego instrukcja).
NL
Als de lampen blijven flikkeren, sluit dan TYXIA
CR1W aan (ref 6353001 zie handleiding).
1
2
3
4
5
L
230V~
2 VA
1
2
L
TYXIA 4850
L
L
230V~
300W
max.
RLC
10''
1'
5'
15'
30'
60'
TYXIA 4840
TYXIA CR1W
< 5s
X%
0%
0%
x%
X%
x%
Appui maintenu / Press and hold /
Langer Tastendruck / Pressione mantenu-
ta / Pulsación larga / Przytrzymaæ przez /
Ingedrukt houden
> 5s
X%
0%
0%
X%
0%
0%
Appui bref / Briefl y pressing /
Kurzer Tastendruck / Pressione breve /
Pulsación corta / Nacisn¹æ krótko /
Kort indrukken
< 5s
X%
0%
0%
X%
100%
100%
0 -> X% -> 0 0 -> X% -> 100%
FR
Commande de l’éclairage /
EN
Lighting control /
DE
Beleuchtungssteuerung /
IT
Comando dell’illuminazione /
ES
Control de la iluminación /
PL
Sterowanie oświetleniem /
NL
Bediening van de verlichting
Ì Recommencez les
opérations pour l’un
et l’autre des réglages
(Min. et Max.).
Ì Repeat the operations
for each of the settings
(Min. and Max.).
Ì Wiederholen Sie den
Vorgang für den zweit-
en Wert (Ober- und
Untergrenze).
Ì Ricominciate le oper-
azioni per entrambe
le regolazioni (Min. e
Max.).
Ì Repita los pasos para
ambos ajustes
(mín. y máx.).
Ì Powtórz czynności
dla poszczególnych
ustawieñ(min i max).
Ì Voer de handeling
nogmaals uit voor de
andere instelling
(min. en max.).
5
6
Appui bref / Briefl y pressing /
Kurzer Tastendruck / Pressione breve /
Pulsación corta / Nacisn¹æ krótko /
Kort indrukken
FR
Réglages complémentaires /
EN
Additional settings
DE
Zusätzliche Einstellungen /
IT
Regolazioni complementari
ES
Ajustes adicionales /
PL
Regulacje dodatkowe
NL
Aanvullende afstellingen
FR
Une fois le TYXIA CR1W câblé, recommencer le réglage des valeurs
Min et Max (étape 1 à 4)./
EN
Once the TYXIA CR1W is wired, you will
have to set the Min. and Max. values again (steps 1 to 4). /
DE
Sobald der
TYXIA CR1W verkabelt ist, können die minimalen und maximalen Werte
eingestellt werden (Schritt 1 bis 4). /
IT
Una volta cablato il TYXIA CR1W,
ricominciare la regolazione dei valori Min. e Max. (fasi 1 - 4 ) /
ES
Cuando
el TYXIA CR1W esté cableado, ajuste de nuevo los valores mín. y máx.
(pasos 1 a 4). /
PL
Po okablowaniu TYXIA CR1W, rozpocz¹æ regulacjê
wartości min. i maks. (etap 1 do 4 ) /
NL
Zodra de TYXIA CR1W is
aangesloten, stelt u de Min. en Max. waarden opnieuw in (stap 1 tot 4).
FR
Réglage de la variation (X%) /
EN
Setting the dimming
(X%) /
DE
Einstellung des Dimmers (X %)/
IT
Regolazione
della variazione (X%) /
ES
Ajuste de la regulación (X %) /
PL
Regulacja natê¿enia (X%) /
NL
Dimregeling (X%)
-
 1
1
-
 2
2


DELTA DORE TYXIA 4840 instrukcja
- Typ
- instrukcja
- Niniejsza instrukcja jest również odpowiednia dla
w innych językach
- español: DELTA DORE TYXIA 4840 Guía del usuario
- italiano: DELTA DORE TYXIA 4840 Guida utente
- Deutsch: DELTA DORE TYXIA 4840 Benutzerhandbuch
- français: DELTA DORE TYXIA 4840 Mode d'emploi
- English: DELTA DORE TYXIA 4840 User guide
- Nederlands: DELTA DORE TYXIA 4840 Gebruikershandleiding
Powiązane artykuły
-
DELTA DORE TYXIA 4840 instrukcja
-
-
-
-
-
-
-
DELTA DORE TYXIA 6410 Instrukcja obsługi
-
-