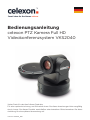
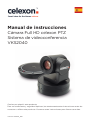
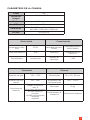
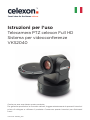
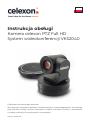
Celexon PTZ camera Full HD video conferencing system VKS2040 Instrukcja obsługi
- Kategoria
- Głośniki soundbar
- Typ
- Instrukcja obsługi
Niniejsza instrukcja jest również odpowiednia dla

Bedienungsanleitung
celexon PTZ Kamera Full HD
Videokonferenzsystem VKS2040
Vielen Dank für den Kauf dieses Produkts.
Für eine optimale Leistung und Sicherheit lesen Sie diese Anweisungen bitte sorgfältig
durch, bevor Sie dieses Produkt anschließen oder betreiben. Bitte bewahren Sie diese
Anleitung für eine spätere Verwendung auf.
Version: 32422_051

1
Lesen und befolgen Sie bitte alle unten und auf dem Produkt aufgeführten Sicherheits-
hinweise, bevor Sie die Kamera an eine Stromquelle anschließen. Die Nichteinhaltung
der Sicherheitshinweise kann zu Brand, Stromschlag, oder Personenschäden führen und
könnte die im Gerät enthaltenen Sicherheitsvorkehrungen beschädigen oder beeinträch-
tigen. Bitte bewahren Sie alle Sicherheitshinweise auf.
• Jegliches Zubehör und jegliche Kabel müssen vor dem Transport der Kamera ent-
fernt werden.
• Ergreifen Sie beim Transport der Kamera nicht den Kamerakopf.
• Verwenden Sie immer die Fernbedienung zum Drehen des Kamerakopfes. Drehen
Sie den Kamerakopf nicht mit der Hand. Sie riskieren sonst mechanische Schäden.
• Vergewissern Sie sich beim Drehen der Kamera, dass sich keine Hindernisse inner-
halb des Drehbereichs der Kamera benden.
• Die Kamera darf ausschließlich nur mit dem mitgelieferten Netzteil betrieben wer-
den.
• Die Kamera darf nicht dem direkten Sonnenlicht ausgesetzt oder an feuchten, fetti-
gen oder staubigen Orten platziert werden, wo das Gerät und die Zubehörteile mit
Regen, Rauch oder Dampf in Kontakt kommen könnten.
• Setzen Sie das Gerät oder seine Bestandteile nie Regen oder Feuchtigkeit aus, um
Brandgefahr oder die Gefahr eines Stromschlags zu reduzieren.
• Die Kamera darf nicht fallen gelassen werden.
• Es dürfen keine Flüssigkeiten auf die Kamera verschüttet werden. Verschüttete Flüs-
sigkeiten können zur Beschädigung der Kamera oder zu Personenschäden führen.
• Es dürfen keine Quellen offener Flammen, z. B. brennende Kerzen, auf die Kamera
gestellt werden.
• Die Kamera darf nicht über einen längeren Zeitraum unter extrem hellen Bedingun-
gen verwendet werden.
• Die Kamera darf nicht in der Nähe von starker elektromagnetischer Strahlung, wie z.
B. Fernseher oder Funksender verwendet werden. Die spezische Frequenz elektro-
magnetischer Felder kann das Kamerabild beeinträchtigen.
• Verwenden Sie das mitgelieferte Stromkabel. Schließen Sie das Stromkabel an eine
Steckdose mit Schutzleiteranschluss an.
• Die Kamera darf nicht an Orten installiert werden, die mechanischen Schwingungen
ausgesetzt sind.
• Die Kamera darf nicht auf eine instabile Oberäche gestellt werden. Dies könnte zu
ernsthaften Personenschäden und Kameraschaden führen. Vergewissern Sie sich,
dass Sie bei der Befestigung der Kamera auf einem Stativ die Anweisungen des Her-
WARNHINWEISE

2
stellers befolgen. Benutzen Sie nur die vom Hersteller empfohlenen Befestigungs-
materialien.
• Halten Sie beim Ausstecken des Stromkabels den Stecker und nicht das Kabel fest.
• Stellen Sie sicher, dass niemand auf das Stromkabel tritt oder es abgeklemmt wird,
insbesondere an der Steckdose, vor anderen Anschlussbuchsen oder am Verbin-
dungspunkt zur Kamera.
• Stecken Sie die Kamera aus, falls Sie sie über einen längeren Zeitraum nicht verwen-
det wird.
• Die Kamera darf nicht außerhalb der angegebenen Temperatur, Luftfeuchtigkeits-
und Leistungsbereiche verwendet werden.
• Entfernen Sie die Kamera vom Stromnetz, falls Sie sie reinigen müssen. Es darf nur
ein weiches, trockenes Tuch zur Reinigung der Kamera und der Kameralinse ver-
wendet werden. Verwenden Sie niemals Alkohol, Lösungsmittel oder auf Ammoniak
basierende Flüssigkeiten bei dieser Kamera.
• Die Fernbedienung der Kamera verwendet Batterien. Vergewissern Sie sich, dass
die Polarität der Batterien (+/-) richtig ausgerichtet ist. Entsorgen Sie gebrauchte
Batterien gemäß den örtlichen Entsorgungsrichtlinien.
• Reparaturen dürfen ausschließlich von qualiziertem Personal durchgeführt werden.
Das Gehäuse darf nicht geöffnet werden. Die Eigenwartung Ihrer Kamera kann für
Sie gefährlich sein und führt zum Erlöschen der Garantie.
• Verwenden Sie nur von celexon spezizierte Ersatzteile. Nicht genehmigte Ersatz-
teile könnten Brand, Stromschlag oder Personenschäden verursachen und führen
zum Erlöschen der Garantie.
• Befolgen Sie diese Anweisungen, um die Bildqualität während der gesamten Le-
bensdauer der Kamera sicherzustellen. Die Nichtbefolgung dieser Anweisungen
kann die Garantie beeinträchtigen.
• Sollten Sie äußerliche Beschädigungen an dem Gerät oder unerwartete oder un-
übliche Funktionsweisen feststellen, darf das Produkt nicht weiter genutzt werden.
Schalten Sie in diesen Fällen das Produkt umgehend aus und nehmen es vom Strom.
Kontaktieren Sie umgehend den Händler, bei dem Sie das Produkt gekauft haben
oder celexon direkt (Web: www.celexon.de, Mail: info@celexon.de) für weitere Infor-
mationen.
• Bei Nichtbeachtung obiger Anweisungen kann es zu Personenschäden und Beschä-
digungen des Produktes oder Geräten die daran angeschlossen sind kommen. Auch
kann bei fehlerhafter Installation oder Verwendung die Garantie erlöschen.
• Wenn Sie beim Verwenden des Produktes unsicher sind, kontaktieren Sie ei-
nen Fachmann, Ihren Händler oder celexon direkt (Web: www.celexon.de, Mail:
info@celexon.de).

3
HAFTUNGSAUSSCHLUSS
Die Angaben in diesem Dokument können ohne vorherige Ankündigung durch
den Hersteller geändert werden. Änderungen werden jeweils in den folgenden
Versionen dieses Handbuchs ergänzt. Der Hersteller übernimmt keine Garantie
oder Gewährleistung auf die Richtigkeit der Angaben in diesem Dokument.
• Technische Änderungen und Irrtümer vorbehalten.
Der Hersteller übernimmt keine Verantwortung für Sachschäden oder Personenschäden,
wenn das Produkt außerhalb der empfohlenen Spezikationen verwendet wird, oder bei
unsachgemäßer Installation.
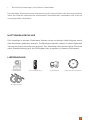
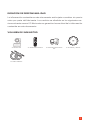
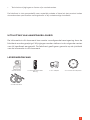
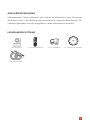
LIEFERUMFANG
1x PTZ Kamera 1x 12V Netzteil1x IR Fernbedienung 1x Mikrofon & Lautsprecher
2x USB 2.0 Kabel

4
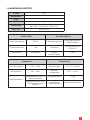
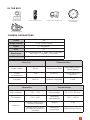
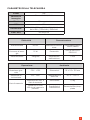
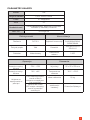
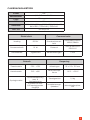
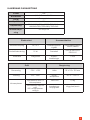
KAMERAPARAMETER
Zoom 10x
Bildsensor 1/ 2.8“ Exmor CMOS
Pixel 2.7 Megapixel
HOV 72°
Auösung 1920x1080@30fps // 1280x720 // 640x480
640x360 // 352x288 // 320x240
Min. Illu 0.[email protected]
Elektrizität Kommunikation
Stromversorgung DC12V Übertragungsrate 2400/4800/9600/
19200/38400
Stromverbrauch 12W Protokoll VISCA/PELCO-D
PELCO-P
Dekodierer Eingebaut Adress-
einstellungen 1-255
Operation Umgebung
Schwenkrotation -178°~ +178° Abmessungen 115 x 115 x 135 mm
Neigrotation -30°~ +90° Betriebs-
temperatur -10°C ~ +50°C
Speicherplätze
Fernbedienung max. 9
Speicherplätze Gesamtgewicht 1.2 kg
Insgesamt bis zu max.
255 Speicherplätze
möglich
Installations-
möglichkeiten Wand/Decke/Stativ

5
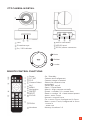
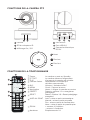
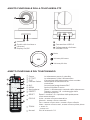
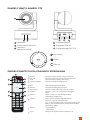
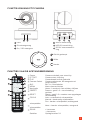
FUNKTIONSUMFANG PTZ KAMERA
FUNKTIONSUMFANG FERNBEDIENUNG
Linse
IR Empfängerauge
On / Off Anzeige
RS232 Anschluss
USB 2.0 Anschluss
DC12V Stromanschluss
Power Kamera schaltet in Standby
P/T RST Kamera startet Ausrichtung
FLIP Kamerabild wird gedreht
Camera Select Kamera auswählen, die gesteuert
werden soll
BLC BLC Ein-/ Ausschalten
MENU Menü öffnen/ schließen
Navigation Home = Kamera mittig ausrichten
PRESET Preset + Zahl 1-9 = Voreinstellung
speichern
RESET Reset + Zahl 1-9 = Reset gespeicherte
Voreinstellung
FOCUS Auto = automatisch fokussieren
Manual = manuelles fokussieren
Far = man. Fokus, Hintergrund scharf stellen
Near = man. Fokus, Vordergrund scharf stellen
ZOOM + rein-zoomen
- raus-zoomen
Zahlen Speicherplätze 1-9
Stumm
Leiser
Lauter
1
2
3
4
5 6
7
89
10 11
12
1
2 3
1
2
3
4
4
5
5
6
6

6
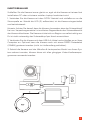
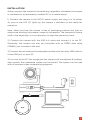
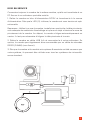
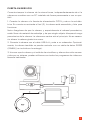
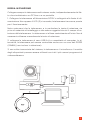
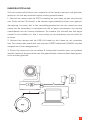
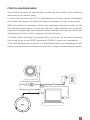
INBETRIEBNAHME
Schließen Sie die Kamera immer gleich an, egal ob die Kamera mit einem fest
installierten PC oder mit einem mobilen Laptop kombiniert wird.
1. Verbinden Sie die Kamera mit dem DC12V Netzteil und schließen es an die
Stromquelle an. Sobald die LED (3) aueuchtet, ist die Kamera eingeschaltet
und betriebsbereit.
Hinweis: Achten Sie darauf, dass die Kamera, besonders aber der Schwenkkopf
frei von Verpackungsmaterial ist und keine Gegenstände den Schwenkbereich
der Kamera blockieren. Die Kamera richtet sich zu Beginn von selbst mittig aus.
Es ist nicht notwendig den Schwenkkopf per Hand auszurichten.
2. Verbinden Sie die Kamera mit dem USB A-A Kabel und schließen es an Ihren
Computer an. Optional kann die Kamera auch mit einem RS232 Datenkabel
(DIN8M) gesteuert werden (nicht im Lieferumfang enthalten).
3. Sobald die Kamera und das Mikrofon & Lautsprecher-Modul von Ihrem Sys-
tem erkannt wurden, können diese mit allen gängigen Video-Konferenzpro-
grammen verwendet werden.

7
Hersteller: celexon Europe GmbH
Adresse: Gutenbergstraße 2, 48282 Emsdetten, DE
Produktname: celexon PTZ Kamera Full HD
Videokonferenzsystem VKS2040
Hiermit erklärt celexon Europe GmbH, dass das celexon PTZ Kamera Full HD
Videokonferenzsystem VKS2040 der Richtlinie 2014/53/EU entspricht. Die
EU-Konformitätserklärung kann unter folgender Adresse heruntergeladen
werden: www.celexon.de/zertikate
INFORMATION ZUR EU-KONFORMITÄT
Das Symbol weist auf die getrennte Rücknahme elektrischer und elektro-
nischer Geräte in EU-Ländern hin. Bitte werfen Sie das Gerät nicht in den
Hausmüll. Informieren Sie sich über das in Ihrem Land gültige Rücknah-
mesystem und wenden Sie sich bei Fragen zum Entsorgungsprozess an
Ihre Kommune oder Ihre örtliche Wert-und Schadstoffsammelstelle.

Operating instructions
celexon PTZ Camera Full HD Video
Conference System VKS2040
Thank you for purchasing this product.
For optimum performance and safety, please read these instructions carefully before
connecting or operating this product. Please retain these instructions for future use.
Version: 32422_051

1
Please read and follow all the safety instructions below and on the product before
connecting the camera to a power source. Failure to comply with the safety instructions
may result in re, electric shock, or personal injury, and could affect the safety features
contained in the unit. Please retain all safety instructions.
• All accessories and cables must be removed before transporting the camera.
• Do not grasp the camera head when transporting the camera.
• Always use the remote control to turn the camera head. Do not turn the camera
head by hand. You risk mechanical damage.
• When turning the camera, make sure that there are no obstacles within the camera‘s
turning range.
• The camera may only be operated with the power pack supplied.
• Do not expose the camera to direct sunlight or to damp, greasy or dusty places or
where the camera could come into contact with rain, smoke or steam.
• Never expose this equipment or its components to rain or moisture to reduce the
risk of re or electric shock.
• Do not drop the camera.
• Do not spill liquids on the camera.
• Do not place sources of open ames, such as lit candles.
• Do not use the camera in extremely bright conditions for long periods of time.
• The camera must not be used in the vicinity of strong electromagnetic radiation, e.g.
televisions and radio transmitters. The specic frequency of electromagnetic elds
can affect the camera image.
• Use the supplied power cable. Connect the power cable to a socket with a
protective earth connection. It is recommended to use a multiple socket outlet with
surge protection. The wall sockets must not be overloaded.
• The camera must not be installed in places subject to mechanical vibrations.
• The camera must not be placed on an unstable surface. This could result in
serious personal injury and camera damage. When mounting the camera on a tripod,
make sure that you follow the manufacturer‘s instructions. Use only the mounting
materials recommended by the manufacturer.
• When unplugging the power cable, hold the plug and not the cable.
• Make sure that no one steps on the power cable especially at the power socket, or
at the connection point to the camera.
• Unplug the camera if you will not be using it for a long period of time.
SAFETY INSTRUCTIONS

2
• The camera must not be used outside the specied temperature,humidity and
power ranges.
• Unplug the camera from the mains if you need to clean it. Only use a soft, dry cloth
to clean the camera and camera lens. Never use alcohol, solvents or ammonia-based
liquids on this camera.
• Wash your hands after handling the cables supplied with this camera.
• The remote control of the camera uses batteries. Make sure that the polarity of
the batteries (+/-) is correctly aligned. Dispose of used batteries according to local
disposal regulations.
• Repairs may only be carried out by qualied personnel. The cover must not be
removed. Unauthorised maintenance of your camera can be dangerous and will
invalidate the warranty.
• Only use spare parts specied by celexon. Unauthorised spare parts could cause
re, electric shock or personal damage and will invalidate the warranty.
• Follow these instructions to ensure image quality throughout the life of the camera.
Failure to follow these instructions may invalidate the warranty.
• Should you notice any external damage to the unit or unexpected or unusual
operation, do not continue to use the product. In these cases switch off the
product immediately and disconnect it from the power supply. Immediately contact the
dealer from whom you purchased the product or celexon directly (Web:
www.celexon.co.uk, Mail: info@celexon.co.uk) for further information.
• Failure to follow the above instructions may result in personal injury or damage to
the product or equipment connected to it. Incorrect installation or use may also be
invalidated if the product is installed or used incorrectly.
• If you are unsure about the use of the product, contact a professional, your dealer or
celexon directly. (Web: www.celexon.co.uk, Mail: info@celexon.co.uk).
• Technical changes and errors are possible.
The manufacturer accepts no responsibility for damage to property or personal injury
if the product is used outside the recommended specications or if it is improperly
installed.
DISCLAIMER
The information in this document is subject to change without notice by the
manufacturer.
Changes will be added to subsequent versions of this manual. The manufac-
turer does not guarantee or warranty for the correctness of the information in
this document.

3
IN THE BOX
1x PTZ camera 1x 12V power supply unit1x IR remote control 1x Microphone &
Loudspeaker
2x USB 2.0 cable
CAMERA PARAMETERS
Zoom 10x
Image Sensor 1/ 2.8“ Exmor CMOS
Pixels 2.7 Megapixel
HOV 72°
Resolution 1920x1080@30fps // 1280x720 // 640x480
640x360 // 352x288 // 320x240
Min. Illu 0.[email protected]
Electricity Commuication
Power supply DC12V Transmission Rate 2400/4800/9600/
19200/38400
Power
consumption 12W Protocol VISCA/PELCO-D
PELCO-P
Decoder Built in Address insettings 1-255
Operation Surroundings
Pivot rotation -178°~ +178° Surroundings 115 x 115 x 135 mm
Tilt rotation -30°~ +90° Operating
temperature -10°C ~ +50°C
Memory
Remote control max. 9
memory locations Weight 1.2 kg
A total of up to max.
255 memory locations
possible
Installation
possibilities Wall/Ceiling/Tripod

4
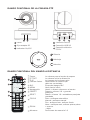
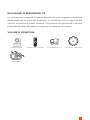
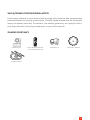
PTZ CAMERA IN DETAIL
Lens
IR receiver eye
On / Off indicator
RS232 connector
USB 2.0 port
DC12V power connector
Mute
Quieter
Louder
REMOTE CONTROL FUNCTIONS
Power On / Standby
P/T RST Camera starts alignment
FLIP Camera image is rotated
Camera Select Select the camera to be
controlled
BLC Switch BLC on/off
MENU Open / Close Menu
Navigation Home = Align camera centrally
PRESET Preset + number 1-9 = preset save
RESET Reset + number 1-9 = reset stored preset
FOCUS Auto = auto. Focus
Manual = manual focus
Far = manu. Focus, background in focus
Near = manu. Focus, foreground in focus
ZOOM + zoom in
- zoom out
Numbers Memory locations 1-9

5
INSTALLATION
Always connect the camera in the same way, regardless of whether the camera
is connected to a permanently installed PC or a mobile laptop.
1) Connect the camera to the DC12V power supply and plug it in to power.
As soon as the LED (3) lights up, the camera is switched on and ready for
operation.
Note: Make sure that the camera is free of packaging material and that no
objects are blocking the camera‘s range of movements. The camera will centre
itself in the beginning. It is not necessary to align the camera by hand.
2) Connect the camera with the USB A-A cable and connect it to the PC.
Optionally, the camera can also be controlled with an RS232 data cable
(DIN8M) (not included in the box).
3) Connect the microphone & loudspeaker module with the other USB cable to
a free USB port on your PC.
4) As soon as the PC has recognised the camera and microphone & loudspe-
aker module, the conference system can be started. The system can be used
with all common video conferencing programs.

6
Manufacturer: celexon Europe GmbH
Adress: Gutenbergstraße 2, 48282 Emsdetten, DE
Productname: celexon PTZ Camera Full HD
Video Conference System VKS2040
Products that are marked with the UKCA mark meet all requirements of
the relevant UK directives. The UK declaration of conformity can be downloaded
at the following address at: www.celexon.de/zertikate
INFORMATION ON UK CONFORMITY
The symbol indicates the separate collection of electrical and electronic
equipment in EU countries. Please do not throw the appliance into the
household waste. Please nd out about the take-back system in force
in your country and if you have any questions about them, contact your
local municipality or your local recycling and hazardous waste collection
centre.

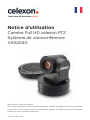
Notice d’utilisation
Caméra Full HD celexon PTZ
Système de visioconférence
VKS2040
Merci d’avoir choisi ce produit.
Pour une performance et une sécurité optimales, veuillez lire attentivement les présentes
instructions avant de connecter ou d’utiliser ce produit. Veuillez conserver la présente
notice pour une utilisation ultérieure.
Version : 32422_051

1
Veuillez lire et suivre toutes les consignes de sécurité mentionnées ci-dessous et sur le
produit avant de connecter la caméra à une source d’alimentation. Le non-respect des
consignes de sécurité peut entraîner un incendie, une électrocution ou des dommages
corporels et pourrait endommager ou compromettre les dispositifs de sécurité contenus
dans l’appareil. Veuillez conserver toutes les consignes de sécurité.
• Tous les accessoires et tous les câbles doivent être retirés avant de transporter la
caméra.
• Ne saisissez pas la tête de la caméra lorsque vous la transportez.
• Utilisez toujours la télécommande pour le pivotement de la tête de la caméra. Ne
faites pas pivoter la tête de la caméra à la main. Vous risquez des dommages mé-
caniques.
• Lorsque vous faites pivoter la caméra, assurez-vous qu’aucun obstacle ne se trouve
dans la zone de rotation de la caméra.
• La caméra ne doit être utilisée qu’avec le bloc d’alimentation fourni.
• Ne pas exposer la caméra à la lumière directe du soleil ni la placer dans des endroits
exposés à l’humidité, à la graisse ou à la poussière, dans lesquels l’appareil et ses
accessoires pourraient entrer en contact avec la pluie, la fumée ou la vapeur.
• N’exposez jamais l’appareil ou ses composants à la pluie ou à l’humidité an de ré-
duire les risques d’incendie ou de choc électrique.
• Il ne faut pas laisser tomber la caméra.
• Aucun liquide ne doit être renversé sur la caméra. Les liquides renversés peuvent
endommager la caméra ou causer des dommages corporels.
• Aucune source de amme nue, telle qu’une bougie allumée, ne doit être placée sur
la caméra.
• La caméra ne doit pas être utilisée pendant une période prolongée dans des condi-
tions de luminosité extrême.
• La caméra ne doit pas être utilisée à proximité d’un fort rayonnement électromagné-
tique, tel qu’un téléviseur ou un émetteur radio. La fréquence spécique des champs
électromagnétiques peut affecter l’image de la caméra.
• Utilisez le câble d’alimentation fourni. Branchez le câble d’alimentation sur une prise
de courant avec raccordement à la terre.
• La caméra ne doit pas être installée dans des endroits soumis à des vibrations mé-
caniques.
• La caméra ne doit pas être posée sur une surface instable. Cela pourrait entraîner
des blessures corporelles et des dommages matériels importants. Assurez-vous de
suivre les instructions du fabricant lors de la xation de la caméra sur un pied. Utili-
AVERTISSEMENTS

2
sez uniquement le matériel de xation recommandé par le fabricant.
• Lorsque vous débranchez le câble d’alimentation, tenez la che et non le câble.
• Assurez-vous que personne ne marche sur le câble d’alimentation ou ne le dé-
branche, en particulier au niveau de la prise de courant, devant d’autres prises de
raccordement ou au point de connexion avec la caméra.
• Débranchez la caméra si vous ne l’utilisez pas pendant une période prolongée.
• La caméra ne doit pas être utilisée en dehors des plages de températures, d’humidi-
tés et de puissances indiquées.
• Débranchez la caméra si vous devez la nettoyer. Seul un chiffon doux et sec peut
être utilisé pour nettoyer la caméra et son objectif. N’utilisez jamais d’alcool, de sol-
vants ou de liquides à base d’ammoniaque avec cette caméra.
• La télécommande de la caméra utilise des piles. Assurez-vous que la polarité des
piles (+/-) est correctement orientée. Éliminez les piles usagées conformément aux
directives locales en matière d’élimination.
• Les réparations doivent exclusivement être effectuées par un personnel qualié. Le
boîtier ne doit pas être ouvert. L’entretien de votre caméra par vous-même peut être
dangereux pour vous et entraîne l’annulation de la garantie.
• Utilisez uniquement les pièces de rechange spéciées par celexon. Les pièces de
rechange non homologuées pourraient provoquer un incendie, une électrocution ou
des dommages corporels et annuleraient la garantie.
• Suivez ces instructions pour garantir la qualité de l’image pendant toute la durée de
vie de la caméra. Le non-respect de ces instructions peut affecter la garantie.
• Si vous constatez des dommages extérieurs sur l’appareil ou des fonctionnements
inattendus ou inhabituels, le produit ne doit plus être utilisé. Dans ce cas, éteignez
immédiatement le produit et débranchez-le. Contactez immédiatement le reven-
deur auprès duquel vous avez acheté le produit ou directement celexon (web :
www.celexon.fr, mail : info@celexon.fr) pour de plus amples informations.
• Le non-respect des instructions énoncées ci-dessus peut entraîner des dommages
corporels et endommager le produit ou les appareils qui y sont raccordés. Une ins-
tallation ou une utilisation incorrecte peut entraîner l’annulation de la garantie.
• Si vous n’êtes pas sûr lors de l’utilisation du produit, contactez le personnel spé-
cialisé, votre revendeur ou directement celexon (Web : www.celexon.fr, Mail :
info@celexon.fr).
• Sous réserve de modications techniques et d’erreurs.
Le fabricant décline toute responsabilité en cas de dommages matériels ou corporels si
le produit est utilisé en dehors des spécications recommandées ou s’il n’est pas installé
correctement.

3
EXCLUSION DE RESPONSABILITÉ
Les informations contenues dans le présent document peuvent être modiées
sans préavis par le fabricant. Les modications seront ajoutées dans les ver-
sions suivantes de ce manuel. Le fabricant n’offre aucune garantie ou assurance
quant à l’exactitude des informations contenues dans le présent document.
CONTENU DE LA LIVRAISON
1x caméra PTZ 1x bloc d’alimentation 12 V1x télécommande IR 1x microphone & enceinte
2x câbles USB 2.0

4
PARAMÈTRES DE LA CAMÉRA
Zoom 10x
Capteur
d’images
1/ 2,8“ Exmor CMOS
pixels 2.7 mégapixels
HOV 72°
Résolution 1920x1080@30fps // 1280 x 720 // 640 x 480 640 x 360 //
352 x 288 // 320 x 240
Min. Illu 0.[email protected]
Électricité Communication
Alimentation DC12V Vitesse de trans-
mission
2400/4800/9600/
19200/38400
Consommation
électrique
12 W Protocole VISCA/PELCO-D
PELCO-P
Décodeur Intégré Paramètres
d’adresse 1-255
Exploitation Environnement
Rotation en pivo-
tement
-178°~ +178° Dimensions 115 x 115 x 135 mm
Rotation en incli-
naison
-30°~ +90° Température de
service -10°C ~ +50°C
Emplacements
Télécommande max. 9
Emplacements Poids total 1,2 kg
Au total jusqu’à max.
25 emplacements
possibles
Possibilités
d’installation Mur/plafond/pied
Strona się ładuje...
Strona się ładuje...
Strona się ładuje...
Strona się ładuje...
Strona się ładuje...
Strona się ładuje...
Strona się ładuje...
Strona się ładuje...
Strona się ładuje...
Strona się ładuje...
Strona się ładuje...
Strona się ładuje...
Strona się ładuje...
Strona się ładuje...
Strona się ładuje...
Strona się ładuje...
Strona się ładuje...
Strona się ładuje...
Strona się ładuje...
Strona się ładuje...
Strona się ładuje...
Strona się ładuje...
Strona się ładuje...
Strona się ładuje...
Strona się ładuje...
Strona się ładuje...
Strona się ładuje...
Strona się ładuje...
Strona się ładuje...
Strona się ładuje...
Strona się ładuje...
Strona się ładuje...
Strona się ładuje...
Strona się ładuje...
Strona się ładuje...
Strona się ładuje...
Strona się ładuje...
Strona się ładuje...
Strona się ładuje...
Strona się ładuje...
Strona się ładuje...
Strona się ładuje...
Strona się ładuje...
-
 1
1
-
 2
2
-
 3
3
-
 4
4
-
 5
5
-
 6
6
-
 7
7
-
 8
8
-
 9
9
-
 10
10
-
 11
11
-
 12
12
-
 13
13
-
 14
14
-
 15
15
-
 16
16
-
 17
17
-
 18
18
-
 19
19
-
 20
20
-
 21
21
-
 22
22
-
 23
23
-
 24
24
-
 25
25
-
 26
26
-
 27
27
-
 28
28
-
 29
29
-
 30
30
-
 31
31
-
 32
32
-
 33
33
-
 34
34
-
 35
35
-
 36
36
-
 37
37
-
 38
38
-
 39
39
-
 40
40
-
 41
41
-
 42
42
-
 43
43
-
 44
44
-
 45
45
-
 46
46
-
 47
47
-
 48
48
-
 49
49
-
 50
50
-
 51
51
-
 52
52
-
 53
53
-
 54
54
-
 55
55
-
 56
56
-
 57
57
-
 58
58
-
 59
59
-
 60
60
-
 61
61
-
 62
62
-
 63
63


Celexon PTZ camera Full HD video conferencing system VKS2040 Instrukcja obsługi
- Kategoria
- Głośniki soundbar
- Typ
- Instrukcja obsługi
- Niniejsza instrukcja jest również odpowiednia dla
w innych językach
- español: Celexon PTZ camera Full HD video conferencing system VKS2040 El manual del propietario
- italiano: Celexon PTZ camera Full HD video conferencing system VKS2040 Manuale del proprietario
- Deutsch: Celexon PTZ camera Full HD video conferencing system VKS2040 Bedienungsanleitung
- français: Celexon PTZ camera Full HD video conferencing system VKS2040 Le manuel du propriétaire
- Nederlands: Celexon PTZ camera Full HD video conferencing system VKS2040 de handleiding