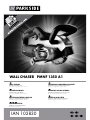
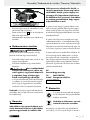
Parkside PMNF 1350 A1 Operation and Safety Notes
- Kategoria
- Elektronarzędzia
- Typ
- Operation and Safety Notes

IAN 102830
Wall CHaSER PMNF 1350 a1
MauERNutFRäSE
Bedienungs- und Sicherheitshinweise
Originalbetriebsanleitung
Wall CHaSER
Operation and Safety Notes
Translation of original operation manual
FREZaRKa DO ROWKÓW W MuRZE
Wskazówki dotyczące obsługi i bezpieczeństwa
Tłumaczenie oryginalnej instrukcji obsługi
REZKalNIK ZIDNIH utOROV
Navodila za upravljanje in varnostna opozorila
Prevod originalnega navodila za uporabo
DRÁŽKOVaCÍ FRÉZa DO ZDIVa
Pokyny pro obsluhu a bezpečnostní pokyny
Překlad originálního provozního návodu
DRÁŽKOVaCIa FRÉZa
Pokyny pre obsluhu a bezpečnostné pokyny
Preklad originálneho návodu na obsluhu
FalHORONYMaRÓ
Kezelési és biztonsági utalások
Az originál használati utasítás fordítása

Before reading, unfold the page containing the illustrations and familiarise yourself with all functions of the
device.
Przed przeczytaniem proszę rozłożyć stronę z ilustracjami, a następnie proszę zapoznać się z wszystkimi
funk cjami urządzenia.
Olvasás előtt kattintson az ábrát tartalmazó oldalra és végezetül ismerje meg a készülék mindegyik
funk cióját.
Pred branjem odprite stran s slikami in se nato seznanite z vsemi funkcijami naprave.
Před čtením si otevřete stranu s obrázky a potom se seznamte se všemi funkcemi přístroje.
Pred čítaním si odklopte stranu s obrázkami a potom sa oboznámte so všetkými funkciami prístroja.
Klappen Sie vor dem Lesen die Seite mit den Abbildungen aus und machen Sie sich anschließend mit allen
Funktionen des Gerätes vertraut.
GB Operation and Safety Notes Page 5
PL Wskazówki dotyczące obsługi i bezpieczeństwa Strona 15
HU Kezelési és biztonsági utalások Oldal 27
SI Navodila za upravljanje in varnostna opozorila Stran 39
CZ Pokyny pro obsluhu a bezpečnostní pokyny Strana 49
SK Pokyny pre obsluhu a bezpečnostné pokyny Strana 59
DE / AT / CH Bedienungs- und Sicherheitshinweise Seite 69

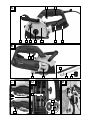
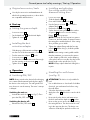
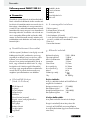
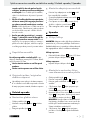
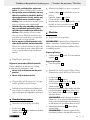
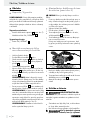
A
0
1
C D E
B
3
1 2
16
91
467
11 10 1215
9
5 3 a
14
14
8
13


5 GB
Table of contents
Introduction
Intended use ........................................................................................................................................Page 6
Device description .............................................................................................................................. Page 6
Scope of delivery ...............................................................................................................................Page 6
Technical Data ....................................................................................................................................Page 6
General power tool safety warnings
1. Work area safety ...........................................................................................................................Page 7
2. Electrical safety ..............................................................................................................................Page 7
3. Personal safety ...............................................................................................................................Page 7
4. Power tool use and care ................................................................................................................Page 8
5. Service ............................................................................................................................................Page 8
Cut-off machine safety warnings .......................................................................................................Page 8
Further safety instructions for abrasive cutting-off operations ........................................................Page 10
Supplementary Instructions ................................................................................................................Page 10
Original accessories / tools ...............................................................................................................Page 11
Start-up
Setting the groove depth....................................................................................................................Pa g e 11
Installing the dust extraction adapter ................................................................................................Page 11
Operation
Switching ON / OFF ...........................................................................................................................Page 11
Installing and adjusting the cutting width of the diamond cutting discs .........................................Page 11
Handling the wall chaser ...................................................................................................................Page 11
Maintenance and Cleaning .............................................................................................Page 12
Warranty ........................................................................................................................................Page 12
Disposal ............................................................................................................................................ Page 12
Translation of the original declaration of conformity /
Manufacturer ..............................................................................................................................Page 13

6 GB
Introduction / General power tool safety warnings
Introduction
Wall chaser PMNF 1350 A1
Introduction
We congratulate you on the purchase of your new
device. You have chosen a high quality product. The
instructions for use are part of the product. They
contain important information concerning safety,
use and disposal. Before using the product, please
familiarise yourself with all of the safety information
and instructions for use. Only use the unit as de
scribed
and for the specified applications. If you pass the
product on to anyone else, please ensure that you
also pass on all the documentation with it.
Intended use
The wall chaser (normative cut-off machine), in the
following also referred to as device, in conjunction
with an approved industrial dust extractor, is intended
to cut or slit primarily mineral materials, e.g. concrete
or masonry when firmly applied with the guide sled
without the use of water. Any other uses, and / or
modifications to the appliance, are deemed to be
improper usage and may result in serious physical
injury. Not for commercial applications.
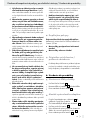
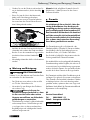
Device description
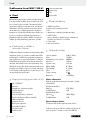
(see Fig. A–D)
1
ON- / OFF-switch
2
Handle
3
Dust extraction adapter
3 a
Union nut
4
Protective cover
5
Adapter flange (with thread)
6
Depth stop set screw
7
Depth stop
8
Additional handle
9
Switch lock
10
Spindle lock
11
Roller
12
Reducer
13
Centring flange
14
Spacers
15
Face pin wrench
16
Chisel
Scope of delivery
1 Wall chaser
2 Cutting discs (preinstalled)
1 Face pin wrench
1 Extraction adapter (preinstalled)
1 Reducer
(for use with the extraction adapter and a size
∅ 32 mm vacuum hose)
1 Chisel
1 Instructions for use
Technical Data
Mains voltage: 230 V∼ 50 Hz
Power input: 1350 W
Rated no load speed: 9000 min
-1
Disc ø: 125 mm
Mounting hole: 22.2 mm
Groove depth: 0–30 mm
Groove width: 8–26 mm
Thread: M14
Protection class: II /
Weight: approx. 4.05 kg
Noise and vibration
Noise and vibration ratings were determined
according to EN 60745.
Noise level L
pA
: 97.6 dB(A)
Uncertainty K
pA
: 3 dB
Sound power level L
WA
: 108.6 dB(A)
Uncertainty K
WA
: 3 dB
Wear ear protection.
Exposure to noise can cause hearing loss.
The total vibration (vector sum of three directions)
is calculated in accordance with EN 60745.
Declaration of vibration emission value
(Cutting concrete slab):
Main Handle: 6.417 m / s
2
Auxiliary Handle: 4.258 m / s
2
Uncertainty K = 1.5 m / s
2

7 GB
Introduction / General power tool safety warnings
Introduction
The vibration emission value specified was measured
according to a standardised testing method and may
vary depending on the method the power tool is
being used, and in exceptions be higher than the
specified value.
The vibration emission value specified can be used
to compare power tools.
The vibration emission value specified can also serve
as a preliminary assessment of the impact.
Try to keep the vibration loads as low as possible.
Measures to reduce the vibration load are, e.g. wea-
ring gloves and limiting the working time. Wherein all
states of operation must be included (e.g. times
when
the power tool is switched off and times where the
power tool is switched on but running without load).
General power tool
safety warnings
Read all safety
warnings and all instructions. Fail-
ure to follow the warnings and instructions
may result in electric shock, fire and / or serious injury.
Save all warnings and instructions for
future reference.
The term “power tool” in the warnings refers to your
mains-operated (corded) power tool or battery-op-
erated (cordless) power tool.
1. Work area safety
a) Keep work area clean and well lit.
Cluttered or dark areas invite accidents.
b) D
o not operate power tools in explosive
atmospheres, such as in the presence
of flammable liquids, gases or dust.
Power tools create sparks which may ignite the
dust or fumes.
c) Keep children and bystanders away
while operating a power tool. Distractio
ns
can cause you to lose control.
2. Electrical safety
a) Power tool plugs must match the outlet.
Never modify the plug in any way. Do
not use any adapter plugs with earthed
(grounded) power tools. Unmodified plug
s
and matching outlets will reduce risk of electric
shock.
b) Avoid body contact with earthed or
grounded surfaces, such as pipes,
radiators, ranges and refrigerators.
There is an increased risk of electric shock if
your body is earthed or grounded.
c) Do not expose power tools to rain or
wet conditions. Water entering a power tool
will increase the risk of electric shock.
d) Do not abuse the cord. Never use the
cord for carrying, pulling or unplugging
the power tool. Keep cord away from
heat, oil, sharp edges or moving parts.
Damaged or entangled cords increase the risk
of electric shock.
e)
When operating a power tool outdo
ors,
use an extension cord suitable for out-
door use. Use of a cord suitable for outdoor
use reduces the risk of electric shock.
f) If operating a power tool in a damp
location is unavoidable, use a residual
current device (RCD) protected supply.
Use of an RCD reduces the risk of electric shock.
3. Personal safety
a) Stay alert, watch what you are doing
and use common sense when operat-
ing a power tool. Do not use a power
tool while you are tired or under the
influence of drugs, alcohol or medica-
tion. A moment of inattention while operating
power tools may result in serious personal injury.
b) Use personal protective equipment.
Always wear eye protection. Protective
equipment such as dust mask, non-skid safety
shoes, hard hat, or hearing protection used for
appropriate conditions will reduce personal in-
juries.

8 GB
General power tool safety warnings
General power tool safety warnings
c) Prevent unintentional starting. Ensure
the switch is in the off-position before
connecting to power source and / or
battery pack, picking up or carrying
the tool. Carrying power tools with your fing
er
o
n the switch or energising power tools that hav
e
the switch on invites accidents.
d) Remove any adjusting key or wrench
before turning the power tool on. A
wrench or a key left attached to a rotating part
of the power tool may result in personal injury.
e) Do not overreach. Keep proper foot-
ing and balance at all times. This enables
better control of the power tool in unexpected
situations.
f) Dress properly. Do not wear loose
clothing or jewellery. Keep your hair,
clothing and gloves away from mov-
ing parts. Loose clothes, jewellery or long
hair can be caught in moving parts.
g) If devices are provided for the connec-
tion of dust extraction and collection
facilities, ensure these are connected
and properly used. Use of dust collection
can reduce dust-related hazards.
4. Power tool use and care
a) Do not force the power tool. Use the
correct power tool for your applica
tion.
The correct power tool will do the job better
and safer at the rate for which it was designed.
b) Do not use the power tool if the switch
does not turn it on and off. Any power
tool that cannot be controlled with the switch is
dangerous and must be repaired.
c) Disconnect the plug from the power
source and / or the battery pack from
the power tool before making any ad-
justments, changing accessories, or
storing power tools. Such preventive safety
measures reduce the risk of starting the power
tool accidentally.
d) Store idle power tools out of the reach
of children and do not allow persons
unfamiliar with the power tool or these
instructions to operate the power tool.
Power tools are dangerous in the hands of un-
trained users.
e) Maintain power tools. Check for mis-
alignment or binding of moving parts,
breakage of parts and any other con-
dition that may affect the power tool’s
operation. If damaged, have the power
tool repaired before use. Many accidents
are caused by poorly maintained power tools.
f) Keep cutting tools sharp and clean.
Properly maintained cutting tools with sharp
cutting edges are less likely to bind and are
easier to control.
g) Use the power tool, accessories and
tool bits etc. in accordance with these
instructions, taking into account the
working conditions and the work to
be performed. Use of the power tool for
operations different from those intended could
result in a hazardous situation.
5. Service
a) Have your power tool serviced by a
qualified repair person using only
iden-
tical replacement parts. This will ensure
that the safety of the power tool is maintained.
Cut-off machine safety warnings
a) The guard provided with the tool must
be securely attached to the power tool
and positioned for maximum safety,
so the least amount of wheel is ex-
posed towards the operator. Position
yourself and bystanders away from
the plane of the rotating wheel. The
guard helps to protect operator from broken
wheel fragments and accidental contact with
wheel.
b) Only use diamond-tip cutting discs with
your power tool. Just because an accessory
can be attached to your power tool, it does not
assure safe operation.
c) The rated speed of the accessory must
be at least equal to the maximum spee
d

9 GB
General power tool safety warnings
General power tool safety warnings
marked on the power tool. Accessories
running faster than their rated speed can break
and fly apart.
d) Wheels must be used only for recom-
mended applications. For example:
do not grind with the side of cut-off
wheel. Abrasive cut-off wheels are intended
for peripheral grinding, side forces applied to
these wheels may cause them to shatter.
e) Always use undamaged wheel flanges
that are of correct diameter for your
selected wheel. Proper wheel flanges sup-
port the wheel thus reducing the possibility of
wheel breakage.
f) Do not use worn down reinforced
wheels from larger power tools. Wheels
intended for a larger power tool are not suita-
ble for the higher speed of a smaller tool and
may burst.
g) The outside diameter and the thickness
of your accessory must be within the
capacity rating of your power tool. In-
correctly sized accessories cannot be adequately
guarded or controlled.
h) The arbour size of wheels and flanges
must properly fit the spindle of the
power tool. Wheels and flanges with arbour
holes that do not match the mounting hardware
of the power tool will run out of balance, vibrate
excessively and may cause loss of control.
i) Do not use damaged wheels. Before
each use, inspect the wheels for chips
and cracks. If power tool or wheel is
dropped, inspect for damage or install
an undamaged wheel. After inspecting
and installing the wheel, position your-
self and bystanders away from the
plane of the rotating wheel and run
the power tool at maximum no load
speed for one minute. Damaged wheels
will normally break apart during this test time.
j) Wear personal protective equipment.
Depending on application, use face
shield, safety goggles or safety glasse
s.
As appropriate, wear dust mask, hear-
ing protectors, gloves and shop apron
capable of stopping small abrasive or
workpiece fragments. The eye protection
must be cap-able of stopping flying debris gen-
erated by various operations. The dust mask
or respirator must be capable of filtrating par-
ticles generated by your operation. Prolonged
exposure to high intensity noise may cause
hearing loss.
k) Keep bystanders a safe distance away
from work area. Anyone entering the
work area must wear personal protec-
tive equipment. Fragments of workpiece or
of a broken wheel may fly away and cause in-
jury beyond immediate area of operation.
l) Hold the power tool by insulated grip-
ping surfaces only, when performing
an operation where the cutting acces-
sory may contact hidden wiring or its
own cord. Cutting accessory contacting a
“live” wire may make exposed metal parts of
the power tool “live” and could give the oper-
ator an electric shock.
m) Position the cord clear of the spinning
accessory. If you lose control, the cord may
be cut or snagged and your hand or arm may
be pulled into the spinning wheel.
n) Never lay the power tool down until
the accessory has come to a complete
stop. The spinning wheel may grab the surface
and pull the power tool out of your control.
o) Do not run the power tool while car-
rying it at your side. Accidental contact
with the spinning accessory could snag your
clothing, pulling the accessory into your body.
p) Regularly clean the power tool’s air
vents. The motor’s fan will draw the dust inside
the housing and excessive accumulation of
powdered metal may cause electrical hazards.
q) Do not operate the power tool near
flammable materials. Sparks could ignite
these materials.
r) Do not use accessories that require
liquid coolants. Using water or other liquid
coolants may result in electrocution or shock.

10 GB
General power tool safety warnings / Start-up / Operation
General power tool safety warnings
Further safety instructions for
abrasive cutting-off operations
Kickback and related warnings
Kickback is a sudden reaction to a pinched or snagged
rotating wheel. Pinching or snagging causes rapid
s
talling of the rotating wheel which in turn causes th
e
uncontrolled power tool to be forced in the direction
opposite of the wheel’s rotation at the point of the
binding.
For example, if an abrasive wheel is snagged or
pinched by the workpiece, the edge of the wheel
that is entering into the pinch point can dig into the
surface of the material causing the wheel to climb
out or kick out. The wheel may either jump toward
or away from the operator, depending on direction
of the wheel’s movement at the point of pinching.
Abrasive wheels may also break under these con-
ditions. Kickback is the result of power tool misuse
and / or incorrect operating procedures or condi
tions
and can be avoided by taking proper precautions
as given below.
a) Maintain a firm grip on the power tool
and position your body and arm to
allow you to resist kickback forces. Al-
ways use auxiliary handle, if provided,
for maximum control over kickback or
torque reaction during start-up. The op-
erator can control torque reactions or kickback
forces, if proper precautions are taken.
b) Never place your hand near the rotat-
ing accessory. Accessory may kickback over
your hand.
c) Do not position your body in line with
the rotating wheel. Kickback will propel
the tool in direction opposite to the wheel’s
movement at the point of snagging.
d) Use special care when working cor-
ners, sharp edges etc. Avoid bouncing
and snagging the accessory. Corners,
sharp edges or bouncing have a tendency to
snag the rotating accessory and cause loss of
control or kickback.
e) Do not attach a saw chain, woodcarv-
ing blade, segmented diamond wheel
with a peripheral gap greater than
10 mm or toothed saw blade. Such blades
create frequent kickback and loss of control.
f) Do not “jam” the wheel or apply ex-
cessive pressure. Do not attempt to
make an excessive depth of cut. Over-
stressing the wheel increases the loading and
susceptibility to twisting or binding of the wheel
in the cut and the possibility of kickback or
wheel breakage.
g) When wheel is binding or when inter-
rupting a cut for any reason, switch
off the power tool and hold the power
tool motionless until the wheel comes
to a complete stop. Never attempt to
remove the wheel from the cut while
the wheel is in motion otherwise kick-
back may occur. Investigate and take cor-
rective action to eliminate the cause of wheel
binding.
h) Do not restart the cutting operation in
the workpiece. Let the wheel reach full
speed and carefully re-enter the cut.
The wheel may bind, walk up or kickback if
the power tool is restarted in the workpiece.
i) Support panels or any oversized work-
piece to minimize the risk of wheel
pinching and kickback. Large workpieces
tend to sag under their own weight. Supports
must be placed under the workpiece near the
line of cut and near the edge of the workpiece
on both sides of the wheel.
j) Use extra caution when making a
“pocket cut” into existing walls or
other blind areas. The protruding wheel
may cut gas or water pipes, electrical wiring
or objects that can cause kickback.
Supplementary Instructions
Approved cutting wheel designs: diamond
set, disc diameter 125 mm, disc thickness max.
2.2 mm
Always wear a dust mask!
Always wear ear protection!

11 GB
General power tool safety warnings / Start-up / Operation
General power tool safety warnings
Original accessories / tools
Use only the accessories and attachments de-
tailed in the operating instructions, or those which
are compatible with the device.
Start-up
Setting the groove depth
Loosen set screw
6
.
Set the depth stop
7
to the desired depth.
Tighten set screw
6
.
Installing the dust
extraction adapter
Slide the pegs of the extraction adapter
3
into the slots of the dust extraction connection.
Turn the extraction adapter
3
to lock.
Loosen union nut
3 a
.
Insert the tube of the extraction unit far enough
into the opening on the union nut
3 a
.
Tighten union nut
3 a
.
Operation
Switching ON / OFF
NOTE: Always switch on the device before bringing
into contact with the material and only then apply
the device to the work piece. The wall grinder fea-
tures electronic smooth start-up. The motor‘s start-up
is delayed.
Switching the unit on:
Activate the switch lock
9
(see Fig. C). Then
press the ON / OFF switch
1
.
Switching the device off:
Release the ON / OFF switch
1
.
Installing and adjusting
the cutting width of the
diamond cutting discs
Loosen set screw
6
.
Slide the depth stop
7
up.
Press and hold the spindle lock
10
.
Use the face pin wrench
15
to loosen the
adapter flange
5
.
Remove the adapter flange
5
.
Set the desired cutting width with the number
of spacers
14
. Be sure to use the centring
flange
13
as the top spacer.
NOTE: You may choose from various spacers.
Please note, the total number of spacers betw
een
the cutting discs and the thickness of the cutting
discs yield the groove width.
Tighten the adapter flange with the face pin
wrench
15
. When doing so, hold the spindle
lock.
NOTE: When setting a cutting width smaller
than the maximum, you must use the spacers
on the clamping collar side, as the clamping
collar alone cannot secure the discs due to the
thread length on the spindle (see. Fig. D).
NOTE: Always replace diamond cutting discs
in pairs.
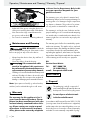
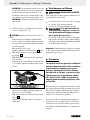
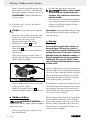
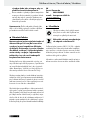
Handling the wall chaser
(see Fig. E)
ATTENTION! This device is only suitable for
dry cuts!
Use a cable detector to check walls for hidden
electrical-, gas- and water lines before using
the wall chaser.
Select the desired groove width.
Apply the roller
11
of the device onto the brick
wall.
Now switch on the device and immerse into
the brick wall until the depth stop
7
touches.
Now cut the groove into the brick wall, noting
the cutting direction. The device must be rotat-
ing in the opposite direction. The device can
otherwise erratically be pushed out of the cut.

12 GB
Operation / Maintenance and Cleaning / Warranty / Disposal
2
3
1
At the end of the groove swing the device out
of the groove and only then switch off the device
.
Now remove the ridge created between the
two grooves with a chisel
16
.
Do not work on materials containing asbestos!
Maintenance and Cleaning
RISK OF INJURY! Switch the
device off and pull the plug out of the mains socket
before carrying out any work on the device.
Always keep the device clean, dry and free of
oil or grease.
Use a dry cloth to clean the housing.
If the connection cable
needs to be replaced, this repair must
be performed by the manufacturer or a
representative to prevent safety hazards.
Grinding tools must be handled and transported
with care. Grinding tools have to be stored in su
ch
a way that they are not exposed to mechanical
damage or damaging environmental influences.
Note: Spare parts not listed (e.g. carbon brushes,
switches) can be ordered through our call centre.
Warranty
The warranty for this appliance is for 3
years from the date of purchase. The ap-
pliance has been manufactured with care
and meticulously examined before deliv-
ery. Please retain your receipt as proof
of purchase. In the event of a warranty
claim, please make contact by telephone
with our Service Department. Only in this
way can a post-free despatch for your
goods be assured.
The warranty covers only claims for material and
maufacturing defects, but not for transport damage, f
or
wearing parts or for damage to fragile components,
e.g. buttons or batteries. This product is for private
use only and is not intended for commercial use.
The warranty is void in the case of abusive and im-
proper handling, use of force and internal tampering
not carried out by our authorized service branch. Your
statutory rights are not restricted in any way by this
warranty.
The warranty period will not be extended by repairs
made unter warranty. This applies also to replaced
and repaired parts. Any damage and defects extant
on purchase must be reported immediately after
unpacking the appliance, at the latest, two days after
the purchase date. Repairs made after the expiration
of the warranty period are subject to payment.
GB
Service Great Britain
Tel.: 0871 5000 720
(0.10 GBP/Min.)
e-mail: k[email protected]
IAN 102830
Disposal
The packaging is wholly composed of
environmentally-friendly materials that can
be disposed of at a local recycling centre.
Do not dispose of electric tools
in the household waste!
In accordance with European Directive
2012 / 19 / EU
(covering waste electrical and electronic equipment)
and its transposition into national legislation, worn out
electrical power tools must be collected separately
and taken for environmentally compatible recycling.
Disposal / Translation of the original declaration of conformity / Manufacturer

13 GB
Operation / Maintenance and Cleaning / Warranty / Disposal
Contact your local refuse disposal authority for more
details of how to dispose of your worn out electrical
devices.
Translation of the original
declaration of conformity /
Manufacturer
We, KOMPERNASS HANDELS GMBH, the person
responsible for documents: Mr Semi Uguzlu, BURG-
STRASSE 21, 44867 BOCHUM, GERMANY, hereby
declare that this product complies with the following
standards, normative documents and EU directives:
Machinery Directive
(2006 / 42 / EC)
EU Low Voltage Directive
(2006 / 95 / EC)
Electromagnetic Compatibility
(2004 / 108 / EC)
RoHS Directive
(2011 / 65 / EU)
Applicable harmonized standards
EN 60745-1/A11:2010
EN 60745-2-22:2011
EN 55014-1/A2:2011
EN 55014-2/A2:2008
EN 61000-3-2/A2:2009
EN 61000-3-3:2008
Type / Device description:
Wall chaser PMNF 1350 A1
Date of manufacture (DOM): 10–2014
Serial number: IAN 102830
Bochum, 31.10.2014
Semi Uguzlu
- Quality Manager -
We reserve the right to make technical modifications
in the course of further development.
Disposal / Translation of the original declaration of conformity / Manufacturer

14
Spis zawartości

15 PL
Spis zawartości
Wstęp
Zastosowanie zgodne z przeznaczeniem ....................................................................................Strona 16
Opis urządzenia ..............................................................................................................................Strona 16
Zakres dostawy ...............................................................................................................................Strona 16
Dane techniczne ..............................................................................................................................Strona 16
Ogólne wskazówki bezpieczeństwa dla elektronarzędzi
1. Bezpieczeństwo miejsca pracy ..................................................................................................Strona 17
2. Bezpieczeństwo elektryczne .....................................................................................................Strona 17
3. Bezpieczeństwo osób .................................................................................................................Strona 18
4. Staranne obchodzenie się i użytkowanie narzędzi elektrycznych ........................................ Strona 18
5. Serwis ...........................................................................................................................................Strona 19
Wskazówki bezpieczeństwa dla przecinarek .............................................................................. Strona 19
Inne wskazówki bezpie czeństwa dla przecinarek szlifierskich .................................................Strona 21
Wskazówki uzupełniające ..............................................................................................................Strona 22
Oryginalne akcesoria / urządzenia dodatkowe ..........................................................................Strona 22
Uruchomienie
Ustawianie głębokości rowka ........................................................................................................Strona 22
Montaż adaptera odkurzacza .......................................................................................................Strona 22
Sposób użycia
Włączanie / wyłączanie .................................................................................................................Strona 22
Montaż i ustawienie szerokości cięcia diamentowych tarcz tnących ........................................ Strona 22
Obsługa bruzdownicy ....................................................................................................................Strona 23
Konserwacja i czyszczenie ...........................................................................................Strona 23
Gwarancja .................................................................................................................................. Strona 23
Utylizacja .....................................................................................................................................Strona 24
Tłumaczenie oryginału Deklaracji zgodności WE / Producent ......Strona 25

16 PL
Wstęp / Ogólne wskazówki bezpieczeństwa dla elektronarzędzi
Wstęp
Frezarka do rowków w
murze PMNF 1350 A1
Wstęp
Gratulujemy zakupu nowego urządzenia. Tym sa-
mym zdecydowali się Państwo na zakup produktu
wysokiej jakości. Instrukcja obsługi jest częścią tego
produktu. Zawiera ona ważne wskazówki dotyczące
bezpieczeństwa, użytkowania iutylizacji. Przed
pierwszym użyciem produktu należy zapoznać się
ze wszystkimi wskazówkami dotyczącymi obsługi
ibezpieczeństwa. Używać produktu wyłącznie
zgodnie zjego poniżej opisanym przeznaczeniem.
Wprzypadku przekazania produktu innej osobie
należy dołączyć do niego całą jego dokumentację.
Zastosowanie zgodne
z przeznaczeniem
Bruzdownica (normatywnie przecinarka spalinowa),
w dalszej części określana także jako urządzenie,
przeznaczona jest, w połączeniu z dopuszczonym
odkurzaczem przemysłowym, przy silnym docisku
z użyciem prowadnicy saneczkowej do oddziela-
nia lub szlifowania w większości mineralnych mate-
riałów jak np. beton lub mury bez użycia wody.
Stosowanie urządzenia do innych celów lub
dokonywanie jego modyfikacji jest uznawane jako
sprzeczne z jego przeznaczeniem i stwarza znacz-
ne zagrożenie wypadkiem. Urządzenie nie jest
przeznaczone do użytku przemysłowego.
Opis urządzenia
(patrz rys. A–D)
1
Przełącznik WŁĄCZ/WYŁĄCZ
2
Uchwyt
3
Adapter odkurzacza
3 a
Nakrętka złączkowa
4
Kołpak ochronny
5
Kołnierz mocujący (z gwintem)
6
Śruba ustalająca do ogranicznika głębokości
7
Ogranicznik głębokości
8
Dodatkowy uchwyt
9
Blokada włącznika
10
Blokada wrzeciona
11
Rolka toczna
12
Złączka redukcyjna
13
Kołnierz centrujący
14
Przekładki
15
Klucz widełkowy
16
Dłuto ręczne
Zakres dostawy
1 bruzdownica
2 tarcze tnące (zamontowane fabrycznie)
1 klucz widełkowy
1 adapter odkurzacza (zamontowany fabrycznie)
1 złączka redukcyjna (do zastosowania z
adapterem odkurzacza i wężem odkurzacza
o średnicy ∅ 32 mm)
1 dłuto ręczne
1 instrukcja obsługi
Dane techniczne
Napięcie zasilania: 230 V∼ 50 Hz
Pobór mocy: 1350 W
Znamionowa
liczba obrotów: 9000 min
-1
Tarcze-ø: 125 mm
Otwór do mocowania: 22,2 mm
Głębokość rowka: 0–30 mm
Szerokość rowka: 8–26 mm
Gwint: M14
Klasa ochrony: II /
Masa: ok. 4,05 kg
Hałas i wibracje
Wartości hałasu i wibracji zostały ustalone
zgodnie z normą EN 60745.
Poziom ciśnienia
akustycznego L
pA
: 97,6 dB(A)
Niepewność pomiaru K
pA
: 3 dB
Poziom mocy
akustycznej L
WA
: 108,6 dB(A)
Niepewność pomiaru K
WA
: 3 dB

17 PL
Wstęp / Ogólne wskazówki bezpieczeństwa dla elektronarzędzi
Wstęp
Nosić ochronniki słuchu.
Oddziaływanie hałasu może spowodować utratę
słuchu.
Wartość całkowita drgań (suma wektorowa trzech
kierunków) wyznaczone zgodnie z normą EN 60745.
Dane wartości wibracji (przy oddzielaniu płyty
betonowej):
Uchwyt: 6,417 m / s
2
Dodatkowy uchwyt: 4,258 m / s
2
Niepewność K = 1,5 m / s
2
Podany poziom emisji drgań zmierzono według
znormalizowanej procedury kontrolnej i może on
zmieniać się w zależności od sposobu użytkowania
elektronarzędzia, a w wyjątkowych przypadkach
leżeć powyżej podanej wartości.
Podany poziom emisji drgań może być wykorzysty-
wana również do porównania elektronarzędzia z
innymi.
Podany poziom emisji drgań może być wykorzysty-
wany również do wstępnego oszacowania nega-
tywnego oddziaływania.
Obciążenie wywołane wibracjami należy utrzymy-
wać na możliwie najniższym poziomie. Zakładanie
rękawic podczas użycia narzędzia oraz ograni-
czenie czasu pracy to przykładowe środki w celu
zmniejszenia obciążenia wibracjami. Przy tym
należy uwzględnić wszystkie udziały cyklu pracy
(na przykład czas, w którym elektronarzędzie jest
wyłączone, i taki, w którym jest ono włączone, ale
pracuje bez obciążenia).
Ogólne wskazówki bezpie-
czeństwa dla elektronarzędzi
Przeczytaj
wszystkie wskazówki dotyczące
bezpieczeństwa oraz instrukcje!
Zaniedbania w przestrzeganiu wskazówek doty-
czących bezpieczeństwa oraz w przestrzeganiu
instrukcji mogą spowodować porażenie prądem
elektrycznym, pożar i / lub ciężkie obrażenia ciała.
Przechowuj na przyszłość wszystkie
wskazówki dotyczące bezpieczeństwa
oraz instrukcje!
Używany we wskazówkach dotyczących bezpie-
czeństwa termin „narzędzie elektryczne“ odnosi się
do narzędzi elektrycznych zasilanych z sieci (z ka-
blem sieciowym) oraz do narzędzi elektrycznych
zasilanych
z akumulatorów (bez kabla sieciowego).
1. Bezpieczeństwo miejsca pracy
a) Utrzymywać stanowisko pracy w czy-
stości i dobrze oświetlone. Nieporządek
i nieoświetlone obszary robocze mogą prowa-
dzić do wypadków.
b) Nie pracuj przy użyciu urządzenia w
otoczeniu zagrożonym eksplozją, w
którym znajdują się palne ciecze, gazy
lub pyły. Urządzenia elektryczne wytwarza-
ją iskry, które mogą zapalić pył lub pary.
c) Podczas użytkowania urządzenia
elektrycznego trzymaj dzieci i inne
osoby z daleka od urządzenia. Przy
odchyleniu możesz stracić kontrolę nad urzą-
dzeniem.
2. Bezpieczeństwo elektryczne
a) Wtyk sieciowy urządzenia musi
pasować do wtykowego gniazdka
sieciowego. W żaden sposób nie wol-
no zmieniać wtyku sieciowego urzą-
dzenia. Nie używaj żadnych wtyków
adapterowych razem z urządzeniami
wyposażonymi w uziemienie ochron
ne.
Niezmienione wtyki sieciowe i pasujące wtykowe
gniazdka sieciowe zmniejszają ryzyko poraże-
nia prądem elektrycznym.
b) Unikaj kontaktu fizycznego z powier-
zchniami uziemionymi takimi jak
powierzchnie rur, grzejników, kuchni
elektrycznych i lodówek. Istnieje podwyż-
szone niebezpieczeństwo porażenia prądem
elektrycznym, gdy twoje ciało jest uziemione.

18 PL
Ogólne wskazówki bezpieczeństwa dla elektronarzędzi
Ogólne wskazówki bezpieczeństwa dla elektronarzędzi
c) Trzymaj urządzenie z daleka od desz-
czu i wilgoci. Wniknięcie wody do urządzenia
elektrycznego zwiększa ryzyko porażenia prą-
dem elektrycznym.
d)
Nie używaj kabla sieciowego w
sposób
sprzeczny z jego przeznaczeniem, tj.
do noszenia urządzenia, zawieszania
urzą dzenie lub do wyciągania wtyku
sieciowego z wtykowego gniazdka
sieciowego. Trzymaj kabel z daleka
od gorąca, oleju, ostrych krawędzi
lub poruszających się części urządzeń.
Uszkodzone lub poplątane kable zwiększają
ryzyko porażenia prądem elektrycznym.
e)
Gdy pracujesz z urządzeniem elektrycz-
nym na dworze używaj wyłącznie
przedłużaczy, które są dopuszczone
również do pracy na dworze. Użycie
przedłużacza przystosowanego do stosowania
na dworze zmniejsza ryzyko porażenia prądem
elektrycznym.
f) Jeśli praca elektronarzędzia w otocze-
niu wilgotnym jest nie do uniknięcia,
należy zastosować wyłącznik prądu
uszkodzeniowego. Zastosowanie wyłącz-
nika prądu uszkodzeniowego zapobiega nie-
bezpieczeństwu porażenia prądem elektrycz
nym.
3. Bezpieczeństwo osób
a) Bądź stale uważny, zwracaj uwagę na
to co robisz i postępuj rozsądnie w trak-
cie pracy z narzędziem elektrycznym.
Nie używaj narzędzia, gdy jesteś zmę-
c
zony lub znajdujesz się pod wpływem
narkotyków, alkoholu lub lekarstw.
Chwila nieuwagi przy użytkowaniu urządzenia
może prowadzić do poważnych obrażeń ciała
.
b) Noś osobiste wyposażenie ochronne i
zawsze okulary ochronne. Noszenie
osobistego wyposażenia ochronnego takiego
jak maska przeciwpyłowa, buty antypoślizgo
we,
kask ochronny lub ochrona słuchu stosownie do
sposobu użytkowania narzędzia elektrycznego
zmniejsza ryzyko obrażeń ciała.
c) Unikaj niezamierzonego uruchomienia.
Upewnij się, że narzędzie elektryczne
jest wyłączone zanim podłączysz je
do zasilania prądowego, uchwycisz je
lub będziesz je przenosił. Jeżeli podczas
przenoszenia urządzenia będziesz trzymał
palec na przełączniku WŁĄCZ. / WYŁĄCZ.
lub jeżeli urządzenie jest włączone, to może
to prowadzić do nieszczęśliwych wypadków.
d) Usuń narzędzia do nastawiania urzą-
dzenia lub klucze płaskie zanim włą-
czysz urządzenie. Narzędzie lub klucz,
który znajduje się w obracającej się części
urządzenia może prowadzić do obrażeń ciała.
e) Unikaj nienormalnej postawy ciała.
Zadbaj o pewne stanowisko i w każdej
chwili utrzymuj równowagę. Dzięki temu
będziesz mógł lepiej kontrolować urządzenie,
zwłaszcza w nieoczekiwanych sytuacjach.
f) Noś odpowiednią odzież. Nie noś ob-
szernej odzieży ani biżuterii. Trzymaj
włosy, odzież i rękawice z daleka od
poruszających się części. Luźna odzież,
biżuteria lub długie włosy mogą zostać uchwy-
cone przez poruszające się części.
g) Jeżeli zostaną zamontowane urzą-
dzenia do odsysania i wychwytywania
pyłu, to upewnij się, że są one podłą-
czone i że będą prawidłowo używane.
Używanie tych urządzeń zmniejsza zagrożenie
wywoływane pyłem.
4. Staranne obchodzenie
się i użytkowanie narzędzi
elektrycznych
a) Nie przeciążaj urządzenia. Używaj
do swojej pracy przeznaczonego do
niej narzędzia elektrycznego. Za pomo-
cą odpowiedniego narzędzia elektrycznego
pracujesz lepiej i bezpieczniej w danym zakre-
sie robót.
b) Nie używaj żadnego narzędzia elek-
trycznego, którego przełącznik jest
uszkodzony. Narzędzie elektryczne, które
nie daje się już więcej włączyć lub wyłączyć,
jest niebezpieczne i musi zostać naprawione.
c) Zanim przeprowadzisz nastawy urzą-
dzenia, wymienisz części osprzętu lub

19 PL
Ogólne wskazówki bezpieczeństwa dla elektronarzędzi
Ogólne wskazówki bezpieczeństwa dla elektronarzędzi
odłożysz urządzenie wyciągnij wtycz-
kę sieciową z sieciowego gniazdka
wtykowego. Ten środek ostrożności zapo-
biega niezamierzonemu startowi urządzenia.
d) Przechowuj nieużywane narzędzia
elektryczne poza zasięgiem dzieci. Nie
pozwól na użytkowanie urządzenia
osobom, które nie są z nim obznajo-
mione lub nie przeczytały niniejszych
instrukcji. Narzędzia elektryczne są niebez-
pieczne, gdy są używane przez osoby niedo-
świadczone.
e) Pielęgnuj starannie urządzenie.
Sprawdź, czy ruchome części urzą-
dzenia funkcjonują nienagannie i nie
zakleszczają się, czy części urządzenia
nie są złamane lub uszkodzone w ta-
kim stopniu, że funkcjonowanie urzą-
dzenia jest uszczuplone. Zleć naprawę
uszkodzonych części przed użyciem
urządzenia. Przyczyną wielu wypadków są
źle konserwowane narzędzia elektryczne.
f) Utrzymuj narzędzia tnące w stanie
ostrym i czystym. Starannie pielęgnowane
narzędzia tnące o ostrych krawędziach tnących
mniej zakleszczają się i dają się łatwiej prowadzić.
g) Używaj narzędzia elektrycznego,
osprzętu, narzędzi wymiennych itp.
odpowiednio do niniejszych instrukcji
i w taki sposób, jaki jest zalecany dla
tego specjalnego typu urządzenia.
Uwzględniaj przy tym warunki robo-
cze i wykonywane czynności. Użycie
narzędzi elektrycznych do innych zastosowań
niż to przewidziano może prowadzić do nie-
bezpiecznych sytuacji.
5. Serwis
a) Urządzenie oddawać do naprawy tyl-
ko wykwalifikowanemu personelowi
fachowemu i tylko z użyciem oryginal-
nych części zamiennych. To sposób na
zapewnienie bezpieczeństwa urządzenia.
Wskazówki bezpieczeństwa
dla przecinarek
a) Osłonę należy stabilnie zamocować
na narzędziu elektrycznym iustawić
wtaki sposób, aby zapewnione było
maksymalne bezpieczeństwo, tj.
odsłonięta powierzchnia narzędzia
ściernego skierowana wstronę użyt-
kownika powinna być możliwie naj-
mniejsza. Należy trzymać siebie i
inne osoby w pobliżu z dala od płasz-
czyzny obracającej się tarczy.
Osłona powinna chronić użytkownika przed
odłamkami iprzypadkowym kontaktem
znarzędziem ściernym.
b) Do elektronarzędzia należy stosować
wyłącznie diamentowych tarcz tnących.
Samo to, że można przymocować wyposaże-
nie do elektronarzędzia, nie gwarantuje jesz-
cze bezpiecznej eksploatacji.
c) Dopuszczalna prędkość obrotowa na-
rzędzia roboczego musi być większa
lub równa prędkości obrotowej
wskazanej na narzędziu elektrycz-
nym. Wyposażenie, które obraca się szybciej
niż z dopuszczalną prędkością, może się
złamać i odlecieć.
d) Narzędzi ściernych można używać
wyłącznie w zalecanym zakresie za-
stosowania. Na przykład: nigdy nie
należy szlifować boczną powierzch-
nią tarczy. Tarcze tnące są przeznaczone
do ścierania materiału krawędzią tarczy.
Wywieranie nacisku z boku na narzędzie
szlifujące może je złamać.
e) Należy używać tylko nieuszkodzonych
kołnierzy mocujących owymiarach
ikształcie odpowiadającym wybra-
nej tarczy szlifierskiej. Odpowiedni koł-
nierz mocujący podpiera tarczę szlifierską
izmniejsza ryzyko jej pęknięcia.
f) Nie stosować żadnych zużytych tarcz
szlifierskich z większych elektrona-
rzędzi. Tarcze szlifierskie do większych elek-
tronarzędzi nie są przystosowane do wyż-
szych obrotów mniejszych elektronarzędzi i
mogą się złamać.

20 PL
Ogólne wskazówki bezpieczeństwa dla elektronarzędzi
Ogólne wskazówki bezpieczeństwa dla elektronarzędzi
g) Średnica zewnętrzna igrubość narzę-
dzia roboczego muszą odpowiadać
parametrom używanego narzędzia
elektrycznego. Źle wymierzonych narzędzi
roboczych nie da się wystarczająco osłonić i
kontrolować.
h) Tarcze szlifierskie i kołnierze muszą
dokładnie pasować do wrzeciona.
Narzędzia robocze, które nie są dokładnie
dopasowane do wrzeciona narzędzia elek-
trycznego, obracają się nierównomiernie, bar-
dzo silnie wibrują imogą spowodować utratę
kontroli nad urządzeniem.
i) Nie używać żadnych uszkodzonych
tarcz szlifierskich. Przed każdym uży-
ciem skontrolować tarcze szlifierskie
pod kątem odłamków i rys. Jeśli elek-
tronarzędzie lub tarcza szlifierska
spadnie, należy sprawdzić, czy nie
jest uszkodzone/uszkodzona lub użyć
nieuszkodzonej tarczy. Po skontrolo-
waniu i nałożeniu tarczy, należy trzy-
mać siebie i inne osoby w pobliżu z
dala od płaszczyzny obracającej się
tarczy i przez minutę pozwolić urzą-
dzeniu pracować na najwyższych ob-
rotach. Uszkodzone tarcze szlifierskie łamią
się zazwyczaj trakcie testu w takim czasie.
j) Należy stosować środki ochrony oso-
bistej. W zależności od zastosowania
należy użyć pełnej ochrony twarzy,
oczu lub okularów ochronnych. Jeśli
dotyczy, nosić maskę przeciwpyłową,
ochronniki słuchu, rękawice ochronne
lub specjalny fartuch, aby osłonić się
przed małym szlifowanymi cząstecz-
kami materiału. Należy chronić przed
unoszącymi się naokoło ciałami obcymi, które
powstają wskutek różnych zastosowań.
Maska przeciwpyłowa lub chroniąca drogi
oddechowe musi filtrować pył powstały wsku-
tek zastosowania. Długie narażenie się na
głośny hałas może skutkować utratą słuchu.
k) W przypadku innych osób w pobliżu
należy zachować bezpieczną odle-
głość od stanowiska pracy. Każda
osoba znajdująca się wobszarze
pracy musi stosować środki ochrony
osobistej. Odłamki narzędzi roboczych lub
obrabianych przedmiotów mogą zostać wy-
rzucone na dużą odległość iwten sposób
spowodować obrażenia również uosób nie-
znajdujących się wbezpośredniej strefie pracy.
I) Urządzenie należy trzymać za izolo-
wane powierzchnie uchwytu podczas
wykonywania prac, w trakcie któ-
rych używane narzędzie może mieć
styczność z ukrytą instalacją elek-
tryczną lub własnym przewodem.
Kontakt zprzewodem sieciowym będącym
pod napięciem może sprawić, że również me-
talowe elementy urządzenia znajdą się pod
napięciem i może dojść do porażenia prądem
elektrycznym.
m) Przewód zasilający powinien znajdo-
wać się wbezpiecznej odległości od
obracających się narzędzi roboczych.
W razie utraty kontroli nad urządzeniem
może dojść do przecięcia lub pochwycenia
przewodu zasilającego, awefekcie dłoń
może znaleźć się przy obracającym się
narzędziu roboczym.
n) Nigdy nie należy odkładać urządzenia,
zanim narzędzie robocze całkowicie
się unieruchomi. Zetknięcie obracającego
się narzędzia roboczego zpowierzchnią, na
którą jest odkładane, mogłoby spowodować
utratę kontroli nad narzędziem elektrycznym.
o) Elektronarzędzie nie może pracować
podczas przenoszenia. Poprzez przypad-
kowy kontakt z obracającym się narzędziem
może zostać uchwycona odzież, a narzędzie
wwierci się wówczas w ciało.
p) Regularnie należy czyścić szczelinę
wentylacyjną elektronarzędzia. Dmu-
chawa silnika wciąga pył do obudowy, a
duża ilość nagromadzonego pyłu metali może
spowodować zagrożenia elektryczne.
q) Narzędzia elektrycznego nie wolno
używać wpobliżu materiałów pal-
nych. Iskry mogą spowodować zapalenie
tych materiałów.
r) Nie należy używać narzędzi robo-
czych, które wymagają płynnych
Strona jest ładowana ...
Strona jest ładowana ...
Strona jest ładowana ...
Strona jest ładowana ...
Strona jest ładowana ...
Strona jest ładowana ...
Strona jest ładowana ...
Strona jest ładowana ...
Strona jest ładowana ...
Strona jest ładowana ...
Strona jest ładowana ...
Strona jest ładowana ...
Strona jest ładowana ...
Strona jest ładowana ...
Strona jest ładowana ...
Strona jest ładowana ...
Strona jest ładowana ...
Strona jest ładowana ...
Strona jest ładowana ...
Strona jest ładowana ...
Strona jest ładowana ...
Strona jest ładowana ...
Strona jest ładowana ...
Strona jest ładowana ...
Strona jest ładowana ...
Strona jest ładowana ...
Strona jest ładowana ...
Strona jest ładowana ...
Strona jest ładowana ...
Strona jest ładowana ...
Strona jest ładowana ...
Strona jest ładowana ...
Strona jest ładowana ...
Strona jest ładowana ...
Strona jest ładowana ...
Strona jest ładowana ...
Strona jest ładowana ...
Strona jest ładowana ...
Strona jest ładowana ...
Strona jest ładowana ...
Strona jest ładowana ...
Strona jest ładowana ...
Strona jest ładowana ...
Strona jest ładowana ...
Strona jest ładowana ...
Strona jest ładowana ...
Strona jest ładowana ...
Strona jest ładowana ...
Strona jest ładowana ...
Strona jest ładowana ...
Strona jest ładowana ...
Strona jest ładowana ...
Strona jest ładowana ...
Strona jest ładowana ...
Strona jest ładowana ...
Strona jest ładowana ...
Strona jest ładowana ...
Strona jest ładowana ...
Strona jest ładowana ...
-
 1
1
-
 2
2
-
 3
3
-
 4
4
-
 5
5
-
 6
6
-
 7
7
-
 8
8
-
 9
9
-
 10
10
-
 11
11
-
 12
12
-
 13
13
-
 14
14
-
 15
15
-
 16
16
-
 17
17
-
 18
18
-
 19
19
-
 20
20
-
 21
21
-
 22
22
-
 23
23
-
 24
24
-
 25
25
-
 26
26
-
 27
27
-
 28
28
-
 29
29
-
 30
30
-
 31
31
-
 32
32
-
 33
33
-
 34
34
-
 35
35
-
 36
36
-
 37
37
-
 38
38
-
 39
39
-
 40
40
-
 41
41
-
 42
42
-
 43
43
-
 44
44
-
 45
45
-
 46
46
-
 47
47
-
 48
48
-
 49
49
-
 50
50
-
 51
51
-
 52
52
-
 53
53
-
 54
54
-
 55
55
-
 56
56
-
 57
57
-
 58
58
-
 59
59
-
 60
60
-
 61
61
-
 62
62
-
 63
63
-
 64
64
-
 65
65
-
 66
66
-
 67
67
-
 68
68
-
 69
69
-
 70
70
-
 71
71
-
 72
72
-
 73
73
-
 74
74
-
 75
75
-
 76
76
-
 77
77
-
 78
78
-
 79
79


Parkside PMNF 1350 A1 Operation and Safety Notes
- Kategoria
- Elektronarzędzia
- Typ
- Operation and Safety Notes
w innych językach
- Deutsch: Parkside PMNF 1350 A1
- slovenčina: Parkside PMNF 1350 A1
Powiązane dokumenty
Inne dokumenty
-
Sparky Group FK 6524 Instrukcja obsługi
-
Sparky Group FK 3014 Instrukcja obsługi
-
Metabo MFE 40 Instrukcja obsługi
-
Meister MMF1700-1 Translation Of The Original Instructions
-
Vonroc WC503AC Wall Chaser Instrukcja obsługi
-
Metabo MFE 30 Instrukcja obsługi
-
Metabo MFE 65 Instrukcja obsługi
-
Hitachi CM 7MRU Instrukcja obsługi
-
Tryton TMB1500K Instrukcja obsługi
-