
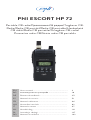
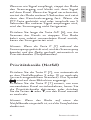
PNI ESCORT HP 72
Portable CB radio/Преносимо CB радио/Tragbares CB-
Radio/Radio CB portátil/Radio CB portable/Hordozható
CB rádió/Radio CB portatile/Draagbare CB-radio/
Przenośne radio CB/Statie radio CB portabila
EN User manual ......................................................... 3
BG Ръководство за употреба ............................. 18
DE Benutzerhandbuch .............................................. 35
ES Manual de usuario ............................................... 51
FR Manuel utilisateur ............................................... 66
HU Használati utasítás .............................................. 82
IT Manuale utente .................................................. 97
NL Handleiding ........................................................ 112
PL Instrukcja obsługi ............................................... 127
RO Manual de utilizare ............................................. 142


3User manual
English
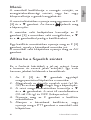
Special warnings
Read below warnings to prevent fire, personal
injury, or damages to the product or antenna.
Do not try to set the radio while driving.
Doing so exposes you to the risk of road
accidents.
Use only the provided charger.
Do not place the radio on an excessively
dusty, damp or unstable surface.
Do not connect the antenna during
transmission; risk of electric shock.
Please keep away from interfering devices
(such as: tv, generator, etc.)
Those who use pacemakers are advised to
keep their distance from the antenna during
transmission and especially not to touch it.
Do not approach metal objects close to the
internal electrical parts of the radio; danger of
electric shock.
Avoid exposing the radio to temperatures
lower than -26°C and higher than +80°C. The
temperature on board a vehicle can sometimes
exceed 80°C, which can cause irreparable
damage to the radio in case of prolonged
exposure.
Do not expose the radio to sunlight for a
long time.
Do not transmit for a long time, the radio
may heat up and malfunction.
Keep the radio away from children.

User manual 4
English
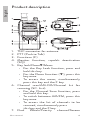
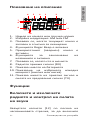
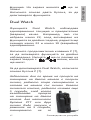
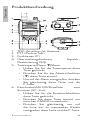
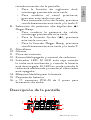
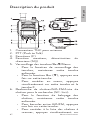
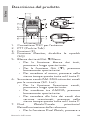
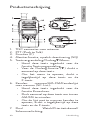
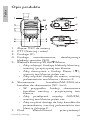
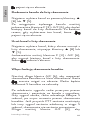
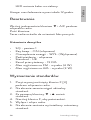
Product description
1. TNC connector for antenna
2. PTT (Push to Talk)
3. Functions (F)
4. Monitor function, squelch deactivation
(SQ)
5. Key lock/Down▼/ Menu:
• For the Key Lock function, press and
hold this key.
• For the Down function (▼), press this
key once.
• To access the menu, simultaneously
press this key and the F key.
6. Channel scan/AM-FM/Channel list for
scanning (SC. List):
• For the Channel Scan function, press
and hold this key.
• To switch between AM/FM, press this
key once.
• To access the list of channels to be
scanned, simultaneously press
this key and the F key.
7. Dual Watch/Priority channel/Screen

5User manual
English
backlight:
• For the Dual Watch function, press
and hold this key.
• To switch to the priority channel, press
this key once.
• To turn on the backlight, simultaneously
press this key and F key.
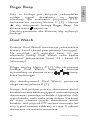
8. Hi-Low power selection/Up▲/Roger Beep:
• To change the output power, press and
hold this key.
• For Up function (▲), press this key
once.
• For Roger Beep function,
simultaneously press this key and F
key.
9. Microphone
10. Speaker
11. Belt clip
12. On/O and Volume control
13. LED indicator. The LED is red when the
radio is emitting and when the battery is
discharged. The LED is green when the
radio is receiving and when the squelch is
o.
14. Lock/Unlock the battery pack
15. Battery pack
16. and 17. 2-pin PNI-M connector for audio
accessories
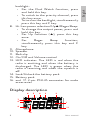
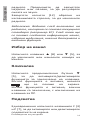
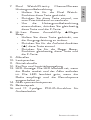
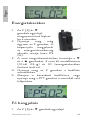
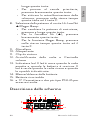
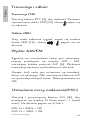
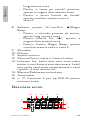
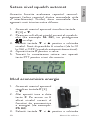
Display description
1
23456
7
8
9
10
11

User manual 6
English
1. Channel number or selected Standard
2. Selected modulation: AM or FM
3. Appears when the current channel is saved
in the scan list
4. The Roger Beep function is active
5. The priority (emergency) channel is active
6. The key lock function is active
7. Appears when you are on the menu
8. The radio receives a signal (RX)
9. Indicates the battery level
10. Show the selected output power (High or
Low)
11. Indicates the level of the received signal
and the strength of the transmitted signal
(TX)
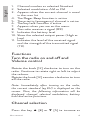
Functions
Turn the radio on and o and
Volume control
Rotate the knob [12] clockwise to turn on the
radio. Continue to rotate right or left to adjust
the volume.
Rotate the knob [12] counter clockwise to turn
o the radio.
Note: Immediately after turning on the radio,
the current standard (eg EU) is displayed on the
screen. Then, the following information will be
displayed: channel, selected modulation, battery
level and active functions.
Channel selection
Press the key ▲ [8] or ▼ [5] to increase or

7User manual
English
decrease the channel number.
Key lock
Long press the key ▼ [5] to enable/disable the
key lock function. When the function is active,
the icon will be displayed on the screen.
When the function is active, all keys are locked
except the PTT key.
Backlight
Simultaneously press the keys F [3] and P [7]
to enable or disable the screen backlight.
If the backlight is enabled, the screen will light
up each time you press a key (except PTT and
Volume key) and will turn o 10 seconds after
the last key press.
Channel scan
Through the scan function, only the channels
added to the list are scanned. When a channel
that has been added to the scan list is selected,
the icon will appear on the screen.
Adding a channel to the scan list
First select the channel using the keys ▲ [8]
or ▼ [5].
Once you have reached the desired channel,
press the keys F [3] and A/F [6] simultaneously
to add the current channel to the scan list. Each
time you select this channel, the icon will
appear on the screen.

User manual 8
English
Remove a channel from the scan list
First select the channel you want to remove
from the scan list using the keys ▲ [8] or ▼
[5].
Simultaneously pree the keys F [3] and A/F [6]
to remove the current channel from the scan
list. The icon will disappear from the screen.
Enable channel scan function
Long press the key A/F [6] to start scanning
the channels in the scan list. The icon
will flash on the screen. The radio will scan 5
channels per second.
When it receives signal, the radio stops the
scanning process and stays on the channel
with signal. When the signal disappears, the
radio waits for another 5 seconds after which
it resumes the channel scanning process. If
the PTT button is pressed or another signal is
received within 5 seconds, scanning does not
resume.
Long press the key A/F [6] to stop channel
scanning. The radio will return to the last
channel used before starting the scan.
Note: If the P [7] key is pressed during the scan,
scanning will stop and the radio will automatically
switch to priority (emergency) channels.
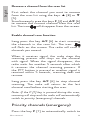
Priority channels (emergency)
Press the key P [7] to automatically switch to

9User manual
English
emergency channels 9 or 19 (depending on the
selected standard). The icon will appear on
the screen.
Press the P [7] key again to return to the
channel used before activating the priority
channels or press the keys ▲ or ▼ to manually
change the channel.
Note: When the radio is set on one of the
emergency channels, the scan function will be
disabled.
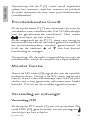
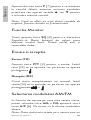
Monitor function
Hold down the SQ key [4] to deactivate the
Squelch. While holding down the SQ key, turn
the volume knob to the left or to the right until
you get the desired volume level. You can now
hear the weak signals.
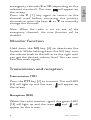
Transmission and reception
Transmission (TX)
Press the PTT key [2] to transmit. The red LED
[13] will light up and the icon will appear on
the screen
Reception (RX)
When the radio receives signal, the green LED
[13] will light up and the icons and will
appear on the screen.

User manual 10
English
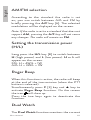
AM/FM selection
According to the standard the radio is set
on, you can switch between AM and FM by
briefly pressing the A/F key [6]. The selected
modulation will be displayed on the screen.
Note: If the radio is set to a standard that does not
support AM, pressing the A/F key will not cause
any changes. The radio will remain on FM.
Setting the transmission power
(H/L)
Long press the H/L key [8] to switch between
H (high power) and L (low power). H or L will
appear on the screen.
FM: H = 4W/L = 1W
AM: H = 3W/L = 1W
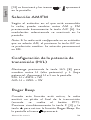
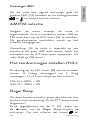
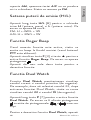
Roger Beep
When this function is active, the radio will beep
at the end of the transmission (when the PTT
button is released).
Simultaneously press F [3] key and ▲ key to
activate Roger Beep function. On the screen
the icon will show up.
Press the two keys again to deactivate the
function.
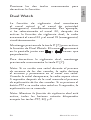
Dual Watch
The Dual Watch function monitors the current

11 User manual
English
channel and the priority (emergency) channel
simultaneously. For example, if you have
selected channel 22, after activating the Dual
Watch function, the radio will scan channel 22
and channel 19 (emergency) simultaneously.
Long press the key P [7] to activate Dual
Watch function. The icon will be displayed
on the screen together with and icons
that will blink.
To deactivate Dual Watch, long press again the
P [7] key.
Note: If a signal is received during the scanning
process of the two channels, the radio stops the
scan and stays on the channel with signal. When
the signal disappears, the radio waits for another
5 seconds after which it resumes the scanning
process of the two channels. If the PTT button
is pressed or another signal is received within 5
seconds, scanning does not resume.
Note: As long as the Dual Watch function is
active, all buttons will be locked except the PTT,
SQ, and P keys.
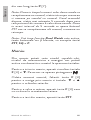
Menu
From the menu you can set the squelch level,
the energy saving level or you can activate or
deactivate the key beep.
To access the menu, simultaneously press the
keys F [3] and ▼. The icon will appear on
the screen.

User manual 12
English
Once into the menu, use the F key [3] to
navigate the menu and the keys ▼ and ▲ to
change the settings.
To save a setting, press the key F [3] that will
take you to the next menu setting.
To exit the menu, press the PTT key.
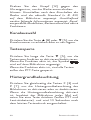
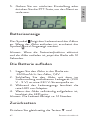
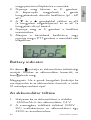
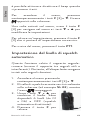
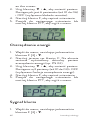
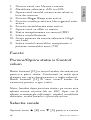
Set the Squelch level
This function evaluates the signal-to-noise ratio
(ie the ratio between useful and interfering
signals). Thus, only useful signals are sent to the
speaker.
1. Access the menu by pressing the F [3] and
▼ keys simultaneously.
2. The current squelch
level (eg SL 02) will be
displayed and the icon
will blink on the
screen.
3. Use the keys ▼ and
▲ to change the level.
There are 6 levels
available (from 01 up to
06) and OFF (squelch disabled).
4. Press F key to save the setting.
5. Go to the next setting or press the PTT key
to exit the menu.

13 User manual
English
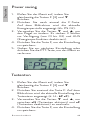
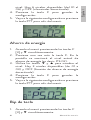
Power saving
1. Access the menu by pressing the F [3] and
▼ keys simultaneously.
2. Press one more time F key. On the screen
will be displayed the current level of power
saving (ie: PS 02).
3. Use the keys ▼ and ▲ to change the
level. There are 3 levels available (from 01
up to 03) and OFF (power saving function
disabled).
4. Press F key to save the setting.
5. Go to the next setting or press the PTT key
to exit the menu.
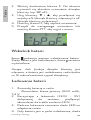
Key beep
1. Access the menu by pressing the F [3] and
▼ keys simultaneously.
2. Press twice the key F. On the screen will
be displayed the current setting of the key
beep (ie: bP oF).
3. Use the keys ▼ and ▲ to switch between
oN (key beep enabled) and oF (key beep
disabled).
4. Press F key to save the setting.
5. Go to the next setting or press the PTT key
to exit the menu.

User manual 14
English
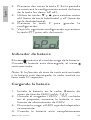
Battery indicator
The icon shows the battery level. When
the battery is discharged, the icon will be
displayed.
Note: If the key beep function is activated and the
battery is discharged, the radio will beep every 10
seconds.
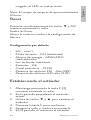
Charging the battery
1. Install the battery in the radio.
2600mAh Li-Ion battery, 7.4V
2. Using the charger (230V - 9V) included
in the package, connect the battery to a
230V power source.
3. During charging, the red LED on the
adapter is lit.
4. When the battery is fully charged, the LED
turns green.
Note: The charging time is approximately 12 hours.
Reset
Simultaneously press the keys ▼ and A/F
while turning the radio on.
Release the keys.
Now the radio has returned to factory settings.

15 User manual
English
Default settings
• SQ - level 1
• Key beep - ON (enabled)
• Power saving - OFF (disabled)
• Backlight - Enabled
• Standard - EU
• Priority channel - 19 FM
• Output power on FM - High (4W)
• Output power on AM - High (3W)
Setting the standard
1. Hold pressed the key F [3] while turning
the radio on.
2. On the screen the current standard will
blink.
3. Use the keys ▼ and ▲ to change the
standard.
4. Press the key F to confirm.
5. Turn the radio o and back on.
6. On the screen the set standard will be
displayed.
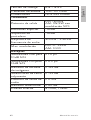
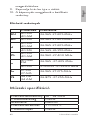
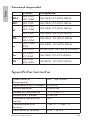
Available standards
Channels Frequency
EU 40 FM
40 AM 26.965-27.405 MHz
EC 40 FM 26.965-27.405 MHz
d
40 FM
40 AM 26.965-27.405 MHz
40 FM 26.565-26.955 MHz
PL 40 FM
40 AM 26.960-27.400 MHz

User manual 16
English
u40 AM/FM 26.965 -27.405 MHz
40 FM 27.60125 -27.99125 MHz
In 27 FM
27 AM 26.965-27.275 MHz
IS 34 FM
34 AM 26.875 -27.255 MHz
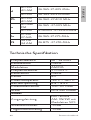
Technical specification
Frequency range 26 - 28 MHz
Channel spacing 10KHz
Modulation AM/FM
Frequency stability ± 0.005 %
Channel step 10KHz
Channels 40
Working temperature -26°C ~ +80°C
Working voltage 6.8 ~ 8.4V
Antenna connector TNC 50 Ohm
Dimensions 120x 54x 35mm
Transmitter
Output power FM: 1W/4W
AM: 1W/3W with
modulation 50%
Spurious emissions -55dB
Carrier suppression -55dB
Audio frequency
response 300Hz - 2.5KHz
Max. modulation
FM: +/- 2KHz
AM: 100%
Receiver

17 User manual
English
AM sensitivity for
10dB S/N < 1.0 μV
FM sensitivity for
12dB S/N < 0.2 μV
Image rejection ratio > -65 dB
Adjacent channel
selectivity > -55 dB
Audio output power > 0.5W
Signal to noise ratio > 40 dB
Internal speaker 8 Ohm, 1 Watt

Ръководство за употреба
Български
18
Специални предупреждения
Прочетете предупрежденията по-долу за
предотвратяване на пожар, нараняване
или повреда на продукта или антената.
Не се опитвайте да настроите радиото,
докато шофирате. Това ви излага на риск
от пътни инциденти.
Не поставяйте радиото на прекалено
прашна, влажна или нестабилна
повърхност.
Не свързвайте антената по време на
предаване; риск от токов удар.
Моля, пазете се от смущаващи
устройства (като: телевизор, генератор и
др.)
На тези, които използват пейсмейкъри,
се препоръчва да се отдалечават от
антената по време на предаване и
особено да не я докосват.
Не приближавайте метални предмети
близо до вътрешните електрически части
на радиото; опасност от токов удар.
Избягвайте да излагате радиото на
температури под -26°C и по-високи
от +80°C. Температурата на борда
на автомобила понякога може да
надвишава +80°C, което може да причини
непоправими щети на радиото в случай
на продължителна експозиция.
Не излагайте радиото на слънчева
светлина дълго време.
Не предавайте дълго време, радиото
може да се нагрее и да се повреди.
Пазете радиото далеч от деца.

Ръководство за употреба
Български
19
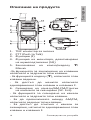
Описание на продукта
1. TNC конектор за антена
2. PTT (Push to Talk)
3. Функции (F)
4. Функция на монитора, деактивиране
на шумоподтискане (SQ)
5. Заключване на ключа/надолу ▼/
Меню:
-За функцията за заключване на клавиши
натиснете и задръжте този клавиш.
- За функцията надолу (▼), натиснете този
клавиш веднъж.
- За достъп до менюто натиснете
едновременно този клавиш и клавиша F.
6. Сканиране на канали/AM-FM/Списък
на каналите за сканиране (SC. List):
- За функцията за сканиране на канали
натиснете и задръжте този клавиш.
- За да превключвате между AM/FM,
натиснете веднъж този клавиш.
- За достъп до списъка с канали за
сканиране, натиснете едновременно този
клавиш и клавиша F.

Ръководство за употреба
Български
20
7. Dual Watch/Приоритетен канал/
подсветка на екрана:
- За функцията за двойно гледане
натиснете и задръжте този клавиш.
- За да превключите на приоритетен
канал, натиснете веднъж този клавиш.
- За да включите подсветката, натиснете
едновременно този клавиш и клавиша F.
8. Избор на Hi-Low мощност/нагоре ▲/
Roger Beep:
- За да промените изходната мощност,
натиснете и задръжте този клавиш.
- За функция нагоре (▲), натиснете този
клавиш веднъж.
- За функцията Roger Beep натиснете
едновременно този бутон и клавиша F.
9. Микрофон
10. Говорител
11. Щипка за колан
12. Включване/изключване и контрол на
силата на звука
13. Лед индикатор. Светодиодът е червен,
когато радиото излъчва и когато
батерията е изтощена. Светодиодът е
зелен, когато радиото приема и когато
шумозаглушителят е изключен.
14. Заключете/отключете батерията
15. Батерия
16. и 17. 2-пинов конектор PNI-M за аудио
аксесоари
Strona się ładuje...
Strona się ładuje...
Strona się ładuje...
Strona się ładuje...
Strona się ładuje...
Strona się ładuje...
Strona się ładuje...
Strona się ładuje...
Strona się ładuje...
Strona się ładuje...
Strona się ładuje...
Strona się ładuje...
Strona się ładuje...
Strona się ładuje...
Strona się ładuje...
Strona się ładuje...
Strona się ładuje...
Strona się ładuje...
Strona się ładuje...
Strona się ładuje...
Strona się ładuje...
Strona się ładuje...
Strona się ładuje...
Strona się ładuje...
Strona się ładuje...
Strona się ładuje...
Strona się ładuje...
Strona się ładuje...
Strona się ładuje...
Strona się ładuje...
Strona się ładuje...
Strona się ładuje...
Strona się ładuje...
Strona się ładuje...
Strona się ładuje...
Strona się ładuje...
Strona się ładuje...
Strona się ładuje...
Strona się ładuje...
Strona się ładuje...
Strona się ładuje...
Strona się ładuje...
Strona się ładuje...
Strona się ładuje...
Strona się ładuje...
Strona się ładuje...
Strona się ładuje...
Strona się ładuje...
Strona się ładuje...
Strona się ładuje...
Strona się ładuje...
Strona się ładuje...
Strona się ładuje...
Strona się ładuje...
Strona się ładuje...
Strona się ładuje...
Strona się ładuje...
Strona się ładuje...
Strona się ładuje...
Strona się ładuje...
Strona się ładuje...
Strona się ładuje...
Strona się ładuje...
Strona się ładuje...
Strona się ładuje...
Strona się ładuje...
Strona się ładuje...
Strona się ładuje...
Strona się ładuje...
Strona się ładuje...
Strona się ładuje...
Strona się ładuje...
Strona się ładuje...
Strona się ładuje...
Strona się ładuje...
Strona się ładuje...
Strona się ładuje...
Strona się ładuje...
Strona się ładuje...
Strona się ładuje...
Strona się ładuje...
Strona się ładuje...
Strona się ładuje...
Strona się ładuje...
Strona się ładuje...
Strona się ładuje...
Strona się ładuje...
Strona się ładuje...
Strona się ładuje...
Strona się ładuje...
Strona się ładuje...
Strona się ładuje...
Strona się ładuje...
Strona się ładuje...
Strona się ładuje...
Strona się ładuje...
Strona się ładuje...
Strona się ładuje...
Strona się ładuje...
Strona się ładuje...
Strona się ładuje...
Strona się ładuje...
Strona się ładuje...
Strona się ładuje...
Strona się ładuje...
Strona się ładuje...
Strona się ładuje...
Strona się ładuje...
Strona się ładuje...
Strona się ładuje...
Strona się ładuje...
Strona się ładuje...
Strona się ładuje...
Strona się ładuje...
Strona się ładuje...
Strona się ładuje...
Strona się ładuje...
Strona się ładuje...
Strona się ładuje...
Strona się ładuje...
Strona się ładuje...
Strona się ładuje...
Strona się ładuje...
Strona się ładuje...
Strona się ładuje...
Strona się ładuje...
Strona się ładuje...
Strona się ładuje...
Strona się ładuje...
Strona się ładuje...
Strona się ładuje...
Strona się ładuje...
Strona się ładuje...
Strona się ładuje...
Strona się ładuje...
Strona się ładuje...
Strona się ładuje...
-
 1
1
-
 2
2
-
 3
3
-
 4
4
-
 5
5
-
 6
6
-
 7
7
-
 8
8
-
 9
9
-
 10
10
-
 11
11
-
 12
12
-
 13
13
-
 14
14
-
 15
15
-
 16
16
-
 17
17
-
 18
18
-
 19
19
-
 20
20
-
 21
21
-
 22
22
-
 23
23
-
 24
24
-
 25
25
-
 26
26
-
 27
27
-
 28
28
-
 29
29
-
 30
30
-
 31
31
-
 32
32
-
 33
33
-
 34
34
-
 35
35
-
 36
36
-
 37
37
-
 38
38
-
 39
39
-
 40
40
-
 41
41
-
 42
42
-
 43
43
-
 44
44
-
 45
45
-
 46
46
-
 47
47
-
 48
48
-
 49
49
-
 50
50
-
 51
51
-
 52
52
-
 53
53
-
 54
54
-
 55
55
-
 56
56
-
 57
57
-
 58
58
-
 59
59
-
 60
60
-
 61
61
-
 62
62
-
 63
63
-
 64
64
-
 65
65
-
 66
66
-
 67
67
-
 68
68
-
 69
69
-
 70
70
-
 71
71
-
 72
72
-
 73
73
-
 74
74
-
 75
75
-
 76
76
-
 77
77
-
 78
78
-
 79
79
-
 80
80
-
 81
81
-
 82
82
-
 83
83
-
 84
84
-
 85
85
-
 86
86
-
 87
87
-
 88
88
-
 89
89
-
 90
90
-
 91
91
-
 92
92
-
 93
93
-
 94
94
-
 95
95
-
 96
96
-
 97
97
-
 98
98
-
 99
99
-
 100
100
-
 101
101
-
 102
102
-
 103
103
-
 104
104
-
 105
105
-
 106
106
-
 107
107
-
 108
108
-
 109
109
-
 110
110
-
 111
111
-
 112
112
-
 113
113
-
 114
114
-
 115
115
-
 116
116
-
 117
117
-
 118
118
-
 119
119
-
 120
120
-
 121
121
-
 122
122
-
 123
123
-
 124
124
-
 125
125
-
 126
126
-
 127
127
-
 128
128
-
 129
129
-
 130
130
-
 131
131
-
 132
132
-
 133
133
-
 134
134
-
 135
135
-
 136
136
-
 137
137
-
 138
138
-
 139
139
-
 140
140
-
 141
141
-
 142
142
-
 143
143
-
 144
144
-
 145
145
-
 146
146
-
 147
147
-
 148
148
-
 149
149
-
 150
150
-
 151
151
-
 152
152
-
 153
153
-
 154
154
-
 155
155
-
 156
156
-
 157
157


PNI HP72 Escort HP 72 Portable CB Radio Instrukcja obsługi
- Typ
- Instrukcja obsługi
- Niniejsza instrukcja jest również odpowiednia dla
w innych językach
Powiązane artykuły
-
PNI HP72 Escort HP 72 Portable CB Radio Instrukcja obsługi
-
-
PNI HP-6550 Instrukcja obsługi
-
-
-
-
PNI RD290 Instrukcja obsługi
-
PNI Escort HP 7120 Instrukcja obsługi
-
PNI International PMR R15 Instrukcja obsługi
-
PNI EXTRA 48 Instrukcja obsługi