Melitta CAFFEO Barista® TS Instrukcja obsługi
- Kategoria
- Ekspresy do kawy
- Typ
- Instrukcja obsługi
Ten podręcznik jest również odpowiedni dla

1
РУССКИЙ POLSKI TÜRKÇE ESPAÑOL ENGLISHУКРАЇНСЬКА
Bedienungsanleitung
Operating Instructions
РУССКИЙ POLSKI TÜRKÇE ESPAÑOL ENGLISHУКРАЇНСЬКА


Table of contents
3
ENGLISH
Table of contents
1 For your safety ..................................................................................................................... 5
1.1 Symbols used ............................................................................................................ 6
1.2 Proper use ................................................................................................................... 6
1.3 Danger due to electrical current ........................................................................ 6
1.4 Risk of burning and scalding ............................................................................... 7
1.5 General safety............................................................................................................ 7
2 Overview of the appliance .............................................................................................. 8
2.1 Overview of the appliance ................................................................................... 8
2.2 Overview of the control panel ..........................................................................10
3 First steps .............................................................................................................................11
3.1 Unpacking the appliance ....................................................................................11
3.2 Checking the delivery contents ........................................................................ 11
3.3 Positioning the appliance ................................................................................... 12
3.4 Connecting the appliance ..................................................................................12
3.5 Switching the appliance on for the rst time ..............................................12
4 Basic operation ..................................................................................................................13
4.1 Switching the appliance on and o ................................................................13
4.2 Using the control panel .......................................................................................14
4.3 Navigating in the menu .......................................................................................15
4.4 Filling with coee beans and using BeanSelect ........................................17
4.5 Using ground coee .............................................................................................18
4.6 Filling in water .........................................................................................................19
4.7 Adjusting the outlet .............................................................................................. 20
4.8 Using milk ................................................................................................................. 20
4.9 Emptying the drip tray and coee grounds container .............................22
5 Preparing beverages .......................................................................................................23
5.1 Preparing espresso and café crème ................................................................23
5.2 Preparing cappuccino .......................................................................................... 23
5.3 Preparing latte macchiato ..................................................................................24
5.4 Preparing milk froth and warm milk ............................................................... 24
5.5 Preparing hot water .............................................................................................. 25
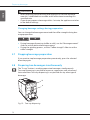
5.6 Changing beverage settings before and during preparation ...............25
5.7 Stopping beverage preparation ....................................................................... 26
5.8 Preparing two beverages simultaneously ....................................................26
6 Permanently changing beverage settings .............................................................27
6.1 Selecting recipes .................................................................................................... 27
6.2 Changing default settings ..................................................................................28

Table of contents
4
ENGLISH
7 Personal settings – "My Coee" .................................................................................. 29
7.1 Editing personal user proles ............................................................................ 29
7.2 Selecting/changing personal settings ...........................................................30
7.3 Preparing beverages with personal settings ...............................................31
8 Changing basic settings .................................................................................................32
8.1 Setting the language ............................................................................................ 32
8.2 Setting the time ......................................................................................................32
8.3 Activating/deactivating Auto Bean Select ....................................................33
8.4 Setting Auto OFF ....................................................................................................33
8.5 Setting energy save mode .................................................................................. 34
8.6 Resetting the appliance to the factory settings..........................................35
8.7 Displays in the System menu .............................................................................35
8.8 Setting the grinding neness ............................................................................ 36
8.9 Converting the connection for the milk hose .............................................37
9 Care and maintenance ....................................................................................................37
9.1 General cleaning ....................................................................................................37
9.2 Rinsing the coee system ...................................................................................38
9.3 Cleaning the brewing unit ..................................................................................38
9.4 "Easy Cleaning" programme ..............................................................................39
9.5 "Cleaning milk system" programme ...............................................................39
9.6 "Cleaning coee system" programme ............................................................41
9.7 "Descaling" programme ......................................................................................42
9.8 Setting the water hardness ................................................................................43
9.9 Using a water lter .................................................................................................43
10 Problems ...............................................................................................................................45
11 Transport, storage and disposal ................................................................................. 46
11.1 Venting the appliance .......................................................................................... 46
11.2 Transporting the appliance ................................................................................46
11.3 Disposing of the appliance .................................................................................47
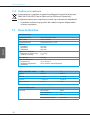
12 Technical data ....................................................................................................................47

For your safety
5
ENGLISH
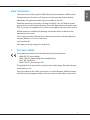
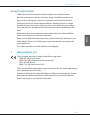
Dear Customer,
Thank you for purchasing the CaeOBarista fully automatic coee maker.
The operating instructions will help you to discover the diverse options
oered by the appliance and enjoy your coee to the full.
Read the operating instructions through carefully. This will help to avoid
personal injury and material damage. Store the operating instructions care-
fully. If you pass the appliance on, enclose the operating instructions with it.
Melitta accepts no liability for damage caused by failure to observe the
operating instructions.
If you require further information or have any questions on the appliance,
contact Melitta or visit our website at:
www.melitta.de
We hope you enjoy using your appliance.
1 For your safety
The appliance conforms to the following European directives:
2006 / 95 / EC (low voltage),
2004 / 108 / EC (electromagnetic compatibility),
2011 / 65 / EU (RoHS),
2009 / 125 / EC (eco- design / ErP).
The appliance has been built using the latest technology. Residual dangers
nevertheless exist.
You must observe the safety instructions to avoid dangers. Melitta accepts
no liability for damage caused by failure to observe the safety instructions.

For your safety
6
ENGLISH
1.1 Symbols used
The following symbols indicate particular risks in using the appliance or
provide useful tips.
CAUTION
The signal word CAUTION indicates possible injuries.
ATTENTION
The signal word ATTENTION indicates possible damage to the appliance.
Information
The signal word "Information" indicates additional notes and tips on using
the appliance.
1.2 Proper use
The appliance is used to prepare beverages consisting of coee beans or
ground coee and to heat milk and water.
The appliance is intended for use in private households.
Any other use is regarded as improper and may lead to personal injury and
material damage. Melitta accepts no liability for damage which arises due
to improper use of the appliance.
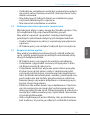
1.3 Danger due to electrical current
If the appliance or the power cable is damaged, the risk
of a fatal electric shock is run.
Observe the following safety instructions to avoid dan-
gers due to electrical current:
Do not use a damaged power cable.
A damaged power cable may only be replaced by the
manufacturer, its customer service or a similarly quali-
ed person.
Do not open any covers rmly screwed onto the appli-
ance housing.
Only use the appliance when it is in a technically aw-
less condition.

For your safety
7
ENGLISH
A defective appliance may only be repaired by an
authorised workshop. Do not repair the appliance
yourself.
Do not undertake any changes to the appliance, its
components or its accessories.
Do not immerse the appliance in water.
1.4 Risk of burning and scalding
Escaping uids and steam may be very hot. Parts of the
appliance also become very hot.
Observe the following safety instructions to avoid scalds
and burns:
Prevent skin from coming into contact with escaping
uids and steam.
Do not touch any nozzles on the outlet during opera-
tion.
1.5 General safety
Observe the following safety instructions to avoid per-
sonal injury and material damage:
Do not reach into the interior of the appliance during
operation.
The appliance and its power cable must be kept out of
the reach of children under 8 years of age.
This appliance may be used by children over 8 years of
age and by persons with reduced physical, sensory or
mental capabilities or a lack of experience and knowl-
edge if they are supervised or have been instructed in
using the appliance safely and understand the result-
ing risks.
Children must not play with the appliance. Cleaning
and maintenance must not be undertaken by children
younger than 8 years of age. Children over 8 years of
age must be supervised during cleaning and mainte-
nance.
Disconnect the appliance from the power supply
when it is left unsupervised for a long time.

Overview of the appliance
8
ENGLISH
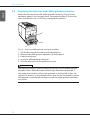
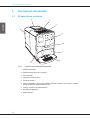
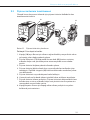
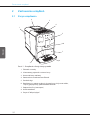
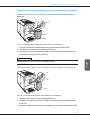
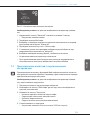
2 Overview of the appliance
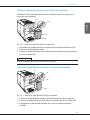
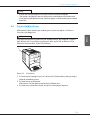
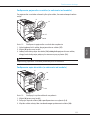
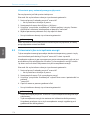
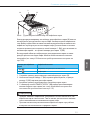
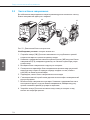
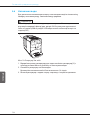
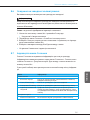
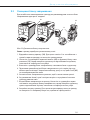
2.1 Overview of the appliance
1
2
3
4
5
6
7
8
9
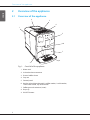
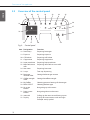
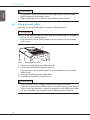
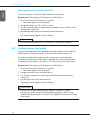
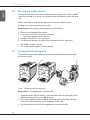
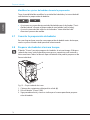
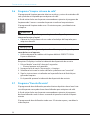
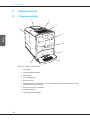
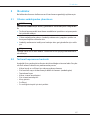
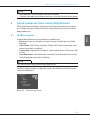
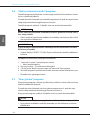
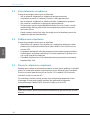
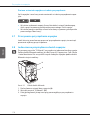
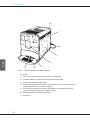
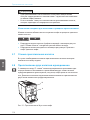
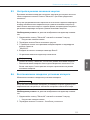
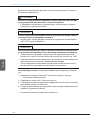
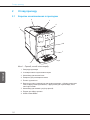
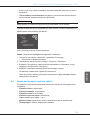
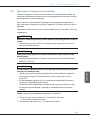
Fig. 1: Front left of the appliance
1 Water tank
2 2-chamber bean container
3 Ground coee chute
4 Cup rest
5 Control panel
6 Height-adjustable outlet with 2 coee nozzles, 2 milk nozzles,
1 hot water nozzle, cup illumination
7 Coee grounds container (inner)
8 Drip tray
9 ON/OFF button

Overview of the appliance
9
ENGLISH
11
12
13
15
17
16
14
10
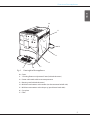
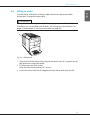
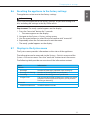
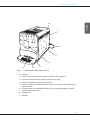
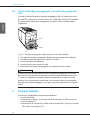
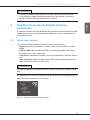
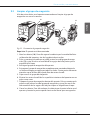
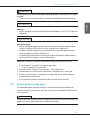
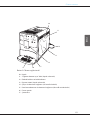
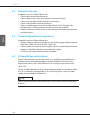
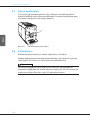
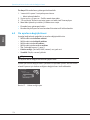
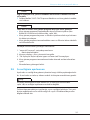
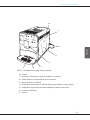
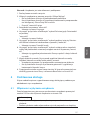
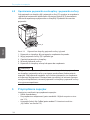
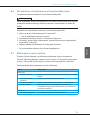
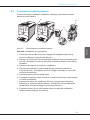
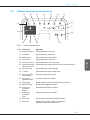
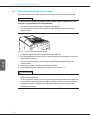
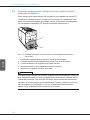
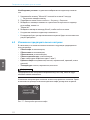
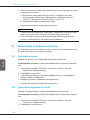
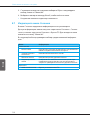
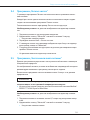
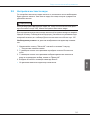
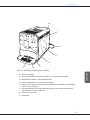
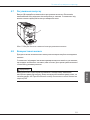
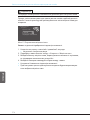
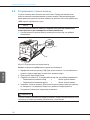
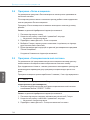
Fig. 2: Front right of the appliance
10 Cover
11 "Grinding neness adjustment" lever (behind the cover)
12 Power cable with cable insert compartment
13 Brewing unit (behind the cover)
14 Milk hose connection at the outlet (can be converted to left side)
15 Milk hose connection at the drip tray (possible on both sides)
16 Cup plate
17 Float

Overview of the appliance
10
ENGLISH
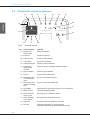
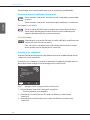
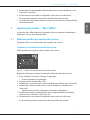
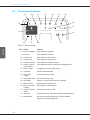
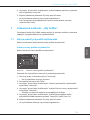
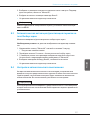
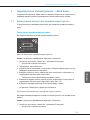
2.2 Overview of the control panel
Please select your beverage
09:52
2019
18
21 22 23 24 25
26
27
28
29303132
33
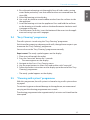
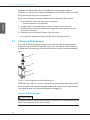
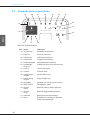
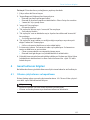
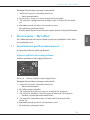
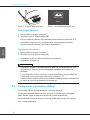
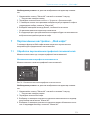
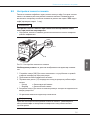
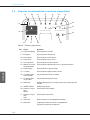
Fig. 3: Control panel
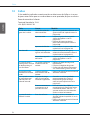
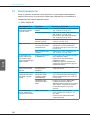
Item Designation Function
18 Direct keys Preparing beverages
19 Espresso Preparing espresso
20 Café crème Preparing café crème
21 Cappuccino Preparing cappuccino
22 Latte macchiato Preparing latte macchiato
23 Milk froth/warm
milk
Preparing milk froth or warm milk
24 Hot water Preparing hot water
25 2 cups Two-cup dispensing
26 Beverage
amount slider
Setting the beverage amount
27 Coee strength
slider
Setting the coee strength
28 My Coee Selecting personal settings for beverages
29 BEANSELECT Selecting the bean type
30 Up arrow
button
Navigating up in the menu
31 Down arrow
button
Navigating down in the menu
32 menu/ok Calling up the menu or conrming inputs
33 Display Display of current menus and messages
Example: ready symbol

First steps
11
ENGLISH
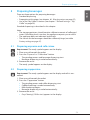
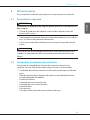
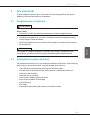
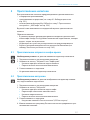
3 First steps
This chapter describes how to prepare your appliance for use.
3.1 Unpacking the appliance
CAUTION
Contact with cleaning agents may lead to eye and skin irritation.
Store the enclosed cleaning agents out of the reach of children.
Unpack the appliance. Remove the packaging material, the adhesive
strips and the protective lms from the appliance.
Keep the packaging material for transport and possible return ship-
ments.
Information
The appliance may contain traces of coee and water. The appliance has
been tested in the factory to ensure that it functions perfectly.
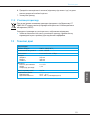
3.2 Checking the delivery contents
Check the completeness of delivery using the following list. If parts are
missing, contact your retailer.
Coee spoon with screw-in aid for the water lter,
Milk hose or milk container including milk hose (depending on model),
Cleaning brush,
Coee system cleaning agent,
Milk system cleaning agent,
Descaling agent,
Water lter,
Test strip for determining the water hardness.

First steps
12
ENGLISH
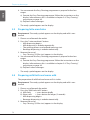
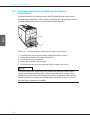
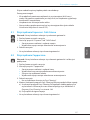
3.3 Positioning the appliance
Observe the following instructions:
Do not position the appliance in damp rooms.
Position the appliance on a stable, at and dry surface.
Do not position the appliance in the vicinity of sinks or the like.
Do not position the appliance on hot surfaces.
Position the appliance a sucient distance, approx. 10cm, away from
the wall and other objects. The space above the appliance should be at
least 20cm.
Route the power cable so that it cannot be damaged by edges or hot
surfaces.
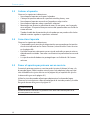
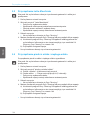
3.4 Connecting the appliance
Observe the following instructions:
Check that the supply voltage matches the operating voltage specied
in the technical data (see table Technical data on page47).
Only connect the appliance to a properly installed earthing contact
socket. If in doubt, consult a specialist electrician.
The socket must be fused with at least a 10 A fuse.
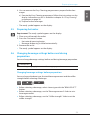
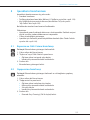
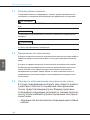
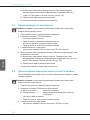
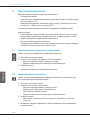
3.5 Switching the appliance on for the rst time
During initial starting up, you can set the language, the time and the water
hardness. The settings can be changed at a later point in time (see chap-
ter 8 Changing basic settings on page32 and chapter 9.8 Setting the
water hardness on page43).
Use the enclosed test strip to determine the water hardness. Observe the
instructions on the test strip packaging and in table Water hardness range
on page47.
Information
We recommend pouring away the rst two cups of coee after initially
starting up.

Basic operation
13
ENGLISH
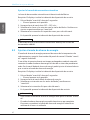
Requirement: The appliance has been positioned and connected.
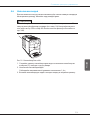
1. Place a vessel beneath the outlet.
2. Switch the appliance on with the ON/OFF button.
» The welcome display appears on the display.
» The request to carry out set-up appears on the display: Please set up
the machine.
» The "menu/ok" button ashes.
3. Conrm with "menu/ok".
» The Language menu appears.
4. Select your language with the arrow buttons. Conrm with
"menu/ok".
» The Clock menu appears.
5. Select the hour and minutes with the arrow buttons. Conrm each set-
ting with "menu/ok".
» The Water hardness menu appears.
6. Select the determined water hardness range with the arrow buttons or
conrm the default value with "menu/ok".
» The request Please rell and insert water tank appears.
7. Remove the water tank. Rinse the water tank out with clean water. Fill
the water tank with fresh water and insert it.
» The appliance heats up and performs automatic rinsing.
» The ready symbol and the request Fill beans appear in the display
8. Fill coee beans into the bean container. To do this, read chapter Filling
with coee beans and using BeanSelect on page17.
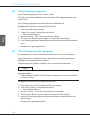
4 Basic operation
This chapter describes basic operating steps for using the appliance on a
daily basis.
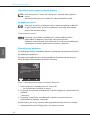
4.1 Switching the appliance on and o
Before switching on when initially starting up the appliance, read chap-
ter 3.5 Switching the appliance on for the rst time on page12.
Information
The appliance performs automatic rinsing when switching on and o.
During rinsing, rinsing water is also conducted into the drip tray.

Basic operation
14
ENGLISH
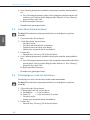
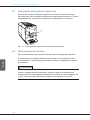
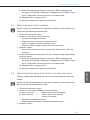
9
Hello
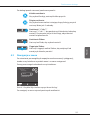
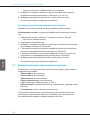
Fig. 4: ON/OFF button Fig. 5: Welcome display
Switching the appliance on
1. Place a vessel beneath the outlet.
2. Press the ON/OFF button (9).
» The welcome display appears on the display (see Fig. 5).
» The appliance heats up and performs automatic rinsing.
» The ready symbol appears on the display.
Switching the appliance o
1. Place a vessel beneath the outlet.
2. Press the ON/OFF button (9).
» The appliance performs automatic rinsing.
» The appliance switches o.
Information
The appliance switches o automatically when it is not operated for a
long time. Automatic rinsing is also carried out in this case.
The o time can be set in the Auto OFF menu, see chapter 8.4 Setting
Auto OFF on page33.
If no beverage has been prepared since switching on or if the water tank
is empty, no rinsing takes place.
4.2 Using the control panel
The essential functions can be accessed using the control panel.
Press the button with a ngertip. The control panel does not react when
touched with a pen or other objects.
Only those buttons which can be used in the appliance's current status light
up.

Basic operation
15
ENGLISH
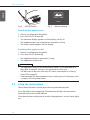
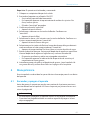
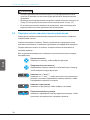
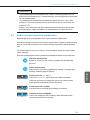
Use the following actions to operate the control panel:
Brief press
Press a button briey to select a function.
Long press
Press a button for longer than 2 seconds to select a second
function which may be available.
Press "+" or "–"
Press "+" or "–" to increase or reduce the current value.
Hold a button down to change the value continuously.
Press the slider
Press on the slider to select a value.
Pull the slider
Press and pull the slider to increase or reduce the current
value.
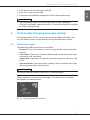
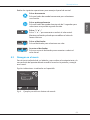
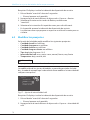
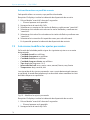
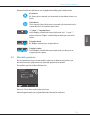
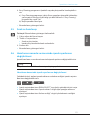
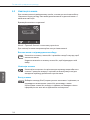
4.3 Navigating in the menu
To set individual beverages and for maintenance and care, you must call up
the menu in the display and navigate in the menu.
Observe the instructions on the display.
Direct keys
Espresso
Coffee strength
Strong
Confirm with OK:
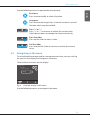
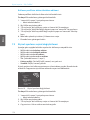
Fig. 6: Example: display with buttons
Use the following options to navigate in the menu:

Basic operation
16
ENGLISH
Calling up the menu and conrming the selection
Press the "menu/ok" button for longer than 2 seconds to call up the
menu.
Press the "menu/ok" button briey to conrm your selection.
Navigating in the menu
Press the arrow buttons to navigate down or up in the menu. Hold
an arrow button down to quickly switch to the menu options.
Exiting a menu
Select the command Exit with the arrow buttons and conrm with
"menu/ok" to exit a menu.
Exit sub-menus, which only display information and in which you
do not carry out any settings, with "menu/ok".
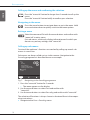
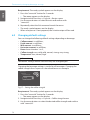
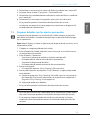
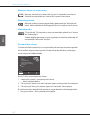
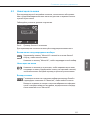
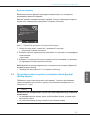
Calling up sub-menus
Certain of the appliance's functions are reached by calling up several sub-
menus in succession.
Sub-menus are always called up in a similar manner. Navigation to the
Descaling programme is described here as an example.
Care
Exit
Rinsing
Easy cleaning
Cleaning milk system
Cleaning coffee system
Descaling
Filter
Fig. 7: Navigating to the Descaling programme
1. Press the "menu/ok" button for 2 seconds.
» The menu appears on the display.
2. Use the arrow buttons to select Care and conrm with
"menu/ok".
3. Use the arrow buttons to select Descaling and conrm with "menu/ok".
The selection of functions is always shown in shortened form in these oper-
ating instructions:
Navigate to the Care > Descaling menu.

Basic operation
17
ENGLISH
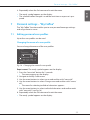
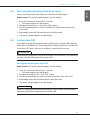
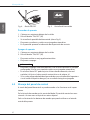
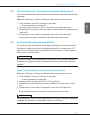
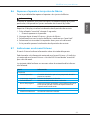
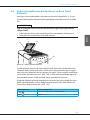
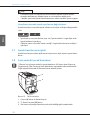
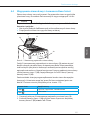
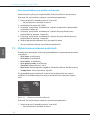
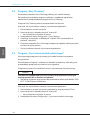
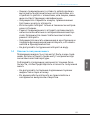
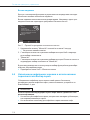
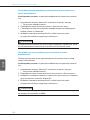
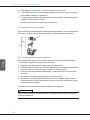
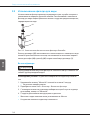
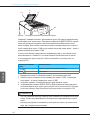
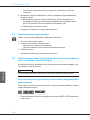
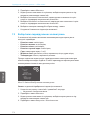
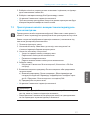
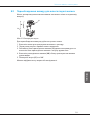
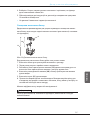
4.4 Filling with coee beans and using BeanSelect
Roasted coee beans lose their aroma. Only ll the bean container with as
many coee beans as you will consume over the next 3 – 4 days.
ATTENTION
Using unsuitable types of coee may lead to clogging of the grinder.
Do not use freeze-dried or caramelised coee beans.
Do not pour ground coee into the bean container.
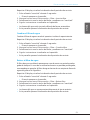
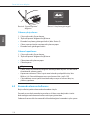
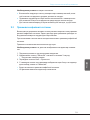
2
29
34
35
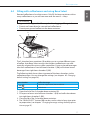
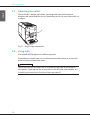
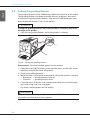
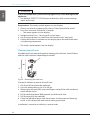
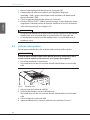
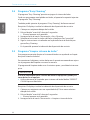
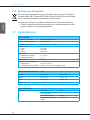
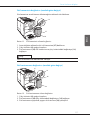
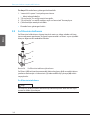
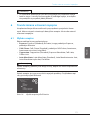
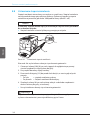
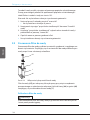
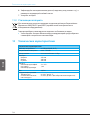
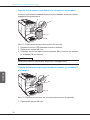
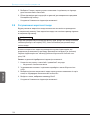
Fig. 8: 2-chamber bean container
The 2-chamber bean container (2) enables you to use two dierent types
of coee. Auto Bean Select ensures that the best coee beans are auto-
matically selected for various coee specialities. Espresso-based beverages
take their coee beans from left bean chamber 1(34), café crème-based
beverages from right bean chamber 2(35).
The following table shows the assignment of the bean chambers to the
coee beverages. You can change the settings (see chapter 6.2 Changing
default settings on page28).
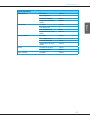
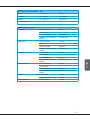
Bean chamber Coee beverage
1 (34)
Espresso, cappuccino, latte macchiato
2 (35)
Café crème
1. Open the lid of the 2-chamber bean container(2).
2. Fill espresso beans into left bean chamber 1(34) and café crème beans
into right bean chamber 2 (35).
3. Close the lid of the 2-chamber bean container.
4. The "BEANSELECT" button (29) can be used to select a bean type prior
to preparation (see chapter Changing beverage settings before prepara-
tion on page25)

Basic operation
18
ENGLISH
Information
The grinder is emptied during each grinding process. Minimal coee
type mixing may nevertheless occur.
Empty grinding causes a dierent type of noise and is normal.
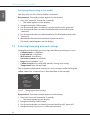
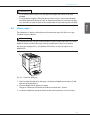
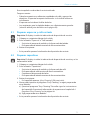
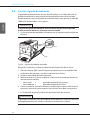
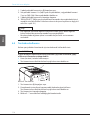
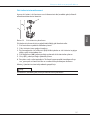
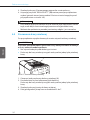
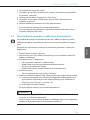
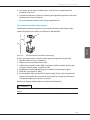
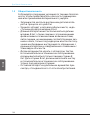
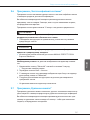
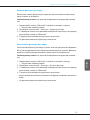
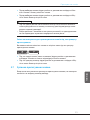
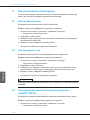
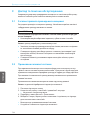
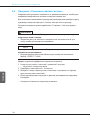
4.5 Using ground coee
You may also use ground coee to prepare coee beverages.
ATTENTION
The use of unsuitable types of coee may lead to brewing unit clogging.
Do not use any instant products.
Fill a maximum of one coee spoon of ground coee into the ground
coee chute.
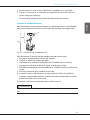
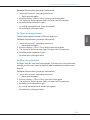
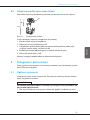
3
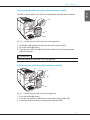
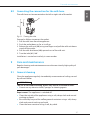
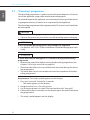
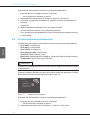
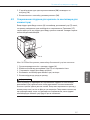
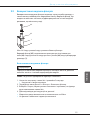
Fig. 9: Ground coee chute
1. Open the lid of the ground coee chute (3).
2. Use the enclosed coee spoon for dosing.
Fill a maximum of one coee spoon of ground coee into the ground
coee chute.
3. Close the lid of the ground coee chute.
4. Proceed as described in chapters 5 to 7.
Information
Two-cup dispensing is not possible when using ground coee.
If you do not prepare any coee within 3 minutes of opening the ground
coee chute, the appliance switches to operation with coee beans and
the ground coee is discharged into the coee grounds container.

Basic operation
19
ENGLISH
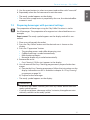
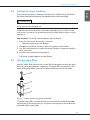
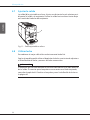
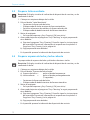
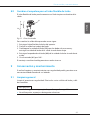
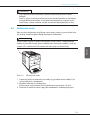
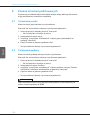
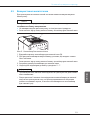
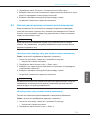
4.6 Filling in water
Use only fresh, cold water without carbon dioxide for optimum coee
enjoyment. Change the water daily.
Information
The quality of the water extensively determines the taste of the coee.
Therefore, use a water lter (see chapter 9.8 Setting the water hardness on
page43 and chapter 9.9 Using a water lter on page43).
1
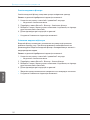
Fig. 10: Water tank
1. Open the lid of the water tank and pull the water tank (1) upwards out of
the appliance using the handle.
2. Fill the water tank with water.
Note the maximum capacity of 1.8 litres.
3. Insert the water tank into the appliance from above and close the lid.

Basic operation
20
ENGLISH
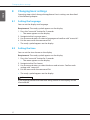
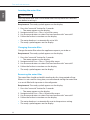
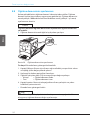
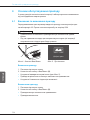
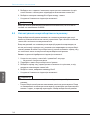
4.7 Adjusting the outlet
The outlet (6) is height-adjustable. Set the greatest possible distance
between the outlet and the vessel. Depending on vessel, push the outlet up
or down.
6
Fig. 11: Height-adjustable outlet
4.8 Using milk
Use cooled milk for optimum coee enjoyment.
Depending on model, you can use the enclosed milk container or the milk
hose and conventional milk packs.
Information
The connection for the milk hose is installed on the right of the outlet in
the factory. If you require the connection on the left side, read chapter 8.9
Converting the connection for the milk hose on page37.
Strona jest ładowana ...
Strona jest ładowana ...
Strona jest ładowana ...
Strona jest ładowana ...
Strona jest ładowana ...
Strona jest ładowana ...
Strona jest ładowana ...
Strona jest ładowana ...
Strona jest ładowana ...
Strona jest ładowana ...
Strona jest ładowana ...
Strona jest ładowana ...
Strona jest ładowana ...
Strona jest ładowana ...
Strona jest ładowana ...
Strona jest ładowana ...
Strona jest ładowana ...
Strona jest ładowana ...
Strona jest ładowana ...
Strona jest ładowana ...
Strona jest ładowana ...
Strona jest ładowana ...
Strona jest ładowana ...
Strona jest ładowana ...
Strona jest ładowana ...
Strona jest ładowana ...
Strona jest ładowana ...
Strona jest ładowana ...
Strona jest ładowana ...
Strona jest ładowana ...
Strona jest ładowana ...
Strona jest ładowana ...
Strona jest ładowana ...
Strona jest ładowana ...
Strona jest ładowana ...
Strona jest ładowana ...
Strona jest ładowana ...
Strona jest ładowana ...
Strona jest ładowana ...
Strona jest ładowana ...
Strona jest ładowana ...
Strona jest ładowana ...
Strona jest ładowana ...
Strona jest ładowana ...
Strona jest ładowana ...
Strona jest ładowana ...
Strona jest ładowana ...
Strona jest ładowana ...
Strona jest ładowana ...
Strona jest ładowana ...
Strona jest ładowana ...
Strona jest ładowana ...
Strona jest ładowana ...
Strona jest ładowana ...
Strona jest ładowana ...
Strona jest ładowana ...
Strona jest ładowana ...
Strona jest ładowana ...
Strona jest ładowana ...
Strona jest ładowana ...
Strona jest ładowana ...
Strona jest ładowana ...
Strona jest ładowana ...
Strona jest ładowana ...
Strona jest ładowana ...
Strona jest ładowana ...
Strona jest ładowana ...
Strona jest ładowana ...
Strona jest ładowana ...
Strona jest ładowana ...
Strona jest ładowana ...
Strona jest ładowana ...
Strona jest ładowana ...
Strona jest ładowana ...
Strona jest ładowana ...
Strona jest ładowana ...
Strona jest ładowana ...
Strona jest ładowana ...
Strona jest ładowana ...
Strona jest ładowana ...
Strona jest ładowana ...
Strona jest ładowana ...
Strona jest ładowana ...
Strona jest ładowana ...
Strona jest ładowana ...
Strona jest ładowana ...
Strona jest ładowana ...
Strona jest ładowana ...
Strona jest ładowana ...
Strona jest ładowana ...
Strona jest ładowana ...
Strona jest ładowana ...
Strona jest ładowana ...
Strona jest ładowana ...
Strona jest ładowana ...
Strona jest ładowana ...
Strona jest ładowana ...
Strona jest ładowana ...
Strona jest ładowana ...
Strona jest ładowana ...
Strona jest ładowana ...
Strona jest ładowana ...
Strona jest ładowana ...
Strona jest ładowana ...
Strona jest ładowana ...
Strona jest ładowana ...
Strona jest ładowana ...
Strona jest ładowana ...
Strona jest ładowana ...
Strona jest ładowana ...
Strona jest ładowana ...
Strona jest ładowana ...
Strona jest ładowana ...
Strona jest ładowana ...
Strona jest ładowana ...
Strona jest ładowana ...
Strona jest ładowana ...
Strona jest ładowana ...
Strona jest ładowana ...
Strona jest ładowana ...
Strona jest ładowana ...
Strona jest ładowana ...
Strona jest ładowana ...
Strona jest ładowana ...
Strona jest ładowana ...
Strona jest ładowana ...
Strona jest ładowana ...
Strona jest ładowana ...
Strona jest ładowana ...
Strona jest ładowana ...
Strona jest ładowana ...
Strona jest ładowana ...
Strona jest ładowana ...
Strona jest ładowana ...
Strona jest ładowana ...
Strona jest ładowana ...
Strona jest ładowana ...
Strona jest ładowana ...
Strona jest ładowana ...
Strona jest ładowana ...
Strona jest ładowana ...
Strona jest ładowana ...
Strona jest ładowana ...
Strona jest ładowana ...
Strona jest ładowana ...
Strona jest ładowana ...
Strona jest ładowana ...
Strona jest ładowana ...
Strona jest ładowana ...
Strona jest ładowana ...
Strona jest ładowana ...
Strona jest ładowana ...
Strona jest ładowana ...
Strona jest ładowana ...
Strona jest ładowana ...
Strona jest ładowana ...
Strona jest ładowana ...
Strona jest ładowana ...
Strona jest ładowana ...
Strona jest ładowana ...
Strona jest ładowana ...
Strona jest ładowana ...
Strona jest ładowana ...
Strona jest ładowana ...
Strona jest ładowana ...
Strona jest ładowana ...
Strona jest ładowana ...
Strona jest ładowana ...
Strona jest ładowana ...
Strona jest ładowana ...
Strona jest ładowana ...
Strona jest ładowana ...
Strona jest ładowana ...
Strona jest ładowana ...
Strona jest ładowana ...
Strona jest ładowana ...
Strona jest ładowana ...
Strona jest ładowana ...
Strona jest ładowana ...
Strona jest ładowana ...
Strona jest ładowana ...
Strona jest ładowana ...
Strona jest ładowana ...
Strona jest ładowana ...
Strona jest ładowana ...
Strona jest ładowana ...
Strona jest ładowana ...
Strona jest ładowana ...
Strona jest ładowana ...
Strona jest ładowana ...
Strona jest ładowana ...
Strona jest ładowana ...
Strona jest ładowana ...
Strona jest ładowana ...
Strona jest ładowana ...
Strona jest ładowana ...
Strona jest ładowana ...
Strona jest ładowana ...
Strona jest ładowana ...
Strona jest ładowana ...
Strona jest ładowana ...
Strona jest ładowana ...
Strona jest ładowana ...
Strona jest ładowana ...
Strona jest ładowana ...
Strona jest ładowana ...
Strona jest ładowana ...
Strona jest ładowana ...
Strona jest ładowana ...
Strona jest ładowana ...
Strona jest ładowana ...
Strona jest ładowana ...
Strona jest ładowana ...
Strona jest ładowana ...
Strona jest ładowana ...
Strona jest ładowana ...
Strona jest ładowana ...
Strona jest ładowana ...
Strona jest ładowana ...
Strona jest ładowana ...
Strona jest ładowana ...
Strona jest ładowana ...
Strona jest ładowana ...
Strona jest ładowana ...
Strona jest ładowana ...
Strona jest ładowana ...
Strona jest ładowana ...
Strona jest ładowana ...
Strona jest ładowana ...
Strona jest ładowana ...
Strona jest ładowana ...
Strona jest ładowana ...
Strona jest ładowana ...
Strona jest ładowana ...
Strona jest ładowana ...
Strona jest ładowana ...
Strona jest ładowana ...
Strona jest ładowana ...
Strona jest ładowana ...
Strona jest ładowana ...
Strona jest ładowana ...
Strona jest ładowana ...
Strona jest ładowana ...
Strona jest ładowana ...
Strona jest ładowana ...
Strona jest ładowana ...
Strona jest ładowana ...
Strona jest ładowana ...
Strona jest ładowana ...
Strona jest ładowana ...
Strona jest ładowana ...
Strona jest ładowana ...
Strona jest ładowana ...
Strona jest ładowana ...
Strona jest ładowana ...
Strona jest ładowana ...
Strona jest ładowana ...
Strona jest ładowana ...
Strona jest ładowana ...
Strona jest ładowana ...
Strona jest ładowana ...
Strona jest ładowana ...
Strona jest ładowana ...
Strona jest ładowana ...
Strona jest ładowana ...
Strona jest ładowana ...
Strona jest ładowana ...
Strona jest ładowana ...
Strona jest ładowana ...
Strona jest ładowana ...
Strona jest ładowana ...
Strona jest ładowana ...
Strona jest ładowana ...
Strona jest ładowana ...
Strona jest ładowana ...
Strona jest ładowana ...
Strona jest ładowana ...
Strona jest ładowana ...
Strona jest ładowana ...
Strona jest ładowana ...
-
 1
1
-
 2
2
-
 3
3
-
 4
4
-
 5
5
-
 6
6
-
 7
7
-
 8
8
-
 9
9
-
 10
10
-
 11
11
-
 12
12
-
 13
13
-
 14
14
-
 15
15
-
 16
16
-
 17
17
-
 18
18
-
 19
19
-
 20
20
-
 21
21
-
 22
22
-
 23
23
-
 24
24
-
 25
25
-
 26
26
-
 27
27
-
 28
28
-
 29
29
-
 30
30
-
 31
31
-
 32
32
-
 33
33
-
 34
34
-
 35
35
-
 36
36
-
 37
37
-
 38
38
-
 39
39
-
 40
40
-
 41
41
-
 42
42
-
 43
43
-
 44
44
-
 45
45
-
 46
46
-
 47
47
-
 48
48
-
 49
49
-
 50
50
-
 51
51
-
 52
52
-
 53
53
-
 54
54
-
 55
55
-
 56
56
-
 57
57
-
 58
58
-
 59
59
-
 60
60
-
 61
61
-
 62
62
-
 63
63
-
 64
64
-
 65
65
-
 66
66
-
 67
67
-
 68
68
-
 69
69
-
 70
70
-
 71
71
-
 72
72
-
 73
73
-
 74
74
-
 75
75
-
 76
76
-
 77
77
-
 78
78
-
 79
79
-
 80
80
-
 81
81
-
 82
82
-
 83
83
-
 84
84
-
 85
85
-
 86
86
-
 87
87
-
 88
88
-
 89
89
-
 90
90
-
 91
91
-
 92
92
-
 93
93
-
 94
94
-
 95
95
-
 96
96
-
 97
97
-
 98
98
-
 99
99
-
 100
100
-
 101
101
-
 102
102
-
 103
103
-
 104
104
-
 105
105
-
 106
106
-
 107
107
-
 108
108
-
 109
109
-
 110
110
-
 111
111
-
 112
112
-
 113
113
-
 114
114
-
 115
115
-
 116
116
-
 117
117
-
 118
118
-
 119
119
-
 120
120
-
 121
121
-
 122
122
-
 123
123
-
 124
124
-
 125
125
-
 126
126
-
 127
127
-
 128
128
-
 129
129
-
 130
130
-
 131
131
-
 132
132
-
 133
133
-
 134
134
-
 135
135
-
 136
136
-
 137
137
-
 138
138
-
 139
139
-
 140
140
-
 141
141
-
 142
142
-
 143
143
-
 144
144
-
 145
145
-
 146
146
-
 147
147
-
 148
148
-
 149
149
-
 150
150
-
 151
151
-
 152
152
-
 153
153
-
 154
154
-
 155
155
-
 156
156
-
 157
157
-
 158
158
-
 159
159
-
 160
160
-
 161
161
-
 162
162
-
 163
163
-
 164
164
-
 165
165
-
 166
166
-
 167
167
-
 168
168
-
 169
169
-
 170
170
-
 171
171
-
 172
172
-
 173
173
-
 174
174
-
 175
175
-
 176
176
-
 177
177
-
 178
178
-
 179
179
-
 180
180
-
 181
181
-
 182
182
-
 183
183
-
 184
184
-
 185
185
-
 186
186
-
 187
187
-
 188
188
-
 189
189
-
 190
190
-
 191
191
-
 192
192
-
 193
193
-
 194
194
-
 195
195
-
 196
196
-
 197
197
-
 198
198
-
 199
199
-
 200
200
-
 201
201
-
 202
202
-
 203
203
-
 204
204
-
 205
205
-
 206
206
-
 207
207
-
 208
208
-
 209
209
-
 210
210
-
 211
211
-
 212
212
-
 213
213
-
 214
214
-
 215
215
-
 216
216
-
 217
217
-
 218
218
-
 219
219
-
 220
220
-
 221
221
-
 222
222
-
 223
223
-
 224
224
-
 225
225
-
 226
226
-
 227
227
-
 228
228
-
 229
229
-
 230
230
-
 231
231
-
 232
232
-
 233
233
-
 234
234
-
 235
235
-
 236
236
-
 237
237
-
 238
238
-
 239
239
-
 240
240
-
 241
241
-
 242
242
-
 243
243
-
 244
244
-
 245
245
-
 246
246
-
 247
247
-
 248
248
-
 249
249
-
 250
250
-
 251
251
-
 252
252
-
 253
253
-
 254
254
-
 255
255
-
 256
256
-
 257
257
-
 258
258
-
 259
259
-
 260
260
-
 261
261
-
 262
262
-
 263
263
-
 264
264
-
 265
265
-
 266
266
-
 267
267
-
 268
268
-
 269
269
-
 270
270
-
 271
271
-
 272
272
-
 273
273
-
 274
274
-
 275
275
-
 276
276
-
 277
277
-
 278
278
-
 279
279
-
 280
280
-
 281
281
-
 282
282
-
 283
283
-
 284
284
-
 285
285
-
 286
286
-
 287
287
-
 288
288
-
 289
289
-
 290
290
-
 291
291
-
 292
292
-
 293
293
-
 294
294
-
 295
295
-
 296
296
-
 297
297
-
 298
298
-
 299
299
-
 300
300


Melitta CAFFEO Barista® TS Instrukcja obsługi
- Kategoria
- Ekspresy do kawy
- Typ
- Instrukcja obsługi
- Ten podręcznik jest również odpowiedni dla
w innych językach
Powiązane dokumenty
-
Melitta CAFFEO Barista® T Export Instrukcja obsługi
-
-
-
-
-
-
Melitta CAFFEO Bistro Instrukcja obsługi
-