
QUICK START GUIDE
TESLA SMART SWITCH/DUAL
(With Neutral Required)
EN
SK
SL
DE
PL
CZ
HU
TSL-SWI-WIFI1/ TSL-SWI-WIFI2

- Voice/APP Control
- Smart Home Automation with Multi devices
- Silent switch with LED Indication
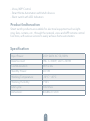
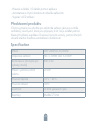
Product Indtoruction
Smart switch products are suitable for electrical equipment such as light-
ning, fans, curtains, etc., through the network, voice and APP remote control
functions, with various sensors to easily achieve home automation.
Specification
Input Power: 200~240V AC 50/60Hz
Resistive load: INC 3•300W, LED 5•300W
Communication: WiFi 2.4G
Standby Power: ≤0.5W
Working Temperature: -10°C ~ 45°C
Working Humidity: <90%
Life Cycle: 50k times
Dimension: 86x86x37.5mm
2

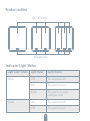
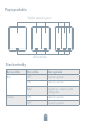
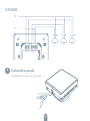
Product outline
Indicator Light Status
Indicator LED
On/Off button
Light Color Green Light Status Switch Status:
White OFF The switch turn off
ON The switch turn on
Flicker The switch is in quick
configure mode
Green ON The switch turn off
OFF The switch turn on
3

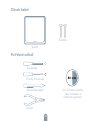
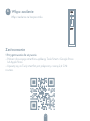
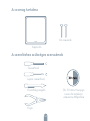
Contents Supplied
Tools You‘ll Need
Switch
Screws
Flat-head Screwdriver
Screwdriver
Pliers
Voltage tester Approximately
30 minutes of your time
to install and setup
the Switch
4

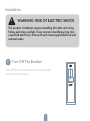
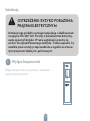
Installation
Turn Off The Breaker
Turn off the circuit break and use the electrical
tester to test the power.
WARNING: RISK OF ELECTRIC SHOCK
This product installation requires handling 100-240 volt wiring.
Follow each step carefully. If any concerns handling wiring, hire
a qualified electrician. Ensure all work meets applicable local and
national codes.
1
5

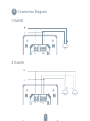
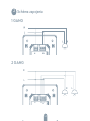
L2 LN
N
N L
L
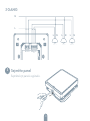
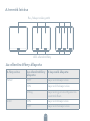
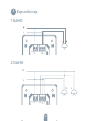
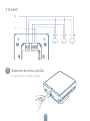
Connection Diagram
1 GANG
2 GANG
2
6

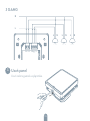
3 GANG
N
L
L2L3 LN
N
NL N L
L
L
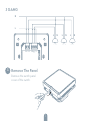
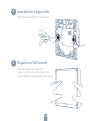
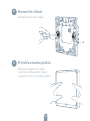
Remove The Panel
3
Remove the switch panel
cover of the switch.
7

1
2
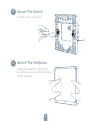
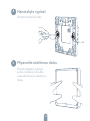
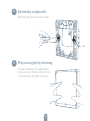
Mount The Switch
Attach The Wallplate
4
5
Use the screws provided.
Attach the adapter to the switch
using the screws provided and snap
on the wallplate.
8

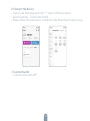
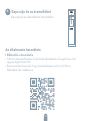
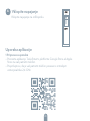
Turn On The power
APP Operation
6
Turn the power back on at the circuit breaker
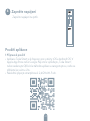
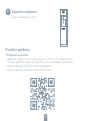
1 Preparation for use
•Tesla Smart is available for both iOS and Android OS. Search the name
‚Tesla Smart‘ in App Store or Android Market, or scan the QR-Code to
download the App and register or login your account.
• Make sure that the smartphone is connected to the 2.4Ghz network.
9

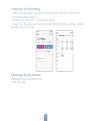
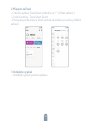
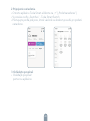
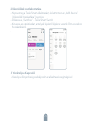
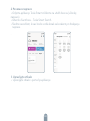
2 Connect the device
• Open Tesla Smart app and click “+” sign to Add new device
• Select Switches - Tesla Smart Switch
• Please follow the instructions to add the Tesla Smart Switch step by step
3 Control Switch
• Control switch with APP
10

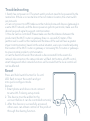
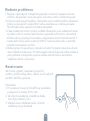
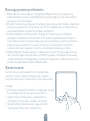
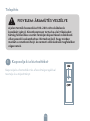
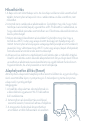
Reset
Press and hold switch button for 5s until
LED flash to reset the switch and get
into quick configure mode.
Remark:
1. Smart phone and device must connect
to same Wi-Fi during setup mode
2. The device must be added to the
account before it can be controlled remotely
3. After the device is successfully accessed,
other users can obtain control of the product
through the sharing function.
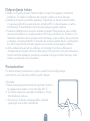
Troubleshooting
1. Switch has not power on? The smart switch products need to be powered by the
neutral line. If there is no neutral line in the inch-Manor location, the smart switch
can not work
2. Can not connect to APP? Make sure the mobile phone and devices (gateways) in
a same Wi-Fl network, and the device power an get into pair mode, make sure the
device has good signal to support communication.
3. How far can be controlled? Please make sure that the distance between the
product and the Wi-Fi router or gateway does no- exceed 25 meters, If the
partition wall is used but the material and thickness of the wall will have a greater
impact communication, based on the actual situation, users can consider adjusting
the location of the Wi-Fi router or gateway or increasing Wi-Fi routers or gateways
to ensure normal product communication.
4. Can the Switch still work if the network is disconnected? In the event of a
network disconnection, the status indicator will flash. At this time, all APP control,
smart linkage and other network functions will be invalid but the local control will
not be affected.
11

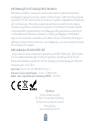
Connectivity: Wi-Fi 2,4 GHz IEEE 802.11b/g/n
Frequency band: 2.412 - 2.4835 MHz
Max. radio-frequency power (EIRP): < 20 dBm
EU DECLARATION OF CONFORMITY
Hereby, Tesla Global Limited declares that the radio equipment type
ESW-1WAA-EU, ESW-2WAA-EU is in compliance with EU directives. The
full text of the EU declaration of conformity is available at the following
internet address: tsl.sh/doc
Manufacturer
Tesla Global Limited
Far East Consortium Building,
121 Des Voeux Road Central
Hong Kong
www.teslasmart.com
INFORMATION ABOUT DISPOSAL AND RECYCLING
This product is marked with the symbol for separate collection. The pro-
duct must be disposed of in accordance with the regulations for disposal
of electrical and electronic equipment (Directive 2012/19/EU on waste
electrical and electronic equipment). Disposal together with regular muni-
cipal waste is prohibited. Dispose of all electrical and electronic products
in accordance with all local and European regulations at the designated
collection points which hold the appropriate authorisation and certification
in line with the local and legislative regulations. Correct disposal and
recycling help to minimise impacts on the environment and human health.
Further information regarding disposal can be obtained from the vendor,
authorised service centre or local authorities.
12

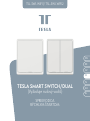
BEGLEITER DURCH
DEN SCHNELLSTART
EN
SK
SL
DE
PL
CZ
HU
TSL-SWI-WIFI1/ TSL-SWI-WIFI2
TESLA SMART SWITCH/DUAL
(Nullleiter erforderlich)

- Stimmenbetätigung / Betätigung mittels einer App
- Automatisierung des intelligenten Haushalts durch einige Geräte
- Schalter mit der LED-Anzeige
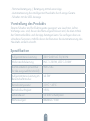
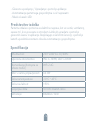
Vorstellung des Produkts
Smarte Schalter sind für Elektrogeräte geeignet, wie Leuchten, Lüfter,
Vorhänge usw. sind, die an das Netz angeschlossen sind, die man mittels
der Stimmenbefehle und der App betätigen kann. Sie verfügen über ver-
schiedene Sensoren, mithilfe deren der Benutzer die Automatisierung des
Haushalts einfach erreicht.
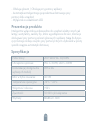
Spezifikation
Aufgenommene Leistung: 200~240V AC 50/60Hz
Widerstandsbelastung: INC 3•300W, LED 5•300W
Kommunikation (erreichbar
für das ausgewählte Modell) : WiFi 2.4G
Aufgenommene Leistung im
Bereitschaftsmodus: ≤0.5W
Betriebstemperatur: -10°C ~ 45°C
Betriebsfeuchtigkeit: <90%
Lebensdauer: 50 000 Schaltzyklen
Abmessungen: 86x86x37.5mm
14

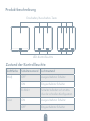
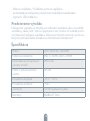
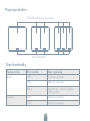
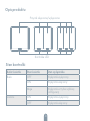
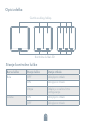
Produktbeschreibung
Zustand der Kontrollleuchte
LED-Kontrollleuchte
Einschalten/Ausschalten-Taste
Lichtfarbe Schalterzustand Lichtzustand
Weiß OFF Ausgeschalteter Schalter
ON Eingeschalteter Schalter
Es blinkt Schalter befindet sich im Mo-
dus der schnellen Konfiguration
Grün ON Ausgeschalteter Schalter
OFF Eingeschalteter Schalter
15

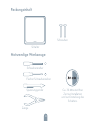
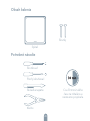
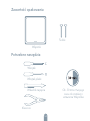
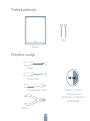
Packungsinhalt
Notwendige Werkzeuge
Schalter
Schraubenzieher
Flacher Schraubenzieher
Spannungsprüfer
Zange
Schrauben
Ca. 30 Minuten Ihrer
Zeit zur Installation
und zur Einstellung des
Schalters.
16

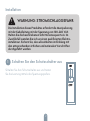
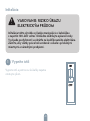
Installation
Schalten Sie den Schutzschalter aus
Schalten Sie den Schutzschalter aus und testen
Sie die Leistung mittels des Spannungsprüfers.
1
WARNUNG: STROMSCHLAGGEFAHR
Die Installation dieses Produktes erfordert die Manipulierung
mit der Kabelleitung mit der Spannung von 100-240 Volt.
Halten Sie die beschriebenen Schritte konsequent ein. Im
Zweifelsfall wenden Sie sich an einen qualifizierten Elektro-
installateur. Sichern Sie, dass alle Arbeiten im Einklang mit
den entsprechenden örtlichen und nationalen Vorschriften
durchgeführt werden.
17

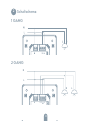
L2 LN
N
N L
L
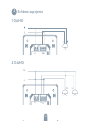
Schaltschema
1 GANG
2 GANG
2
18

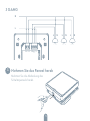
3 GANG
N
L
L2L3 LN
N
NL N L
L
L
Nehmen Sie das Paneel herab
3
Nehmen Sie die Abdeckung des
Schalterpaneels herab.
19

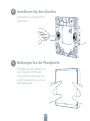
Installieren Sie den Schalter
Befestigen Sie die Wandplatte
4
5
Verwenden Sie mitgelieferte
Schrauben.
Schließen Sie den Adapter an
den Schalter mit Hilfe der
mitgelieferten Schrauben an
und schnappen Sie es an die
Wandplatte auf.
1
2
20
Strona się ładuje...
Strona się ładuje...
Strona się ładuje...
Strona się ładuje...
Strona się ładuje...
Strona się ładuje...
Strona się ładuje...
Strona się ładuje...
Strona się ładuje...
Strona się ładuje...
Strona się ładuje...
Strona się ładuje...
Strona się ładuje...
Strona się ładuje...
Strona się ładuje...
Strona się ładuje...
Strona się ładuje...
Strona się ładuje...
Strona się ładuje...
Strona się ładuje...
Strona się ładuje...
Strona się ładuje...
Strona się ładuje...
Strona się ładuje...
Strona się ładuje...
Strona się ładuje...
Strona się ładuje...
Strona się ładuje...
Strona się ładuje...
Strona się ładuje...
Strona się ładuje...
Strona się ładuje...
Strona się ładuje...
Strona się ładuje...
Strona się ładuje...
Strona się ładuje...
Strona się ładuje...
Strona się ładuje...
Strona się ładuje...
Strona się ładuje...
Strona się ładuje...
Strona się ładuje...
Strona się ładuje...
Strona się ładuje...
Strona się ładuje...
Strona się ładuje...
Strona się ładuje...
Strona się ładuje...
Strona się ładuje...
Strona się ładuje...
Strona się ładuje...
Strona się ładuje...
Strona się ładuje...
Strona się ładuje...
Strona się ładuje...
Strona się ładuje...
Strona się ładuje...
Strona się ładuje...
Strona się ładuje...
Strona się ładuje...
Strona się ładuje...
Strona się ładuje...
Strona się ładuje...
Strona się ładuje...
Strona się ładuje...
Strona się ładuje...
-
 1
1
-
 2
2
-
 3
3
-
 4
4
-
 5
5
-
 6
6
-
 7
7
-
 8
8
-
 9
9
-
 10
10
-
 11
11
-
 12
12
-
 13
13
-
 14
14
-
 15
15
-
 16
16
-
 17
17
-
 18
18
-
 19
19
-
 20
20
-
 21
21
-
 22
22
-
 23
23
-
 24
24
-
 25
25
-
 26
26
-
 27
27
-
 28
28
-
 29
29
-
 30
30
-
 31
31
-
 32
32
-
 33
33
-
 34
34
-
 35
35
-
 36
36
-
 37
37
-
 38
38
-
 39
39
-
 40
40
-
 41
41
-
 42
42
-
 43
43
-
 44
44
-
 45
45
-
 46
46
-
 47
47
-
 48
48
-
 49
49
-
 50
50
-
 51
51
-
 52
52
-
 53
53
-
 54
54
-
 55
55
-
 56
56
-
 57
57
-
 58
58
-
 59
59
-
 60
60
-
 61
61
-
 62
62
-
 63
63
-
 64
64
-
 65
65
-
 66
66
-
 67
67
-
 68
68
-
 69
69
-
 70
70
-
 71
71
-
 72
72
-
 73
73
-
 74
74
-
 75
75
-
 76
76
-
 77
77
-
 78
78
-
 79
79
-
 80
80
-
 81
81
-
 82
82
-
 83
83
-
 84
84
-
 85
85
-
 86
86


w innych językach
- Deutsch: Tesla TSL-SWI-WIFI1 Benutzerhandbuch
- slovenčina: Tesla TSL-SWI-WIFI1 Užívateľská príručka
Powiązane artykuły
-
Tesla TSL-SWI-ZIGBEE1 instrukcja
-
Tesla Smart Switch Module Dual Instrukcja obsługi
-
Tesla TSL-SWI-DIMMER instrukcja
-
Tesla Smart Laser Dot Cat Instrukcja obsługi
-
Tesla TSL-SEN-WATER Instrukcja obsługi
-
Tesla TSL-SEN-BUTTON Instrukcja obsługi
-
Tesla TSL-SWI-SCENEZG4 instrukcja
-
-
Tesla TSL-SWI-WBREAK2 instrukcja
-