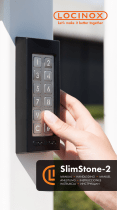
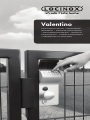
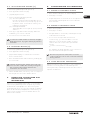
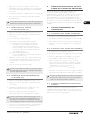
VALENTINO
2023-06-12 - rev 2
LOCINOX LOCINOX USA
6
5
3
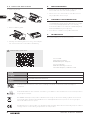
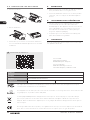
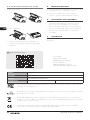
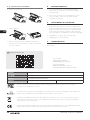
Ø9 mm
Ø3/8”
120 mm
4-3/4”
96 mm
3-3/4”
161 mm
6-5/16”
213 mm
8-3/8”
Min. 110 mm
Min. 4-5/16”
31 mm
1-1/4”
120 mm
4-3/4”
140 mm
5-1/2”
Ø24 mm
Ø15/16”
Ø9 mm
Ø3/8”
Ø15 mm
Ø9/16”
Ø18 mm
Ø3/4”
Ø15 mm
Ø9/16”
20 mm
13/16”
www.locinox.com www.locinoxusa.com
www.locinox.com/valentino www.locinoxusa.com/valentino
CEE: +48 717 58 21 00
877- LOCINOX
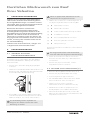
4
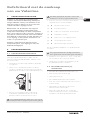
3006CR3006C
FREE-EXIT
3006C 5
4
HEX
6 mm
3 mm
2.5 mm
1
5
3
4
7
6
2
6x
HEX
3 mm
HEX
3 mm
HEX
6 mm
3 mm
2.5 mm
2
1
6
3
8
7

2023-06-12 - rev 2
Doc. Nr.: MANU-000444
pictur[email protected]
SUCCESSFUL
INSTALLATION?
Please send us your
pictures & videos
SUCCESVOLLE
INSTALLATIE?
Stuur gerust uw foto's
& video's door
INSTALLATION
RÉUSSIE?
Veuillez nous envoyer
vos photos & vidéos
ERFOLGREICHE
INSTALLATION?
Bitte senden Sie uns
Ihre Bilder & Videos
INSTALACION
EXITOSA?
Por favor envíenos
sus fotos y videos
UDANA
INSTALACJA?
Prześlij nam swoje
zdjęcia i filmy
УСПЕШНАЯ
УСТАНОВКА?
Пожалуйста, отправьте нам
свой фотографии и видео
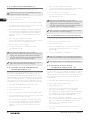
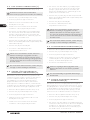
20 mm
13/16”
HEX
3 mm
HEX
6 mm
180°
180°
1
PH2
HEX
2.5 mm
HEX
2.5 mm
2
43
7
8
8
Locinox NV • Brabantstraat 107 • 8790 Waregem • Belgium
Locinox CEE• Irysowa 9 • 55-040 Bielany Wrocławskie • Poland
Locinox LLC • 460 Windy Point Drive • Glendale Heights - IL 60139 • USA

Valentino
CONFIGURATION MANUAL •PROGRAMMATIE
HANDLEIDING • MANUEL DE CONFIGURATION
• KONFIGURATIONSANLEITUNG • MANUAL DE
CONFIGURACIÓN • INSTRUKCJA KONFIGURACJI
• РУКОВОДСТВО ПО НАСТРОЙКЕ

2 2023-03-17 Rev 03 -Valentino
COPYRIGHT
Copyright© 2022 Locinox. All rights reserved. This product incorporates copyright protected technology that is
protected by a number of EU patent method claims and other intellectual property rights owned by the Locinox
Corporation and other rightholders.
Use of this copyright protected technology must be authorized by the Locinox Corporation. Reverse engineering or
disassembly is prohibited.
No part of this publication can either be reproduced, communicated, transcribed, stored in a retrieval system or
be translated into any language in any form or by any means, whether electronic, mechanical, magnetic, optical,
chemical, manual or otherwise, unless explicit written consent has been given by the copyright holder.
NOTICE
The contents of this publication are subject to change. The Locinox Corporation reserves the right to alter the contents
of this publication at any time and without notice. The contents of this publication may contain inaccuracies or
typographical errors and is supplied for informational use only.
TECHNICAL SUPPORT
If you require any additional information or assistance during the installation, please contact your dealer, who will be
able to provide the latest information. Alternatively, you can visit the Locinox website for more technical information or
e-mail us on [email protected]. Please keep the serial number at hand of your product for future support.

2023-03-17 Rev 03 - Valentino 3
Valentino
CONFIGURATION MANUAL • PROGRAMMATIE
HANDLEIDING • MANUEL DE CONFIGURATION
• KONFIGURATIONSANLEITUNG • MANUAL DE
CONFIGURACIÓN • INSTRUKCJA KONFIGURACJI
• РУКОВОДСТВО ПО НАСТРОЙКЕ

4 2023-03-17 Rev 03 -Valentino
Valentino
Up to 100
entry codes
Free exit
functioning
possible
Compatible
with push
handles
Extreme
weather
proof
IP 56
Easily
readable
digits by
LED lighting
PUSH
150K+ cycles
on same set
of batteries

2023-03-17 Rev 03 - Valentino 5
CONTENTS
EN 1. PRODUCT DESCRIPTION .................................................................................... 6
2. PROGRAMMING ................................................................................................ 6
3. FACTORY RESET UPON LOSS OF MASTER PIN ................................................ 8
4. FUNCTIONING OF VALENTINO ....................................................................... 8
5. MAINTENANCE .................................................................................................. 9
6. GENERAL INFORMATION ................................................................................. 9
7. WARRANTY .......................................................................................................... 9
NL 1. PRODUCTBESCHRIJVING................................................................................... 10
2. PROGRAMMERING ............................................................................................ 10
3. DE MASTERPINCODE RESETTEN BIJ VERLIES VAN DE MASTERPINCODE ........ 12
4. WERKING VAN DE VALENTINO ....................................................................... 12
5. ONDERHOUD...................................................................................................... 13
6. ALGEMENE INFORMATIE .................................................................................. 13
7. GARANTIE ............................................................................................................ 13
FR 1. DESCRIPTION DU PRODUIT ............................................................................... 14
2. PROGRAMMATION ............................................................................................ 14
3. RÉINITIALISATION EN CAS DE PERTE DU CODE PIN PRINCIPAL ...................... 16
4. FONCTIONNEMENT DE VALENTINO .............................................................. 16
5. ENTRETIEN ........................................................................................................... 17
6. INFORMATIONS GÉNÉRALES ........................................................................... 17
7. GARANTIE ............................................................................................................ 17
DE 1. PRODUKTBESCHREIBUNG ................................................................................. 18
2. PROGRAMMIERUNG ......................................................................................... 18
3. URÜCKSETZEN DES MASTERPINCODES BEI VERLUST DER MASTER PIN ........ 20
4. FUNKTIONSWEISE DES VALENTINO ............................................................... 20
5. WARTUNG ........................................................................................................... 21
6. ALLGEMEINE INFORMATIONEN ...................................................................... 21
7. GARANTIE ............................................................................................................ 21
ES 1. DESCRIPCIÓN DEL PRODUCTO ........................................................................ 22
2. PROGRAMACIÓN............................................................................................... 22
3. RESTABLECER EL PIN MAESTRO SI SE HA PERDIDO ....................................... 24
4. FUNCIONAMIENTO DE VALENTINO ............................................................... 24
5. MANTENIMIENTO .............................................................................................. 25
6. INFORMACIÓN GENERAL ................................................................................ 25
7. GARANTÍA ........................................................................................................... 25
PL 1. OPIS PRODUKTU ................................................................................................. 26
2. PROGRAMOWANIE ........................................................................................... 26
3. RESETOWANIE GŁÓWNEGO KODU PIN .............................................................. 28
4. FUNKCJONOWANIE VALENTINO .................................................................... 28
5. KONSERWACJA .................................................................................................. 29
6. INFORMACJE OGÓLNE ..................................................................................... 29
7. GWARANCJA ...................................................................................................... 29

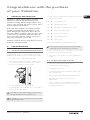
Congratulations with the purchase
of your Valentino
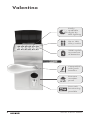
1. PRODUCT DESCRIPTION
Valentino is a high quality battery operated
electronic code lock with aluminium housing.
Valentino’s energy efficient design makes it very
easy to equip any gate with access control, with a
minimal need for maintenance.
Both sides of the Valentino are equipped with a
weather protected illuminated electronic code
panel. Using these code panels, PIN codes can
be easily added, modified or removed. Up to 100
codes can be programmed. Different codes can
be used for entry and exit, and the system also
supports permanently open codes.
Valentino supports the use of a pushbar, free-exit
and code controlled handles.
2. PROGRAMMING
2.1 ACCESS PROGRAMMING MODE
Valentino offers 2 alternative methods to enter the
programming menu: by using the Master PIN code
(default value ‘12345’), or by using the key contact:
• Press [#] for 5 sec, [#] will start flashing
• Either enter the Master PIN code, and press [#],
or turn and hold the key contact in the locking
direction for a duration of 2 seconds
• If a wrong Master PIN is entered, the
programming mode ends and time out procedure
as described in 4.2 applies
For safety reasons we strongly recommend to
change the Master PIN upon first use
If only [#] is lit, you are in the main menu of the
programming mode
• Select a menu and confirm with [#]. The following
menus are available:
[9] setup Master PIN
[1] manage PIN codes
[2] manage permanently open codes
[3] setup switching duration
[4] setup free exit mode
[5] setup lighting mode
[0] factory reset
See next paragraphs for detailed information
The programming mode ends automatically
when there is no activity for 60 seconds
• After selecting a menu, it’s possible to return to the
main menu by pressing the [C] key
• Press [C] for 5 seconds to exit the programming
mode
2.2 SETUP MASTER PIN [9]
• Access programming mode (see 2.1)
• Press [9] and confirm with [#]
• [9] and [#] are both lit
• The default Master PIN is 12345. It always has to
be a 5-digit code
• Enter a new 5-digit Master PIN and press [#]
• Repeat previous step to confirm the new
Master PIN
• If both codes are equal, all LEDs will light briefly
and you will return to the main menu of the
programming mode
EN
2023-03-17 Rev 03 - Valentino 6

2.3 MANAGE PIN CODES [1]
• Access programming mode (see 2.1)
A maximum of 100 different PIN codes can
be programmed (4-8 digits)
• Press [1] and confirm with [#]
• [1] and [#] are both lit
• Enter a new PIN code and confirm with [#]
• In case of a new code, the code will need to be
repeated and confirmed with [#]
• The lights below button [3] and [8] are indicating
on which side of the lock the code is valid. [8] is
used for the side the user is currently using, while
[3] is used for the other side
• Pressing [3] and [8] will select (permanently on) or
de-select (flashing) the corresponding side
• Press [#] to confirm
• You will return to the main menu of the
programming mode
When two different codes or a wrong code
length is entered, all keys will flash three times,
indicating the code setting hasn’t been saved.
Try again. [1] will remain lit
A code can be removed by de-selecting [3]
and [8] before confirmation
2.4 MANAGE PERMANENTLY OPEN
CODES [2]
PIN codes generated using menu [1] (manage PIN
codes) will unlock the lock for a predefined duration,
as configured in menu [3] (‘setup switching duration’).
In contrast, a ‘permanently open’ code has no
predefined duration to remain open, but will remain
open, until the same code (or another permanently
open code) is entered.
• Access programming mode (see 2.1)
• Press [2] and confirm with [#]
• [2] and [#] are both lit
• Enter a new PIN code and confirm with [#]
• In case of a new code, the code will need to be
repeated and confirmed with [#]
• The lights below button [3] and [8] are indicating
on which side of the lock the code is valid. [8] is
used for the side the user is currently using, while
[3] is used for the other side
• Pressing [3] and [8] will select (permanently on) or
de-select (flashing) the corresponding side
• Press [#] to confirm
• You will return to the main menu of the
programming mode
When two different codes or a wrong code
length is entered, all keys will flash three times,
indicating the code setting hasn’t been saved.
Try again. [2] will remain lit
A code can be removed by de-selecting [3]
and [8] before confirmation
2.5 SETUP SWITCHING DURATION [3]
• Access programming mode (see 2.1)
• Press [3] and confirm with [#]
• [3] and [#] are both lit
• Enter a value between 1 and 99, and confirm with
[#]. When all leds flash, your choice is saved
• You will return to the main menu
In case an invalid time is entered, all keys will
flash three times. Menu [3] remains activated
The default time is set at 8 seconds
2.6 SETUP FREE EXIT MODE [4]
The free-exit mode menu allows configuring a side
of the lock in ‘free exit mode’. On the free-exit side,
entering a PIN code is not required: just pressing any
key will unlock the lock for a predefined duration.
• Access programming mode (see 2.1)
• Press [4] and confirm with [#]
• [4] and [#] are both lit
• The lights below button [3] and [8] are indicating
which side of the lock is configured in free exit-
mode. [8] is used for the side the user is currently
using, while [3] is used for the other side
• Pressing [3] or [8] will select (permanently on) or
de-select (flashing) the corresponding side to be
configured in free-exit mode
• The selection is confirmed by pressing the [#] key
• You will return to the main menu of the
programming mode
The free-exit mode can be disabled by
de-selecting [3] and [8] before confirmation
EN
7 2023-03-17 Rev 03 -Valentino

2.7 SET LIGHTING MODE [5]
• Access programming mode (see 2.1)
• Press [5] and confirm with [#]
• [5] and [#] are both lit
• Choose the desired lighting mode:
[1] Auto dim (default):
During normal operation backlights are off.
As soon as a button is pressed, they go to full
brightness. After 5 seconds of inactivity the
lighting is switched off
[2] Backlight disabled:
The backlights will not light up upon pressing
a button
• Press [1] or [2] and confirm with [#]. When all
leds flash, your choice is saved
• You will return to the main menu
In case an invalid number is entered, all lights
flash three times. Try again. Menu [5] remains
activated
2.8 FACTORY RESET [0]
• Access programming mode (see 2.1)
• Press [0] and confirm with [#]
• [0] will flash rapidly to indicate an irreversible
action can be taken
• Enter the Master PIN and confirm by holding [#]
for 2 seconds
Instead of entering the Master PIN code, the
user can also confirm the reset by turning the
key contact in the locking direction for
a duration of 2 seconds
• When all LEDs flash, the factory reset is complete.
All settings are restored to default values
3. RESETTING THE MASTER PIN
UPON LOSS OF THE
MASTER PIN
Upon loss of the Master PIN code, it’s still possible to
enter the programming menu using the key contact,
as descibed in paragraph 2.1. After entering the
programming menu, the user can change the Master
PIN, as descibed in paragraph 2.2. Alternatively a
factory reset will also return the Master PIN to the
default value 12345.
4. FUNCTIONING OF VALENTINO
4.1 ENTER A CORRECT CODE
• Enter a PIN code (min. 4 - max. 8 digits)
• Press [#] to confirm
• A light sequence run from the left to the right across
the keypad, indicating that a correct code has
been entered
4.2 ENTER A WRONG CODE
• Enter a wrong PIN
• Press [#] to confirm
• All lights flash for 2 seconds, indicating a wrong
code has been entered
• If 5 or more wrong codes are entered
consecutively, you won’t be able to use the
Valentino for a certain period due to safety
reasons. The time out period is specified as
follows:
2[number of failed attempts] seconds
For example: 6 failed attempts result in a time out
period of 64 seconds (26 seconds)
The time out period is reset when a correct
code is entered, or if no new code was entered
during 2 hours
4.3 LOW BATTERY WARNING
When the batteries start running out, the low battery
indicator on the keypad will start flashing when
entering a code, indicating that the time has come to
replace the batteries.
EN
2023-03-17 Rev 03 - Valentino 8

Federal Trade Commission rules restrict sending unwanted commercial email messages to
computers
A discarded device can either be returned to your dealer or be sent back to Locinox. This product’s
recycling fee is € 0,2.
The WEEE marking on the product indicates that it may not be thrown away together with normal
household waste and must be handed over to a designated collection point for the recycling of
electrical and electronic rejects.
As manufacturer of this product, we guarantee that we have taken all the necessary steps in order to
comply with the current safety requirements for this product.
5. MAINTENANCE
• Clean the housing and display using a soft cloth,
moistened with a neutral cleaning agent
• Never use fuel or chemicals on the device since
they might harm the housing
6. GENERAL INFORMATION
• Please observe the local regulations on the deposit
of packaging material and of appliances no longer
in use. Our packaging material is eco-friendly.
It can be divided into 2 materials: cardboard (box)
and expandable polyester (buffer)
• Your device is made of recyclable materials
7. WARRANTY
A 2 year warranty covers all electronics
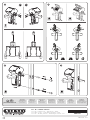
4.4 REPLACE BATTERIES
• Open keyboard
• Remove battery pack
• Always insert battery pack correctly, according to
the instructive arrow on the side of the battery.
Order battery pack here:
EN
Brand Locinox
Product Valentino
Model LOKQ4040Y2LZILVVSZC
Rating U = 4.5 VDC I = 5mA
Locinox HQ
Mannebeekstraat 21
8790 Waregem- Blegium
Locinox USA LLC
460-464 Windy Point Drive
Glendale Heights, IL 60319 - USA
HEX
2.5 mm
9 2023-03-17 Rev 03 -Valentino

Gefeliciteerd met de aankoop
van uw Valentino
1. PRODUCTBESCHRIJVING
Valentino is een batterijgevoed elektronisch
codeslot met aluminium behuizing. Dankzij het
energie-efficiënte ontwerp van Valentino is het
heel eenvoudig om elke poort uit te rusten met
onderhoudsarme toegangscontrole.
Beide kanten van de Valentino zijn uitgerust
met een weerbestendig verlicht elektronisch
codepaneel. Met behulp van deze codepanelen
kunt u eenvoudig pincodes toevoegen, wijzigen of
verwijderen. U kunt maximaal 100 codes instellen.
Verschillende codes kunnen worden gebruikt voor
in- en uitgang, en het systeem ondersteunt ook
codes voor permanent open.
Valentino ondersteunt het gebruik van een
anti-paniekopener, vrije uitgang en met code
bediende handgrepen.
2. PROGRAMMERING
2.1 PROGRAMMATIEMODUS
Valentino biedt twee alternatieve methoden om
naar de programmatiemodus te gaan: met de
masterpincode (standaardwaarde ‘12345’) of met
het sleutelcontact:
• Houd [#] 5 seconden lang ingedrukt, [#] begint
te knipperen
• Ofwel voert u de masterpincode in en drukt u
op [#], of u draait het sleutelcontact en houdt het
gedurende 2 seconden in de vergrendelde positie
• Als een foute masterpincode is ingevoerd,
eindigt de programmatiemodus en start de
pauzeprocedure zoals beschreven in 4.2
Om veiligheidsredenen raden we u aan om de
masterpincode te wijzigen bij het eerste gebruik
Als alleen [#] oplicht, bevindt u zich in het
hoofdmenu van de programmatiemodus
• Selecteer een menu en bevestig met [#]. De
volgende menu's zijn beschikbaar:
[9] masterpincode instellen
[1] pincodes beheren
[2] codes voor permanent open beheren
[3] schakelduur instellen
[4] modus voor vrije uitgang instellen
[5] verlichtingsmodus instellen
[0] fabrieksinstellingen herstellen
Zie de volgende paragrafen voor gedetailleerde
informatie
De programmatiemodus eindigt automatisch
als er gedurende 60 seconden geen activiteit is
• Nadat een menu gekozen is, keert u terug naar
het hoofdmenu door op [C] te drukken
• Houd [C] 5 seconden lang ingedrukt om de
programmatiemodus te verlaten
2.2 MASTERPINCODE [9]
INSTELLEN
• Ga naar de programmatiemodus (zie 2.1)
• Druk op [9] en bevestig met [#]
• [9] en [#] lichten op
• De standaard masterpincode is 12345
• Voer een nieuwe masterpincode van 5 cijfers in
en druk op [#]
• Herhaal de vorige stap om de nieuwe
masterpincode te bevestigen
• Als beide codes identiek zijn, lichten alle
leds kortstondig op en keert u terug naar het
hoofdmenu van de programmatiemodus
NL
2023-03-17 Rev 03 - Valentino 10

2.3 PINCODES BEHEREN [1]
• Ga naar de programmatiemodus (zie 2.1)
U kunt maximaal 100 verschillende pincodes
programmeren (4-8 cijfers)
• Druk op [1] en bevestig met [#]
• [1] en [#] lichten op
• Voer een nieuwe pincode in en bevestig met [#]
• In het geval van een nieuwe code moet u de code
herhalen en bevestigen met [#]
• De toetsen [3] en [8] geven aan aan welke kant
van het slot de code geldig is. [8] wordt gebruikt
voor de kant die de gebruiker op dit ogenblik
gebruikt, terwijl [3] voor de andere kant wordt
gebruikt
• Als u op [3] en [8] drukt, wordt de
overeenstemmende kant geselecteerd (permanent
aan) of niet geselecteerd (knipperen)
• Druk op [#] om te bevestigen
• U keert terug naar het hoofdmenu van de
programmatiemodus
Als twee verschillende codes worden
ingevoerd of als te weinig of te veel cijfers zijn
ingegeven, knipperen alle toetsen drie keer
om aan te geven dat de code niet bewaard is.
Probeer opnieuw. [1] blijft oplichten
Een code kan verwijderd worden door [3] en
[8] te de-selecteren vóór bevestiging
2.4 CODES VOOR PERMANENT
OPEN BEHEREN [2]
Pincodes die zijn aangemaakt met menu [1] (pincodes
beheren), ontgrendelen de vergrendeling voor een
vooraf bepaalde duur, zoals geconfigureerd in menu
[3] (‘schakelduur instellen’). Een code voor ‘permanent
open’ heeft dan weer geen vooraf bepaalde duur om
open te blijven, maar blijft open tot dezelfde code (of
een andere code voor permanent open) is ingevoerd.
• Ga naar de programmatiemodus (zie 2.1)
• Druk op [2] en bevestig met [#]
• [2] en [#] lichten op
• Voer een nieuwe pincode in en bevestig met [#]
• In het geval van een nieuwe code moet u de code
herhalen en bevestigen met [#]
• De toetsen [3] en [8] geven aan aan welke kant
van het slot de code geldig is. [8] wordt gebruikt
voor de kant die de gebruiker op dit ogenblik
gebruikt, terwijl [3] voor de andere kant wordt
gebruikt
• Als u op [3] en [8] drukt, wordt de
overeenstemmende kant geselecteerd (permanent
aan) of niet geselecteerd (knipperen)
• Druk op [#] om te bevestigen
• U keert terug naar het hoofdmenu van de
programmatiemodus
Als twee verschillende codes worden
ingevoerd of als te weinig of te veel cijfers zijn
ingegeven, knipperen alle toetsen drie keer
om aan te geven dat de code niet bewaard is.
Probeer opnieuw. [2] blijft oplichten
Een code kan verwijderd worden [3] en [8] te
de-selecteren vóór bevestiging
2.5 SCHAKELDUUR INSTELLEN [3]
• Ga naar de programmatiemodus (zie 2.1)
• Druk op [3] en bevestig met [#]
• [3] en [#] lichten op
• Voer een waarde tussen 1 en 99 in en bevestig
met [#]. Als alle leds knipperen, is uw keuze
opgeslagen
• U keert terug naar het hoofdmenu
Als een ongeldige duur is ingevoerd, knipperen
alle toetsen drie keer. Menu [3] blijft geactiveerd
De standaardduur is ingesteld op 8 seconden
2.6 MODUS VOOR VRIJE
UITGANG INSTELLEN [4]
Met de modus voor vrije uitgang kunt u kant van het
slot in 'modus voor vrije uitgang' configureren. Aan de
kant voor vrije uitgang moet geen pincode worden
ingevoerd: door louter op een toets te drukken wordt
de vergrendeling voor een vooraf bepaalde duur
ontgrendeld.
• Ga naar de programmatiemodus (zie 2.1)
• Druk op [4] en bevestig met [#]
• [4] en [#] lichten op
• De toetsen [3] en [8] geven aan welke kant
van het slot in de modus voor vrije uitgang
geconfigureerd is. [8] wordt gebruikt voor de kant
die de gebruiker op dit ogenblik gebruikt, terwijl
[3] voor de andere kant wordt gebruikt
• Als u op [3] of [8] drukt, wordt de
overeenstemmende kant geselecteerd (permanent
aan) of niet geselecteerd (knipperen) om in de
modus voor vrije uitgang te worden
geconfigureerd
• De selectie wordt bevestigd met een druk op
toets [#]
NL
11 2023-03-17 Rev 03 -Valentino

• U keert terug naar het hoofdmenu van de
programmatiemodus
De modus voor vrije uitgang kan worden
uitgeschakeld door [3] en [8] te de-selecteren
vóór bevestiging
2.7 VERLICHTINGSMODUS
INSTELLEN [5]
• Ga naar de programmatiemodus (zie 2.1)
• Druk op [5] en bevestig met [#]
• [5] en [#] lichten op
• Kies de gewenste verlichtingsmodus:
[1] Automatisch dimmen (standaard):
Tijdens normale werking is de
achtergrondverlichting gedoofd. Zodra een
knop wordt ingedrukt, licht het klavier op. De
verlichting wordt na 5 seconden inactiviteit
gedoofd
[2] Achtergrondverlichting uitgeschakeld:
De achtergrondverlichting licht niet op
wanneer op een knop wordt gedrukt
• Druk op [1] of [2] en bevestig met [#]. Als alle
leds knipperen, is uw keuze opgeslagen
• U keert terug naar het hoofdmenu
Als een ongeldig nummer is ingevoerd,
knipperen alle toetsen drie keer. Probeer
opnieuw. Menu [5] blijft geactiveerd
2.8 FABRIEKSINSTELLINGEN
HERSTELLEN [0]
• Ga naar de programmatiemodus (zie 2.1)
• Druk op [0] en bevestig met [#]
• [0] knippert snel om aan te geven dat een
onomkeerbare actie kan worden ondernomen
• Voer de masterpincode in en bevestig door [#]
minstens 2 seconden ingedrukt te houden
In plaats van een masterpincode invoeren kan
de gebruiker de reset ook bevestigen door het
sleutelcontact gedurende 2 seconden in de
vergrendelde positie te draaien
• Wanneer alle leds knipperen, is het terugzetten
naar de fabrieksinstellingen voltooid. Alle
standaardwaarden zijn hersteld
3. DE MASTERPINCODE RESETTEN
BIJ VERLIES VAN DE
MASTERPINCODE
Als u de masterpincode kwijt bent, kunt u nog altijd
naar het programmeringsmenu gaan met behulp van
het sleutelcontact, zoals beschreven in paragraaf
2.1. In het programmeringsmenu kan de gebruiker
de masterpincode wijzigen, zoals beschreven
in paragraaf 2.2. Na het terugzetten van de
fabrieksinstellingen is de standaard masterpincode
opnieuw 12345.
4. WERKING VAN DE VALENTINO
4.1 EEN CORRECTE CODE
INVOEREN
• Voer een pincode in (min. 4 en max. 8 cijfers)
• Druk op [#] om te bevestigen
• Een looplicht van links naar rechts op het
toetsenbord geeft aan dat een correcte code is
ingevoerd
4.2 EEN FOUTE CODE INVOEREN
• Voer een foute pincode in
• Druk op [#] om te bevestigen
• Alle lichten knipperen 2 seconden lang. Dit
betekent dat een foute code is ingegeven.
• Als u 5 of meer opeenvolgende keren een
foute code invoert, kunt u de Valentino om
veiligheidsredenen enige tijd niet gebruiken. De
pauzetijd wordt als volgt berekend:
2[aantal mislukte pogingen] seconden
Bijvoorbeeld: 6 mislukte pogingen leiden tot een
pauzetijd van 64 seconden (26 seconden)
De pauzetijd wordt gereset wanneer een juiste
code wordt ingegeven of als twee uur lang
geen nieuwe code werd ingevoerd
4.3 WAARSCHUWING VOOR
BATTERIJ BIJNA LEEG
Wanneer de batterijen bijna leeg zijn, begint de
batterij-indicator op het toetsenbord te knipperen
wanneer u een code invoert. Dit geeft aan dat het tijd
is om de batterijen te vervangen.
NL
2023-03-17 Rev 03 - Valentino 12

Merk Locinox
Product Valentino
Model LOKQ4040Y2LZILVVSZC
Beoordeling U = 4.5 VDC I = 5mA
Locinox HQ
Mannebeekstraat 21
8790 Waregem- Blegium
Locinox USA LLC
460-464 Windy Point Drive
Glendale Heights, IL 60319 - USA
4.4 BATTERIJEN VERVANGEN
• Open het codeklavier
• Verwijder de batterij
• Voeg de batterij altijd op de juiste manier in,
volgens de instructiepijl op de zijkant van de
batterij
•
Bestel de batterij hier:
De regels van de Federal Trade Commission beperken het verzenden van ongewenste
commerciële e-mailberichten naar computers
Een afgedankt product kan naar de verdeler of naar Locinox worden geretourneerd. De
recyclingbijdrage van dit product bedraagt € 0,2.
De WEEE-markering op het product geeft aan dat het niet met het gewone huishoudelijk afval mag
worden weggegooid en dat het product naar een specifiek inzamelpunt moet worden gebracht
voor recycling van elektrische en elektronische afgedankte producten.
Als fabrikant van dit product garanderen we u dat we alle nodige stappen ondernomen hebben
om te voldoen aan de huidige veiligheidsvereisten voor dit product.
5. ONDERHOUD
• Maak de behuizing en het scherm schoon met
een zacht doekje, bevochtigd met een neutraal
schoonmaakmiddel
• Gebruik nooit brandstof of chemische middelen
op het toestel, die kunnen de behuizing aantasten
6. ALGEMENE INFORMATIE
• Volg de plaatselijke reglementen voor het
weggooien van verpakkingsmateriaal en van
toestellen die niet meer worden gebruikt. Ons
verpakkingsmateriaal is milieuvriendelijk. Het kan
worden verdeeld in 2 materialen: karton (doos) en
uitzetbaar polyester (buffer)
• Uw toestel is gemaakt van recycleerbare
materialen
7. GARANTIE
Een garantie van 2 jaar dekt alle elektronica
NL
13 2023-03-17 Rev 03 -Valentino

Vous venez d’acquérir le modèle
Valentino et nous vous en félicitons!
1. DESCRIPTION DU PRODUIT
Valentino est une serrure à code électronique
de haute qualité fonctionnant à batteries et
dotée d’un boîtier en aluminium. La conception
écoénergétique de Valentino permet d’équiper
très facilement n’importe quel portail d’un contrôle
d’accès, sans toutefois nécessiter trop d’entretien.
Les deux côtés de Valentino sont équipés d’un
panneau à code électronique éclairé et résistant
aux intempéries. Vous pouvez ainsi facilement
ajouter, modifier ou supprimer des codes PIN. Il
est possible de programmer jusqu’à 100codes.
Différents codes peuvent être utilisés pour l’entrée
et la sortie. Le système prend également en charge
les codes ouverts en permanence.
Valentino est compatible avec une barre de
poussée, une poignée en sortie libre et une
poignée contrôlée par code.
2. PROGRAMMATION
2.1 ACCÈS AU MODE DE
PROGRAMMATION
Valentino propose 2méthodes pour accéder au menu
de programmation: avec le code PIN principal (valeur
par défaut‘12345’) ou avec le contacteur à clé:
• Appuyez sur [#] pendant 5secondes. [#] se met
à clignoter
• Saisissez le code PIN principal et appuyez sur
[#], ou tournez le contacteur à clé dans le sens de
verrouillage et maintenez-le pendant 2secondes
• Si le code PIN principal saisi est erroné, le mode
de programmation se ferme et la procédure de
temporisation décrite au point4.2 démarre
Pour des raisons de sécurité, nous vous
recommandons fortement de changer le PIN
principal lors de la première utilisation
Si seule la touche [#] est allumée, vous êtes dans
le menu principal du mode de programmation
• Sélectionnez un menu et confirmez votre choix
avec la touche [#]. Les menus suivants sont
disponibles:
[9] Configurer le code PIN principal
[1] Gérer les codes PIN
[2] Gérer les codes ouverts en permanence
[3] Configurer la durée de commutation
[4] Configurer le mode de sortie libre
[5] Configurer le mode d’éclairage
[0] Revenir aux paramètres d’usine
Consultez la section suivante pour plus d’informations
Le mode de programmation se ferme
automatiquement après 60secondes d’inactivité
• Après la sélection d’un menu, il est possible de
revenir au menu principal en appuyant sur la
touche [C]
• Appuyez sur la touche [C] pendant 5secondes
pour quitter le mode de programmation
2.2 CONFIGURER LE CODE PIN
PRINCIPAL [9]
• Passez en mode de programmation (voir 2.1)
• Appuyez sur la touche [9] et confirmez avec la
touche [#]
• Les touches [9] et [#] s’allument
• Le code PIN principal par défaut est 12345. Il doit
toujours s’agir d’un code à 5chiffres
• Saisissez un nouveau code PIN principal à
5chiffres et appuyez sur [#]
• Répétez l’étape précédente pour confirmer le
nouveau code PIN principal
• Si les deux codes sont identiques, l’ensemble des
LED s’allument brièvement, puis le menu principal
du mode de programmation s’affiche de nouveau
FR
2023-03-17 Rev 03 - Valentino 14

2.3 GÉRER LES CODES PIN [1]
• Passez en mode de programmation (voir 2.1)
Vous pouvez programmer jusqu’à 100codes
PIN différents (de 4 à 8chiffres)
• Appuyez sur la touche [1] et confirmez avec la
touche [#]
• Les touches [1] et [#] s’allument
• Saisissez un nouveau code PIN et confirmez avec
la touche [#]
• Dans le cas d’un nouveau code, vous devez
répéter ce code et le confirmer avec [#]
• Les voyants sous les boutons [3] et [8] indiquent
de quel côté de la serrure le code est valide. [8] est
utilisé pour le côté que l’utilisateur utilise actuellement,
tandis que [3] est utilisé pour l’autre côté
• Appuyez sur [3] ou sur [8] pour sélectionner
(allumage continu) ou désélectionner (clignotant)
le côté correspondant
• Confirmez l’opération en appuyant sur la touche [#]
• Vous retournez au menu principal du mode de
programmation
Si vous saisissez deux codes différents ou un
code de longueur inappropriée, toutes les
touches clignotent trois fois pour indiquer que la
programmation du code n’a pas été enregistrée.
Veuillez réessayer. La touche [1] reste allumée
Vous pouvez supprimer un code en
désélectionnant [3] et [8] avant la confirmation
2.4 GÉRER LES CODES OUVERTS EN
PERMANENCE [2]
Les codes PIN générés à l’aide du menu [1] (Gérer
les codes PIN) déverrouillent la serrure pour une
durée prédéfinie, telle que configurée dans le
menu [3] (Configurer la durée de commutation). En
revanche, un code «ouvert en permanence» n’a pas
de durée prédéfinie pour rester ouvert, mais le restera
jusqu’à ce que le même code (ou un autre code
ouvert en permanence) soit saisi
• Passez en mode de programmation (voir 2.1)
• Appuyez sur la touche [2] et confirmez avec la
touche [#]
• Les touches [2] et [#] s’allument
• Saisissez un nouveau code PIN et confirmez avec
la touche [#]
• Dans le cas d’un nouveau code, saisissez-le de
nouveau et confirmez avec [#]
• Les voyants sous les boutons [3] et [8] indiquent de
quel côté de la serrure le code est valide [8] est
utilisé pour le côté que l’utilisateur utilise actuellement,
tandis que [3] est utilisé pour l’autre côté
• Appuyez sur [3] ou sur [8] pour sélectionner
(allumage continu) ou désélectionner (clignotant)
le côté correspondant
• Confirmez l’opération en appuyant sur la touche [#]
• Vous retournez au menu principal du mode de
programmation
Si vous saisissez deux codes différents ou
un code de longueur inappropriée, toutes
les touches clignotent trois fois pour indiquer
que la programmation du code n’a pas été
enregistrée. Veuillez réessayer. La touche [2]
reste allumée
Vous pouvez supprimer un code en
désélectionnant [3] et [8] avant la confirmation
2.5 CONFIGURER LA DURÉE DE
COMMUTATION [3]
• Passez en mode de programmation (voir 2.1)
• Appuyez sur la touche [3] et confirmez avec la
touche [#]
• Les touches [3] et [#] s’allument
• Saisissez une valeur entre 1 et 99 et confirmez
avec la touche [#]. L’enregistrement de votre choix
est confirmé par un clignotement unique de toutes
les LED
• Vous retournez au menu principal
Si vous avez saisi une durée incorrecte, toutes
les touches clignotent trois fois. Le menu [3]
reste activé
La durée par défaut est réglée sur 8secondes
2.6 CONFIGURER LE MODE DE
SORTIE LIBRE [4]
Le menu du mode de sortie libre permet de configurer
un côté de la serrure en «mode de sortie libre.
Côté sortie libre, la saisie d’un code PIN n’est pas
nécessaire: il suffit d’appuyer sur n’importe quelle
touche pour déverrouiller la serrure pour une durée
prédéfinie.
• Passez en mode de programmation (voir 2.1)
• Appuyez sur la touche [4] et confirmez avec la
touche [#]
• Les touches [4] et [#] s’allument
• Les voyants sous les boutons [3] et [8] indiquent
quel côté de la serrure est configuré en mode de
sortie libre. [8] est utilisé pour le côté que l’utilisateur
utilise actuellement, tandis que [3] est utilisé pour
l’autre côté
FR
15 2023-03-17 Rev 03 -Valentino

• Appuyez sur [3] ou sur [8] pour sélectionner
(allumage continu) ou désélectionner (clignotant)
le côté correspondant à configurer en mode de
sortie libre
• Confirmez la sélection en appuyant sur la touche [#]
• Vous retournez au menu principal du mode de
programmation
Vous pouvez supprimer le mode de sortie libre en
désélectionnant [3] et [8] avant la confirmation
2.7 RÉGLAGE DU MODE
D’ÉCLAIRAGE [5]
• Passez en mode de programmation (voir 2.1)
• Appuyez sur la touche [5] et confirmez avec la
touche [#]
• Les touches [5] et [#] s’allument
• Choisissez le mode d’éclairage souhaité:
[1] Atténuation automatique (par défaut):
Pendant le fonctionnement normal, les
rétroéclairages sont éteints. Dès qu’un
bouton est actionné, ils passent en pleine
luminosité. Après 5secondes d’inactivité,
l’éclairage s’éteint
[2] Rétroéclairage désactivé:
Le rétroéclairage ne s’active pas quand un
bouton est actionné
• Appuyez sur la touche [1] ou [2] et validez avec
la touche [#]. L’enregistrement de votre choix est
confirmé par un clignotement unique de toutes
les LED
• Vous retournez au menu principal
Si vous avez saisi une valeur incorrecte, toutes
les LED clignotent trois fois. Veuillez réessayer.
Le menu [5] reste activé
2.8 REVENIR AUX PARAMÈTRES
D’USINE [0]
• Passez en mode de programmation (voir 2.1)
• Appuyez sur la touche [0] et confirmez avec la
touche [#]
• [0] clignote rapidement pour indiquer qu’une
action irréversible peut être entreprise
• Saisissez le PIN principal et confirmez en
maintenant [#] enfoncé pendant 2secondes
Au lieu de saisir le code PIN principal, vous
pouvez aussi confirmer la réinitialisation en
tournant le contacteur à clé dans le sens du
verrouillage pendant une durée de 2secondes
• Lorsque toutes les LED clignotent, la réinitialisation
d’usine est terminée. Tous les paramètres sont
restaurés aux valeurs par défaut
3. RÉINITIALISATION EN CAS DE
PERTE DU CODE PIN PRINCIPAL
En cas de perte du code PIN principal, il est
toujours possible d’entrer dans le menu de
programmation à l’aide du contacteur à clé, comme
décrit au paragraphe2.1. Une fois dans le menu
de programmation, vous pouvez modifier le PIN
principal, comme décrit au paragraphe2.2. Vous
pouvez aussi revenir aux paramètres d’usine, afin que
le code PIN principal retrouve sa valeur par défaut,
12345.
4. FONCTIONNEMENT DE
VALENTINO
4.1 SAISIE D’UN CODE CORRECT
• Saisissez un code PIN (de 4 à 8chiffres)
• Confirmez l’opération en appuyant sur la touche [#]
• Une séquence lumineuse s’exécute de gauche à
droite sur le clavier, indiquant qu’un code a bien
été saisi
4.2 SAISIE D’UN CODE INCORRECT
• Vous saisissez un code PIN incorrect
• Confirmez l’opération en appuyant sur la touche [#]
• Toutes les LED clignotent pendant 2secondes
pour signaler la saisie d’un code incorrect
• Après 5tentatives erronées ou plus, vous ne
pourrez plus utiliser Valentino pendant un certain
temps pour des raisons de sécurité. Le délai de
temporisation est calculé comme suit:
2[nombre de tentatives erronées] secondes.
Exemple: 6 tentatives erronées entraînent un délai
de temporisation de 64secondes (26secondes)
Le délai de temporisation est remis à 0 après la
saisie d’un code correct ou si aucun nouveau
code n’a été saisi pendant 2heures
4.3 AVERTISSEMENT DE BATTERIE
FAIBLE
Lorsque les batteries commencent à s’épuiser,
l’indicateur de batterie faible sur le clavier se met à
clignoter lors de la saisie d’un code, indiquant que les
batteries doivent être remplacées.
FR
2023-03-17 Rev 03 - Valentino 16

Marque Locinox
Produit Valentino
Modèle LOKQ4040Y2LZILVVSZC
Classement U = 4.5 VDC I = 5mA
Locinox HQ
Mannebeekstraat 21
8790 Waregem- Blegium
Locinox USA LLC
460-464 Windy Point Drive
Glendale Heights, IL 60319 - USA
Les règles de la Commission fédérale du commerce limitent l’envoi de messages électroniques
commerciaux non désirés sur les ordinateurs.
Tout appareil mis au rebut peut être retourné au revendeur ou renvoyé à Locinox. La contribution de
recyclage pour ce produit s’élève à 0,20€.
Le marquage DEEE (Déchets d’équipements électriques et électroniques) sur le produit indique
qu’il ne peut pas être mis au rebut avec d’autres déchets ménagers ordinaires et qu’il doit être
déposé dans une déchetterie agréée pour le recyclage des déchets d’équipements électriques et
électroniques.
En tant que fabricants de ce produit, nous garantissons avoir pris toutes les dispositions nécessaires
pour être en conformité avec les normes de sécurité en vigueur pour ce type de produit.
5. ENTRETIEN
• Nettoyez le boîtier et l’écran à l’aide d’un chiffon
doux, humidifié avec un nettoyant neutre
• N’utilisez jamais de l’essence ou un autre produit
chimique, car vous risqueriez d’endommager le
boîtier
6. INFORMATIONS GÉNÉRALES
• Veuillez respecter les réglementations locales
concernant la mise au rebut des matériaux
d’emballage et des appareils arrivés en fin de vie.
Nos emballages sont écologiques. Ils peuvent
être séparés en 2matériaux: carton (boîte) et
polyester expansé (calage)
• Le produit que vous avez acheté est fabriqué à
partir de matériaux recyclables
7. GARANTIE
Tous les composants électroniques sont couverts par
une garantie de 2ans
4.4 REMPLACER LES BATTERIES
• Ouvrez le clavier
• Retirer la batterie
• Veillez à toujours insérer correctement la batterie,
en vous référant à la flèche figurant sur le côté de
la batterie
Commander la batterie ici:
FR
17 2023-03-17 Rev 03 -Valentino

Herzlichen Glückwunsch zum Kauf
Ihres Valentino
1. PRODUKTBESCHREIBUNG
Valentino ist ein hochwertiges batteriebetriebenes
elektronisches Codeschloss mit Aluminiumgehäuse.
Das energieeffiziente Design von Valentino macht es
sehr einfach, jedes Tor mit einer Zugangskontrolle mit
minimalem Wartungsbedarf auszustatten.
Beide Seiten des Valentino sind mit einem
wettergeschützten beleuchteten elektronischen
Code-Eingabefeld ausgestattet. Mit diesen Code-
Eingabefeldern können PIN-Codes leicht hinzugefügt,
geändert oder entfernt werden. Es können bis zu
100 Codes programmiert werden. Für den Ein- und
Ausgang können unterschiedliche Codes verwendet
werden, und das System unterstützt auch Codes für
die dauerhafte Öffnung.
Valentino kann mit einem Free-Exit-, Stangen- und
codegesteuerten Griff verwendet werden.
2. PROGRAMMIERUNG
2.1 ZUGRIFF AUF DEN
PROGRAMMIERMODUS
Valentino bietet zwei alternative Methoden, um in das
Programmiermenü zu gelangen: über den Master-
PIN-Code (Standardwert '12345') oder über den
Schlüsselkontakt:
• Drücken Sie 5 Sekunden lang [#]. [#] fängt an
zu blinken
• Geben Sie entweder den Master-PIN-Code ein und
drücken Sie [#], oder halten Sie den Schlüsselkontakt
2 Sekunden lang in die Schließrichtung
• Bei Eingabe eines falschen Master-PIN-Codes
wird der Programmiermodus geschlossen und die
Wartezeit beginnt, wie unter4.2 beschrieben
Aus Sicherheitsgründen empfehlen wir
dringend, die Master-PIN bei der ersten
Benutzung zu ändern
Wenn nur [#] leuchtet, befinden Sie sich im
Hauptmenü des Programmiermodus
• Wählen Sie ein Menü aus und bestätigen Sie es
mit [#]. Die folgenden Menüs sind verfügbar:
[9] Master-PIN einrichten
[1] PIN-Codes verwalten
[2] Codes für dauerhafte Öffnung verwalten
[3] Schaltdauer einrichten
[4] Freier-Ausgang-Modus einrichten
[5] Beleuchtungsmodus einrichten
[0] Werkseinstellung
Ausführliche Informationen finden Sie in den nächsten
Abschnitten
Der Programmiermodus endet automatisch,
wenn 60 Sekunden lang keine Aktivität erfolgt
• Nach der Auswahl eines Menüs können Sie
durch Drücken der Taste [C] in das Hauptmenü
zurückkehren
• Drücken Sie [C] für 5Sekunden, um den
Programmiermodus zu verlassen
2.2 MASTER-PIN EINRICHTEN [9]
• Rufen Sie den Programmiermodus auf (s. 2.1)
• Drücken Sie [9] und bestätigen Sie mit [#]
• Sowohl [9] als auch [#] leuchten auf
• Der Standard-Master-PIN-Code lautet 12345.
Dieser Code muss immer 5-stellig sein
• Geben Sie einen neuen 5-stelligen
Master-PIN-Code ein und drücken Sie [#]
• Wiederholen Sie den vorherigen Schritt zur
Bestätigung des neuen Master-PIN-Codes
• Wenn beide Codes gleich sind, leuchten alle
LEDs kurz auf und Sie kehren zum Hauptmenü des
Programmiermodus zurück
DE
2023-03-17 Rev 03 - Valentino 18
Strona się ładuje...
Strona się ładuje...
Strona się ładuje...
Strona się ładuje...
Strona się ładuje...
Strona się ładuje...
Strona się ładuje...
Strona się ładuje...
Strona się ładuje...
Strona się ładuje...
Strona się ładuje...
Strona się ładuje...
-
 1
1
-
 2
2
-
 3
3
-
 4
4
-
 5
5
-
 6
6
-
 7
7
-
 8
8
-
 9
9
-
 10
10
-
 11
11
-
 12
12
-
 13
13
-
 14
14
-
 15
15
-
 16
16
-
 17
17
-
 18
18
-
 19
19
-
 20
20
-
 21
21
-
 22
22
-
 23
23
-
 24
24
-
 25
25
-
 26
26
-
 27
27
-
 28
28
-
 29
29
-
 30
30
-
 31
31
-
 32
32


w innych językach
- español: Locinox LOKQ4040 Manual de usuario
- Deutsch: Locinox LOKQ4040 Benutzerhandbuch
- français: Locinox LOKQ4040 Manuel utilisateur
- Nederlands: Locinox LOKQ4040 Handleiding