JANOME Elna Lotus Instrukcja obsługi
- Kategoria
- Maszyny do szycia
- Typ
- Instrukcja obsługi

JanomeFlyer.com
Elna Lotus
Instruction Manual
Elna Lotus Sewing Machine Instruction Manual
www.janomeflyer.com
Lotus Owners Manual/ User Guide

JanomeFlyer.com
IMPORTANT SAFETY INSTRUCTIONS
This appliance is not intended for use by persons (including children) with reduced physical, sensory or mental
capabilities, or lack of experience and knowledge, unless they have been given supervision or instruction concerning
use of the appliance by a person responsible for their safety.
Children should be supervised to ensure that they do not play with the appliance.
When using an electrical appliance, basic safety precautions should always be followed, including the
following:
This sewing machine is designed and manufactured for household use only.
Read all instructions before using this sewing machine.
Please note that on disposal, this product must be safely recycled in accordance with relevant National legislation relating to
electrical/electronic products. If in doubt please contact your retailer for guidance. (European Union only)
DANGER
—
To reduce the risk of electric shock:
An appliance should never be left unattended when plugged in. Always unplug this sewing machine from the
electric outlet immediately after using and before cleaning.
WARNING
—
To reduce the risk of burns, fire, electric shock, or injury to persons:
1. Do not allow to be used as a toy. Close attention is necessary when this sewing machine is used by or near
children.
2. Use this appliance only for its intended use as described in this owner’s manual.
Use only attachments recommended by the manufacturer as contained in this owner’s manual.
3. Never operate this sewing machine if it has a damaged cord or plug, if it is not working properly, if it has been
dropped or damaged, or dropped into water.
Return this sewing machine to the nearest authorized dealer or service center for examination, repair, electrical or
mechanical adjustment.
4. Never operate the appliance with any air opening blocked. Keep ventilation openings of this sewing machine and
foot controller free from accumulation of lint, dust and loose cloth.
5. Never drop or insert any object into any opening.
6. Do not use outdoors.
7. Do not operate where aerosol (spray) products are being used or where oxygen is being administered.
8. To disconnect, turn all controls to the off (“O”) position, then remove plug from outlet.
9. Do not unplug by pulling on cord. To unplug, grasp the plug, not the cord.
10. Keep fingers away from all moving parts. Special care is required around the sewing machine needle.
11. Always use the proper needle plate. The wrong plate can cause the needle to break.
12. Do not use bent needles.
13. Do not pull or push fabric while stitching. It may deflect the needle causing it to break.
14. Switch this sewing machine off (“O”) when making any adjustment in the needle area, such as threading the
needle, changing the needle, threading the bobbin or changing the presser foot, and the like.
15. Always unplug this sewing machine from the electrical outlet when removing covers, lubricating, or when making
any other adjustments mentioned in this owner’s manual.
SAVE THESE INSTRUCTIONS
Elna Lotus Sewing Machine Instruction Manual
www.janomeflyer.com
Lotus Owners Manual/ User Guide

JanomeFlyer.com
Table of Contents
SECTION I. NAMES OF PARTS
Names of Parts ........................................................... 2-3
Standard Accessories ................................................... 3
Accessory Storages ...................................................... 4
Protection Flaps ............................................................ 5
SECTION II. GETTING READY TO SEW
Connecting the Power Supply ....................................... 6
Before Using Your Sewing Machine .............................. 6
Operating Instructions ................................................... 6
Presser Foot Lifter ......................................................... 7
Changing the Presser Foot ........................................... 7
Removing and Attaching the Foot Holder ..................... 7
Changing the Needle ..................................................... 8
Selecting Thread and Needles ...................................... 8
Needle Definitions ......................................................... 9
Machine Operating Buttons .......................................... 10
Pattern Selection ......................................................... 11
LCD Display ..................................................................11
Speed Control Slider ....................................................11
Controlling Sewing Speed ............................................11
Bobbin Winding ....................................................... 12-14
Threading the Machine ............................................15-17
Adjusting the Needle Thread Tension ..........................18
Dropping or Raising the Feed Dog ............................... 19
Correcting Distorted Stretch Stitch Patterns ................19
Setting Mode .......................................................... 20-21
SECTION III. BASIC SEWING
Straight Stitch Sewing ............................................ 22-23
Lock-a-Matic Stitch .......................................................24
Triple Stretch Stitch ......................................................24
Stretch Stitch ................................................................24
Zigzag Stitch ................................................................ 25
Multiple Zigzag ............................................................ 25
Super Stretch Stitch .................................................... 26
Super Overlock Stitch ................................................. 26
Overedge Stitch........................................................... 26
Zipper Sewing .........................................................27-28
Rolled Hem .................................................................. 29
Pintuckis ...................................................................... 30
Gathering ..................................................................... 30
Button Sewing ..............................................................31
Blind Hem .................................................................... 32
Applique ...................................................................... 33
Fringing ........................................................................ 33
Sculpture Stitch ........................................................... 34
Patchwork .................................................................... 34
Bridging (Fagoting) ...................................................... 35
Attaching Elastic .......................................................... 35
Scallop edges .............................................................. 35
Various Kinds of Buttonholes and Their Uses ............. 36
Classic Square Buttonhole .....................................36-38
Adjusting the Stitch Width and Density for
Buttonholes ................................................................. 39
Corded Buttonhole ...................................................... 40
Classic Keyhole Buttonhole ......................................... 40
Darning Stitch ............................................................... 41
SECTION IV CARE OF YOUR MACHINE
Cleaning the Hook Race, Feed Dog and the Thread
Cutter Mechanism ....................................................... 42
Installing the Bobbin Holder ........................................ 42
Problems and Warning Signs ...................................... 43
Troubleshooting ........................................................... 44
Elna Lotus Sewing Machine Instruction Manual
www.janomeflyer.com
Lotus Owners Manual/ User Guide

JanomeFlyer.com
2
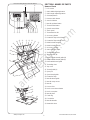
SECTION I. NAMES OF PARTS
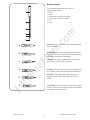
Names of Parts
q LCD screen
w Stitch width adjusting buttons
e Stitch length adjusting buttons
r Start/stop button
t Reverse stitch button
y Auto-lock button
u Needle up/down button
i Thread cutter button
o Speed control slider
!0 Touch panel
!1 Thread tension dial
!2 Accessory drawer
!3 Protection flaps unlock button
!4 Protection flaps release lever
!5 Bobbin winder stopper
!6 Bobbin winder spindle
!7 Accessory storage
!8 Stitch reference chart
!9 Thread take-up lever
@0 Thread guide (B)
@1 Bobbin winder thread guide (B)
@2 Bobbin winder thread guide (A)
@3 Retractable thread guide
@4 Threading chart
@5 Top cover
@6 Thread guide (A)
@7 Spool pin
@8 Spool thread guide
@9 Protection flaps
#0 Needle thread guide
#1 Needle cramp screw
#2 Needle
#3 Presser foot
#4 Hook cover release button
#5 Hook cover plate
#6 Needle plate
#7 Feed dog
#8 Foot holder
#9 Needle threader
$0 Buttonhole lever
r t
y
u
!3
i
!1
o
!4
!5
!0
!6
!7
!8
!9
@0
@1
@2
@3
@4
@5
@6
@7
@8
@9
@9
q w e
!2
#0
#1
#2
#3
#4
#5
#6
#7
#8
#9
$0
Elna Lotus Sewing Machine Instruction Manual
www.janomeflyer.com
Lotus Owners Manual/ User Guide

JanomeFlyer.com
3
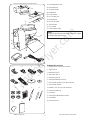
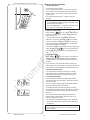
NOTE:
Sewing machine design and specifications are subject
to change without prior notice.
$1
$2
$3
$4
$5
$6
$7
$8
$9
%0
%1
$1 Feed adjusting screw
$2 Drop feed lever
$3 Carrying handle
$4 Handwheel
$5 Power switch
$6 Foot control jack
$7 Machine inlet
$8 Presser foot lifter
$9 Thread cutter
%0 Foot control
%1 Power supply cable
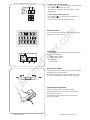
Standard Accessories
q
Zigzag foot:
A (set on the machine)
w
Zipper foot: E
e
Blind hem foot: G
r
Satin stitch foot: F
t
Rolled hem foot: D
y
Automatic buttonhole foot: R
u
Spool holder (large) (set on the machine)
i
Spool holder (small)
o
Bobbins ( X 4) (1 set on the machine)
!0
Assorted needle set
!1
Lint brush
!2
Seam ripper (Buttonhole opener)
!3
Screwdriver
!4
Instruction book
q w e r
t y u i
o !0 !1 !2
!3 !4
Elna Lotus Sewing Machine Instruction Manual
www.janomeflyer.com
Lotus Owners Manual/ User Guide

JanomeFlyer.com
4
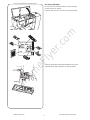
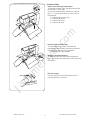
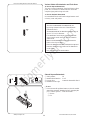
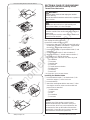
Accessory Storages
Accessories can be stored in the accessory storage
and the accessory drawer.
Open the top cover to access the accessory storage.
Open the protection flap (front) and pull the tab on the
right side of the flap to open the accessory drawer.
Elna Lotus Sewing Machine Instruction Manual
www.janomeflyer.com
Lotus Owners Manual/ User Guide

JanomeFlyer.com
5
Protection Flaps
•Openingandclosingprotectionaps
To open the protection flaps, slide the protection flap
release lever q to the right.
To close the protection flaps, fold the rear and front
flaps w e, then fold the left flap r until it snaps to
the both flaps.
q Protection flaps release lever
w Protection flap (front)
e Protection flap (rear)
r Protection flap (left)
q
w
e
r
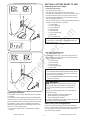
•Detachingtheprotectionaps
To detach the protection flaps, push down the
protection flap unlock button, and pull the protection
flaps away from the machine as illustrated.
t Protection flaps unlock button
•Attachingtheprotectionaps
To attach the protection flaps, push the protection
flaps, inserting the hook into the hole until it snaps into
the machine.
•Free-armsewing
Free-arm sewing is useful for darning socks and
mending the knee or cuff areas.
t
Elna Lotus Sewing Machine Instruction Manual
www.janomeflyer.com
Lotus Owners Manual/ User Guide

JanomeFlyer.com
6
WARNING:
While in operation, always keep your eyes on the
sewing area and do not touch any moving parts
such as the thread take-up lever, handwheel or
needle.
Always turn off the power switch and unplug from
the power supply:
- when leaving the machine unattended.
- when attaching or removing parts.
- when cleaning the machine.
Do not place anything on the foot control, otherwise
the machine will run inadvertently.
SECTION II. GETTING READY TO SEW
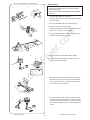
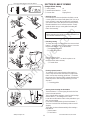
ConnectingthePowerSupply
•Usingthefootcontrol
Turn off the power switch q.
Pull the foot control cord from the foot control.
Insert the foot control plug w into the foot control jack e.
Insert the machine plug r into the machine inlet t.
Insert the power supply plug y into the wall outlet u.
Turn on the power switch q.
The foot control sign i will be displayed when the foot
control is connected to the machine.
q Power switch
w Foot control plug
e Foot control jack
r Machine plug
t Machine inlet
y Power supply plug
u Wall outlet
i Foot control sign
•Usingthestart/stopbutton
Turn off the power switch q.
Insert the machine plug w into the machine inlet e.
Insert the power supply plug r into the wall outlet t.
Turn on the power switch q.
q Power switch
w Machine plug
e Machine inlet
r Power supply plug
t Wall outlet
NOTES:
•Themachinewillbeinitializedwhenturningonthe
power switch. Do not touch the machine while the
machine is being initialized.
•Thestart/stopbuttondoesnotworkwhenthefoot
control is connected.
BeforeUsingYourSewingMachine
Before using your sewing machine for the first time,
place a scrap of fabric under the presser foot and run the
machine without thread for a few minutes. Wipe away
any oil which may appear.
OperatingInstructions:
The symbol “O” on a switch indicates the “off” position
of a switch.
For appliances with a polarized plug (one blade wider
than the other): To reduce the risk of electric shock, this
plug is intended to fit in a polarized outlet only one way.
If it still does not fit, contact a qualified electrician to
install the proper outlet. Do not modify the plug in any
way (U.S.A. and Canada only).
* Foot control model 21371 is used with this sewing
machine.
q
w
e
t
u
y
r
i
q
e
t
r
w
NOTE:
Do not pull the cord of foot control beyond the red
marker on the cord.
Elna Lotus Sewing Machine Instruction Manual
www.janomeflyer.com
Lotus Owners Manual/ User Guide

JanomeFlyer.com
7
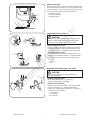
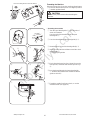
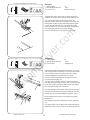
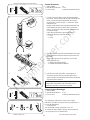
ChangingthePresserFoot
CAUTION:
Turn OFF the power switch before changing the foot.
Always use the proper foot for the selected pattern.
The wrong foot can cause the needle to break.
•Removingthepresserfoot
Raise the needle to its highest position by turning the
handwheel counterclockwise. Raise the presser foot,
and press the lever q on the back of the foot holder.
•Attachingthepresserfoot
Place the selected presser foot so that the pin e on
the foot lies just under the groove w in the foot holder.
Lower the presser bar to lock the foot into the place.
q Lever
w Groove
e Pin
RemovingandAttachingtheFootHolder
•Removingthefootholder
Remove the thumbscrew q by turning it
counterclockwise with a screwdriver.
•Attachingthefootholder
Align the hole in the foot holder w with the threaded
hole in the presser bar e. Fit the thumbscrew q
into the hole. Tighten the thumbscrew q by turning it
clockwise with a screwdriver.
q Thumbscrew
w Foot holder
e Presser bar
CAUTION:
Turn OFF the power switch before detaching or
attaching foot holder.
q
w
e
q
w
e
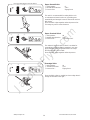
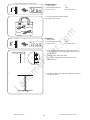
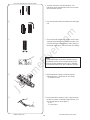
Presser Foot Lifter
The presser foot lifter q raises and lowers the presser foot.
You can raise the foot about 1/4˝ (0.6 cm) higher than the
normal up position w for easy removal of the presser foot,
or to help you place thick material under the foot.
q Presser foot lifter
w Normal up position
e Highest position
q
w
e
q
we
Elna Lotus Sewing Machine Instruction Manual
www.janomeflyer.com
Lotus Owners Manual/ User Guide

JanomeFlyer.com
8
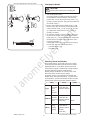
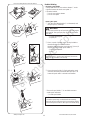
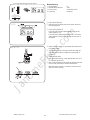
ChangingtheNeedle
z Turn off the power switch.
Raise the needle to its highest position by turning
the handwheel counterclockwise, and lower the
presser foot. Loosen the needle clamp screw q by
turning it counterclockwise. Remove the needle from
the needle clamp w.
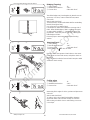
x Insert a new needle into the needle clamp w with
the flat side to the rear. When inserting the needle
into the needle clamp w, push it up as far as it will
go. Tighten the needle clamp screw q firmly by
turning it clockwise.
c To see if the needle is in good condition, place the
flat side of the needle onto something flat (needle
plate, glass, etc.). The gap between the needle and
the flat surface should be consistent. Never use a
bent or blunt needle.
A damaged needle can cause permanent snags or
runs in knits, fine silks and silk-like fabrics.
q Needle clamp screw
w Needle clamp
CAUTION:
Turn OFF the power switch before changing the
needle.
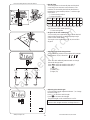
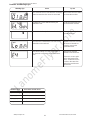
Fabric
Light
Thread
Medium
Heavy
Lawn
Georgette
Tricot
Wool,
Polyester
Cotton,
Polyester
Fine jersey
Wool
Denim
Jersey
Coating
Quilting
Silk #80-100
Cotton #80-100
Synthetic #80-100
Silk #50
Cotton #60-80
Synthetic #50-80
Cotton #50
Silk #50
Cotton #40-50
Synthetic #40-50
Silk #30
Cotton #50
#9/65–11/75
#11/75–14/90
#14/90
#14/90–16/100
#16/100
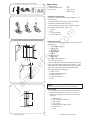
SelectingThreadandNeedles
For general sewing, use needle size 11/75 or 14/90.
A fine thread and needle should be used for sewing
lightweight fabrics, so the fabric will not be marred.
Heavy fabrics require a needle large enough to pierce
the fabric without fraying the needle thread.
Always test the needle size on a small scrap of the
fabric that will be used for actual sewing.
In general, use the same thread for the needle and
bobbin. When sewing stretch fabrics, very fine fabrics
and synthetics, use a BLUE TIPPED needle. The blue
tipped needle effectively prevents skipped stitches.
Needle
q w
Elna Lotus Sewing Machine Instruction Manual
www.janomeflyer.com
Lotus Owners Manual/ User Guide

JanomeFlyer.com
9
q
w
e
r
t
y
A
B
C
D
E
F
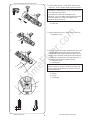
Needle Definitions
The illustration identifies the main parts of a
sewing machine needle.
q
Body
w
Shaft
e
Long groove (round side of needle)
r
Short groove (flat side of needle)
t
Eye
y
Point
A:Universal
– an all-purpose needle that handles
most
woven and knit fabrics.
B: Ball point
– the point spreads the fibers,
preventing
tears and is especially suited for loose knits and interlock
knits. Not recommended for embroidery.
C: Denim
– the sharp point effectively pierces densely
woven fabrics such as denim and canvas.
D:Stretch
– specially designed to prevent skipped stitch-
es in synthetic suedes and elasticized knits (swimwear).
E:Leather
– the cutting point creates small holes in
leather and suede. Holes remain after stitching is re-
moved.
F:Topstitching
– the extra sharp point penetrates layers
of fabrics; extra large eye and large groove accommodate
heavyweight topstitching thread.
Elna Lotus Sewing Machine Instruction Manual
www.janomeflyer.com
Lotus Owners Manual/ User Guide

JanomeFlyer.com
10
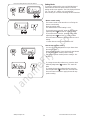
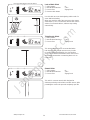
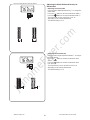
w Reversestitchbutton
When stitches (01, 05, 06) are selected, the
machine will sew in reverse while the reverse stitch
button is pressed.
If you press the reverse stitch button when stitch
pattern 01, 05 or 06 is selected and the foot control
is not connected, the machine will sew in reverse as
long as the button is pressed, and the machine will
stop when the button is released.
If you press the reverse stitch button when sewing any
other stitches except (02, 18), the machine will
immediately sew locking stitches and automatically
stop.
e Auto-lockbutton
When stitches (01, 05, 06) are selected, the
machine will sew immediately sew locking stitches
and automatically stop when the auto-lock button is
pressed.
If you press the auto-lock button when sewing any
other stitches, the machine will sew locking stitches at
the end of the current pattern and automatically stop.
r Needleup/downbutton
Press this button to bring the needle up or down.
The machine will stop with the needle up or down
depending on the machine setting (see page 20).
t ThreadCutterButton
Press this button to trim the threads after sewing.
The thread cutter sign will blink y while the machine
cuts the threads.
You can continue sewing without pulling the bobbin
thread up after trimming the threads.
To trim the threads automatically after the sewing,
select the desired stitch pattern, then press and hold
the thread cutter button until the thread cutter sign
appears u.
The machine will automatically stop and trim the
threads after locking stitches when the reverse or
auto-lock button is pressed.
* To cancel the auto-thread cutting, press and hold
the thread cutter button until the thread cutter sign
disappears.
NOTE:
Use the thread cutter on the face cover if the thread
is #30 or thicker.
MachineOperatingButtons
q Start/Stopbutton
Lower the presser foot lifter.
Press the start/stop button q to start the machine.
The machine starts running slowly for the first few
stitches; it then runs at the speed set by the speed
control slider.
Press the start/stop button q again to stop the
machine.
NOTES:
•Themachinerunsslowlyaslongasyoupressand
hold the start/stop button q.
•Thestart/stopbuttonq cannot be used when the
foot control is connected to the machine.
q
w
e
r t
y
u
Elna Lotus Sewing Machine Instruction Manual
www.janomeflyer.com
Lotus Owners Manual/ User Guide

JanomeFlyer.com
11
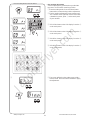
i Stitchwidthadjustingbutton
Press “ ” or “ ” to change the stitch width or needle
drop position (see pages 23 and 25).
The indicator !0 will show the stitch width or needle
drop position.
o Stitchlengthadjustingbutton
Press “ ” or “ ” to change the stitch length (see
pages 23 and 25).
The indicator !1 will show the stitch length.
i o
!0 !1
Speed Control Slider
Sewing speed can be varied by the speed control slider
according to your sewing needs.
To increase sewing speed, slide the slider to the right.
To decrease sewing speed, slide the slider to the left.
ControllingSewingSpeed
Depress the foot control to start the machine.
The further down you press on the foot control, the
faster the machine runs.
The maximum sewing speed can be varied by the
speed control slider.
Pattern Selection
You can select stitch patterns directly by pressing the
pattern keys on the touch panel.
LCD Display
The LCD display shows the following information when
the machine is turned on:
q Stitch pattern number
w Type of presser foot
e Stitch width
r Stitch length
q e
r
w
Elna Lotus Sewing Machine Instruction Manual
www.janomeflyer.com
Lotus Owners Manual/ User Guide

JanomeFlyer.com
12
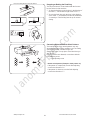
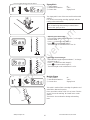
•Settingthespool
z Turn the spool thread guide e as illustrated, and
the spool pin r will lift up.
WARNING
Do not lean over the top of spool pin when turning the
spool guide. The spool pin pops up and it may strike
your face.
e Spool thread guide
r Spool pin
Bobbin Winding
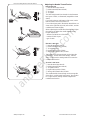
•Removingthebobbin
Gently slide the hook cover release button q to the
right and remove the hook cover plate w.
Lift out the bobbin.
q Hook cover release button
w Hook cover plate
q
w
e
r
t
u
x
c
z
t
r
x Place a spool of thread on the spool pin with the
thread running off counterclockwise.
Draw the thread from the spool about 4˝ (10 cm) of
thread. Attach the large spool holder t.
t Large spool holder
y Slit
c Press the spool holder t firmly against the spool
of thread, and then push down the spool pin r to
lower the spool until it is locked in the bottom.
* The small spool holder u is used with narrow or
small spools of thread.
u Small spool holder
NOTE:
If a rimless spool may not let thread out smoothly,
place the spool on the spool pin in up position and do
not use the spool holder so the spool can rotate freely.
NOTE:
If there is a slit y on the spool of thread, be sure to
place the spool with the slit end up.
y
Elna Lotus Sewing Machine Instruction Manual
www.janomeflyer.com
Lotus Owners Manual/ User Guide

JanomeFlyer.com
13
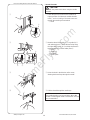
•Bobbinwinding
NOTES:
•Setthespeedcontrolslideratitsfastestposition
for bobbin winding.
•Closetheretractablethreadguideafterthebobbin
winding.
z Turn the spool guide as illustrated.
Draw the thread from the spool and pass it through
the spool guide.
x Pass the thread through the thread guide (A).
c Raise the retractable thread guide.
Guide the thread around the bobbin winder thread
guide (A) q and (B) w as illustrated.
v Pass the thread through the hole in the top of the
bobbin from the inside to outside.
b Put the bobbin on the bobbin winder spindle.
n Push the bobbin to the right. The bobbin mark e
appears on the LCD display.
m With the free end of the thread held in your hand,
start the machine. Stop the machine when bobbin
has wound a few layers, and then cut the thread
close to the hole in the bobbin.
, Start the machine again. When the bobbin is fully
wound, it will stop automatically. Stop the machine
and return the bobbin winder to its original position
by moving the spindle to the left. Cut the thread as
shown.
z x
v
b n
e
m
,
c
q
w
Elna Lotus Sewing Machine Instruction Manual
www.janomeflyer.com
Lotus Owners Manual/ User Guide

JanomeFlyer.com
14
•Insertingthebobbin
z Place a bobbin in the bobbin holder w with the
thread running off counterclockwise.
q End of thread
w Bobbin holder
x Guide the thread into the first notch e on the front
side of the bobbin holder.
e Notch
c Draw the thread to the left, sliding it between the
tension spring blades.
v Continue to draw the thread lightly until the thread
slips into the second notch r. Pull out about 4˝ (10
cm) of thread.
r Notch
b Attach the hook cover plate. Check the threading
by referring to the diagram t shown on the hook
cover plate.
t Threading diagram
y End of thread
z
x
c
v
b
q
e
r
t
w
y
Elna Lotus Sewing Machine Instruction Manual
www.janomeflyer.com
Lotus Owners Manual/ User Guide

JanomeFlyer.com
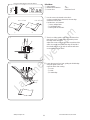
15
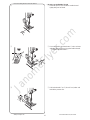
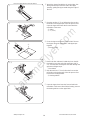
ThreadingtheMachine
Raise the presser foot. Press the needle up/down button
q to raise the thread take-up lever to its highest position.
q Needle up/down button
CAUTION:
Turn OFF the power switch before threading the
machine.
•Threadingthemachine
z Turn the spool thread guide w in the direction of
arrow as illustrated.
Pass the end of the thread through the spool
thread guide w.
x Pass the thread through the thread guide (A) e.
q
w
z
x
c
v
b
z x
c v
b n
e
r
t
y
n
m
u
i
c Draw the thread around the thread guide (B) r.
v Draw the end of the thread down around the check
spring holder t.
t Check spring holder
b Firmly draw the thread up from right to left over the
take-up lever, and down into the take-up lever eye
y.
n Pass the thread through the lower thread guide
u. Slide the thread behind the needle bar thread
guide on the left i.
m Thread the needle from front to back, or use the
needle threader (see page 16).
m
Elna Lotus Sewing Machine Instruction Manual
www.janomeflyer.com
Lotus Owners Manual/ User Guide

JanomeFlyer.com
16
NOTE:
The needle threader can be used with a #11 to #16
needle or a blue tipped needle. Thread sizes 50 to 90
are recommended.
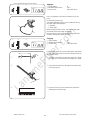
•NeedleThreader
CAUTION:
Turn OFF the power switch when using the needle
threader.
z Lower the presser foot. Raise the needle to its
highest position. Pull down the needle threader
knob q as far as it will go. The hook comes out
through the needle eye from behind.
q Knob
x Draw the thread from guide (a) e to guide (b) r
and under the hook w. Draw the thread up along
the right side of guide (b) r and slip the thread in
between guide (b) and the holder plate t.
w Hook
e Guide (a)
r Guide (b)
t Holder plate
c Raise the knob in the direction of the arrow,
drawing the thread loop through the needle.
v Pull the thread through the needle eye.
q
w
t
r
w
e
z
x
c
v
Elna Lotus Sewing Machine Instruction Manual
www.janomeflyer.com
Lotus Owners Manual/ User Guide

JanomeFlyer.com
17
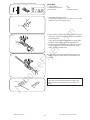
•DrawinguptheBobbinThread
z Raise the presser foot. Hold the needle thread
lightly with your left hand.
x Press the needle up/down button q twice to lower
and raise the needle to pick up the bobbin thread.
q Needle up/down button
c Pull both threads 4˝ to 6˝ (10 to 15 cm) under and
behind the presser foot.
q
z
x
c
Elna Lotus Sewing Machine Instruction Manual
www.janomeflyer.com
Lotus Owners Manual/ User Guide

JanomeFlyer.com
18
•Tensionistooloose
q Needle thread (top thread)
w Bobbin thread (bottom thread)
e To tighten tension
r Right side (top side) of fabric
t Wrong side (bottom side) of fabric
The needle thread shows through on the wrong side
of the fabric, and the stitch feels bumpy. Turn the dial
to a higher tension setting number to tighten the
needle thread tension.
•Tensionistootight
q Needle thread (top thread)
w Bobbin thread (bottom thread)
e To loosen tension
r Right side (top side) of fabric
t Wrong side (bottom side) of fabric
The bobbin thread shows through on the right side
of the fabric, and the stitch feels bumpy. Turn the
dial to a lower tension setting number to loosen the
needle thread tension.
AdjustingtheNeedleThreadTension
•Correcttension
q Needle thread (top thread)
w Bobbin thread (bottom thread)
e To loosen
r To tighten
The ideal straight stitch has threads locked between
two layers of fabric, as illustrated (magnified to show
detail).
If you look at the top and bottom of the seam, notice
that the stitches are evenly balanced.
For an ideal zigzag stitch, the bobbin thread does not
show on the right side (top side) of the fabric, and the
needle thread shows slightly.
When adjusting the needle thread tension, the higher
the number, the tighter the needle thread tension.
Results depend on:
- stiffness and thickness of the fabric
- number of fabric layers
- type of stitch
q
q
w
e
r
w
e
r
t
q
w
r
t
e
Elna Lotus Sewing Machine Instruction Manual
www.janomeflyer.com
Lotus Owners Manual/ User Guide
Strona się ładuje...
Strona się ładuje...
Strona się ładuje...
Strona się ładuje...
Strona się ładuje...
Strona się ładuje...
Strona się ładuje...
Strona się ładuje...
Strona się ładuje...
Strona się ładuje...
Strona się ładuje...
Strona się ładuje...
Strona się ładuje...
Strona się ładuje...
Strona się ładuje...
Strona się ładuje...
Strona się ładuje...
Strona się ładuje...
Strona się ładuje...
Strona się ładuje...
Strona się ładuje...
Strona się ładuje...
Strona się ładuje...
Strona się ładuje...
Strona się ładuje...
Strona się ładuje...
Strona się ładuje...
Strona się ładuje...
-
 1
1
-
 2
2
-
 3
3
-
 4
4
-
 5
5
-
 6
6
-
 7
7
-
 8
8
-
 9
9
-
 10
10
-
 11
11
-
 12
12
-
 13
13
-
 14
14
-
 15
15
-
 16
16
-
 17
17
-
 18
18
-
 19
19
-
 20
20
-
 21
21
-
 22
22
-
 23
23
-
 24
24
-
 25
25
-
 26
26
-
 27
27
-
 28
28
-
 29
29
-
 30
30
-
 31
31
-
 32
32
-
 33
33
-
 34
34
-
 35
35
-
 36
36
-
 37
37
-
 38
38
-
 39
39
-
 40
40
-
 41
41
-
 42
42
-
 43
43
-
 44
44
-
 45
45
-
 46
46
-
 47
47
-
 48
48


JANOME Elna Lotus Instrukcja obsługi
- Kategoria
- Maszyny do szycia
- Typ
- Instrukcja obsługi
w innych językach
- English: JANOME Elna Lotus Owner's manual
Powiązane artykuły
-
JANOME Memory Craft 2400 Instrukcja obsługi
-
JANOME Sewist525S LE Instrukcja obsługi
-
-
-
JANOME Memory Craft 500E Instrukcja obsługi
-
JANOME 001400E Instrukcja obsługi
-
-
JANOME Skyline S9 Instrukcja obsługi
-
JANOME 001SKS3 Instrukcja obsługi
-
Inne dokumenty
-
 usha Sewing Machine Instrukcja obsługi
-
Kompernass KH 4001 Instrukcja obsługi
-
Emerio SEW-121820 Sewing Machine Instrukcja obsługi
-
-
Silvercrest SNM 33 A1 Instrukcja obsługi
-
ELNA 2600 Series 2800 Series Instrukcja obsługi
-
-
-
Silvercrest SON 90 A1 Operating Instructions Manual
-
 Garudan GF-3131-447 MH Instrukcja obsługi

