Festool DTSC 400 3,1 I-Plus Instrukcja obsługi
- Kategoria
- Szlifierki elektryczne
- Typ
- Instrukcja obsługi
Niniejsza instrukcja jest również odpowiednia dla

708506_(
Festool GmbH
Wertstraße 20
D-73240 Wendlingen
Tel.: +49 (0)7024/804-0
Telefax: +49 (0)7024/804-20608
www.festool.com
Originalbetriebsanleitung - Schwingschleifer 7
Original operating manual - Orbital sander 13
Notice d’utilisation d’origine - Ponceuse vibrante 19
Manual de instrucciones original - Lijadora orbital 25
Istruzioni per l'uso originali - Levigatrice oscillanti per microfiniture 31
Originele gebruiksaanwijzing - Vlakschuurmachine 37
Originalbruksanvisning - Skakslipmaskin 43
Alkuperäiset käyttöohjeet - Tasohiomakone 48
Original brugsanvisning - Rystepudser 53
Originalbruksanvisning - Plansliper 58
Manual de instruções original - Lixadora vibratória 63
Оригинал Руководства по эксплуатации - Виброшлифмашинка 69
Originál návodu k obsluze - Vibrační bruska 75
Oryginalna instrukcja eksploatacji - Szlifierka oscylacyjna 80
RTSC 400 Li
DTSC 400 Li

RTSC 400
www.festool.com
DTSC 400
www.festool.com
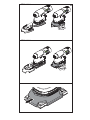
1
DTSC 400 Li
RTSC 400 Li
1-1
1-1
1-4
1-5
1-4
1-5
1-6
1-6
1-7
1-7
1-11
1-8
1-8
1-2
1-2
1-9
1-10
1-3
1-3

2a 2b
3a 3b
3c
3d
4a
DTSC 400 Li
RTSC 400 Li
1
1
1
1
1
1
2
2
2
2
2
2

4b
4
5
1
2
1
3
DTSC 400 Li RTSC 400 Li

6
1
1
4
DTSC 400 Li
RTSC 400 Li
3
2
2

Schwingschleifer
Orbital sander
Ponceuse vibrante
Seriennummer *
Serial number *
N° de série *
(T-Nr.)
RTSC/DTSC 400 Li 10018960, 10022934
ETSC 125 Li 10022936
EG-Konformitätserklärung. Wir erklären
in alleiniger Verantwortung, dass dieses Produkt
allen ein-schlägigen Bestimmungen der folgen-
den Richtlinien einschließlich ihrer Änderungen
entspricht und mit den folgenden Normen über-
einstimmt:
EC-Declaration of Conformity. We declare
under our sole responsibility that this product is
in conformity with all relevant provisions of the
following directives including their amendments
and complies with the following standards:
CE-Déclaration de conformité communau-
taire. Nous déclarons sous notre propre res-
ponsabilité que ce produit est conforme aux nor-
mes ou documents de normalisation suivants:
CE-Declaración de conformidad. Decla-
ramos bajo nuestra exclusiva responsabilidad
que este producto corresponde a las siguientes
normas o documentos normalizados:
CE-Dichiarazione di conformità. Dichiaria-
mo sotto la nostra esclusiva responsabilità che
il presente prodotto e conforme alle norme e ai
documenti normativi seguenti:
EG-conformiteitsverklaring. Wij verklaren
op eigen verantwoordelijkheid dat dit produkt
voldoet aan de volgende normen of normatieve
documenten:
EG-konformitetsförklaring. Vi förklarar i
eget ansvar, att denna produkt stämmer överens
med följande normer och normativa dokument:
EY-standardinmukaisuusvakuutus. Va-
kuutamme yksinvastuullisina, etta tuote on seu-
raavien standardien ja normatiivisten ohjeiden
mukainen:
EF-konformitetserklæring Vi erklærer
at have alene ansvaret for, at dette produkt er
i overensstemmelse med de følgende normer
eller normative dokumenter:
CE-Konformitetserklæring Vi erklærer på
eget ansvar at dette produktet er i overensstem-
melse med følgende normer eller normative
dokumenter:
CE-Declaração de conformidade: Decla-
ramos, sob a nossa exclusiva responsabilidade,
que este produto corresponde às normas ou aos
documentos normativos citados a seguir:
Декларация соответствия ЕС: Мы
заявляем с исключительной ответственностью,
что данный продукт соответствует следующим
нормам или нормативным документам:
ES prohlašeni o shodě: Prohlašujeme s
veškerou odpovědnosti, že tento vyrobek je ve
shodě s nasledujicimi normami nebo normativni-
mi dokumenty: .
'HNODUDFMDR]JRGQRǭFL]QRUPDPL8(:
Niniejszym oświadczamy na własną odpowie-
dzialność, że produkt ten spełnia następujące
normy lub dokumenty normatywne:
________________________________________
2006/42/EG, 2014/30/EU, 2011/65/EU
EN62841-1: 2015, EN62841-2-4:2014,
EN55014-1: 2016, EN55014-2: 2016, EN61000-
3-2: 2015, EN61000-3-3: 2014, EN50581:2012
________________________________________
Festool GmbH
Wertstr. 20, D-73240 Wendlingen
GERMANY
Wolfgang Zondler
Head of Research, Development and Technical
Documentation
Wendlingen, 2017-05-02
* im definierten Seriennummer-Bereich (S-Nr.) von 40000000 -
49999999
in the specified serial number range (S-Nr.) from 40000000 -
49999999
dans la plage de numéro de série (S-Nr.) de 40000000 - 49999999
717675_A

DTSC 400 Li, RTSC 400 Li
7
D
Originalbetriebsanleitung
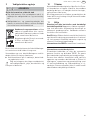
1Symbole
2 Sicherheitshinweise
2.1 Allgemeine Sicherheitshinweise
WARNUNG!
Lesen Sie alle Sicherheits-
hinweise und Anweisungen.
Versäumnisse
bei der Einhaltung der Sicherheitshinweise und
Anweisungen können elektrischen Schlag, Brand
und/oder schwere Verletzungen verursachen.
Bewahren Sie alle Sicherheitshinweise und An-
weisungen für die Zukunft auf.
Der in den Sicherheitshinweisen verwendete Be-
griff „Elektrowerkzeug“ bezieht sich auf netzbe-
triebene Elektrowerkzeuge (mit Netzleitung) und
auf akkubetriebene Elektrowerkzeuge (ohne Netz-
leitung).
2.2 Maschinenspezifische Sicherheitshin-
weise
–
Beim Arbeiten können gesundheitsschädigen-
de Stäube entstehen (z.B. bleihaltiger Anstrich,
einige Holzarten).
Das Berühren oder Einatmen
dieser Stäube kann für die Bedienperson oder in
der Nähe befindliche Personen eine Gefährdung
darstellen. In Ihrem Land gültige Sicherheitsvor-
schriften beachten.
Zum Schutz Ihrer Gesundheit eine P2-Atem-
schutzmaske tragen. In geschlossenen Räu-
men für ausreichende Belüftung sorgen und
eine Absaugeinrichtung anschließen.
Wegen den beim Schleifen auftretenden Ge-
fahren, stets eine Schutzbrille tragen.
–
Reinigen Sie mit Ölen getränkte Arbeits-
mittel, wie z.B. Schleifpad oder Polierfilz mit
Wasser und lassen Sie diese ausgebreitet
trocknen.
In Öl getränkte Arbeitsmittel können
sich selbst entzünden.
–
Achtung Brandgefahr! Vermeiden Sie eine
Überhitzung des Schleifgutes und des Schlei-
fers. Entleeren Sie vor Arbeitspausen stets den
Staubbehälter.
Schleifstaub im Filtersack bzw.
Filter des Absaugmobils kann sich unter un-
günstigen Bedingungen, wie Funkenflug beim
Schleifen von Metallen, selbst entzünden. Be-
sondere Gefahr besteht, wenn der Schleifstaub
mit Lack-, Polyurethanresten oder anderen che-
mischen Stoffen vermischt ist und das Schleifgut
nach langem Arbeiten heiß ist.
–
Prüfen Sie nach dem Herunterfallen das Elekt-
rowerkzeug und den Schleifschuh auf Beschä-
digung. Demontieren Sie den Schleifschuh zur
genauen Prüfung. Lassen Sie beschädigte Teile
vor dem Einsatz reparieren.
Gebrochene
Schleifschuhe und beschädigte Maschinen kön-
nen zu Verletzungen und Unsicherheit der Ma-
schine führen.
–
Nur original Festool Schleifschuhe verwenden.
–
Bei Verwendung des Longlife-Staubsacks kann
es zu elektrischer Aufladung kommen. Verwen-
den Sie mit dem Elektrowerkzeug immer, wenn
möglich, einen Antistatik-Saugschlauch (AS).
Ein leichter elektrischer Schlag kann zu einem
kurzen Schreckmoment führen und die Auf-
merksamkeit stören, dadurch kann es zu einem
Unfall kommen.
– Verwenden Sie den Netzadapter nur mit diesem
Gerät.
– Verwenden Sie den Netzadapter nur mit einem
original plug it-Kabel von Festool.
2.3 Maschinenspezifische Sicherheitshinweise
für Akkupack und Ladegerät
– Dieses Ladegerät kann von Personen mit verrin-
gerten physischen, sensorischen oder mentalen
Fähigkeiten oder Mangel an Erfahrung und Wissen
benutzt werden, wenn sie beaufsichtigt werden
oder bezüglich des sicheren Gebrauchs des Gerä-
tes unterwiesen wurden und die daraus resultie-
renden Gefahren verstehen.
Kinder
dürfen das
Gerät nicht benutzen oder damit spielen.
Symbol Bedeutung
Warnung vor allgemeiner Gefahr
Warnung vor Stromschlag
Betriebsanleitung, Sicherheitshinweise
lesen!
Gehörschutz tragen!
Atemschutz tragen!
Schutzbrille tragen!
Stromversorgung herstellen.
Stromversorgung trennen.
Nicht in den Hausmüll geben.
Tipp, Hinweis
Handlungsanweisung
Schutzklasse II

8
DTSC 400 Li, RTSC 400 Li
D
– Akkupack und Ladegerät nicht öffnen!
– Ladegerät vor Metallteilen (z. B. Metallspäne)
oder Flüssigkeiten schützen!
–
Keine Netzteile oder Fremd-Akkupacks zum
Betreiben des Akku-Elektrowerkzeugs ver-
wenden. Keine Fremd-Ladegeräte zum Laden
der Akkupacks verwenden.
Die Verwendung von
nicht vom Hersteller vorgesehenem Zubehör
kann zu einem elektrischen Schlag und/oder
schweren Unfällen führen.
– Akkupack vor Hitze > 50 °C z. B. auch vor dauern-
der Sonneneinstrahlung und Feuer schützen!
– Brennende LiIon-Akkupacks nie mit Wasser lö-
schen! Sand oder Feuerlöschdecke verwenden.
– Regelmäßig den Stecker und das Kabel prüfen,
um eine Gefährdung zu vermeiden. Diese bei Be-
schädigung ausschließlich von einer autorisier-
ten Kundendienstwerkstatt erneuern lassen.
– Bei Nicht-Gebrauch des Ladegeräts den Netz-
stecker aus der Steckdose ziehen.
2.4 Emissionswerte
Die nach EN 62841 (siehe EG-Konformitätserklä-
rung) ermittelten Geräuschwerte betragen typi-
scherweise:
Schwingungsemissionswert a
h
(Vektorsumme
dreier Richtungen) und Unsicherheit K ermittelt
entsprechend EN 62841 (siehe EG-Konformitätser-
klärung):
Die angegebenen Emissionswerte (Vibration, Ge-
räusch)
– dienen dem Maschinenvergleich,
– eignen sich auch für eine vorläufige Einschät-
zung der Vibrations- und Geräuschbelastung
beim Einsatz,
– repräsentieren die hauptsächlichen Anwendun-
gen des Elektrowerkzeugs.
Erhöhung möglich bei anderen Anwendungen, mit
anderen Einsatzwerkzeugen oder wenn ungenü-
gend gewartet. Leerlauf- und Stillstandszeiten der
Maschine beachten!
3 Bestimmungsgemäße Verwen-
dung
Bestimmungsgemäß sind die Schleifer zum Schlei-
fen von Holz, Kunststoff, Verbundwerkstoffen, Far-
be/Lacke, Spachtelmasse und ähnlichen Werkstof-
fen vorgesehen. Metall und asbesthaltige Werk-
stoffe dürfen nicht bearbeitet werden.
Wegen der elektrischen Sicherheit darf die Maschi-
ne nicht feucht sein und nicht in feuchter Umge-
bung betrieben werden. Die Maschine darf nur für
Trockenschliff verwendet werden.
Bei nicht bestimmungsgemäßem Gebrauch
haftet der Benutzer.
4 Technische Daten
5Geräteelemente
DTSC 400 Li RTSC 400 Li
Schalldruckpegel L
PA
dB(A) dB(A)
Schallleistungspegel
L
WA
dB(A) dB(A)
Unsicherheit K 3 dB 3 dB
VORSICHT
Beim Arbeiten eintretender Schall
Schädigung des Gehörs
X
Benutzen Sie einen Gehörschutz!
DTSC 400 Li RTSC 400 Li
Schwingungsemissi-
onswert (3-achsig) a
h
<2,5 m/s
2
3 m/s
2
Unsicherheit K 2 m/s
2
2 m/s
2
Akku-Schwingschleifer DTSC 400 Li RTSC 400 Li
Spannung 18 - 20 V 18 - 20 V
Drehzahl (Leerlauf) 6000 - 10000 min
-1
6000 - 10000 min
-1
Schleifhub 2,0 mm 2,0 mm
Schleifschuh 100 x 150 mm 80 x 130 mm
Gewicht (ohne Akkupack, mit Schleifschuh) 1,0 kg 1,0 kg
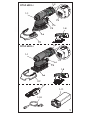
[1-1]
Ein-/Ausschalter
[1-2]
Akkupack
[1-3]
Kapazitätsanzeige
[1-4]
Absaugstutzen
[1-5]
Drehzahlregelung
[1-6]
Schleifschuh
[1-7]
Kantenschutz (Protector)

DTSC 400 Li, RTSC 400 Li
9
D
* nicht bei allen Varianten im Lieferumfang
Die angegebenen Abbildungen befinden sich am
Anfang der Betriebsanleitung.
6 Inbetriebnahme
6.1 Ein-/Ausschalten
Der Schalter
[1-1]
dient als Ein-/Ausschalter (I =
EIN, 0 = AUS).
L
Wenn der Akku leer ist, bei Stromausfall oder
wenn der Netzstecker gezogen wird, den Ein-/
Ausschalter sofort in die Aus-Position bringen.
Dies verhindert einen unkontrollierten Wieder-
anlauf.
6.2 Akkupack
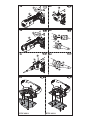
X
Akkupack einsetzen
[2a]
X
Akkupack abnehmen
[2b]
Kapazitätsanzeige
Durch Drücken der grünen Taste an der Kapazitäts-
anzeige
[1-3]
wird der Ladezustand des Akkupacks
angezeigt:
6.3 Netzadapter
Der Netzadapter (teilweise Zubehör) ermöglicht
den Gebrauch des Akkuschleifers als Netzschleifer,
so dass die Stromversorgung variabel gewährleis-
tet ist. Die Nutzung der Ein-/Ausschaltautomatik
des Absaugmobils ist in Verbindung mit dem
Netzadapter möglich.
L
Bei älteren Absaugmobilen wird die Ein-/Aus-
schaltautomatik aufgrund geringer Leistungs-
aufnahme gegebenenfalls erst unter Last und
noch nicht im Leerlauf aktiviert.
X
Netzadapter einsetzen
[3a]
X
Netzadapter mit plug it-Kabel verbinden
[3b]
X
Netzadapter lösen
[3c]
X
Netzadapter von plug it-Kabel lösen
[3d]
7 Einstellungen
7.1 Elektronik
Sanftanlauf
Der elektronisch geregelte Sanftanlauf sorgt für
ruckfreien Anlauf des Elektrowerkzeugs.
Temperatursicherung
Um ein Überhitzen des Motors zu vermeiden, wird
bei zu hoher Motortemperatur die Leistungsauf-
nahme begrenzt. Steigt die Temperatur weiter,
schaltet das Elektrowerkzeug ab. Erst nach Abküh-
lung des Motors ist ein erneutes Einschalten mög-
lich.
Konstante Drehzahl
Die vorgewählte Motordrehzahl wird elektronisch
konstant gehalten. Dadurch wird bei bestimmungs-
gemäßer Anwendung (angemessene Anpresskraft)
eine gleichbleibende Schleifgeschwindigkeit er-
reicht.
Drehzahl einstellen
Die Drehzahl lässt sich mit dem Stellrad
[1-5]
zwi-
schen 6000 und 10000 min
-1
einstellen.
Für Schleifarbeiten empfehlen wir folgende Ein-
stellungen des Stellrades
[1-5]
:
[1-8]
Handgriff (isolierte Griffflächen)
[1-9]
Netzadapter mit plug it-Anschluss*
[1-10]
Plug it-Kabel*
[1-11]
Longlife-Staubbeutel
70 - 100 %
40 - 70 %
15 - 40 %
< 15 %
Empfehlung:
Akkupack vor weite-
rer Verwendung laden.
WARNUNG
Unzulässige Spannung oder Frequenz!
Unfallgefahr
X
Die Netzspannung und die Frequenz der Strom-
quelle müssen mit den Angaben auf dem Typen-
schild übereinstimmen.
X
In Nordamerika dürfen nur Festool-Maschinen
mit der Spannungsangabe 120 V/60 Hz einge-
setzt werden.
WARNUNG
Verletzungsgefahr
X
Vor allen Arbeiten am Elektrowerkzeug den Ak-
kupack oder den Netzadapter vom Elektrowerk-
zeug abnehmen!

10
DTSC 400 Li, RTSC 400 Li
D
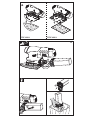
7.2 Schleifschuh wechseln [4a]
Ein optimales Arbeitsergebnis ist nur mit
Originalzubehör und Verbrauchsmaterial zu
erreichen. Wird nicht Originalzubehör oder
Verbrauchsmaterial eingebaut, erlischt der
Garantieanspruch.
Wenn der StickFix-Belag des Schleifschuhs abge-
nutzt ist, kann der komplette Schleifschuh ausge-
tauscht werden:
Vier Schrauben öffnen.
Schleifschuh nach unten abnehmen.
Neuen Schleifschuh anbringen.
Mit vier Schrauben handfest (2,5 Nm) anziehen.
7.3 Schleif-Zubehör mit StickFix befestigen
[4b]
Auf dem StickFix Schleifschuh lassen sich die dazu
passenden StickFix Schleifpapiere und StickFix
Schleifvliese schnell und einfach befestigen.
X
Selbsthaftendes Schleif-Zubehör auf den
Schleifschuh aufdrücken.
7.4 Absaugung
Eigenabsaugung mit Longlife-Staubbeutel
Die Schleifer sind serienmäßig mit einer Eigenab-
saugung ausgestattet. Der Schleifstaub wird durch
Absaugöffnungen im Schleifschuh abgesaugt und
im Staubbeutel aufgefangen.
Montage des Staubbeutels [5]
Staubbeutel bis zum Einrasten an der Maschine
anschließen.
Bei nachlassender Absaugleistung, Staub-
beutel leeren.
Staubbeutel an Betätigungselementen zusam-
mendrücken.
Staubbeutel nach hinten abnehmen.
Klappe am Staubbeutel öffnen.
Staubbeutel ausleeren und Abfall entsorgen.
Absaugung mit Festool Absaugmobil
Um bei längeren Schleifarbeiten ein häufiges Ent-
leeren des Staubbeutels zu vermeiden, kann an den
Absaugstutzen
[1-4]
ein Festool Absaugmobil mit
einem Absaugschlauchdurchmesser von 27 mm
angeschlossen werden.
L
Die Anlaufautomatik schaltet das Absaugmobil
automatisch mit dem Einschalten des Schwing-
schleifers an. Die Anlaufautomatik funktioniert
nur in Verbindung mit dem Netzadapter.
L
Wird das Elektrowerkzeug im Akkubetrieb mit
einem Absaugmobil genutzt, verringert sich die
Akkulaufzeit. Die Reduzierung der Absaugleis-
tung verringert diesen Effekt.
L
Bei hoher Absaugleistung kann das Führungs-
verhalten des Elektrowerkzeugs verschlech-
tern. Die Reduzierung der Absaugleistung ver-
ringert diesen Effekt.
Empfehlung:
Antistatik-Saugschlauch verwenden!
Dadurch kann die elektrische Aufladung reduziert
werden.
7.5 Kantenschutz (Protector) [6]
Der Kantenschutz
[1-7]
verhindert, dass der
Schleifschuh mit seiner Umfangseite eine Fläche
berührt (z.B. beim Schleifen entlang einer Wand
oder eines Fensters), und dadurch ein Rückschlag
der Maschine bzw. eine Beschädigung erfolgt.
Schleifarbeiten Stellrad-
Stufe
– Schleifen mit max. Abrieb
– Abschleifen alter Farbe
– Schleifen von Holz und Furnier vor der La-
ckierung
– Lackzwischenschliff auf Flächen
5 - 6
– Schleifen von dünn aufgetragenem Vor-
lack
– Schleifen von Holz mit Schleif-Vlies
– Kantenbrechen an Holzteilen
– Glätten von grundierten Holzflächen
4 - 5
– Schleifen von Vollholz- und Furnierkanten
– Schleifen im Falz von Fenstern und Türen
– Lackzwischenschliff an Kanten
– Anschleifen von Naturholzfenstern mit
Schlief-Vlies
– Glätten der Holzoberfläche vor dem Bei-
zen mit Schleif-Vlies
– Abreiben oder Abheben der überflüssigen
Kalkpaste mit Schleif-Vlies
3 - 4
– Lackzwischenschliff auf gebeizten Flä-
chen
– Säubern von Naturholz-Fensterfälzen mit
Schleif-Vlies
2 - 3
– Schleifen von gebeizten Kanten
– Schleifen von thermoplastischen Kunst-
stoffen
1 - 2
WARNUNG
Gesundheitsgefährdung durch Stäube
X
Nie ohne Absaugung arbeiten.
X
Nationale Bestimmungen beachten.

DTSC 400 Li, RTSC 400 Li
11
D
Den Kantenschutz in die Nut der Maschine
schieben.
Die beiden Enden des Kantenschutzes rechts
und links einrasten.
Die beiden Enden des Kantenschutzes lösen.
Den Kantenschutz nach vorne abziehen.
8 Arbeiten mit der Maschine
Folgende Hinweise beachten:
– Überlasten Sie die Maschine nicht, indem Sie
diese zu stark andrücken! Sie erreichen das bes-
te Schleifergebnis, wenn Sie mit mäßig starkem
Anpressdruck arbeiten. Die Schleifleistung und -
qualität hängen im Wesentlichen von der Wahl
des richtigen Schleifmittels ab.
– Das Arbeiten in Ecken und Kanten führt zu eher
punktueller Beanspruchung der Spitze und zu
erhöhter Wärmeentwicklung. Arbeiten Sie daher
mit reduziertem Druck.
– Halten Sie die Maschine für eine sichere Führung
mit einer Hand am Handgriff
[1-8]
.
8.1 Warnsignale
Maschine schaltet ab und piept:
X
Maschine ausschalten.
Akkupack ist leer.
X
Akkupack wechseln.
Maschine schaltet ab und piept nicht:
Maschine ist überhitzt oder wurde überlastet.
X
Maschine für 30 Sekunden ausschalten.
X
Maschine weniger belasten.
Wenn die Maschinenendrehzahl danach nicht er-
reicht wird, Maschine abkühlen lassen.
9 Wartung und Pflege
Kundendienst und Reparatur
nur
durch Hersteller oder durch Service-
werkstätten: Nächstgelegene Adresse
unter: www.festool.com/service
Nur original Festool Ersatzteile ver-
wenden! Bestell-Nr. unter:
www.festool.com/service
Zur Sicherung der Luftzirkulation müssen die
Kühlluftöffnungen im Motorgehäuse stets frei und
sauber gehalten werden.
Bei Leistungsnachlass oder erhöhten Vibrationen
Kühlluftöffnungen ausblasen und säubern.
X
Die Anschlusskontakte am Elektrowerkzeug,
Ladegerät und Akkupack sauber halten.
Für Wartung, Pflege, Entsorgung und Trans-
port des Akkupacks, dem Akkupack beilie-
gende Hinweise beachten!
10 Zubehör
Verwenden Sie nur original Schleifschuhe von
Festool. Durch die Verwendung von minderwerti-
gen Schleifschuhen kann es zu erheblichen Un-
wuchten kommen, die die Qualität der Arbeitser-
gebnisse verschlechtern und den Verschleiß der
Maschine erhöhen.
Die Bestellnummern für Zubehör und Werkzeuge
finden Sie in Ihrem Festool Katalog oder im Internet
unter „www.festool.com“.
11 Umwelt
Elektrowerkzeuge nicht in den Hausmüll werfen!
Geräte, Zubehör und Verpackungen einer umwelt-
gerechten Wiederverwertung zuführen. Geltende
nationale Vorschriften beachten.
WARNUNG
Verletzungsgefahr
X
Werkstück so befestigen, dass es sich beim Be-
arbeiten nicht bewegen kann.
WARNUNG
Verletzungsgefahr, Stromschlag
X
Vor allen Wartungs- und Pflegearbeiten stets
den Akkupack oder den Netzadapter von dem
Elektrowerkzeug abnehmen!
X
Alle Wartungs- und Reparaturarbeiten, die ein
Öffnen des Motorgehäuses erfordern, dürfen
nur von einer autorisierten Kundendienstwerk-
statt durchgeführt werden.
EKAT
1
2
3
5
4

12
DTSC 400 Li, RTSC 400 Li
D
Nur EU:
Gemäß Europäischer Richtlinie über Elek-
tro- und Elektronik-Altgeräte und Umsetzung in
nationales Recht, müssen verbrauchte Elektro-
werkzeuge getrennt gesammelt und einer umwelt-
gerechten Wiederverwertung zugeführt werden.
Informationen zur REACh:
www.festool.com/reach
Informationen zum Datenschutz
Das Elektrowerkzeug enthält einen Chip zur auto-
matischen Speicherung von Maschinen- und Be-
triebsdaten (RFID). Die gespeicherten Daten ent-
halten keinen direkten Personenbezug.
Die Daten können mit speziellen Geräten kontakt-
los ausgelesen werden, und werden von Festool
ausschließlich zur Fehlerdiagnose, Reparatur- und
Garantieabwicklung sowie zur Qualitätsverbesse-
rung bzw. Weiterentwicklung des Elektrowerk-
zeugs verwendet. Eine darüber hinausgehende
Nutzung der Daten – ohne ausdrückliche Einwilli-
gung des Kunden – erfolgt nicht.

DTSC 400 Li, RTSC 400 Li
13
GB
Original operating manual
1Symbols
2 Safety instructions
2.1 General safety instructions
WARNING! Read all safety warnings, instruc-
tions, illustrations and specifications provid-
ed with this power tool. Failure to follow all instruc-
tions listed below may result in electric shock, fire
and/or serious injury.
Save all warnings and instructions for future ref-
erence.
The term "power tool" in the warnings refers toyour
mains-operated (corded) power tool or battery-op-
erated (cordless) power tool.
2.2 Machine-related safety instructions
–
Dust that is harmful to your health may be pro-
duced as you work (e.g. paint products contain-
ing lead and some types of wood).
Contact with
or inhalation of this dust may pose a risk for the
operating personnel or persons in the vicinity.
Observe the safety regulations that apply in your
country.
Wear a P2 respiratory mask to protect your
health. In enclosed spaces, ensure that
there is sufficient ventilation and connect an
extraction system.
Always wear protective goggles to protect
against sanding hazards.
–
Clean work equipment soaked in oils, for exam-
ple sanding pad or polishing felt, with water and
allow to dry.
Work equipment soaked in oil may
combust spontaneously.
–
Attention: Risk of fire! Avoid overheating the
grinding material and the sander. Always empty
the dust container before taking a break.
Swarf
in the filter bag or filter of the mobile dust ex-
tractor may self-ignite in unfavourable condi-
tions such as flying sparks when grinding metals.
Particular danger exists if the swarf is mixed with
paint, polyurethane residue or other chemical
materials and the grinding material is hot after
long periods of work.
–
If the power tool is dropped or falls, check for
damage to the machine and sanding pad. Re-
move the sanding pad for closer inspection.
Have the damaged parts repaired before
use.
Broken sanding pads and damaged ma-
chines can cause injuries and machine instabili-
ty.
–
Always use original Festool sanding pads.
–
While using the long-life dust bag be aware of
electric charge. Always when possible use an
antistatic suction hose with the power tool.
A
slight electric shock may cause you to panic
briefly and become distracted, which may result
in an accident.
– Only use the mains adapter with this device.
– Only use the mains adapter together with an
original Festool plug-it cable.
–
Only for AS/NZS:
The tool shall always be sup-
plied via residual current device with a rated re-
sidual current of 30 mA or less.
2.3 Battery pack and charger safety instruc-
tions
– This charger can be operated by persons with re-
duced physical, sensory or mental capabilities or
a lack of practical experience and knowledge,
provided they are supervised or have been in-
structed to use the machine safely and under-
stand the dangers of machine operation.
Children
are not allowed use or play with the ma-
chine.
Symbol Significance
Warning of general danger
Risk of electric shock
Read operating instructions and safety
notices!
Wear ear protection.
Wear a dust mask.
Wear protective goggles.
Switch the power supply on.
Switch the power supply off.
Do not dispose of as domestic waste.
Tip or advice
Handling instruction
Safety class II

14
DTSC 400 Li, RTSC 400 Li
GB
– Do not open the battery pack or the charger!
– Prevent metal parts (e.g. metal chips) or fluids
from entering the charger!
–
Do not use power adapters or battery packs
form other manufacturers to operate the cord-
less power tool. Do not use any charger from
other manufacturers for charging the battery
pack.
The use of impermissible accessories may
result in electric shock and / or serious acci-
dents!
– Protect the battery pack from excessive heat > 50
°C or constant heat sources such as sunlight or
naked flames!
– Never use water to extinguish burning li-ion bat-
tery packs! Use sand or a fire blanket.
– Check the plug and the cable regularly and
should either become damaged, in order to avoid
a hazard, have them replaced by an authorised
after-sales service workshop.
– Always pull the mains plug out of the socket
when the charger is not in use.
2.4 Emission levels
Typically, the noise levels that are determined in ac-
cordance with EN 62841 (see EC declaration of con-
formity) are as follows:
Vibration emission value a
h
(vector sum for three
directions) and uncertainty K measured in accor-
dance with EN 62841 (see EU Declaration of Con-
formity):
The specified emission values (vibration, noise)
– are used to compare machines.
– They are also used for making preliminary esti-
mates regarding vibration and noise loads during
operation.
– They represent the primary applications of the
power tool.
Increase possible for other applications, with other
insertion tools or if not maintained adequately. Take
note of idling and downtimes of machine!
3 Intended use
The sanders are designed for sanding wood, plas-
tic, composites, paint/varnish, filler and similar
materials as directed. Metals and materials that
contain asbestos must not be processed.
To guarantee electrical safety, the machine must
not be damp or operated in a damp environment.
The machine must only be used for dry sanding.
The user is liable for improper or non-in-
tended use.
4Technical data
5 Machine features
DTSC 400Li RTSC 400Li
Sound pressure level
L
PA
dB(A) dB(A)
Noise level L
WA
dB(A) dB(A)
Uncertainty K 3 dB 3 dB
CAUTION
When working with noise
Damage to hearing
X
Always use ear protection.
DTSC 400Li RTSC 400Li
Vibration emissions
value (triaxial) a
h
< 2.5 m/s
2
3 m/s
2
Uncertainty K 2 m/s
2
2 m/s
2
Cordless orbital sander DTSC 400Li RTSC 400Li
Voltage 18 - 20 V 18 - 20 V
No-load speed 6000 - 10000 rpm 6000 - 10000 rpm
Sanding stroke 2,0 mm 2,0 mm
Sanding pad 100 x 150 mm 80 x 130 mm
Weight (excl. battery pack, incl. sanding pad) 0,9 kg 0,9 kg
[1-1]
On/Off switch
[1-2]
Battery pack
[1-3]
Capacity display
[1-4]
Extractor connector
[1-5]
Speed control
[1-6]
Sanding pad
[1-7]
Edge protector

DTSC 400 Li, RTSC 400 Li
15
GB
* not on all versions included in the scope of deliv-
ery
The specified illustrations appear at the beginning
of the Operating Instructions.
6 Commissioning
6.1 Switch on/off
The switch
[1-1]
is an on/off switch (I = ON, 0 =
OFF).
L
When the battery is empty, or if there is a power
failure or the mains plug is removed, move the
on/off switch immediately to the Off position.
This prevents uncontrolled restarting.
6.2 Battery pack
X
Inserting the battery pack
[2a]
X
Removing the battery pack
[2b]
Capacity display
Pressing the green button on the capacity display
[1-3]
shows the charge status of the battery pack:
6.3 Mains adapter
The mains adapter (available as an accessory de-
pending on the model) facilitates use of the cord-
less sanding technology with mains power, en-
abling you to switch between power supply sources.
The mains adapter enables the mobile dust ex-
tractor's automatic electronic switch-on/shut-off
function.
X
Insert the mains adapter
[3a]
X
Connect the mains adapter and plug-it cable
[3b]
X
Remove the mains adapter
[3c]
X
Detach the mains adapter from the plug-it cable
[3d]
7 Settings
7.1 Electronics
Smooth start-up
The electronically controlled smooth start-up en-
sures that the machine starts up jolt-free.
Temperature cut-out
To avoid the motor overheating, the power con-
sumption is limited at an excessive motor tempera-
ture. If the temperature continues to rise, the pow-
er tool switches off and can only be switched on
again once the motor has cooled sufficiently.
Constant speed
The preselected motor speed is kept constant
through electronic control. This means that, if the
machine is used as intended (reasonable contact
pressure), a constant sanding speed is achieved.
Setting and adjusting the speed
The speed can be set
[1-5]
between 6000 and
10000 min
-1
using the adjusting wheel.
For sanding, we recommend the following settings
for the adjusting wheel
[1-5]
:
[1-8]
Handle (insulated gripping surface)
[1-9]
Mains adapter with plug-it connection*
[1-10]
Plug-it cable*
[1-11]
Long-life dust bag
70 - 100%
40 - 70%
15 - 40%
< 15%
Recommendation:
Charge battery
pack before further use.
WARNING
Unauthorised voltage or frequency!
Risk of accident
X
The mains voltage and the frequency of the pow-
er source must correspond with the specifica-
tions on the machine's name plate.
X
In North America, only Festool machines with
the voltage specifications 120 V/60 Hz may be
used.
WARNING
Risk of injury
X
When working on power tools, always remove
the batteries or disconnect the mains adapter
first.

16
DTSC 400 Li, RTSC 400 Li
GB
7.2 Changing sanding pad [4a]
An optimal work result can only be achieved
using original accessories and consumables.
The use of non-original accessories or con-
sumables invalidates the right to claim under war-
ranty.
If the StickFix coating on the sanding pad has worn
out, the entire sanding pad can be replaced:
Undo the four screws.
Remove the sanding pad by pulling it down-
wards.
Attach the new sanding pad.
Use four screws to tighten it by hand (2.5 Nm).
7.3 Attaching sanding accessories using
StickFix [4b]
The suitable StickFix sandpaper and StickFix sand-
ing cloth can be attached quickly and simply to the
StickFix sanding pad.
X
Affix the self-adhesive sanding accessory to the
sanding pad.
7.4 Dust extraction
Integral dust extractor with long-life dust bag
As standard, the sanders are equipped with an inte-
gral dust extractor. The sanding dust is extracted
through extraction openings in the sanding pad and
is collected in the dust bag.
Installing the dust bag [5]
Slide the dust bag onto the machine until it
clicks into place.
If the suction power is decreasing, empty the
dust bag.
Press the dust bag onto the actuating elements.
Remove the dust bag by moving it towards the
rear.
Open the flap on the dust bag.
Empty the dust bag and dispose of the waste.
Dust extraction with Festool's mobile dust ex-
tractor
To prevent having to frequently empty the dust bag
when carrying out sanding work for a long period of
time, you can connect Festool's mobile dust ex-
tractor (with an extraction hose diameter of 27 mm)
to the extractor connection piece
[1-4]
.
L
The start-up mode switches the mobile dust ex-
tractor on as soon as you switch the orbital
sander on. The start-up mode only works in
conjunction with the mains adapter.
Recommendation:
Use an antistatic suction hose.
This helps reduce the electric charge.
7.5 Edge protector [6]
The edge protector
[1-7]
prevents the sanding pad
circumference from coming into contact with a sur-
face (e.g. when sanding along a wall or a window),
thus preventing back-kick of the machine, or ma-
chine damage.
Push the edge protector into the groove on the
machine.
Slot the two ends of the edge protector into
place until they click.
Sanding work Adjusting
wheel set-
ting
– Sanding with max. abrasion
– Sanding off old paint
– Sanding of wood and veneered surface
prior to paintwork
– Intermediate sanding of paintwork on sur-
faces
5 - 6
– Sanding thinly applied undercoat
– Sanding wood with sanding cloth
– Edge breaking on wooden parts
– Smoothing primed wooden surfaces
4 - 5
– Sanding solid wood and veneered edges
– Sanding rebate of windows and doors
– Intermediate sanding of paintwork at edg-
es
– Light sanding of natural wood windows
using sanding cloth
– Smoothing wooden surfaces using sand-
ing cloth before staining
– Rubbing or removing excess limestone
residue using sanding cloth
3 - 4
– Intermediate sanding of paintwork on
stained surfaces
– Cleaning natural wood window rebate us-
ing sanding cloth
2 - 3
– Sanding stained edges
– Sanding of thermoplastics
1 - 2
WARNING
Dust hazard
X
Dust can be hazardous to health. Always work
with a dust extractor.
X
Always read applicable national regulations be-
fore extracting hazardous dust.

DTSC 400 Li, RTSC 400 Li
17
GB
Loosen both ends of the edge protector.
Remove the edge protector by pulling it for-
wards.
8 Working with the machine
Observe the following instructions:
– Do not overload the machine by pressing with ex-
cessive force! The best sanding results are
achieved with moderate application pressure.
The sanding capacity and quality are mainly de-
pendent on the selection of the correct abrasive.
– Work in corners and on edges tends to subject
the tip to increased stress and results in in-
creased heat development. In such cases, work
with reduced contact pressure.
– Hold the machine with one hand on the handle
[1-8]
.
8.1 Warning signal
The machine shuts down and makes a sound:
X
Switch off the machine.
Battery pack is empty.
X
Change the battery pack.
The machine shuts down and does not make a
sound:
Machine is overheated or has been overloaded.
X
Switch off the machine for 30 seconds.
X
Reduce the machine load.
If the machine's final speed is then not reached, al-
low the machine to cool down.
9 Service and maintenance
Customer service and repair
only
through manufacturer or service
workshops: Please find the nearest
address at: www.festool.com/service
Only use original Festool spare parts!
Order No. at: www.festool.com/service
To ensure constant air circulation, always keep the
cooling air openings in the motor housing clean and
free of any obstruction.
In the event of a slowdown in performance or in-
creased vibrations, blow and clean cooling air
openings.
X
Keep the contacts on the machine, charger and
battery pack clean.
For service, maintenance, disposal and
transport of the battery pack, note enclosed
instructions of the battery pack!
10 Accessories
Use only original Festool sanding pads. Low-quality
sanding pads may cause serious machine imbal-
ance that decreases the quality of the working re-
sults and increases machine wear.
The order numbers of the accessories and tools can
be found in the Festool catalogue or on the Internet
under "www.festool.com".
11 Environment
Do not dispose of electric power tools in house-
hold waste!
Recycle devices, accessories and
packaging. Observe applicable country-specific
regulations.
EU only:
In accordance with European Directive on
waste electrical and electronic equipment and im-
plementation in national law, used electric power
tools must be collected separately and handed in
for environmentally friendly recycling.
Information on REACh:
www.festool.com/reach
Information on data protection
The power tool contains a chip which automatically
stores machine and operating data (RFID). This
data saved cannot be traced back directly to an in-
dividual.
WARNING
Risk of injury
X
Always secure the workpiece in such a manner
that it cannot move while being machined.
WARNING
Risk of injury, electric shock
X
When carrying out servicing and maintenance
work, always remove the batteries or the mains
adapter from the power tool first.
X
All maintenance and repair work which requires
the motor housing to be opened should always
be carried out by an authorised service work-
shop.
EKAT
1
2
3
5
4

18
DTSC 400 Li, RTSC 400 Li
GB
The data can be read using special (contactless) de-
vices and shall only be used by Festool for fault di-
agnosis, repair and warranty processing and for
quality improvement or enhancement of the power
tool. The data shall not be used in any other way
without the express consent of the customer.
,PSRUWHGLQWRWKH8.E\
)HVWRRO8./WG
$QJOR6D[RQ:D\%XU\
6W(GPXQGV
,3;+
*UHDW%ULWDLQ

DTSC 400 Li, RTSC 400 Li
19
F
Notice d'utilisation d'origine
1Symboles
2 Consignes de sécurité
2.1 Consignes générales de sécurité
AVERTISSEMENT !
Veuillez lire toutes
les consignes de sécurité et instructions.
Des erreurs résultant du non-respect des
consignes d'avertissement et des instructions
peuvent occasionner un choc électrique, des brû-
lures et/ou des blessures graves.
Conservez toutes les consignes de sécurité et ins-
tructions pour une référence future.
Le terme "outil électrique" utilisé dans les
consigne de sécurité se rapporte aux outils élec-
triques fonctionnant sur secteur (avec cordon d'ali-
mentation) et aux outils électriques fonctionnant
sur batteries (sans cordon d'alimentation).
2.2 Consignes de sécurité spécifiques à la
machine
–
Au cours du travail, des poussières dange-
reuses pour la santé peuvent être générées
(comme les poussières de peintures au plomb,
certaines poussières de bois).
Le contact ou l'in-
halation de ces poussières peut présenter un
danger pour l'utilisateur ou les personnes se
trouvant à proximité. Veuillez respecter les pres-
criptions de sécurité en vigueur dans votre pays.
Pour votre santé, porter un masque de pro-
tection respiratoire de classe P2. Dans les
espaces clos, assurer une ventilation suffi-
sante et brancher un dispositif d'aspiration.
Porter systématiquement des lunettes de
protection pour se protéger des risques in-
hérents au ponçage.
–
Nettoyez à l'eau les accessoires imprégnés
d'huile, comme par ex. le patin de ponçage ou le
feutre de polissage, et laissez-les sécher en les
étalant convenablement.
Les accessoires imbi-
bés d'huile sont susceptibles de s'enflammer
spontanément.
–
Attention au risque d'incendie ! Évitez la sur-
chauffe des matériaux travaillés et de la pon-
ceuse. Videz systématiquement le bac de
récupération des poussières avant de faire une
pause dans votre travail.
Les particules de pous-
sières se trouvant dans le sac filtre ou le filtre de
l'aspirateur peuvent s'enflammer d'elles-
mêmes dans des conditions défavorables,
comme par ex. la projection d'étincelles lors du
ponçage de pièces en métal. Le risque est parti-
culièrement important lorsque les particules de
poussières sont mélangées à des résidus de ver-
nis, de polyuréthane ou d'autres substances
chimiques et que les matériaux travaillés sont
très chauds après avoir été longtemps travaillés.
–
En cas de chute, vérifiez que l'outil électropor-
tatif et le patin de ponçage ne sont pas endom-
magés. Démontez le patin de ponçage pour un
examen minutieux. Faites réparer les pièces
endommagées avant toute utilisation.
Des pa-
tins de ponçage cassés et des machines endom-
magées peuvent causer des blessures et
compromettre la sûreté de la machine.
–
N'utilisez que des plateaux de ponçage d'ori-
gine Festool.
–
L'utilisation du sac à poussière Longlife peut
entraîner une décharge électrique. Utiliser tou-
jours, si possible, un tuyau d’aspiration antista-
tique (AS) avec l'outil électroportatif.
Un simple
choc électrique peut faire brièvement peur et
perturber l'attention, risquant ainsi de provoquer
un accident.
– Utilisez l'adaptateur secteur uniquement avec
cet appareil.
– Utilisez l'adaptateur secteur uniquement avec un
câble plug-it d'origine Festool.
Sym-
bole
Signification
Avertissement de danger
Avertissement contre le risque d'électro-
cution
Notice d'utilisation, lire les consignes de
sécurité !
Porter une protection auditive !
Porter une protection respiratoire !
Porter des lunettes de protection !
Mettre sous tension.
Mettre hors tension.
Ne pas jeter l'appareil avec les ordures
ménagères.
Astuce, information
Consignes opératoires
Classe de protection II

20
DTSC 400 Li, RTSC 400 Li
F
2.3 Consignes de sécurité spécifiques au
bloc batteries et au chargeur
– Ce chargeur peut être utilisé par des personnes
aux capacités physiques, sensorielles ou men-
tales réduites ou présentant un manque d'expé-
riences ou de connaissances si elles sont
surveillées ou qu'elles ont été instruites pour son
utilisation sûre et qu'elles comprennent les dan-
gers qui en résultent. Les
enfants
ne doivent pas
utiliser la machine ou jouer avec.
– Ne pas ouvrir la batterie ni le chargeur!
– Protéger le chargeur des pièces métalliques (par
ex. copeaux métalliques) ou des liquides!
–
N’utiliser d’alimentation ou batteries d’autres
fabricants pour faire fonctionner l’outil élec-
trique sans fil. N’utiliser un chargeur d’autres
fabricants pour charger la batterie.
L'utilisation
d'accessoires non autorisées peut entraîner un
choc électrique et / ou accidents graves!
– Protéger la batterie contre une température su-
périeure à 50 °C par ex. également contre les
rayons de soleil permanents et le feu !
– N'utiliser en aucun cas de l'eau pour éteindre
une batterie "Li-ion" enflammée ! Utiliser du
sable ou une couverture anti-feu.
– Contrôler régulièrement le connecteur et le
câble pour éviter tout danger. En cas d'endom-
magement, les faire remplacer uniquement par
un atelier de service après-vente agréé.
– Lorsque le chargeur n'est pas utilisé, débran-
chez systématiquement la fiche secteur de la
prise de courant.
2.4 Valeurs d'émission
Les valeurs sonores mesurées selon la norme EN
62841 (voir déclaration de conformité CE) sont ha-
bituellement :
Valeur d'émission vibratoire a
h
(somme vectorielle
tridirectionnelle) et incertitude K déterminées
conformément à la norme EN 62841 (voir déclara-
tion de conformité CE) :
Les valeurs d'émission indiquées (vibration, bruit)
– sont destinées à des fins de comparaisons entre
les outils.
– Elles permettent également une estimation pro-
visoire de la charge de vibrations et de la nui-
sance sonore lors de l'utilisation
– et représentent les principales applications de
l'outil électrique.
Cependant, si la ponceuse est utilisée pour
d'autres applications, avec d'autres outils de travail
ou est insuffisamment entretenue, la charge de
vibrations et la nuisance sonore peuvent être nette-
ment supérieures. Tenir compte des temps de ra-
lenti et d'immobilisation de l'outil !
3 Utilisation en conformité avec les
instructions
Les ponceuses sont prévues pour le ponçage des
matériaux suivants : bois, matières plastiques, ma-
tériaux composites, peintures / vernis, enduits et
matériaux similaires. L'usinage du métal et de
l'amiante est formellement interdit.
Afin de garantir la sécurité électrique, l'outil ne doit
pas être mouillé ou utilisé en environnement hu-
mide. Cet outil doit être exclusivement utilisé pour
le ponçage à sec.
L'utilisateur est responsable des dommages
provoqués par une utilisation non conforme.
4 Caractéristiques techniques
DTSC 400Li RTSC 400Li
Niveau de pression
acoustique L
PA
dB(A) dB(A)
Niveau de puissance
acoustique L
WA
dB(A) dB(A)
Incertitude K 3 dB 3 dB
ATTENTION
Acoustique se produisant lors du travail
Endommagement de l'ouïe
X
Utilisez une protection acoustique !
DTSC 400Li RTSC 400Li
Valeur d'émission
vibratoire (tridirec-
tionnelle) a
h
< 2,5 m/s
2
3 m/s
2
Incertitude K 2 m/s
2
2 m/s
2
Ponceuse vibrante sans fil DTSC 400Li RTSC 400Li
Tension 18 - 20 V 18 - 20 V
Vitesse (à vide) 6000 - 10000
tr/min
6000 - 10000
tr/min
Course de ponçage 2,0 mm 2,0 mm
Strona się ładuje...
Strona się ładuje...
Strona się ładuje...
Strona się ładuje...
Strona się ładuje...
Strona się ładuje...
Strona się ładuje...
Strona się ładuje...
Strona się ładuje...
Strona się ładuje...
Strona się ładuje...
Strona się ładuje...
Strona się ładuje...
Strona się ładuje...
Strona się ładuje...
Strona się ładuje...
Strona się ładuje...
Strona się ładuje...
Strona się ładuje...
Strona się ładuje...
Strona się ładuje...
Strona się ładuje...
Strona się ładuje...
Strona się ładuje...
Strona się ładuje...
Strona się ładuje...
Strona się ładuje...
Strona się ładuje...
Strona się ładuje...
Strona się ładuje...
Strona się ładuje...
Strona się ładuje...
Strona się ładuje...
Strona się ładuje...
Strona się ładuje...
Strona się ładuje...
Strona się ładuje...
Strona się ładuje...
Strona się ładuje...
Strona się ładuje...
Strona się ładuje...
Strona się ładuje...
Strona się ładuje...
Strona się ładuje...
Strona się ładuje...
Strona się ładuje...
Strona się ładuje...
Strona się ładuje...
Strona się ładuje...
Strona się ładuje...
Strona się ładuje...
Strona się ładuje...
Strona się ładuje...
Strona się ładuje...
Strona się ładuje...
Strona się ładuje...
Strona się ładuje...
Strona się ładuje...
Strona się ładuje...
Strona się ładuje...
Strona się ładuje...
Strona się ładuje...
Strona się ładuje...
Strona się ładuje...
Strona się ładuje...
Strona się ładuje...
-
 1
1
-
 2
2
-
 3
3
-
 4
4
-
 5
5
-
 6
6
-
 7
7
-
 8
8
-
 9
9
-
 10
10
-
 11
11
-
 12
12
-
 13
13
-
 14
14
-
 15
15
-
 16
16
-
 17
17
-
 18
18
-
 19
19
-
 20
20
-
 21
21
-
 22
22
-
 23
23
-
 24
24
-
 25
25
-
 26
26
-
 27
27
-
 28
28
-
 29
29
-
 30
30
-
 31
31
-
 32
32
-
 33
33
-
 34
34
-
 35
35
-
 36
36
-
 37
37
-
 38
38
-
 39
39
-
 40
40
-
 41
41
-
 42
42
-
 43
43
-
 44
44
-
 45
45
-
 46
46
-
 47
47
-
 48
48
-
 49
49
-
 50
50
-
 51
51
-
 52
52
-
 53
53
-
 54
54
-
 55
55
-
 56
56
-
 57
57
-
 58
58
-
 59
59
-
 60
60
-
 61
61
-
 62
62
-
 63
63
-
 64
64
-
 65
65
-
 66
66
-
 67
67
-
 68
68
-
 69
69
-
 70
70
-
 71
71
-
 72
72
-
 73
73
-
 74
74
-
 75
75
-
 76
76
-
 77
77
-
 78
78
-
 79
79
-
 80
80
-
 81
81
-
 82
82
-
 83
83
-
 84
84
-
 85
85
-
 86
86


Festool DTSC 400 3,1 I-Plus Instrukcja obsługi
- Kategoria
- Szlifierki elektryczne
- Typ
- Instrukcja obsługi
- Niniejsza instrukcja jest również odpowiednia dla
w innych językach
- español: Festool DTSC 400 3,1 I-Plus Instrucciones de operación
- italiano: Festool DTSC 400 3,1 I-Plus Istruzioni per l'uso
- eesti: Festool DTSC 400 3,1 I-Plus Kasutusjuhend
- português: Festool DTSC 400 3,1 I-Plus Instruções de operação
- français: Festool DTSC 400 3,1 I-Plus Mode d'emploi
- dansk: Festool DTSC 400 3,1 I-Plus Betjeningsvejledning
- Nederlands: Festool DTSC 400 3,1 I-Plus Handleiding
Powiązane artykuły
-
Festool ES-ETS 125 REQ-Plus Instrukcja obsługi
-
Festool LS 130 EQ-Plus Instrukcja obsługi
-
Festool RS 200 EQ Instrukcja obsługi
-
Festool ETSC 125 Li 3,1 I-Plus Instrukcja obsługi
-
Festool ETSC 125 Li Eccentric Sander Instrukcja obsługi
-
Festool RS 300 EQ-Set Instrukcja obsługi
-
Festool RS 100 CQ-Plus Instrukcja obsługi
-
Festool RTS 400 REQ-Plus Instrukcja obsługi
-
Festool RO 90 DX FEQ-Plus Instrukcja obsługi
-