Musica Portable CD Player CD player Instrukcja obsługi

Kategoria
Odtwarzacze MP3 / MP4
Typ
Instrukcja obsługi

Ten podręcznik jest również odpowiedni dla

1
English
Your Player At A Glance
Liquid Crystal
Display (LCD)
Play/Pause
Microphone
Scroller
Volume
Increase
Volume
Decrease
Front View Side View
Earphone
connector
Volume
Increase
English.book Page 1 Wednesday, May 5, 2004 10:36 AM
2
English
Getting Started
1
1
Install the Software
Your Creative MuVo TX FM comes with software that helps you create audio tracks, manage
your music library and use your player.
1. Make sure that your player is not connected to your computer.
2. Insert the Installation CD into your CD-ROM drive.
3. The disc supports Windows AutoPlay mode and starts running automatically. If not, click
Start
Run. In the Open box, type d:\ctrun\ctrun.exe (replace d:\ with the drive
letter of your CD/DVD-ROM drive), and then click the OK button.
4. Click the Install software for Creative MuVo TX FM to select it.
5. Click the OK button.
6. Follow the instructions on the screen.
7. When prompted, restart your system.
For Windows 2000/XP users:
To install the software, you must log in as the computer administrator. For more
information, refer to your operating system's online Help.
English.book Page 2 Wednesday, May 5, 2004 10:36 AM
3
2
2
Connect the USB Flash Drive to your
computer
Do not press the buttons on your USB Flash Drive while connecting it to your computer.
USB port
Battery
module
USB port
USB Flash
Drive
a
b
English.book Page 3 Wednesday, May 5, 2004 10:36 AM
4
3
3
Transferring tracks or files
1. After connecting the USB Flash Drive to your computer, you will see
Figure 1 on the player's LCD screen.
2. On your Desktop, right-click the My Computer icon, and then click
Explore. The USB Flash Drive appears as a removable disk icon
(Figure 2).
3. Drag and drop files into your player. During the transfer, Figure 3
appears on the LCD screen.
You can also use applications such as Creative MediaSource (included with the Installation CD)
to manage the music tracks in your player.
For Windows 98 SE users only:
Do not remove the USB Flash Drive until Figure 1 appears on the screen again for at least
five seconds.
For other Windows operating system users only:
Make sure you stop your player properly, using the Eject or Safely remove USB Mass
Storage Device option, before disconnecting it from your computer. Failure to
disconnect the player properly can result in corrupted files or music tracks. See the
“Troubleshooting” section in this booklet for details.
Music tracks are played in alphanumeric order starting with the tracks in the root level
followed by those in folders. The MuVo TX FM will only play supported music tracks that
are stored in either the root level or the first level of a folder. Tracks stored in sub-folders
of a folder will not be recognized.
Figure 1
Figure 2
Figure 3
English.book Page 4 Wednesday, May 5, 2004 10:36 AM
5
Formatting Your Player
If you need to format your player, backup the files in your player first. When you format your
player, all songs and files will be deleted. By default, your player is already formatted.
1. Connect your player to your computer's USB port.
2. Launch Windows Explorer on your computer. Your player is recognized as a Removable
Disk in Windows Explorer.
3. Right-click the Removable Disk icon and
click the Format option. The Format F:\
dialog box appears (replace F:\ with the
drive letter of your player).
4. Follow the instructions on the screen to
format your player.
5. After the formatting is complete, make sure you stop your player before disconnecting it
from your computer.
For more information about using Windows Explorer, refer to its online Help.
Your MuVo TX FM must be formatted in the FAT or FAT16 file system only. Do not select
FAT32 or NTFS. If those options are available in your operating system, those formats are
not recognized by your MuVo TX FM.
Windows 98SE users must have MuVo TX FM drivers installed before formatting the
player.
English.book Page 5 Wednesday, May 5, 2004 10:36 AM
6
How To Use Your Player
Remember to unplug the USB Flash Drive from your computer and insert it into the battery
module before turning on the player. For more usage information, refer to the PDF User's
Guide. Go to d:\manual\<language>\manual.pdf (replace d:\ with the drive letter of your
CD\DVD-ROM drive and <language> with the language the document is in).
Inserting the battery
The life of a battery depends on the type of battery used. It is recommended that you use
an alkaline battery. With an alkaline battery, you can play up to fourteen hours worth of
.MP3 files or eleven hours of .WMA files.
a
b
c
English.book Page 6 Wednesday, May 5, 2004 10:36 AM
7
Using Your Scroller
"Scroll Select", indicates that you should use the Scroller to scroll through options, and then
select the option by pressing the Scroller.
Using Your Player
Turning on the player
Press and hold the Play/Pause button for a few seconds. The Creative logo appears
on the screen, followed by the Creative MuVo TX FM logo, and there is music playback.
If your player contains no audio tracks, the message "No Music" or "No Recording" will appear
onscreen, depending on whether you are in Music or Recordings mode.
Turning off the player
Press and hold the Play/Pause button for a few seconds until after the Power off
message disappears
1. Use the Scroller to scroll through
options.
3. Press the Scroller to select the option.
2. Scroll to an option. 4. The selection appears.
English.book Page 7 Wednesday, May 5, 2004 10:36 AM
8
Stopping/Pausing a music track
Press the Play/Pause button .
Skipping folders (Albums)
1. Press the Scroller.
2. Scroll Select Skip Folder (Figure 4).
3. The Skip Folder menu appears.
4. Scroll to the folder that you want to skip to.
5. To resume normal playback, press the Scroller again.
Making a voice recording
1. Press the Scroller. Scroll Select Microphone (Figure 5).
2. The recording bar appears onscreen.
3. Press the Play/Pause button to start the recording.
4. Press the Play/Pause button again to end the recording.
5. A name is automatically assigned to your recording and is saved in your player. The naming
convention typically used is: VOC [Current File Number].
For easy navigation, store your albums as folders in the root directory.
When recording, the available recording time is determined by:
- available memory space in your player.
- battery power remaining in your player.
Figure 4
Figure 5
English.book Page 8 Wednesday, May 5, 2004 10:36 AM
9
Listening to FM radio
To c h a n ge t h e F M r e g i o n
Perform these steps first when scanning for stations for the first time.
1. Press the Scroller.
The Main Menu appears.
2. Scroll Select the Settings icon (Figure 6). A list appears.
3. Scroll Select the FM Region icon (Figure 7). A list appears.
Scroll Select the region that you are in.
To perform an autoscan and autosave
1. Press the Scroller.
The Main Menu appears.
2. Scroll Select the FM Radio icon (Figure 8).
A radio frequency appears on the LCD screen.
3. Press the Scroller.
4. Scroll Select the Autoscan icon (Figure 9).
The player scans and stores channels it detects. At the end of
the autoscan, it plays the first channel.
To select a channel
1. Press the Scroller.
The Main Menu similar to appears.
2. Scroll Select the FM Radio icon (Figure 8).
A radio frequency appears on the LCD screen.
3. Turn the Scroller to select the preset channel you want.
Figure 6
Figure 7
Figure 8
Figure 9
English.book Page 9 Wednesday, May 5, 2004 10:36 AM
10
Software Included
Creative MediaSource
Creative MediaSource allows you to rip CDs and create high quality digital audio files, play and
organize media files on your computer as well as transfer music tracks or files seamlessly to
and from your player. Special features such as SMARTFIT, using intelligent track management
and WMA compression, enables you to transfer a higher number of music tracks to your
player. For more information, refer to the Creative MediaSource online Help.
Go to Start
Programs/All Programs Creative Creative MediaSource
Creative MediaSource Organizer.
English.book Page 10 Wednesday, May 5, 2004 10:36 AM
11
Troubleshooting
When you turn on the player, an error message “File system error” appears
before the player turns off.
Try formatting your player. See section "Formatting Your Player".
After playing the first few music tracks, the player skips a music track.
The player will only play .MP3, .WMA or .WAV recordings. Other files will be skipped.
Files or music tracks are corrupted when transferred to the player.
After the transfer is complete, make sure you stop your player before disconnecting it from
your computer.
The player turns off immediately after it is turned on.
Check that the battery is not depleted.
I have to change the battery quite often. Is there anything I can do to make it last
longer?
Some operations consume more battery power:
a long backlight timeout setting. A shorter timeout conserves battery power.
frequent use of fast forward/reverse.
turning the player on/off too many times.
frequent use of passive speakers or high-powered headphones.
playback of .WMA files.
Can I play DRM-protected WMA files on my Creative MuVo TX FM?
Ye s.
English.book Page 11 Wednesday, May 5, 2004 10:36 AM
12
More Information
Register your product!
Enjoy a host of benefits by registering your product during installation, or at
www.creative.com/register. Benefits include:
Service and product support from Creative
Exclusive updates on promotions and events.
Technical Support and Warranty information
You can find Technical Support, Warranty and other information in the Installation CD.
(replace d:\ with the drive letter of your CD-ROM/DVD-ROM drive, <region> with the
region that you are in, and <language> with the language that your document is in)
Technical Support d:\support\<language>\support.pdf
You can also click Start Programs Creative Technical Support
Warranty d:\warranty\<region>\<language>\warranty.pdf
Please keep your Proof of Purchase for the duration of the warranty period.
Regulatory d:\fcc\<language>\doc.pdf
User’s Guide d:\manual\<language>\manual.pdf
Creative Knowledgebase
Resolve and troubleshoot technical queries at Creative's 24-hour self-help Knowledgebase.
Go to www.creative.com and select your region.
Copyright © 2004 Creative Technology Ltd. All rights reserved. The Creative logo, MuVo and Creative MediaSource are
trademarks or registered trademarks of Creative Technology Ltd. in the United States and/or other countries. NOMAD is
a registered trademark of Aonix and is used by Creative Technology Ltd. and/or its affiliates under license. Microsoft, Windows
and the Windows logo are registered trademarks of Microsoft Corporation. All other products are trademarks or registered
trademarks of their respective owners and are hereby recognized as such. All specifications are subject to change without
prior notice. Actual contents may differ slightly from those pictured.
English.book Page 12 Wednesday, May 5, 2004 10:36 AM
13
Français
Votre lecteur en un coup d'œil
Ecran à cristaux
liquides (LCD)
Lecture/Pause
Microphone
Molette
Augmentation
du volume
Diminution
du volume
Vue avant Vue latérale
Connecteur
des écouteurs
English.book Page 13 Wednesday, May 5, 2004 10:36 AM
14
Français
Démarrage
1
1
Installation du logiciel
Votre Creative MuVo TX FM est livré avec un logiciel qui permet de créer des pistes audio, de
gérer une bibliothèque de musique et d'utiliser le lecteur.
1. Assurez-vous que le lecteur n’est pas connecté à l’ordinateur.
2. Insérez le CD d'installation dans le lecteur de CD-ROM.
3. Le disque prend en charge le mode exécution automatique de Windows et démarre
automatiquement. Dans le cas contraire, cliquez sur marrer
Exécuter. Dans le
champ Ouvrir, tapez d:\ctrun\ctrun.exe (remplacez d:\ par la lettre de votre lecteur de
CD/DVD-ROM), puis cliquez sur le bouton OK.
4. Cliquez sur l’option Installer le logiciel pour Creative MuVo TX FM pour la
sélectionner.
5. Cliquez sur le bouton OK.
6. Suivez les instructions apparaissant à l'écran.
7. A l'invite, redémarrez votre système.
Pour les utilisateurs Windows 2000/XP :
Pour installer le logiciel, vous devez vous connecter en tant qu'administrateur système.
Pour plus d'informations, consultez l'aide en ligne de votre système d'exploitation.
English.book Page 14 Wednesday, May 5, 2004 10:36 AM
15
2
2
Connexion du Flash Drive USB à votre
ordinateur
N’appuyez pas sur les boutons de votre Flash Drive USB lorsque vous le connectez à votre
ordinateur.
Port USB
Module
de pile
Port USB
Flash Drive
USB
a
b
English.book Page 15 Wednesday, May 5, 2004 10:36 AM
16
3
3
Transfert de pistes ou de fichiers
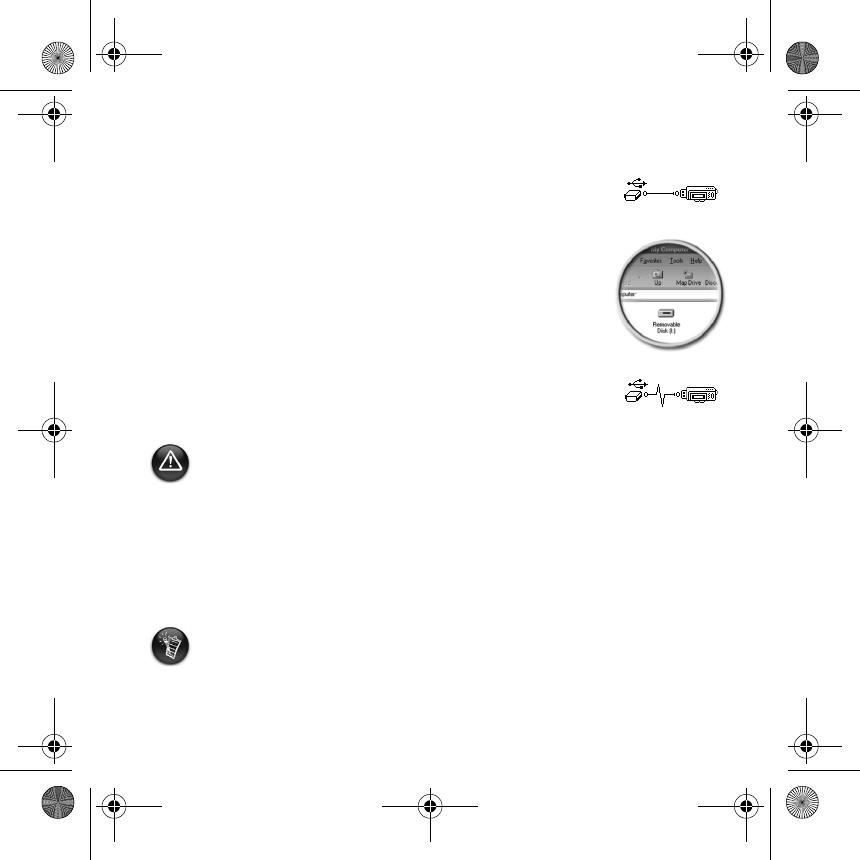
1. Après connexion du Flash Drive USB à votre ordinateur, Figure 1
apparaît sur l’écran LCD du lecteur.
2. Sur votre Poste de travail, cliquez avec le bouton droit sur l'icône
Poste de travail, puis sur Explorer. L’icône du Flash Drive USB
représente un disque amovible (Figure 2).
3. Glissez-déplacez les fichiers vers votre lecteur. Lors du transfert,
Figure 3 apparaît sur l’écran LCD.
Vous pouvez également utiliser des applications telles que Creative MediaSource (inclus sur le
CD d’installation) pour gérer les pistes musicales sur votre lecteur.
Pour les utilisateurs Windows 98 Deuxième Edition uniquement :
Ne retirez pas le Flash Drive USB jusqu’à ce que la figure 1 apparaisse de nouveau à l’écran
pendant au moins cinq secondes.
Pour les utilisateurs d’autres systèmes d’exploitation Windows uniquement :
Assurez-vous de correctement arrêter votre lecteur, en utilisant l’option Ejecter ou
Supprimer le périphérique de stockage USB en toute sécurité, avant de le
déconnecter de votre ordinateur. Les fichiers ou les pistes musicales risquent d’être
corrompus si le lecteur n’est pas correctement déconnecter. Reportez-vous à la section «
Dépannage » de cette brochure pour plus de détails.
Les pistes musicales sont lues dans un ordre alphanumérique, en commençant par les
pistes situées à la racine suivies de celles situées dans les dossiers. Le lecteur MuVo TX FM
ne lit que les pistes musicales prises en charge qui sont stockées soit à la racine, soit dans
le premier niveau de dossier. Les pistes stockées dans les sous-dossiers ne sont pas
reconnues.
Figure 1
Figure 2
Figure 3
English.book Page 16 Wednesday, May 5, 2004 10:36 AM
17
Formatage de votre lecteur
Si vous devez formater votre lecteur, sauvegardez tout d’abord les fichiers qui se trouvent dans
votre lecteur. Lorsque vous formatez votre lecteur, toutes les chansons et tous les fichiers
seront supprimés. Par défaut, votre lecteur est déjà formaté.
1. Connectez votre lecteur au port USB de votre ordinateur.
2. Lancez l’Explorateur Windows sur votre ordinateur. Votre lecteur est reconnu en tant
que disque amovible dans l’Explorateur Windows.
3. Cliquez avec le bouton droit de la souris sur
l’icône Disque amovible et cliquez sur
l’option Formater. La boîte de dialogue
Formater F:\ s’affiche (remplacez F:\ par la
lettre de votre lecteur).
4. Suivez les instructions qui s'affichent à
l’écran pour formater votre lecteur.
5. Une fois le formatage terminé, assurez-vous de mettre votre lecteur hors tension avant de
le déconnecter de votre ordinateur.
Pour obtenir plus d’informations sur l’utilisation de l’Explorateur Windows, consultez l’aide en
ligne.
Votre lecteur MuVo TX FM doit être formaté au format de système de fichiers FAT ou
FAT16 uniquement. Ne sélectionnez pas le format FAT32 ou NTFS. Si ces options sont
disponibles sur votre système d’exploitation, ces formats ne sont pas reconnus par votre
lecteur MuVo TX FM.
Pour les utilisateurs Windows 98 Deuxième Edition, les pilotes MuVo TX FM doivent être
installés avant de formater le lecteur.
English.book Page 17 Wednesday, May 5, 2004 10:36 AM
18
Utilisation de votre lecteur
N'oubliez pas de déconnecter le Flash Drive USB de votre ordinateur et de l'insérer dans le
module de pile avant de mettre le lecteur sous tension. Pour plus d’informations d’utilisation,
consultez le Guide de l’utilisateur au format PDF. Sélectionnez
d:\manual\<langue>\manual.pdf (remplacez d:\ par la lettre de votre lecteur de
CD/DVD-ROM et <langue> par la langue de rédaction du document).
Insertion de la pile
La durée de vie d’une pile dépend du type de pile utilisée. Il est recommandé d’utiliser une
pile alcaline. Avec une pile alcaline, vous pouvez écouter jusqu’à quatorze heures de
fichiers .MP3 ou jusqu’à onze heures de fichiers .WMA.
a
b
c
English.book Page 18 Wednesday, May 5, 2004 10:36 AM
19
Utilisation de votre molette
« Sélectionnez par navigation » signifie que vous devez utiliser la molette pour parcourir les
options et sélectionner l’option souhaitée en appuyant sur la molette.
Utilisation du lecteur
Mise sous tension du lecteur
Appuyez sur le bouton Lecture/Pause pendant quelques secondes. Le logo Creative
s’affiche, suivi du logo Creative MuVo TX FM, puis la musique est jouée.
Si votre lecteur ne contient aucune piste audio, le message « Pas de musique » ou « Pas
d’enregistrement voix » s’affichera sur l’écran en fonction du mode dans lequel vous vous
trouvez (Musique ou Enregistrements).
Mise hors tension du lecteur
Maintenez le bouton Lecture/Pause enfoncé pendant quelques secondes jusqu'à ce
que le message Mise hors tension disparaisse.
1. Utilisez la molette pour faire défiler les
options.
3. Appuyez sur la molette pour
sélectionner l'option de votre choix.
2. Parcourez les options pour rechercher
celle souhaitée.
4. La sélection apparaît.
English.book Page 19 Wednesday, May 5, 2004 10:36 AM
20
Arrêt/Pause d’une piste musicale
Appuyez sur le bouton Lecture/Pause .
Saut de dossiers (Albums)
1. Appuyez sur la molette.
2. Sélectionnez par navigation Sauter dossier Figure 4).
3. Le menu Ignorer le dossier apparaît.
4. Sélectionnez le dossier auquel vous souhaitez passer.
5. Pour reprendre la lecture normale, appuyez de nouveau sur la molette.
Création d'un enregistrement vocal
1. Appuyez sur la molette. Sélectionnez par navigation Microphone
(Figure 5).
2. La barre d'enregistrement s'affiche à l'écran.
3. Appuyez sur le bouton Lecture/Pause pour démarrer
l'enregistrement.
4. Appuyez de nouveau sur le bouton Lecture/Pause pour arrêter
l'enregistrement.
5. Un nom est automatiquement attribué à votre enregistrement et est sauvegardé dans
votre lecteur. La convention de dénomination généralement utilisée est : VOC [numéro
du fichier en cours].
Pour une recherche plus facile, stockez vos albums dans des dossiers au niveau du
répertoire racine.
Lors de l’enregistrement, le temps d’enregistrement dépend des éments suivants :
- la mémoire disponible sur le lecteur
- l'énergie restante de la pile du lecteur
Figure 4
Figure 5
English.book Page 20 Wednesday, May 5, 2004 10:36 AM
  • Page 1 1
  • Page 2 2
  • Page 3 3
  • Page 4 4
  • Page 5 5
  • Page 6 6
  • Page 7 7
  • Page 8 8
  • Page 9 9
  • Page 10 10
  • Page 11 11
  • Page 12 12
  • Page 13 13
  • Page 14 14
  • Page 15 15
  • Page 16 16
  • Page 17 17
  • Page 18 18
  • Page 19 19
  • Page 20 20
  • Page 21 21
  • Page 22 22
  • Page 23 23
  • Page 24 24
  • Page 25 25
  • Page 26 26
  • Page 27 27
  • Page 28 28
  • Page 29 29
  • Page 30 30
  • Page 31 31
  • Page 32 32
  • Page 33 33
  • Page 34 34
  • Page 35 35
  • Page 36 36
  • Page 37 37
  • Page 38 38
  • Page 39 39
  • Page 40 40
  • Page 41 41
  • Page 42 42
  • Page 43 43
  • Page 44 44
  • Page 45 45
  • Page 46 46
  • Page 47 47
  • Page 48 48
  • Page 49 49
  • Page 50 50
  • Page 51 51
  • Page 52 52
  • Page 53 53
  • Page 54 54
  • Page 55 55
  • Page 56 56
  • Page 57 57
  • Page 58 58
  • Page 59 59
  • Page 60 60
  • Page 61 61
  • Page 62 62
  • Page 63 63
  • Page 64 64
  • Page 65 65
  • Page 66 66
  • Page 67 67
  • Page 68 68
  • Page 69 69
  • Page 70 70
  • Page 71 71
  • Page 72 72
  • Page 73 73
  • Page 74 74
  • Page 75 75
  • Page 76 76
  • Page 77 77
  • Page 78 78
  • Page 79 79
  • Page 80 80
  • Page 81 81
  • Page 82 82
  • Page 83 83
  • Page 84 84
  • Page 85 85
  • Page 86 86
  • Page 87 87
  • Page 88 88
  • Page 89 89
  • Page 90 90
  • Page 91 91
  • Page 92 92
  • Page 93 93
  • Page 94 94
  • Page 95 95
  • Page 96 96
  • Page 97 97
  • Page 98 98
  • Page 99 99
  • Page 100 100
  • Page 101 101
  • Page 102 102
  • Page 103 103
  • Page 104 104
  • Page 105 105
  • Page 106 106
  • Page 107 107
  • Page 108 108
  • Page 109 109
  • Page 110 110
  • Page 111 111
  • Page 112 112
  • Page 113 113
  • Page 114 114
  • Page 115 115
  • Page 116 116
  • Page 117 117
  • Page 118 118
  • Page 119 119
  • Page 120 120
  • Page 121 121
  • Page 122 122
  • Page 123 123
  • Page 124 124
  • Page 125 125
  • Page 126 126
  • Page 127 127
  • Page 128 128
  • Page 129 129
  • Page 130 130
  • Page 131 131
  • Page 132 132
  • Page 133 133
  • Page 134 134
  • Page 135 135
  • Page 136 136
  • Page 137 137
  • Page 138 138
  • Page 139 139
  • Page 140 140
  • Page 141 141
  • Page 142 142
  • Page 143 143
  • Page 144 144
  • Page 145 145
  • Page 146 146
  • Page 147 147
  • Page 148 148
  • Page 149 149
  • Page 150 150
  • Page 151 151
  • Page 152 152
  • Page 153 153
  • Page 154 154
  • Page 155 155
  • Page 156 156
  • Page 157 157
  • Page 158 158
  • Page 159 159
  • Page 160 160
  • Page 161 161
  • Page 162 162
  • Page 163 163
  • Page 164 164
  • Page 165 165
  • Page 166 166
  • Page 167 167
  • Page 168 168
  • Page 169 169
  • Page 170 170
  • Page 171 171
  • Page 172 172
  • Page 173 173
  • Page 174 174
  • Page 175 175
  • Page 176 176
  • Page 177 177
  • Page 178 178
  • Page 179 179
  • Page 180 180
  • Page 181 181
  • Page 182 182
  • Page 183 183
  • Page 184 184

Musica Portable CD Player CD player Instrukcja obsługi

Kategoria
Odtwarzacze MP3 / MP4
Typ
Instrukcja obsługi
Ten podręcznik jest również odpowiedni dla