
First edition: Sep. 2017
Q04990500
©2017 SATO Corporation
Quick Guide
Kurzanleitung
Guía rápida
Guide rapide
Guida rapida
Snelgids
Skrócona instrukcja obsługi
Guia rápido
Snabbguide
Panduan Ringkas
PW208NX/PW208mNX
PW208NX
PW208mNX
A
CB D E
Mobile Printer
English
This is the quick start guide for your rst operation. For detail, refer to the operator
manual available on your region’s website (www.satoworldwide.com).
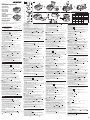
Accessories (See gure .)
Battery
Global Warranty Program leaet
Belt clip (One pair) (PW208NX only)
Screws (2) (PW208NX only)
Documents
BD address sticker
Loading the Media (See gure
A
.)
• When setting the media, be careful not to get cut your nger with the cutter
c
.
• Use only the supply products specied by SATO.
• Slide the media guide
b
by pulling the lever up
a
to match a media guide with
media size. (PW208NX only)
Installing and Removing the Battery (See gure
B
.)
• Turn off the power of the printer before inserting or removing the battery.
• Insert a battery from the metal side.
Charging the Battery (See gure
C
.)
• During charging, do not turn off the power of the printer.
* The shape of power plug varies depending on the region in which it was purchased.
CAUTION
Risk of explosion if battery is replaced by an incorrect type.
Dispose of used batteries according to the instructions.
Turning on the Power (See gure
D
.)
Press the (Standby) button. To shut down the printer, press the (Standby)
button until the STATUS LED lights in red.
: Feed / Enter button,
: Print / Select button
Basic Specications
Print method: Direct thermal, Head density (Resolution): 203 dpi (8 dots/mm)
[PW208NX] Dimensions
*1
: 95 (W) x 68.2 (D) x 128 (H) mm (3.7 x 2.7 x 5 in.),
Weight
*2
: 444 g (1 lb)
[PW208mNX] Dimensions
*1
: 95 (W) x 55.5 (D) x 109.5 (H) mm (3.7 x 2.2 x 4.3 in.),
Weight
*2
: 374 g (0.8 lb)
*1 Include protruding parts / *2 Including a battery pack of 105 g (0.2 lb), not including media
Power requirements (AC adapter):
[Optional / Bundled with 1BAY CHARGING CRADLE] Manufacturer: Adapter
Technology Co., LTD. Model: ATS018T-A100 Input voltage:
AC100-240 V, 50 Hz-
60 Hz Output voltage: DC10 V +10%-0%
1.9 A (DC Symbol )
[Bundled with 4BAY CHARGING CRADLE] Manufacturer: Li Tone Electronics Co.,
Ltd. Model: LTE65ES-S2-31202 Input voltage: AC100-240V, 50Hz - 60Hz Output
voltage: DC12 V ± 5%
5 A (DC Symbol )
Battery pack requirements (Lithium-ion): Manufacturer: Joules Miles Co., Ltd.
Model: GM/195HiBAT-SM, GM/195HiBAT-SSM Nominal voltage: DC 7.2 V Nominal
capacity: 1950 mAh Charge-discharge cycle
*3
: About 300 cycles or 3 years from the
date of rst use, whichever comes rst.
*3 The charge-discharge cycle and charging time may vary depending on usage environment.
Environmental conditions (Temperature/Humidity): (1) Operating: −15 - 50 ºC
(5 - 122ºF), 10 - 85 % RH(non-condensing) (2) Storage: −25 - 60 ºC (−13 - 140 ºF),
10 - 85 % RH(non-condensing) (3) Charging the Battery Pack: 5 - 35 ºC (41 - 95 ºF)
Technical Specication (See gure
E
.)
Bluetooth
Wireless LAN
NFC
Frequency band
Modulation
Number of
channel
Channel Spacing
Max. output power
Antenna gain
Deutsch
Dies ist die Kurzanleitung für Ihren ersten Betrieb. Weitere Details nden Sie in
der Betriebsanleitung, die auf der Webseite für Ihre Region erhältlich ist (www.
satoworldwide.com).
Zubehör (Siehe Abbildung .)
Akku
Weltweite Garantie
Gürtelhalterung (Ein Paar) (nur PW208NX)
Schrauben (2) (nur PW208NX)
Unterlagen
BD Adressaufkleber
Laden der Medien (Siehe Abbildung
A
.)
• Achten Sie beim Einstellen der Medien darauf, sich nicht mit dem Schneider
c
in den Finger zu schneiden.
• Verwenden Sie nur die durch SATO spezizierten Produkte.
• Verschieben Sie die Etikettenführung
b
, indem Sie den Hebel nach oben drücken
a
,
um die Etikettenführung an die Mediengröße anzupassen. (nur PW208NX)
Installieren und Entfernen des Akkus (Siehe Abbildung
B
.)
• Bevor Sie den Akku einführen oder entfernen, schalten Sie den Drucker aus.
• Legen Sie einen Akku von der Metallseite ein.
Auaden des Akkus (Siehe Abbildung
C
.)
• Schalten Sie den Drucker während des Ladevorgangs nicht aus.
* Die Form der Stecker kann je nach Land unterschiedlich sein.
ACHTUNG
Explosionsrisiko, falls Batterie durch einen falschen Typ ersetzt wird.
Entsorgen Sie gebrauchte Batterien entsprechend den Anweisungen.
Einschalten des Stroms (Siehe Abbildung
D
.)
Drücken Sie die Taste (Im Bereitschaftszustand). Um den Drucker
abzuschalten, drücken Sie die Taste
(Im Bereitschaftszustand) bis die
STATUS-LED rot leuchtet.
: Taste für Einzug / Eingabe, : Taste für Drucken / Auswählen
Wesentliche technische Daten
Druckverfahren: Thermodirektmethode, Thermokopf-Druckdichte (Auösung):
203 dpi (8 Punkte/mm)
[PW208NX] Abmessungen
*1
: 95 (W) x 68,2 (D) x 128 (H) mm, Gewicht
*2
: 444 g
[PW208mNX] Abmessungen
*1
: 95 (W) x 55,5 (D) x 109,5 (H) mm, Gewicht
*2
: 374 g
*1 Enthält hervorstehende Teile / *2 Einschließlich Akkupack mit 105 g, ohne Medien
Spannungsversorgung (Netzteil):
[Optional / Gebündelt mit 1-BAY LADESTATION] Hersteller: Adapter Technology
Co., LTD. Modell: ATS018T-A100 Eingangsspannung:
AC100-240 V, 50 Hz-60 Hz
Ausgangsspannung: DC10 V +10%-0%
1,9 A (DC-Symbol )
[Gebündelt mit 4-BAY LADESTATION] Hersteller: Li Tone Electronics Co., Ltd. Modell:
LTE65ES-S2-31202 Eingangsspannung: AC100-240V, 50Hz - 60Hz
Ausgangsspannung: DC12 V ± 5%
5 A (DC-Symbol )
Anforderungen an Akkupack (Lithium-Ionen): Hersteller: Joules Miles Co., Ltd.
Modell: GM/195HiBAT-SM, GM/195HiBAT-SSM Nominalspannung: DC 7.2 V
Nennkapazität: 1950 mAh Ladungs- / Entladungszyklus:
*3
: Ca 300 Zyklen oder 3
Jahre ab dem Datum des ersten Gebrauchs, je nachdem, was zuerst eintritt.
*3 Der Lade-/Entladezyklus und die Ladezeit sind je nach Verwendungsumgebung unterschiedlich.
Umgebungsbedingungen (Temperatur/Luftfeuchtigkeit): (1) Bei Betrieb: −15 -
50 ºC, 10 - 85 % Luftfeuchtigkeit (nicht kondensierend) (2) Bei Lagerung: −25 - 60 ºC,
10 - 85 % Luftfeuchtigkeit (nicht kondensierend) (3) Beim Auaden des Akkupacks:
5 - 35 ºC
Technische Spezikationen (Siehe Abbildung
E
.)
Bluetooth
Wireless LAN
NFC
Frequenzband
Modulation
Kanalnummer
Kanalabstand
Max. Ausgangsleistung
Antennenverstärkung
Español
El presente documento es la guía de inicio rápido para el primer uso. Para obtener más
información, consulte el manual de uso disponible en el sitio web de su región (www.
satoworldwide.com).
Accesorios (véase la ilustración ).
Batería
Especicaciones de garantía
pinzas de cinturón (un par) (sólo PW208NX)
Tornillos (2) (sólo PW208NX)
Documentos
Etiqueta de dirección BD
Carga del papel (véase la ilustración
A
).
• Al colocar el papel, tenga cuidado de no cortarse los dedos con el cortador
c
.
• Utilice únicamente los productos suministrados y especicados por SATO.
• Desplace la guía de papel
b
levantando la palanca
a
para hacer coincidir la guía de
papel con el tamaño del papel. (sólo PW208NX)
Instalación y extracción de la batería (véase la ilustración
B
).
• Apague la alimentación de la impresora antes de introducir o extraer la batería.
• Inserte una batería por el lado metálico.
Carga de la batería (véase la ilustración
C
).
• Durante el proceso de carga, no apague la impresora.
* La forma de la toma de corriente puede ser distinta si la impresora es adquirida en una
región diferente.
PRECAUCIÓN
Existe riesgo de explosión si la batería se reemplaza por otra que no sea la correcta.
Deseche las baterías usadas según las instrucciones.
Encendido de la alimentación (véase la ilustración
D
).
Pulse el botón (standby). Para apagar la impresora, pulse el botón (standby) hasta
que se encienda en rojo el LED DE ESTADO.
: Botón de alimentación/Entrar, : Botón de impresión/selección
Open Source Software
This printer product includes open source software applied to the open source
software license. Please see our web site for more information.
http://www.satoworldwide.com/licenses/OSS.aspx
a
b
b
c
*
Especicaciones básicas
Método de impresión: Método térmico directo, Densidad de cabezales (resolución):
203 dpi (8 puntos/mm)
Dimensiones [PW208NX]
*1
: 95 (An) x 68,2 (P) x 128 (Al) mm (3,7 x 2,7 x 5 in.),
Peso
*2
: 444 g (1 lb)
Dimensiones [PW208NX]
*1
: 95 (An) x 55,5 (P) x 109,5 (Al) mm (3,7 x 2,2 x 4,3 in.),
Peso
*2
: 374 g (0,8 lb)
*1 Incluidas las partes que sobresalen/*2 Incluido un pack de baterías de 105 g (0,2 lb); papel no incluido
Requisitos de alimentación de corriente (adaptador de CA):
[Opcional/suministrada con BASE DE CARGA DE 1 PUERTO] Fabricante: Adapter
Technology Co., LTD. Modelo: ATS018T-A100 Voltaje de entrada:
CA de 100 a 240 V,
50 Hz-60 Hz Voltaje de salida: CC de 10 V +10%-0%
1,9 A (Símbolo de CC )
[Suministrada con BASE DE CARGA DE 4 PUERTOS] Fabricante: Li Tone Electronics
Co., Ltd. Modelo: LTE65ES-S2-31202 Voltaje de entrada: CA de 100 a 240 V, 50-60 Hz
Voltaje de salida: CC de 12 V ± 5%
5 A (Símbolo de CC )
Requisitos de la batería (ion de litio): Fabricante: Joules Miles Co., Ltd. Modelo:
GM/195HiBAT-SM, GM/195HiBAT-SSM Voltaje nominal: CC de 7,2 V Capacidad
nominal: 1950 mAh Ciclo de carga-descarga
*3
: Unos 300 ciclos o 3 años desde la
fecha del primer uso, lo que suceda antes.
*3 El ciclo de carga-descarga y el tiempo de carga pueden variar en función del entorno de uso.
Condiciones ambientales (temperatura/humedad): (1) En funcionamiento:
−15 - 50 ºC (5 - 122 ºF), 10 - 85 % RH (sin condensación) (2) En almacenaje: −25
- 60 ºC (−13 - 140 ºF), 10 - 85 % RH (sin condensación) (3) Carga del pack de baterías:
5 - 35 ºC (41 - 95 ºF)
Especicaciones técnicas (véase la ilustración
E
).
Bluetooth
LAN inalámbric
a
NFC
Bandas de frecuencias
Modulación
Número
de canal
Separación entre canales
Potencia máx. de salida
Ganancia de antena
Français
Ceci est le guide de démarrage rapide pour la première utilisation. Pour plus de détails,
reportez-vous au manuel de l’opérateur sur le site Web de votre région (www.
satoworldwide.com).
Accessoires (Consultez la gure .)
Batterie
Brochure “programme de garantie”
Boucle de ceinture (une paire)
(PW208NX seulement)
Vis (2) (PW208NX seulement)
Documents
Autocollant
d’adresse BD
Chargement des étiquettes (Consultez la gure
A
.)
• Lorsque vous placez les étiquettes, prenez garde à ne pas vous couper le doigt avec
le massicot
c
.
• N’utilisez que les produits fournis et spéciés par SATO.
• Faites glisser le guide papier
b
en tirant le levier vers le haut
a
pour faire
correspondre un guide papier avec la taille du papier. (PW208NX seulement)
Installation et retrait de la batterie (voir gure
B
.)
• Mettez l’imprimante hors tension avant d’insérer ou de retirer la batterie.
• Insérez une batterie du côté métallique.
Chargement de la batterie (voir la gure
C
.)
• Pendant le chargement, ne mettez pas l’imprimante hors tension.
* La forme de la prise secteur varie en fonction du pays où a été achetée la machine.
ATTENTION
Risque d’explosion si la batterie est remplacée par un type de batterie incorrect.
Élimination des batteries usagées conformément aux instructions.
Mise sous tension (voir la gure
D
.)
Appuyez sur le bouton (Veille). Pour éteindre l’imprimante, appuyez sur le bouton
(Veille) jusqu’à ce que le voyant STATUT s’allume en rouge.
: Bouton Insérer / Entrer, : Bouton Imprimer / Sélectionner
Spécications de base
Méthode d’impression : Mode thermique direct, Densité de la tête (Résolution) :
203 dpi (8 points/mm)
[PW208NX] Dimensions
*1
: 95 (L) x 68,2 (P) x 128 (H) mm (3,7 x 2,7 x 5 po.),
Poids
*2
: 444 g (1 lb)
[PW208mNX] Dimensions
*1
: 95 (L) x 55,5 (P) x 109,5 (H) mm (3,7 x 2,2 x 4,3 po.),
Poids
*2
: 374 g (0,8 lb)
*1 Parties saillantes incluses / *2 Bloc batterie de 105 g (0,2 lb)
inclus, étiquettes non fournies
Spécications pour l’alimentation électrique (adaptateur secteur) :
[Options / Fourni avec STATION DE CHARGEMENT À 1 BAIE] Fabricant : Adapter
Technology Co., LTD. Modèle : ATS018T-A100 Tension d’entrée :
CA 100-240 V,
50 Hz-60 Hz Tension de sortie : CC 10 V +10%-0%
1,9 A (Symbole CC )
[Fourni avec STATION DE CHARGEMENT À 4 BAIES] Fabricant : Li Tone Electronics
Co., Ltd. Modèle : LTE65ES-S2-31202 Tension d’entrée : CA 100-240 V, 50 Hz - 60 Hz
Tension de sortie : CC 12 V ± 5 %
5 A (Symbole CC )
Exigences du bloc-batterie (Lithium-ion) : Fabricant : Joules Miles Co., Ltd.
Modèle : GM/195HiBAT-SM, GM/195HiBAT-SSM Tension nominale : CC 7,2 V
Capacité nominale : 1950 mAh Cycle de charge-décharge
*3
: Environ 300 cycles ou
3 ans à compter de la date de la première utilisation, selon la première éventualité.
*3 Le cycle de charge-décharge et la durée de chargement peuvent varier en fonction de
l’environnement d’utilisation.
Conditions d’utilisation (Température/Humidité) : (1) En service : −15 - 50 ºC (5 -
122 ºF), hygrométrie 10 - 85 % (sans condensation) (2) En stockage : −25 - 60 ºC (−13
- 140 ºF), hygrométrie 10 - 85 % (sans condensation) (3) Chargement du bloc batterie :
5 - 35 ºC (41 - 95 ºF)
Spécication technique (voir la gure
E
.)
Bluetooth
LAN sans l
NFC
Bandes de fréquence
Modulation
Nombre
de canaux
Espacement des canaux
Puissance de sortie max.
Gain d’antenne
Italiano
È una guida introduttiva per la prima operazione. Per i dettagli, consultare il manuale
dell’operatore disponibile sul sito web della propria regione (www.satoworldwide.com).
Accessori (vedere la gura )
Batteria
Opuscolo del programma di garanzia globale
Clip cintura (una coppia)
(solo per PW208NX)
Viti (2) (solo per PW208NX)
Documenti
Adesivo indirizzo BD
Caricamento del supporto (vedere la gura
A
.)
• Quando si imposta il supporto, fare attenzione a non tagliarsi le dita con la lama di
strappo
c
.
• Utilizzare solo i prodotti di stampa specicati da SATO.
• Far scorrere la guida del materiale di stampa
b
tirando verso l’alto la leva
a
in modo
da far corrispondere la guida del materiale di stampa con la dimensione del materiale
di stampa. (solo per PW208NX)
Installazione e rimozione della batteria (vedere gura
B
.)
• Spegnere la stampante prima di inserire o rimuovere la batteria.
• Inserire una batteria dal lato metallico.
Carica della batteria (vedere la gura
C
.)
• Durante la ricarica, non spegnere la stampante.
* La forma della spina di alimentazione varia a seconda della regione in cui è stato acquistato.
ATTENZIONE
Rischio di esplosione se la batteria viene sostituita con una di tipo non corretto.
Smaltire le batterie usate osservando le istruzioni.
Accensione (vedere gura
D
.)
Premere il pulsante (Stand-by). Per spegnere la stampante, premere il pulsante
(Stand-by) no a far accendere il LED di stato di colore rosso.
: Tasto Feed/Enter, : Tasto Print/Select
Speciche di base
Metodo di stampa: Metodo termico diretto, densità testa (Risoluzione): 203 dpi
(8 punti/mm)
Dimensioni [PW208NX]
*1
: 95 (L) x 68,2 (P) x 128 (H) mm, Peso
*2
: 444 g
Dimensioni [PW208mNX]
*1
: 95 (L) x 55,5 (P) x 109,5 (H) mm, Peso
*2
: 374 g
*1 Incluse parti sporgenti/*2 Inclusa batteria da 105 g, materiale da stampa non incluso
Requisiti di alimentazione (adattatore CA):
[Opzionale/In dotazione con CARICABATTERIE A 1 CONNETTORE] Marca: Adapter
Technology Co., LTD. Modello: ATS018T-A100 Tensione di ingresso: 100-240 V CA,
50 Hz-60 Hz Tensione di uscita: 10 V CC +10%-0%
1,9 A (simbolo CC )
[In dotazione con CARICABATTERIE A 4 CONNETTORI] Marca: Li Tone Electronics
Co., Ltd. Modello: LTE65ES-S2-31202 Tensione di ingresso: 100-240 V CA, 50 Hz -
60 Hz Tensione di uscita: 12 V CC ± 5%
5 A (simbolo CC )
Requisiti batteria (ioni di litio): Produttore: Joules Miles Co., Ltd. Modello:
GM/195HiBAT-SM, GM/195HiBAT-SSM Tensione nominale: 7,2 V CC Capacità
nominale: 1950 mAh Ciclo di carica-scarica
*3
: Circa 300 cicli oppure, se precedente,
3 anni dalla data del primo utilizzo.
*3 Il ciclo di carica-scarica e il tempo di carica possono variare a seconda dell’ambiente di utilizzo.
Condizioni ambientali (temperatura/umidità): (1) Di funzionamento: −15 - 50 ºC,
10 - 85% di umidità relativa (senza condensa) (2) Stoccaggio: −25 - 60 ºC, 10 - 85% di
umidità relativa (senza condensa) (3) Carica della batteria: 5 - 35 ºC
Specica tecnica (vedere gura
E
.)
Bluetooth
LAN wireless
NFC
Banda di frequenza
Modulazione
Numero
di canale
Spaziatura tra i canali
Potenza in uscita max.
Guadagno
dell’antenna
Nederlands
Dit is de snelstartgids voor uw eerste handeling. Meer informatie vindt u in de
gebruikershandleiding op de website van uw regio (www.satoworldwide.com).
Accessoires (zie afbeelding )
Batterij
Brochure met wereldwijd garantieprogramma
Riemclip (1 paar) (alleen
PW208NX)
Schroeven (2) (alleen PW208NX)
Documenten
Adressticker BD
Het papier plaatsen (zie afbeelding
A
.)
• Wees bij het plaatsen van het papier voorzichtig dat u uw vinger niet aan het mes
c
snijdt.
• Gebruik alleen verbruiksartikelen die door SATO zijn vermeld.
• Schuif de papiergeleider
b
door de hendel omhoog te trekken
a
om de
papiergeleider af te stellen op de grootte van het papier. (alleen PW208NX)
De batterij plaatsen en verwijderen (zie afbeelding
B
.)
• Schakel de printer uit voordat u de batterij plaatst of verwijdert.
• Plaats een batterij vanaf de metalen zijde.
Opladen van de batterij (zie afbeelding
C
.)
• Zet de printer niet uit tijdens het opladen.
* De vorm van de stekker hangt af van de regio waar u deze gekocht heeft.
OPGELET
Gevaar voor ontplofng als de batterij wordt vervangen door een verkeerd type.
Doe gebruikte batterijen volgens de instructies weg.
De stroom inschakelen (zie afbeelding
D
.)
Druk op de knop (Stand-by). Als u de printer uit wilt schakelen, drukt u op de knop
(Stand-by) totdat het STATUS-lampje rood wordt.
: Knop Feed / Enter, : Knop Print / Select
Basisspecicaties
Afdrukmethode: Directe thermische methode, Kop dichtheid (Resolutie): 203 dpi
(8 dots/mm)
[PW208NX] Afmetingen
*1
: 95 (B) x 68,2 (D) x 128 (H) mm, Gewicht
*2
: 444 g
[PW208mNX] Afmetingen
*1
: 95 (B) x 55,5 (D) x 109,5 (H) mm, Gewicht
*2
: 374 g
*1 Inclusief uitstekende onderdelen/ *2 Inclusief een batterij van 105 g, exclusief media
Stroomvereisten (Netadapter):
[Optioneel / Gebundeld met LAADSTATION VOOR 1 APPARAAT] Fabrikant:
Adapter Technology Co., LTD. Model: ATS018T-A100 Ingangsspanning:
AC 100 -
240 V, 50 Hz - 60 Hz Uitgangsspanning: DC 10 V +10%-0%
1,9 A (DC-symbool
)
[Gebundeld met LAADSTATION VOOR 4 APPARATEN] Fabrikant: Li Tone Electronics
Co., Ltd. Model: LTE65ES-S2-31202 Ingangsspanning: AC 100 - 240V, 50 Hz - 60 Hz
Uitgangsspanning: DC 12 V ± 5%
5 A (DC-symbool )
Vereisten batterijpack (lithium-ion): Fabrikant: Joules Miles Co., Ltd. Model:
GM/195HiBAT-SM, GM/195HiBAT-SSM Nominale spanning: DC 7,2 V Nominale
capaciteit: 1950 mAh Laad-ontlaadcyclus
*3
: Ongeveer 300 cycli of 3 jaar na de datum
van eerste gebruik, afhankelijk van wat eerst komt.
*3 De laad-ontlaadcyclus en de laadtijd kan verschillen per gebruiksomgeving.
Omgevingscondities (temperatuur/luchtvochtigheid): (1) In werking: −15 - 50 ºC,
10 - 85% RH (niet-condenserend) (2) In opslag: −25 - 60 ºC, 10 - 85% RV (niet-
condenserend) (3) De batterij opladen: 5 - 35 ºC
Technische specicatie (zie afbeelding
E
.)
Bluetooth
Draadloos LAN
NFC
Frequentieband
Modulatie
Aantal
kanalen
Kanaalafstand
Max. uitgangsvermogen
Antenneversterking
Polski
Niniejszy dokument to skrócona instrukcja obsługi umożliwiająca rozpoczęcie pracy.
Szczegółowe informacje znajdują się w podręczniku operatora dostępnym w lokalnej
witrynie internetowej (www.satoworldwide.com).
Akcesoria (Patrz rys. ).
Bateria
Broszura Globalny program gwarancyjny
Klips na pasek (jedna para) (tylko
model PW208NX)
Wkręty (2) (tylko model PW208NX)
Dokumenty
Naklejka adresu BD
Ładowanie nośnika (Patrz rys.
A
.)
• Podczas wkładania nośnika należy uważać, aby nie przeciąć palców obcinakiem
c
.
• Stosować wyłącznie produkty wskazane przez rmę SATO.
• Wsuń prowadnicę etykiet
b
, pociągając dźwignię w górę
a
, tak aby dopasować
prowadnicę do rozmiaru nośnika. (tylko model PW208NX)
Wkładanie i wyjmowanie baterii (Patrz rys.
B
.)
• Przed włożeniem lub wyjęciem baterii należy wyłączyć zasilanie drukarki.
• Baterię należy włożyć od metalowej strony przedziału baterii.
Ładowanie baterii (Patrz rys.
C
.)
• Podczas ładowania nie wolno wyłączać drukarki.
* Kształt wtyczki zasilania różni się w zależności od regionu, w którym dokonano zakupu.
PRZESTROGA
Włożenie baterii nieprawidłowego typu grozi wybuchem.
Zużyte baterie należy utylizować zgodnie z instrukcjami.
Włączanie zasilania (Patrz rys.
D
.)
Naciśnij przycisk (tryb gotowości). Aby wyłączyć drukarkę, naciśnij przycisk (Tryb
gotowości) i przytrzymaj do chwili, gdy kontrolka LED stanu zacznie świecić na czerwono.
: przycisk podawania/wprowadzania, : przycisk drukowania/wyboru
Podstawowe dane techniczne
Metoda druku: Bezpośredni druk termiczny, Gęstość głowicy (rozdzielczość):
203 dpi (8 pkt/mm)
[PW208NX] Wymiary
*1
: 95 x 68,2 x 128 mm, Masa
*2
:444 g
[PW208mNX] Wymiary
*1
: 95 x 55,5 x 109,5 mm, Masa
*2
:374 g
*1 Z wystającymi częściami / *2 Z akumulatorem o masie 105 g, bez nośnika
Wymagania dotyczące zasilania (zasilacz sieciowy):
[Opcja / W zestawie z 1-KOMOROWĄ STACJĄ ŁADUJĄCĄ] Producent: Adapter
Technology Co., LTD. Model: ATS018T-A100 Napięcie wejściowe:
100–240 V AC,
50–60 Hz Napięcie wyjściowe: 10 V DC +10%-0%
1,9 A (symbol DC )
[W zestawie z 4-KOMOROWĄ STACJĄ ŁADUJĄCĄ] Producent: Li Tone Electronics
Co., Ltd. Model: LTE65ES-S2-31202 Napięcie wejściowe: 100–240 V AC, 50–60 Hz
Napięcie wyjściowe: 12 V DC ±5%
5 A (symbol DC )
Wymagania dotyczące akumulatora (litowo-jonowy): Producent: Joules Miles Co.,
Ltd. Model: GM/195HiBAT-SM, GM/195HiBAT-SSM Napięcie znamionowe: 7,2 V DC
Pojemność znamionowa:1950 mAh Cykl ładowania-rozładowania
*3
:Około 300 cykli
lub 3 lata od daty pierwszego użycia, zależnie od tego, co nastąpi wcześniej.
*3 Cykl ładowania-rozładowania i czas ładowania mogą się różnić w zależności od środowiska użycia.
Warunki środowiskowe (temperatura/wilgotność): (1) Działanie: od –15 do 50ºC,
10–85% RH (bez kondensacji) (2) Przechowywanie: od –25 do 60ºC, 10–85% RH (bez
kondensacji) (3) Ładowanie akumulatora:od 5 do 35ºC
Specykacja techniczna (Patrz rys.
E
.)
Bluetooth
Bezprzewodowa sieć LAN
NFC
Pasmo częstotliwości
Modulacja
Numer kanału
Odstęp kanału
Maks. moc wyjściowa
Zysk anteny
Português
Este é um guia de início rápido para a primeira utilização. Para mais informações,
consulte o manual do utilizador disponível no website da sua região (www.
satoworldwide.com).
Acessórios (ver gura .)
Bateria
Folheto-GWP (Potencial de Aquecimento Global)
Clip de cinto (Um par)
(apenas PW208NX)
Parafusos (2) (apenas PW208NX)
Documentos
Autocolante
de endereço BD
Colocar as etiquetas (ver gura
A
.)
• Ao colocar as etiquetas, tenha cuidado para não cortar o dedo no cortador
c
.
• Utilize apenas os produtos de alimentação especicados pela SATO.
• Deslize o guia de etiquetas
b
puxando a alavanca para cima
a
para corresponder
um guia de etiquetas com o tamanho das etiquetas.
Instalar e retirar a bateria (ver gura
B
.)
• Desligue a alimentação da impressora antes de introduzir ou retirar a bateria.
• Introduza uma bateria a partir do lado metálico.
Carregar a bateria (ver gura
C
.)
• Durante o carregamento, não desligue a impressora.
* O formato do plugue de energia pode ser diferente se a impressora for comprada em outra região.
CUIDADO
Risco de explosão se a bateria for substituída por uma do tipo incorreto.
Eliminação de baterias usadas de acordo com as instruções.
Ligando a Energia (ver gura
D
.)
Prima o botão (Standby). Para desligar a impressora, prima o botão (Standby) até
o LED ESTADO acender a vermelho.
: Botão Alimentação/Enter, : Botão Imprimir/Selecionar
Especicações básicas
Método de impressão: Método Impressão térmica direta, Densidade do cabeçote
(Resolução): 203 ppp (8 pontos/mm)
[PW208NX] Dimensões
*1
: 95 (L) x 68,2 (P) x 128 (A) mm, Peso
*2
: 444 g
[PW208mNX] Dimensões
*1
: 95 (L) x 55,5 (P) x 109,5 (A) mm, Peso
*2
: 374 g
*1 Incluir partes salientes/*2 Incluindo um pacote da bateria de 105 g, não incluindo etiquetas
Requisitos de alimentação de energia (Transformador CA):
[Opcional/Agrupado com BASE DE CARREGAMENTO DE 1 BAÍA] Fabricante:
Adapter Technology Co., LTD. Modelo: ATS018T-A100 Voltagem:
CA100-240 V, 50 Hz-
60 Hz Voltagem de saída: CC10 V +10%-0%
1,9 A (Símbolo CC )
[Agrupado com BASE DE CARREGAMENTO DE 4 BAÍAS] Fabricante: Li Tone
Electronics Co., Ltd. Modelo: LTE65ES-S2-31202 Voltagem: CA100-240V, 50Hz - 60Hz
Voltagem de saída: CC12 V ± 5%
5 A (Símbolo CC )
Requisitos do pacote da bateria (Ião de lítio): Fabricante: Joules Miles Co., Ltd.
Modelo: GM/195HiBAT-SM, GM/195HiBAT-SSM Voltagem nominal: CC 7,2 V
Capacidade nominal: 1950 mAh Ciclo de carga-descarga
*3
: Cerca de 300 ciclos ou
3 anos a partir da data da primeira utilização, o que ocorrer primeiro.
*3 O ciclo de carga/descarga e o tempo de carregamento podem variar dependendo das condições
de utilização.
Condições ambientais (temperatura/humidade): (1) Funcionamento: −15 - 50 ºC, 10
- 85 % RH (sem condensação) (2) Armazenamento: −25 - 60 ºC, 10 - 85 % RH (sem
condensação) (3) Carregar o pacote da bateria: 5 - 35 ºC
Especicação técnica (ver gura
E
.)
Bluetooth
LAN sem os
NFC
Banda de frequências
Modulação
Número
de canal
Espaçamento de canais
Potência máx. de saída
Ganho de antena
Svenska
Detta är en snabbguide för att du ska kunna komma igång och använda produkten. För
mer detaljerad information kan du läsa användarhandboken som nns på webbplatsen
för din region (www.satoworldwide.com).
Tillbehör (se gur .)
Batteri
Globalt garantiprogrambroschyr
Bältesklämma (ett par) (endast PW208NX)
Skruvar (2) (endast PW208NX)
Dokument
BD-adressetikett
Ladda media (Se bild
A
.)
• När du laddar media måste du vara försiktig så att du inte skär dig i ngrarna med klipparen
c
.
• Används endast tillbehör och material som rekommenderas av SATO.
• Skjut pappersledaren åt sidan
b
genom att dra spaken uppåt
a
. Matcha
pappersledaren med storleken på det media som används. (endast PW208NX)
Installera och plocka ur batteriet (se bild
B
.)
• Slå av strömmen till skrivaren innan du sätter i eller plockar ur batteriet.
• Sätt i batteriet i batterifacket.
Ladda batteriet (se bild
C
.)
• Slå inte av skrivaren medan batteriet håller på att laddas.
* Formen på kontakten varierar beroende på region där inköp skedde.
FÖRSIKTIGHET
Explosionsrisk föreligger om batteriet ersätts av en felaktig typ.
Kassera gamla batterier enligt anvisningarna.
Sätta på strömmen (se bild
D
.)
Tryck på -knappen (Standby). För att slå av skrivaren, trycker du på -knappen
(Standby) tills lampan STATUS LED börjar lysa med rött ljus.
: Matnings-/returknappen, : Utskrifts-/väljarknappen
Generella specikationer
Utskriftsmetod: Direk termisk metod, Huvuddensitet (Upplösning): 203 dpi (8 punkter/mm)
[PW208NX] Mått
*1
: 95 (B) x 68,2 (D) x 128 (H) mm (3,7 x 2,7 x 5 tum),Vikt
*2
: 444 g
[PW208mNX] Mått
*1
: 95 (B) x 55,5 (D) x 109,5 (H) mm (3,7 x 2,2 x 4,3 tum),Vikt
*2
: 374 g
*1 Inklusive utskjutande delar / *2 Inklusive ett batteripaket på 105 g, inkluderar ej media
Krav för kraftförsörjning (AC-adapter):
[Tillval/medföljer tillsammans med LADDNINGSDOCKAN 1BAY] Tillverkare:
Adapter Technology Co., LTD. Modell: ATS018T-A100 Inspänning:
100-240 V AC,
50–60 Hz Utspänning: 10 V DC +10%-0%
1,9 A (DC-symbol )
[Medföljer tillsammans med LADDNINGSDOCKAN 4BAY] Tillverkare: Li Tone
Electronics Co., Ltd. Modell: LTE65ES-S2-31202 Inspänning: 100-240 V AC, 50–60 Hz
Utspänning: 12 V DC ± 5 % 5 A (DC-symbol )
Krav för batteripaketet (litiumjon): Tillverkare: Joules Miles Co., Ltd. Modell:
GM/195HiBAT-SM, GM/195HiBAT-SSM Nominalspänning: 7,2 V DC
Nominalkapacitet: 1 950 mAh Cykel för laddning/urladdning
*3
: Cirka 300 cykler eller
3 år från när det tas i bruk, beroende på vilket som inträffar först.
*3 Laddnings-urladdningscykeln och laddningstiden kan variera beroende av miljön.
Miljövillkor (temperatur/luftfuktighet): (1) Drift: −15 till +50 ºC, 10–85 % RH
(icke-ledande) (2) Förvaring: –25 till +60 ºC, 10–85 % RH (icke-ledande) (3) Laddning
av batteripaketet: 5–35 ºC
Teknisk specikation (se bild
E
.)
Bluetooth
Trådlöst LAN
NFC
Frekvensband
Modulering
Antal kanaler
Kanalraster
Max. utmatningseffekt
Antennförstärkning
Bahasa Malaysia
Ini ialah panduan mula ringkas untuk operasi pertama anda. Untuk mendapatkan
butiran, rujuk manual operator yang tersedia pada laman web kawasan anda (www.
satoworldwide.com).
Aksesori (Lihat rajah .)
Bateri
Risalah Program Waranti Global
Klip tali pinggang (Satu pasang) (PW208NX
sahaja)
Skru (2) (PW208NX sahaja)
Dokumen
Pelekat alamat BD
Memuatkan Media (Lihat rajah
A
.)
• Apabila menetapkan media, berhati-hati agar tidak terpotong jari anda dengan pemotong
c
.
• Hanya gunakan produk yang dibekalkan yang dinyatakan oleh SATO.
• Gelongsorkan panduan media
b
dengan menarik tuil ke atas
a
bagi memadankan
panduan media dengan saiz media. (PW208NX sahaja)
Memasang dan Mengeluarkan Bateri (Lihat rajah
B
.)
• Matikan kuasa pencetak sebelum memasukkan atau mengeluarkan bateri.
• Masukkan bateri daripada sisi besi.
Mengecas Bateri (Lihat rajah
C
.)
• Semasa pengecasan, jangan matikan kuasa pencetak.
* Bentuk palam kuasa berbeza-beza bergantung pada kawasan pembeliannya.
AWAS
Risiko letupan jika bateri digantikan dengan jenis yang tidak betul.
Lupuskan bateri yang telah digunakan mengikut arahan.
Menghidupkan Kuasa (Lihat rajah
D
.)
Tekan butang (Tunggu sedia). Untuk mematikan pencetak, tekan butang (Tunggu
sedia) sehingga LED STATUS bernyala merah.
: butang Suapan / Masuk, : butang Cetak / Pilih
Spesikasi Asas
Kaedah cetakan: Kaedah terma langsung, Ketumpatan kepala (Resolusi): 203 dpi (8 titik/mm)
[PW208NX] Dimensi
*1
: 95 (W) x 68.2 (D) x 128 (H) mm (3.7 x 2.7 x 5 in.),Berat
*2
: 444 g
[PW208mNX] Dimensi
*1
:
95 (W) x 55.5 (D) x 109.5 (H) mm (3.7 x 2.2 x 4.3 in.), Berat
*2
: 374 g
*1 Termasuk bahagian yang terjulur / *2 Termasuk pek bateri seberat 105 g, tidak termasuk media
Keperluan kuasa (Penyesuai AC):
[Pilihan / Disertakan dengan PENATANG PENGECASAN 1 RUANG] Pembuat:
Adapter Technology Co., LTD. Model: ATS018T-A100 Voltan input:
AC100-240 V,
50 Hz-60 Hz Voltan output: DC10 V +10%-0%
1.9 A (Simbol DC )
[Disertakan dengan PENATANG PENGECASAN 4 RUANG] Pembuat: Li Tone
Electronics Co., Ltd. Model: LTE65ES-S2-31202
Voltan input: AC100-240V, 50Hz - 60Hz
Voltan output:: DC12 V ± 5%
5 A (Simbol DC )
Keperluan pek bateri (Ion litium): Pembuat: Joules Miles Co., Ltd. Model:
GM/195HiBAT-SM, GM/195HiBAT-SSM Voltan nominal: DC 7.2 V Kapasiti nominal:
1950 mAh Kitaran cas-nyahcas
*3
: Lebih kurang 300 kitaran atau 3 tahun dari tarikh
penggunaan pertama, mana-mana yang berlaku dahulu.
*3
Kitaran cas-nyahcas dan masa pengecasan mungkin berlainan bergantung pada persekitaran penggunaan.
Keadaan persekitaran (Suhu/Kelembapan): (1) Beroperasi: −15 - 50 ºC, 10 - 85 %
RH(tidak meluwap) (2) Simpanan: −25 - 60 ºC, 10 - 85 % RH(tidak meluwap)
(3) Mengecas Pek Bateri: 5 - 35 ºC
Spesikasi Teknikal (Lihat rajah
E
.)
Bluetooth
LAN Kabel
NFC
Jalur frekuensi
Modulasi
Bilangan saluran
Penjarakan Saluran
Kuasa output maksima.
Kekuatan Antena
คู่มือแนะน�ำกำรใช้งำนแบบย่อ
)
A
)
c
b
a
B
)
C
)
D
)
*1
*2
*1
*2
+
±
*3
ºC
ºCºC
E
)
a
b
→
→
→
→
→
→
→
→
→
→
→
→
→
→
→
→
→
→
→
→
→
→
→
→
→
→
→
→
→
→
→
→
→
→
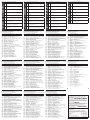
Technical Specication
Bluetooth
Wireless LAN
NFC
Frequecy
band
2402 - 2480
MHz
2412 -
2472 MHz
5180 -
5700 MHz
13.56 MHz
Modulation FHSS
DSSS,
OFDM
OFDM
NFC Type 2 Tag (Passive)
Number of
channel
79 13 19
1
Channel
Spacing
1 MHz 5 MHz 20 MHz
N/A
Max. output
power
10 dBm
20 dBm 20 dBm
Operating distance of up
to 100 mm (depending
on various parameters,
such as eld strength
and antenna geometry)
Antenna
gain
+1.4 dBi +2.1 dBi +2.4 dBi

Icon
a
No.
b
Messages (Cause
Countermeasure)
1001
Machine Error
→ Recycle power. Contact service if not resolved.
1002
Program Error
→
Memory or program error. Recycle power. Contact service if not resolved.
1006
Buffer Overow
→ Receiving buffer full. Check host program.
1007
Cover Open
→ Cover is open. Close cover.
1008
Out of Paper
→ Check and load paper properly.
1010
Media Error
→
Print is too long or wrong setting. Adjust print data or sensor settings.
1012
Head Error
→ Contact customer service.
1013
Memory Error
→ Contact customer service if not resolved.
1014
Memory Full
→ Free up space.
Icon
a
No.
b
Messages (Cause
Countermeasure)
1017
SBPL CMD Error
→ Check print data.
1022
Head Overheat
→ Please wait till printhead cools down.
1028
GAP Not Found
→ Please set label correctly.
1035
I-mark Not Found
→ Please set label correctly.
1043
Low Battery
→ Please charge battery.
1046
EAP Auth Error
→ Errorneous Wi-Fi settings. Adjust settings.
1047
EAP Auth Error
→ Authentication timed out. Check AP and Server congurations.
1050
Bluetooth Error
→ Contact customer service.
1058
CRC Check Error
→ Signature doesn’t match. Verify the transmitted data.
Icon
a
No.
b
Messages (Cause
Countermeasure)
1059
Charging
→ Please wait till low battery is cleared.
1060
No Battery
→ Please insert battery.
1061
Degraded Batt.
→ Contact customer service.
1063
Battery Error
→ Please replace battery.
1064
Motor Overheat
→ Please wait till motor cools down.
1065
Printer Overheat
→ Contact customer service.
1066
Paper Jam
→ Open cover and load label again.
1067
Charging
→ Please wait till charging is complete.
1068
WLAN Error
→ Contact customer service.
Icon
a
No.
b
Messages (Cause
Countermeasure)
1069
Option Error
→ Contact customer service.
1070
Bat. Wearing out
→ [Notice]Please replace battery.
1071
Worn out battery
→ [Warning!]Please replace battery.
1072
Power Off Error
→ Please cancel the error by issuing key.
1075
NFC Error
→ Contact customer service.
1076
Invalid command
→ Failed to install settings from NFC.
1099
Cong Warning
→ Conguration Initialization.
English
Error Message (See the table above.)
When an error message appears on the display, there is error in the printer. Check
the error number and warning message.
a
No.
b
Messages (Cause
Countermeasure)
1001 Machine Error → Recycle power. Contact service if not resolved.
1002 Program Error → Memory or program error. Recycle power. Contact
service if not resolved.
1006 Buffer Overow → Receiving buffer full. Check host program.
1007 Cover Open → Cover is open. Close cover.
1008 Out of Paper → Check and load paper properly.
1010 Media Error → Print is too long or wrong setting. Adjust print data or
sensor settings.
1012 Head Error → Contact customer service.
1013 Memory Error → Contact customer service if not resolved.
1014 Memory Full → Free up space.
1017 SBPL CMD Error → Check print data.
1022 Head Overheat → Wait till printhead cools down.
1028 GAP Not Found → Set label correctly.
1035 I-mark Not Found → Set label correctly.
1043 Low Battery → Charge battery.
1046 EAP Auth Error → Errorneous Wi-Fi settings. Adjust settings.
1047 EAP Auth Error → Authentication timed out. Check AP and Server
congurations.
1050 Bluetooth Error → Contact customer service.
1058 CRC Check Error → Signature doesn’t match. Verify the transmitted data.
1059 Charging → Wait till low battery is cleared.
1060 No Battery → Insert battery.
1061 Degraded Batt. → Contact customer service.
1063 Battery Error → Replace battery.
1064 Motor Overheat → Wait till motor cools down.
1065 Printer Overheat → Contact customer service.
1066 Paper Jam → Open cover and load label again.
1067 Charging → Wait till charging is complete.
1068 WLAN Error → Contact customer service.
1069 Option Error → Contact customer service.
1070 Bat. Wearing out → [Notice] Replace battery.
1071 Worn out battery → [Warning!] Replace battery.
1072 Power Off Error → Cancel the error by issuing key.
1075 NFC Error → Contact customer service.
1076 Invalid command → Failed to install settings from NFC.
1099 Cong Warning → Conguration Initialization.
Deutsch
Fehlermeldung (Siehe die obige Tabelle)
Wenn eine Fehlermeldung auf dem Anzeigefeld erscheint, liegt im Drucker ein
Fehler vor. Überprüfen Sie die Fehlernummer sowie die Warnmeldung.
a
Nr.
b
Meldungen (Ursache
Gegenmaßnahme)
1001 Machine Error → Aus- und wieder einschalten. Service kontaktieren, wenn das
Problem weiterhin besteht.
1002 Program Error → Speicher- oder Programmfehler. Aus- und wieder
einschalten. Service kontaktieren, wenn das Problem weiterhin besteht.
1006 Buffer Overow → Empfangspuffer ist voll. Host-Programm überprüfen.
1007 Cover Open → Abdeckung ist geöffnet. Abdeckung schließen.
1008 Out of Paper → Papier überprüfen und richtig einlegen.
1010 Media Error → Druck ist zu lang oder falsche Einstellung. Druckdaten oder
Sensoreinstellung anpassen.
1012 Head Error → Kundenservice kontaktieren.
1013 Memory Error → Kundenservice kontaktieren, wenn Problem weiterhin
besteht.
1014 Memory Full → Platz frei machen.
1017 SBPL CMD Error → Druckdaten überprüfen.
1022 Head Overheat → Warten, bis Druckkopf abgekühlt ist.
1028 GAP Not Found → Etikett richtig einrichten.
1035 I-mark Not Found → Etikett richtig einrichten.
1043 Low Battery → Akku auaden.
1046 EAP Auth Error → Fehlerhafte Wi-Fi-Einstellungen. Einstellungen anpassen.
1047 EAP Auth Error → Authentizierung abgelaufen. AP und Serverkongurationen
überprüfen.
1050 Bluetooth Error → Kundenservice kontaktieren.
1058 CRC Check Error → Signatur stimmt nicht überein. Übermittelte Daten
überprüfen.
1059 Charging → Warten bis Akku wieder etwas aufgeladen ist.
1060 No Battery → Akku einlegen.
1061 Degraded Batt. → Kundenservice kontaktieren.
1063 Battery Error → Akku ersetzen.
1064 Motor Overheat → Warten bis Motor abgekühlt ist.
1065 Printer Overheat → Kundenservice kontaktieren.
1066 Paper Jam → Abdeckung öffnen und Etikett erneut einlegen.
1067 Charging → Warten bis Ladevorgang abgeschlossen ist.
1068 WLAN Error → Kundenservice kontaktieren.
1069 Option Error → Kundenservice kontaktieren.
1070 Bat. Wearing out → [Hinweis] Akku ersetzen.
1071 Worn out battery → [Warnung!] Akku ersetzen.
1072 Power Off Error → Fehler mittels Schlüssel entfernen.
1075 NFC Error → Kundenservice kontaktieren.
1076 Invalid command → Übernahme der Einstellungen von NFC fehlgeschlagen.
1099 Cong Warning → Initialisierung der Konguration.
Español
Mensaje de error (véase la tabla anterior).
Cuando aparece un mensaje de error en la pantalla, hay un error en la impresora.
Compruebe el número de error y el mensaje de advertencia.
a
N.º
b
Mensajes (Causa
Medidas)
1001 Machine Error → Apague la alimentación y vuelva a encenderla. Póngase en
contacto con el servicio de atención al cliente si no se resuelve.
1002 Program Error → Error de memoria o de programa. Apague la alimentación y
vuelva a encenderla. Póngase en contacto con el servicio de atención al
cliente si no se resuelve.
1006 Buffer Overow → Búfer de recepción lleno. Compruebe el programa host.
1007 Cover Open → La cubierta está abierta. Cierre la cubierta.
1008 Out of Paper → Compruebe y cargue bien el papel.
1010 Media Error → La impresión es demasiado larga o está mal congurada.
Ajuste los datos de impresión o la conguración de los sensores.
1012 Head Error → Póngase en contacto con el servicio de atención al cliente.
1013 Memory Error → Póngase en contacto con el servicio de atención al cliente si
no se resuelve.
1014 Memory Full → Libere espacio.
1017 SBPL CMD Error → Compruebe los datos de impresión.
1022 Head Overheat → Espere hasta que el cabezal de impresión se enfríe.
1028 GAP Not Found → Coloque la etiqueta correctamente.
1035 I-mark Not Found → Coloque la etiqueta correctamente.
1043 Low Battery → Cargue la batería.
1046 EAP Auth Error → Conguración de wi errónea. Ajuste la conguración.
1047 EAP Auth Error → Tiempo de espera de la autenticación agotado. Compruebe
las conguraciones de AP y del servidor.
1050 Bluetooth Error → Póngase en contacto con el servicio de atención al cliente.
1058 CRC Check Error → La rma no corresponde. Verique los datos transmitidos.
1059 Charging → Espere hasta que desaparezca el mensaje de batería baja.
1060 No Battery → Inserte la batería.
1061 Degraded Batt. → Póngase en contacto con el servicio de atención al cliente.
1063 Battery Error → Sustituya la batería.
1064 Motor Overheat → Espere hasta que el motor se enfríe.
1065 Printer Overheat → Contacte con el servicio de atención al cliente.
1066 Paper Jam → Abra la cubierta y vuelva a cargar la etiqueta.
1067 Charging → Espere hasta que se complete la carga.
1068 WLAN Error → Póngase en contacto con el servicio de atención al cliente.
1069 Option Error → Póngase en contacto con el servicio de atención al cliente.
1070 Bat. Wearing out → [Aviso] Sustituya la batería.
1071 Worn out battery → [¡Advertencia!] Sustituya la batería.
1072 Power Off Error → Cancele el error con la clave emitida.
1075 NFC Error → Póngase en contacto con el servicio de atención al cliente.
1076 Invalid command → Fallo al instalar la conguración de NFC.
1099 Cong Warning → Inicialización de la conguración.
Français
Message d’erreur (voir le tableau ci-dessus.)
Lorsqu’un message d’erreur apparaît à l’écran, il y a une erreur dans l’imprimante.
Consultez le numéro d’erreur et le message d’avertissement.
a
N°
b
Messages (Cause
Contre-mesure)
1001 Machine Error → Redémarrer. Contactez l’assistance si le problème persiste.
1002 Program Error → Erreur de mémoire ou de programme. Redémarrez.
Contactez l’assistance si le problème persiste.
1006 Buffer Overow → Mémoire tampon destinataire pleine. Vériez le programme
hôte.
1007 Cover Open→ Le capot est ouvert. Fermez le capot.
1008 Out of Paper → Vériez et chargez le papier correctement.
1010 Media Error → L’impression est trop longue ou mauvaise. Ajustez les données
d’impression ou les paramètres du capteur.
1012 Head Error → Contactez le service clientèle.
1013 Memory Error → Contactez le service clientèle si le problème persiste.
1014 Memory Full → Libérez de l’espace.
1017 SBPL CMD Error→ Vériez les données d’impression.
1022 Head Overheat → Attendez que la tête d’impression refroidisse.
1028 GAP Not Found → Placez l’étiquette correctement.
1035 I-mark Not Found → Placez l’étiquette correctement.
1043 Low Battery → Chargez la batterie.
1046 EAP Auth Error → Paramètres Wi-Fi erronés. Ajustez les paramètres.
1047 EAP Auth Error → Délai d’authentication dépassé. Vériez les congurations
AP et du serveur.
1050 Bluetooth Error → Contactez le service clientèle.
1058 CRC Check Error → La signature ne correspond pas. Vériez les données
transmises.
1059 Charging → Attendez que l’indication batterie faible disparaisse.
1060 No Battery → Insérez la batterie.
1061 Degraded Batt. → Contactez le service clientèle.
1063 Battery Error → Remplacez la batterie.
1064 Motor Overheat → Attendez que le moteur refroidisse.
1065 Printer Overheat → Contactez le service clientèle.
1066 Paper Jam → Ouvrez la capot et rechargez l’étiquette.
1067 Charging → Attendez que le chargement soit complet.
1068 WLAN Error → Contactez le service clientèle.
1069 Option Error → Contactez le service clientèle.
1070 Bat. Wearing out → [Avis] Remplacez la batterie.
1071 Worn out battery → [Avertissement !] Remplacez la batterie.
1072 Power Off Error → Annulez l’erreur en appuyant sur une touche.
1075 NFC Error → Contactez le service clientèle.
1076 Invalid command → Impossible d’installer les paramètres de NFC.
1099 Cong Warning → Initialisation de la conguration.
Italiano
Messaggio di errore (vedere la tabella precedente.)
Quando viene visualizzato un messaggio di errore sul display, è presente un errore nella
stampante. Vericare il numero dell’errore e il messaggio di avvertenza.
a
N.
b
Messaggi (Causa
Contromisura)
1001 Machine Error → Errore Macchina. Spegnere e riattivare l’alimentazione.
Contattare l’assistenza se l’errore non viene risolto.
1002 Program Error → Errore della memoria o del programma. Spegnere e riattivare
l’alimentazione. Contattare l’assistenza se l’errore non viene risolto.
1006 Buffer Overow → Buffer ricevente pieno. Vericare il programma host.
1007 Cover Open → Il coperchio è aperto. Chiudere il coperchio.
1008 Out of Paper → Fine Carta. Vericare e caricare correttamente la carta.
1010 Media Error → Errore Supporto. Stampa troppo lunga o impostazioni errate.
Regolare i dati di stampa o le impostazioni del sensore.
1012 Head Error → Errore testina. Contattare l’assistenza clienti.
1013 Memory Error → Contattare l’assistenza clienti se l’errore non viene risolto.
1014 Memory Full → Spazio libero non disponibile.
1017 SBPL CMD Error → Vericare i dati di stampa.
1022 Head Overheat → Attendere il raffreddamento della testina di stampa.
1028 GAP Not Found → Gap non rilevato. Impostare l’etichetta correttamente.
1035 I-mark Not Found → I-Mark non rilevato. Impostare l’etichetta correttamente.
1043 Low Battery → Caricare la batteria.
1046 EAP Auth Error → Impostazioni Wi-Fi errate. Regolare le impostazioni.
1047 EAP Auth Error → Time out autenticazione. Vericare le congurazioni AP e
del server.
1050 Bluetooth Error → Contattare l’assistenza clienti.
1058 CRC Check Error → La rma non corrisponde. Vericare i dati trasmessi.
1059 Charging → Attendere no a quando la batteria non è più scarica.
1060 No Battery → Inserire la batteria.
1061 Degraded Batt. → Batteria Degradata. Contattare l’assistenza clienti.
1063 Battery Error → Errore Batteria. Sostituire la batteria.
1064 Motor Overheat → Motore surriscaldato. Attendere il raffreddamento del
motore.
1065 Printer Overheat → Testina surriscaldata. Contattare l’assistenza clienti.
1066 Paper Jam → Carta Inceppata. Aprire il coperchio e caricare di nuovo l’etichetta.
1067 Charging → Attendere il termine della carica.
1068 WLAN Error → Contattare l’assistenza clienti.
1069 Option Error → Contattare l’assistenza clienti.
1070 Bat. Wearing out → [Avviso] Sostituire la batteria.
1071 Worn out battery → [Avvertenza!] Sostituire la batteria.
1072 Power Off Error → Cancellare l’errore rilasciando il tasto.
1075 NFC Error → Contattare l’assistenza clienti.
1076 Invalid command → Installazione delle impostazioni da NFC non riuscita.
1099 Cong Warning → Inizializzazione della congurazione.
Nederlands
Foutbericht (zie bovenstaande tabel)
Wanneer een foutbericht wordt weergegeven op het scherm, is een fout
opgetreden in de printer. Controleer het foutnummer en het waarschuwingsbericht.
a
Nr.
b
Berichten (Oorzaak
Maatregel)
1001 Machine Error → Schakel stroom uit en weer in. Neem contact op met de
klantenservice als dit niet is opgelost.
1002 Program Error → Fout in geheugen of programma. Schakel stroom uit en
weer in. Neem contact op met de klantenservice als dit niet is opgelost.
1006 Buffer Overow → Ontvangende buffer is vol. Controleer hostprogramma.
1007 Cover Open → Deksel is open. Sluit de deksel.
1008 Out of Paper → Controleer en plaats papier op de juiste wijze.
1010 Media Error → Afdruk is te lang of verkeerde instelling. Pas de
afdrukgegevens of sensorinstellingen aan.
1012 Head Error → Neem contact op met de klantenservice.
1013 Memory Error → Neem contact op met de klantenservice als dit niet is
opgelost.
1014 Memory Full → Maak ruimte vrij.
1017 SBPL CMD Error → Controleer afdrukgegevens.
1022 Head Overheat → Wacht tot de printkop afkoelt.
1028 GAP Not Found → Stel het label juist in.
1035 I-mark Not Found → Stel het label juist in.
1043 Low Battery → Laad de batterij op.
1046 EAP Auth Error → Foutieve WiFi-instellingen. Pas de instellingen aan.
1047 EAP Auth Error → Time-out bij authenticatie. Controleer AP- en
serverconguratie.
1050 Bluetooth Error → Neem contact op met de klantenservice.
1058 CRC Check Error → Handtekening komt niet overeen. Controleer de
verzonden gegevens.
1059 Charging → Wacht totdat de batterij niet meer bijna leeg is.
1060 No Battery → Plaats een batterij.
1061 Degraded Batt. → Neem contact op met de klantenservice.
1063 Battery Error → Vervang de batterij.
1064 Motor Overheat → Wacht tot de motor afkoelt.
1065 Printer Overheat → Neem contact op met de klantenservice.
1066 Paper Jam → Open de deksel en plaats het label opnieuw.
1067 Charging → Wacht totdat het opladen is voltooid.
1068 WLAN Error → Neem contact op met de klantenservice.
1069 Option Error → Neem contact op met de klantenservice.
1070 Bat. Wearing out → [Kennisgeving] Vervang de batterij.
1071 Worn out battery → [Waarschuwing!] Vervang de batterij.
1072 Power Off Error → Annuleer de fout door de toets in te drukken.
1075 NFC Error → Neem contact op met de klantenservice.
1076 Invalid command → Het installeren van instellingen via NFC is mislukt.
1099 Cong Warning → Initialisatie van de conguratie.
Polski
Komunikat o błędzie (Patrz tabela powyżej).
Gdy na ekranie pojawi się komunikat o błędzie, w drukarce występuje błąd. Należy
sprawdzić numer błędu i komunikat z ostrzeżeniem.
a
Nr
b
Komunikaty (Przyczyna
Działanie zaradcze)
1001 Machine Error → Wyłącz i włącz zasilanie. Jeśli problemu nie udało się
rozwiązać, należy się skontaktować z działem serwisu.
1002 Program Error → Błąd pamięci lub programu. Wyłącz i włącz zasilanie. Jeśli
problemu nie udało się rozwiązać, należy się skontaktować z działem serwisu.
1006 Buffer Overow → Bufor odbiorczy jest pełny. Sprawdź program główny.
1007 Cover Open→ Pokrywa jest otwarta. Zamknij pokrywę.
1008 Out of Paper → Sprawdź, czy jest papier oraz czy jest prawidłowo załadowany.
1010 Media Error → Wydruk jest zbyt długi lub wybrano nieprawidłowe ustawienie.
Zmień dane wydruku lub ustawienia czujnika.
1012 Head Error → Skontaktuj się z działem obsługi klienta.
1013 Memory Error → Jeśli problem nie ustąpi, skontaktuj się z działem obsługi
klienta.
1014 Memory Full → Zwolnij miejsce w pamięci.
1017 SBPL CMD Error → Sprawdź dane wydruku.
1022 Head Overheat → Poczekaj na ochłodzenie głowicy.
1028 GAP Not Found → Prawidłowo ustaw etykietę.
1035 I-mark Not Found → Prawidłowo ustaw etykietę.
1043 Low Battery → Naładuj baterię.
1046 EAP Auth Error → Nieprawidłowe ustawienia sieci Wi-Fi. Zmień ustawienia.
1047 EAP Auth Error → Upłynął limit czasu uwierzytelniania. Sprawdź kongurację
punktu dostępu i serwera.
1050 Bluetooth Error → Skontaktuj się z działem obsługi klienta.
1058 CRC Check Error → Niezgodne sygnatury. Sprawdź przesyłane dane.
1059 Charging → Poczekaj na zniknięcie ostrzeżenia o rozładowanej baterii.
1060 No Battery → Włóż baterię.
1061 Degraded Batt. → Skontaktuj się z działem obsługi klienta.
1063 Battery Error → Wymień baterię.
1064 Motor Overheat → Poczekaj na ochłodzenie silnika.
1065 Printer Overheat → Skontaktuj się z działem obsługi klienta.
1066 Paper Jam → Otwórz pokrywę i ponownie załaduj etykietę.
1067 Charging → Poczekaj na zakończenie ładowania.
1068 WLAN Error → Skontaktuj się z działem obsługi klienta.
1069 Option Error → Skontaktuj się z działem obsługi klienta.
1070 Bat. Wearing out → [Uwaga] Wymień baterię.
1071 Worn out battery → [Ostrzeżenie!] Wymień baterię.
1072 Power Off Error → Skasuj błąd poprzez wprowadzenie odpowiedniego kodu.
1075 NFC Error → Skontaktuj się z działem obsługi klienta.
1076 Invalid command → Nie udało się zainstalować ustawień z karty NFC.
1099 Cong Warning → Inicjowanie konguracji.
Português
Mensagem de erro (Consulte a tabela acima.)
Quando aparece uma mensagem de erro no visor, existe um erro na impressora.
Verique o número do erro e a mensagem de aviso.
a
N.º
b
de mensagens (Causa
Medida preventiva)
1001 Machine Error → Recicle a alimentação. Contacte a assistência se não
for resolvido.
1002 Program Error → Erro de memória ou programa. Recicle a alimentação.
Contacte a assistência se não for resolvido.
1006 Buffer Overow → Memória de receção cheia. Verique o programa
antrião.
1007 Cover Open → A tampa está aberta. Feche a tampa.
1008 Out of Paper → Verique e coloque o papel corretamente.
1010 Media Error → A impressão demora demasiado tempo ou denição
errada. Ajuste os dados de impressão ou as denições do sensor.
1012 Head Error → Contacte o apoio ao cliente.
1013 Memory Error → Contacte o apoio ao cliente se não for resolvido.
1014 Memory Full → Liberte espaço.
1017 SBPL CMD Error → Verique os dados de impressão.
1022 Head Overheat → Aguarde até o cabeçote de impressão arrefecer.
1028 GAP Not Found → Coloque a etiqueta corretamente.
1035 I-mark Not Found → Coloque a etiqueta corretamente.
1043 Low Battery → Carregue a bateria.
1046 EAP Auth Error → Denições Wi-Fi erradas. Ajuste as denições.
1047 EAP Auth Error → Tempo de autenticação expirado. Verique as
congurações de AP e Servidor.
1050 Bluetooth Error → Contacte o apoio ao cliente.
1058 CRC Check Error → A assinatura não corresponde. Verique os dados
transmitidos.
1059 Charging → Aguarde até o sinal de bateria fraca desaparecer.
1060 No Battery → Introduza a bateria.
1061 Degraded Batt. → Contacte o apoio ao cliente.
1063 Battery Error → Substitua a bateria.
1064 Motor Overheat → Aguarde até o motor arrefecer.
1065 Printer Overheat → Contacto o apoio ao cliente.
1066 Paper Jam → Abra a tampa e coloque novamente a etiqueta.
1067 Charging → Aguarde até o carregamento estar concluído.
1068 WLAN Error → Contacte o apoio ao cliente.
1069 Option Error → Contacte o apoio ao cliente.
1070 Bat. Wearing out → [Observação] Substitua a bateria.
1071 Worn out battery → [Aviso!] Substitua a bateria.
1072 Power Off Error → Cancele o erro emitindo a chave.
1075 NFC Error → Contacte o apoio ao cliente.
1076 Invalid command → Falha ao instalar denições a partir de NFC.
1099 Cong Warning → Inicialização da conguração.
Svenska
Felmeddelande (se tabellen ovan.)
När det visas ett felmeddelande på skärmen så har det uppstått ett fel i skrivaren.
Kontrollera felkoden och varningsmeddelandet.
a
Kod
b
Meddelande (Orsak
Åtgärd att vidta)
1001
Machine Error → Starta om. Kontakta serviceavdelningen om felet inte kan lösas.
1002 Program Error → Minnes- eller programfel. Starta om. Kontakta
serviceavdelningen om felet inte kan lösas.
1006 Buffer Overow → Den mottagande bufferten är full. Kontrollera
värdprogrammet.
1007 Cover Open → Luckan är öppen. Stäng luckan.
1008 Out of Paper → Kontrollera och ladda papper på rätt sätt.
1010 Media Error → Utskriften är för lång eller fel inställningar. Justera
utskriftsuppgifterna eller sensorinställningarna.
1012 Head Error → Kontakta kundtjänsten.
1013 Memory Error → Kontakta kundtjänsten om felet inte kan lösas.
1014 Memory Full → Frigör minne.
1017 SBPL CMD Error → Kontrollera utskriftsdata.
1022 Head Overheat → Vänta tills skrivarhuvudet kylts av.
1028 GAP Not Found → Ställ in etiketten på rätt sätt.
1035 I-mark Not Found → Ställ in etiketten på rätt sätt.
1043 Low Battery → Ladda batteriet.
1046 EAP Auth Error → Felaktiga Wi-Fi-inställningar. Justera inställningarna.
1047 EAP Auth Error → Tidsgränsen för autentisering uppnådd. Kontrollera
kongurationerna för AP och servern.
1050 Bluetooth Error → Kontakta kundtjänsten.
1058 CRC Check Error → Signaturerna stämmer inte överens. Kontrollera de
överförda uppgifterna.
1059 Charging → Vänta tills batteriet har tillräcklig laddning.
1060 No Battery → Sätt i batteriet.
1061 Degraded Batt. → Kontakta kundtjänsten.
1063 Battery Error → Byt ut batteriet.
1064 Motor Overheat → Vänta tills motorn kylts av.
1065 Printer Overheat → Kontakta kundtjänsten.
1066 Paper Jam → Öppna luckan och ladda etiketten igen.
1067 Charging → Vänta tills laddningen har slutförts.
1068 WLAN Error → Kontakta kundtjänsten.
1069 Option Error → Kontakta kundtjänsten.
1070 Bat. Wearing out → [Meddelande] Byt ut batteriet.
1071 Worn out battery → [Varning!] Byt ut batteriet.
1072 Power Off Error → Annullera felet genom att ange rätt kod.
1075 NFC Error → Kontakta kundtjänsten.
1076 Invalid command → Det gick inte att installera inställningar från NFC.
1099 Cong Warning → Kongurationsinitialisering.
Bahasa Malaysia
Ralat Mesej (Lihat jadual di atas.)
Apabila mesej ralat muncul pada paparan, terdap at ralat dalam pencetak. Lihat
nombor ralat dan mesej amaran.
a
No.
b
Mesej (Punca
Penyelesaian)
1001 Machine Error → Kitar semula kuasa. Hubungi khidmat pelanggan jika
tidak dapat diselesaikan.
1002 Program Error → Ralat memori atau program. Kitar semula kuasa.
Hubungi khidmat pelanggan jika tidak dapat diselesaikan.
1006 Buffer Overow → Penimbal penerimaan penuh. Semak program hos.
1007 Cover Open → Penutup terbuka. Tutup penutup.
1008 Out of Paper → Periksa dan muatkan kertas dengan betul.
1010 Media Error → Cetakan terlalu panjang atau tetapan salah. Laraskan data
cetakan atau tetapan pengesan.
1012 Head Error → Hubungi khidmat pelanggan.
1013 Memory Error → Hubungi khidmat pelanggan jika tidak dapat
diselesaikan.
1014 Memory Full → Kosongkan ruangan.
1017 SBPL CMD Error → Semak data cetakan.
1022 Head Overheat → Tunggu sehingga kepala cetak menyejuk.
1028 GAP Not Found → Tetapkan label dengan betul.
1035 I-mark Not Found → Tetapkan label dengan betul.
1043 Low Battery → Cas bateri.
1046 EAP Auth Erro → Tetapan Wi-Fi beralat. Laraskan tetapan.
1047 EAP Auth Error → Pengesahan tamat masa. Semak kongurasi AP dan
Pelayan.
1050 Bluetooth Error → Hubungi khidmat pelanggan.
1058 CRC Check Error → Tandatangan tidak sepadan. Sahkan data yang
dihantarkan.
1059 Charging → Tunggu sehingga status bateri rendah telah berlalu.
1060 No Battery → Masukkan bateri.
1061 Degraded Batt. → Hubungi khidmat pelanggan.
1063 Battery Error → Tukar bateri.
1064 Motor Overheat → Tunggu sehingga motor menyejuk.
1065 Printer Overheat → Hubungi khidmat pelanggan.
1066 Paper Jam → Buka penutup dan muatkan semula label.
1067 Charging → Tunggu sehingga pengecasan selesai.
1068 WLAN Error → Hubungi khidmat pelanggan.
1069 Option Error → Hubungi khidmat pelanggan.
1070 Bat. Wearing out → [Notis] Tukar bateri.
1071 Worn out battery → [Amaran!] Tukar bateri.
1072 Power Off Error → Batalkan ralat dengan keluarkan kunci.
1075 NFC Error → Hubungi khidmat pelanggan.
1076 Invalid command → Gagal memasang tetapan daripada NFC.
1099 Cong Warning → Pemulaan Kongurasi.
คู่มือแนะน�ำกำรใช้งำนแบบย่อ
)
A
)
c
b
a
B
)
C
)
D
)
*1
*2
*1
*2
+
±
*3
ºC
ºCºC
E
)
a
b
→
→
→
→
→
→
→
→
→
→
→
→
→
→
→
→
→
→
→
→
→
→
→
→
→
→
→
→
→
→
→
→
→
→
Noise (EMC) standards/EMC-Normen, Geräuschnormen/Estándares de
ruido (EMC)/Normes de compatibilité électromagnétique (CEM)/Standard
di rumore (EMC)/EMC-normen/Normy dotyczące zakłóceń (EMC)/
Padrões de emissão de ruído (EMC)/Störningar (EMC) standarder/
Standard bunyi(EMC)/
EN55032, EN55024, RCM
Safety standards/Sicherheitsstandards/Estándares de seguridad/
Normes de sécurité/Standard di sicurezza/Veiligheidsnormen/Normy
dotyczące bezpieczeństwa/Padrões de segurança/Säkerhetsstandarder/
Standard keselamatan/
CB IEC 60950-1, EN 60950-1, RCM
Wireless regulations/Wireless-Bestimmungen/Normativa sobre conexión
inalámbrica/Règlements sur le Wi-Fi/Normative wireless/Regelgeving
voor draadloze verbindingen/Przepisy dotyczące transmisji
bezprzewodowej/Regulamentos para tecnologia sem os/Trådlös-
bestämmelse/Peraturan wayarles/
RE, RCM, IMDA, SIRIM, NBTC
Lärm-Emmissionswert
< 70 dB(A)
RoHS-Richtlinie
Wir haben uns verpichtet, nur Materialien zu verwenden, die
keine von der RoHS-Richtlinie betroffenen Substanzen enthalten.
Von der RoHS-Richtlinie betroffene Substanzen (6 Stoffe)
Sechswertiges Chrom
............................................
0,1 % oder weniger
Blei
.................................................................................
0,1 % oder weniger
Quecksilber
................................................................
0,1 % oder weniger
Cadmium
.....................................................................
0,01 % oder weniger
Polybromierte Biphenyle(PBB)
...........................
0,1 % oder weniger
Polybromierte Diphenylether(PBDE)
................
0,1 % oder weniger
-
 1
1
-
 2
2


w innych językach
- español: SATO PW2NX Guía del usuario
- italiano: SATO PW2NX Guida utente
- Deutsch: SATO PW2NX Benutzerhandbuch
Powiązane artykuły
-
SATO FX3-LX instrukcja
-
SATO Thermal UHF RFID Printer instrukcja
-
SATO CT4-LX instrukcja
-
SATO SG112-ex instrukcja
-
-
SATO CT4-LX-HC Barcode Printer Skrócona instrukcja obsługi
-
-
-
-