Keystone Visage Installation Instructions Manual
- Kategoria
- Kominki
- Typ
- Installation Instructions Manual

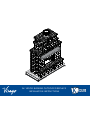
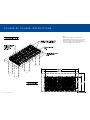
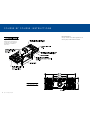
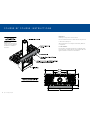
36" WOOD BURNING OUTDOOR FIREPLACE
INSTALLATION INSTRUCTIONS

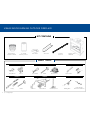
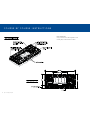
2 Keystone Step-by-StepKits
VISAGE WOOD BURNING OUTDOOR FIREPLACE
Gloves
Exterior Grade
Construction Adhesive
Level(s)
Safety Glasses
Layout Stakes
Hand Compactor
Concrete Saw
BASIC TOOLS
Shovel Wheel Barrow
safety
alterations layout
finishing
leveling general
Mallet
Line
Caulking Gun
MalletStone Chisel
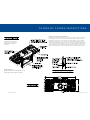
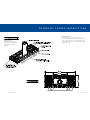
KIT CONTAINS
12" and 48"
Chimney Sections
Storm CollarContemporary
Termination Round
Fireplace Insert
with Grate
Steel Lintel Fireplace
Trim Piece

Keystone Step-by-StepKits 3
www.KeystoneRetailProducts.com
VISAGE WOOD BURNING OUTDOOR FIREPLACE
www.KeystoneRetailProducts.com
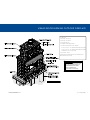
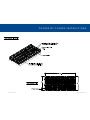
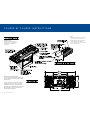
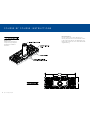
You will need:
132 - Visage - 16"/12"unit
158 - Visage - 16"/14"unit
100 - Visage Cap units
200 - Alignment Pins (approximate)
25 - Tubes exterior grade concrete adhesive
6 - 1½" x 1½" x 20" - zinc plated slotted angles (14+ gauge)
2 - 1½" x 1½" x 17" - zinc plated slotted angles (14+ gauge)
1 - Mantel Piece (3"h x 70"w x 10"d)
Concrete Slab - 18.8 cf
Fireplace Insert (contact Keystone for specs & retail options)
Note: All units are 6"h x 8"d.
General Note:
In consideration of freeze / thaw issues
during the cold weather season it is
recommended that this Fireplace
element be protected from
rain, snow and ice as necessary.

4 Keystone Step-by-StepKits
VISAGE WOOD BURNING OUTDOOR FIREPLACE

Keystone Step-by-StepKits 5
www.keystonewalls.com
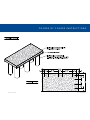
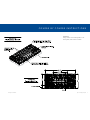
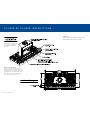
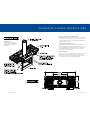
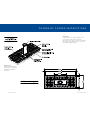
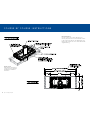
COURSE BY COURSE INSTRUCTIONS

6 Keystone Step-by-Step Kits
COURSE BY COURSE INSTRUCTIONS
Note:
Due to block outside face texture variances
when building the fireplace courses, the outside
dimensions of the courses may get wider than
desired. If required, cut an interior perimeter unit
to get the required outside dimension.

Keystone Step-by-Step Kits 7
www.keystonewalls.com
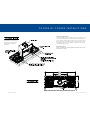
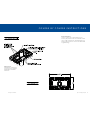
COURSE BY COURSE INSTRUCTIONS

8 Keystone Step-by-Step Kits
COURSE BY COURSE INSTRUCTIONS
Block Cutting Note:
Using a concrete saw or wheel grinder tool w/
masonry disk, cut block units as needed.

Keystone Step-by-Step Kits 9
www.keystonewalls.com
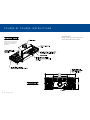
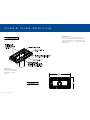
COURSE BY COURSE INSTRUCTIONS
Cap Cutting:
Using a concrete saw or wheel grinder tool w/
masonry disk, cut block units as needed.

10 Keystone Step-by-Step Kits
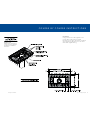
COURSE BY COURSE INSTRUCTIONS
Cap Cutting:
Using a concrete saw or wheel grinder tool w/
masonry disk, cut block units as needed.
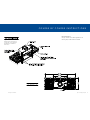
Fireplace Placement Note:
Prior to placing the fireplace insert for
proper removal of the fireplace stainless
steel face protective wrap, peel back the
outside portions of the protective wrap
where it will come in contact with block
units, cap units and top trim piece.
Fireplace Note:
Install fireplace and chimney
components as per fireplace
manufacturers installation
instructions.

Keystone Step-by-Step Kits 11
www.keystonewalls.com
COURSE BY COURSE INSTRUCTIONS
Fireplace Note:
Install fireplace and chimney
components as per fireplace
manufacturers installation
instructions.
Fireplace Installation Note:
The installed fireplace front outside corners of the fireplace insert
face should contact the small end units at the inside end of the
two inside walls. If the fireplace insert does not contact the small
units at each side, trim the front and or side units below to allow
the fireplace insert to move forward to contact the small units at
each odd numbered course.
Block Cutting Note:
Using a concrete saw or wheel grinder tool w/masonry disk, cut
block units as needed.

12 Keystone Step-by-Step Kits
COURSE BY COURSE INSTRUCTIONS
Fireplace Note:
Install fireplace and chimney
components as per fireplace
manufacturers installation
instructions.
Block Cutting Note:
Using a concrete saw or wheel grinder tool w/
masonry disk, cut block units as needed.

Keystone Step-by-Step Kits 13
www.keystonewalls.com
COURSE BY COURSE INSTRUCTIONS
Fireplace Note:
Install fireplace and chimney
components as per fireplace
manufacturers installation
instructions.
Block Cutting Note:
Using a concrete saw or wheel grinder tool w/
masonry disk, cut block units as needed.

14 Keystone Step-by-Step Kits
COURSE BY COURSE INSTRUCTIONS
Fireplace Note:
Install fireplace and chimney
components as per fireplace
manufacturers installation
instructions.
Block Cutting Note:
Using a concrete saw or wheel grinder tool w/
masonry disk, cut block units as needed.

Keystone Step-by-Step Kits 15
www.keystonewalls.com
COURSE BY COURSE INSTRUCTIONS
Fireplace Top Trim PIece Placement Note:
For proper removal of the top trim piece stainless steel face protective wrap prior
to installing the top trim piece, peel back the bottom portion of the protective
wrap where it will come in contact with the top of the fireplace. Using a Phillips
head pattern screwdriver, loosen and remove existing firebox cabinet front top
screws. Place supplied top trim piece across the front top of firebox cabinet align-
ing the top trim piece holes with the existing screw holes and flush with the front
face of the firebox cabinet. Reinstall removed screws through the top trim piece
and into the existing holes and secure the top trim piece to the fireplace cabinet.
Block Cutting Note:
Using a concrete saw or wheel grinder tool w/
masonry disk, cut block units as needed.
Fireplace Note:
Install fireplace and chimney
components as per fireplace
manufacturers installation
instructions.

16 Keystone Step-by-Step Kits
COURSE BY COURSE INSTRUCTIONS
Block Steel Lintel Cutting Note:
Position steel lintel to allow a minimum of
½" space between the steel lintel and the
fireplace flue.
Prior to installing steel lintel, use a wheel
grinding tool to notch out top of block
creating a level shelf to place steel lintel,
such that lintel is flush with top of cut block.
Block units to be cut for steel lintel are
shown with solid hatching.
Note:
Steel lintel installer to remove the
two (2) front S.S. top spacers on
supplied fireplace insert that will
conflict w/steel lintel. Remove
screws and remove brackets, they
will not be needed.
Fireplace Note:
Install fireplace and chimney
components as per fireplace
manufacturers installation
instructions.

Keystone Step-by-Step Kits 17
www.keystonewalls.com
COURSE BY COURSE INSTRUCTIONS
Fireplace Note:
Install fireplace and chimney
components as per fireplace
manufacturers installation
instructions.
Block Cutting Note:
Using a concrete saw or wheel grinder tool w/masonry disk,
cut block units as needed. Block units to be cut due to
obstruction are labeled with solid hatching. Block units to
be cut to fit are labeled with angular hatching.
Cantilever Support Block for Mantel Note:
Install cantilever support blocks for the mantel upside down
so the block channel is facing up. Pin holes from underside
of inverted units should be used to attach the mantel piece
w/lag bolts and washers.
Temporary Block Support Note:
Build temporary support up from 3rd course hearth cap-
ping to support blocks resting on steel lintel using wood
or other rigid support material until sufficient weight from
courses above will safely hold steel lintel block in place,
then remove temporary support.

18 Keystone Step-by-Step Kits
COURSE BY COURSE INSTRUCTIONS
Fireplace Note:
Install fireplace and chimney
components as per fireplace
manufacturers installation
instructions.
Mantel Note:
Mantel piece as per home owners interest.
Pin holes and channels in the cantilever blocks may be used
to attach the mantel piece.
Attach mantel piece once fireplace and chimney build out
is completed.
For Wood Mantel:
Once fireplace and chimney build out is completed, attach
the mantel to the cantilever blocks using minimum ⅜" steel
lag bolts w/washers to fasten to mantel above.

Keystone Step-by-Step Kits 19
www.keystonewalls.com
COURSE BY COURSE INSTRUCTIONS
Block Cutting Note:
Using a concrete saw or wheel grinder tool w/
masonry disk, cut block units as needed. Block units
to be cut due to obstruction are labeled with solid
hatching. Block units to be cut to fit are labeled with
angular hatching.
Fireplace Note:
Install fireplace and chimney
components as per fireplace
manufacturers installation
instructions.

20 Keystone Step-by-Step Kits
COURSE BY COURSE INSTRUCTIONS
Block Cutting Note:
Using a concrete saw or wheel grinder tool w/
masonry disk, cut block units as needed. Block units
to be cut due to obstruction are labeled with solid
hatching. Block units to be cut to fit are labeled with
angular hatching.
Fireplace Note:
Install fireplace and chimney
components as per fireplace
manufacturers installation
instructions.
Strona jest ładowana ...
Strona jest ładowana ...
Strona jest ładowana ...
Strona jest ładowana ...
Strona jest ładowana ...
Strona jest ładowana ...
Strona jest ładowana ...
Strona jest ładowana ...
Strona jest ładowana ...
Strona jest ładowana ...
-
 1
1
-
 2
2
-
 3
3
-
 4
4
-
 5
5
-
 6
6
-
 7
7
-
 8
8
-
 9
9
-
 10
10
-
 11
11
-
 12
12
-
 13
13
-
 14
14
-
 15
15
-
 16
16
-
 17
17
-
 18
18
-
 19
19
-
 20
20
-
 21
21
-
 22
22
-
 23
23
-
 24
24
-
 25
25
-
 26
26
-
 27
27
-
 28
28
-
 29
29
-
 30
30


Keystone Visage Installation Instructions Manual
- Kategoria
- Kominki
- Typ
- Installation Instructions Manual
w innych językach
- English: Keystone Visage
Powiązane dokumenty
Inne dokumenty
-
 Kratki Umbrella Instrukcja obsługi
-
Danfoss 089F0258 instrukcja
-
SKAMET S- 16 Series Instrukcja obsługi
-
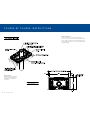
 RiteTemp 8025 Instrukcja instalacji
-
Intermatic CA8900 Instrukcja obsługi
-
 RiteTemp 6010 Instrukcja instalacji
-
 RiteTemp 6030 Instrukcja instalacji
-
 Filtrete 3M-22 Instrukcja obsługi
-
Yamaha MOTIF ES6 Instrukcja obsługi
-
 RiteTemp 6035 Instrukcja instalacji


