
www.kucht.com
APPLICABLE MODEL: K7740D
INSTALLATION MANUAL
DISHWASHER
BE A PRO IN YOUR KITCHEN

SAFETY INSTRUCTIONS
Important Safety Instructions
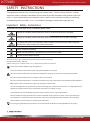
What the icons and signs in this installation guide mean:
Hazards or unsafe practices that may result in severe personal injury or death.
Hazards or unsafe practices that may result in personal injury or property damage.
To reduce the risk o f f ire, e xplosion, e lectric shock, o r personal injury when using the
dishwasher, f ollow t hese basic safety precautions:
Follow d irections explicitly.
Make sure the machine is grounded to prevent electric shock.
Call the service center f or help.
These w arning s igns a re h ere t o p revent i njury t o y ou a nd o thers.
Please f ollow t hem e xplicitly.
A f ter r eading t his section, k eep i t i n a s
afe p la ce f or f uture r eference.
Throughout this manual, you' ll see W arning and C aution notes. T hese w arnings,cautions, a nd the
important safety instructions that f ollow d o not cover a ll possible conditions a nd situations that may
occur. I t's your responsibility to use common sense, c aution, a nd care w hen installing, m aintaining,
and operating the dishwasher. is not liable f or damages resulting f rom improper use.Kucht
Read all instructions before using the a ppliance.
Install and store the dishwasher inside, a way f rom exposure to w eather.
Do not instal
l the dishwasher near electrical components. K eep the dishwasher a way from open f lames.
Do not install the dishwasher on a c arpet as this is a f ire hazard.
Do not install the dishwasher in a l ocation w here the w ater may freeze (where the temperature f alls below 3 2°
F(0C°). Frozen w ater in the hoses or pipes may damage the dishwasher.
As with all equipment using electricity, w ater and moving parts, p otential hazards exist. T o safely operate this
appliance, b ecome f amiliar w ith its operation and exercise care w hen using it.
The dishwasher must be properly grounded. N ever connec
t it to a n ungrounded outlet.
Prior to removal of original dishwasher a nd the installation of your new u nit, m ake sure to switch off your
circuit breaker. D o not connect the dishwasher u ntil you have completed the installation. C onnecting the
power cable is the last step when installing the dishwasher.
All wiring a nd grounding must be done in accordance w ith the electrical code applicable to the region.
FOR MORE DETAILS AND INFORMATION, PLEASE VISIT OUR WEBSITE WWW.KUCHT.COM
INSTALLATION GUIDE AND USER MANUAL
K7740D

This appliance must be connected to grounded metal, a p ermanent w iring system, o r an equipment-grounding
conductor must be run w ith the circuit conductors and connected to the equipment-grounding terminal or
lead on the appliance.
The dishwasher is very heavy. D o n ot attempt to move or carry a d ishwasher a lone. T wo or more people are
needed to move a d ishwasher a nd avoid potential injuries.
If t he power cable is damaged, i t must be replaced by the manufacturer, a s ervice agent or similarly qualified
person in order to avoid a h azard.
Do not touch the power cable w ith w et hands.
Do no
t connect a nother appliance to the same power outlet as the dishwasher.
Make sure to use a n ew w ater supply line. O ld lines are susceptible to breakage because they become
hardened and may cause property damage due to a w ater leakage.
The dishwasher must be connected to a h ot water supply with a t emperature between 1 20 F°(49C° ) and 149 °
F(65C°). T his temperature range provides the best washing result a nd shortest cycle time. Temperature should
not exceed 1 49 F°(65C°) to prevent damage to dishes.
Ensure that the w ater supplied to the dishwasher does not f reeze. F rozen w ate
r can damage the hoses, v alves,
pump, o r other components.
For a f ull list of safety information, p lease refer to the User M anual.
GROUNDING I NSTRUCTIONS
For a p ermanently connected appliance:
Before Installing The Dishwasher
Tip-Over Hazard
D o not use the dishwasher u ntil it is correctly installed.
D o not push down on the door w hen it is open.
D o not place excessive weight on the open door.
Electric Shock H azard
Failure to f ollow t hese instructions can result in death, f ire, o r electric shock:
E lectrically ground the dishwasher
C onnect the ground w ire to the green ground connector in the junction box
.
D o not use an extension cord.
To reduce the risk of e lectric shock, f ire, o r injury to persons, t he installer must ensure that
dishwasher is completely enclosed at the time of installation.
FOR MORE DETAILS AND INFORMATION, PLEASE VISIT OUR WEBSITE WWW.KUCHT.COM
INSTALLATION GUIDE AND USER MANUAL
K7740D

CONTENTS
PREPARING T HE DISHW ASHER ENCLOSURE
Product dimensions
Enclosure dimensions
5
5
5
06
6
6
8
INSTALLING T HE DISHWASHER
STEP 1 C heck t he parts and tools
STEP 2 S elect the best location f or the dishwasher
STEP 3 C heck w ater supply requirements and cautions
STEP 4 C heck t he electrical requirements and cautions
STEP 5 U npacking and inspecting the dishwasher
STEP 6 P reparing the dishwasher
STEP 7 P lacing the dishwasher a nd connecting the hot w ater supply line
STEP 8 L eveling the dishwasher
STEP 9 S ecuring the dishwasher
STEP 1 0 C onnecting the drain hose
STEP 1 1 W iring connections
STEP 1 2 C ompleting the installation
9
10
11
13
14
15
16
17
20
21
SPEC IFICATIONS
22
22
FOR MORE DETAILS AND INFORMATION, PLEASE VISIT OUR WEBSITE WWW.KUCHT.COM
INSTALLATION GUIDE AND USER MANUAL
K7740D

17 .7"(450mm)
minimum
32 .5 "(825mm)
minimum
23"(580mm)
minimum
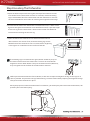
PREP ARING THE DISHW ASHER ENCLOSURE
Product Dimensions
Enclosure Dimensions
The w ater supply
line, p ower cable
and drain hose
should go through
this space behind
the dishwasher.
Then, t he power
cable run in
channels under
the dishwasher to
connections in the
Front.
This dishwasher is designed to be enclosed on the top and
on both sides by a s tandard residential k itchen cabinet unit.
The installation enclosure must be clean and f ree
of a ny obstructions.
The enclosure must be at least 1 7.7 i nches w ide 2 3 i nches
deep and 3 2.5 inches high.
For the f ront door of t he dishwasher to be f lush w ith the
leading edge of the counter top, t he counter top must be at
le
ast 2 3 inches deep.
Rear view
Front view
Back view
580mm
825mm
450mm
FOR MORE DETAILS AND INFORMATION, PLEASE VISIT OUR WEBSITE WWW.KUCHT.COM
INSTALLATION GUIDE AND USER MANUAL
K7740D

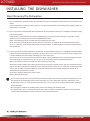
INSTALLING THE DISHW ASHER
Be sure that you or your installer follow t hese instructions closely so that the new dishwasher w orks
properly and that you're not a t risk o f injury when w ashing dishes.
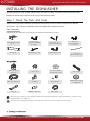
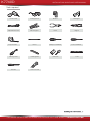
Step 1 Check The Parts And Tools
Before starting on the installation, p repare all the necessary tools and parts required to install the
dishwasher. T his w ill save installation time and simplify the installation process.
Parts Required
Provided w ith the dishwasher. C heck w hen you unbox the dishwasher in Step 5 .
For the hot w ater supply line ? W e strongly recommend using copper tubing w ith a c ompression f itting or a f lexible stainless
steel braided hot w ater supply line.
Do not use plastic tubing. P lastic tubing can deteriorate over time and cause a l eak inside the tube f itting.
S T3.5* 9 X 2
(For the installation
b racket)
Installation brackets
X 2
ST3.9* 13 X 2
(for t he k ick p late)
S T4* 14 X 2
( For installation
B rackets)
Adjustment cap X 2
C ondensation strip
C able T ie
(for t he d rain h ose)
K ick plate
90° E lbow
Tw ist on wire
c onnector
Strain r elief
E lectrical tape &
Standard d uct t ape
Power c able
Hot w ater s upply line
Tube f ittings
Air g ap
Rubber c onnector
Teflon tape o r s ealing
c ompound
Hose clamp
FOR MORE DETAILS AND INFORMATION, PLEASE VISIT OUR WEBSITE WWW.KUCHT.COM
INSTALLATION GUIDE AND USER MANUAL
K7740D

Tools required
Electric d rill
Safety glasses
G loves
Flashlight
Adjustable w rench
W ire stripper
Pliers
Nipper
Tape m easure
Pencil
Phillips screw driver
Flat screwdriver
Tubing cutter
C utting k nif e
Hole s aw
Level
Torx t20
Hex L-wrench
FOR MORE DETAILS AND INFORMATION, PLEASE VISIT OUR WEBSITE WWW.KUCHT.COM
INSTALLATION GUIDE AND USER MANUAL
K7740D

INSTALLING THE DISHW ASHER
New installation
If t he dishwasher is a n ew i nstallation, m ost of t he installation w ork m ust be done before the dishwasher is
moved into place.
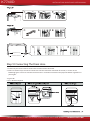
Step 2 Select The Best Location For The Dishwasher
The f ollowing criteria a re i mportant t o e nsure the b est l ocation f or t he dishw asher:
The location must have a s olid f loor t hat is able to support the w eight of t he dishwasher.
The location must be near a s ink w ith easy access to the w ater supply, d rain, a nd electrical outlet.
For the drain to operate properly, t he dishwasher should be installed w ithin .9.8 f t (3 m) of the sink
The location must let you load your dishes into the dishwasher easily.
The location must have sufficient space f or the dishwasher door to open easily and provide
enough space between the dishwasher a nd the cabinet sid
es (at least 0 .1 in (2 mm)).
If t he dishwasher is installed in a c omer, e nsure that the side of t he dishwasher is more than 2 i n (50 mm) f rom
the w all or cabinet to its right or left.
The w all at the back must be free of o bstructions.
If t his is a n ew i nstallation, f ollow t hese steps:
Replacement
If t he dishwasher is replacing an old dishwasher, y ou must check t he exising dishwasher connections f or
compatibility with the new d ishwasher. R epace the existing connections as necessary.
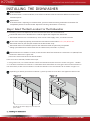
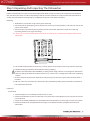
1. U sing a h ole s aw, c ut a h ole i nto the side o f t he cabinet t hat hold t he s ink a s shown in Figure 1 -1 b elow.
2. I f t he base i nside the s ink c abinet i s r aised above t he k itchen f loor and is higher t han t he c onnections o n
the dishw asher, m ake a h ole i n t he base inside the c abinet a nd in t he c abinet side as s hown in Figure 1 -2.
Depending o n w here your electrical o utlet is, y ou m ay need to c ut a h ole i n t he opposite c abinet s ide.
The hole for the water supply line, drain hose and
power cables.
FOR MORE DETAILS AND INFORMATION, PLEASE VISIT OUR WEBSITE WWW.KUCHT.COM
INSTALLATION GUIDE AND USER MANUAL
K7740D

STEP 3 CHECK W ATER SUPPL Y REQUIREMENTS AND CAUTIONS
The hot w ater supply line pressure m ust be between 0 . 04-1M Pa.
Adjust t he w ater h eater to d eliver w ater between 1 20 F°(4 9C° ) ~149 F°(6 5C° ).
The dishw asher m ust b e connected to a h ot w ater s upply between 1 20 F°(49C° ) ~1 49 F°(6 5C° ). This
temperature r ange provides t he best w ashing r esult a nd shortest cycle time. T emperature should n ot
excee d 149 F°(65C° ) t o prevent d amage t o d ishes.
Ensure that t he w ater s upply valve is t urned off b efore connecting the hot w ater s upply line to t he
dishwasher.
Seal the h ot w ater s upply line connections using teflon tape o r sealing c ompound to s top any water
leakage.
W hen y ou install t he dishwasher, e nsure t here is n othing o n t he d rain h ose a nd be careful not to t ear i t
d
uring the i nstallation process.
FOR MORE DETAILS AND INFORMATION, PLEASE VISIT OUR WEBSITE WWW.KUCHT.COM
INSTALLATION GUIDE AND USER MANUAL
K7740D

INSTALLING THE DISHW ASHER
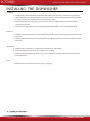
Step 4 Check The Electrical Requirements And Cautions
In the United States, i nstall in accordance w ith the National Electric C ode/State a nd M unicipal codes and/or local
codes.
In C anada, i nstall in a ccordance w ith the C anadian Electric C ode C 22.1-latest edition/Provincial and M unicipal
codes and/or local codes.
For cable direct connections.
Use f lexible, a rmored or non-metallic sheathed, c opper w ire w ith a g rounding w ire that meets the w iring
requirements f or your local codes and ordinances.
Use the strain relief m ethod provided w ith the w iring junction box or install a U.L.-listed/CSA-certifi
ed clamp
connector to the w iring junction box. I f u sing conduit, use a U .L.-listed/CSA-certified conduit connector.
The electrical requirements for the dishwasher are as f ollows:
FOR MORE DETAILS AND INFORMATION, PLEASE VISIT OUR WEBSITE WWW.KUCHT.COM
INSTALLATION GUIDE AND USER MANUAL
K7740D

Step 5 Unpacking And Inspecting The Dishwasher
Iunbox the dishwasher in an open a rea f ree of o bstruction both a round the carton and overhead. W e recommend
that you retain the carton and all of the packing materials until the dishwasher is f ully installed and operational to
ensure you have removed all the product' s components f rom the carton prior to disposal.
Unboxing
1. U nbuckle or cut the f our straps securing the carton top.
2. L ift the top of the telescoping carton clear of t he carton tray and the contents, a nd then turn it over a nd
p lace it on the floor.
3. P ut the straps and all of the packing materials f rom around the dishwasher inside th
e carton top,
i nspecting them f or a ny signs of damage.
4. L ocate and set aside the dishwasher' s kick plate. T he K ick plate is attached to packing material of the
d ishwasher.
5. L ift the dishwasher f rom the carton tray, a nd then place it on the floor. P ut the tray into the carton top.
6. R emove the bag that protects the dishwasher during shipping.
A LWAYS LIFT THE Dishwasher TO M OVE IT. S liding it over rough surfaces can damage the dishwasher' s
f eet and sliding the feet over f inished surfaces can, i n some cases, d amage that f inish or the underlying
s urface.
7. T here is also packing inside the d
ishwasher that you may w ant to leave in place until the dishwasher is
i nstalled.
8. D O not, u nder any circumstances, r emove the sound-absorbent padding that surrounds the exterior o f
t he tub of the dishwasher.
Inspecting
M echanical
1. C heck t he plastic base assembly to ensure that it is intact
2. C heck t he dishwasher' s feet to ensure they are in place and can be adjusted so you can level and secure
t he dishwasher.
3. C heck a ll the visible components on the bottom of the dishwasher t o ensure they are intact and secure.
4. C heck t he door latch, t he operation of t he hinges, a nd confirm the do
or is properly secured to the
d ishwasher.
FOR MORE DETAILS AND INFORMATION, PLEASE VISIT OUR WEBSITE WWW.KUCHT.COM
INSTALLATION GUIDE AND USER MANUAL
K7740D

INSTALLING THE DISHWASHER
Plumbing
1. C heck t he hot w ater connection o n the f ront left-side of t he base of t he dishwasher. T he mounting
p late should be secured to the front of t he base, t he threads inside the connection should be smooth
a nd shiny, a nd the area should be clean and free of a ny debris.
2. C heck t he plastic Brake and Sensor cases to ensure these a ssemblies are not cracked and that a ll
c onnections are secure.
3. C heck t he drain hose f or a ny holes or deformities that could allow a w ater leak d uring draining.
Electrical
1. C onfirm the junction box cover is secured to the junction box on the front right-side of t he ba
se of t he
d ishwasher.
2. C onfirm the electrical box w as not damaged during shipping and that it is secured to the base of t he
d ishwasher.
Appearance
1. C onfirm there a re no dents or scratches on the f ront of t he dishwasher
2. C heck t he edges of t he doors f or a ny roughness or cracking
3. C heck t he control panel to ensure it is clear a nd unscratched, a nd that all the control markers are in
t heir proper places.
Parts
1. C onfirm you have all the parts listed in Step 1 a n page 6 .
FOR MORE DETAILS AND INFORMATION, PLEASE VISIT OUR WEBSITE WWW.KUCHT.COM
INSTALLATION GUIDE AND USER MANUAL
K7740D

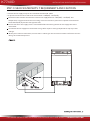
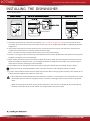
Step 6 Preparing The Dishwasher
1. E nsure that the circuit breaker and w ater supply valve are turned off b efore proceeding w ith the f ollowing steps.
B efore you move or lay down the dishwasher f or installation, m ake sure to adjust the height of t he legs so the
l egs are as short as possible. T his prevents the legs f rom breaking. L evel the dishwasher by adjusting the height
o f t he legs after you have the dishwasher in place.
2. M ake sure there are no k inks and that the hose is not bent at any extreme angles that could constrict the f low o f
w ater.
3. R emove the junction box cover located at the bottom f ront right of t he dishwasher using a s crew
driver, a nd then
I nstall the strain relief (Figure 4 - C ). M ake sure to k eep the junction box cover you r emoved. I t is used in Step 1 1,
W iring C onnections.
4. I f t he countertop is made of w ood or a m aterial that is not damaged by drilling, a ttach the two Installation
b rackets that w ere supplied with the dishwasher using the supplied screws (Figure 4 - A ). T hey w ill be used in
S tep 9 . S ecuring the Dishwasher.
Do not overtighten the 90° Elbow.
Doing so m ay damage the w ater inlet valve
and cause a w ater leak.
1
2
FOR MORE DETAILS AND INFORMATION, PLEASE VISIT OUR WEBSITE WWW.KUCHT.COM
INSTALLATION GUIDE AND USER MANUAL
K7740D

Drain Hose2
Drain hose1
Drain hose2
Hose clamp on the gray area
INSTALLING THE DISHWASHER
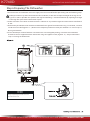
Step 7 placing The Dishwasher And Connecting The Hot Water
Supply Line
1. A djust t he three l eveling legs at t he b ottom of t he dishwasher a fter measuring t he height o f t he cabinet
o pening f rom under t he c ountertop to t he f loor. ( See S tep 8 , L eveling t he Dishwasher. )
2. L ocate t he h ot w ater s upply line a nd t he power c able.
3. P lace t he dishwasher s o t hat t he power c able i s in t he r ight channel o f t he base o f t he d ishwasher. U se
s tandard duct t ape o r c able t ies to s ecure t he e lectrical cable t o t heir a djacent channels in the base. T his
c an prevent t he e lectrical c able f rom being squeezed w hen you p ush the d ishwasher i nto p lace.
4. P ull t he d rain h ose through t he h ole i n t he sin
k c abinet s ide w all. K eep it f ree of k inks.
5. M ake sure t he h ot w ater s upply line is not twisted, a nd t hen c onnect the hot w ater s upply line to t he elbow
j oint.
6. S lide t he dishwasher c arefully into t he i nstallation space. I f p ossible, g ently pull a ny excess l engths o f w ater
s upply line, d rain h ose, o r pow er cable b ack a s you move the dishwasher. G et a s econd or t hird person to
h elp you do t his if n ecessary.
D o n ot p lace t he d ishwasher o n t he w ater supply line, d rain h ose, o r p ower cable.
A lso, m ake s ure they a re not f olded o r t wisted.
Do not overtighten the 90° Elbow.
Doing so m ay damage the w ater inlet
valve and cause a w ater leak.
Hot water supply line
Rubber connector
90° Elbow
Inlet valve
Teflon tape or sealing compound
FOR MORE DETAILS AND INFORMATION, PLEASE VISIT OUR WEBSITE WWW.KUCHT.COM
INSTALLATION GUIDE AND USER MANUAL
K7740D

FOR MORE DETAILS AND INFORMATION, PLEASE VISIT OUR WEBSITE WWW.KUCHT.COM
INSTALLATION GUIDE AND USER MANUAL
K7740D
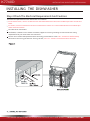
Step 8 Leveling The Dishwasher
1. O pen the door and place the level against the top of t he tub on the inside
a nd check i f the the dishwasher is level.If it is not level, r otate the leveling
l egs a t the bottom f ront of t he dishwasher u ntil the dishwasher is level.See
t he f irst note below f or instructions on adusting the height of t he f ront legs.
2. U se the level to check i f t he dishwasher is level front to back, a s shown in the
f igure to the right.If t he dishwasher is not level front to back, a djust the height
o f t he rear leg until the dishwasher is level.See the second note below f or
i nstructions on adusting the the rear leg.
3. O pen the door of t he dis
hwasher and check if b oth the tub and
door clearances are correct.If not, r otate the leveling legs on the
bottom f ront of t he dishwasher.You can also check this by placing
a level against an inside f ront vertical surface of the tub.
If t he leveling legs are rotated to the right (counter clockwise), t hey are
lossened and the f ront of t he dishwasher is raised. A nd the maximum
height be raised is about 5 0mm. I f t hey are rotated to the left (clockwise),
they are tightened and the f ront of t he dishwasher is lowered.
Before you move the dishwasher f or installation, m ake sure to adju
st the height of t he legs so the legs are a s
short a s possible. T his prevents the legs f rom breaking. L evel the dishwasher by adjusting the height of t he legs
after you have the dishwasher in place.
When you prepare to move the dishwasher f or installation, y ou should put your hand under the basement, t his
prevents your hand f rom injuring.

INSTALLING THE DISHW ASHER
Step 9 Securing The Dishwasher
You must f ix the dishwasher to the countertop or cabinet side w alls f or a dditional stability and safety.
If t he countertop is made of w ood or the material w ill not be damaged by drilling, f ollow t he instructions in 2-1
below.
If t he countertop is made of granite, m arble, o r any other material that can be damaged by drilling, f ollow t he
Instructions in 2-2 b elow.
Put a l arge towel into the bottom of the dishwasher to prevent w ood shavings or a d ropped screw f rom f alling
into the dishwasher.
Carefully drill screw h oles Into the counter top bottom by passing the drill bit through a s crew h ole in eac
h
bracket, a nd then drilling into the counter top bottom beneath.
Make sure the hole you drill is smaller than the diameter of t he screw.
Firstly, p ut the installation bracket into the slot of t he side plane and tighten to the dishwasher w ith screw
ST3.5* 9. S econdly, i nsert the provided screws into the brackets, a nd then tighten to secure the dishwasher to
the counter t op.
Put a l arge towel into the bottom of the dishwasher to prevent w ood shavings or a d ropped screw f rom f alling
into the dishwasher. R emove the adjustment cap w ith the tip of a s crewdriver. T he caps are just inside the tub
near t
he middle of t he tub an both sides(Figure 9 o n the next page).
Drill a h ole into the sides of t he k itchen cabinet on both sides by carefully passing a d rill bit through the screw
holes exposed by the removal of the spacer caps, a nd then drilling into the cabinet side beneath.
Make sure the hole you drill is smaller than the diameter of t he screw.
Also make sure the drill bit does not strike the sides of the spacer cap holes. Firstly, p ut the installation bracket
into the slot of t he side plane and tighten to the dishwasher w ith screw S T3.5* 9. S econdly, I nsert the provided
screws into the holes, a nd then tighten t
o secure the dishwasher to the cabinet. M ake sure the tub is not
distorted by pressure f rom the screws.
If t he tub is distorted, l oosen the screws a l ittle.
Replace the tub spacer caps.
1.
2-1.
2-2.
The screws or tub spacer cap may fall into the dishwasher w hile you are w orking w ith the door open. C over
the interior o f t he dishwasher w ith a t owel to prevent a ny screws f rom f alling into the dishwasher. I f a ny
foreign items such as a s crew g et into the dishwasher, i t may cause noise, a n abnormal operation, d amage,
or a m alfunction.
Use a m agnetic screwdriver to help prevent screws f rom f alling into t
he dishwasher.
If a f oreign item such as a s crew g ets into the dishwasher a nd you are unable to remove it. t he dishwasher
needs to be disassembled. C ontact a q ualified service technician f or this.
FOR MORE DETAILS AND INFORMATION, PLEASE VISIT OUR WEBSITE WWW.KUCHT.COM
INSTALLATION GUIDE AND USER MANUAL
K7740D

Drain hose2
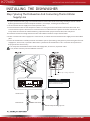
Step 10 Connecting The Drain Hose
1. C heck t he parts on the sink to w hich the drain hose w ill be connected.
2. T here are several ways to insert the drain hose into the drain hose connector of t he sink, a s shown in the
followi n g f igures. Y ou must connect the drain hose in accordance w ith the w ater pipe installation regulations in
yo u r region.
<Figure 1 0>
Case 1 . W ithout disposal
1
2 3
1 2
3 4
1
2 3
Adjustment cap
Screw t o side wall
FOR MORE DETAILS AND INFORMATION, PLEASE VISIT OUR WEBSITE WWW.KUCHT.COM
INSTALLATION GUIDE AND USER MANUAL
K7740D

INSTALLING THE DISHWASHER
Case 2 . W ith disposal
Drain hose2
Check t he size of t he sink' s drain hose connector( ). I f t he end of the drain 21mm- a s shown in Figure 1 1 below
hose does not f it onto t he drain hose connector of t he sink, u se an adaptor purchasable at a p lumbing/hardware
supply store.
Slide a h ose clamp over the end of t he drain hose. A ttach the drain hose to the sink c onnector, s lide the hose
clamp to the end of the hose, a nd then tighten the hose clamp.
Note : Y ou must use a h ose clamp. F ailure to do so may cause w ater leakage.
If t here is no a ir gap, m ake sure to hang. t he middle of t he drain hose w ell above the sink cabinet base to prevent
backflow ( see Figure 1 3 o
n the next page).
When drilling a h ole f or the drain hose on the cabinet w all, t ake caution not to damage the drain hose by sharp
edges of t he hole. O n w ooden w alls, u se sand paper to soften the edges.On metal w alls, u se insulation tape or
duct tape to cover the sharp edges around the hole.
Take caution not the damage the drain hose w hen installing the dishwasher o n the f loor, w all,or cabinet.
3.
4.
5.
6.
7.
To prevent leaks or drainage problems, m ake sure the drain hose is not damaged, k inked,or twisted.
8. D o n ot cut the w rinkled area o f the drain hose to f it the size. W hen arranging the drain hose, t ake cauti
on not to
c ontact on sharp edges of t he cabinet or under-sink.
Be careful w hen cutting off t he end of t he drain hose a s there is a r isk o f injury. C lean around the sink' s drain
connection so that it does not damage the hose. C heck f or any foreign items in the drain hose and remove
them.
When arranging the drain hose, m ake sure the drain hose is not cut, t orn, o r broken by any sharp edges of
the f loor, t he product itself, o r the cabinet. A d amaged drain hose causes a l eak.
FOR MORE DETAILS AND INFORMATION, PLEASE VISIT OUR WEBSITE WWW.KUCHT.COM
INSTALLATION GUIDE AND USER MANUAL
K7740D

Drain h ose
The drain hose internal
diameter is 2 1mm
Secure the drain hose to the sink w all using
cable ties or other f astening materials.
Otherwise, t he drain hose may bend at the
end. c ausing a d rainage problem or excessive
supply of w ater.
FOR MORE DETAILS AND INFORMATION, PLEASE VISIT OUR WEBSITE WWW.KUCHT.COM
INSTALLATION GUIDE AND USER MANUAL
K7740D

INSTALLING THE DISHWASHER
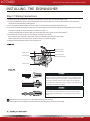
Step 11 Wiring Connections
Before connecting the power cable to the dishwasher, m ake sure the circuit breaker is off.
In the junction box located at the f ront bottom right of t he dishwasher, f ind the three power w ires f rom the
dishwasher including the grounding line.
Pass the power cable through the strain relief, a nd then into the junction box (Figure 1 4).
Connect the black w ire of the dishwasher to the black w ire of t he power cable by inserting both into a w ire nut
and then rotating the w ire connector as shown in Figure 1 5.
Connect the w hite w ire to the w hite w ire and the green to the green in the same manner.
Recheck e ach w ire to e
nsure it is connected correctly and securely.
Each colored w ire should be connected to the corresponding w ire of t he same color.
White should be connected to w hite, b lack t o black, a nd green to green.
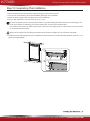
Replace the junction box cover on the dishwasher.
1.
2.
3.
4.
5.
6.
Electrical Shock H azard
To a void electrical shock, d o not work o n an energized circuit.
Doing so could result in serious injury or death. O nly qualified
electricians should perform electrical work. D o not attempt
any work o n the dishwasher electric supply circuit until you are
certain the circuit is de-ener
gized.
Fire Hazard
To a void a f ire hazard, m ake sure electrical w ork i s properly
installed. O nly qualified electricians should perform electrical
work.
Recheck e ach w ire to ensure it is connected correctly and securely.
Each colored w ire should be connected to the corresponding w ire of t he same color.
Power cable
Junction box
Strain relief
Black t o black
White to white
G reen to green
(Ground to ground)
FOR MORE DETAILS AND INFORMATION, PLEASE VISIT OUR WEBSITE WWW.KUCHT.COM
INSTALLATION GUIDE AND USER MANUAL
K7740D
Strona się ładuje...
Strona się ładuje...
-
 1
1
-
 2
2
-
 3
3
-
 4
4
-
 5
5
-
 6
6
-
 7
7
-
 8
8
-
 9
9
-
 10
10
-
 11
11
-
 12
12
-
 13
13
-
 14
14
-
 15
15
-
 16
16
-
 17
17
-
 18
18
-
 19
19
-
 20
20
-
 21
21
-
 22
22


w innych językach
- English: Kucht K7740D Installation guide
Inne dokumenty
-
Bradford White M-2-50S6DS Instrukcja obsługi
-
Bradford White RE120WV6 Instrukcja obsługi
-
 Kingston Brass HCC3162 Instrukcja instalacji
-
ROOMS TO GO 12409288 Assembly Instructions
-
LG Electronics WM3488HW instrukcja
-
Whirlpool ADG 120 A+ instrukcja
-
Bradford White MS120R6SS Instrukcja obsługi
-
Jandy AquaLink RS series Troubleshooting Manual
-
-
