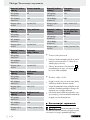
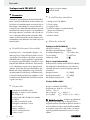
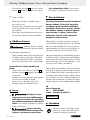
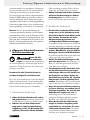
Parkside PBS 600 A1 Operation and Safety Notes
- Typ
- Operation and Safety Notes

IAN 89170
BELT SANDER PBS 600 A1
BANDSCHLEIFER
Bedienungs- und Sicherheitshinweise
Originalbetriebsanleitung
BELT SANDER
Operation and Safety Notes
Translation of original operation manual
SZLIFIERKA T AŚMOW A
Wskazówki dotyczące obsługi i bezpieczeństwa
Tłumaczenie oryginalnej instrukcji obsługi
PÁSOV Á BRUSKA
Pokyny pro obsluhu a bezpečnostní pokyny
Překlad originálního provozního návodu
PÁSOV Á BRÚSKA
Pokyny pre obsluhu a bezpečnostné pokyny
Preklad originálneho návodu na obsluhu
TRAČNI BRUSILNIK
Navodila za upravljanje in varnostna opozorila
Prevod originalnega navodila za uporabo
SZALAgCSISZOLó
Kezelési és biztonsági utalások
Az originál használati utasítás fordítása

GB Operation and Safety Notes Page 5
PL Wskazówki dotyczące obsługi i bezpieczeństwa Strona 15
HU Kezelési és biztonsági utalások Oldal 25
SI Navodila za upravljanje in varnostna opozorila Stran 35
CZ Pokyny pro obsluhu a bezpečnostní pokyny Strana 45
SK Pokyny pre obsluhu a bezpečnostné pokyny Strana 55
DE / AT / CH Bedienungs- und Sicherheitshinweise Seite 65
Before reading, unfold the page containing the illustrations and familiarise yourself with all functions of the
device.
Przed przeczytaniem proszę rozłożyć stronę z ilustracjami, a następnie proszę zapoznać się z wszystkimi
funk cjami urządzenia.
Olvasás előtt kattintson az ábrát tartalmazó oldalra és végezetül ismerje meg a készülék mindegyik
funk cióját.
Pred branjem odprite stran s slikami in se nato seznanite z vsemi funkcijami naprave.
Před čtením si otevřete stranu s obrázky a potom se seznamte se všemi funkcemi přístroje.
Pred čítaním si odklopte stranu s obrázkami a potom sa oboznámte so všetkými funkciami prístroja.
Klappen Sie vor dem Lesen die Seite mit den Abbildungen aus und machen Sie sich anschließend mit allen
Funktionen des Gerätes vertraut.

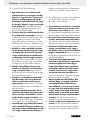
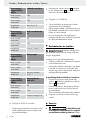
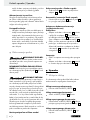
A
B C
D E F
8
12
2 3 4
13
11
1
67 5
9
10


5 GB
Table of contents
Introduction
Proper use ...........................................................................................................................................Page 6
Features and equipment .....................................................................................................................Page 6
Included items .....................................................................................................................................Page 6
Technical information .........................................................................................................................Page 6
General safety advice for electrical power tools
1. Workplace safety ...........................................................................................................................Page 7
2. Electrical safety ..............................................................................................................................Page 7
3. Personal safety ...............................................................................................................................Page 7
4. Careful handling and use of electrical power tools .................................................................... Page 8
5. Service ............................................................................................................................................Page 8
Safety advice for belt sanders...........................................................................................................Page 9
Preparing for use
Tensioning / changing the sanding belt ............................................................................................Page 9
Advice on use .....................................................................................................................................Page 10
Vacuum dust extraction ......................................................................................................................Page 10
Operation
Switching on and off ..........................................................................................................................Page 10
Selecting the correct rotational speed and sanding belt ................................................................Pag e 11
Using the device in a fixed mounting ................................................................................................Page 12
Tips and tricks .....................................................................................................................................Page 12
Maintenance and cleaning .............................................................................................. Page 12
Service centre .............................................................................................................................Page 12
Warranty ........................................................................................................................................Page 12
Disposal ............................................................................................................................................ Page 13
Declaration of Conformity / Manufacturer........................................................Page 13

6 GB
Introduction / General safety advice for electrical power tools
Introduction
Belt sander PBS 600 A1
Q
Introduction
We congratulate you on the purchase of your new
device. You have chosen a high quality product.
The instructions for use are part of the product. They
contain important information concerning safety,
use and disposal. Before using the product, please
familiarise yourself with all of the safety information
and instructions for use. Only use the unit as descri-
bed and for the specified applications. If you pass
the product on to anyone else, please ensure that
you also pass on all the documentation with it.
Q
Proper use
The belt sander - depending on the sanding paper
used - is designed for dry sanding wood, plastic,
metal and putty, as well as painted surfaces. The de-
vice may only be used for dry sanding. Always use
a sanding belt and grade of grit suitable for the par-
ticular surface you are sanding. The speed selected
should also be appropriate for the material. The de-
vice is not intended for commercial use. Any other
use or modification to the device shall be considered
as improper use and could give rise to considerable
dangers. The manufacturer will not accept liability for
loss or damage arising from improper use.
Q
Features and equipment
1
Belt speed adjuster wheel
2
Recesses for clamp mounting
3
ON / OFF switch
4
Lock button for ON / OFF switch
5
Dust box
6
Release button for dust box
7
Belt adjuster screw
8
Sanding belt
9
Adapter port
10
Tensioning lever for sanding belt
11
Clamps
12
Adapter for external vacuum extraction
13
Reducer piece
Q
Included items
1 Belt sander PBS 600 A1
1 Sanding belt
1 Dust collection box
1 Vacuum extraction adapter and reducer piece
(for external vacuum extraction)
2 Clamps
1 Operating instructions
Q
Technical information
Belt sander PBS 600 A1
Nominal voltage: 230 V
~
50 Hz
Nom. power input: 600 W
No-load belt speed: 170–250 m / min
Sanding belt: 75 x 457 mm
Protection class: II /
Noise and vibration data:
Measured values for noise are determined in accor-
dance with EN 60745. The A-weighted noise level
of the electrical power tool are typically:
Sound pressure level: 76.1 dB(A)
Sound power level: 87.1 dB(A)
Uncertainty K: 3 dB
Wear ear protection!
Total vibration, EN 60745:
Vibration emission value a
h,W
= 5.79 m / s
2
Uncertainty K = 1.5 m / s
2
rear handle: a
h,W
= 4.22 m / s
2
front handle: a
h,W
= 5.79 m / s
2
,
K = 1.5 m / s
2
The vibration level specified in
these instructions was measured in accordance with
an EN 60745 standardised measurement process
and can be used to compare equipment. The vibra-
tion emission value specified can also serve as a
preliminary assessment of the exposure.
The vibration level will change according to the ap-
plication of the electrical tool an in some cases may
exceed the value specified in these instructions. Re-
gularly using the electric tool in such a way may
make it easy to underestimate the vibration.

7 GB
Introduction / General safety advice for electrical power tools
Introduction
Note: If you wish to make an accurate assessment
of the vibration loads experienced during a particu-
lar period of working, you should also take into
account the intervening periods of time when the
device is switched off or is running but is not actual-
ly in use. This can result in a much lower vibration
load over the whole of the period of working.
Q
General safety advice for
electrical power tools
Read all the safety
advice and instructions! Failure to
observe the safety advice and instructions
may result in electric shock, fire and / or serious injury.
Keep all the safety advice and instructions
in a safe place for future reference!
The term “electrical tool” used in the safety advice
refers to electrical tools powered by mains electrici-
ty (by means of a mains lead) and electrical tools
powered by rechargeable batteries (without a
mains lead).
1.
Workplace safety
a) Keep your working area clean and
well lit. Untidy or poorly lit working areas
can lead to accidents.
b) Do not work with the device in poten-
tially explosive environments in which
there are inflammable liquids, gases
or dusts. Electrical power tools create sparks,
which can ignite dusts or fumes.
c) Keep children and other people away
while you are operating the electrical
tool. Distractions can cause you to lose con-
trol of the device.
2.
Electrical safety
a)
The mains plug on the device must match
the mains socket. The plug must not
be modified in any way. Do not use
an adapter plug with devices fitted
with a protective earth. Unmodified
plugs and matching sockets reduce the risk of
electric shock.
b) Avoid touching earthed surfaces such
as pipes, radiators, ovens and refrig-
erators with any part of your body.
There is an increased risk of electric shock if
your body is earthed
.
c) Keep the device away from rain or
moisture. Water entering an electrical device
increases the risk of electric shock.
d) Do not use the mains lead for any pur-
pose for which it was not intended,
e.g.
to carry the device, to hang up the de-
vice or to pull the mains plug out of
the mains socket. Keep the mains lead
away from heat, oil, sharp edges or
moving parts of the device. Damaged
or tangled mains leads increase the risk of
electric shock.
e) When working outdoors with an
electrical power tool always use ex-
tension cables that are also approved
for use outdoors. The use of an extension
cable suitable for outdoor use reduces the risk
of electric shock.
f) Use a residual current device (RCD)
for protection if operating the electri-
cal power tool in a moist environment
is unavoidable. The use of an RCD reduces
the risk of electric shock.
3. Personal safety
a) Remain alert at all times, watch what
you are doing and always proceed
with caution. Do not use the device if
you are tired or under the influence of
drugs, alcohol or medication. One mo
ment
of carelessness when using the device can lead
to serious injury.
b) Wear personal protective equipment
and always wear safety glasses. The
wearing of personal protective equipment
such as dust masks, non-slip safety shoes, safe-
ty helmets or ear protectors, appropriate to

8 GB
General safety advice for electrical power tools / Preparing for use
General safety advice for electrical power tools
the type of electrical power tool used and
work undertaken, reduces the risk of injury.
c) Avoid unintentional operation of the
device. Check that the electrical power
tool is switched off before you connect
it to the mains, pick it up or carry it.
Accidents can happen if you carry the device
with your finger on the ON / OFF switch or with
the device switched on.
d) Remove any setting tools or spanners
before you switch the device on. A tool
or spanner left attached to a rotating part of a
device can lead to injury.
e) Avoid placing your body in an unnat-
ural position. Keep proper footing
and balance at all times. By doing this
you will be in a better position to control the
device in unforeseen circumstances.
f) Wear suitable clothing. Do not wear
loose clothing or jewellery. Keep your
hair, clothing and gloves clear of mov-
ing parts. Loose clothing, jewellery or long
hair can become trapped in moving parts.
g) If vacuum dust extraction and collection
devices are fitted do not forget to
check
that they are properly connected and
correctly used. The use of these devices
reduces the hazard presented by dust.
4.
Careful handling and use
of electrical power tools
a) Do not overload the device. Always
use an electrical power tool that is
intended for the task you are under-
taking. By using the right electrical power
tool for the job you will work more safely and
achieve a better result.
b) Do not use an electrical power tool if
its switch is defective. An electrical power
tool that can no longer be switched on and off
is dangerous and must be repaired.
c) Pull the mains plug from the socket
before you make any adjustments to
the device, change accessories or when
the device is put away. This precaution is
intended to prevent you from unintentionally
starting the device.
d) When not in use always ensure that
electrical power tools are kept out of
reach of children. Do not let anyone use
the device if he or she is not familiar
with it or has not read the instructions
and advice. Electrical power tools are dan-
gerous when they are used by inexperienced
people.
e) Look after the device carefully. Check
that moving parts are working prop-
erly and move freely. Check for any
parts that are broken or damaged
enough to detrimentally affect the
functioning of the device. Have dam-
aged parts repaired before you use
the device. Many accidents have their origins
in poorly maintained electrical power tools.
f) Keep cutting tools clean and sharp.
Carefully maintained cutting tools with sharp
cutting edges are less likely to jam and are
easier to control.
g) Use the electrical power tool, accesso-
ries, inserted tools etc. in accordance
with these instructions and advice, and
the stipulations drawn up for this par-
ticular type of device. In doing this, take
into account the working conditions
and the task in hand. The use of electrical
power tools for purposes other than those in-
tended can lead to dangerous situations.
5. Service
a) Have your device repaired at the ser-
vice centre or by qualified specialist
personnel using original manufacturer
parts only. This will ensure that your device
remains safe to use.

9 GB
General safety advice for electrical power tools / Preparing for use
General safety advice for electrical power tools
Q
Safety advice for
belt sanders
Hold the device by the insulated han-
dle surfaces as the sanding belt could
strike the device’s own mains lead.
Damaging a live wire could result in the metal
parts of the device also becoming live and
could lead to an electric shock.
DANGER OF FIRE FROM FLYING SPARKS!
Sanding metal creates flying sparks. For this
reason, always make sure that nobody is placed
in any danger and that there are no inflammable
materials near the working area.
When undertaking prolonged sanding of wood,
and in particular when working on materials
that give rise to dusts that are hazardous to
health, the sander must be connected to a
suitable external dust extraction device.
Ensure that there is adequate ventilation when
working on plastic, paint, varnish etc.
The belt sander is designed for the dry sanding
of large surfaces of wood, plastic, metal and
plaster and painted surfaces. The device is to
be used for dry sanding only.
Do not sand materials containing asbestos.
Asbestos is a known carcinogen.
POISONOUS DUSTS!
Sanding paints containing lead, some types of
wood and metal for example may give rise to
hazardous or poisonous dusts and represents a
risk to the health of the person operating the
device and to anyone near the work area.
Wear safety glasses and a dust protection mask!
Securely support the workpiece. Use clamps or
a vice to grip the workpiece firmly. This is much
safer than holding it with your hand.
Never support yourself by placing your hands
near or in front of the device or the workpiece
surface. A slip can result in injury.
If a dangerous situation arises, pull the mains
plug immediately out of the mains socket.
Always work with the mains lead leading
away from the rear of the device.
Avoid contact with the moving sanding belt.
Do not work on moistened materials or damp
surfaces.
Always switch on the device before placing it
against the workpiece. After sanding, lift the de-
vice from the workpiece before switching it off.
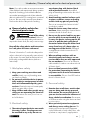
When working always hold the device securely
with both hands (see Fig. E). Always keep prop-
er footing and balance.
Switch the device off and allow it to come to
a complete standstill before you put it down.
When taking a break from your work, before
carrying out any tasks on the device itself (e.g.
changing the sanding belt) and when you are
not using the device, always pull the mains
plug out of the mains socket.
Q
Preparing for use
Q
Tensioning / changing the
sanding belt
DANGER OF INJURY!
Before you carry out any work on the belt sander
always pull the plug out of the mains socket.
1. Then release the tensioner for the sanding belt
by moving the tensioning lever
10
fully outwards
(see fig. C). The sanding belt
8
can be removed.
2. Next insert a new sanding belt
8
or change
the belt for one suitable for a different material
or one with a different grit size.
IMPORTANT: The direction of the arrows on
the inside of the sanding belt
8
must agree
with that on sander housing.
3. Press the tensioning lever
10
back into its
initial position.
Adjusting the sanding belt path manually:
If the belt does not run centrally when switched on,
you may have to adjust the sanding belt manually.
To do this, turn the adjuster screw
7
on the front
roller until the sanding belt
8
runs centrally.
IMPORTANT: Always make sure that the
sanding belt
8
does not cut into the housing.
Check the sanding belt regularly and if neces-
sary re-adjust it using the adjuster screw
7
.

10 GB
Operation
Preparing for use / Operation
Q
Advice on use
Light sanding pressure is enough:
Apply light sanding pressure only. The weight
of the belt sander alone is adequate to produce
good sanding results. By adopting this approach
you will also prolong the life of your sanding
belts and obtain a smoother workpiece surface.
Sanding and surfaces:
The sanding output and the quality of the surface
finish obtained are determined by the belt speed
and the grade of grit on the sanding belt (see the
section on “Selecting the correct rotational speed
and sanding belt”).
Sanding procedure:
With the sander switched on, bring it into con-
tact with the workpiece and move it forward
carefully. Work in parallel and overlapping
widths. Always work in the direction of the grain
to avoid undesirable transverse sanding marks.
After sanding always lift the device from the
workpiece before switching it off.
Q
Vacuum dust extraction
EXPLOSIVE MATERIAL!
If there is an explosive mixture of dust and air you
must use a vacuum device especially intended for
that purpose.
DANGER OF FIRE FROM FLYING SPARKS!
Do not use any form of dust extraction (dust box
5
or vacuum extraction device) if you are sanding metal.
DANGER OF FIRE! There is
the danger of fire when working with electrical de-
vices that have a dustbox or can be connected to a
vacuum cleaner. Under certain conditions the wood
dust in the dust collection box (or in the vacuum‘s
dust bag) may self-ignite, e.g. as a result of flying
sparks generated when abrading metals or metal
objects left in wood. This can happen particularly if
the wood dust is mixed with paint residue or other
chemicals and the abraded particles are hot from
prolonged abrasion. Therefore you must empty the
device’s dust collection box and the vacuum clean-
er’s dust bag before taking a break or stopping
work and always avoid overheating of the abraded
particles and the device.
Wear a dust mask!
Dust extraction with dust box:
Push the dust box
5
on to the adapter port
9
.
Dismantle / remove the dust box:
Press the release button
6
of the dust box
5
and withdraw it towards the rear of the device.
Adapter for external vacuum extraction
(with reducer piece)
Connection:
Push the adapter for external vacuum extraction
12
into the adapter port
9
. If it is necessary to
use the reducer piece
13
, push the reducer piece
into the adapter for external vacuum extraction
12
.
Slide the hose of a suitable dust extraction de-
vice approved for that purpose (e.g. a workshop
vacuum cleaner) on to the adapter for external
vacuum extraction
12
with the reducer piece
13
,
if used.
Removal:
Pull off the dust extraction device hose.
Pull off the adapter for external vacuum extrac-
tion
12
(with the reducer piece
13
, if used).
Q
Operation
Q
Switching on and off
When operating the belt sander you can select
between intermittent or continuous operation mode.
To switch on intermittent operation mode:
Press the ON / OFF switch
3
.
To switch off intermittent operation mode:
Release the ON / OFF switch
3
.
To switch on continuous operation mode:
Press the ON / OFF switch
3
, and keep it
pressed, then press the locking knob
4
.

11 GB
Operation
Preparing for use / Operation
To switch off continuous operation mode:
Press and then release the ON / OFF switch
3
.
Q
Selecting the correct rotational
speed and sanding belt
You can select the belt speed using the belt speed
adjuster wheel
1
even whilst the sander is running.
The optimum belt speed depends on the workpiece
and the workpiece material. Always confirm the best
speed by carrying out a small test. The following
table lists some recommended values to help you
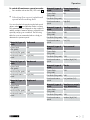
determine the optimum speed.
Material / type of
work
Softwood
Coarse finish
(Grit grade)
60
Fine finish (Grit grade) 240
Preselected rotation
speed
high (5-6)
Material / type of
work
Hardwood
Coarse finish
(Grit grade)
60
Fine finish (Grit grade) 180
Preselected rotation
speed
high (5-6)
Material / type of
work
Chipboard
Coarse finish
(Grit grade)
60
Fine finish (Grit grade) 150
Preselected rotation
speed
high (5-6)
Material / type of
work
Removing paint /
varnish
Coarse finish
(Grit grade)
60
Fine finish (Grit grade) ––
Preselected rotation
speed
high (5-6)
Material / type of
work
Sanding varnish
Coarse finish
(Grit grade)
150
Fine finish (Grit grade) 320
Preselected rotation
speed
low (1-2)
Material / type of
work
Rust removal
Coarse finish
(Grit grade)
40
Fine finish (Grit grade) 120
Preselected rotation
speed
medium / high (3-4)
Material / type of
work
Plastic
Coarse finish
(Grit grade)
120
Fine finish (Grit grade) 240
Preselected rotation
speed
low / medium (2-3)
Material / type of
work
Non-ferrous metals
(e.g. aluminium)
Coarse finish
(Grit grade)
80
Fine finish (Grit grade) 150
Preselected rotation
speed
medium / high (3-4)

12 GB
Warranty / Disposal / Declaration of Conformity / Manufacturer
Operation / Maintenance and cleaning / Service centre / Warranty
Q
Using the device in
a fixed mounting
Turn the electrical power tool upside down as
shown in Figures D, F and place it on a stable
working surface.
Insert the two clamps
11
into the recesses
2
provided for this purpose and clamp the electri-
cal power tool securely down on to the surface.
Q
Tips and tricks
Never use the same sanding belt to sand wood
and metal.
Worn or ripped sanding belts can damage
the workpiece. Change sanding belts at the
appropriate time.
Keep the sanding belt properly tensioned so
that it does not hang down too much and
become unusable due to nicks, creases etc.
Q
Maintenance and cleaning
Before you carry out any work
on the belt sander always pull the mains plug out
of the mains socket.
The belt sander is designed to be maintenance-free.
Clean the device frequently. This should be done
immediately after you have finished using it.
Use a dry cloth to clean the device - never use
petrol, solvents or cleaners that attack plastic.
Emptying / cleaning the dust box:
Simultaneously press the two release button(s)
6
and pull the dust box
5
backwards from of
the device.
Empty the dust collection box completely by
knocking the dust out and place the dust box
back on to the device.
Always keep the ventilation slots clear.
Remove any adhering dust with a narrow
paint brush.
Q
Service centre
Have your device re-
paired only by qualified specialist
personnel using original manufacturer
parts only. This will ensure that your device
remains safe to use.
If the plug or mains lead
needs to be replaced, always have the
replacement carried out by the manu-
facturer or its service centre. This will
ensure that your device remains safe to use.
Q
Warranty
The warranty for this appliance is for 3
years from the date of purchase. The ap-
pliance has been manufactured with care
and meticulously examined before deliv-
ery. Please retain your receipt as proof
of purchase. In the event of a warranty
claim, please make contact by telephone
with our Service Department. Only in this
way can a post-free despatch for your
goods be assured.
The warranty covers only claims for material and
maufacturing defects, but not for transport damage,
for wearing parts or for damage to fragile compo-
nents, e.g. buttons or batteries. This product is for pri-
vate use only and is not intended for commercial use.
The warranty is void in the case of abusive and im-
proper handling, use of force and internal tamper-
ing not carried out by our authorized service branch.
Your statutory rights are not restricted in any way
by this warranty.
The warranty period will not be extended by repairs
made unter warranty. This applies also to replaced
and repaired parts. Any damage and defects extant
on purchase must be reported immediately after
unpacking the appliance, at the latest, two days after
the purchase date. Repairs made after the expiration
of the warranty period are subject to payment.

13 GB
Warranty / Disposal / Declaration of Conformity / Manufacturer
Operation / Maintenance and cleaning / Service centre / Warranty
GB
Service Great Britain
Tel.: 0871 5000 720
(0,10 GBP/Min.)
e-mail: k[email protected]
IAN 89170
Q
Disposal
The packaging is wholly composed of
environmentally-friendly materials that can
be disposed of at a local recycling centre.
Do not dispose of electrical power
tools with the household rubbish!
In accordance with European Directive 2002 / 96 / EC
(covering waste electrical and electronic equipment)
and its transposition into national legislation, worn
out electrical power tools must be collected sepa
rately
and taken for environmentally compatible recycling.
Contact your local refuse disposal authority for
more details of how to dispose of your worn out
electrical devices.
Q
Declaration of Conformity /
Manufacturer
We, KOMPERNASS GMBH, the person responsible
for documents: Mr Semi Uguzlu, BURGSTR. 21,
44867 BOCHUM, GERMANY, hereby declare that
this product complies with the following standards,
normative documents and EU directives:
Machinery Directive
(2006 / 42 / EC)
EU Low Voltage Directive
(2006 / 95 / EC)
Electromagnetic Compatibility
(2004 / 108 / EC)
RoHS Directive
(2011 / 65 / EU)
Applicable harmonized standards
EN 60745-1:2009+A11
EN 60745-2-4:2009
EN 55014-1:2006+A1
EN 55014-2:1997+A1+A2
EN 61000-3-2:2006+A1+A2
EN 61000-3-3:2008
Type / Description of product:
Belt sander PBS 600 A1
Date of manufacture (DOM): 04–2013
Serial number: IAN 89170
Bochum, 30.04.2013
Semi Uguzlu
- Quality Manager -
We reserve the right to make technical modifications
in the course of further development.

14
Spis zawartości

15 PL
Spis zawartości
Wstęp
Użytkowanie zgodnie z przeznaczeniem .....................................................................................Strona 16
Wyposażenie ...................................................................................................................................Strona 16
Zakres dostawy ...............................................................................................................................Strona 16
Dane techniczne .............................................................................................................................. Strona 16
Ogólne wskazówki bezpieczeństwa dla elektronarzędzi
1. Bezpieczeństwo miejsca pracy ..................................................................................................Strona 17
2. Bezpieczeństwo elektryczne .....................................................................................................Strona 17
3. Bezpieczeństwo osób .................................................................................................................Strona 18
4. Staranne obchodzenie się i użytkowanie narzędzi elektrycznych ........................................ Strona 18
5. Serwis ........................................................................................................................................... Strona 19
Wskazówki dotyczące bezpieczeństwa dla szlifierki taśmowej ................................................Strona 19
Uruchomienie
Zamocowanie / wymiana taśmy szlifierskiej .................................................................................Strona 20
Wskazówki robocze........................................................................................................................Strona 20
Odsysanie pyłu ................................................................................................................................Strona 20
Obsługa
Włączanie i wyłączanie ................................................................................................................. Strona 21
Wybór obrotów i taśmy szlifierskiej ...............................................................................................Strona 21
Praca stacjonarna ............................................................................................................................Strona 22
Dobre rady i triki ..............................................................................................................................Strona 22
Konserwacja i czyszczenie ...........................................................................................Strona 22
Serwis .............................................................................................................................................Strona 23
Gwarancja .................................................................................................................................. Strona 23
Utylizacja .....................................................................................................................................Strona 23
Deklaracja zgodności / Producent .........................................................................Strona 24

16 PL
Wstęp / Ogólne wskazówki bezpieczeństwa dla elektronarzędzi
Wstęp
Szlifierka taśmowa PBS 600 A1
Q
Wstęp
Gratulujemy zakupu nowego urządzenia. Tym sa-
mym zdecydowali się Państwo na zakup produktu
wysokiej jakości. Instrukcja obsługi jest częścią tego
produktu. Zawiera ona ważne wskazówki dotyczące
bezpieczeństwa, użytkowania iutylizacji. Przed
pierwszym użyciem produktu należy zapoznać się
ze wszystkimi wskazówkami dotyczącymi obsługi
ibezpieczeństwa. Używać produktu wyłącznie
zgodnie zjego poniżej opisanym przeznaczeniem.
Wprzypadku przekazania produktu innej osobie
należy dołączyć do niego całą jego dokumentację.
Q
Użytkowanie zgodnie
z przeznaczeniem
Szlifierka taśmowa jest - zależnie od papieru ścier-
nego - wykoncypowana do suchego szlifowania
powierzchni drewnianych, z tworzywa sztucznego,
metalu i masy szpachlowej jak również polakiero-
wanych powierzchni. Urządzenia wolno używać
wyłącznie do szlifowania na sucho. Zwróć uwagę
na to, żeby do obróbki różnych materiałów stoso
wać
odpowiednie arkusze szlifierskie o zróżnicowanej
ziarnistości, a także na to, żeby również dopasować
obroty do materiału. Urządzenie nie jest przewidzia-
ne do celów zarobkowych. Każde inne zastosowa-
nie maszyny lub przeprowadzenie w niej zmian jest
uznawane za niezgodne z przeznaczeniem i kryje
w sobie poważne zagrożenie nieszczęśliwym wy-
padkiem. Za szkody powstałe wskutek sprzeczne
go
z przeznaczeniem użytkowania producent nie po-
nosi żadnej odpowiedzialności.
Q
Wyposażenie
1
Kółko nastawcze prędkości taśmy
2
Wycięcia na śrubowy ścisk stolarski
3
WŁĄCZNIK / WYŁĄCZNIK
4
Przycisk blokady WŁĄCZNIKA / WYŁĄCZNIKA
5
Pojemnik na pył
6
Przycisk zwalniający pojemnika na pył
7
Śruba regulacyjna biegu taśmy
8
Taśma szlifierska
9
Przyłącze adaptera
10
Dźwignia napinająca taśmy szlifierskiej
11
Śrubowy ścisk stolarski
12
Adapter do odpylania zewnętrznego
13
Złączka redukcyjna
Q
Zakres dostawy
1 Szlifierka taśmowa PBS 600 A1
1 Taśma szlifierska
1 Pojemnik zintegrowanego systemu odsysania pyłu
1 Adapter odpylania i złączka redukcyjna
(do odpylania zewnętrznego)
2 Śrubowe ściski stolarskie
1 Instrukcja obsługi
Q
Dane techniczne
Szlifierka taśmowa
PBS 600 A1
Napięcie znamionowe: 230 V
~
50 Hz
Pobór mocy znamionowy: 600 W
Bieg jałowy-Prędkość taśmy: 170–250 m / min
Taśma szlifierska: 75 x 457 mm
Klasa ochrony: II /
Informacje dotyczące hałasu i wibracji:
Wartość pomiarowa hałasu wyznaczona zgodnie
z EN 60745. Poziom hałasu elektronarzędzia wg
oceny A wynosi typowo:
Poziom ciśnienia hałasu: 76,1 dB(A)
Pozom mocy hałasu: 87,1 dB(A)
Niepewność pomiaru K: 3 dB
Zakładać ochronniki słuchu!
Wartości całkowite drgań, EN 60745:
Wartość emisji drgań a
h,W
= 5,79 m / s
2
Niepewność K = 1,5 m / s
2
tylny uchwyt: a
h,W
= 4,22 m / s
2
przedni uchwyt: a
h,W
= 5,79 m / s
2
, K = 1,5 m / s
2
Podany w niniejszych in-
strukcjach poziom drgań wyznaczony został za
pomocą metody pomiarowej określonej w normie

17 PL
Wstęp / Ogólne wskazówki bezpieczeństwa dla elektronarzędzi
EN 60745 i może zostać użyty do porównania
urządzeń. Podany poziom emisji drgań może być
wykorzystywany również do wstępnego oszaco-
wania przerw w działaniu.
Poziom drgań będzie się różnił w zależności od za-
stosowania elektronarzędzia i w niektórych przy-
padkach może przekroczyć wartość podaną w niniejs-
zej instrukcji. Obciążenie drganiami może wydawać
się mniejsze niż w rzeczywistości, jeśli elektronarzędzie
będzie regularnie używane ten sposób.
Wskazówka: Celem dokładnego oszacowania
obciążenia wibracjami w okresie określonego
okresu czasu pracy należy uwzględnić również te
okresy, w których urządzenie jest wyłączone lub
wprawdzie jest włączone, ale w rzeczywistości nie
pracuje. Może to przyczynić się do znacznej redukcji
obciążenia wibracjami w całym okresie czasu pracy.
Ogólne wskazówki bezpie-
czeństwa dla elektronarzędzi
Przeczytaj
wszystkie wskazówki dotyczące
bezpieczeństwa oraz instrukcje!
Zaniedbania w przestrzeganiu wskazówek doty-
czących bezpieczeństwa oraz w przestrzeganiu
instrukcji mogą spowodować porażenie prądem
elektrycznym, pożar i / lub ciężkie obrażenia ciała.
Przechowuj na przyszłość wszystkie
wskazówki dotyczące bezpieczeństwa
oraz instrukcje!
Używany we wskazówkach dotyczących bezpie-
czeństwa termin „narzędzie elektryczne“ odnosi się
do narzędzi elektrycznych zasilanych z sieci (z ka-
blem sieciowym) oraz do narzędzi elektrycznych
zasilanych
z akumulatorów (bez kabla sieciowego).
1.
Bezpieczeństwo miejsca pracy
a) Utrzymywać stanowisko pracy w czy-
stości i dobrze oświetlone. Nieporządek
i nieoświetlone obszary robocze mogą prowa-
dzić do wypadków.
b) Nie pracuj przy użyciu urządzenia w
otoczeniu zagrożonym eksplozją, w
którym znajdują się palne ciecze, gazy
lub pyły. Urządzenia elektryczne wytwarza-
ją iskry, które mogą zapalić pył lub pary.
c) Podczas użytkowania urządzenia
elektrycznego trzymaj dzieci i inne
osoby z daleka od urządzenia. Przy
odchyleniu możesz stracić kontrolę nad urzą-
dzeniem.
2.
Bezpieczeństwo elektryczne
a) Wtyk sieciowy urządzenia musi
pasować do wtykowego gniazdka
sieciowego. W żaden sposób nie wol-
no zmieniać wtyku sieciowego urzą-
dzenia. Nie używaj żadnych wtyków
adapterowych razem z urządzeniami
wyposażonymi w uziemienie ochron
ne.
Niezmienione wtyki sieciowe i pasujące wtykowe
gniazdka sieciowe zmniejszają ryzyko poraże-
nia prądem elektrycznym.
b) Unikaj kontaktu fizycznego z powier-
zchniami uziemionymi takimi jak
powierzchnie rur, grzejników, kuchni
elektrycznych i lodówek. Istnieje podwyż-
szone niebezpieczeństwo porażenia prądem
elektrycznym, gdy twoje ciało jest uziemione.
c) Trzymaj urządzenie z daleka od desz-
czu i wilgoci. Wniknięcie wody do urządzenia
elektrycznego zwiększa ryzyko porażenia prą-
dem elektrycznym.
d)
Nie używaj kabla sieciowego w
sposób
sprzeczny z jego przeznaczeniem, tj.
do noszenia urządzenia, zawieszania
urzą dzenie lub do wyciągania wtyku
sieciowego z wtykowego gniazdka
sieciowego. Trzymaj kabel z daleka
od gorąca, oleju, ostrych krawędzi
lub poruszających się części urządzeń.
Uszkodzone lub poplątane kable zwiększają
ryzyko porażenia prądem elektrycznym.
e)
Gdy pracujesz z urządzeniem elektrycz-
nym na dworze używaj wyłącznie
przedłużaczy, które są dopuszczone
również do pracy na dworze. Użycie
Wstęp

18 PL
Ogólne wskazówki bezpieczeństwa dla elektronarzędzi
Ogólne wskazówki bezpieczeństwa dla elektronarzędzi
przedłużacza przystosowanego do stosowania
na dworze zmniejsza ryzyko porażenia prądem
elektrycznym.
f) Jeśli praca elektronarzędzia w otocze-
niu wilgotnym jest nie do uniknięcia,
należy zastosować wyłącznik prądu
uszkodzeniowego. Zastosowanie wyłącz-
nika prądu uszkodzeniowego zapobiega nie-
bezpieczeństwu porażenia prądem elektrycz
nym.
3. Bezpieczeństwo osób
a) Bądź stale uważny, zwracaj uwagę
na to co robisz i postępuj rozsądnie w
trakcie pracy z narzędziem elektrycz-
nym. Nie używaj narzędzia, gdy jesteś
zmęczony lub znajdujesz się pod
wpływem narkotyków, alkoholu lub
lekarstw. Chwila nieuwagi przy użytkowaniu
urządzenia może prowadzić do poważnych
obrażeń ciała.
b) Noś osobiste wyposażenie ochronne i
zawsze okulary ochronne. Noszenie
osobistego wyposażenia ochronnego takiego
jak maska przeciwpyłowa, buty antypoślizgo
we,
kask ochronny lub ochrona słuchu stosownie
do sposobu użytkowania narzędzia elektrycz-
nego zmniejsza ryzyko obrażeń ciała.
c) Unikaj niezamierzonego uruchomienia.
Upewnij się, że narzędzie elektryczne
jest wyłączone zanim podłączysz je
do zasilania prądowego, uchwycisz je
lub będziesz je przenosił. Jeżeli podczas
przenoszenia urządzenia będziesz trzymał
palec na przełączniku WŁĄCZ. / WYŁĄCZ.
lub jeżeli urządzenie jest włączone, to może
to prowadzić do nieszczęśliwych wypadków.
d) Usuń narzędzia do nastawiania urzą-
dzenia lub klucze płaskie zanim włą-
czysz urządzenie. Narzędzie lub klucz,
który znajduje się w obracającej się części
urządzenia może prowadzić do obrażeń ciała.
e) Unikaj nienormalnej postawy ciała.
Zadbaj o pewne stanowisko i w każdej
chwili utrzymuj równowagę. Dzięki temu
będziesz mógł lepiej kontrolować urządzenie,
zwłaszcza w nieoczekiwanych sytuacjach.
f) Noś odpowiednią odzież. Nie noś ob-
szernej odzieży ani biżuterii. Trzymaj
włosy, odzież i rękawice z daleka od
poruszających się części. Luźna odzież,
biżuteria lub długie włosy mogą zostać uchwy-
cone przez poruszające się części.
g) Jeżeli zostaną zamontowane urzą-
dzenia do odsysania i wychwytywania
pyłu, to upewnij się, że są one podłą-
czone i że będą prawidłowo używane.
Używanie tych urządzeń zmniejsza zagrożenie
wywoływane pyłem.
4.
Staranne obchodzenie
się i użytkowanie narzędzi
elektrycznych
a) Nie przeciążaj urządzenia. Używaj
do swojej pracy przeznaczonego do
niej narzędzia elektrycznego. Za pomo-
cą odpowiedniego narzędzia elektrycznego
pracujesz lepiej i bezpieczniej w danym zakre-
sie robót.
b) Nie używaj żadnego narzędzia elek-
trycznego, którego przełącznik jest
uszkodzony. Narzędzie elektryczne, które
nie daje się już więcej włączyć lub wyłączyć,
jest niebezpieczne i musi zostać naprawione.
c) Zanim przeprowadzisz nastawy urzą-
dzenia, wymienisz części osprzętu lub
odłożysz urządzenie wyciągnij wtycz-
kę sieciową z sieciowego gniazdka
wtykowego. Ten środek ostrożności zapo-
biega niezamierzonemu startowi urządzenia.
d) Przechowuj nieużywane narzędzia
elektryczne poza zasięgiem dzieci. Nie
pozwól na użytkowanie urządzenia
osobom, które nie są z nim obznajo-
mione lub nie przeczytały niniejszych
instrukcji. Narzędzia elektryczne są niebez-
pieczne, gdy są używane przez osoby niedo-
świadczone.
e) Pielęgnuj starannie urządzenie.
Sprawdź, czy ruchome części urzą-
dzenia funkcjonują nienagannie i nie
zakleszczają się, czy części urządzenia
nie są złamane lub uszkodzone w ta-

19 PL
Ogólne wskazówki bezpieczeństwa dla elektronarzędzi
kim stopniu, że funkcjonowanie urzą-
dzenia jest uszczuplone. Zleć naprawę
uszkodzonych części przed użyciem
urządzenia. Przyczyną wielu wypadków są
źle konserwowane narzędzia elektryczne.
f) Utrzymuj narzędzia tnące w stanie
ostrym i czystym. Starannie pielęgnowane
narzędzia tnące o ostrych krawędziach tnących
mniej zakleszczają się i dają się łatwiej prowadzić.
g) Używaj narzędzia elektrycznego,
osprzętu, narzędzi wymiennych itp.
odpowiednio do niniejszych instrukcji
i w taki sposób, jaki jest zalecany dla
tego specjalnego typu urządzenia.
Uwzględniaj przy tym warunki robo-
cze i wykonywane czynności. Użycie
narzędzi elektrycznych do innych zastosowań
niż to przewidziano może prowadzić do nie-
bezpiecznych sytuacji.
5.
Serwis
a) Urządzenie oddawać do naprawy tyl-
ko wykwalifikowanemu personelowi
fachowemu i tylko z użyciem oryginal-
nych części zamiennych. To sposób na
zapewnienie bezpieczeństwa urządzenia.
Q
Wskazówki dotyczące bezpie-
czeństwa dla szlifierki taśmowej
Niniejsze urządzenie należy trzymać
na
izolowanych powierzchniach uchwytόw
,
jako że taśma szlifierska może uszko-
dzić własny przewόd sieciowy. Uszko-
dzenie przewodόw przewodzących prąd elek-
tryczny może spowodować, że metalowe części
urządzenia znajdą się pod napięciem oraz do-
prowadzić do porażenia prądem elektrycznym.
ZAGROŻENIE POŻAROWE WSKUTEK
WYRZUCANIA ISKIER! Gdy szlifowane są
metale postaje wyrzut iskier. Dlatego też należy
bezwzględnie zwracać uwagę na to, żeby nie
zostały zagrożone żadne osoby oraz żeby w
pobliżu obszaru roboczego nie znajdowały się
żadne palne materiały.
Przy obróbce drewna, a zwłaszcza, gdy obra-
biane będą materiały, w przypadku których
powstają szkodliwe dla zdrowia pyły, należy
podłączyć odpowiednie zewnętrzne urządzenie
odsysające.
Przy obróbce tworzyw sztucznych, farb,
lakierów itp. należy zadbać o wystarczające
napowietrzanie.
Szlifierka taśmowa jest zaprojektowana do szli-
fowania powierzchniowego na sucho drewna,
tworzywa sztucznego, metalu i masy szpachlowej
oraz powierzchni lakierowanych. Urządzenie
wolno stosować tylko do szlifu suchego.
Materiału zawierającego azbest nie wolno ob-
rabiać. Azbest jest uznawany za rakotwórczy.
TRUJACE PYŁY! Powsta-
jące przy szlifowaniu na przykład powłok ma-
larskich zawierających ołów, niektórych rodzajów
drewna oraz metali szkodliwe / trujące pyły
stanowią zagrożenie zdrowia dla osoby obsłu-
gującej urządzenie lub dla osób znajdujących
się w pobliżu.
Noś okulary ochronne i maskę przeciwpyłową!
Zabezpieczaj przedmiot obrabiany. Używaj
urządzenia mocującego / imadła, aby przy-
trzymać przedmiot obrabiany. W ten sposób
jest on przytrzymywany pewniej niż ręką.
W żadnym wypadku nie opieraj rąk obok lub
przed urządzeniem oraz przed obrabianą
powierzchnią, ponieważ w razie ześlizgnięcia
istnieje niebezpieczeństwo obrażeń ciała.
W przypadku niebezpieczeństwa wyciągnij
natychmiast wtyczkę sieciową z wtykowego
gniazdka sieciowego.
Zawsze prowadź kabel od urządzenia do tyłu.
Unikaj kontaktu z biegnącą taśmą szlifierską.
Nie obrabiaj żadnych zwilżonych lub wilgot-
nych powierzchni.
Urządzenie należy prowadzić zawsze w stanie
włączonym do przedmiotu obrabianego. Po
obróbce należy podnieść urządzenie z przed-
miotu obrabianego i dopiero wtedy je wyłączyć.
W trakcie obróbki zawsze trzymaj urządzenie
mocno oburącz (zobacz również rysunek E).
Zadbaj o pewną podstawę.
Pozwól, aby urządzenie całkowicie zatrzymało
się i wyłącz je zanim je odłożysz.
Ogólne wskazówki bezpieczeństwa dla elektronarzędzi

20 PL
Uruchomienie / Obsługa
Ogólne wskazówki bezpieczeństwa dla elektronarzędzi / Uruchomienie
Podczas przerw w pracy, przed wszelkimi ro-
botami na urządzeniu (na przykład wymiana
papieru ściernego)oraz w przypadku nieużyt-
kowania urządzenia należy zawsze wyciągnąć
wtyk sieciowy z wtykowego gniazdka sieciowego
.
Q
Uruchomienie
Q
Zamocowanie / wymiana
taśmy szlifierskiej
NIEBEZPIECZEŃSTWO
POWSTANIA OBRAŻEŃ! Zawsze wyciągnij wtyk
sieciowy z wtykowego gniazdka sieciowego zanim
przystąpisz do wykonania robót na szlifierce taśmowej.
1. Poluzuj najpierw urządzenie mocujące taśmy
szlifierskiej odchylając całkowicie dźwignię
mocującą
10
(zobacz Rysunek C). Taśmę szli-
fierską
8
można zdjąć.
2. Teraz należy założyć nową taśmę szlifierską
8
względnie wymienić ją, aby obrabiać inny
materiał lub zmienić ziarnistość.
WAŻNE: Kierunki strzałek na stronie wewnętrz-
nej taśmy szlifierskiej
8
oraz na obudowie
urządzenia muszą być zgodne.
3. Naciśnij znowu dźwignię mocująca
10
w pozycję wyjściową.
Ręczna regulacja taśmy szlifierskiej:
Jeśli po włączeniu taśma nie biegnie centrycznie,
należy dokonać ręcznej regulacji.
W tym celu należy pokręcać śrubę regulacyjną
7
na przedniej rolce, dopóki taśma szlifierska
nie będzie biec centrycznie
8
.
WAŻNE: Zwracaj bezwzględnie uwagę na
to, żeby taśma szlifierska
8
nie ocierała się o
obudowę. Sprawdzaj regularnie bieg taśmy i
w razie potrzeby wyreguluj go za pomocą
śruby justującej
7
.
Q
Wskazówki robocze
Niewielki nacisk przy szlifowaniu
wystarczy:
Pracuj przy niewielkim nacisku szlifowania. Ciężar
własny szlifierki taśmowej jest wystarczający
do uzyskania dobrych wydajności szlifowania.
Dzięki takiemu sposobowi pracy oszczędzasz
zużycie taśmy szlifierskiej, a powierzchnia ob-
rabianego przedmiotu będzie gładsza.
Usuwanie materiału i powierzchnia:
Wydajność usuwania materiału i jakość powierzch-
ni jest wyznaczana przez prędkość taśmy szlifierskiej
oraz grubość ziarna taśmy szlifierskiej (zobacz rów-
nież rozdział »Wybór obrotów i taśmy szlifierskiej«).
Proces szlifowania:
Włączone urządzenie ulokować na obrabianym
przedmiocie i pracować z równomiernym
posuwem. Proces szlifowania należy prowadzić
równoległymi pasmami i na zakładkę. Aby
uniknąć zakłócających obraz szlifu, przebiega-
jących poprzecznie śladów szlifowania, należy
szlifować wyłącznie w kierunku włókien. Po
obróbce podnieś urządzenie z przedmiotu
obrabianego i dopiero wtedy je wyłącz.
Q
Odsysanie pyłu
NIEBEZPIECZEŃSTWO
WYBUCHU! W przypadku wybuchowej miesza-
niny pył / powietrze musisz użyć nadającego się
specjalnie do tego celu odsysacza.
NIEBEZPIECZEŃSTWO POWSTANIA PO-
ŻARU OD WYLATUJĄCYCH ISKIER! Podczas
szlifowania powierzchni metalowych nie należy
używać odpylania (pojemnik na pył
5
lub odku-
rzacz).
ZAGROŻENIE POŻA-
ROWE! W trakcie robót z urządzeniami elektrycz-
nymi, które dysponują pojemnikami zintegrowanego
systemu odsysania pyłu lub które mogą zostać
połączone poprzez urządzenie odsysające pył z
odkurzaczem, istnieje zagrożenie pożarowe! Przy
Strona jest ładowana ...
Strona jest ładowana ...
Strona jest ładowana ...
Strona jest ładowana ...
Strona jest ładowana ...
Strona jest ładowana ...
Strona jest ładowana ...
Strona jest ładowana ...
Strona jest ładowana ...
Strona jest ładowana ...
Strona jest ładowana ...
Strona jest ładowana ...
Strona jest ładowana ...
Strona jest ładowana ...
Strona jest ładowana ...
Strona jest ładowana ...
Strona jest ładowana ...
Strona jest ładowana ...
Strona jest ładowana ...
Strona jest ładowana ...
Strona jest ładowana ...
Strona jest ładowana ...
Strona jest ładowana ...
Strona jest ładowana ...
Strona jest ładowana ...
Strona jest ładowana ...
Strona jest ładowana ...
Strona jest ładowana ...
Strona jest ładowana ...
Strona jest ładowana ...
Strona jest ładowana ...
Strona jest ładowana ...
Strona jest ładowana ...
Strona jest ładowana ...
Strona jest ładowana ...
Strona jest ładowana ...
Strona jest ładowana ...
Strona jest ładowana ...
Strona jest ładowana ...
Strona jest ładowana ...
Strona jest ładowana ...
Strona jest ładowana ...
Strona jest ładowana ...
Strona jest ładowana ...
Strona jest ładowana ...
Strona jest ładowana ...
Strona jest ładowana ...
Strona jest ładowana ...
Strona jest ładowana ...
Strona jest ładowana ...
Strona jest ładowana ...
Strona jest ładowana ...
Strona jest ładowana ...
Strona jest ładowana ...
Strona jest ładowana ...
-
 1
1
-
 2
2
-
 3
3
-
 4
4
-
 5
5
-
 6
6
-
 7
7
-
 8
8
-
 9
9
-
 10
10
-
 11
11
-
 12
12
-
 13
13
-
 14
14
-
 15
15
-
 16
16
-
 17
17
-
 18
18
-
 19
19
-
 20
20
-
 21
21
-
 22
22
-
 23
23
-
 24
24
-
 25
25
-
 26
26
-
 27
27
-
 28
28
-
 29
29
-
 30
30
-
 31
31
-
 32
32
-
 33
33
-
 34
34
-
 35
35
-
 36
36
-
 37
37
-
 38
38
-
 39
39
-
 40
40
-
 41
41
-
 42
42
-
 43
43
-
 44
44
-
 45
45
-
 46
46
-
 47
47
-
 48
48
-
 49
49
-
 50
50
-
 51
51
-
 52
52
-
 53
53
-
 54
54
-
 55
55
-
 56
56
-
 57
57
-
 58
58
-
 59
59
-
 60
60
-
 61
61
-
 62
62
-
 63
63
-
 64
64
-
 65
65
-
 66
66
-
 67
67
-
 68
68
-
 69
69
-
 70
70
-
 71
71
-
 72
72
-
 73
73
-
 74
74
-
 75
75


Parkside PBS 600 A1 Operation and Safety Notes
- Typ
- Operation and Safety Notes
w innych językach
- slovenčina: Parkside PBS 600 A1
Powiązane dokumenty
-
Parkside PBS 900 B1 Operation and Safety Notes
-
Parkside PBS 600 A1 - 4 Operation and Safety Notes
-
Parkside PBS 900 A1 Operation and Safety Notes
-
-
-
-
-
-
-
Inne dokumenty
-
Triton T41200BS Instrukcja obsługi
-
Makita 9920 Karta katalogowa
-
-
Meister MBS600-1 Translation Of The Original Instructions
-
Einhell Classic TC-BS 8038 Instrukcja obsługi
-
-
EINHELL Expert TE-BS 8540 E Instrukcja obsługi
-
Bosch GEF 7 E Professional Instrukcja obsługi
-
-
 XTline XT105319 Instrukcja obsługi
