
1 6E 6127.c
6E 6127.c
7
6
on
off
5
4
3
2
1
ON
OFF
enter
reset
prog
auto
manu
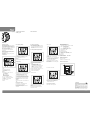
EG170
§
1 channel time switch -
weekly cycle
User instruction
Æ
Working principle :
The EG170 is a time switch for the automatic
control of electrical loads.
It is fully programmable with a maximum of 20
program steps. Each program step can be
applied to one or several days, maximising the
use of each memory location.
The front cover is sealable preventing
unauthorised access after completion of
programming.
Warning : at the beginning of use, please
reset the device in order to clear the memory
before programming.
This is achieved by using a pen to push the
reset button.
Presentation :
Display :
time
circuit status (ON or OFF)
day of the week
(1 = Monday, 2 = Tuesday ....)
Buttons :
Mode selector : to select one of the
following modes :
time setting
prog programming
auto running mode
manu manual override
“1” to “7” : selection of the days
“on/off” : chooses whether the circuit
is on or off
“+” and “-” : changes settings
“enter” : to confirm
“reset”
Time and day setting :
1. Move mode selector to
2. Select with key “1” to “7” , the actual day
(1=Monday, 2 = Tuesday .)
3. Input time with buttons “+” and “-”.
Important :
The clock starts when exiting the time setting mode.
Programming :
1. Move mode selector to “prog”.
2. Select with keys “1” to “7” the day(s) assigned
to this program step. An arrow appears
above each day concerned.
3. Input switching time with buttons “+” and “-”.
4. Input the type of switching with button “on/off”
(for the first action ON is automatically proposed).
5. Enter this program step with button “enter”.
Program additional time settings by repeating
steps 2 to 5.
Important :
To activate the program, move mode selector to
“auto”.
Running Auto mode
This mode is the current displaying mode.
It does not allow any modification.
Move mode selector to “auto”.
Display of the time, the day and the state of
the channel.
To check your program :
1. Move mode selector to “prog”.
2. Press the “enter” key repeatedly to display
the different program steps (switching time,
days of the week and state of the channel
ON or OFF).
To override the output :
Permanent override :
1. Move mode selector to “manu”.
2. Select the state of the output with key
“on/off”.
To switch back to automatic mode, move
mode selector to “auto”.
1234 56 7
4
5
1
6 7 8 9
3
2
enter
reset
on
off
prog
auto
manu
OFF
1234 56 7
enter
reset
on
off
prog
auto
manu
To modify or delete a program step :
1. Move mode selector to “prog”.
2. Press “enter” repeatedly and select the
program step to modify or to delete.
3. Modify :
- switching time with keys “+” or “-”
- days assigned with keys “1” to “7”.
(an arrow flashes above all days assigned,
press once to add a day, press twice to
cancel).
- state of the channel with key “on/off”.
To delete a program step, press keys “1” to “7”
in order to cancel all days assigned.
4. Confirm with the “enter” key.
EG170
345621
L
N
Technical specifications :
Electrical characteristics :
- supply voltage : 230V AC +10/-15% 50/60Hz
- output : 1 changeover contact
μ 16A - 250V AC1.
μ 3A - 250V cos ϕ = 0,6
1000 W incandescent lighting
- power consumption : 1 VA
- protection degree : IP20
- insulation class : II
Functional characteristics :
- accuracy : ± 1sec. / day at 20 °C
- operating reserve : lithium battery, total of
three years.
Environment :
Operating temperature : -10 to +50 °C
Storage temperature : -10 to +50 °C
Connection tunnel terminals :
flexible : 0,5 to 2.5 mm
2
rigid : 0,5 to 4 mm
2
Dimensions : 3 modules (3x17,5mm)
Electrical connections :
1. Move mode selector to “manu”.
2. Select the state of the output with key
“on/off”.
3. Input with key “+” and “-” the override duration :
from 1 to 23 hours by steps of 1 hour.
Then from 1 to 27 days by steps of 1 day.
4. Move mode selector to “auto”.
The state indication is flashing. This means a
timed override. Return to the initial program
after the duration.
To reset the time switch :
Press “reset“ to clear the program.
1. Move mode selector to “manu”.
2. Press key “-” or “+” until display -h.
3. Move mode selector to “auto” to switch
back to automatic mode.
Timed override :
To cancel the timed override :
A warranty period of 24 months is offered on hager products,
from date of manufacture, relating to any material of manufac-
turing defect. If any product is found to be defective it must be
returned via the installer and supplier (wholesaler). The warranty
is withdrawn if :
- after inspection by hager quality control dept the device is
found to have been installed in a manner which is contrary to
IEE wiring regulations and accepted practice within the industry at
the time of installation.
- the procedure for the return of goods has not been followed.
Explanation of defect must be included when returning goods.
Warranty
GB
1234 56 7
enter
reset
on
off
prog
auto
manu
ON
1234 56 7
enter
reset
on
off
prog
auto
manu
ON
1234 56 7
enter
reset
on
off
prog
auto
manu
ON
1234 56 7
enter
reset
on
off
prog
auto
manu
ON
1
2
34 56 7
enter
reset
on
off
prog
auto
manu
ON

2 6E 6127.c
6E 6127.c
7
6
on
off
5
4
3
2
1
ON
OFF
enter
reset
prog
auto
manu
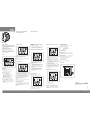
EG170
Æ
Zegar cyfrowy jednokanałowy
o cyklu tygodniowym
Instrukcja obsługi
Uwaga
PL
Ze względów bezpieczeństwa montaż urządzenia może być
wykonany tylko przez elektryka.
Zastosowanie :
EG170 jest zegarem sterującym, przeznaczo-
nym do automatycznego załączania i wyłącza-
nia urządzeń i obwodów elektrycznych w cyklu
tygodniowym. Zegar może zapamiętać maks 20
instrukcji programowania.
Każdej instrukcji może być
przyporządkowany jeden lub kilka dni.
Pokrywa czołowa jest plombowania.
Uwaga : W celu upewnienia się, że zegar nie
zawiera już żadnych instrukcji sterowania,
zaleca się przed rozpoczęciem programowania
zresetowanie zegara.
Opis :
Wyświetlacz:
Czas zegarowy
Wskazanie stanu ustawienia (ON/OFF)
Dzień tygodnia
(1 = poniedziałek, 2 = wtorek ...)
Przyciski i przełączniki:
Suwak do wybierania jednego z
następujących trybów pracy:
ustawienie czasu
prog programowanie czasów łączenia,
auto praca automatyczna
manu obsługa manualna
“1” do “7” : wybór dnia tygodnia
“on/off” : wybór stanu ustawienia
“+” i “-” : zmiana czasu zegarowego oraz
czasu przełączenia
“enter” : zatwierdzenie wprowadzonych
danych
“reset” : wyzerowanie programowania
(zresetowanie).
Ustawianie czasu:
1. Ustawić suwak na
2. Wybrać aktualny dzień tygodnia.
3. Wyregulować zegar przyciskami “+” i “-”.
Uwaga:
Zegar zacznie odliczać czas dopiero po opuszczeniu
trybu ustawiania czasu.
Programowanie :
1. Ustawić suwak na “prog”.
2. Wybrać przyciskami od “1” do “7” dzień tygodnia,
w którym ma być wykonana instrukcja.
Wybrany dzień zostanie zaznaczony na wyświetlaczu.
3. Ustawić czas włączenia przyciskami “+” i “-”.
4. Ustawić stan łączenia przyciskiem “on/off”
5. Potwierdzić wprowadzenie przyciskiem “enter”.
W celu wprowadzenia dalszych instrukcji,
powtórzyć kroki od 2 do 5.
Uwaga:
Aby można było wykonać programowanie, suwak
musi być ustawiony na “auto”.
Praca automatyczna
Jest to normalny tryb pracy urządzenia, w którym
nie ma możliwości wprowadzenia zmian ustawień.
Ustawić suwak na “auto”.
Wyświetlanie czasu zegarowego, dnia tygodnia i
trybu pracy.
Sprawdzenie zaprogramowanych
ustawień:
1. Ustawić suwak na “prog”.
2. Wciskać przycisk “enter” , aby wyświetlić
kolejne instrukcje (czas przełączenia, dzień
tygodnia i stan wyjściowy Zał./Wył.).
Praca manualna:
Nieograniczone sterowanie specjalne
(permanentne zał./wył.) :
1. Ustawić suwak na “manu”.
2. Ustawić stan ustawienia przyciskiem “on/off”.
W celu anulowania sterowania specjalnego,
ustawić suwak w pozycji “auto”.
Zmienianie lub kasowanie instrukcji:
1. Ustawić suwak na “prog”.
2. Wciskąć przycisk “enter” , aby wybrać
instrukcję programu.
3. Zmiana :
- czasu przełączenia przyciskami “+”i “-”
- dodanie lub usunięcie dnia tygodnia przez
naciśnięcie odpowiedniego przycisku (od
“1” do “7”).
- stanu wyjściowego przyciskiem “on/off”.
Kasowanie:
W celu skasowania instrukcji, wyłączyć
wszystkie wybrane dni tygodnia przycis-
kami od “1” do “7”.
4. Potwierdzić wprowadzenie przyciskiem
“enter”.
Dane techniczne:
Charakterystyka elektryczna:
- napięcie znamionowe: 230V AC +10/-15%
50/60Hz
- wyjście: 1 zestyk przełączny
μ 16A - 250V AC1.
μ 3A - 250V cos ϕ = 0,6
żarówki: 1000 W
- moc strat: 1 VA
- stopień ochrony: IP20
- izolacja ochronna: II
Parametry pracy:
- dokładność działania: ± 1s / dzień przy 20 °C
- rezerwa działania: co najmniej 3 lata dla baterii
litowych
Temperatury otoczenia:
temperatura pracy: od -10 do +50 °C
temperatura magazynowania: od -10 do +50 °C
Przekrój zacisków przyłączeniowych:
linka: od 0,5 do 2,5 mm
2
drut: od 0,5 do 4 mm
2
Wymiary: 3 moduły (3 x 17,5mm)
Podłączenie:
1. Ustawić suwak na “manu”.
2. Ustawić stan ustawienia przyciskiem
“on/off”.
3. Ustawić czasowe ograniczenia wciskając
przycisk “+” lub “-”.
Ustawianie odbywa się krokami co 1 godzinę,
od 1 do 23 godzin. Czasy przekraczające 23
godziny można ustawić krokami co 1 dzień.
Okres trwania, jaki można określić, wynosi
maksymalnie 27 dni.
4. Ustawić suwak na “auto”.
Wskazanie stanu ustawienia miga. W ten
sposób podawana jest informacja, że specjalne
sterowanie ograniczone czasowo jest aktywne.
Po upływie ustawionego czasu nastąpi
ponowne ustawienie wyjścia według określonej
instrukcji programu.
Zerowanie zegara sterującego:
Naciśnięcie przycisku “reset“ spowoduje skaso-
wanie zaprogramowanych kroków zegara ste-
rującego.
1. Ustawić suwak na “manu”.
2. Wciskać przycisk “-” aż na wyświetlaczu
pojawi się znak -h.
3. Ustawić suwak na “auto”.
Sterowanie specjalne ograniczone czasowo
(Timer)
1234 56 7
4
5
1
6 7 8 9
3
2
enter
reset
on
off
prog
auto
manu
OFF
1234 56 7
enter
reset
on
off
prog
auto
manu
EG170
345621
L
N
1234 56 7
enter
reset
on
off
prog
auto
manu
ON
1234 56 7
enter
reset
on
off
prog
auto
manu
ON
1234 56 7
enter
reset
on
off
prog
auto
manu
ON
1234 56 7
enter
reset
on
off
prog
auto
manu
ON
1
2
34 5 6 7
enter
reset
on
off
prog
auto
manu
ON
Anulowanie sterowania ograniczonego
czasowo
Hager SAS - 132 bld d’Europe - BP 78 - 67 212 Obernai cedex (FRANCE) - Tél. +333 88 49 50 50 - www.hagergroup.net
Hager 01.2010
-
 1
1
-
 2
2


w innych językach
- English: Hager EG170
Powiązane artykuły
Inne dokumenty
-
Danfoss TP9000 Installation And User Instructions Manual
-
Samsung SCC-C6433P Instrukcja obsługi
-
AEG CTV 4807 DVD Instrukcja obsługi
-
Samsung SCC-C7435 Instrukcja obsługi
-
-
Danfoss TP5001 & TP5001-RF Instrukcja instalacji
-
Behringer FLOOD PANEL FP150 Skrócona instrukcja obsługi
-
Nice Planotime Instrukcja obsługi
-
Yamaha DMR8 instrukcja
-
OJ Electronics OJ Microline ICD3-1999 Instrukcja obsługi