
Produkt zgodny z normami/ Product complies with/
Produkt konform mit den Normen: EN71
INSTRUKCJA UŻYTKOWANIA/
USER MANUAL/
BENUTZERHANDBUCH
ROWEREK TRÓJKOŁOWY
TRICYCLE
DREIRAD
Dash
WAŻNE! Prosimy o uważne przeczytanie niniejszej instrukcji użytkowania przed pierwszym użyciem produktu.
Instrukcję należy zachować na wypadek potrzeby ponownego z niej skorzystania.
IMPORTANT! Please read these instructions carefully before the first use of the product. This manual should
be kept for future use.
WICHTIG! Wir bitten um genaues Durchlesen dieser Bedienungsanleitung vor der ersten Anwendung des
Produkts. Die Bedienungsanleitung ist für den Fall der Notwendigkeit ihrer erneuten Nutzung aufzubewahren.

Dziękujemy za zakup rowerka trójkołowego Toyz by Caretero Dash.
Kupili Państwo nowoczesny produkt wysokiej jakości.
Jesteśmy przekonani, że zapewni on Państwa maluchowi bezpieczeństwo i pomoże
w jego harmonijnym rozwoju.
Zachęcamy do zapoznania się z naszą kompletną ofertą na stronie www.toyz.pl.
Czekamy również na wszelkie uwagi dotyczące użytkowania naszych produktów.
Zespół marki Toyz by Caretero.
Thank you for choosing the Toyz by Caretero Dash tricycle.
You bought a modern, high quality product.
We are sure it will help your child in safe, harmonious growth.
We encourage you to learn about our full offer on our website: www.toyz.pl
Should you have any remarks about this product, feel free to share them with us.
Toyz by Caretero TEAM.
Wir danken Ihnen für den Kauf des Dreirads Toyz by Caretero Dash. Sie haben
ein modernes Produkt von hoher Qualität erworben.
Wir sind überzeugt, dass es Ihrem Kind Sicherheit garantiert und es bei der
harmonischen Entwicklung unterstützt. Wir laden Sie herzlich dazu ein, sich mit
unserem vollständigen Angebot auf der Website www.toyz.pl bekannt zu machen.
Außerdem nehmen wir gern Anmerkungen und Hinweise zur Nutzung unserer
Produkte entgegen.
Toyz by Caretero MANNSCHAFT.

1
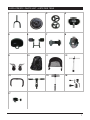
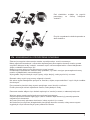
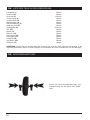
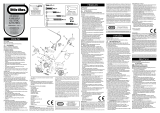
LISTA CZĘŚCI \ PARTS LIST \ LISTE DER TEILE
PL DANE TECHNICZNE
PL INSTRUKCJA MONTAŻU
1211109
8765
4321
15 161413
17

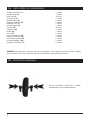
PL INSTRUKCJA MONTAŻU
2
PL LISTA CZĘŚCI W OPAKOWANIU
widelec kierownicy (1)
przednie koło (2)
tylne koło (3)
tylny koszyk (4)
przedni koszyk (5)
podnóżki siedziska (6)
podnóżki ramy (7)
przedni błotnik (8)
hamulce (9)
siedzisko (10)
budka (11)
rama (12)
barierka siedziska (13)
uchwyt kierownicy (14)
rączka do skęcania (15)
zestaw napędowy (16)
podstawa siedziska (17)
UWAGA: Przed montażem rowerka, prosimy o sprawdzenie, czy wszystkie wymienione części znajdują
się w zestawie. Jeśli masz możliwość, zleć montaż rowerka w profesjonalnym serwisie.
1 sztuka
1 sztuka
2 sztuki
1 sztuka
1 sztuka
1 sztuka
1 sztuka
1 sztuka
2 sztuki
1 sztuka
1 sztuka
1 sztuka
1 sztuka
1 sztuka
1 sztuka
1 sztuka
1 sztuka
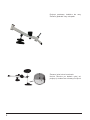
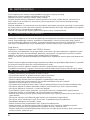
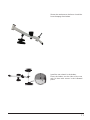
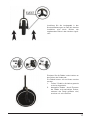
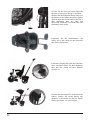
Umieść plastikowe mocowania z układu
napędowego na osi przedniego koła.

3
Zamontuj widelec kierownicy w plastiko-
wych mocowaniach na kole, prawidłowy
montaż będzie zasygnalizowany kliknięciem
mocowanych rurek w otworach.
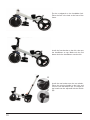
Umieść pedały w otworach po bokach
przedniego koła.
Pedały mogą być zamontowane na dwa
sposoby:
1. wolnobieg - pedały włożone w otwory i
dociśnięte jeden raz;
2. ruchome pedały - wkładając pedały i
dwukrotnie przekręcając cały czas
dociskając pedał blokujemy jego
pozycję.

4
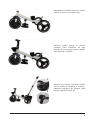
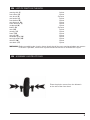
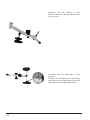
Przykręć podstawę siedziska do ramy.
Zamontuj podnóżki ramy od spodu.
Zamontuj tylne koła w hamulcach.
Umieść hamulce po bokach tylnej osi,
przykręć je śrubami we wskazanym miejscu.

5
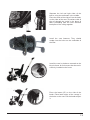
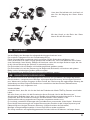
Nałóż błotnik na widelec kierownicy. Umieść
widelec w otworze na przedzie ramy.
Zamontuj przedni koszyk na widelcu,
następnie nałóż kierownicę od góry.
Upewnij się że czerwony przycisk zabloko-
wał kierownicę na widelcu.
Zamontuj tylny koszyk nad tylnymi kołami.
Umieść rączkę do skręcania w otworze i
zabezpiecz zapięciem (A). Długość rączki
możesz regulować klamrą (B).
A
B

6
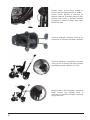
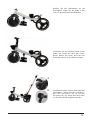
Rozłącz lewą i prawą stronę barierki za
pomocą czerwonego przycisku na środku.
Umieśc końce barierki w otworach po
bokach siedziska. Przewlecz jedną se stron
barierki przez oczko w kawałku materiału
wystającym z siedziska. Połącz obie części
barierki ze sobą.
Zamontuj podnóżki siedziska. Powinny się
zaklinować w otworach od spodu siedziska.
Zamontuj siedzisko w podstawie zamonto-
wanej na ramie rowerka. Kliknięcie oznacza
prawidłowy montaż siedziska na ramie.
Wciśnij przycisk (C) znajdujący się po boku
budki. Umieść oba zaczepy budki w
otworach na siedzisku. Pociągnij za daszek
aby go otworzyć.
C

Pod siedziskiem znajduje się przycisk
pozwalający na zmianę nachylenia
siedziska.
Przycisk na podstawie siedziska pozwala na
obrót siedziska.
7
PL KONSERWACJA I CZYSZCZENIE ROWERKA
Zalecana jest regularna konserwacja rowerka w profesjonalnym serwisie rowerowym.
Należy regularnie kontrolować i ewentualnie dopasowywać poszczególne elementy rowerka, przede
wszystkim: dokręcać śruby i nakrętki, smarować części ruchome odpowiednim smarem/lubrykantem
(tuleje w układzie kierowniczym itp.).
Nadmiar smarów należy usunąć przy pomocy czystej szmatki.
Przed każdym użytkowaniem rowerka należy sprawdzić, czy śrubki mocujące poszczególne elementy
rowerka są odpowiednio mocno dokręcone.
W przypadku zużycia niektórych części (opony, tuleje, obejmy), należy wymienić je na nowe.
Rowerek należy czyścić przy pomocy wilgotnej ściereczki.
Nie wolno używać detergentów opartych na amoniaku, olejów, rozpuszczalników i innych silnych środków
chemicznych.
Do smarowania piast kół należy używać specjalnego smaru lub oleju z teflonem.
Po kilku pierwszych dniach użytkowania rowerka, należy dokręcić śruby.
Demontaż rowerka odbywa się w krokach opisanych w instrukcji montażu, w odwrotnej kolejności.
Wymianę opony powierz profesjonalnemu serwisowi rowerowemu.
Częste używanie elementów regulujących (docisk siedziska bądź kierownicy) powoduje powolne
zużywanie tych elementów.
Jeśli stracą one swoje pierwotne właściwości, należy wymienić je na nowe.
Jeśli konieczna jest wymiana jakiegokolwiek pracującego elementu rowerka, należy zawsze używać
oryginalnych części dostarczonych przez producenta rowerka.

8
PL OSTRZEŻENIA
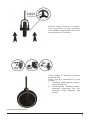
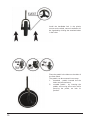
• Produkt przeznaczony jest dla dzieci w wieku 1,5-5 lat.
• Nie pozwalać dziecku na wkładanie do buzi małych elementów.
• Nie przeciążać pojazdu. Maksymalne obciążenie to 25 kg.
• Podczas zabawy dziecko powinno znajdować się pod opieką osoby dorosłej.
• Dziecko powinno być poinstruowane w jaki sposób prawidłowo korzystać z pojazdu.
• Pojazdu nie można używać w ruchu ulicznym.
• Dla zapewnienia bezpieczeństwa należy z miejsca zabawy dziecka usunąć wszelkie plastikowe torby.
• Nie używać pojazdu w pobliżu zbiorników wodnych (rzek, basenów itp.) oraz innych przeszkód.
• Nie używać pojazdu w ciemności i w czasie złej pogody.
• Przed każdym użyciem należy sprawdzić, czy wszystkie elementy są odpowiednio przymocowane.
• Ciągnięcie rowerka za samochodem lub innym pojazdem jest zabronione.
• Rowerek przeznaczony jest dla jednej osoby. Nie powinien być używany jednocześnie przez więcej niż
jedno dziecko.
• Nie używać rowerka, jeśli jakikolwiek jego element jest uszkodzony lub go brakuje.
• Nie używać części zamiennych innych niż te, które są aprobowane przez producenta.
• Zapobiegać dostępowi do schodów i stopni.
• Montaż rowerka może przeprowadzić tylko i wyłącznie osoba dorosła.
• Należy pilnować, czy dziecko podczas jazdy nie zdejmuję rąk z kierownicy. Jazda bez trzymania
kierownicy może być przyczyną poważnych wypadków, zranień i okaleczeń ciała.
• Podczas użytkowania rowerka trójkołowego, należy mieć na sobie sprzęt ochronny (kask, ochraniacze
na łokcie, kolana, rękawiczki itp.).
PL BEZPIECZEŃSTWO
Przed rozpoczęciem montażu, należy dokładnie przeczytać niniejszą instrukcję.
Maksymalna nośność rowerka trójkołowego wynosi 25 kg.
Regularnie kontroluj i dokręcaj wszelkie śruby i nakrętki.
Dla pełni bezpieczeństwa, użytkownik rowerka powinien nosić kask, solidne obuwie, ochraniacze na
łokcie, kolana oraz wszelkie inne ochraniacze, jakie mogą okazać się konieczne do bezpiecznego
korzystania z rowerka.
Rowerek trójkołowy nie jest przeznaczony do jeżdżenia po drogach, po których poruszają się samochody.
Nie należy używać rowerka po zmroku, podczas opadów deszczu lub śniegu, kiedy podłoże jest wilgotne
lub śliskie oraz na nieutwardzonych podłożach.
Rowerek nie powinien być używany jednocześnie przez więcej niż jedno dziecko!
PL OGRANICZENIA GWARANCJI
Gwarancja nie obejmuje zniszczenia lub zgubienia poszczególnych elementów rowerka na skutek upadku,
otarcia, nieprawidłowego montażu, użytkowania niezgodnego z instrukcją, bezmyślnej jazdy, jazdy na
wyścigi, brutalnego traktowania rowerka, zaniechania regularnego serwisowania, użytkowania nieoryginal-
nych części lub dodatkowych części napędzających (silników elektrycznych, spalinowych itp.).
Drogi Kliencie,
Dziękujemy za wybranie produktu marki TOYZ by Caretero.
Informujemy, że podstawowa wersja tego rowera przeznaczona jest do użytkowania w łagodnym terenie,
na drogach bez ruchu samochodowego. Konieczne może okazać się wyposażenie rowerka w światła,
odblaski i inne elementy wymagane przez Kodeks Ruchu Drogowego.
Ważne jest również stosowanie dodatkowych zabezpieczeń użytkownika rowerka (patrz dział bezpieczeń-
stwo).
Bardzo istotnym aspektem bezpiecznego użytkowania produktu jest prawidłowe dopasowanie i sprawdza-
nie ważnych elementów (hamulce, właściwe dokręcenie śrub).
Zalecany jest montaż i regularna inspekcja rowerka w profesjonalnym serwisie rowerowym.
Prawidłowo zmontowany i regularnie serwisowany rowerek będzie służył Twojemu dziecku lepiej i dłużej.

9
EN LIST OF PARTS IN THE BOX
steering fork (1)
front wheel (2)
rear wheel (3)
rear basket (4)
front basket (5)
seat footrests (6)
frame footrests (7)
mudguard (8)
brakes (9)
seat (10)
canopy (11)
frame (12)
seat rail (13)
handlebar grip (14)
turning handle (15)
drive kit (16)
seat base (17)
WARNING: Before assembling the tricycle, please check that all the parts mentioned above are present
in the box. If possible, commission a professional bike service to assemble the tricycle.
EN ASSEMBLY INSTRUCTIONS
1 piece
1 piece
2 pieces
1 piece
1 piece
1 piece
1 piece
1 piece
2 pieces
1 piece
1 piece
1 piece
1 piece
1 piece
1 piece
1 piece
1 piece
Place the plastic mounts from the drivetrain
on the axle of the front wheel.

10
Install the handlebar fork in the plastic
mounts on the wheel, correct installation will
be signaled by clicking the attached tubes
in the holes.
Place the pedals in the holes on the sides of
the front wheel.
The pedals can be mounted in two ways:
1. freewheel - pedals inserted into the
holes and pressed once;
2. movable pedals - by inserting the
pedals and turning them twice while
pressing the pedal, we lock its
position.

11
Screw the seat base to the frame. Install the
frame footpegs from below.
Install the rear wheels in the brakes.
Place the brakes on the sides of the rear
axle, fix them with screws in the indicated
place.

12
A
B
Put the mudguard on the handlebar fork.
Place the fork in the hole at the front of the
frame.
Install the front basket on the fork, then put
the handlebars on top. Make sure the red
button locks the handlebars onto the fork.
Install the rear basket over the rear wheels.
Place the twisting handle in the hole and
secure it with the fastener (A). The length of
the handle can be adjusted with the buckle
(B).

13
Separate the left and right sides of the
barrier using the red button in the middle.
Place the ends of the side rail into the holes
on the sides of the seat. Thread one side of
the rail through the eyelet in the piece of
fabric protruding from the seat. Connect
both parts of the railing together.
Install the seat footrests. They should
wedge into the holes on the underside of
the seat.
Install the seat in the base mounted on the
bicycle frame. A click means that the seat is
correctly installed on the frame.
Press the button (C) on the side of the
booth. Place both hooks of the canopy in
the holes on the seat. Pull the hood to open
it.
C

14
EN CLEANING AND MAINTENANCE
Regular maintenance of the trike in a bike shop is recommended.
Please check and adjust all trike parts, especially do the following: tighten loose screws and nuts,
libricate moving parts with appropriate lubricants (handlebar bearings etc.).
The excess of lubricants should be removed with a clean cloth.
Before each use of the trike, please check whether all screws and nuts are tight enough.
If any part of the trike gets broken or worn (tires, clamps, bearings), replace them with new.
The tricycle should be cleaned with a damp cloth.
Never use ammonia-based detergents, oils, solvents and any other strong chemical substances.
To lubricate the wheel bearings, please use a dedicated lubricant or teflon oil.
After first couple of days of using the tricycle, tighten all screws and nuts.
Frequent adjustment of the tricycle’s elements (handlebar clamp etc.) causes slow degradation of these
elements. If they lose their original properties, please replace them with new.
If any part of the tricycle requires replacing, use only parts supplied by the distributor of the tricycle.
Under the seat there is a button that allows
you to change the inclination of the seat.
The button on the base of the seat allows
you to rotate the seat.

15
EN WARNINGS
• Product intended for children aged 1,5-5.
• Do not allow your child to put small elements of the trike in his/her mouth.
• Do not overload the tricycle. Maximal user weight is 25 kg.
• The child should always be supervised by and adult during playing on the trike.
• The child should be instructed on how to use the tricycle properly before first use.
• Do not use the tricycle in car traffic.
• For the safety of the child, remove all plastic bags from the place the child is playing.
• Never use this tricycle near water reservoirs (rivers, swimming pools etc.) or any other obstacles.
• Never use in darkness and during bad weather.
• Before each use please check if all the elements of the trike are properly assembled.
• Pulling the trike behind a car or any other vehicle is forbidden.
• This tricycle is designed for one person. It should never be used by more than one child at a time.
• Do not use the tricycle if any part is damaged or missing.
• Never use spare parts other than those supplied by the distributor of the trike.
• Do not allow your child to play near steps and stairwells.
• The assembly of the trike must be conducted by an adult person.
• Please supervise that the child never takes his/her hands off the handlebars. Riding without holding the
handlebars may cause serious injuries and damages to the child.
• The child should always wear protective equipment such as a helmet, elbow and knee pads, gloves etc.
EN SAFETY
Before starting the assembly, please read this manual thoroughly.
Maximum user weight for this tricycle is 25 kg.
Regularly check and tighten all screws and nuts.
To ensure proper safety, the user of this tricycle should wear a helmet, solid shoes, elbow and knee
protectors and any other pads that may be necessary.
This tricycle is not made for use on roads with car traffic.
Never use this tricycle after dark, during rain and snowfall, when the floor is wet and slippery or on loose,
gravel surfaces.
Never allow for the trike to be used by more than one child at a time.
EN WARRANTY LIMITATIONS
Warranty does not cover damaging or loosing any parts of the tricycle caused by falls, scratches,
improper assembly, usage against the guidelines in this manual, careless riding, racing, rough treatment
of the trike, not maintaining the trike regularly, using non-original spare parts or additional propelling
elements (electrical or standard motors etc.).
Dear Client,
Thank you for choosing this TOYZ product.
We inform you that the base version of this tricycle is designed for use in mild terrain, on traffic-free
roads. It may be necessary to adapt this tricycle to conform with the regulations of the road code (lamps,
reflex safety lights etc.). It may also be necessary to supply your child with protective equipment (see
SAFETY part of this manual).
To ensure safe use of this tricycle, it is very important to check the proper assembly and working of all
elements of this product.
Assembly and regular maintenance in a professional bike shop is recommended.
A properly assembled and regularly maintaned tricycle will serve your child longer and better.

16
DE LISTE DER TEILE IN DER VERPACKUNG
Lenkgabel (1)
Vorderrad (2)
Hinterrad (3)
hinterer Korb (4)
vorderer Korb (5)
Sitzfußstützen (6)
Rahmenfußrasten (7)
Kotflügel vorne (8)
Vordergabel (9)
Sitz (10)
Stand (11)
Rahmen (12)
Sitzschiene (13)
Lenkergriff (14)
Drehgriff (15)
Antriebskit (16)
Sitzbasis (17)
ACHTUNG: Prüfen Sie vor der Montage des Dreirads, ob sich alle oben genannten Elemente in der
Verpackung befinden. Wenn es Ihnen möglich ist, beauftragen Sie einen Profi-Service mit der Montage.
DE MONTAGEANLEITUNG
1 Stück
1 Stück
1 Stücke
1 Stück
1 Stück
1 Stück
1 Stück
1 Stück
2 Stücke
1 Stück
1 Stück
1 Stück
1 Stück
1 Stück
1 Stück
1 Stück
1 Stück
Setzen Sie die Kunststoffhalterungen vom
Antriebsstrang auf die Achse des Vorder-
rads.

17
Installieren Sie die Lenkergabel in den
Kunststoffhalterungen am Rad, die korrekte
Installation wird durch Klicken der
angebrachten Rohre in den Löchern signali-
siert.
Platzieren Sie die Pedale in den Löchern an
den Seiten des Vorderrads.
Die Pedale können auf zwei Arten montiert
werden:
1. Freilauf - Pedale in die Löcher gesteckt
und einmal gedrückt;
2. bewegliche Pedale - durch Einsetzen
der Pedale und zweimaliges Drehen,
während das Pedal gedrückt wird,
arretieren wir seine Position.

18
Schrauben Sie die Sitzbasis an den
Rahmen. Montieren Sie die Rahmenfußra-
sten von unten.
Installieren Sie die Hinterräder in den
Bremsen.
Platzieren Sie die Bremsen an den Seiten
der Hinterachse und befestigen Sie sie mit
Schrauben an der angegebenen Stelle.
Strona się ładuje...
Strona się ładuje...
Strona się ładuje...
Strona się ładuje...
Strona się ładuje...
Strona się ładuje...
Strona się ładuje...
Strona się ładuje...
-
 1
1
-
 2
2
-
 3
3
-
 4
4
-
 5
5
-
 6
6
-
 7
7
-
 8
8
-
 9
9
-
 10
10
-
 11
11
-
 12
12
-
 13
13
-
 14
14
-
 15
15
-
 16
16
-
 17
17
-
 18
18
-
 19
19
-
 20
20
-
 21
21
-
 22
22
-
 23
23
-
 24
24
-
 25
25
-
 26
26
-
 27
27
-
 28
28


w innych językach
- Deutsch: TOYZ DASH Benutzerhandbuch
- English: TOYZ DASH User manual
Powiązane artykuły

Inne dokumenty
-
Lionelo Haari Three wheeler bike Instrukcja obsługi
-
Lionelo Kori Instrukcja obsługi
-
Kinderkraft ASTON Instrukcja obsługi
-
 Little Tikes 630415C Assembly Manual
-
Puky 2411 - CEETY CAT S6 Instrukcja obsługi
-
Radio Flyer 488A Instrukcja obsługi
-
-
 Little Tikes 4-in-1 Deluxe Edition Trike Instrukcja obsługi

