JANOME Memory Craft 4400 Instruction book
- Kategoria
- Maszyny do szycia
- Typ
- Instruction book


IMPORTANT
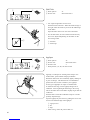
Be sure to keep machine away from static electricity, heat sources, humidity, and direct sunlight.
When using your sewing machine for the first few times, place a waste fabric under the presser foot and
run the machine without thread for a few minutes. Wipe away any oil which may have appeared.
IMPORTANT SAFETY INSTRUCTIONS
When using an electrical appliance, basic safety precautions should always be followed, including the
followings:
Read all instructions before using this appliance.
DANGER— To reduce the risk of electric shock:
1. An appliance should never be left unattended when plugged in. Always unplug this sewing machine from the
electric outlet immediately after using and before cleaning.
2. Always unplug before replacing a sewing machine bulb. Replace bulb with same type rated 12 Volts, 5 Watts.
WARNING— To reduce the risk of burns, fire, electric shock, or injury to persons:
1. Do not allow to be used as a toy. Close attention is necessary when this sewing machine is used by or near
children.
2. Use this appliance only for its intended use as described in this owner’s manual.
Use only attachments recommended by the manufacturer as contained in this owner’s manual.
3. Never operate this sewing machine if it has a damaged cord or plug, if it is not working properly, if it has been
dropped or damaged, or dropped into water.
Return this sewing machine to the nearest authorized dealers or service center for examination, repair, electri-
cal or mechanical adjustment.
4. Never operate the appliance with any air opening blocked. Keep ventilation openings of this sewing machine
and foot controller free from accumulation of lint, dust and loose cloth.
5. Never drop or insert any object into any opening.
6. Do not use outdoors.
7. Do not operate where aerosol (spray) products are being used or where oxygen is being
administered.
8. To disconnect, turn all controls to the off (“O”) position, then remove plug from outlet.
9. Do not unplug by pulling on cord. To unplug, grasp the plug, not the cord.
10. Keep fingers away from all moving parts. Special care is required around the sewing machine needle.
11. Always use the proper needle plate. The wrong plate can cause the needle to break.
12. Do not use bent needles.
13. Do not pull or push fabric while stitching. It may deflect the needle causing it to break.
14. Switch this sewing machine off (“O”) when making any adjustment in the needle area, such as threading the
needle, changing the needle, threading the bobbin or changing the presser foot, and the like.
15. Always unplug this sewing machine from the electrical outlet when removing covers, lubricating, or when
making any other adjustments mentioned in this owner’s manual.
SAVE THESE INSTRUCTIONS

1
SECTION I NAMES OF PARTS
Name of Parts........................................................................ 3
Screen Sharpness Adjusting Dial .......................................... 4
Extension Table ..................................................................... 4
Standard Accessories ............................................................ 5
SECTION II GETTING READY TO SEW
Connecting Machine to Power Supply ................................. 6
For Your Safety ..................................................................... 6
Controlling Sewing Speed .................................................... 6
Main Function of Buttons/Keys ............................................ 7
• Up/down needle position button......................................... 7
• Auto-lock button ................................................................. 7
• Reverse button .................................................................... 7
• Mode selection key ............................................................. 8
• Twin needle key .................................................................. 8
• Editing key ......................................................................... 8
• Stitch width selection key................................................... 8
• Stitch length selection key .................................................. 8
• Message key ....................................................................... 9
• Turn-over memory key ....................................................... 9
• Elongation key .................................................................... 9
• Stock/call key ..................................................................... 9
• Clear key........................................................................... 10
• Memory key ..................................................................... 10
• Direct pattern selection and number keys ........................ 10
• Pattern selection and screen indication .............................11
• Number key selection ........................................................11
Memory Mode/Buzzer Sound/Multiple
Language Settings ............................................................... 12
To Raise or Drop the Feed Dogs ......................................... 13
Pressure Lever..................................................................... 13
Presser Foot Lifter .............................................................. 13
Changing Needles ............................................................... 14
To Attach and Remove the Presser Foot ............................. 14
To Remove and Attach the Foot Holder ............................. 14
Selecting Needle and Thread .............................................. 15
Winding the Bobbin ............................................................ 16
• Set the spool ..................................................................... 16
• Removing the bobbin ....................................................... 16
• Winding the bobbin .......................................................... 17
• Inserting the bobbin .......................................................... 18
Threading the Machine ....................................................... 19
• Threading the machine ..................................................... 19
• Needle threader................................................................. 20
• Drawing up the bobbin thread .......................................... 21
Balanced Thread Tension .................................................... 22
• Auto-thread tension .......................................................... 22
• Manual thread tension adjustment.............................. 22
SECTION III BASIC SEWING
Straight Stitch Sewing ...................................................... 23
• Starting to sew................................................................ 23
• Changing sewing direction ........................................... 23
• Finishing sewing ............................................................. 23
Practice Common Stitching Skills................................... 24
Using the Seam Guides on the Needle Plate ................ 24
Turning Square Corners................................................... 24
Using the Quilting Bar ..................................................... 24
Sewing on Heavy Fabrics ................................................. 24
• Manual stitch length ...................................................... 25
• Variable needle position ............................................... 25
Various Utility Stitch........................................................ 26
• Basting ............................................................................ 26
• Straight stitches.............................................................. 27
• Automatic reverse stitch ............................................... 27
• Triple stretch stitch ........................................................ 27
• Auto-lock stitch .............................................................. 27
• Stretch stitch................................................................... 28
• Saddle stitch ................................................................... 28
• Sculpture stitch .............................................................. 28
Zigzag Stitch...................................................................... 29
• Interfacing ...................................................................... 29
• To change the width and length ................................... 29
Variation of Zigzag Stitches ............................................ 30
• Overcasting..................................................................... 30
• Tricot stitch ..................................................................... 30
• Knit stitch ....................................................................... 31
• Overedge sewing (1) ..................................................... 31
SECTION IV DECORATIVE STITCHING
TECHNIQUES
Overedge Sewing (2), (3) ................................................. 32
Sewing Buttons ................................................................. 33
Sensor Buttonhole ....................................................... 34-37
• Automatic buttonholing ................................................ 34
• Sewing preparation........................................................ 35
• Starting sewing ............................................................... 36
Adjusting Stitch Width and Density in Buttonholes .... 37
• Sensor buttonhole 09 and 10 ........................................ 38
• Adjusting the stitch width and
density in buttonholes 09 and 10.................................. 38
Corded Buttonholes ......................................................... 39
Free Size Automatic Buttonhole 20................................ 40
Zipper Sewing ................................................................... 41
• Put in a zipper ................................................................ 41
• Attaching the zipper foot.............................................. 41
• Fabric preparation ......................................................... 41
TABLE OF CONTENTS

2
Zipper Sewing, cont’d....................................................... 42
Darning .............................................................................. 43
• To sew .............................................................................. 43
• For darning less than 2 cm ............................................ 43
• To memorize darning stitches....................................... 43
• Adjusting the shape of darning stitches ...................... 43
Bartacking ......................................................................... 44
• Memorizing bartacking ................................................. 44
• Adjusting the evenness of bartacking stitches............ 44
Rolled Hem ....................................................................... 45
Blind Stitch Hemming...................................................... 46
• How to fold the fabric ................................................... 46
• How to sew ..................................................................... 46
• Changing the needle position....................................... 46
Pintucking.......................................................................... 47
Quilting .............................................................................. 47
Shell Tack........................................................................... 48
Applique ............................................................................ 48
Smocking ........................................................................... 49
Fagoting ............................................................................. 49
Scallop Stitch (A), (B)...................................................... 50
Patchwork.......................................................................... 51
Satin Stitch Sewing ........................................................... 51
Cross Stitch........................................................................ 52
Decorative Stitch .............................................................. 52
Cording .............................................................................. 53
Twin Needle Stitching ...................................................... 54
Adjusting Pattern Balance .............................................. 55
• Adjusting distorted stretch stitch patterns.................. 55
• Adjusting distorted letters or numbers in
B or C Mode................................................................... 55
• Adjusting the stitch density for buttonhole 20 ........... 55
Programming Decorative Stitch Patterns 61, 58 ........... 56
• A programmed stitch sewing pattern finishing with
auto-lock, stitches 61, 58, 98 .......................................... 56
Cycle Stitching with Mirror Image Patterns.................. 57
Restarting Programmed Patterns ................................... 57
Elongation ......................................................................... 58
• Sewing sample, stitch pattern 51 .................................. 58
Sewing Letters in Block Style ......................................... 59
Combining Letters in Script Style .................................. 60
Editing Function (1) ......................................................... 61
• Check and correct pattern combination
before sewing ................................................................. 61
• Deleting a stitch pattern, letter or
number by editing.......................................................... 61
• Adding letters or space between letters ...................... 62
Editing Function (2) ......................................................... 63
• Uniform width, length adjustment............................... 63
Editing Function (3) ......................................................... 63
• Custom stitch sizing ....................................................... 63
SECTION V CARE OF YOUR MACHINE
Care of Your Machine...................................................... 64
Cleaning the Hook Race and Feed Dogs ...................... 64
Replacing the Bobbin Holder ......................................... 64
Replacing the Light Bulb................................................. 65
• Removing light bulb ...................................................... 65
• Attaching light bulb ....................................................... 65
Troubleshooting ...........................................................66, 67
• When message appears on the screen ......................... 67

3
q
w
e
r
t
y
u
i
o
!0
!1
!2
!3
!4
!5
!6
!7
!8
!9
@0
@1
@2
@3
@4
@5
@6
@7
@8
@9
#0
#1
#2
#3
#4
#5
#6
#7
q
w
e
r
t
y
u
i
o
!0 !1 !2 !3 !4 !5
!6
!7
!8
!9
@0
@7
@8
@9
#0
#1
#2
#3
#4
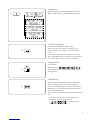
SECTION I NAME OF PARTS
@6
#7
#6
#5
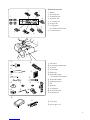
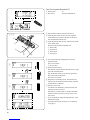
Names of Parts
Spool holder
Spool pin
Auto-tension dial
Upper thread guide
Thread take-up lever
Face plate
Thread cutter
Needle threader
Needle plate
Extension table
Hook cover plate
Hook cover plate release button
Feed balancing dial
Reverse button
Auto-lock button
Up/down needle button
Speed setting lever
Keyboard
Screen sharpness adjustment dial
LCD screen
Needle clamp
Needle
Presser foot
Foot holder
Thumb screw
Pattern chart
Carrying handle
Bobbin winder spindle
Bobbin winder stopper
Handwheel
Power switch
Machine sockets
Drop feed lever
Free arm
Buttonhole lever
Presser foot lifter
@1
@2
@3
@4
@5

4
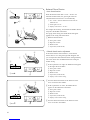
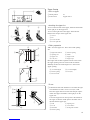
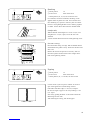
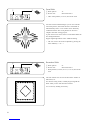
Screen Sharpness Adjusting Dial
Use this to adjust the sharpness of the liquid crystal
display.
If no indication is shown on the screen after you switch on
the power, adjust the screen brightness with this dial.
Extension Table
The extension table provides added sewing surface and
can be easily removed for free arm sewing.
Detaching the table:
Pull the table away from the machine, as illustrated.
Free arm sewing
Free arm sewing is useful for darning socks or mending
knees, elbows or areas of wear in children’s cloths.
Attaching the table:
Push the extension table until it snaps into the machine.
qProjection
wHole
qw

5
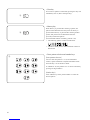
GAE
C
D
FH
Standard Accessories
qBobbins
wH: Cording foot
eG: Blind hem foot
rD: Hemmer foot
tC: Overedge foot
yE: Zipper foot
uA: Zigzag foot
* It is attached on the machine.
iF: Satin stitch foot
oScrewdriver
!0 R: Automatic buttonhole foot
!1 Lint brush
!2 Set of needles
!3 Seam ripper
!4 Spool holder (Large)
* It is attached on the machine.
!5 Spool holder (Small)
!6 Additional spool pin
!7 Felt
!8 Spool base
!9 L: Quilting bar
@0 M: Overcasting foot
@1 P: Darning foot
@2 Foot control
@3 Power supply cord
q
w
e
r
t
y
u
i
o!0
!1
!2
!3
!4 !5
!6
!7
!8 !9 @0
@1
@3
@2

6
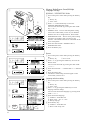
Connecting Machine to Power Supply
Before connecting the power supply, make sure the
voltage and frequency shown on the machine conform to
your electrical power.
Turn off the power switch, and insert the foot control plug
q, machine plug w, into the machine and power supply
plug e into the outlet in the following order.
qFoot control plug
wMachine plug
ePower supply plug
rPower switch
tPower supply cord
yFoot control
For Your Safety
* While in operation, always keep your eyes on the
sewing area. Do not touch any moving parts such as the
thread take-up lever, handwheel or needle.
* Always turn off the power switch and unplug from the
power supply:
– When leaving the machine unattended
– When attaching or removing parts
– When cleaning the machine
* Do not place anything on the foot control, when not
sewing.
Operating instructions
“For appliances with a polarized plug (one blade wider
than the other), to reduce the risk of electric shock, this
plug is intended to fit in a polarized outlet only one way. If
it does not fit fully in the outlet, reverse the plug. If it still
does not fit, contact a qualified electrician to install the
proper outlet. Do not modify the plug in any way.”
Foot controller Model 21371 for use with Sewing Machine
MC4400.
Controlling Sewing Speed
Speed setting lever
The maximum sewing speed can be controlled by the
speed setting lever. To increase the speed, slide the lever to
the right (toward “ ”).
To decrease the sewing speed, slide the lever to the left
(toward “ ”).
Foot control
Sewing speed can be varied by the foot control.
The harder you press on the control, the faster the
machine runs.
Note: The Memory Craft 4400 is equipped with a
protective circuit to prevent overheating.
The machine will stop automatically if it is running
overloaded for a long time. In such a case, follow the
message that appears on the LCD screen.
r
q
y
w
t
e
SECTION II GETTING READY TO SEW

7
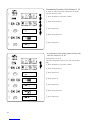
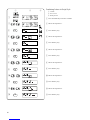
Main Function of Buttons / Keys
• Up/down needle position button
When the Up/down needle position button is pressed, the
needle bar goes down and stops in the lowest position.
When pressed again, the needle bar goes up and stops in
the highest position.
* When this button is pressed, the needle bar alternates
between up and down positions when the machine
stops.
• Auto-lock button
When stitches are selected, the machine will
immediately sew locking stitches when the auto-lock
button is pressed, then automatically stop.
When sewing all other stitches, the machine will sew
locking stitches at the end of the current pattern and
automatically stop.
• Reverse button
When stitches are selected, the machine will sew in
reverse while the reverse button is pressed.
If you press the reverse button when sewing all other
stitches, the machine will immediately sew locking stitches
and automatically stop.
q
w
e
rty u i o!0!1!2
!5
!4 !3
q
w
e

8
• Mode selection key
By pressing the key, LED light will move step by step to
select the stitch mode, as shown.
Direct Mode: Direct mode pattern selection
A Mode: Pattern selection using number keys (utility
and decorative stitches)
B Mode: Character selection using number keys
(block type)
C Mode: Character selection using number keys
(script type)
• Twin needle key
Just press this button and “ A ” mark will appear on the
display screen.
Press button again for single needle sewing.
• Editing key
This button can be used for adding, deleting and changing
combinations and monograms before sewing while
programming stitch patterns or monograms.
For editing, use the stitch width “+” or “–” key to select
editing position (see page 61, 62).
[Manual setting function of the zigzag width and stitch
length for programmed patterns]
The individual programmed zigzag pattern width or stitch
length can be changed (see page 63).
• Stitch width selection key
Press “+” or “–” to change the stitch width.
• Stitch length selection key
Press “+” or “–” to change the stitch length.
r
t
y
u
i
A

9
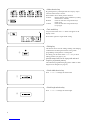
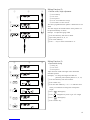
• Message key
When Message key is pressed, a detailed message will
display suitable stitches, patterns and machine settings.
• Turn-over memory key
(To memorize the pattern in mirror image)
Select a desired pattern and press TOM key so the
selected pattern’s mirror image will be shown on the
screen.
Use this key to memorize and sew patterns in a mirror
image. Programmed letters or numbers will be reduced to
2/3 of their actual size when you press the TOM key.
• Elongation key
(For A Mode)
Stitches 45 to 60 ( )
can be elongated up to five times their normal length by
pressing this key.
• Stock/call key
When you press the Stock/call key after memorizing a
pattern or editing patterns, the currently registered
patterns will be deleted and new patterns will be stored.
Other than this, you can recall the stored patterns when
you press the Stock/call key.
You can store a maximum of 50 programmed patterns and
sew.
* You cannot store the Direct mode patterns and
buttonholes also you cannot memorize
( ) patterns by using
memory key (see page 10).
o
!0
!1
!2

10
SEN
• Clear key
If an incorrect pattern is memorized, pressing this key will
immediately clear it (like a backspace key).
• Memory key
When this key is pressed after selecting a pattern, the
pattern will be memorized as many times as the key is
pressed. When the key is pressed after selecting another
pattern, that pattern will be memorized after the
previously memorized pattern.
(The maximum number of memory patterns is 50)
* The following patterns cannot be memorized.
* The Direct mode patterns and buttonholes cannot be
memorized.
• Direct pattern selection and number keys
[Direct pattern selection]
You can select the patterns 1 to 10, also buttonhole
stitches, square buttonhole to keyhole buttonhole when
the mode key is set at the Direct mode.
In A Mode 01~96, the patterns 01 to 10 can be selected by
pressing two-digit numbers.
[Number keys]
Press number keys of the pattern number to select the
desired pattern.
!3
!4
!5
M
C

11
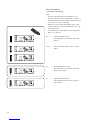
• Pattern selection and screen indication
zSelect the Direct mode pattern selection.
xPress the pattern key on the keyboard.
Example: Pattern 05, as shown.
cThe display screens shows from left to right:
qStitch pattern: 05
wThread tension: AUTO
ePresser foot: A
rStitch width: 5.0
tStitch length: 2.0
yBuzzer sound on:
(see page 12 to mute the buzzer sound)
• Number key selection
You can select the patterns by pressing number keys.
Example: pattern number 51
z
x
c
qwert
y
SEN
SEN

12
M
Memory Mode/Buzzer Sound/Multiple
Language Settings
NORMAL / RESUMPTION Mode
zTurn on the power switch while pressing the memory
key.
qMemory key
wPower switch
xSelect “ 1 ” on the number key to access the
NORMAL/RESUMPTION mode.
You can select the mode by pressing the stitch width
key “+” or “–”.
* NORMAL mode – The last selected pattern setting
will not be recalled when you turn on your machine.
Machine turns on in straight stitch 01, Direct mode.
* RESUMPTION mode – The last sewn pattern setting
will always be recalled when you turn on your
machine. The machine will turn on in the mode of the
sewn stitch pattern.
cSelect the desired mode: NORMAL SET or
RESUMPTION SET.
vPress the Memory key.
Buzzer
zTurn on the power switch while pressing the memory
key.
qMemory key
q
w
e
r
t
y
u
z
x
c
v
x
c
x
c
wPower switch
xSelect “ 2 ” by pressing the number key to access the
Buzzer mode.
You can select the mode by pressing the stitch width
“+” or “–”.
cSelect desired mode “–” SOUND ON or “+” SOUND
OFF.
vPress the memory key.
* The Buzzer sound setting mark will appear on the
screen when you have set it .
Language selection setting
zTurn on the power switch while pressing the memory
key.
qMemory key
wPower switch
xSelect “ 3 ” by pressing the number key to access
language selection settings.
You can select the desired language by pressing stitch
width “+” or “–”.
cSelect the desired language.
eNORMAL / RESUMPTION
rBuzzer sound “ ON ” or “ OFF ”
tMultiple language
vPress Memory key.
yNORMAL / RESUMPTION
uBuzzer sound setting mark
M

13
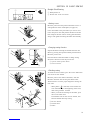
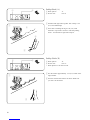
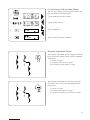
To Raise or Drop the Feed Dogs
• For button sewing etc., drop the feed dogs.
• When finished sewing, raise the feed dogs.
The feed dogs must always be up for normal sewing.
qLowered position
wRaised position
Pressure Lever
The pressure levr should be set at “ 3 ” for regular sewing.
Reduce the pressure to “ 2 ” for applique, cutwork, drawn work,
basting and embroidery.
Set the pressure to “ 1 ” when sewing chiffon, lace, organdy
and other fine fabrics. Velour and knit with a lot of stretch may
also require a “ 1 ” setting.
Align the setting mark on the lever with the desired number.
qPressure lever
Presser Foot Lifter
The presser foot lifter raises and lowers your presser foot.
You can raise it about 0.6 cm (1/4˝) higher than the normal up
position for easy removal of the presser foot or to help you
place heavy fabric under the foot.
qNormal up position
wHighest position
q
w
q
w
q
w
w
q
q

14
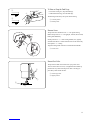
zx
c
qw
e
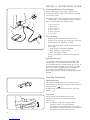
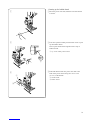
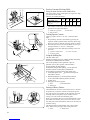
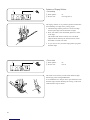
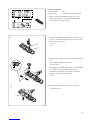
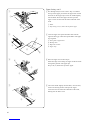
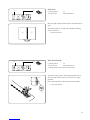
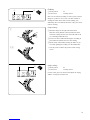
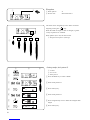
Changing Needles
zRaise the needle by pressing the Up/down needle
position key and lower the presser foot.
Turn off the power switch.
Loosen the needle clamp screw by turning it
counterclockwise.
Remove the needle from the clamp.
xInsert the new needle into the needle clamp with the
flat side to the rear.
When inserting the needle into the clamp, push it up
as far as it will go. Tighten the clamp screw firmly by
turning it clockwise.
cTo check for a good needle, put the flat side of the
needle onto something flat (the needle plate, glass
etc.).
The gap between the needle and the flat surface
should be consistent. Never use a bent or blunt needle.
qNeedle clamp screw
wPin
eNeedle clamp
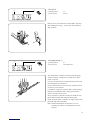
To Attach and Remove the Presser Foot
zPress the red button on the back of the foot holder.
The presser foot will drop off.
xPlace the selected presser foot so the pin on the foot
lies just under the groove of the foot holder.
Lower the presser bar to lock the foot in place.
qRed button
wGroove
ePin
To Remove and Attach the Foot Holder
zTo Remove:
Remove the screw by turning the screw
counterclockwise with the screwdriver.
xTo Attach:
Match the hole in the foot holder with the threaded
hole in the presser bar.
Fit the screw into the hole.
Tighten the screw by turning it clockwise.
qScrew
wFoot holder
ePresser bar
zx
zx
qw
e
qw
e

15
Selecting Needle and Thread
NEEDLE SIZE
9 or 11
11 or 14
14 or 16
FABRICS
Crepe de Chine,
Voile, Lawn,
Organdy,
Georgette,Tricot
Linens, Cotton,
Pique, Serge,
Double Knits,
Percale
Denim, tweed,
Gabardine, Coating,
Drapery, and
Upholstery Fabric
LIGHT WEIGHT
MEDIUM WEIGHT
HEAVY WEIGHT
NOTE:
* In general, fine threads and needles are used for sewing fine fabrics, and thicker threads and needles are used for sewing
heavy fabrics.
Always test thread and needle size on a small piece of fabric which will be used for actual sewing.
* Use the same thread for needle and bobbin.
* When sewing stretch, very fine fabrics and synthetics, use a blue tipped needle.
The blue tipped needle effectively prevents skipped stitches.
THREADS
Fine Silk
Fine Cotton
Fine Synthetic
Fine Cotton-covered Polyester
50 Silk
50 to 80 Cotton
50 to 60 Synthetic
Cotton-covered Polyester
50 Silk
40 to 50 Cotton
40 to 50 Synthetic
Cotton-covered Polyester

16
ewq
rt
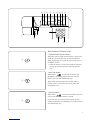
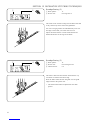
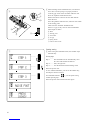
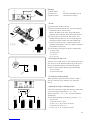
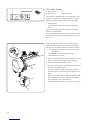
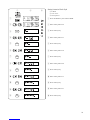
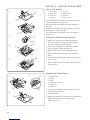
Winding the Bobbin
• Set the spool
Lift up the spool pin and place the spool of thread on it
with the thread coming off the spool as shown.
Press the large spool holder firmly against the spool of
thread.
* The small spool holder is used with a small or narrow
spool of thread.
qSpool pin
wOrdinary spool
eLarge spool holder
rSmall spool holder
tSmall spool
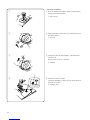
• Removing the bobbin
Gently slide the hook cover plate release button to the
right and remove the cover plate.
Lift out the bobbin.
qHook cover plate release button
wHook cover plate
q
w

17
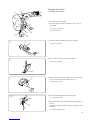
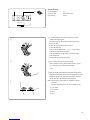
• Winding the bobbin
zGuide the thread around the thread guide.
xThread through the hole in the bobbin from the inside
to the outside.
* The additional spool pin is used to wind an extr
bobbin without unthreading the machine. To use,
insert the spool stand and the additional spool pin
in the hole. Place the felt and spool on the pin with
the thread coming off the spool as shown.
qHole for additional spool pin r Felt
wSpool stand t Spool
eAdditional spool pin
cPut the bobbin on the bobbin winder spindle, and push
it to the right. With the free end of the thread held in
your hand, depress the foot control. Stop the machine
when it has made a few turns, and cut the thread close
to the hole in the bobbin.
yBobbin winder stopper
vDepress the foot control again. When the bobbin is
fully wound, it will stop automatiaclly.
bReturn the bobbin winder to its original position by
moving the spindle to the left, and cut the thread as
shown.
z
x
vb
c
e
t
r
y
q
w

18
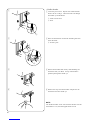
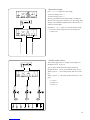
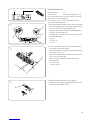
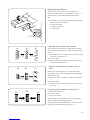
• Inserting the bobbin
zPlace the bobbin in the bobbin holder with the thread
running off counterclockwise.
qEnd of thread
xGuide the thread into the notch on the front side of
the bobbin holder.
wNotch
cContinue to draw the thread lightly. The thread slips
into notch .
Pull out about 15 cm (6˝) of thread.
eNotch
vAttach the hook cover plate.
Check the threading by referring to the chart shown on
the hook cover plate.
rThreading chart
z
x
c
v
q
w
e
B
A
A
B
A
B
r
Strona jest ładowana ...
Strona jest ładowana ...
Strona jest ładowana ...
Strona jest ładowana ...
Strona jest ładowana ...
Strona jest ładowana ...
Strona jest ładowana ...
Strona jest ładowana ...
Strona jest ładowana ...
Strona jest ładowana ...
Strona jest ładowana ...
Strona jest ładowana ...
Strona jest ładowana ...
Strona jest ładowana ...
Strona jest ładowana ...
Strona jest ładowana ...
Strona jest ładowana ...
Strona jest ładowana ...
Strona jest ładowana ...
Strona jest ładowana ...
Strona jest ładowana ...
Strona jest ładowana ...
Strona jest ładowana ...
Strona jest ładowana ...
Strona jest ładowana ...
Strona jest ładowana ...
Strona jest ładowana ...
Strona jest ładowana ...
Strona jest ładowana ...
Strona jest ładowana ...
Strona jest ładowana ...
Strona jest ładowana ...
Strona jest ładowana ...
Strona jest ładowana ...
Strona jest ładowana ...
Strona jest ładowana ...
Strona jest ładowana ...
Strona jest ładowana ...
Strona jest ładowana ...
Strona jest ładowana ...
Strona jest ładowana ...
Strona jest ładowana ...
Strona jest ładowana ...
Strona jest ładowana ...
Strona jest ładowana ...
Strona jest ładowana ...
Strona jest ładowana ...
Strona jest ładowana ...
Strona jest ładowana ...
Strona jest ładowana ...
-
 1
1
-
 2
2
-
 3
3
-
 4
4
-
 5
5
-
 6
6
-
 7
7
-
 8
8
-
 9
9
-
 10
10
-
 11
11
-
 12
12
-
 13
13
-
 14
14
-
 15
15
-
 16
16
-
 17
17
-
 18
18
-
 19
19
-
 20
20
-
 21
21
-
 22
22
-
 23
23
-
 24
24
-
 25
25
-
 26
26
-
 27
27
-
 28
28
-
 29
29
-
 30
30
-
 31
31
-
 32
32
-
 33
33
-
 34
34
-
 35
35
-
 36
36
-
 37
37
-
 38
38
-
 39
39
-
 40
40
-
 41
41
-
 42
42
-
 43
43
-
 44
44
-
 45
45
-
 46
46
-
 47
47
-
 48
48
-
 49
49
-
 50
50
-
 51
51
-
 52
52
-
 53
53
-
 54
54
-
 55
55
-
 56
56
-
 57
57
-
 58
58
-
 59
59
-
 60
60
-
 61
61
-
 62
62
-
 63
63
-
 64
64
-
 65
65
-
 66
66
-
 67
67
-
 68
68
-
 69
69
-
 70
70


JANOME Memory Craft 4400 Instruction book
- Kategoria
- Maszyny do szycia
- Typ
- Instruction book
w innych językach
- English: JANOME Memory Craft 4400