LD Systems ICOA 15 A BT Instrukcja obsługi
- Kategoria
- Sprzęt muzyczny
- Typ
- Instrukcja obsługi

USER´S MANUAL
BEDIENUNGSANLEITUNG
MANUEL D`UTILISATION
MANUAL DE USUARIO
INSTRUKCJA OBSŁUGI
MANUALE D‘ USO
操作说明书
操作說明書
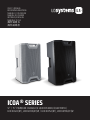
ICOA® SERIES
12" / 15" POWERED COAXIAL PA LOUDSPEAKER (BLUETOOTH)
LDICOA12A(BT), LDICOA12A(BT)W / LDICOA15A(BT), LDICOA15A(BT)W

CONTENTS / INHALTSVERZEICHNIS / CONTENU / CONTENIDO /
TREŚĆ / CONTENUTO / 目录 / 目錄
ENGLISH
SAFETY INFORMATION 3
PROPERTIES 4
CONNECTIONS, CONTROL, AND DISPLAY ELEMENTS 5
OPERATION 6
STAND ADAPTER 9
USE AS A FLOOR MONITOR 10
ROTATE TWEETER BY 90° 10
OPTIONAL ACCESSORIES 11
TECHNICAL SPECIFICATIONS 11
MANUFACTURER’S DECLARATIONS 12
DEUTSCH
SICHERHEITSHINWEISE 14
EIGENSCHAFTEN 15
ANSCHLÜSSE, BEDIEN- UND ANZEIGEELEMENTE 16
BEDIENUNG 17
STATIVFLANSCH 20
VERWENDUNG ALS BODENMONITOR 21
HOCHTONHORN UM 90° DREHEN 21
OPTIONALES ZUBEHÖR 22
TECHNISCHE DATEN 22
HERSTELLERERKLÄRUNGEN 23
FRANCAIS
CONSIGNES DE SÉCURITÉ 25
CARACTÉRISTIQUES 26
RACCORDEMENTS, ÉLÉMENTS DE COMMANDE ET D’AFFICHAGE 27
UTILISATION 28
BRIDE SUPPORT 31
UTILISATION COMME RETOUR DE SCÈNE AU SOL 32
TOURNER LE PAVILLON D’AIGUS À 90° 32
ACCESSOIRE DISPONIBLE EN OPTION 33
CARACTÉRISTIQUES TECHNIQUES 33
DÉCLARATIONS DU FABRICANT 34
ESPAÑOL
INSTRUCCIONES DE SEGURIDAD 36
CARACTERÍSTICAS 37
CONEXIONES, ELEMENTOS DE MANEJO Y ELEMENTOS DE VISUALIZACIÓN 38
FUNCIONAMIENTO 39
BRIDA DE SOPORTE 42
USO COMO MONITOR DE SUELO 43
DIFUSOR DE ALTA FRECUENCIA CON GIRO DE 90° 43
ACCESORIOS OPCIONALES 44
DATOS TÉCNICOS 44
DECLARACIONES DEL FABRICANTE 45
POLSKI
ZASADY BEZPIECZEŃSTWA 47
CHARAKTERYSTYKA 48
PRZYŁĄCZA, ELEMENTY OBSŁUGI I WSKAŹNIKI 49
OBSŁUGA 50
KOŁNIERZ STATYWU 53
WYKORZYSTANIE W FUNKCJI MONITORA PODŁOGOWEGO 54
GŁOŚNIK WYSOKOTONOWY OBRACANY O 90° 54
AKCESORIA OPCJONALNE 55
DANE TECHNICZNE 55
OŚWIADCZENIA PRODUCENTA 56
ITALIANO
INDICAZIONI SULLA SICUREZZA 58
CARATTERISTICHE 59
CONNESSIONI, ELEMENTI DI COMANDO E DI VISUALIZZAZIONE 60
UTILIZZO 61
FLANGIA TREPPIEDE 64
UTILIZZO COME MONITOR DA PAVIMENTO 65
RUOTARE IL TWEETER A TROMBA DI 90° 65
ACCESSORI OPZIONALI 66
DATI TECNICI 66
DICHIARAZIONI DEL PRODUTTORE 67
简体中文
安全提示 69
特征 70
接口、操作和显示元件 71
操作 72
三脚架法兰 75
用作地板监视器 76
将高音喇叭转动90° 76
可选配件 77
技术参数 77
制造商声明 78
繁體中文
安全注意事項 79
特性 80
連接器、操縱及顯示元件 81
操作 82
三腳架法蘭 85
用作地面監測器 86
將高音喇叭旋轉90° 86
可選配件 87
技術資料 87
製造商聲明 88

3
DEUTSCH
ENGLISHFRANCAIS
ESPAÑOL
POLSKIITALIANO
简体中文繁體中文
ENGLISH
YOU‘VE MADE THE RIGHT CHOICE!
We have designed this product to operate reliably over many years. LD Systems stands for this with its name and many years of experience
as a manufacturer of high-quality audio products. Please read this User‘s Manual carefully, so that you can begin making optimum use of
your LD Systems product quickly.
You can nd more information about LD-SYSTEMS at our Internet site WWW.LD-SYSTEMS.COM
SAFETY INFORMATION
1. Please read these instructions carefully.
2. Keep all information and instructions in a safe place.
3. Follow the instructions.
4. Observe all safety warnings. Never remove safety warnings or other information from the equipment.
5. Use the equipment only in the intended manner and for the intended purpose.
6. Use only sufciently stable and compatible stands and/or mounts (for xed installations). Make certain that wall mounts are properly
installed and secured. Make certain that the equipment is installed securely and cannot fall down.
7. During installation, observ e the applicable safety regulations for your country.
8. Never install and operate the equipment near radiators, heat registers, ovens or other sources of heat. Make certain that the equipment
is always installed so that is cooled sufciently and cannot overheat.
9. Never place sources of ignition, e.g., burning candles, on the equipment.
10. Ventilation slits must not be blocked.
11. Keep a minimum distance of 20 cm around and above the device.
12. Do not use this equipment in the immediate vicinity of water (does not apply to special outdoor equipment - in this case, observe the
special instructions noted below. Do not expose this equipment to ammable materials, uids or gases. Avoid direct sunlight!
13. Make certain that dripping or splashed water cannot enter the equipment. Do not place containers lled with liquids, such as vases or
drinking vessels, on the equipment.
14. Make certain that objects cannot fall into the device.
15. Use this equipment only with the accessories recommended and intended by the manufacturer.
16. Do not open or modify this equipment.
17. After connecting the equipment, check all cables in order to prevent damage or accidents, e.g., due to tripping hazards.
18. During transport, make certain that the equipment cannot fall down and possibly cause property damage and personal injuries.
19. If your equipment is no longer functioning properly, if uids or objects have gotten inside the equipment or if it has been damaged in
anot her way, switch it off immediately and unplug it from the mains outlet (if it is a powered device). This equipment may only be repaired
by authorized, qualied personnel.
20. Clean the equipment using a dry cloth.
21. Comply with all applicable disposal laws in your country. During disposal of packaging, please separate plastic and paper/cardboard.
22. Plastic bags must be kept out of reach of children.
23. Please note that changes or modications not expressly approved by the party responsible for compliance could void the user´s
authority to operate the equipment.
FOR EQUIPMENT THAT CONNECTS TO THE POWER MAINS
24. CAUTION: If the power cord of the device is equipped with an earthing contact, then it must be connected to an outlet with a protective
ground. Never deactivate the protective ground of a power cord.
25. If the equipment has been exposed to strong uctuations in temperature (for example, after transport), do not switch it on immediately.
Moisture and condensation could damage the equipment. Do not switch on the equipment until it has reached room temperature.
26. Before connecting the equipment to the power outlet, rst verify that the mains voltage and frequency match the values specied on
the equipment. If the equipment has a voltage selection switch, connect the equipment to the power outlet only if the equipment values
and the mains power values match. If the included power cord or power adapter does not t in your wall outlet, contact your electrician.
27. Do not step on the power cord. Make certain that the power cable does not become kinked, especially at the mains outlet and/or power
adapter and the equipment connector.
28. When connecting the equipment, make certain that the power cord or power adapter is always freely accessible. Always disconnect the
equipment from the power supply if the equipment is not in use or if you want to clean the equipment. Always unplug the power cord and
power adapter from the power outlet at the plug or adapter and not by pulling on the cord. Never touch the power cord and power adapter
with wet hands.
29. Whenever possible, avoid switching the equipment on and off in quick succession because otherwise this can shorten the useful life of
the equipment.
30. IMPORTANT INFORMATION: Replace fuses only with fuses of the same type and rating. If a fuse blows repeatedly, please contact an
authorised service centre.
31. To disconnect the equipment from the power mains completely, unplug the power cord or power adapter from the power outlet.
32. If your device is equipped with a Volex power connector, the mating Volex equipment connector must be unlocked before it can be
removed. However, this also means that the equipment can slide and fall down if the power cable is pulled, which can lead to personal
injuries and/or other damage. For this reason, always be careful when laying cables.
33. Unplug the power cord and power adapter from the power outlet if there is a risk of a lightning strike or before extended periods
of disuse.

4
DEUTSCHENGLISH FRANCAIS
ESPAÑOL
POLSKI ITALIANO
简体中文 繁體中文
34. The appliance is not to be used by persons (including children) with reduced physical, sensory or mental capabilities, or lack of experience
and knowledge.
35. Children must be instructed not to play with the device.
36. If the power cord of the device is damaged, do not use the device. The power cord must be replaced by an adequate cable or assembly from an
authorized service center.
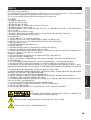
CAUTION:
To reduce the risk of electric shock, do not remove cover (or back). There are no user serviceable
parts inside. Maintenance and repairs should be exclusively carried out by qualied service
personnel.
The warning triangle with lightning symbol indicates dangerous uninsulated voltage inside the unit, which may cause an
electrical shock.
The warning triangle with exclamation mark indicates important operating and maintenance instructions.
Warning! This device is designed for use below 2000 metres in altitude.
Warning! This product is not intended for use in tropical climates.
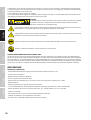
CAUTION! HIGH VOLUMES IN AUDIO PRODUCTS!
This device is meant for professional use. Therefore, commercial use of this equipment is subject to the respectively applicable national ac-
cident prevention rules and regulations. As a manufacturer, Adam Hall is obligated to notify you formally about the existence of potential
health risks.
Hearing damage due to high volume and prolonged exposure: When in use, this product is capable of producing high sound-pressure levels
(SPL) that can lead to irreversible hearing damage in performers, employees, and audience members. For this reason, avoid prolonged
exposure to volumes in excess of 90 dB.
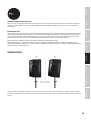
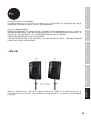
PROPERTIES
LDICOA12A(BT), LDICOA12A(BT)W
• Genuine all-rounder for full-range, satellite, and monitor applications
• Two-way speaker with 12” woofer
• BT model equipped with Bluetooth® audio streaming
• 126 dB max. SPL and 300 W RMS power handling
• Coaxial design with rotatable, BEM-optimized CD horn for vertical and horizontal use
• Horn-loaded woofer
• DynX DSP with four presets featuring three band equalizer (EQ) and delay function
• Two line/mic input channels with individual gain controllers, 3.5 mm jack input plus mono mix output
• 36 mm dual-tilt stand connection with a tilt angle of 0° and 5°, 55° monitor angle with sturdy stand
• 6x M10 ying points
• Shockproof front grille for the best speaker protection
• Four aluminum handles with ergonomic, rubberized surface
• Comprehensive range of optionally available accessories for installation and transport

5
DEUTSCH
ENGLISHFRANCAIS
ESPAÑOL
POLSKIITALIANO
简体中文繁體中文
LDICOA15A(BT), LDICOA15A(BT)W
• Genuine all-rounder for full-range, satellite, and monitor applications
• Two-way speaker with 15" woofer
• BT model equipped with Bluetooth® audio streaming
• 128 dB max. SPL and 300 W RMS power handling
• Coaxial design with rotatable, BEM-optimized CD horn for vertical and horizontal use
• Horn-loaded woofer
• DynX DSP with four presets featuring three band equalizer and delay function
• Two line/mic input channels with individual gain controllers, 3.5 mm jack input plus mono mix output
• 36 mm dual-tilt stand connection with a tilt angle of 0° and 5°, 55° monitor angle with sturdy stand
• Shockproof front grille for the best speaker protection
• Four aluminium handles with ergonomic, rubberized surface
• Comprehensive range of optionally available accessories for installation and transport
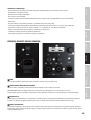
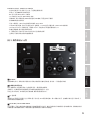
1
2
3
6
7
5
8
4
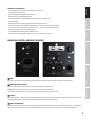
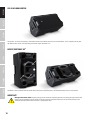
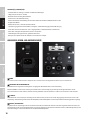
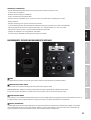
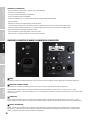
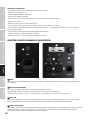
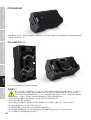
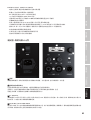
CONNECTIONS, CONTROL, AND DISPLAY ELEMENTS
1
POWER
On/off switch. The speaker should always be the last device to be switched on in the signal chain, and the rst to be switched off.
2
POWER SOCKET AND FUSE HOLDER
IEC power socket with integrated fuse holder. A suitable power cable is included in delivery.
IMPORTANT NOTE: Only replace the fuse with a fuse of the same type and values. Please note
the inscription on the housing. If a fuse trips repeatedly, please contact an authorized service center.
3
LC DISPLAY
Multifunctional graphic LC display for displaying the master volume, the DSP preset and the input level for channels 1 and 2 in the main menu. The
menu items, submenu items, and corresponding editing options are displayed in the Editing menu.
4
VOLUME / PUSH FOR MENU
From the main menu, the master volume can be adjusted by turning the rotary-push encoder. Press the rotary-push encoder to access the Editing
menu. Use the rotary-push encoder to navigate the Editing menu, adjust system settings, and change values in the respective menu items.

6
DEUTSCHENGLISH FRANCAIS
ESPAÑOL
POLSKI ITALIANO
简体中文 繁體中文
5
INPUT 1–2
XLR/jack combo sockets for balancing audio output of channels 1 and 2 The inputs are suited for both line-level signals as well as for directly
connecting the microphone. The inputs are not equipped with phantom power.
6
GAIN
Controller for adjusting the input gain of channels 1 and 2. For an optimum signal-to-noise ratio, set the signal as high as possible, but make sure
that the Peak display does not light up or briey appear, to prevent signal distortion and system damage. If necessary, also adjust the player’s
output level.
7
AUX IN
Unbalanced audio input with 3.5 mm stereo jack socket. A connected stereo signal is summed to mono internally. Control the volume for the AUX IN
channel using the gain controller for channel 2. If necessary, also adjust the player and master volume with the rotary-push-encoder.
8
SYSTEM OUT
Balanced audio output with male 3-pin XLR socket. The connected signal is a mix out of channel 1 and 2 and AUX IN.
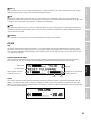
OPERATION
NOTE:
The LD Systems logo briey appears on the display as soon as the speaker is correctly connected to the power supply and switched on. All settings
(e.g. Preset, EQ, and Delay) resume the way they were as before the speaker was switched off. If Bluetooth was previously enabled (on models with
Bluetooth), it will be automatically disabled after a restart. The speaker will be ready for use after completion of this process, which usually takes
one second.
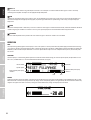
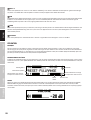
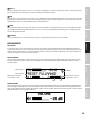
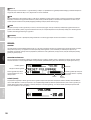
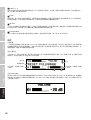
MAIN MENU
The main display is activated during normal operation. It shows the master volume setting, the activated speaker preset, the input levels of chan-
nels 1 and 2, and Bluetooth if it is activated on Bluetooth-enabled models (see gure).
Master volume
Speaker preset
Input level with peak display
channel 2
Bluetooth
Input level with peak display
channel 2
Level Peak
VOLUME
From the main menu, the master volume can be directly adjusted by turning the rotary-push encoder VOLUME / PUSH FOR MENU from -60 to +10 dB.
When the encoder is rotated, the display automatically changes to the corresponding symbol (see gure below). The main menu will automatically
reappear after approx. 8 seconds of inactivity. Pressing the encoder immediately changes the display to the main menu.

7
DEUTSCH
ENGLISHFRANCAIS
ESPAÑOL
POLSKIITALIANO
简体中文繁體中文
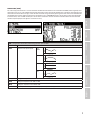
AUDIO SETTINGS (AUDIO)
Press the rotary-push encoder to access the main menu and then turn the encoder to select the menu item AUDIO (dark background). Press
the encoder again to access the submenu and then turn the encoder to select the desired submenu item. Conrm the selection by pressing
the encoder. Turn the encoder to change a value and then conrm the change in value by pressing the encoder. Refer to the table below for
the submenu items and the relevant information. In the submenu, select MAIN MENU and press the encoder to return to the main menu.
In the main menu, select HOME and then press the encoder to conrm this selection and return to the main menu. The main menu will
automatically be displayed after approx. 8 seconds of inactivity.
AUDIO (Change value = turn encoder, conrm change in value = press encoder)
MAIN MENU Return to main menu
PRESET Selection of the speaker preset FULL
RANGE
MONITOR
FLAT
SAT
HIGH EQ Setting treble frequencies from -10dB to + 10dB
MID EQ Setting mid frequencies from -10dB to +10dB
LOW EQ Setting bass frequencies from -10dB to +10dB
DELAY Time delay of the audio signal in 0.32 ft steps up to 32 ft (0 ft = OFF, display in meters and feet)

8
DEUTSCHENGLISH FRANCAIS
ESPAÑOL
POLSKI ITALIANO
简体中文 繁體中文
BLUETOOTH® (only LDICOA12ABT(W) and LDICOA15ABT models(W))
The LDICOA12ABT and LDICOA15ABT models are Bluetooth-enabled to allow for audio les on another Bluetooth device (e.g. smartphone, tablet) to
be played back on speakers (maximum distance between both devices is approx. 10 meters; stereo signals are summed to mono internally.). To
enable Bluetooth, press the rotary-push encoder to access the main menu and then turn the encoder to select the menu item BLUETOOTH
(dark background). Press the encoder again to access the submenu and then turn the encoder to select ON (return to main menu with []).
Conrm the selection by pressing the encoder. Select the submenu item HOME and then press the encoder to conrm the selection.
A ashing Bluetooth icon will now appear in the main display. Switch on Bluetooth on your smartphone or tablet and look for available
devices on the user interface. Select “LD ICOA® 12” or “LD ICOA® 15” to pair and connect your Bluetooth device with the speaker’s Bluetooth
unit. The audio playback can start as soon as the process is completed. The Bluetooth symbol now permanently appears on the display.
If the Bluetooth connection is lost (e.g. out of range), the Bluetooth icon will start to ash again. The volume setting is carried out on the
player, and the master volume is adjusted using the encoder. If a Bluetooth connection to the speaker is not required to emit sound, disable
Bluetooth in the Bluetooth submenu (BLUETOOTH OFF).
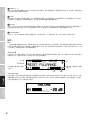
SYSTEM SETTINGS (SETTINGS)
Press the rotary-push encoder to access the main menu and then turn the encoder to select the menu item SETTINGS (dark background).
Press the encoder again to access the submenu and then turn the encoder to select the desired submenu item. Conrm the selection by
pressing the encoder. Turn the encoder to change a value and then conrm the change in value by pressing the encoder. Refer to the table
below for the submenu items and the relevant information. In the submenu, select MAIN MENU and press the encoder to return to the
main menu. In the main menu, select HOME and then press the encoder to conrm this selection and return to the main menu. The main
menu will automatically be displayed after approx. 8 seconds of inactivity.
SETTINGS (Change value or status = turn encoder, conrm or request information = press encoder)
MAIN MENU Return to main menu
LCD DIM Automatic display dimming ON Display is dimmed after approx. 8 seconds of inactivity
OFF Automatic display dimming switched off
BRIGHTNESS Setting the display brightness (0–100%)
CONTRAST Setting the display contrast (0–100%)
INFO Display of model number and software version
FACTORY DEFAULT Reset to factory default
(AUDIO, BLUETOOTH + SETTINGS)
CANCEL Cancel reset
RESET SURE? YES Execute reset
CANCEL Cancel reset

9
DEUTSCH
ENGLISHFRANCAIS
ESPAÑOL
POLSKIITALIANO
简体中文繁體中文
WHAT DOES LD SYSTEMS DynX® DSP MEAN?
DSP is an acronym that stands for digital signal processing. DynX® includes the Limiter, EQ, Compressor, and Crossover functions. Digital signal
processing ensures optimal audio playback with maximum clarity while protecting the PA system from overloading.
WHAT EXACTLY DOES DynX® DSP DO?
The Limiter function protects the speaker and prevents overload-induced distortion. Separate limiters for the bass, mid, and treble regions limit the
signal if the level exceeds a value that could have negative effects. Each limiter is optimized for one of the three seamlessly connected frequency
ranges (multi-band limiter). This allows the system to be operated at an overall higher sound pressure since extreme signal peaks are automatically
limited so that the master volume does not have to be reduced.
The multi-band EQ handles the entire frequency range and optimizes the system’s overall sound.
Depending on the frequency range, the crossovers divide the audio signal into the respective speakers, i.e. the subwoofer, midrange tweeter, and
tweeter of the array column. The amplitude and run-time optimization of the crossovers also ensure that all frequencies are evenly emitted and reach
listeners at the same time.
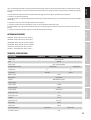
STAND ADAPTER
The speakers are equipped with a stand adapter with a stand connection with an angle of 0° (rear position) and a stand connection with a tilt angle
of 5° (front position). Examples of use: Use the stand adapter with an angle of 0° for emitting sound to a public audience and the stand adapter
with a tilt angle of 5° for emitting sound to a seated audience.

10
DEUTSCHENGLISH FRANCAIS
ESPAÑOL
POLSKI ITALIANO
简体中文 繁體中文
A
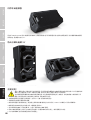
USE AS A FLOOR MONITOR
The speakers can also be used entirely as oor monitors thanks to the monitor DSP preset, the rotatable tweeter, and its all-purpose housing. Non-
slip rubber washers ensure secure positioning. The monitor angle is positioned at 55°.
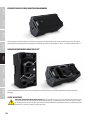
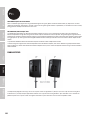
ROTATE TWEETER BY 90°
The tweeter can be rotated 90° when the speaker needs to be used in situations where it is installed horizontally or used as a oor monitor.
IMPORTANT!
Warning: Risk of electric shock! Dangerous voltages present inside device! Opening the device and rotating the high-frequency horn
requires specialist knowledge and may only be carried out by specially trained personnel! If you are not suitably qualied, do not
attempt the procedure yourself. Refer instead to a qualied professional.

11
DEUTSCH
ENGLISHFRANCAIS
ESPAÑOL
POLSKIITALIANO
简体中文繁體中文
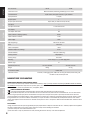
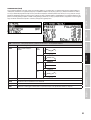
OPTIONAL ACCESSORIES
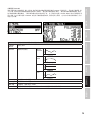
TECHNICAL SPECIFICATIONS
Article number: LDICOA12A(W) LDICOA12ABT(W) LDICOA15A(W) LDICOA15ABT(W)
Product type: Coaxial PA speaker
Type: Powered
Housing color: Black / white (RAL 9003)
Bluetooth audio receiver: - Bluetooth 4.0 - Bluetooth 4.0
Large woofer: 12" 15”
Large woofer: 304.8 mm 381 mm
Woofer magnet: Ferrite
Woofer brand: Custom-made
Tweeter: BEM-optimized CD horn
Large HF driver: 1”
Large HF driver: 25.4 mm
HF driver magnet: Ferrite
HF driver brand: Custom-made
HF driver voice coil: 1.4”
HF driver voice coil: 35 mm
Amplier: Class D
Dispersion (H x V): 90° x 50°
Power (RMS): 300 W
Power (Peak): 1200 W
Frequency response: 50 Hz–20 kHz 48 Hz–20 kHz
Crossover frequency: 2 kHz
Take care when opening the device and rotating the high-frequency horn, in order to avoid damage to the speaker and injury to persons. Follow
each step of the instructions exactly. The manufacturer shall not be liable for any damage to devices or injury to persons resulting from improper
handling.
1. Fully disconnect the speaker from the mains (pull out the mains plug) and wait for approx. 3 minutes before starting work!
2. Disconnect all cables from the speaker.
3. Place the speaker in its slanted monitoring position, remove the front grille from the housing (5 x 2.5-mm internal hex screws on left and right of
the housing).
4. Loosen the 4 screws that secure the high-frequency horn (see gure A).
5. Carefully lift the horn and rotate it through 90°, taking care not to damage the tweeter driver cable.
6. Feed the tweeter driver cable into the retainer nut next to the securing lug and replace the horn in the retainers. Ensure that the cable is not
pinched.
7. Carefully secure the horn with the screws and re-install the front grille on the housing.
LDICOA12UB - Universal bracket for ICOA® 12 (Black)
LDICOA15UB - Universal bracket for ICOA® 15 (Black)
LDICOA12UBW - Universal bracket for ICOA® 12 (White)
LDICOA15UBW - Universal bracket for ICOA® 15 (White)
LDICOA12PC - Padded protective cover for ICOA® 12
LDICOA15PC - Padded protective cover for ICOA® 15

12
DEUTSCHENGLISH FRANCAIS
ESPAÑOL
POLSKI ITALIANO
简体中文 繁體中文
Max. SPL (Peak): 126 dB 128 dB
Protection circuits: Multi-band limiter, overheating, overvoltage, excess current
Control elements: On/Off switch, rotary-push encoder, 2 x gain controller
Display elements: LC display
Mic/line inputs: 2
Mic/line input connections: XLR/6.3 mm jack combi sockets (balanced)
Line inputs: 1
Line input connections: 3.5 mm stereo socket
Line outputs: 1
Line output connections: XLR
AD/DA converter sampling frequency: 48 kHz
AD/DA converter resolution: 24 bit
Power supply: SMPS
Operating voltage: 100–240 V AC 50–60 Hz
Fuse: T4AL 250 V
Power consumption: 150 W
Ambient temperature (running): 0 - 40°C
Relative humidity: < 80% (non-condensing)
Housing material: Polypropylene
Housing design: Bassreex
Mounting: 36 mm ange (0°, 5°), 6 x M10 ying points
Monitor angle: 55°
Dimensions (W x H x D): 375 x 635 x 396 mm 416 x 695 x 415 mm
Weight: 19.9 kg 24.3 kg
Accessories included: Power cable
Additional features: 4 handles, 6 x M10 rigging points, rubber feet for using the monitor, robust front grille,
DSP with user EQ and Delay function
FCC STATEMENT
Changes or modications not expressly approved by the party responsible for compliance could void the user‘s authority to operate the equipment.
This device complies with Part 15 of the FCC Rules. Operation is subject to the following two conditions:
(1) This device may not cause harmful interference, and
(2) This device must accept any interference received, including interference that may cause undesired operation
MANUFACTURER´S DECLARATIONS
MANUFACTURER‘S WARRANTY & LIMITATIONS OF LIABILITY
You can nd our current warranty conditions and limitations of liability at: https://cdn-shop.adamhall.com/media/pdf/MANUFACTURERS-DECLARATIONS_
LD_SYSTEMS.pdf To request warranty service for a product, please contact Adam Hall GmbH, Adam-Hall-Str. 1,
61267 Neu Anspach / Email: [email protected] / +49 (0)6081 / 9419-0.
CORRECT DISPOSAL OF THIS PRODUCT
(valid in the European Union and other European countries with a differentiated waste collection system)
This symbol on the product, or on its documents indicates that the device may not be treated as household waste. This is to avoid environ-
mental damage or personal injury due to uncontrolled waste disposal. Please dispose of this product separately from other waste and have it
recycled to promote sustainable economic activity. Household users should contact either the retailer where they purchased this product, or their
local government ofce, for details on where and how they can recycle this item in an environmentally friendly manner. Business users should
contact their supplier and check the terms and conditions of the purchase contract. This product should not be mixed with other commercial waste
for disposal.

13
DEUTSCH
ENGLISHFRANCAIS
ESPAÑOL
POLSKIITALIANO
简体中文繁體中文
EU DECLARATION OF CONFORMITY
Hereby, Adam Hall GmbH declares that this radio equipment type is in compliance with Directive 2014/53/EU.
The full text of the EU declaration of conformity is available at the following
internet address: www.adamhall.com/compliance/
CE Compliance
Adam Hall GmbH states that this product meets the following guidelines (where applicable):
R&TTE (1999/5/EC) or RED (2014/53/EU) from June 2017
Low voltage directive (2014/35/EU)
EMV directive (2014/30/EU)
RoHS (2011/65/EU)
The complete declaration of conformity can be found at www.adamhall.com.
Furthermore, you may also direct your enquiry to [email protected].
NOTE: This equipment has been tested and found to comply with the limits for a Class B digital device, pursuant to Part 15 of the FCC
Rules. These limits are designed to provide reasonable protection against harmful interference in a residential installation. This equipment
generates, uses and can radiate radio frequency energy and, if not installed and used in accordance with the instructions, may cause
harmful interference to radio communications. However, there is no guarantee that interference will not occur in a particular installation. If
this equipment does cause harmful interference to radio or television reception, which can be determined by turning the equipment off and
on, the user is encouraged to try to correct the interference by one or more of the following measures:
- Reorient or relocate the receiving antenna.
- Increase the separation between the equipment and receiver.
- Connect the equipment into an outlet on a circuit different from that to which the receiver is connected.
- Consult the dealer or an experienced radio/TV technician for help.

14
DEUTSCHENGLISH FRANCAIS
ESPAÑOL
POLSKI ITALIANO
简体中文 繁體中文
DEUTSCH
SIE HABEN DIE RICHTIGE WAHL GETROFFEN!
Dieses Gerät wurde unter hohen Qualitätsanforderungen entwickelt und gefertigt, um viele Jahre einen reibungslosen Betrieb zu gewährleisten.
Dafür steht LD Systems mit seinem Namen und der langjährigen Erfahrung als Hersteller hochwertiger Audioprodukte. Bitte lesen Sie diese Bedie-
nungsanleitung sorgfältig, damit Sie Ihr neues Produkt von LD Systems schnell optimal einsetzen können.
Mehr Informationen zu LD SYSTEMS nden Sie auf unserer Internetseite WWW.LD-SYSTEMS.COM
SICHERHEITSHINWEISE
1. Lesen Sie diese Anleitung bitte sorgfältig durch.
2. Bewahren Sie alle Informationen und Anleitungen an einem sicheren Ort auf.
3. Befolgen Sie die Anweisungen.
4. Beachten Sie alle Warnhinweise. Entfernen Sie keine Sicherheitshinweise oder andere Informationen vom Gerät.
5. Verwenden Sie das Gerät nur in der vorgesehenen Art und Weise.
6. Verwenden Sie ausschließlich stabile und passende Stative bzw. Befestigungen (bei Festinstallationen). Stellen Sie sicher, dass Wandhalterungen
ordnungsgemäß installiert und gesichert sind. Stellen Sie sicher, dass das Gerät sicher installiert ist und nicht herunterfallen kann.
7. Beachten Sie bei der Installation die für Ihr Land geltenden Sicherheitsvorschriften.
8. Installieren und betreiben Sie das Gerät nicht in der Nähe von Heizkörpern, Wärmespeichern, Öfen oder sonstigen Wärmequellen. Sorgen Sie dafür,
dass das Gerät immer so installiert ist, dass es ausreichend gekühlt wird und nicht überhitzen kann.
9. Platzieren Sie keine Zündquellen wie z.B. brennende Kerzen auf dem Gerät.
10. Lüftungsschlitze dürfen nicht blockiert werden.
11. Halten Sie einen Mindestabstand von 20 cm seitlich und oberhalb des Geräts ein.
12. Betreiben Sie das Gerät nicht in unmittelbarer Nähe von Wasser. Bringen Sie das Gerät nicht mit brennbaren Materialien, Flüssigkeiten oder
Gasen in Berührung. Direkte Sonneneinstrahlung vermeiden!
13. Sorgen Sie dafür, dass kein Tropf- oder Spritzwasser in das Gerät eindringen kann. Stellen Sie keine mit Flüssigkeit gefüllten Behältnisse wie
Vasen oder Trinkgefäße auf das Gerät.
14. Sorgen Sie dafür, dass keine Gegenstände in das Gerät fallen können.
15. Betreiben Sie das Gerät nur mit dem vom Hersteller empfohlenen und vorgesehenen Zubehör.
16. Öffnen Sie das Gerät nicht und verändern Sie es nicht.
17. Überprüfen Sie nach dem Anschluss des Geräts alle Kabelwege, um Schäden oder Unfälle, z. B. durch Stolperfallen zu vermeiden.
18. Achten Sie beim Transport darauf, dass das Gerät nicht herunterfallen und dabei möglicherweise Sach- und Personenschäden
verursachen kann.
19. Wenn Ihr Gerät nicht mehr ordnungsgemäß funktioniert, Flüssigkeiten oder Gegenstände in das Geräteinnere gelangt sind, oder das Gerät an-
derweitig beschädigt wurde, schalten Sie es sofort aus und trennen es von der Netzsteckdose (sofern es sich um ein aktives Gerät handelt). Dieses
Gerät darf nur von autorisiertem Fachpersonal repariert werden.
20. Verwenden Sie zur Reinigung des Geräts ein trockenes Tuch.
21. Beachten Sie alle in Ihrem Land geltenden Entsorgungsgesetze. Trennen Sie bei der Entsorgung der Verpackung bitte Kunststoff und Papier bzw.
Kartonagen voneinander.
22. Kunststoffbeutel müssen außer Reichweite von Kindern aufbewahrt werden.
23. Sämtliche vom Benutzer vorgenommenen Änderungen und Modikationen, denen die für die Einhaltung der Richtlinien verantwortliche Partei
nicht ausdrücklich zugestimmt hat, können zum Entzug der Betriebserlaubnis für das Gerät führen.
BEI GERÄTEN MIT NETZANSCHLUSS
24. ACHTUNG: Wenn das Netzkabel des Geräts mit einem Schutzkontakt ausgestattet ist, muss es an einer Steckdose mit Schutzleiter angeschlossen
werden. Deaktivieren Sie niemals den Schutzleiter eines Netzkabels.
25. Schalten Sie das Gerät nicht sofort ein, wenn es starken Temperaturschwankungen ausgesetzt war (beispielsweise nach dem Transport). Feuch-
tigkeit und Kondensat könnten das Gerät beschädigen. Schalten Sie das Gerät erst ein, wenn es Zimmertemperatur erreicht hat.
26. Bevor Sie das Gerät an die Steckdose anschließen, prüfen Sie zuerst, ob die Spannung und die Frequenz des Stromnetzes mit den auf dem Gerät
angegebenen Werten übereinstimmen. Verfügt das Gerät über einen Spannungswahlschalter, schließen Sie das Gerät nur an die Steckdose an,
wenn die Gerätewerte mit den Werten des Stromnetzes übereinstimmen. Wenn das mitgelieferte Netzkabel bzw. der mitgelieferte Netzadapter
nicht in Ihre Netzsteckdose passt, wenden Sie sich an Ihren Elektriker.
27. Treten Sie nicht auf das Netzkabel. Sorgen Sie dafür, dass spannungsführende Kabel speziell an der Netzbuchse bzw. am Netzadapter und der
Gerätebuchse nicht geknickt werden.
28. Achten Sie bei der Verkabelung des Geräts immer darauf, dass das Netzkabel bzw. der Netzadapter stets frei zugänglich ist. Trennen Sie das
Gerät stets von der Stromzuführung, wenn das Gerät nicht benutzt wird, oder Sie das Gerät reinigen möchten. Ziehen Sie Netzkabel und Netzadapter
immer am Stecker bzw. am Adapter und nicht am Kabel aus der Steckdose. Berühren Sie Netzkabel und Netzadapter niemals mit nassen Händen.
29. Schalten Sie das Gerät möglichst nicht schnell hintereinander ein und aus, da sonst die Lebensdauer des Geräts beeinträchtigt werden könnte.
30. WICHTIGER HINWEIS: Ersetzen Sie Sicherungen ausschließlich durch Sicherungen des gleichen Typs und Wertes. Sollte eine Sicherung wiederholt
auslösen, wenden Sie sich bitte an ein autorisiertes Servicezentrum.
31. Um das Gerät vollständig vom Stromnetz zu trennen, entfernen Sie das Netzkabel bzw. den Netzadapter aus der Steckdose.
32. Wenn Ihr Gerät mit einem verriegelbaren Netzanschluss bestückt ist, muss der passende Gerätestecker entsperrt werden, bevor er entfernt wer-
den kann. Das bedeutet aber auch, dass das Gerät durch ein Ziehen am Netzkabel verrutschen und herunterfallen kann, wodurch Personen verletzt
werden und/oder andere Schäden auftreten können. Verlegen Sie Ihre Kabel daher immer sorgfältig.
33. Entfernen Sie Netzkabel und Netzadapter aus der Steckdose bei Gefahr eines Blitzschlags oder wenn Sie das Gerät länger nicht verwenden.
34. Das Gerät darf nicht von Personen (einschließlich Kindern) mit eingeschränkten körperlichen, sensorischen oder geistigen Fähigkeiten oder
mangelnder Erfahrung und Kenntnis benutzt werden.

15
DEUTSCH
ENGLISHFRANCAIS
ESPAÑOL
POLSKIITALIANO
简体中文繁體中文
35. Kinder müssen angewiesen werden, nicht mit dem Gerät zu spielen.
36. Wenn das Netzkabel des Geräts beschädigt ist, darf das Gerät nicht verwendet werden. Das Netzkabel muss durch ein adäquates Kabel oder eine
spezielle Baugruppe von einem autorisierten Service-Center ersetzt werden.
ACHTUNG
Entfernen Sie niemals die Abdeckung, da sonst das Risiko eines elektrischen Schlages besteht. Im In-
neren des Geräts benden sich keine Teile, die vom Bediener repariert oder gewartet werden können.
Lassen Sie Wartung und Reparaturen ausschließlich von qualiziertem Servicepersonal durchführen.
Das gleichseitige Dreieck mit Blitzsymbol warnt vor nichtisolierten, gefährlichen Spannungen im Geräteinneren, die einen elektrischen
Schlag verursachen können.
Das gleichseitige Dreieck mit Ausrufungszeichen kennzeichnet wichtige Bedienungs- und Wartungshinweise.
Warnung! Dieses Gerät ist für eine Nutzung bis zu einer Höhe von maximal 2000 Metern über dem Meeresspiegel bestimmt.
Warnung! Dieses Gerät ist nicht für den Einsatz in tropischen Klimazonen bestimmt.
ACHTUNG HOHE LAUTSTÄRKEN BEI AUDIOPRODUKTEN!
Dieses Gerät ist für den professionellen Einsatz vorgesehen. Der kommerzielle Betrieb dieses Geräts unterliegt den jeweils gültigen nationalen
Vorschriften und Richtlinien zur Unfallverhütung. Als Hersteller ist Adam Hall gesetzlich verpichtet, Sie ausdrücklich auf mögliche Gesundheitsrisiken
hinzuweisen. Gehörschäden durch hohe Lautstärken und Dauerbelastung: Bei der Verwendung dieses Produkts können hohe Schalldruckpegel
(SPL) erzeugt werden, die bei Künstlern, Mitarbeitern und Zuschauern zu irreparablen Gehörschäden führen können. Vermeiden Sie länger anhaltende
Belastung durch hohe Lautstärken über 90 dB.
EIGENSCHAFTEN
LDICOA12A(BT), LDICOA12A(BT)W
• Echter Allrounder für Fullrange-, Satelliten- und Monitor-Anwendungen
• 2-Wege Lautsprecher mit 12“ Tieftöner
• Bluetooth® Audio-Streaming beim BT-Modell
• 126 dB max. SPL und 300 W RMS-Leistung
• Vertikale und horizontale Anwendung durch koaxialen Aufbau mit drehbarem, BEM-optimiertem CD-Horn
• Horngeladener Woofer
• DynX DSP mit 4 Presets mit 3-Band-EQ und Delay-Funktion
• 2 Line/Mic Eingangskanäle mit individuellen Gain-Reglern, 3,5mm Klinkeneingang plus Mono Mix Ausgang
• 36 mm Dual-Tilt Stativaufnahme mit 0° und 5° Neigungswinkel, 55° Monitorwinkel mit stabilem Stand
• 6 x M10 Flugpunkte
• Stoßsicheres Frontgitter zum optimalen Schutz des Lautsprechers
• 4 Aluminiumgriffe mit ergonomischer, gummierter Oberäche
• Umfangreiches, optional erhältliches Zubehör für Installation und Transport

16
DEUTSCHENGLISH FRANCAIS
ESPAÑOL
POLSKI ITALIANO
简体中文 繁體中文
LDICOA15A(BT), LDICOA15A(BT)W
• Echter Allrounder für Fullrange-, Satelliten- und Monitor-Anwendungen
• 2-Wege Lautsprecher mit 15“ Tieftöner
• Bluetooth® Audio-Streaming beim BT-Modell
• 128 dB max. SPL und 300 W RMS-Leistung
• Vertikale und horizontale Anwendung durch koaxialen Aufbau mit drehbarem, BEM-optimiertem CD-Horn
• Horngeladener Woofer
• DynX DSP mit 4 Presets, 3-Band-EQ und Delay-Funktion
• 2 Line/Mic Eingangskanäle mit individuellen Gain-Reglern, 3,5mm Klinkeneingang plus Mono Mix Ausgang
• 36 mm Dual-Tilt Stativaufnahme mit 0° und 5° Neigungswinkel, 55° Monitorwinkel mit stabilem Stand
• Stoßsicheres Frontgitter zum optimalen Schutz des Lautsprechers
• 4 Aluminiumgriffe mit ergonomischer, gummierter Oberäche
• Umfangreiches, optional erhältliches Zubehör für Installation und Transport
ANSCHLÜSSE, BEDIEN- UND ANZEIGEELEMENTE
1
2
3
6
7
5
8
4
1
POWER
Ein- und Ausschalter. Schalten Sie den Lautsprecher stets als letztes Gerät in der Signalkette ein und als erstes Gerät wieder aus.
2
NETZBUCHSE UND SICHERUNGSHALTER
IEC Netzbuchse mit integriertem Sicherungshalter. Ein geeignetes Netzkabel bendet sich im Lieferumfang.
WICHTIGER HINWEIS: Ersetzen Sie die Sicherung ausschließlich durch eine Sicherung des gleichen Typs und mit gleichen Werten. Achten
Sie auf den Aufdruck auf dem Gehäuse. Sollte die Sicherung wiederholt auslösen, wenden Sie sich bitte an ein autorisiertes Servicezentrum.
3
LC DISPLAY
Multifunktionales Grak-LC-Display für die Anzeige der Gesamtlautstärke, des DSP-Presets und der Eingangspegel für die Kanäle 1 und 2 in der
Hauptanzeige. Im Bearbeitungsmenü werden die Menüpunkte, die Untermenüpunkte und die entsprechenden Bearbeitungsoptionen angezeigt.
4
VOLUME / PUSH FOR MENU
Ausgehend von der Hauptanzeige kann die Gesamtlautstärke direkt durch Drehen des Dreh-Drück-Encoders eingestellt werden. Drücken Sie auf
den Dreh-Drück-Encoder, um ins Bearbeitungsmenü zu gelangen. Navigieren Sie mit Hilfe des Dreh-Drück-Encoders im Bearbeitungsmenü, passen
Systemeinstellungen an und ändern Werte in den entsprechenden Menüpunkten.

17
DEUTSCH
ENGLISHFRANCAIS
ESPAÑOL
POLSKIITALIANO
简体中文繁體中文
5
INPUT 1 - 2
Symmetrische Audioeingänge der Kanäle 1 und 2 mit XLR/Klinke Kombibuchsen. Die Eingänge sind sowohl für Signale mit Line-Pegel als auch zum
direkten Anschließen eines Mikrofons geeignet. Die Eingänge sind nicht mit einer Phantomspeisung ausgestattet.
6
GAIN
Regler für die Eingangsverstärkung der Kanäle 1 und 2. Für einen optimalen Rauschabstand pegeln Sie ein Signal so hoch wie möglich ein, sorgen
aber dafür, dass die Peak-Anzeige im Display nicht oder nur kurzzeitig erscheint, um Signalverzerrungen und Schäden am System zu vermeiden.
Passen Sie ggf. auch den Ausgangspegel des Zuspielgeräts an.
7
AUX IN
Unsymmetrischer Audioeingang mit 3,5mm Stereo-Klinkenbuchse. Ein anliegendes Stereosignal wird intern Mono summiert. Regeln Sie die Laut-
stärke für den AUX IN-Kanal mit Hilfe des Gain-Reglers von Kanal 2, ggf. auch am Zuspielgerät und die Gesamtlautstärke mit Hilfe des Dreh-Drück-
Encoders.
8
SYSTEM OUT
Symmetrischer Audioausgang mit männlicher 3-Pol XLR-Buchse. Das anliegende Signal ist ein Mix aus Kanal 1 und 2 und AUX IN.
BEDIENUNG
HINWEISE
Sobald der Lautsprecher korrekt am Stromnetz angeschlossen und eingeschaltet wird, erscheint das LD Systems Logo für kurze Zeit im Display. Alle
Einstellungen, wie z.B. Preset, EQ und Delay werden geladen, so, wie sie vor dem Ausschalten des Lautsprechers eingestellt waren. Bluetooth wird
bei einem Neustart automatisch deaktiviert, falls Bluetooth zuvor aktiviert war (bei den Modellen mit Bluetooth). Nach diesem Vorgang, der nur
etwa eine Sekunde dauert, ist der Lautsprecher betriebsbereit.
DISPLAY HAUPTANZEIGE
Im normalen Betrieb ist die Hauptanzeige aktiviert, dabei werden im Display die eingestellte Gesamtlautstärke, das aktivierte Lautsprecher-Preset,
die Eingangspegel der Kanäle 1 und 2 und bei Modellen mit Bluetooth-Funktion das Bluetooth-Symbol angezeigt, wenn Bluetooth aktiviert ist (siehe
Abbildung).
Gesamtlautstärke
Lautsprecher-Preset
Eingangspegel mit Peak-Anzeige
Kanal 1
Bluetooth
Eingangspegel mit Peak-Anzeige
Kanal 2
Pegel Peak
LAUTSTÄRKE (VOLUME)
Ausgehend von der Hauptanzeige kann die Gesamtlautstärke direkt durch Drehen des Dreh-Drück-Encoders VOLUME / PUSH FOR MENU von -60 bis +10
dB eingestellt werden. Die Anzeige im Display wechselt beim Drehen des Encoders automatisch zur entsprechenden Darstellung (siehe Abbildung
unten). Nach circa 8 Sekunden Inaktivität wird automatisch wieder die Hauptanzeige angezeigt, durch Drücken auf den Encoder wechselt die
Anzeige sofort zur Hauptanzeige.

18
DEUTSCHENGLISH FRANCAIS
ESPAÑOL
POLSKI ITALIANO
简体中文 繁體中文
AUDIOEINSTELLUNGEN (AUDIO)
Drücken Sie auf den Dreh-Drück-Encoder, um in das Hauptmenü zu gelangen und wählen dann durch Drehen des Encoders den Menüpunkt
AUDIO aus (dunkel hinterlegt). Drücken Sie wiederum auf den Encoder, um ins Untermenü zu gelangen und wählen den gewünschten
Untermenüpunkt durch Drehen des Encoders aus. Bestätigen Sie durch Drücken auf den Encoder. Ändern Sie einen Wert durch Drehen des
Encoders, bestätigen Sie die Wertänderung durch Drücken des Encoders. Entnehmen Sie die Untermenüpunkte und die entsprechenden
Informationen dazu aus nachfolgender Tabelle. Wählen Sie im Untermenü MAIN MENU und drücken auf den Encoder, um zum Hauptmenü
zurückzugelangen, wählen Sie im Hauptmenü HOME, bestätigen durch Drücken auf den Encoder, um dann zur Hauptanzeige zurückzukeh-
ren. Nach circa 8 Sekunden Inaktivität wird die Hauptanzeige automatisch angezeigt.
AUDIO (Wert ändern = Encoder drehen, Wertänderung bestätigen = Encoder drücken)
MAIN MENU Zurück zum Hauptmenü
PRESET Auswahl des Lautsprecher-Presets FULL-
RANGE
MONITOR
FLAT
SAT
HIGH EQ Einstellen der Höhenfrequenzen von -10dB bis +10dB
MID EQ Einstellen der Mittenfrequenzen von -10dB bis +10dB
LOW EQ Einstellen der Bassfrequenzen von -10dB bis +10dB
DELAY Zeitverzögerung des Audiosignals in 0,1m Schritten bis 10m (0m = OFF, Anzeige in Meter und Feet)

19
DEUTSCH
ENGLISHFRANCAIS
ESPAÑOL
POLSKIITALIANO
简体中文繁體中文
BLUETOOTH® (nur Modelle LDICOA12ABT(W) und LDICOA15ABT(W))
Die Modelle LDICOA12ABT und LDICOA15ABT sind mit Bluetooth ausgestattet, was bedeutet, dass Audio-Dateien eines anderen Bluetooth-Geräts
(z.B. Smartphone, Tablet) über die Lautsprecher wiedergegeben werden können (maximale Entfernung zwischen beiden Geräten ca. 10 Meter,
Stereo-Signale werden intern Mono-summiert). Drücken Sie zum Aktivieren von Bluetooth auf den Dreh-Drück-Encoder, um in das Hauptmenü
zu gelangen und wählen dann durch Drehen des Encoders den Menüpunkt BLUETOOTH aus (dunkel hinterlegt). Drücken Sie wiederum auf
den Encoder, um ins Untermenü zu gelangen und wählen durch Drehen des Encoders ON aus (zurück zum Hauptmenü mit []). Bestätigen
Sie durch Drücken auf den Encoder, wählen den Untermenüpunkt HOME aus und bestätigen abermals durch Drücken auf den Encoder. Ein
blinkendes Bluetooth-Symbol erscheint nun in der Hauptanzeige, aktivieren Sie Bluetooth auf Ihrem Smartphone oder Tablet und suchen
auf der Benutzeroberäche nach verfügbaren Geräten. Wählen Sie den Eintrag „LD ICOA® 12“ bzw. „LD ICOA® 15“ und koppeln und verbinden
damit Ihr Bluetooth-Gerät mit der Bluetooth-Einheit des Lautsprechers. Sobald der Vorgang abgeschlossen ist, kann die Audiowieder-
gabe gestartet werden, das Bluetooth-Symbol im Display erscheint nun permanent. Wird die Bluetooth-Verbindung unterbrochen (z.B.
überschreiten der Reichweite), beginnt das Bluetooth-Symbol wieder zu blinken. Die Lautstärkeeinstellung erfolgt am Zuspielgerät und mit
Hilfe des Encoders wird die Gesamtlautstärke eingestellt. Wenn eine Bluetooth-Verbindung zum Lautsprecher während einer Beschallung
nicht benötigt wird, deaktivieren Sie Bluetooth im Bluetooth Untermenü (BLUETOOTH OFF).
SYSTEMEINSTELLUNGEN (SETTINGS)
Drücken Sie auf den Dreh-Drück-Encoder, um in das Hauptmenü zu gelangen und wählen dann durch Drehen des Encoders den Menüpunkt
SETTINGS aus (dunkel hinterlegt). Drücken Sie wiederum auf den Encoder, um ins Untermenü zu gelangen und wählen den gewünschten
Untermenüpunkt durch Drehen des Encoders aus. Bestätigen Sie durch Drücken auf den Encoder. Ändern Sie einen Wert durch Drehen des
Encoders, bestätigen Sie die Wertänderung durch Drücken des Encoders. Entnehmen Sie die Untermenüpunkte und die entsprechenden
Informationen dazu aus nachfolgender Tabelle. Wählen Sie im Untermenü MAIN MENU und drücken auf den Encoder, um zum Hauptmenü
zurückzugelangen, wählen Sie im Hauptmenü HOME, bestätigen durch Drücken auf den Encoder, um dann zur Hauptanzeige zurückzukeh-
ren. Nach circa 8 Sekunden Inaktivität wird die Hauptanzeige automatisch angezeigt.
SETTINGS (Wert bzw. Status ändern = Encoder drehen, Wertänderung bestätigen bzw. Informationen abfragen = Encoder drücken)
MAIN MENU Zurück zum Hauptmenü
LCD DIM Automatische Display-Abdunklung ON Display wird nach ca. 8 Sekunden Inaktivität automatisch abgedunkelt
OFF Automatische Display-Abdunklung ausgeschaltet
BRIGHTNESS Einstellen der Display-Helligkeit (0 - 100%)
CONTRAST Einstellen des Display-Kontrasts (0 - 100%)
INFO Anzeige von Modellnummer und Software-Version
FACTORY DEFAULT Zurücksetzen auf Werkseinstellungen
(AUDIO, BLUETOOTH + SETTINGS)
CANCEL Zurücksetzen abbrechen
RESET SURE? YES Zurücksetzen durchführen
CANCEL Zurücksetzen abbrechen

20
DEUTSCHENGLISH FRANCAIS
ESPAÑOL
POLSKI ITALIANO
简体中文 繁體中文
WAS BEDEUTET LD SYSTEMS DynX® DSP?
DSP ist die Abkürzung für Digital Signal Processing (Digitale Signalverarbeitung), DynX® beinhaltet die Funktionen Limiter, EQ, Kompressor und
Frequenzweiche. Die digitale Signalverarbeitung gewährleistet eine optimale Audiowiedergabe mit maximaler Klarheit und schützt gleichzeitig das
PA-System vor Überlastung.
WAS GENAU BEWIRKT DynX® DSP?
Die Limiter-Funktion schützt die Lautsprecher und verhindert durch Übersteuerung verursachte Verzerrungen. Separate Limiter für den Bass-Mitten-
und Höhenbereich schwächen das Signal ab, sobald der Pegel einen Wert übersteigt, der sich negativ auswirken könnte. Jeder Limiter ist für einen
der drei nahtlos aneinander anschließenden Frequenzbereiche optimiert (Multiband-Limiter). Das System lasst sich auf diese Weise mit einem
insgesamt höheren Schalldruck betreiben, da extreme Signalspitzen automatisch abgeschwächt werden, sodass die Gesamtlautstärke nicht
reduziert werden muss.
Der Multiband-EQ bearbeitet den gesamten Frequenzbereich und optimiert den Gesamtklang des Systems.
Die Frequenzweichen teilen das Audiosignal je nach Frequenzbereich den jeweiligen Lautsprechern, also dem Subwoofer bzw. den Mitten- und Hoch-
tönern der Array-Säule zu. Die Amplituden- und Laufzeit-Optimierung der Frequenzweichen sorgt dafür, dass alle Frequenzen gleichmäßig ausgegeben
werden und den Zuhörer zeitgleich erreichen.
STATIVFLANSCH
Die Lautsprecher verfügen über einen Stativansch mit einer Stativaufnahme mit 0° Winkelung (Position hinten) und einer Stativaufnahme mit 5°
Neigungswinkel (Position vorne). Anwendungsbeispiele: Verwenden Sie die Stativaufnahme mit 0° Winkelung für die Beschallung von stehendem
Publikum und die Stativaufnahme mit 5° Neigungswinkel für die Beschallung von sitzendem Publikum.
Strona się ładuje...
Strona się ładuje...
Strona się ładuje...
Strona się ładuje...
Strona się ładuje...
Strona się ładuje...
Strona się ładuje...
Strona się ładuje...
Strona się ładuje...
Strona się ładuje...
Strona się ładuje...
Strona się ładuje...
Strona się ładuje...
Strona się ładuje...
Strona się ładuje...
Strona się ładuje...
Strona się ładuje...
Strona się ładuje...
Strona się ładuje...
Strona się ładuje...
Strona się ładuje...
Strona się ładuje...
Strona się ładuje...
Strona się ładuje...
Strona się ładuje...
Strona się ładuje...
Strona się ładuje...
Strona się ładuje...
Strona się ładuje...
Strona się ładuje...
Strona się ładuje...
Strona się ładuje...
Strona się ładuje...
Strona się ładuje...
Strona się ładuje...
Strona się ładuje...
Strona się ładuje...
Strona się ładuje...
Strona się ładuje...
Strona się ładuje...
Strona się ładuje...
Strona się ładuje...
Strona się ładuje...
Strona się ładuje...
Strona się ładuje...
Strona się ładuje...
Strona się ładuje...
Strona się ładuje...
Strona się ładuje...
Strona się ładuje...
Strona się ładuje...
Strona się ładuje...
Strona się ładuje...
Strona się ładuje...
Strona się ładuje...
Strona się ładuje...
Strona się ładuje...
Strona się ładuje...
Strona się ładuje...
Strona się ładuje...
Strona się ładuje...
Strona się ładuje...
Strona się ładuje...
Strona się ładuje...
Strona się ładuje...
Strona się ładuje...
Strona się ładuje...
Strona się ładuje...
Strona się ładuje...
Strona się ładuje...
Strona się ładuje...
Strona się ładuje...
-
 1
1
-
 2
2
-
 3
3
-
 4
4
-
 5
5
-
 6
6
-
 7
7
-
 8
8
-
 9
9
-
 10
10
-
 11
11
-
 12
12
-
 13
13
-
 14
14
-
 15
15
-
 16
16
-
 17
17
-
 18
18
-
 19
19
-
 20
20
-
 21
21
-
 22
22
-
 23
23
-
 24
24
-
 25
25
-
 26
26
-
 27
27
-
 28
28
-
 29
29
-
 30
30
-
 31
31
-
 32
32
-
 33
33
-
 34
34
-
 35
35
-
 36
36
-
 37
37
-
 38
38
-
 39
39
-
 40
40
-
 41
41
-
 42
42
-
 43
43
-
 44
44
-
 45
45
-
 46
46
-
 47
47
-
 48
48
-
 49
49
-
 50
50
-
 51
51
-
 52
52
-
 53
53
-
 54
54
-
 55
55
-
 56
56
-
 57
57
-
 58
58
-
 59
59
-
 60
60
-
 61
61
-
 62
62
-
 63
63
-
 64
64
-
 65
65
-
 66
66
-
 67
67
-
 68
68
-
 69
69
-
 70
70
-
 71
71
-
 72
72
-
 73
73
-
 74
74
-
 75
75
-
 76
76
-
 77
77
-
 78
78
-
 79
79
-
 80
80
-
 81
81
-
 82
82
-
 83
83
-
 84
84
-
 85
85
-
 86
86
-
 87
87
-
 88
88
-
 89
89
-
 90
90
-
 91
91
-
 92
92


LD Systems ICOA 15 A BT Instrukcja obsługi
- Kategoria
- Sprzęt muzyczny
- Typ
- Instrukcja obsługi
w innych językach
Powiązane artykuły
-
LD Systems ICOA 12A Coaxial 12" Powered Speaker Instrukcja obsługi
-
LD Systems ICOA SUB 18 A Instrukcja obsługi
-
-
LD Systems LDMAUI28G2 Instrukcja obsługi
-
-
LD LDU505CS4 Instrukcja obsługi
-
-
-
-
LD AM 8 Instrukcja obsługi