ZEEGMA Zonder Pro Multi Industrial Vacuum Cleaner Instrukcja obsługi
- Kategoria
- Odkurzacze
- Typ
- Instrukcja obsługi

Zonder Pro
Mul
EN DE PL IT FR
ES NL UA LT HR
User Manual
Bedienungsanleitung
Instrukcja obsługi
Manuale d’uso
Manuel de l’U lisateur
Manual de usuario
Handleiding
Посібник користувача
Vartotojo vadovas
Korisnički priručnik

B
A
3
4
5
6
7
1
9
2
14
10
11
12
13
8
15 16 17 18 19
21 22 23 24 25
20
26

1
2

3
4

A
B
5
6

7
8

A B
9 10
11

EN
Introducon
Dear customer!
Thank you for placing trust in us and choosing Zeegma.
We provide you with a product perfect for everyday use thanks
to the use of high-quality materials and modern soluons.
We are convinced that the product will sasfy your requirements
as it has been designed with utmost care.
Before you use the product, please read this manual carefully.
Should you have any remarks or quesons concerning the
product, please do not hesitate to contact us:
IMPORTANT INFORMATION
Please read this instrucon manual before operang the device
to familiarise yourself with its funcons and use it as intended.
Failure to follow the safety instrucons and use not in
accordance with the instrucons may result in damage to the
device, property and injury to persons.
IMPORTANT! KEEP THIS MANUAL FOR
FUTURE REFERENCE!
1.
The device may be used by children
over 8 years of age and persons with
reduced physical, sensory or mental
capabilies, as well as persons without
relevant knowledge and experience
in the use of the device, if they are
supervised or have been previously
instructed in the safe use of the device
and the risks involved.
2.
Children must not play with the device.
3.
Cleaning and maintenance of the

EN
device must not be undertaken by
children without adult supervision.
4.
Disconnect the device from the power
source aer each use and before any
cleaning and maintenance. Disconnect
from the power socket by holding the
plug, never the cord.
5.
The device is suitable for non-professional
use only for vacuuming dust and spills
and washing upholstery, carpets or rugs.
The vacuum cleaner is not suitable for
vacuuming industrial surfaces.
6. The device is designed for collecng
cold ash from fireplaces, ovens,
cookers, furnaces, ashtrays or similar
ash accumulaons.
7. Warning! Risk of re.
8.
Do not vacuum hot, burning or glowing
ash. The device is designed for cold
ash collecon only.
9.
The tank should be emptied and
cleaned before and aer each use of
the device.
10. Do not use paper bags or bags made
of other ammable materials.
11.
Do not use devices that are not
suitable for vacuuming ash.

EN
12.
Do not leave the device on ammable
or polymeric surfaces such as carpets
or vinyl les.
13.
Do not repair or modify the device. These
operaons can only be undertaken by
an authorised service centre.
14. Do not start the device if you noce
any damage.
15.
Do not use the device if it starts to
malfuncon, has been dropped or
got wet, becomes excessively hot,
discolouraon, bulges, emits unnatural
sounds, smells and if other abnormal
phenomena occur. In such instances,
contact the manufacturer’s authorised
service centre immediately.
16.
Check the power cable regularly for
damage. Do not use the device if the
power cord is damaged.
17.
The device should be operated at room
temperature. Do not run the device at
low temperatures. The device should be
le at room temperature for a minimum
of 30 minutes before commissioning.
18.
The device is not waterproof, do not
immerse it in water or keep it in a damp
place.

EN
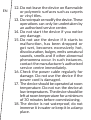
19. Place the device on a at, horizontal
surface and avoid lng. Avoid placing
it on very so surfaces.
20.
Use the device away from heat sources,
high temperatures, hot surfaces, direct
sunlight, sources of spark, open ames,
oils and sharp edges.
21.
Do not use the device in an
environment containing ammable,
explosive or toxic substances.
22.
Do not use chemicals to clean the
device.
23.
Do not use the device for purposes
other than those for which it was
designed.
24. Only use the ps included in the set
for their intended purpose.
25. Ensure that the local power source is
compable with the vacuum cleaner’s
power requirements.
26.
Do not bend, stretch or pull the exible
hose. Do not use the vacuum cleaner
when the hose is damaged.
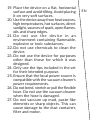
27.
Do not vacuum up mud, paste-like
elements or sharp objects. This can
cause damage to the dust container,
lter and motor.

EN
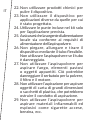
28.
Do not use the vacuum cleaner to pull
in large paper items or plasc bags,
which can clog the sucon path.
29. Do not pull ammable and explosive
materials such as lit cigarees, petrol,
etc. with the vacuum cleaner.
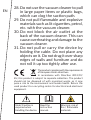
30.
Do not block the air outlet at the
back of the vacuum cleaner. This can
cause overheang and damage to the
vacuum cleaner.
31.
Do not pull or carry the device by
holding the cable. Do not place any
objects on it. Do not drag it over sharp
edges of walls and furniture and do
not roll it up too ghtly aer use.
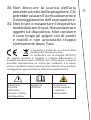
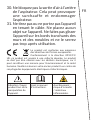
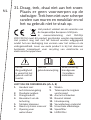
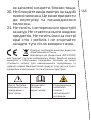
The product complies with the requirements
of European Union direcves.
In accordance with Direcve 2012/19/
EU, this product is subject to separate collecon. The product
should not be disposed of with municipal waste, as it may
pose a risk to the environment and human health. Return the
used product to a recycling centre for electrical and electronic
equipment.
Note! Cauon is
required when
handling the device.
Read the
instrucon
manual.
Warning: risk of
re / ammable
materials.

EN
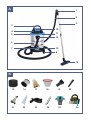
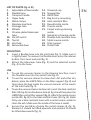
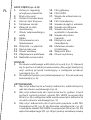
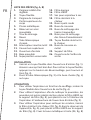
LIST OF PARTS (g. A, B)
1. Adjustable airow handle
2. Flexible hose
3. Transport handle
4. Upper body
5. Metal clamps
6. Stainless steel tank
7. Drainage hole
8. Wheels
9. Chrome-plated telescopic
tube
10. On/o switch
11. Top lid
12. Inlet hole
13. Removable base
14. Universal cap
15. Sponge lter
16. HEPA lter
17. Bag for dry vacuuming
18. Heat-resistant lter
19. Round bristle nozzle
20. Crevice nozzle
21. Carpet and rug cleaning
nozzle
22. Upholstery cleaning nozzle
23. Flexible heat-resistant hose
24. Metal crevice nozzle
25. Filter support
26. Outlet hole
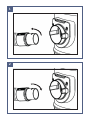
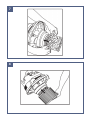
MOUNTING
1. Insert a exible hose into the inlet hole (g. 1). Make sure it
is ghtly xed. To remove the exible hose, press the release
buon, then twist and pull (g. 2).
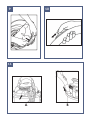
2.
Aach the telescopic tube (g. 3) and the selected nozzle
(g. 4) to the hose.
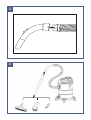
USE
1.
To use the vacuum cleaner in the blowing funcon, insert
the exible hose into the outlet hole (g. 6).
2. To use the vacuum cleaner to clean dust, dirt and other dry
debris, place the HEPA lter on the lter support (g. 8) and
then place the bag inside the vacuum cleaner at the mouth
of the inlet hole (g. 9).
3.
To use the vacuum cleaner to clean ash, insert the heat-resistant
lter (18, g. A) into the device tank (6, g. A) and then place the
HEPA lter on the lter support (g. 8). Aach the metal crevice
nozzle (24, g. B) to the heat-resistant hose (23, g. B). Note!
Only use a heat-resistant hose with a metal crevice nozzle to
clean the ash. Make sure the inside of the hose is metal.
4.
Secure the top lid by closing the metal clamps (5, g. A).
Element A should be lied upwards and element B should
be lied downwards (g. 5).

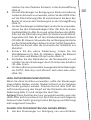
EN
5.
Connect the power cord to the power source and then switch
on the vacuum cleaner by pressing the switch (10, g. A).
6. To adjust the airow, move the slider on the handle (1, g.
A) up or down as preferred (g. 10).
HEPA FILTER CLEANING FUNCTION
When using this funcon, the vacuum cleaner should remain
switched on and the exible hose inserted into the body of the
device. Using the adjustable airow handle, press the buon on
the back of the top lid (g. 11) and clean the lter.
Note! This funcon can only be used if the HEPA lter is slightly
dirty. Aer prolonged use of the device, the lter should be cleaned
(see: Cleaning and maintenance) or replaced.
VACUUMING UP LIQUIDS AND WET FLOORS
1.
To use the vacuum cleaner to clean spills and leaks, place the
sponge lter on the lter support (g. 7).
2.
Connect the power cord to the power source and then switch
on the vacuum cleaner by pressing the switch (10, g. A).
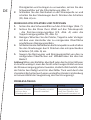
WASHING OF UPHOLSTERY AND CARPETS
1. Place the sponge lter on the lter support (g. 7).
2. Place the nozzle of your choice on the telescopic tube - the
upholstery cleaning nozzle (22, g. A) or the carpet and rug
cleaning nozzle (21, g. A).
3.
Clean/wash the upholstery, carpet or rug using the appropriate
detergents as recommended by the manufacturer of the
surface to be cleaned.
4.
Connect the power cord to the power source and then switch
on the vacuum cleaner by pressing the switch (10, g. A).
5. Suck up residual water and detergent from the surfaces to
be cleaned. Repeat if necessary.
Note! If the tank overflows or the device overturns with
water inside, the device must be switched off immediately
and disconnected from the power source due to the risk of
damaging the motor. Overlling of the tank will be signalled by
the characterisc sound of a clogged passage combined with
a drop in the device’s sucon power.

EN
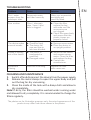
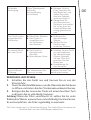
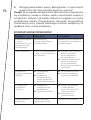
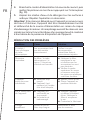
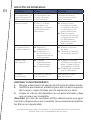
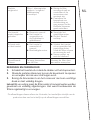
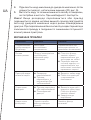
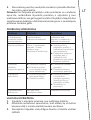
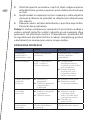
TROUBLESHOOTING
Problem Cause Soluon
Dirt / water
escapes from the
telescopic tube.
Accessories were
not ed correctly. Make sure accessories
are ghtly and
correctly ed.
Poor sucon. Filter / telescopic
tube / hose / inlet
hole is clogged.
• Clean the lter,
replace the bag
and make sure the
accessories are
not clogged.
• Check the upper body
and ensure that the
plasc clamps are
properly closed.
The device makes
unusual sounds. • Overlled tank.
• The device fell
over and the air
inlet was blocked.
• Remove excess water.
• Place the device in
an upright posion.
Smoke is coming
out of the device. • The device is
overheated or
overlled.
• Damaged motor.
• Switch o the device
and remove excess
water. Clean the lter
and replace the bag.
• Contact the
manufacturer.
Insucient
ltering. Filter life is too long. Replace the lter
with a new one.
CLEANING AND MAINTENANCE
1.
Switch o and disconnect the device from the power supply
2. Release the metal clamps to open the upper body and pull
out the bag for dry vacuuming.
3. Clean the inside of the tank with a damp cloth and allow to
dry completely.
Note! If dirty, the lter should be washed under running water
and allowed to dry completely. It is recommended to change the
lters regularly.
The photos are for illustrave purposes only, the actual appearance of the
products may dier from those shown in the photos.

DE
Einführung
Sehr geehrter Kunde!
Wir möchten uns bei Ihnen bedanken, dass Sie uns vertraut und
die Zeegma-Marke gewählt haben.
Wir übergeben Ihnen das Produkt, dass sich dank hochqualitaver
Materialien und moderner technologischer Lösungen in dem
täglichen Bedarf perfekt bewährt.
Wir sind sicher, dass die sehr sorgfälge Ausführung Ihre
Anforderungen erfüllt.
Vor der Verwendung des Produkts machen Sie sich mit der
vorliegenden Bedienungsanleitung vertraut.
Falls Sie Anmerkungen oder Fragen haben, setzen Sie sich mit
uns in Verbindung:
WICHTIGE INFORMATIONEN
Bie lesen Sie diese Gebrauchsanleitung, bevor Sie das Gerät
in Betrieb nehmen, um sich mit seinen Funkonen vertraut zu
machen und es besmmungsgemäß zu verwenden.
Die Nichtbeachtung der Sicherheitshinweise und eine nicht
Verwendung, die nicht den Besmmungen der Gebrauchsanleitung
entspricht, können zu Schäden am Gerät, an Eigentum und an
Personen führen.
WICHTIG! BEWAHREN SIE DIESE
ANLEITUNG FÜR EINE SPÄTERE
VERWENDUNG AUF!
1.
Das Gerät kann von Kindern
über 8 Jahren und Personen mit
eingeschränkten körperlichen,
sensorischen oder geisgen Fähigkeiten
sowie von Personen ohne einschlägige
Kenntnisse und Erfahrungen im Umgang
mit dem Gerät verwendet werden, wenn

DE
diese beaufsichgt werden oder zuvor
in den sicheren Gebrauch des Geräts
und die damit verbundenen Risiken
eingewiesen wurden.
2.
Kinder sollten nicht mit dem Gerät
spielen.
3.
Die Reinigung und Wartung des Geräts
darf nicht von Kindern ohne Aufsicht
von Erwachsenen durchgeführt
werden.
4.
Trennen Sie das Gerät nach jedem
Gebrauch und vor jeder Reinigung und
Wartung vom Stromnetz. Ziehen Sie
den Netzstecker aus der Steckdose,
indem Sie den Stecker festhalten,
niemals das Kabel.
5.
Das Gerät ist nur für den Hausgebrauch
zum Aufsaugen von Staub und
verschütteten Flüssigkeiten sowie
zum Waschen von Polstern, Teppichen
und Vorhängen geeignet. Der
Staubsauger ist nicht zum Saugen von
Industrieoberächen geeignet.
6.
Dieses Gerät ist zum Aufsaugen kalter
Asche aus Kaminen, Herden, Kochern,
Aschenbechern oder ähnlichen
Ascheansammlungen geeignet.

DE
7. Achtung Brandgefahr.
8.
Saugen Sie mit dem Staubsauger
keine heiße, brennende oder glühende
Asche auf. Das Gerät ist nur für das
Aufsaugen kalter Asche ausgelegt.
9.
Der Behälter sollte vor und nach
jedem Gebrauch des Geräts geleert
und gereinigt werden.
10.
Verwenden Sie keine Papiertüten
oder Tüten aus anderen brennbaren
Materialien.
11.
Verwenden Sie keine Geräte, die
nicht für das Aufsaugen von Asche
ausgelegt sind.
12.
Lassen Sie das Gerät nicht auf
brennbaren oder polymeren
Oberflächen wie Teppichen oder
Vinyliesen stehen.
13.
Reparieren oder modifizieren Sie
das Gerät nicht. Diese Maßnahmen
dürfen nur von einer autorisierten
Servicestelle durchgeführt werden.
14. Starten Sie das Gerät nicht, wenn Sie
einen Schaden feststellen.
15.
Verwenden Sie das Gerät nicht, wenn
es nicht mehr richtig funktioniert,
wenn es heruntergefallen oder nass

DE
geworden ist, wenn es übermäßig heiß
wird, wenn es sich verfärbt, sich wölbt,
unnatürliche Geräusche oder Gerüche
von sich gibt oder wenn andere
abnormale Phänomene auftreten.
Wenden Sie sich in solchen Fällen
sofort an die autorisierte Servicestelle
des Herstellers.
16.
Überprüfen Sie das Netzkabel
regelmäßig auf Schäden. Verwenden
Sie das Gerät nicht, wenn das
Netzkabel beschädigt ist.
17. Das Gerät sollte bei Raumtemperatur
betrieben werden. Starten Sie das
Gerät nicht bei niedriger Temperatur.
Lassen Sie das Gerät mindestens 30
Minuten lang bei Raumtemperatur
stehen, bevor Sie es in Betrieb nehmen.
18.
Das Gerät ist nicht wasserdicht,
tauchen Sie es nicht in Wasser und
bewahren Sie es nicht an einem
feuchten Ort auf.
19. Stellen Sie das Gerät auf eine ebene,
horizontale Fläche und vermeiden
Sie es, es zu kippen. Vermeiden Sie
das Abstellen des Gerätes auf sehr
weichen Oberächen.

DE
20.
Verwenden Sie das Gerät nicht in
der Nähe von Wärmequellen, hohen
Temperaturen, heißen Oberächen,
direktem Sonnenlicht, Funkenquellen,
oenen Flammen, Ölen und scharfen
Kanten.
21. Verwenden Sie das Gerät nicht in einer
Umgebung, die enlammbare, explosive
oder giige Substanzen enthält.
22.
Verwenden Sie keine Chemikalien zur
Reinigung des Geräts.
23.
Verwenden Sie das Gerät nicht für
andere Zwecke als die, für die es
entwickelt wurde.
24.
Verwenden Sie die im Kit enthaltenen
Spitzen nur für den vorgesehenen
Zweck.
25. Vergewissern Sie sich, dass die lokale
Stromquelle mit dem Strombedarf des
Staubsaugers kompabel ist.
26. Biegen, dehnen oder ziehen Sie nicht
an dem exiblen Schlauch. Verwenden
Sie den Staubsauger nicht, wenn der
Schlauch beschädigt ist.
27.
Verwenden Sie den Staubsauger nicht,
um Schlamm, klebrige Gegenstände
und scharfe Objekte einzusaugen. Dies
Strona jest ładowana ...
Strona jest ładowana ...
Strona jest ładowana ...
Strona jest ładowana ...
Strona jest ładowana ...
Strona jest ładowana ...
Strona jest ładowana ...
Strona jest ładowana ...
Strona jest ładowana ...
Strona jest ładowana ...
Strona jest ładowana ...
Strona jest ładowana ...
Strona jest ładowana ...
Strona jest ładowana ...
Strona jest ładowana ...
Strona jest ładowana ...
Strona jest ładowana ...
Strona jest ładowana ...
Strona jest ładowana ...
Strona jest ładowana ...
Strona jest ładowana ...
Strona jest ładowana ...
Strona jest ładowana ...
Strona jest ładowana ...
Strona jest ładowana ...
Strona jest ładowana ...
Strona jest ładowana ...
Strona jest ładowana ...
Strona jest ładowana ...
Strona jest ładowana ...
Strona jest ładowana ...
Strona jest ładowana ...
Strona jest ładowana ...
Strona jest ładowana ...
Strona jest ładowana ...
Strona jest ładowana ...
Strona jest ładowana ...
Strona jest ładowana ...
Strona jest ładowana ...
Strona jest ładowana ...
Strona jest ładowana ...
Strona jest ładowana ...
Strona jest ładowana ...
Strona jest ładowana ...
Strona jest ładowana ...
Strona jest ładowana ...
Strona jest ładowana ...
Strona jest ładowana ...
Strona jest ładowana ...
Strona jest ładowana ...
Strona jest ładowana ...
Strona jest ładowana ...
Strona jest ładowana ...
Strona jest ładowana ...
Strona jest ładowana ...
Strona jest ładowana ...
Strona jest ładowana ...
Strona jest ładowana ...
Strona jest ładowana ...
Strona jest ładowana ...
Strona jest ładowana ...
Strona jest ładowana ...
Strona jest ładowana ...
Strona jest ładowana ...
Strona jest ładowana ...
Strona jest ładowana ...
Strona jest ładowana ...
Strona jest ładowana ...
Strona jest ładowana ...
Strona jest ładowana ...
Strona jest ładowana ...
Strona jest ładowana ...
Strona jest ładowana ...
Strona jest ładowana ...
Strona jest ładowana ...
Strona jest ładowana ...
Strona jest ładowana ...
Strona jest ładowana ...
Strona jest ładowana ...
Strona jest ładowana ...
Strona jest ładowana ...
Strona jest ładowana ...
Strona jest ładowana ...
Strona jest ładowana ...
-
 1
1
-
 2
2
-
 3
3
-
 4
4
-
 5
5
-
 6
6
-
 7
7
-
 8
8
-
 9
9
-
 10
10
-
 11
11
-
 12
12
-
 13
13
-
 14
14
-
 15
15
-
 16
16
-
 17
17
-
 18
18
-
 19
19
-
 20
20
-
 21
21
-
 22
22
-
 23
23
-
 24
24
-
 25
25
-
 26
26
-
 27
27
-
 28
28
-
 29
29
-
 30
30
-
 31
31
-
 32
32
-
 33
33
-
 34
34
-
 35
35
-
 36
36
-
 37
37
-
 38
38
-
 39
39
-
 40
40
-
 41
41
-
 42
42
-
 43
43
-
 44
44
-
 45
45
-
 46
46
-
 47
47
-
 48
48
-
 49
49
-
 50
50
-
 51
51
-
 52
52
-
 53
53
-
 54
54
-
 55
55
-
 56
56
-
 57
57
-
 58
58
-
 59
59
-
 60
60
-
 61
61
-
 62
62
-
 63
63
-
 64
64
-
 65
65
-
 66
66
-
 67
67
-
 68
68
-
 69
69
-
 70
70
-
 71
71
-
 72
72
-
 73
73
-
 74
74
-
 75
75
-
 76
76
-
 77
77
-
 78
78
-
 79
79
-
 80
80
-
 81
81
-
 82
82
-
 83
83
-
 84
84
-
 85
85
-
 86
86
-
 87
87
-
 88
88
-
 89
89
-
 90
90
-
 91
91
-
 92
92
-
 93
93
-
 94
94
-
 95
95
-
 96
96
-
 97
97
-
 98
98
-
 99
99
-
 100
100
-
 101
101
-
 102
102
-
 103
103
-
 104
104


ZEEGMA Zonder Pro Multi Industrial Vacuum Cleaner Instrukcja obsługi
- Kategoria
- Odkurzacze
- Typ
- Instrukcja obsługi
w innych językach
- español: ZEEGMA Zonder Pro Multi Industrial Vacuum Cleaner Manual de usuario
- italiano: ZEEGMA Zonder Pro Multi Industrial Vacuum Cleaner Manuale utente
- Deutsch: ZEEGMA Zonder Pro Multi Industrial Vacuum Cleaner Benutzerhandbuch
- français: ZEEGMA Zonder Pro Multi Industrial Vacuum Cleaner Manuel utilisateur
- Nederlands: ZEEGMA Zonder Pro Multi Industrial Vacuum Cleaner Handleiding
Powiązane dokumenty
Inne dokumenty
-
eta Enzo 1514 90000 Instrukcja obsługi
-
-
-
Concept VP 8240 Instrukcja obsługi
-
Concept VP 8310 Instrukcja obsługi
-
-
Cecotec Conga Instrukcja obsługi
-
Philips EasyLife FC8138/12 Instrukcja obsługi
-
-