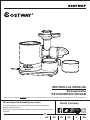
Costway ES10002DE Instrukcja obsługi
- Kategoria
- Sokowirówki
- Typ
- Instrukcja obsługi
Niniejsza instrukcja jest również odpowiednia dla

Slow Juicer
ES10002DE/ES10002GB
EN DE FR ES IT PL
THIS INSTRUCTION BOOKLET CONTAINS IMPORTANT SAFETY INFORMATION. PLEASE READ AND KEEP FOR FUTURE REFERENCE.
Follow Costway
Please give us a chance to make it right and do better
Contact our friendly customer service department for help first.
Replacements for missing or damaged parts will be shipped ASAP!
USER’S MANUAL

Contact Us!
Do NOT return this item.
Contact our friendly customer service department for help first.
E-mail
US: cs.us@costway.com
UK: cs.uk@costway.com
Before You StartBefore You Start
Please read all instructions carefully.
Retain instructions for future reference.
Separate and count all parts and hardware.
Read through each step carefully and follow the proper order.
We recommend that, where possible, all items are assembled near to the
area in which they will be placed in use, to avoid moving the product
unnecessarily once assembled.
Always place the product on a flat, steady and stable surface.
Keep all small parts and packaging materials for this product away from
babies and children as they potentially pose a serious choking hazard.
02

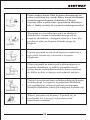
Please read all manual carefully before using
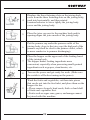
Attentions
1. Be sure to disconnect power supply before taking apart, packing or
commissioning of any part of this product.
2. This product belongs to Y connection. If power supply cords are damaged,
please contact with our Customer Service Department in order to avoid risks. Be
sure not to take apart or repair by yourself.
3. Before use, please check if the power cord, plug, fine strainer, auger, noodle
extruding body and other parts are damaged. Please stop using the product if any
damage is found, and contact our customer service department in time, and do
not disassemble and repair voluntarily in case of danger.
4. If this product needs to be repaired in the course of application, please contact
with our Customer Service Department. Be sure not to take apart or repair by
yourself in order to avoid risks.
5. Before switching on the power, please make sure that the removable parts are
fully installed, such as the juicing body, auger, fine strainer, juicing body cover, etc.
6. During operation, in case of any damage to the operator or the product, it is
strictly forbidden to put fingers or sharp objects into the material inlet to directly
contact the rotating parts such as the auger, etc.; it is strictly forbidden to use any
object to replace pusher rods. It is strictly forbidden to keep eyes close to the
material inlet in case of any accident.
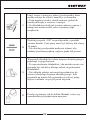
7. The ingredients should be cut into small pieces so that they can be put into the
inlet of the juicing body. If there are fruits and vegetables with kernel, hard seed,
thick skin or hard shell, remove them before process¬ing.
8. When ingredients are put in, the force to push the ingredients should not be so
great, and it is advisable that the ingredients can be cut off.
9. It is normal for the fine strainer, juicing body cover, auger and other parts to
be stained after juicing certain fruits and vegetables. It does not affect the quality
of the food and will not be harmful to eaters' health.
10. The product is equipped with an intelligent protection chip, making it
automatically stop after 20 minutes of continuous work. At this time, please stop
the operation for 20-30 minutes, and then continue to use the motor after
cooling. This method is conducive to extending the service life of the product.
03

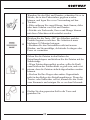
11. The product has a current limiting design. When processing harder
ingredients, the motor will be locked-rotor and the current will increase. When
the current exceeds 2A, the machine will make a "tick” sound and the motor will
stop working. This method can effectively protect the motor from over-current
and extend the service life of the motor.
12. If the motor stops due to current limiting protection or locked-rotor and the
motor cannot be automatically reversed during the operation process, start the
"Reverse" key of the power switch. You need to get the ingredients out, and then
start the "ON" key of the power switch for normal use of the machine. If it is still
locked-rotor, it is recommended to clean up the ingredients in the auger and
continue to use it. This method is to protect the motor.
13. After use, please wait until the motor and auger stop rotating and make sure
that the power is disconnected before removing the removable parts of the
machine.
14. All parts of this product are not allowed to be disinfected with hot water over
80°C and microwave ovens to avoid thermal deformation damage. Parts and
materials in contact with food ingredients are in line with food hygiene
certification, clean, hygienic and reliable.
15. Do not put the juicer body into water or other liquids, nor flush it with water
or other liquids to avoid any damage the machine body.
16. Not allow to use steel wool, abrasive cleaner or corrosive liquid (e.g. petrol
or acetone) to wash this product
17. This product is only applicable to individual or home application.
18. This product is a Class I appliance. The grounding wire of the socket must be
well grounded.
19. The instructions for appliances warn against misuse.
20. Always disconnect the appliance from the supply if it is left unattended and
before assembling, disassembling or cleaning.
21. This appliance shall not be used by children. Keep the appliance and its cord
out of reach of children.
22. Appliances can be used by persons with reduced physical, sensory or mental
capabilities or lack of experience and knowledge if they have been given
supervision or instruction concerning use of the appliance in a safe way and if
they understand the hazards involved.
04

23. Children shall not play with the appliance.
24. Switch off the appliance and disconnect from supply before changing
accessories or approaching parts that move in use.
25. This appliance is intended for household use and similar applications such as,
- staff kitchen areas in shops, offices and other working environments
- farm houses
- by clients in hotels, motels and other residential type environments
- bed and breakfast type environments
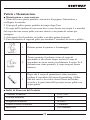
The symbol on the product or its packaging indicates:
Do not dispose of electrical appliances as unsorted municipal waste, use
separate collection facilities. Contact your local authority for
information regarding the collection systems available. If electrical
appliances are disposed of in landfills or dumps hazardous substances can leak
into the groundwater and get into the food Chain, damaging your health and
well-being. Please contact your local or regional waste authority for more
information on collection, reuse and recycling programs.
05

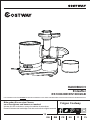
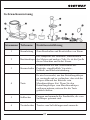
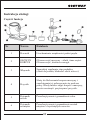
Directions for use
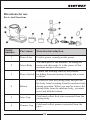
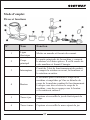
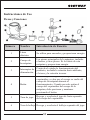
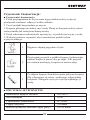
Parts And Functions
1 Power Line Used to power on and provide power.
Catch and collect fruit juice separated from the
juicing body.
Catch and collect pomace separated from the
juice.
Juicer Body
The main parts of the machine, including the
motor and other parts. It is the source of this
machine and provides power.
Button
Juice Cup
Pomace Cup
It is used to lock the juicing body and prevent
the body from loosening from the machine body
during operation. When you need to remove the
juicing body from the machine body, you must
press and hold the button.
2
Power Switch
Control the working status of the product,
including forward rotation, closing and reverse
rotation.
3
4
5
6
Serial
number Part name Function introduction
06

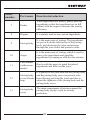
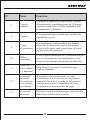
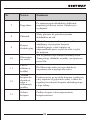
7 Pusher
When ingredients are placed, gently push the
ingredients so that the ingredients are in full
contact with the auger to increase the juicing
efficiency.
8 Hopper It is mainly used to store juiced ingredients.
9 Juicing body
It is the main parts of juicing. The ingredients
are put in from the inlet on top of the juicing
body, and discharge the juice and pomace
through the juice outlet and pomace outlet.
10 Auger
It is the main parts of juicing, which is used to
convey the ingredients and grind the
ingredients by running in with the fine strainer.
11
Fine strainer
(with screen
inside)
Run in with the auger to grind the juiced
ingredients and filter out the juice.
12
Juicing body
cover silicone
loop
It is placed at the joint between the juicing body
and the juicing body cover (to prevent juice
from flowing out from the joint) and also to
adjust the tightness of the juicing body and the
juicing body cover.
13 Juicing body
cover
The main components of juicing connect the
juicing body to play a role in security
protection.
Serial
number Part name Function introduction
07

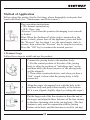
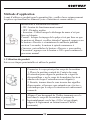
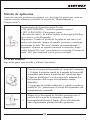
Method of Application
Before using this product for the first time, please thoroughly wash parts that
touch with foods (see “Maintenance and Preservation")
I. Product Usage
Follow these steps to install and use the product:
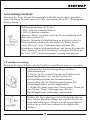
Keys operation instructions:
• ON: normal operation key
• OFF: Close, stop
-Reverse: Used when the pomace discharging is not smooth
or locked.
Hint: When the flushing off of the pulp is unsmooth or the
motor is stuck, please turn off the appliance, press and hold
the "Reverse" key for about 3 sec, the spiral motor starts to
reverse, then release the "Reverse" key to stop the reversion;
Press the "ON" key to continue the normal process.
Connect the juicing body to the machine body:
1. Put the central position of the inlet of the juicing
body to align the position of "unlocking sign" on the
machine body (the three fasteners of the juicing body
will be aligned).
2. Then rotate counterclockwise, and when you hear a
"tick" sound, it shows that the juicing body is fully
connected.
1
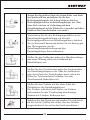
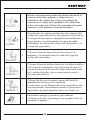
Align the auger's hexagonal axis with the hole in the
machine body and push it horizontally to the bottom.
(If it is not aligned, slightly align by rotating the auger)
2
Put the larger end of the fine strainer in from the end of
the auger, and align the three fasteners of the fine strainer
to the three fastening slots in the juicing body. (The fine
strainer is only used in conjunction with the juicing
button on the back, and this function is used for juicing)
3
08

Displace the three fastening slots on the juicing body
cover from the three fastening slots on the juicing body,
push into horizontally, and then rotated
counterclockwise to screw tightly the juicing body
cover and the juicing body.
4
Place the juice cup next to the machine body and its
opening aligns the juice mouth of the juicing body.
5
Put the pomace cup under the pomace outlet of the
juicing body, close to the juice cup (the high end of the
pomace cup shall be close to the pomace outlet, which
is more conducive to pomace discharging).
6
Place the hopper on the upper end of the feeding barrel
of the juicing body.
The hopper makes feeding ingredients more
convenient, especially when processing small-grained
ingredients such as grapes, strawberries, etc.
7
Turn on the power and get ready for work. (Make sure
the switch is off before turning on the power)
8
Wash the fruits and vegetables, cut them into pieces
that can be put into the feed inlet, and place them on the
hopper for use.
• Please remove kernels, hard seeds, thick or hard shell
of fruits and vegetables first.
• Fruits such as sugar cane, guava, and mango cannot
be juiced with this machine.
9
09

II. Tips for Fruit Selection
1. Select and use fresh fruits and vegetables, which contain more juice.
Particularly suitable fruits include pineapple, celery sticks, apples, cucumbers,
spinach, melons, tomatoes, oranges, grapes, and the like.
2. Instead of paring the thin skin of fruits and vegetables, you only need to pare
the thick skin of fruits and vegetables like oranges, pineapples, etc. Seeds of
citrus fruits also need to be removed because they will bring bitterness to the
juice.
3. When apples are squeezed, the concentration of apple juice depends on the
type of apple selected; the juicier the apple juice is, the clearer it is, so choose
the type of apple to be used for juice based on the concentra¬tion of juice you
want.
4. Freshly juiced apple juice may quickly turn brown, and you can add a few
drops of lemon juice to slow this process.
Press the "ON" key of the switch and the product starts
to work. The working time shall be less than or equal to
10 minutes.
• Do not touch the power switch with wet hands to
avoid electric shock, electric leakage or fire.
10
Put the ingredients into the feed inlet of the juicing
body and push the ingredients with the push rod.
• When ingredients are put in, the force to push the
ingredients should not be so great, and it is advisable
that the ingredients just can be cut off.
• Don't put your fingers or other objects into the feed
inlet of the juicing body. If the pomace cup or juice cup
is full, disc¬onnect the power and clean it before use.
11
Pour the squeezed juice into the cup and enjoy.
12
10

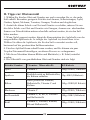
5. Leaves and leaf stems (such as lettuce) can be juiced with this machine.
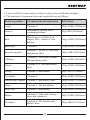
6. The nutrients of common fruits and vegetables are as follows:
Fruits/vegetables Vitamins/mineral substances KJ/Calorie
Apple Vitamin C
200g=150KJ (72Calorie)
Apricot Abundant in dietary fiber,
containing kalium
30g=85KJ (20Calorie)
Beet
Good sources of folic acid,
dietary fiber, vitamin C and
kalium
160g=190KJ (45Calorie)
Blueberry Vitamin C
125g=295KJ (70Calorie)
Brussels sprouts Vitamin C, B, B6, E, folic acid
and dietary fiber
100g=l10KJ (26Calorie)
Cabbage Vitamin C, folic acid, kalium,
B6 and dietary fiber
100g=110KJ (26Calorie)
Carrot Vitamin A, C, B6 and dietary
fiber
120g=125KJ (30Calorie)
Celery Vitamin C and kalium
80g=55KJ (13Calorie)
Cucumber Vitamin C
280g=120KJ (29Calorie)
Foeniculum vulgare Vitamin C and dietary fiber
300g=145KJ (35Calorie)
Kiwi fruit Vitamin C and kalium
100g=100KJ (40Calorie)
Grape Vitamin C, B6 and kalium
125g=355KJ (85Calorie)
Melon Vitamin C, folic acid, dietary
fiber and vitamin A
200g=210KJ (50Calorie)
Nectarine Vitamin C, B3, kalium and
dietary fiber
100g=90KJ (22 Calorie)
11

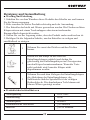
Cleaning and Maintenance
■ Maintenance and Preservation
1. Before washing this product, be sure to turn off the switch and disconnect the
power supply.
2. Please timely wash this product after application.
3. The juicer body must not be washed with water. The stains on the body must
be wiped with a drying rag or drying cotton cloth.
4. Please make sure the product is clean and dry before storage.
5. Please refer to the following steps to disassemble the juicer and then clean.
Take out the pusher and the hopper first.
1
Hold the button near the juicing body down, and at the
same time rotate the juicing body clockwise to take the
body down. If the button is not pressed, the body can't
be taken down.
2
After the juicing body is disassembled, take the juicing
body cover, the juice fine strainer and the auger down
in proper order, and the removable parts can be cleaned
with clear water.
3
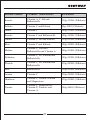
Peer Dietary fiber
150g=250KJ (60Calorie)
Pineapple Vitamin C
150g=245KJ (59Calorie)
Raspberry Vitamin C, ferrum, kalium and
magnesium
125g=130KJ (31Calorie)
Tomato
Vitamin C, dietary fiber,
vitamin E, folic acid and
vitamin A
180g=355KJ (85Calorie)
Peach Vitamin C, B3, kalium and
dietary fiber
150g=205KJ (49Calorie)
Fruits/vegetables Vitamins/mineral substances KJ/Calorie
12

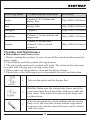
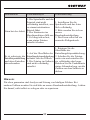
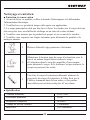
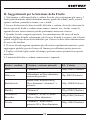
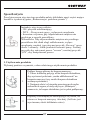
■ Product Safety Indexes
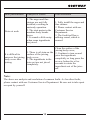
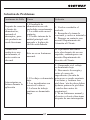
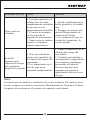
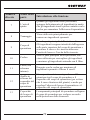
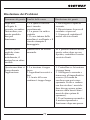
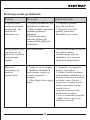
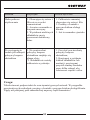
Abnormality Analysis and Solution
Fault phenomenon Analysis of causes Fault resolution
After connecting
the power supply,
turn on the switch,
but this product
cannot work
1. The power plug is not
plugged in properly.
2. The outlet is in poor
contact
3. The internal cable of
the main unit is off, or the
circuit board is damaged.
1. Plug the power plug back
in again.
2. Replace the power socket
and try again.
3. Please contact with our
Customer Service
Department.
When this product
is used initially,
the motor smells
terrible
This is not an abnormal
occurrence.
If the product still emits this
odor after repeated use, please
contact with our Customer
Service Department.
This machine stops
during the
application
1. The voltage is too low
2. Excessive or hard
ingredients
3. The continuous
working hour is too long
1. Check if the voltage is too
low.
2. Disconnect the power and
remove the excess ingredients
(Sugar cane cannot be juiced.
Hard skin/hard core fruits and
vegetables should be first
removed the hard skin/hard
core before juiced).
3. It is a normal phenomenon,
and the motor will resume
operation after a break.
Rated voltage
Rated power
Rated frequency
Continuous Working Hours
Interval
220V-240V
150W
50/60Hz
≤20minutes
≥20-30minutes
13

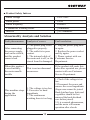
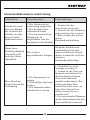
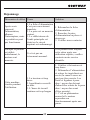
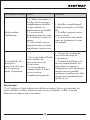
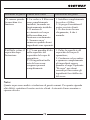
Note:
The above are analysis and resolution of common faults. As for other faults,
please contact with our Customer Service Department. Be sure not to take apart
or repair by yourself.
Fault phenomenon Analysis of causes Fault resolution
Noise at work
1. The auger and fine
strainer are not fully
installed, resulting in
unsteady operation.
2. The start motor in the
machine body breaks
down.
3. It sounds a little noisy
when some ingredients
are juiced.
1. Fully install the auger and
fine strainer.
2. Please contact with our
Customer Service
Department.
3. The food itself has a
rubbing sound, which is
normal.
It is difficult to
unscrew the juicing
body cover after
juicing
1. There is oil stain on the
surface of the juicing
body cover;
2. The ingredients in the
juice net are not juiced
completely.
Clean the surface of the
juicing body cover;
2. Continue to turn on and
juice the ingredients
completely or long press the
reverse button for a few
seconds to rotate the
ingredients out of the juice
net.
14

Welcome to visit our website and purchase our quality products!
We would like to extend our hearelt thanks to
all of our customers for taking me to assemble
this product and giving us valuable feedbacks.
With your inspiring rating, COSTWAY will be more consistent to offer you
EASY SHOPPING EXPERIENCE, GOOD PRODUCTS and EFFICIENT SERVICE!
US office: Fontana, California
UK office: Ipswich
Reward Points
Exclusive Customer Service
Personalized Recommendaons
Permanent Shopping Cart
Order History
15

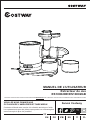
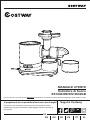
Entsafter
ES10002DE/ES10002GB
Bitte geben Sie uns eine Chance,
es zu korrigieren und besser zu machen!
Wenden Sie sich zunächst an unseren freundlichen Kundendienst.
Ersatz für fehlende oder beschädigte Teile wird so schnell wie möglich versendet!
DAS HANDBUCH ENTHÄLT WICHTIGE SICHERHEITSHINWEISE. BITTE LESEN UND BEWAHREN SIE FÜR DIE ZUKÜNFTIGE VERWENDUNG AUF.
Folgen Costway
EN DE FR ES IT PL
HANDBUCH
16

Kontakeren Sie uns!
E-mail
DE:cs.de@costway.com
Vor dem Beginnen
Bitte lesen Sie alle Anweisungen sorgfältig durch.
Bewahren Sie die Anweisungen zum zukünftigen Verwendung auf.
Separieren und zählen Sie alle Teile und Hardware.
Lesen Sie jeden Schritt sorgfältig durch und befolgen Sie die richtige
Reihenfolge.
Wir empfehlen, wenn möglich, alle Artikel in der Nähe des Einsatzortes zu
montieren, um ein unnötiges Bewegung des Artikels zu vermeiden.
Stellen Sie den Artikel immer auf eine glatte, flache und stabile Oberfläche.
Halten Sie alle kleinen Teile und Verpackungsmaterialien dieses Artikels von
Babys und Kindern fern, da sie zur ernsthaften Erstickungsgefahr führen
können.
17

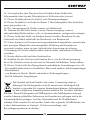
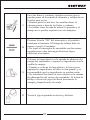
Aufmerksamkeiten
1. Trennen Sie unbedingt die Stromversorgung, bevor Sie Teile dieses Produkts
zerlegen, verpacken oder in Betrieb nehmen.
2. Dieses Produkt gehört zur Y-Verbindung. Wenn die Netzkabel beschädigt
sind, wenden Sie sich bitte an unseren Kundendienst, um Risiken zu vermeiden.
Achten Sie darauf, nicht selbst zu zerlegen oder zu reparieren.
3. Überprüfen Sie vor dem Gebrauch, ob das Netzkabel, der Stecker, das
Feinsieb, die Schnecke, der Nudelextrudierkörper und andere Teile beschädigt
sind. Bitte stellen Sie die Verwendung des Produkts ein, wenn Schäden
festgestellt werden, und wenden Sie sich rechtzeitig an unsere
Kundendienstabteilung. Zerlegen und reparieren Sie diese nicht im Falle einer
Gefahr freiwillig.
4. Wenn dieses Produkt im Laufe der Anwendung repariert werden muss,
wenden Sie sich bitte an unsere Kundendienstabteilung. Nehmen Sie es nicht
selbst auseinander oder reparieren Sie es nicht, um Risiken zu vermeiden.
5. Vergewissern Sie sich vor dem Einschalten, dass die abnehmbaren Teile
vollständig installiert sind, z.B. der Entsaftungskörper, die Schnecke, das
Feinsieb, die Entsaftungskörperabdeckung usw.
6. Während des Betriebs ist es im Falle einer Beschädigung des Bedieners oder
des Produkts strengstens verboten, Finger oder scharfe Gegenstände in den
Materialeinlass zu stecken, um die rotierenden Teile wie die Schnecke usw.
direkt zu berühren. Es ist strengstens verboten, Gegenstände zum Ersetzen von
Schubstangen zu verwenden. Es ist strengstens verboten, im Falle eines Unfalls
die Augen nahe am Materialeinlass zu halten.
7. Die Zutaten sollten in kleine Stücke geschnitten werden, damit sie in den
Einlass des Entsaftungskörpers gegeben werden können. Wenn es Obst und
Gemüse mit Kern, hartem Samen, dicker Haut oder harter Schale gibt, entfernen
Sie diese vor der Verarbeitung.
8. Beim Einlegen der Zutaten sollte die Kraft des Eindrückens der Zutaten nicht
zu groß sein. Es wird empfohlen, die Zutaten zu hacken.
18

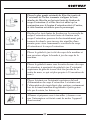
9. Es ist normal, dass das feine Sieb, die Saftabdeckung, die Schnecke und
andere Teile nach dem Entsaften bestimmter Obst- und Gemüsesorten
verschmutzt werden. Es hat keinen Einfluss auf die Qualität der Lebensmittel
und ist nicht gesundheitsschädlich für die Esser.
10. Das Produkt ist mit einem intelligenten Schutzchip ausgestattet, der nach 20
Minuten ununterbrochener Arbeit automatisch stoppt. Bitte stoppen Sie zu
diesem Zeitpunkt den Betrieb für 20 bis 30 Minuten und verwenden Sie den
Motor nach dem Abkühlen weiter. Diese Methode trägt zur Verlängerung der
Lebensdauer des Produkts bei.
11. Das Produkt hat ein Strombegrenzungsdesign. Bei der Verarbeitung härterer
Zutaten wird der Motor blockiert und der Strom steigt an. Wenn der Strom 2A
überschreitet, gibt die Maschine ein „Ticken“ aus und der Motor funktioniert
nicht mehr. Diese Methode kann den Motor effektiv vor Überstrom schützen und
die Lebensdauer des Motors verlängern.
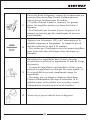
12. Wenn der Motor aufgrund eines Strombegrenzungsschutzes oder eines
blockierten Rotors stoppt und der Motor während des Betriebs nicht automatisch
umgedreht werden kann, starten Sie die Taste „Reverse“ des Netzschalters. Sie
müssen die Zutaten herausholen und dann die Taste „ON“ des Netzschalters für
den normalen Gebrauch der Maschine starten. Wenn der Rotor immer noch
blockiert ist, wird empfohlen, die Zutaten in der Schnecke zu reinigen und weiter
zu verwenden. Diese Methode dient zum Schutz des Motors.
13. Warten Sie nach dem Gebrauch, bis sich Motor und Schnecke nicht mehr
drehen, und stellen Sie sicher, dass die Stromversorgung unterbrochen ist, bevor
Sie die abnehmbaren Teile der Maschine entfernen.
14. Alle Teile dieses Produkts dürfen nicht mit heißem Wasser über 80°C und
Mikrowellenherden desinfiziert werden, um Schäden durch thermische
Verformung zu vermeiden. Teile und Materialien, die mit Lebensmittelzutaten in
Kontakt kommen, entsprechen der Lebensmittelhygiene-Zertifizierung, sind
sauber, hygienisch und zuverlässig.
15. Legen Sie den Entsafter nicht in Wasser oder andere Flüssigkeiten und
spülen Sie ihn nicht mit Wasser oder anderen Flüssigkeiten, um Schäden am
Maschinenkörper zu vermeiden.
19

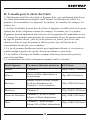
16. Verwenden Sie zum Waschen dieses Produkts keine Stahlwolle,
Scheuermittel oder ätzende Flüssigkeiten (z.B. Benzin oder Aceton).
17. Dieses Produkt gilt nur für Einzel- oder Heimanwendungen.
18. Dieses Produkt ist ein Gerät der Klasse I. Das Erdungskabel der Steckdose
muss gut geerdet sein.
19. Die Anweisungen für Geräte warnen vor Missbrauch.
20. Trennen Sie das Gerät immer von der Stromversorgung, wenn es
unbeaufsichtigt bleibt und bevor Sie es zusammenbauen, zerlegen oder reinigen.
21. Dieses Gerät darf nicht von Kindern benutzt werden. Bewahren Sie das
Gerät und sein Kabel außerhalb der Reichweite von Kindern auf.
22. Geräte können von Personen mit eingeschränkten körperlichen, sensorischen
oder geistigen Fähigkeiten oder mangelnder Erfahrung und Kenntnissen
verwendet werden, wenn sie eine Aufsicht oder Anweisung zur sicheren
Verwendung des Geräts erhalten haben und die damit verbundenen Gefahren
verstehen.
23. Kinder dürfen nicht mit dem Gerät spielen.
24. Schalten Sie das Gerät aus und trennen Sie es von der Stromversorgung,
bevor Sie Zubehör wechseln oder sich in Gebrauch befindlichen Teilen nähern.
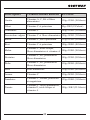
25. Dieses Gerät ist für den Hausgebrauch und ähnliche Anwendungen wie z.B.
- Personalküchenbereiche in Geschäften, Büros und anderen Arbeitsumgebungen
- Bauernhäuser
- von Kunden in Hotels, Motels und anderen Wohnumgebungen
- Bett & Frühstück-Umgebungen
Das Symbol auf dem Produkt oder seiner Verpackung zeigt an:
Entsorgen Sie Elektrogeräte nicht als unsortierten Siedlungsabfall,
sondern verwenden Sie separate Sammeleinrichtungen. Informationen
zu den verfügbaren Sammelsystemen erhalten Sie von Ihrer örtlichen
Behörde. Wenn Elektrogeräte auf Mülldeponien oder Mülldeponien entsorgt
werden, können gefährliche Substanzen ins Grundwasser gelangen und in die
Lebensmittelkette gelangen, was Ihre Gesundheit und Ihr Wohlbefinden
schädigt. Bitte wenden Sie sich an Ihre lokale oder regionale Abfallbehörde, um
weitere Informationen zu Sammel-, Wiederverwendungs- und
Recyclingprogrammen zu erhalten.
20
Strona się ładuje...
Strona się ładuje...
Strona się ładuje...
Strona się ładuje...
Strona się ładuje...
Strona się ładuje...
Strona się ładuje...
Strona się ładuje...
Strona się ładuje...
Strona się ładuje...
Strona się ładuje...
Strona się ładuje...
Strona się ładuje...
Strona się ładuje...
Strona się ładuje...
Strona się ładuje...
Strona się ładuje...
Strona się ładuje...
Strona się ładuje...
Strona się ładuje...
Strona się ładuje...
Strona się ładuje...
Strona się ładuje...
Strona się ładuje...
Strona się ładuje...
Strona się ładuje...
Strona się ładuje...
Strona się ładuje...
Strona się ładuje...
Strona się ładuje...
Strona się ładuje...
Strona się ładuje...
Strona się ładuje...
Strona się ładuje...
Strona się ładuje...
Strona się ładuje...
Strona się ładuje...
Strona się ładuje...
Strona się ładuje...
Strona się ładuje...
Strona się ładuje...
Strona się ładuje...
Strona się ładuje...
Strona się ładuje...
Strona się ładuje...
Strona się ładuje...
Strona się ładuje...
Strona się ładuje...
Strona się ładuje...
Strona się ładuje...
Strona się ładuje...
Strona się ładuje...
Strona się ładuje...
Strona się ładuje...
Strona się ładuje...
Strona się ładuje...
Strona się ładuje...
Strona się ładuje...
Strona się ładuje...
Strona się ładuje...
Strona się ładuje...
Strona się ładuje...
Strona się ładuje...
Strona się ładuje...
Strona się ładuje...
Strona się ładuje...
Strona się ładuje...
Strona się ładuje...
Strona się ładuje...
Strona się ładuje...
Strona się ładuje...
Strona się ładuje...
Strona się ładuje...
Strona się ładuje...
Strona się ładuje...
Strona się ładuje...
-
 1
1
-
 2
2
-
 3
3
-
 4
4
-
 5
5
-
 6
6
-
 7
7
-
 8
8
-
 9
9
-
 10
10
-
 11
11
-
 12
12
-
 13
13
-
 14
14
-
 15
15
-
 16
16
-
 17
17
-
 18
18
-
 19
19
-
 20
20
-
 21
21
-
 22
22
-
 23
23
-
 24
24
-
 25
25
-
 26
26
-
 27
27
-
 28
28
-
 29
29
-
 30
30
-
 31
31
-
 32
32
-
 33
33
-
 34
34
-
 35
35
-
 36
36
-
 37
37
-
 38
38
-
 39
39
-
 40
40
-
 41
41
-
 42
42
-
 43
43
-
 44
44
-
 45
45
-
 46
46
-
 47
47
-
 48
48
-
 49
49
-
 50
50
-
 51
51
-
 52
52
-
 53
53
-
 54
54
-
 55
55
-
 56
56
-
 57
57
-
 58
58
-
 59
59
-
 60
60
-
 61
61
-
 62
62
-
 63
63
-
 64
64
-
 65
65
-
 66
66
-
 67
67
-
 68
68
-
 69
69
-
 70
70
-
 71
71
-
 72
72
-
 73
73
-
 74
74
-
 75
75
-
 76
76
-
 77
77
-
 78
78
-
 79
79
-
 80
80
-
 81
81
-
 82
82
-
 83
83
-
 84
84
-
 85
85
-
 86
86
-
 87
87
-
 88
88
-
 89
89
-
 90
90
-
 91
91
-
 92
92
-
 93
93
-
 94
94
-
 95
95
-
 96
96


Costway ES10002DE Instrukcja obsługi
- Kategoria
- Sokowirówki
- Typ
- Instrukcja obsługi
- Niniejsza instrukcja jest również odpowiednia dla
w innych językach
- español: Costway ES10002DE Manual de usuario
- italiano: Costway ES10002DE Manuale utente
- Deutsch: Costway ES10002DE Benutzerhandbuch
- français: Costway ES10002DE Manuel utilisateur
- English: Costway ES10002DE User manual
Inne dokumenty
-
Zelmer ZJP3900 Instrukcja obsługi
-
Zelmer ZJE3800 Instrukcja obsługi
-
Gracioso G21 Instrukcja obsługi
-
Champion Entsafter Instrukcja obsługi
-
Hendi 221044 Instrukcja obsługi
-
Hyundai JE 702P Instrukcja obsługi
-
ECG OS 185 Instrukcja obsługi
-
Silvercrest SFE 450 A1 Operating Instructions Manual
-
eta Vital Press 1032 Instructions For Use Manual
-