Zelmer ZJP3900 Instrukcja obsługi
- Kategoria
- Sokowirówki
- Typ
- Instrukcja obsługi

ZJP3900 EasyJuice
INSTRUKCJE UŻYTKOWANIA
Wyciskarka wolnoobrotowa
ИНСТРУКЦИЯ ПО ПРИМЕНЕНИЮ
Соковыжималка шнековая
NÁVOD K POUŽITÍ
Pomalý odšťavňovač
ИНСТРУКЦИИ ЗА УПОТРЕБА
Бавна сокоизстисквачка
NAVODILA ZA UPORABO
Pomalý odšťavovač
ІНСТРУКЦІЯ ПО ЗАСТОСУВАННЮ
Шнекова соковижималка
USER MANUAL
Slow juicer
BENUTZERHANDBUCH
Langsamer Entsafter
HASZNÁLATI UTASÍTÁS
Lassú facsaró
INSTRUCȚIUNI DE UTILIZARE
Storcator lent
PL
EN
DE
CZ
SK
HU
RO
RU
UA
BG
ZJP3900

3
2
5 6 7 8
9
10
11
1213
1
4
REV
OFF
SOFT
HARD
1
2
1
2
FIG. 1
FIG. 2 FIG. 3 FIG. 4
FIG. 5 FIG. 6


4
PL
PL
DZIĘKUJEMY ZA WYBÓR MARKI ZELMER. ŻYCZYMY SATYSFAKCJI Z UŻYTKOWANIA URZĄDZENIA.
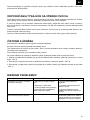
OSTRZEŻENIE
PRZED UŻYCIEM PRODUKTU NALEŻY UWAŻNIE PRZECZYTAĆ INSTRUKCJĘ UŻYTKOWANIA.
PRZECHOWUJ JĄ W BEZPIECZNYM MIEJSCU DO WYKORZYSTANIA W PRZYSZŁOŚCI
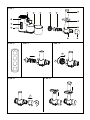
OPIS (RYS. 1)
1. Przewód zasilający
2. Panel sterowania
3. Korpus wyciskarki
4. Przycisk blokady
5. Pojemnik na sok
6. Pojemnik na miąższ
7. Tylna pokrywa komory wyciskarki
8. Ślimak
9. Popychacz
10. Tacka na produkty
11. Komora wyciskarki
12. Przednia pokrywa komory wyciskarki
13. Wylot soku
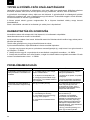
PANEL STEROWANIA (RYS. 2)
A. REV – funkcja rewers (bieg wsteczny): stosowana, gdy wytłaczanie nie odbywa się płynnie lub proces
zostaje zablokowany.
B. OFF – przycisk WYŁ.
C. SOFT - przełącznik niskiej prędkości 65 RPM ±20% (nadaje się do wyciskania soku z owoców miękkich,
pomarańczy, winogron, melona, małych pomidorów itp.)
D. HARD - przełącznik wysokiej prędkości 80 RPM ±20% (nadaje się do wyciskania soku z twardych
owoców i warzyw)
INSTRUKCJE BEZPIECZEŃSTWA
Jeżeli przewód zasilający jest uszkodzony, aby uniknąć
zagrożenia musi on zostać wymieniony przez producenta,
autoryzowany serwis lub odpowiednio wykwalikowaną
osobę.
Urządzenie należy czyścić według wskazówek
znajdujących się w sekcji dotyczącej czyszczenia i
konserwacji.
Przed zmianą akcesoriów lub obsługą części
poruszających się podczas używania wyłącz urządzenie i
odłącz je od zasilania.
Nie używaj urządzenia, jeśli obracające się sito (albo

5
PL
PL
inny obracający się element) lub pokrywa ochronna są
uszkodzone.
Ostrzeżenie: potencjalne uszkodzenie ciała w wyniku
nieprawidłowego użytkowania!
Zawsze odłączaj urządzenie od zasilania, jeżeli zostaje
pozostawione bez nadzoru, a także przed jego montażem,
demontażem lub czyszczeniem.
Urządzenie nie może być używane przez dzieci.
Urządzenie i kabel zasilający należy trzymać poza
zasięgiem dzieci.
To urządzenie jest przeznaczone do użytku domowego.
Nie jest przeznaczone do użytku w: pomieszczeniach
kuchennych dla personelu, w sklepach, biurach i
miejscach pracy, gospodarstwach rolnych, przez klientów
w hotelach, motelach, pensjonatach i innych
obiektach mieszkalnych.
Urządzenie może być używane przez osoby o ograniczonej
sprawności zycznej, sensorycznej i umysłowej oraz
osoby nieposiadające wystarczającego doświadczenia
oraz wiedzy pod warunkiem, że będą one nadzorowane
lub zostaną poinstruowane w zakresie bezpiecznej obsługi
urządzenia i będą rozumiały zagrożenia związane z taką
obsługą.
Dzieci nie mogą bawić się urządzeniem.
Urządzenie jest przeznaczone do użytku na maksymalnej
wysokości 2000m n.p.m.
WAŻNE OSTRZEŻENIA
Urządzenie przeznaczone jest wyłącznie do użytku domowego i w żadnym wypadku nie powinno być wyko-
rzystywane do użytku komercyjnego lub przemysłowego. Nieprawidłowe użycie lub niewłaściwe obcho-
dzenie się z produktem spowoduje unieważnienie gwarancji.

6
PL
PL
Przed podłączeniem urządzenia do sieci sprawdź, czy napięcie zasilania jest takie samo, jak wskazane na
tabliczce znamionowej urządzenia.
W trakcie korzystania z urządzenia przewód zasilający nie może być zaplątany ani owinięty wokół urządze-
nia.
Nie używaj, nie podłączaj ani nie odłączaj urządzenia od zasilania mając mokre ręce i / lub stopy.
Nie ciągnij za przewód zasilający w celu odłączenia urządzenia. Nie używaj przewodu jako uchwytu.
W przypadku jakiejkolwiek awarii lub uszkodzenia natychmiast odłącz urządzenie od sieci i skontaktuj się
z autoryzowanym działem wsparcia technicznego. Aby uniknąć wszelkiego ryzyka, nie otwieraj obudowy
urządzenia. Jedynie wykwalikowany personel techniczny z ocjalnego serwisu technicznego marki może
przeprowadzać naprawy lub procedury na urządzeniu.
Eurogama Sp. z o.o. nie ponosi odpowiedzialności za jakiekolwiek szkody, które mogą wystąpić na oso-
bach, zwierzętach lub przedmiotach z powodu nieprzestrzegania tych ostrzeżeń.
SPOSÓB MONTAŻU
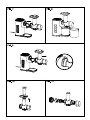
1. Włóż ślimak (8) do komory wyciskarki (11) zgodnie z kierunkiem strzałki - RYS. 3
2. Załóż tylną pokrywę (7) na komorę wyciskarki (11) zgodnie z kierunkiem strzałki - RYS. 4, krok 1.
3. Obracając tylną pokrywę (7) w kierunku przeciwnym do ruchu wskazówek zegara, upewnij się, że tylna
pokrywa blokuje się na zatrzasku na komorze wyciskarki - RYS. 4, krok 2.
4. Załóż przednią pokrywę (12) na komorze wyciskarki (11) - RYS. 5, krok 1
5. Obracając przednią pokrywę (12) w kierunku przeciwnym do ruchu wskazówek zegara, upewnij się, że
przednia pokrywa blokuje się na zatrzasku na komorze wyciskarki RYS. 5, krok 2
6. Umieść tackę na produkty (10) na górnym końcu podajnika na komorze wyciskarki (11) - RYS. 6. Taca na
produkty sprawia, że wkładanie składników jest wygodniejsze, zwłaszcza przy przetwarzaniu składników
drobnych, takich jak winogrona, truskawki itp.
7. Umieść popychacz (9) w podajniku na komorze wyciskarki - RYS. 6
8. Zamontuj komorę (11) na korpusie wyciskarki (3) zgodnie z kierunkiem strzałki. Podczas montażu
słyszalne będzie kliknięcie wskazujące, że wszystkie części zostały właściwie zmontowane - RYS. 7
14. Prawidłowo umieść pojemnik na sok (mały) (5) i pojemnik na miąższ (6) (większy) - RYS. 8
15. Podłącz produkt do sieci i przygotuj się do pracy.
Umyj owoce i warzywa, pokrój je na kawałki, które można włożyć do wlotu podajnika i umieść ja na tacy na
produkty do przetworzenia.
Najpierw usuń z owoców i warzyw pestki, twarde nasiona, grubą lub twardą skorupkę.
Uwaga: Owoce takie jak trzcina cukrowa, gujawa i mango nie mogą być wyciskane za pomocą tego
urządzenia.
SPOSÓB UŻYCIA
Naciśnij przełącznik HARD (D) lub SOFT (C) RYS. 2 - urządzenie zacznie działać. Czas pracy nie powinien
być dłuższy niż 10 minut.
Naciśnij przełącznik OFF (B), aby wyłączyć lub zatrzymać urządzenie.
Naciśnij przełącznik REV (A), gdy wytłaczanie nie odbywa się płynnie lub proces został zablokowany. De-
likatnie naciśnij i przytrzymaj przycisk REV przez około 2 sekundy, ślimak zacznie się cofać, będzie działać
przez 10 sekund po czym funkcja pracy wstecznej automatycznie wyłączy się. Następnie możesz nacisnąć
przycisk HARD (D) lub SOFT (C), aby wznowić normalny proces wyciskania.
Uwaga! Nie dotykaj przełącznika zasilania mokrymi rękami, aby uniknąć porażenia prądem, wycieku prądu
lub pożaru.
Wskazówka:
Włóż składniki do otworu wlotowego na komorze wyciskarki i popchnij je popychaczem.

7
PL
PL
Po włożeniu składników, siła z jaką są dociskane nie powinna być zbyt duża i wskazane jest, aby składniki
po prostu mogły same opadać.
Uwaga! Nie wkładaj palców ani jakichkolwiek przedmiotów do otworu wlotowego komory! Jeśli pojemnik na
miąższ lub dzbanek na sok są pełne, odłącz zasilanie i opróżnij je.
Gdy przetwarzanie składników zostanie zakończone, a z urządzenia nie będzie wypływał sok, wyłącz
przełącznik i odłącz zasilanie. Odczekaj, aż ślimak całkowicie przestanie się obracać, a następnie wyjmij
dzbanek na sok spod otworu.
Świeży sok należy wypić od razu. Jeśli przez jakiś czas będzie wystawiony na działanie powietrza, ucierpi
na tym jego smak i wartość odżywcza. Pozostałości nie mogą być przechowywane przez dłuższy czas.
Uwaga! Nie dotykaj przełącznika zasilania mokrymi rękami, aby uniknąć porażenia prądem, wycieku prądu
lub pożaru.
WSKAZÓWKI DOTYCZĄCE WYBORU OWOCÓW
Korzystaj ze świeżych owoców i warzyw, ponieważ zawierają więcej soku. Szczególnie odpowiednie pro-
dukty to: ananas, seler naciowy, jabłka, ogórki, szpinak, melony, pomidory, pomarańcze, winogrona i tym
podobne.
Nie ma potrzeby obierać cienkiej skórki z owoców i warzyw. Należy obierać tylko grubą skórkę z owo-
ców i warzyw, takich jak pomarańcze, ananasy itp. Należy również usunąć pestki z owoców cytrusowych,
ponieważ wprowadzają one do soku smak goryczy.
Świeżo wyciśnięty sok jabłkowy może szybko zbrązowieć. Proces ten można spowolnić dodając kilka kro-
pel soku z cytryny.
Za pomocą tego urządzenia można wyciskać soki z liści i łodyg liści (np. sałaty).
UTRZYMANIE I KONSERWACJA
Przed przystąpieniem do mycia urządzenia należy wyłączyć przełącznik i odłączyć zasilanie.
Urządzenie należy umyć niezwłocznie po zakończeniu pracy.
Korpusu wyciskarki nie wolno myć pod bieżącą wodą. Plamy na korpusie urządzenia należy wytrzeć szmat-
ką do osuszania lub suchą bawełnianą ściereczką.
Przed schowaniem urządzenia upewnij się, że jest czyste i suche.
Aby rozmontować wyciskarkę, a następnie ją wyczyścić należy postępować zgodnie z poniższymi krokami:
1. Naciśnij i przytrzymaj przycisk blokujący (4) na komorze wyciskarki, a następnie wyciągnij całą komorę
zgodnie z kierunkiem strzałki - RYS. 9
2. Zdemontuj i wyjmij popychacz i tackę na produkty w odpowiedniej kolejności - RYS. 10
3. Zdemontuj i w odpowiedniej kolejności zdejmij pokrywę przednią, ślimak, pokrywę tylną. Następnie umyj
elementy używając wody - RYS. 11
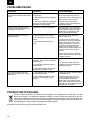
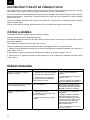
ROZWIĄZYWANIE PROBLEMÓW
PROBLEM ANALIZA PRZYCZYN ROZWIĄZANIE PROBLEMU
Urządzenie nie działa po podłącze-
niu zasilania i włączeniu. 1. Wtyczka nie jest prawidłowo
podłączona
2. Gniazdko jest w złym stanie
3. Kabel wewnętrzny jednostki
głównej jest odłączony lub uszko
dzona jest płytka drukowana.
1. Ponownie podłącz wtyczkę do
zasilania
2. Wymień gniazdko elektryczne i
spróbuj ponownie
3. Przekaż urządzenie do naj-
bliższego punktu serwisowego w
celu przeprowadzenia kontroli
Przy pierwszym użyciu urządze-
nia silnik wydziela nieprzyjemny
zapach.
To jest normalne zjawisko Jeżeli po wielokrotnym użyciu
silnik nadal wydziela ten zapach,
przekaż urządzenie do najbliższe-
go punktu serwisowego w celu
sprawdzenia

8
PL
PL
Urządzenie zatrzymuje się podc-
zas pracy. 1. Napięcie jest zbyt niskie
2. Produkty zbyt twarde lub w zbyt
dużej ilości
3. Czas pracy ciągłej jest zbyt długi
1. Sprawdź, czy napięcie nie jest
zbyt niskie
2. Odłącz zasilanie i usuń nadmiar
składników (trzciny cukrowej nie
można wyciskać). Owoce i wazywa
z twardą skórką lub twarde w
środku należy przed wyciskaniem
obrać lub pozbawić twardego
wnętrza
3. Jest to normalne zjawisko, a
silnik po chwili wznowi pracę
Hałas podczas pracy 1. Ślimak nie jest prawidłowo
zamontowany, co powoduje niesta-
bilną pracę
2. Awaria silnika rozruchowego w
korpusie maszyny
3. Urządzenie jest zbyt głośne,
podczas wyciskania pewnych
produktów
1. Prawidłowo zamontuj ślimak.
2 i 3. Należy przekazać urządzenie
do najbliższego punktu serwisowe-
go w celu przeprowadzenia kontroli
Trudno jest odkręcić pokrywę
komory po wyciskaniu soku 1. Na powierzchni pokrywy komory
jest plama oleju
2. Produkty nie są całkowicie
wyciskane w wyciskarce
1. Oczyść powierzchnię pokrywy
komory
2. Kontynuuj pracę/wyciskanie
soku aż do zakończenia procesu
lub do całkowitego usunięcia pro-
duktów lub naciśnij i przytrzymaj
przez kilka sekund przycisk „REV”,
aby wyciągnąć produkty z komory
wyciskarki
UTYLIZACJA PRODUKTU
To urządzenie jest oznaczone zgodnie z Dyrektywą Europejską 2012/19/UE oraz polską Ustawą
z dnia 11 września 2015 r. „O zużytym sprzęcie elektrycznym i elektronicznym” (Dz.U. z dn.
23.10.2015 poz. 1688) symbolem przekreślonego kontenera na odpady.
Takie oznakowanie informuje, że sprzęt ten, po okresie jego użytkowania nie może być um-
ieszczany łącznie z innymi odpadami pochodzącymi z gospodarstwa domowego.
Użytkownik jest zobowiązany do oddania go prowadzącym zbieranie zużytego sprzętu elektrycznego i
elektronicznego. Prowadzący zbieranie, w tym lokalne punkty zbiórki, sklepy oraz gminne jednostki, tworzą
odpowiedni system umożliwiający oddanie tego sprzętu.
Właściwe postępowanie ze zużytym sprzętem elektrycznym i elektronicznym przyczynia się do uniknięcia
szkodliwych dla zdrowia ludzi i środowiska naturalnego konsekwencji, wynikających z obecności skład-
ników niebezpiecznych oraz niewłaściwego składowania i przetwarzania takiego sprzętu.
Mamy nadzieję, że produkt przyniesie Państwu wiele satysfakcji.

9
PL EN
WE WOULD LIKE TO THANK YOU FOR CHOOSING ZELMER. WE WISH THE PRODUCT PERFORMS
TO YOUR SATISFACTION AND PLEASURE
WARNING
PLEASE READ THE INSTRUCTIONS FOR USE CAREFULLY PRIOR TO USING THE PRODUCT.
STORE THESE IN A SAFE PLACE FOR FUTURE REFERENCE
DESCRIPTION (FIG. 1)
1. Power cord
2. Control panel
3. Slow juicer body
4. Lock buton
5. Juice cup
6. Pulp container
7. Rear cover of juicing body
8. Auger
9. Pusher
10. Food tray
11. Juicing body
12. Front cover
13. Juice outlet
CONTROL PANEL (FIG. 2)
A. REV – reverse function: used when the pomace discharging is not smooth or jammed.
B. OFF – OFF button
C. SOFT - low speed switch 65 RPM ±20% (suitable for juicing soft fruits orange, grape, water melon small
tomato etc.)
D. HARD - high speed switch 80 RPM ±20%
SAFETY INSTRUCTIONS
If the supply cord is damaged it must be replaced by
the manufacturer, its service agent or similarly qualied
persons in order to avoid a hazard. Proceed according
to maintenance and cleaning section of this manual for
cleaning.
Switch off the appliance and disconnect from supply
before changing accessories or approaching parts that
move in use.
Do not use the appliance if the rotating sieve is damaged.
Warning: potential injury from misuse!
Always disconnect the appliance from the supply if it is
left unattended and before assembling, disassembling or

10
PL
EN
cleaning.
This appliance shall not be used by children. Keep the
appliance and its cord out of reach of children.
This appliance is for household use and not intended for
use applications such as: staff kitchen areas in shops,
ofces and working environments, farm houses, by
clients in hotels, motels, “bed and breakfast” and other
residential type environments.
Appliances can be used by persons with reduced physical,
sensory or mental capabilities or lack of experience
and knowledge if they have been given supervision or
instruction concerning use of the appliance in a safe way
and if they understand the hazards involved.
Children shall not play with the appliance.
This device is designed for use at a maximum altitude of
2000 m above sea level.
IMPORTANT WARNINGS
This appliance is designed for home use and should never be used for commercial or industrial use under
any circumstances. Any incorrect use or improper handling of the product shall render the warranty null
and void.
Prior to plugging in the product, check that your mains voltage is the same as the one indicated on the
product label.
The mains connection cable must not be tangled or wrapped around the product during use.
Do not use the device, or connect and disconnect to the supply mains with the hands and / or feet wet.
Do not pull on the connection cord in order to unplug it or use it as a handle.
Unplug the product immediately from the mains in the event of any breakdown or damage and contact
an ofcial technical support service. In order to prevent any risk of danger, do not open the device. Only
qualied technical personnel from the brand´s Ofcial technical support service may carry out repairs or
procedures on the device.
B&B TRENDS SL disclaims all liability for damages that may occur to people, animals or objects, for the
non-observance of these warnings.

11
PL EN
HOW TO ASSEMBLY?
1. Follow the direction arrow, put the auger (8) inside the juicing body (11) – FIG. 3
2. Assemble the rear cover (7) into juicing body (11) as direction arrow shown – FIG. 4, step 1.
3. Turning the rear cover (7) anticlockwise, ensure the rear cove fasten together with the latch on juicing
body – FIG. 4, step 2.
4. Assemble the front cover (12) on juicing body (11) – FIG. 5, step 1
5. Turning the front cover (12) anticlockwise, ensure the front cove fasten together with the latch on juicing
body (11) – FIG. 5, step 2
6. Place the food tray (10) on the upper end of the feeding chute of the juicing body (11) – FIG. 6. The food
tray makes feeding ingredients more convenient, especially when processing small-grained ingredients
such as grapes, strawberries, etc.
7. Place the pusher (9) inside the feed chute of juicing body
8. Follow the arrow direction assemble the juicing body (11) into the slow juicer body (3). During the assem-
bling a “CLICK” sound happen indicating that all the parts were well assemble – FIG. 7
14. Place the juice cup (small shape) (5) and the pulp container (bigger shape) (6) properly – FIG. 8
15. Plug-in the product and get ready for work
Wash the fruits and vegetables, cut them into pieces that can be put into the feed inlet, and place them on
the food tray for use.
Please remove kernels, hard seeds, thick or hard shell of fruits and vegetables rst.
Note: Fruits such as sugar cane, guava, and mango cannot be juiced with this machine.
HOW TO USE?
Press the switch HARD (D) or SOFT (C) FIG. 2 - the product starts to work, the working time shall be less
than or equal to 10 minutes.
Press the switch OFF (B) to switch off or stop the product.
Press the switch REV (A) when the pomace discharging is not smooth or jammed, press and hold the REV
button gently for about 2 seconds, the auger will start to reverse, then working with 10 seconds, reverse
function will automatically stop. Then you may press HARD (D) or SOFT (C) button to resume normal juicing
Caution! Do not touch the power switch with wet hands to avoid electric shock, electric leakage or re.
Hint:
Put the ingredients into the feed inlet of the juicing body and push the ingredients with the pusher.
When ingredients are put in, the force to push the ingredients should not be so great, and it is advisable that
the ingredients just can be cut off.
Caution! Don’t put your ngers or other objects into the feed inlet of the juicing body! If the pomace cup or
juice cup is full, disconnect the power and clean it before use.
When the ingredients processing is completed and there is no juice come out from juice spout, turn off the
switch and disconnect the power. Wait until the auger completely stops rotating, and then remove the juice
cup from the juice mouth.
The fresh juice should be drunk immediately. If it is exposed to the air for a while, its taste and nutritional
value will be affected. Residues cannot be stored for long periods.
Caution! Do not touch the power switch with wet hands to avoid electric shock, electric leakage or re.
TIPS FOR FRUIT SELECTION
Select and use fresh fruits and vegetables, which contain more juice. Particularly suitable fruits include:
pineapple, celery sticks, apples, cucumbers, spinach, melons, tomatoes, oranges, grapes, and the like.
Instead of paring the thin skin of fruits and vegetables, you only need to pare the thick skin of fruits and
vegetables like oranges, pineapples, etc. Seeds of citrus fruits also need to be removed because they will
bring bitterness to the juice.

12
PL
EN
Freshly juiced apple juice may quickly turn brown, and you can add a few drops of lemon juice to slow this
process.
Leaves and leaf stems (such as lettuce) can be juiced with this machine.
MAITENANCE AND PRESERVATION
Before washing this product, be sure to turn off the switch and disconnect the power supply.
Please timely wash this product after application.
The juicer body must not be washed with water. The stains on the body must be wiped with a drying rag or
drying cotton cloth.
Please make sure the product is clean and dry before storage.
Please refer to the following steps to disassemble the juicer and then clean:
1. Press and hold the lock button (4) near the juicing body, then pull out the entire juicing body as the arrow
direction shown - FIG. 9
2. Disassemble and take out the pusher and the food tray in proper order – FIG. 10
3. Disassemble and the front cover, auger, rear cover in proper order. Then use the water to wash directly
– FIG. 11
TROUBLESHOTING
FAULT ANALYSIS OF CAUSES FAULT RESOLUTION
After connecting the power supply,
turn on the switch, but this product
cannot work.
1. The power plug is not plugged
in properly
2. The outlet is in poor contact
3. The internal cable of the main
unit is off or the circuit board is
damaged.
1. Plug the power plug back in
again
2. Replace the power socket and
try again
3. Please send the product to the
nearest ofcial technical service for
inspection
When this product is used initially,
the motor smells terrible. This is not an abnormal occurrence If the product still emits this odor
after repeated use, please send
it to the nearest ofcial technical
service for inspection.
This machine stops during the
application. 1. The voltage is too low
2. Excessive or hard ingredients
3. The continuous working hour is
too long
1. Check if the voltage is too low
2. Disconnect the power and remo-
ve the excess ingredients (Sugar
cane cannot be juiced. Hard skin
/ hard core fruits and vegetables
should be rst removed the hard
skin / hard core before juiced)
3. It is a normal phenomenon, and
the motor will resume operation
after a break
Noise at work 1. The auger is not fully installed,
resulting in unsteady operation;
2. The start motor in the machine
body breaks down.
3. Too noisy when some ingre-
dients are juiced.
1. Fully install the auger.
2 and 3. Please send it to the
nearest ofcial technical service for
inspection.

13
PL EN
It is difcult to unscrew the juicing
body cover after juicing 1. There is oil stain on the surface
of the juicing body cover;
2. The ingredients in the juice net
are not juiced completely;
1. Clean the surface of the juicing
body cover;
2. Continue to proceed working/
juicing until the juicing nished, or
the ingredients completely or press
and hold the “REV” button for a
few seconds to rotate the ingre-
dients out of the juicing bodyi
PRODUCT DISPOSAL
This product complies with European Directive 2012/19/EU on electrical and electronic devices,
known as WEEE (Waste Electrical and Electronic Equipment), provides the legal framework ap-
plicable in the European Union for the disposal and reuse of waste electronic and electrical de-
vices. Do not dispose of this product in the bin, instead going to the electrical and electronic waste
collection centre closest to your home.
We hope that you will be satised with this product.

14
PL
DE
DANKE, DASS SIE SICH FÜR EIN ZELMER-PRODUKT ENTSCHIEDEN HABEN. WIR WÜNSCHEN
IHNEN VIEL FREUDE BEI DER NUTZUNG IHRES GERÄTS
WARNUNG
LESEN SIE DIE GEBRAUCHSANWEISUNG SORGFÄLTIG DURCH, BEVOR SIE DAS GERÄT VERWENDEN.
BEWAHREN SIE SIE ZUM SPÄTEREN NACHSCHLAGEN AN EINEM SICHEREN ORT AUF
BESCHREIBUNG (ABB. 1)
1. Netzkabel
2. Bedienfeld
3. Gehäuse
4. Verriegelungstaste
5. Saftbehälter
6. Tresterbehälter
7. Hintere Abdeckung der Presskammer
8. Schnecke
9. Stopfer
10. Produktschale
11. Presskammer
12. Frontdeckel
13. Saftauslass
BEDIENFELD (ABB. 2)
A. REV - Rückwärtsgangfunktion: wird verwendet, wenn der Pressvorgang nicht reibungslos abläuft oder
der Prozess blockiert ist.
B. OFF – AUS-Taste.
C. SOFT - Schalter für niedrige Drehzahl 65 UpM ±20% (geeignet zum Auspressen von Saft aus weichen
Früchten, Orangen, Trauben, Melonen, kleinen Tomaten usw.).
D. HARD - Schalter für hohe Drehzahl 80 UpM ±20%.
SICHERHEITSHINWEISE
Wenn das Netzkabel beschädigt ist, muss es durch den
Hersteller, eine autorisierte Servicestelle oder einen
Fachmann ersetzt werden, um eine Gefährdung zu
vermeiden.
Reinigen Sie das Gerät gemäß den Anweisungen im
Abschnitt Reinigung und Wartung.
Schalten Sie das Gerät aus und trennen Sie es von der
Stromversorgung, bevor Sie Zubehörteile wechseln oder
während des Betriebs mit beweglichen Teilen hantieren.
Verwenden Sie das Gerät nicht, wenn das Drehsieb
beschädigt ist.

15
PL
DE
Warnung: Mögliche Personenschäden durch
unsachgemäßen Gebrauch!
Trennen Sie das Gerät immer von der Stromversorgung,
wenn es unbeaufsichtigt gelassen wird und bevor es
montiert, demontiert oder gereinigt wird.
Das Gerät darf nicht von Kindern benutzt werden.
Bewahren Sie das Gerät und das Netzkabel außerhalb
der Reichweite von Kindern auf.
Dieses Gerät ist für den Heimgebrauch bestimmt. Es
ist nicht für die Verwendung in Küchenbereichen für
Personal in Geschäften, Büros und Arbeitsplätzen, in
landwirtschaftlichen Betrieben, durch Kunden in Hotels,
Motels, Pensionen und anderen Wohneinrichtungen
bestimmt.
Das Gerät kann von Personen mit eingeschränkten
physischen, sensorischen oder geistigen Fähigkeiten
oder Mangel an Erfahrung und Wissen benutzt werden,
vorausgesetzt, dass sie beaufsichtigt oder bezüglich des
sicheren Gebrauchs des Geräts unterwiesen wurden und
die daraus resultierenden Gefahren verstehen.
Kinder dürfen nicht mit dem Gerät spielen.
Das Gerät ist für den Einsatz in einer maximalen Höhe
von 2000 m über dem Meeresspiegel ausgelegt.
WICHTIGE WARNUNGEN
Das Gerät ist nur für den Hausgebrauch bestimmt und darf unter keinen Umständen für gewerbliche oder
industrielle Anwendungen eingesetzt werden. Bei Missbrauch oder unsachgemäßer Handhabung des
Produkts erlischt die Garantie.
Bevor Sie das Gerät an das Stromnetz anschließen, überprüfen Sie, ob die Versorgungsspannung mit der
auf dem Typenschild des Geräts übereinstimmt.
Das Netzanschlusskabel darf sich während des Gebrauchs nicht verheddern oder um das Produkt
gewickelt werden.
Das Gerät darf mit nassen Händen o. Füßen weder benutzt noch ans Netz angeschlossen bzw. vom Netz

16
PL
DE
getrennt werden.
Ziehen Sie nicht am Verbindungskabel, um es von der Steckdose zu trennen oder es als Tragegriff zu
verwenden.
Trennen Sie bei Störungen oder Schäden das Gerät sofort vom Netz und kontaktieren Sie den technischen
Kundendienst. Um Gefahren zu vermeiden, öffnen Sie nicht das Gehäuse des Geräts. Reparaturen oder
Eingriffe am Gerät sollten nur von qualiziertem Personal des ofziellen technischen Kundendienstes
durchgeführt werden.
B&B TRENDS SL lehnt jede Haftung für Schäden an Personen, Tieren oder Gegenständen ab, die
aufgrund der Nichtbeachtung dieser Warnungen entstehen können.
ZUSAMMENBAU
1. Folgen Sie dem Richtungspfeil und setzen Sie die Schnecke (8) in die Presskammer (11) ein - Abb. 3
2. Setzen Sie die hintere Abdeckung (7) in Pfeilrichtung auf die Presskammer (11) - Abb. 4, Schritt 1.
3. Drehen Sie die hintere Abdeckung (7) gegen den Uhrzeigersinn und stellen Sie sicher, dass die hintere
Abdeckung mit der Verriegelung am Gehäuse einrastet - Abb. 4, Schritt 2.
4. Setzen Sie die vordere Abdeckung (12) auf die Presskammer (11) - Abb. 5, Schritt 1
5. Die vordere Abdeckung (12) gegen den Uhrzeigersinn drehen und sicherstellen, dass die vordere Ab-
deckung mit der Verriegelung an der Presskammer (11) einrastet - Abb. 5, Schritt 2
6. Setzen Sie die Lebensmittelschale (10) auf das obere Ende des Einfüllschachts der Presskammer (11)
- Abb. 6. Der Einfülltrichter erleichtert das Einfüllen der Zutaten, insbesondere bei der Verarbeitung von
kleinstückigen Lebensmittel wie Weintrauben, Erdbeeren, usw.
7. Setzen Sie den Stopfer (9) in den Einfüllschacht des Entsafters ein.
8. Folgen Sie der Pfeilrichtung und setzen Sie die Presskammer (11) auf das Gehäuse (3) auf. Während
des Zusammenbaus ertönt ein „KLICK“-Geräusch, das anzeigt, dass alle Teile gut zusammengebaut
wurden - Abb. 7
14. Setzen Sie den Saftbehälter (klein) (5) und den Tresterbehälter (groß) (6) richtig ein - Abb. 8
15. Schließen Sie das Gerät an und bereiten Sie sich für die Arbeit vor.
Waschen Sie das Obst und Gemüse, schneiden Sie es in Stücke, die in den Einfüllschacht eingeführt
werden können, und legen Sie es zur Verarbeitung auf die Produktschale.
Entfernen Sie zunächst Samen, harte Kerne, dicke oder harte Schalen von Obst und Gemüse.
Hinweis: Früchte wie Zuckerrohr, Guave und Mango können mit dieser Maschine nicht gepresst werden.
VERWENDUNG
Betätigen Sie den Schalter HARD (D) oder SOFT (C) ABB. 2 - das Gerät beginnt zu arbeiten. Die Be-
triebszeit sollte 10 Minuten nicht überschreiten.
Drücken Sie den AUS-Schalter (B), um das Gerät auszuschalten oder anzuhalten.
Drücken Sie den REV-Schalter (A), wenn die Saftpressung nicht reibungslos abläuft oder der Prozess
blockiert wurde. Halten Sie die REV-Taste ca. 2 Sekunden lang gedrückt. Die Schnecke beginnt mit dem
Rückwärtslauf und läuft 10 Sekunden lang, danach schaltet sich die Rücklauffunktion automatisch ab. Sie
können dann die Taste HARD (D) oder SOFT (C) drücken, um den normalen Pressvorgang fortzusetzen.
Achtung! Berühren Sie den Netzschalter nicht mit nassen Händen, um einen elektrischen Schlag, einen
Stromausfall oder einen Brand zu vermeiden.
Hinweis:
Geben Sie die Lebensmittel in den Einfüllschacht der Presskammer ein und drücken Sie sie mit dem
Stopfer.

17
PL
DE
Sobald die Lebensmittel eingelegt sind, sollte die Kraft, mit der sie gepresst werden, nicht zu groß sein. Es
ist ratsam, die Lebensmittel einfach von selbst fallen zu lassen.
Achtung: Stecken Sie weder Ihre Finger noch irgendwelche Gegenstände in den Einfüllschacht der Press-
kammer! Wenn der Tresterbehälter oder der Saftbehälter voll ist, trennen Sie die Stromversorgung und
leeren Sie ihn.
Wenn die Verarbeitung der Zutaten abgeschlossen ist und kein Saft mehr aus dem Gerät austritt, schalten
Sie das Gerät aus und ziehen Sie den Netzstecker. Warten Sie, bis sich die Schnecke nicht mehr dreht, und
nehmen Sie dann den Saftbehälter aus der Öffnung.
Frischer Saft sollte sofort getrunken werden. Wenn er eine Zeit lang der Luft ausgesetzt ist, leiden sein
Geschmack und sein Nährwert. Die Lebensmittelreste dürfen nicht über einen längeren Zeitraum gelagert
werden.
Achtung: Berühren Sie den Netzschalter nicht mit nassen Händen, um einen elektrischen Schlag, einen
Stromausfall oder einen Brand zu vermeiden.
HINWEISE ZUR AUSWAHL VON OBST
Verwenden Sie frisches Obst und Gemüse, da diese mehr Saft enthalten. Besonders geeignet sind: Anan-
as, Sellerie, Äpfel, Gurken, Spinat, Melonen, Tomaten, Orangen, Weintrauben und dergleichen.
Es ist nicht nötig, die dünne Haut von Obst und Gemüse zu schälen. Von Obst und Gemüse wie Orangen,
Ananas usw. sollte nur die dicke Schale entfernt werden. Die Kerne von Zitrusfrüchten sollten ebenfalls
entfernt werden, da sie einen bitteren Geschmack in den Saft bringen.
Frisch gepresster Apfelsaft kann schnell braun werden. Dieser Prozess kann durch die Zugabe von ein
paar Tropfen Zitronensaft verlangsamt werden.
Mit dem Gerät können Säfte aus Blättern und Blattstielen (z.B. Salat) ausgepresst werden.
REINIGUNG UND PFLEGE
Schalten Sie vor der Reinigung des Geräts den Schalter aus und trennen Sie es von der Stromzufuhr.
Reinigen Sie das Gerät sofort nach dem Gebrauch.
Das Gehäuse des Gerätes darf nicht mit Wasser gewaschen werden. Flecken auf dem Gerätekörper soll-
ten mit trockenen Lappen oder Baumwolltuch abgewischt werden.
Stellen Sie sicher, dass das Gerät sauber und trocken ist, bevor Sie es einlagern.
Gehen Sie wie folgt vor, um das Gerät zu zerlegen und anschließend zu reinigen:
1. Die Verriegelungstaste (4) an der Presskammer drücken und halten, dann die gesamte Presskammer in
Pfeilrichtung - ABB 9 - herausziehen.
2. Demontieren und entfernen Sie den Stopfer und die Produktschale in der richtigen Reihenfolge - ABB. 10
3. Demontieren und entfernen Sie in der richtigen Reihenfolge die vordere Abdeckung, die Schnecke und
die hintere Abdeckung. Waschen Sie dann die Bauteile mit Wasser - ABB. 1

18
PL
DE
PROBLEMLÖSUNG
PROBLEM URSACHE PROBLEMLÖSUNG
Nach dem Stromanschluss und
Einschalten funktioniert das Gerät
nicht.
1. Der Stecker ist nicht richtig
eingesteckt.
2. Die Steckdose ist in schlechtem
Zustand.
3. Das interne Kabel der Hauptein-
heit ist nicht angeschlossen bzw.
die Platine ist beschädigt.
1 Schließen Sie den Stecker wie-
der an die Stromversorgung an.
2. Tauschen Sie die Steckdose aus
und versuchen Sie es erneut.
3. Bringen Sie das Gerät zur
Inspektion in die nächstgelegene
Kundendienststelle.
Bei der ersten Benutzung des
Geräts verströmt der Motor einen
unangenehmen Geruch.
Dies ist ein normales Phänomen Wenn der Motor nach wiederhol-
tem Gebrauch immer noch diesen
Geruch abgibt, bringen Sie das
Gerät bitte zur Inspektion in die
nächste Kundendienststelle. .
Das Gerät bleibt während des
Betriebs stehen. 1. Die Spannung ist zu niedrig
2. Zu harte bzw. zu viele Lebens-
mittel.
3. Die Dauerbetriebszeit ist zu
lang.
1 Prüfen Sie, ob die Spannung
nicht zu niedrig ist.
2. Trennen Sie die Stromzufuhr
und entfernen Sie überschüssige
Zutaten (Zuckerrohr kann nicht
ausgepresst werden). Obst und
Gemüse mit harter Schale oder
hartem Inneren sollte vor dem
Auspressen geschält werden bzw.
das harte Innere muss entfernt
werden.
3. Dies ist ein normaler Vorgang
und der Motor wird nach einer Wei-
le wieder anlaufen.
Betriebslärm 1. Die Schnecke ist nicht richtig
installiert, was zu einem instabilen
Betrieb führt.
2. Ausfall des Anlassers im Mas-
chinenkörper.
3. Das Gerät ist beim Auspressen
bestimmter Produkte zu laut.
1. Setzen Sie die Schnecke richtig
ein.
2, 3. Bringen Sie das Gerät zur
Inspektion in die nächstgelegene
Kundendienststelle.
Der Kammerdeckel lässt sich
nach dem Entsaften nur schwer
abnehmen
1. Ein Öleck auf der Oberäche
des Kammerdeckels.
2. Die Produkte werden im Slow
Juicer nicht vollständig ausge-
presst.
1. Reinigen Sie die Oberäche des
Kammerdeckels.
2. Arbeiten Sie weiter, bis der
Prozess abgeschlossen ist oder
bis die Produkte vollständig
entfernt sind, oder halten Sie die
Taste “REV” einige Sekunden lang
gedrückt, um die Produkte aus der
Presskammer zu ziehen.
PRODUKTENTSORGUNG
Dieses Produkt entspricht der Richtlinie 2012/19/EU des Europäischen Parlaments und des
Rates über Elektro- und Elektronik-Altgeräte (WEEE), die den rechtlichen Rahmen für die Ent-
sorgung und Wiederverwendung von Elektro- und Elektronik-Altgeräten in der Europäischen Un-
ion festlegt. Das Produkt nicht mit Kommunalabfällen entsorgen. Bringen Sie dieses Produkt zur
nächstgelegenen Sammelstelle für gebrauchte Elektrogeräte.
Wir hoffen, Sie werden mit dem Produkt zufrieden sein.

19
PL
CZ
DĚKUJEME, ŽE JSTE SI VYBRALI ZNAČKU ZELMER. PŘEJEME VÁM MNOHO SPOKOJENOSTI S
POUŽÍVÁNÍ ZAŘÍZENÍ
VAROVÁNÍ
PŘED POUŽITÍM VÝROBKU SI POZORNĚ PŘEČTĚTE NÁVOD K POUŽITÍ. USCHOVEJTE JEJ NA
BEZPEČNÉM MÍSTĚ PRO BUDOUCÍ POUŽITÍ
POPIS (Obr. 1)
1. Napájecí kabel
2. Ovládací panel
3. Tělo odšťavňovače
4. Tlačítko blokády
5. Džbánek na šťávu
6. Nádoba na dužinu
7. Zadní kryt komory odšťavňovače
8. Šnek
9. Posunovač
10. Zásobník na produkty
11. Komora odšťavňovače
12. Přední kryt
13. Výstup šťávy
OVLÁDACÍ PANEL (Obr. 2)
A. REV - funkce zpětného chodu: používá se, pokud vytlačování neprobíhá hladce nebo je proces blokován.
B. OFF - Tlačítko VYP.
C. SOFT - přepínač nízkých otáček 65 RPM ±20% (vhodný pro odšťavňování měkkého ovoce, pomerančů,
hroznů, melounů, malých rajčat atd..)
D. HARD - přepínač vysokých otáček 80 RPM ±20%
BEZPEČNOSTNÍ POKYNY
Pokud je přívodní kabel poškozen, musí jej z
bezpečnostních důvodů vyměnit výrobce, autorizovaný
servis nebo osoba s příslušnou kvalikací.
Zařízení čistěte podle pokynů uvedených v části věnované
čištění a údržbě.
Před výměnou příslušenství nebo obsluhou částí, které
se během používání pohybují, vypněte zařízení a odpojte
je od napájení.
Nepoužívejte zařízení, pokud došlo k poškození rotačního
sítka.
Varování: riziko tělesného zranění v důsledku nesprávného

20
PL
CZ
použití!
Vždy odpojte zařízení od napájení, pokud je ponecháno
bez dozoru a také před jeho montáží, demontáží nebo
čištěním.
Zařízení nesmí používat děti.
Zařízení a napájecí kabel ukládejte mimo dosah dětí.
Toto zařízení je určeno pro domácí použití. Není určeno
k použití v kuchyňských prostorách pro personál v
obchodech, kancelářích, na pracovištích, zemědělských
farmách, zákazníky v hotelech, motelech, penzionech a
dalších obytných zařízeních.
Zařízení mohou používat osoby se sníženými fyzickými,
smyslovými nebo duševními schopnostmi a osoby bez
dostatečných zkušeností za podmínky, že budou pod
dohledem nebo budou poučeny o bezpečné obsluze
zařízení a budou rozumět rizikům spojeným s takovou
obsluhou.
Nedovolte dětem, aby používaly zařízení jako hračku.
Zařízení je určeno k použití v maximální nadmořské výšce
2000 m n. m.
DŮLEŽITÁ VAROVÁNÍ
Zařízení je určeno pouze pro domácí použití a za žádných okolností nesmí být použito pro komerční nebo
průmyslové účely. Nesprávné použití nebo nesprávná obsluha zařízení má za následek ztrátu záruky.
Před připojením zařízení k síti zkontrolujte, zda je napájecí napětí stejné, jak je uvedeno na typovém štítku
zařízení.
Během používání zařízení nesmí být napájecí kabel zamotaný ani omotaný kolem zařízení.
Zařízení nepoužívejte, nezapojujte ani neodpojujte ze zásuvky, pokud máte mokré ruce a/nebo chodidla.
Při odpojování zařízení ze síťové zásuvky netahejte za napájecí kabel. Nepoužívejte kabel jako držák.
V případě jakékoli poruchy nebo poškození okamžitě odpojte zařízení ze síťové zásuvky a kontaktujte
ociální oddělení technické podpory. Aby se zabránilo jakémukoli ohrožení, neotevírejte schránku zařízení.
Opravy nebo postupy týkající se zařízení smí provádět pouze kvalikovaný personál z ociálního oddělení
technické podpory značky.
B&B TRENDS SL nenese odpovědnost za jakékoli škody nebo úrazy, ke kterým může dojít u osob, zvířat
nebo věcí z důvodu nedodržení těchto varování.
Strona się ładuje...
Strona się ładuje...
Strona się ładuje...
Strona się ładuje...
Strona się ładuje...
Strona się ładuje...
Strona się ładuje...
Strona się ładuje...
Strona się ładuje...
Strona się ładuje...
Strona się ładuje...
Strona się ładuje...
Strona się ładuje...
Strona się ładuje...
Strona się ładuje...
Strona się ładuje...
Strona się ładuje...
Strona się ładuje...
Strona się ładuje...
Strona się ładuje...
Strona się ładuje...
Strona się ładuje...
Strona się ładuje...
Strona się ładuje...
Strona się ładuje...
Strona się ładuje...
Strona się ładuje...
Strona się ładuje...
Strona się ładuje...
Strona się ładuje...
Strona się ładuje...
Strona się ładuje...
Strona się ładuje...
Strona się ładuje...
Strona się ładuje...
Strona się ładuje...
Strona się ładuje...
Strona się ładuje...
Strona się ładuje...
Strona się ładuje...
Strona się ładuje...
Strona się ładuje...
Strona się ładuje...
Strona się ładuje...
-
 1
1
-
 2
2
-
 3
3
-
 4
4
-
 5
5
-
 6
6
-
 7
7
-
 8
8
-
 9
9
-
 10
10
-
 11
11
-
 12
12
-
 13
13
-
 14
14
-
 15
15
-
 16
16
-
 17
17
-
 18
18
-
 19
19
-
 20
20
-
 21
21
-
 22
22
-
 23
23
-
 24
24
-
 25
25
-
 26
26
-
 27
27
-
 28
28
-
 29
29
-
 30
30
-
 31
31
-
 32
32
-
 33
33
-
 34
34
-
 35
35
-
 36
36
-
 37
37
-
 38
38
-
 39
39
-
 40
40
-
 41
41
-
 42
42
-
 43
43
-
 44
44
-
 45
45
-
 46
46
-
 47
47
-
 48
48
-
 49
49
-
 50
50
-
 51
51
-
 52
52
-
 53
53
-
 54
54
-
 55
55
-
 56
56
-
 57
57
-
 58
58
-
 59
59
-
 60
60
-
 61
61
-
 62
62
-
 63
63
-
 64
64


Zelmer ZJP3900 Instrukcja obsługi
- Kategoria
- Sokowirówki
- Typ
- Instrukcja obsługi
w innych językach
- slovenčina: Zelmer ZJP3900 Používateľská príručka
- română: Zelmer ZJP3900 Manual de utilizare
Powiązane artykuły
Inne dokumenty
-
Gracioso G21 Instrukcja obsługi
-
Costway ES10002DE Instrukcja obsługi
-
Hendi 221044 Instrukcja obsługi
-
eta Vital Press 1032 Instructions For Use Manual
-
-
Kenwood JMP800 PureJuice Pro Instrukcja obsługi
-
Kenwood JMP600WH Instrukcja obsługi
-
-
Kenwood JMP800SI Instrukcja obsługi