
S450

2
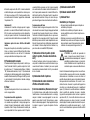
Használati útmutató (55 – 62)
hu
Gebrauchsanweisung (7 – 14)
de
Instructions for use (15 – 22)
en
Instructions d’utilisation (23 – 30) Lietošanas instrukcija (79 – 86)
fr lv
it lt
Istruzioni per l’uso (31 – 38) Naudojimo instrukcija (87 – 94)
(111 – 118)
Gebruiksaanwijzing (39 – 46) Kasutusjuhend (95 – 102)
nl ee
es
Instrucciones para el uso (47 – 54)
Instrukcja obsługi (63 – 70)
pl
Инструкция по эксплуатации (103 – 110)
cz
ru
Návod k použití (71 – 78)
Illustrations (1 – 27)
cn

3
2
8
1
6
4 7
3
52
9

4
14
10
12 15
13
1711
16
18

5
19
20
23
MAX. 1L WARM WATER
27
22
26
24
25
21

6

7
de
Gebrauchsanweisung

8
de
Vorwort
Herzliche Gratulation, dass Sie sich für das Gerät S450 ent-
schieden haben. Damit haben Sie einen wichtigen Schritt
zu gesunder Raumluft und mehr Wohlbefinden getan.
Bestimmungsgemässer Gebrauch:
Das Gerät dient ausschliesslich zur Befeuchtung der Raum-
luft in Innenräumen.
Vorsicht: heisser Dampf und kochendes
Wasser!
Das Gerät darf nicht in die Hände von Kindern
gelangen. Dampf und kochendes Wasser kann
zu Verbrennungen führen.
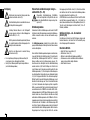
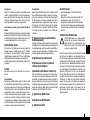
Sicherheitshinweise
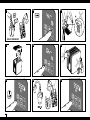
• Gebrauchsanweisung vor der Inbetriebnahme vollstän-
dig durchlesen und zum späteren Nachschlagen gut
aufbewahren.
• Das Gerät nur an Wechselstrom anschliessen – mit
Spannung gemäss dem Typenschild am Gerät.
• Das Netzkabel immer zuerst am Gerät einstecken,
bevor es ans Netz angeschlossen wird. ACHTUNG:
Ein Ton im Gerät signalisiert, dass das Gerät mit Strom
versorgt ist.
• Das Gerät nur in Wohnräumen und innerhalb der
spezifizierten technischen Daten verwenden. Ein nicht
bestimmungsgemässer Gebrauch kann Gesundheit
und Leben gefährden.
• Dieses Gerät ist nicht für die Benutzung durch Per-
sonen (einschliesslich Kindern) mit verminderten kör-
perlichen, sensoriellen oder mentalen Fähigkeiten oder
mangelnder Erfahrung und Kenntnis gedacht, ausser
wenn ihnen durch eine Person, die für ihre Sicherheit
verantwortlich ist, Überwachung oder Beistand hin-
sichtlich der Benutzung dieses Gerätes gegeben wird.
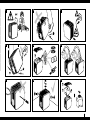
Kinder sollten beaufsichtigt werden, um sicherzustel-
len, dass diese nicht mit dem Gerät spielen (Bild 1).
• Das Gerät nie in Betrieb nehmen, wenn ein Kabel oder
Stecker beschädigt ist, nach Fehlfunktionen des
Gerätes oder wenn dieses heruntergefallen ist (2) oder
auf eine andere Art beschädigt wurde.
• Es darf nur das originale Netzkabel verwendet werden.
• Falls das Netzkabel beschädigt ist, muss es durch den
Hersteller, seinen Servicehändler oder durch eine ähn-
lich qualifizierte Person ersetzt werden, um eine Gefahr
zu vermeiden.
• Das Gerät darf nur in komplett zusammengebautem
Zustand in Betrieb genommen werden.
• Reparaturen an Elektrogeräten dürfen nur von Fach-
kräften durchgeführt werden (3). Durch unsachgemässe
Reparaturen können erhebliche Gefahren für den
Benutzer entstehen.
• Niemals den Netzstecker am Kabel oder mit nassen
Händen aus der Steckdose ziehen.
• Das Gerät darf nicht mit nassen Händen bedient
werden.
• Das Gerät nur auf eine ebene, trockene Fläche
stellen.
• Unterteil nie in Wasser oder andere Flüssigkeiten
tauchen (16).
• Das Gerät so platzieren, dass es nicht umgestossen
werden kann (4).
• Das Kabel nicht mit einem Teppich oder anderen
Dingen bedecken. Gerät so platzieren, dass Sie nicht
über das Kabel stolpern.
• Betreiben Sie das Gerät nicht in Räumen, in denen sich
feuergefährliche Güter, Gase oder Dämpfe befinden.
• Keine Fremdgegenstände in das Gerät stecken.
• Lüftungsöffnungen unbedingt freihalten.
• Setzen Sie sich keinesfalls auf das Gerät und platzieren
Sie keine Gegenstände darauf (Dampfaustritt
freilassen).
• Achtung, das Gerät hat während dem Betrieb heisse
Oberflächen.
• Beim Betrieb darf das Netzkabel nicht auf dem Gerät
liegen: Brand- und Kurzschlussgefahr.
• Keine Verlängerungskabel verwenden.
• Das Gerät nicht auf heisse Oberflächen oder in der
Nähe von offenen Flammen abstellen. Mindestabstand
von 1 m einhalten.
• Gerät oder Kabel nie in Wasser oder andere Flüssig-
keiten tauchen: Verletzungs-, Feuer- oder Stromschlag-
Gefahr.
• Verwenden Sie nur Original Ersatzteile.
• Vor Reinigung des Gerätes Netzstecker ziehen und
vollständig abkühlen lassen.
• Gerät wahrend des Betriebs nie verschieben.
• Für Schäden, die durch Nichtbeachten dieser
Gebrauchsanweisung entstehen, lehnt der Hersteller
jegliche Haftung ab.
Auspacken
• Gerät vorsichtig aus der Verpackung nehmen.
• Gerät aus dem Beutel nehmen. Hinweis: die Geräteab-
deckung ist lose.
• Entnehmen Sie das Zubehör aus dem Geräteinneren (5)
• Entfernen Sie alle Verpackungsmaterialien.

9
de
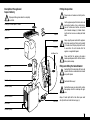
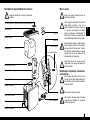
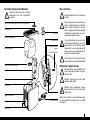
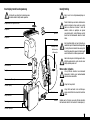
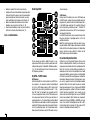
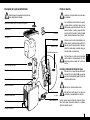
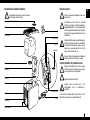
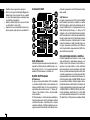
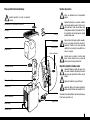
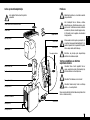
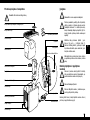
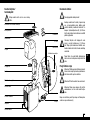
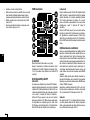
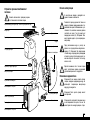
Gerätebeschreibung/Lieferumfang
Das Gerät darf nur in komplett zusammenge-
bautem Zustand in Betrieb genommen werden.
Inbetriebnahme
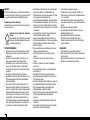
Beachten Sie unbedingt alle Sicherheitshin-
weise!
Gerät auf eine ebene, stabile, wasser- und
wärmeunempfindliche Unterlage stellen. Min-
destabstand von 1 m zu Wänden, Möbel und
Vorhängen einhalten (Gefahr von Feuchtig-
keitsschäden) (6). Achtung: Ein Umkippen des
Gerätes kann zu Verbrühungen durch heisses
Wasser führen.
Das Netzkabel immer zuerst am Gerät einste-
cken, bevor es ans Netz angeschlossen wird (7).
Achtung: Den Stecker bis zum Anschlag in das
Gerät einstecken! Ein Ton im Gerät signalisiert,
dass das Gerät mit Strom versorgt ist.
Bitte beachten Sie, dass das Gerät bei Inbetrieb-
nahme in den ersten Minuten erhöhte Betriebs-
geräusche entwickelt.
Wasser einfüllen / nachfüllen
Achtung: Nur frisches Trinkwasser (Leitungs-
wasser) verwenden. Kein kohlensäurehaltiges
Wasser oder andere Flüssigkeiten verwenden.
Achtung: Nach dem Betrieb heiss!
Achtung: Niemals Wasser in die Lüftungsöff-
nungen giessen, da dies zur Beschädigung des
Geräts führt.
Verwenden Sie zum Wasser einfüllen immer den Tank.
Niemals Wasser direkt in das Gerät oder in das Dampfrohr
füllen (8).
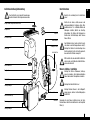
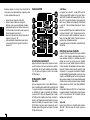
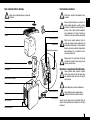
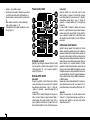
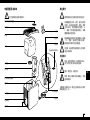
Bedienungspanel
Lüftungsöffnungen
Lüftungsöffnungen
Wassertankdeckel
Dampfrohr
Anti-Kalk-Pad
Wasserstandsanzeige
Dampfaustritt
Dampfrohrabdeckung mit Duftstoffbehälter
Geräteabdeckung
Wassertank
Netzkabel
Optional
Wasserstandssensor
Verdampferschale
Anti-Kalk-Pad
Wasserwanne

10
de
• Sicherstellen, dass das Gerät ausgeschaltet ist.
• Obere Geräteabdeckung abnehmen (Hinweis: Kondens-
wasser auf der Innenseite der Abdeckung nach Betrieb
möglich) und Wassertank am Tankgriff aus dem Gerät
nehmen (9).
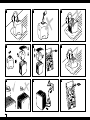
• Wassertank auf den Kopf stellen, Verschlussdeckel
abschrauben, Wasser einfüllen (9 – 10).
• Tankdeckel gut verschliessen, Tank in das Gerät
stellen, Geräteabdeckung auflegen (11).
Durch Drücken der Taste B kann der AUTO-Modus wieder
aktiviert werden.
SLEEP-Modus
Durch Drücken der Taste B kann vom AUTO-Modus in den
SLEEP-Modus (Symbol K) gewechselt werden und umge-
kehrt. Die gewünschte relative Luftfeuchtigkeit (rH) ist im
SLEEP-Modus auf 45% voreingestellt. Das Gerät wählt die
geeignete Leistungsstufe Low «L» / Medium «M» (Symbol
G), um den Wert von 45% rH möglichst energiesparend zu
erreichen.
Im SLEEP-Modus kann die rH jederzeit über die Tasten C
verändert werden, siehe C) Luftfeuchtigkeit einstellen.
Wird die Leistungsstufe durch die Taste D verändert, schal-
tet sich der SLEEP-Modus aus und das Gerät befindet sich
im manuellen Betrieb, siehe D) Manueller Betrieb.
Durch zweimaliges Drücken der Taste B kann der SLEEP-
Modus wieder aktiviert werden.
C) Luftfeuchtigkeit einstellen
Das Gerät ist mit einem Hygrostat ausgestattet. Dieser
misst die relative Luftfeuchtigkeit und schaltet beim Gerät
automatisch bei Erreichen des gewünschten Wertes die Be-
feuchtung ab. Die interne Belüftung bleibt eingeschaltet, um
eine genaue Anzeige der relativen Luftfeuchtigkeit zu ge-
währleisten. Wird die gewünschte relative Luftfeuchte unter-
schritten, schaltet die Befeuchtung wieder automatisch ein.
Durch Drücken der Tasten C kann in 5er Schritten die
gewünschte relative Luftfeuchtigkeit eingestellt werden.
Während der Auswahl wird der gewünschte Wert blinkend
angezeigt. Auf dem Display erscheint die Anzeige DESIRED
(gewünscht) (Symbol H).
Die Anzeige wechselt nach einigen Sekunden automatisch
auf den Wert der aktuellen relativen Luftfeuchtigkeit und
diese zeigt CURRENT (aktuell) (Symbol H). Bei Erreichen
des gewünschten Wertes zeigt das Display DESIRED und
CURRENT an.
Empfehlenswert ist eine relative Luftfeuchtigkeit zwischen 40
und 60%. Der Einstellbereich liegt bei minimal 30% bis ma-
ximal 70% relative Luftfeuchtigkeit oder Dauerbetrieb «Co».
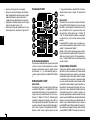
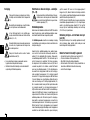
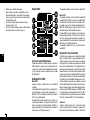
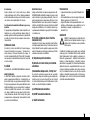
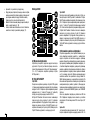
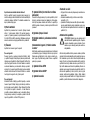
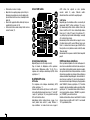
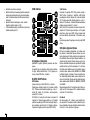
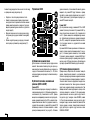
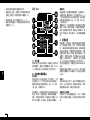
A) Ein/Ausschalten
Beim Berühren der Taste A schaltet das Gerät ein bzw. aus.
Über die Taste A wird auch der Entkalkungsmodus ge-
startet. Siehe Kapitel «Entkalkungsmodus» (18 – 25). Das
Gerät befindet sich nach dem Einschalten im AUTO-Modus
(Symbol J).
B) AUTO- / SLEEP-Modus
AUTO-Modus:
Nach dem Einschalten befindet sich das Gerät im AUTO-
Modus (Symbol J). Die gewünschte relative Luftfeuchtigkeit
(rH) ist im AUTO-Modus auf 50% voreingestellt. Das Gerät
wählt die geeignete Leistungsstufe Low «L» / Medium «M»
/ High «H» (Symbol G), um den Wert von 50% rH möglichst
schnell zu erreichen.
Im AUTO-Modus kann die rH jederzeit über die Tasten C
verändert werden, siehe C) Luftfeuchtigkeit einstellen.
Wird die Leistungsstufe durch die Taste D verändert, schal-
tet sich der AUTO-Modus aus und das Gerät befindet sich
im manuellen Betrieb, siehe D) Manueller Betrieb.
Bedienung S450
L
M
H
AUTO
CURRENT
DESIRED
I
J K
L

11
de
Anzeige E2
Erscheint im Display die Anzeige «E2», hat die aktuelle rela-
tive Luftfeuchtigkeit 90% erreicht. Aus Sicherheitsgründen
schaltet das Gerät automatisch aus. Bei Unterschreiten von
85% relativer Luftfeuchtigkeit schaltet das Gerät wieder
ein.
Schnelle Anzeige der aktuellen relativen Luftfeuchtig-
keit
Bei ausgeschaltetem Gerät (Netzkabel ist angeschlossen)
kann durch kurzes Drücken einer der Tasten C die aktuelle
relative Luftfeuchtigkeit im Display angezeigt werden.
Diese Anzeige erlischt automatisch nach einigen Sekunden.
D) Manueller Betrieb
Das Gerät lässt sich über 3 Leistungsstufen betreiben.
Durch Drücken der Taste D können die Leistungsstufen Low
«L» (Nachtbetrieb), Medium «M» (Normalbetrieb) und High
«H» (Leistungsbetrieb) gewählt werden (der AUTO- bzw.
SLEEP-Modus wird deaktiviert). Die Anzeige der gewünsch-
ten Leistungsstufe erfolgt im Display über das Symbol G.
E) Timer
Das Gerät verfügt über einen Ausschalt– sowie einen
Einschalt-Timer.
Ausschalt-Timer:
Durch Drücken der Taste E bei eingeschaltetem Gerät
wird der Ausschalt-Timer gesetzt. Das Display zeigt nun
blinkend an, in wie viel Stunden das Gerät ausgeschaltet
wird: 0h. Mit den Tasten C kann die Ausschaltzeit von 0h
– 9h eingestellt werden. Nach 3 Sekunden ohne Eingabe
ist der eingestellte Wert aktiviert und Symbol L zeigt an,
dass der Timer eingeschaltet ist. Das Display zeigt wieder
die aktuelle Luftfeuchtigkeit an. Durch Drücken der Taste E
kann jederzeit die verbleibende Dauer bis zum Ausschalten
angezeigt und auch verstellt werden.
Einschalt-Timer
Durch Drücken der Taste E bei ausgeschaltetem Gerät wird
der Einschalt-Timer gesetzt. Das Display zeigt nun blinkend
an, in wie viel Stunden das Gerät eingeschaltet wird: 0h. Mit
den Tasten C kann die Einschaltzeit von 0h – 9h eingestellt
werden. Nach 3 Sekunden ohne Eingabe ist der eingestellte
Wert aktiviert. Das Display zeigt die eingestellte Einschalt-
zeit an und das Symbol L leuchtet. Das Gerät befindet sich
nach dem Einschalten im AUTO-Modus (Symbol J).
F) Symbol Reinigung (siehe auch Kapitel
Entkalkungsmodus)
Das Symbol F im Display zeigt an, dass das Gerät gereinigt
werden muss. Das Symbol bleibt solange angezeigt, bis
der Entkalkungsmodus beendet wird. Durch gleichzeitiges
Drücken der beiden Tasten C über eine Zeitdauer von ca.
5 Sekunden kann das Reinigungssymbol manuell zurück-
gesetzt werden.
G) Symbol für Leistungsstufen
H) Symbol für aktuelle und gewünschte
relative Luftfeuchtigkeit
I) Automatisches Abschalten «Wasser leer»
Bei Unterschreiten des minimalen Wasserstandes schaltet
die Befeuchtung automatisch aus. Das rot blinkende Sym-
bol I erscheint auf dem Display. Wird innerhalb von 5 min.
kein Wasser nachgefüllt, erlischt die komplette Anzeige
bis auf das blinkende Symbol I. Wird Wasser nachgefüllt,
erlischt das Symbol I und das Gerät setzt den Betrieb fort.
J) Symbol für AUTO-Modus
K) Symbol für SLEEP-Modus
L) Symbol für Timer
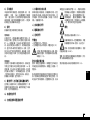
Duftstoffbehälter
• In der Dampfrohrabdeckung ist der Duftstoffbehälter
integriert.
• Nur eine kleine Menge von Duftstoffen in den Duftstoff-
behälter geben und nicht überfüllen (12).
• Achtung! Duftstoffe nicht direkt in den Wassertank,
Wasserwanne oder Verdampferschale beigeben, da
dies das Material und folglich das Gerät beschädigt (13).
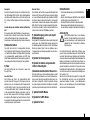
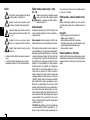
Anti-Kalk-Pad
ACHTUNG: Kochendes Wasser in der Verdamp-
ferschale! Den Anti-Kalk-Pad erst dann entneh-
men, wenn das Wasser in der Verdampferschale
abgekühlt ist. Nur 1 Anti-Kalk-Pad in Verdamp-
ferschale geben.
Der Anti-Kalk-Pad nimmt während des Betriebes einen
grossen Teil des anfallenden Kalkes auf. Der Anti-Kalk-Pad
vermindert die übermässige Verkalkung der Verdampfer-
schale und reduziert so die Häufigkeit der notwendigen Ent-
kalkung. Zum Einlegen des Anti-Kalk-Pads entfernen Sie
die Geräteabdeckung und entnehmen den Wassertank so-
wie das Dampfrohr aus dem Gerät (14). Legen Sie nun den
beigefügten Anti-Kalk-Pad direkt in die Verdampferschale
und setzen Sie das Gerät in umgekehrter Reihenfolge wie-
der zusammen (14).
Sobald sich der Anti-Kalk-Pad komplett mit Kalk gefüllt
hat (Anti-Kalk-Pad wird hart), muss der Anti-Kalk-Pad
ausgetauscht werden. Dies kann – je nach Härtegrad des
Wassers – alle 2 bis 4 Wochen sein. Der Anti-Kalk-Pad kann
mit dem Hausmüll entsorgt werden.

12
de
Wassertank und Abdeckungen reinigen –
wöchentlich (15 – 25)
Wassertank, Geräteabdeckung, Duftstoffbe-
hälter und Dampfrohr mit Spülmittel und einer
weichen Kunststoffbürste reinigen und gut ab-
spülen (17).
Entkalkungsmodus
Verwenden Sie für die Entkalkung ausschliesslich CalcOff.
Schäden, die durch Verwendung von anderen Entkalkungs-
mitteln verursacht werden, sind von der Garantie ausge-
nommen.
Der Entkalkungsmodus ermöglicht eine einfache Reini-
gung und Entkalkung der Verdampferschale, Wasserwanne
und des Dampfrohrs.
Bevor mit dem Entkalkungsmodus begonnen werden kann,
muss der Anti-Kalk-Pad entfernt werden (18) (siehe Kapitel
Anti-Kalk-Pad). Entkalkungsmittel CalcOff in 1L heissem
Wasser auflösen und in die Wasserwanne giessen (19).
Anschliessend das Dampfrohr und die Geräteabdeckung
wieder einsetzen (20). Durch Betätigen der Taste A über
eine Zeitdauer von 5 Sekunden wechselt das Gerät in den
Entkalkungsmodus (21). Die Anzeige des Entkalkungsmo-
dus erfolgt auf dem Display über das nun blinkende Symbol
E (22). Im Display wird der Wert «4h» blinkend angezeigt.
Mit den Tasten C kann die Zeitdauer der Entkalkung, je nach
Grad der Verschmutzung, von 1h bis 9h verändert werden
(22). Nach 3 Sekunden ohne Eingabe gilt der eingestellte
Wert als «gewünschter Wert» und die blinkende Anzeige F
wechselt wieder auf «CURRENT». Das Gerät erhitzt im Ent-
kalkungsmodus die CalcOff-Wasser Mischung und schaltet
danach wieder aus. Dieses Aufheizen des Wassers erfolgt
während des Entkalkungsmodus alle 30 Minuten. Die Rei-
nigungsdauer wird nun laufend angezeigt und wechselt bei
Unterschreiten der 1h-Marke in die Minutenanzeige. Mit
den Tasten C kann die Reinigungsdauer jederzeit verändert
werden. Nach Ablauf der Reinigungsdauer ertönt ein kurzes
Doppelsignal, das Display zeigt den Wert «0h» und das
Reinigungssymbol F blinkt schnell (23). Durch Ausschalten
des Gerätes über die Taste A wird der Entkalkungsmodus
beendet und das Gerät schaltet aus (23).
ACHTUNG: Nun muss das Wasser mit dem CalcOff entleert
und die Wanne ausgespült werden (24 – 25). Achten Sie
darauf, dass kein Wasser in die Lüftungsöffnung fliesst (25).
Tipp: Bei sehr hartnäckigem Kalk über Nacht (12 bis 15
Stunden) entkalken.
Gehäuse reinigen – ein- bis zweimal
jährlich (26)
Das Gehäuse mit einem feuchten Putzlappen reinigen und
trocken Abwischen; bei Bedarf ein für Kunststoff geeig-
netes Reinigungsmittel verwenden.
Nach dem Betrieb
• Gerät mit Taste A ausschalten (27).
• Netzstecker ziehen (15).
• Warten bis das Gerät vollständig ausgekühlt ist.
• Restwasser ausleeren und Wassertank und Wasser-
wanne reinigen. Wenn nötig entkalken.
• Gerät trocknen lassen.
Reinigung
Netzstecker immer vor dem Reinigen oder Aus-
spülen des Gerätes ziehen (15).
Gerät vollständig entleeren und abkühlen lassen.
Achtung Verbrennungsgefahr!
Achtung: Niemals Wasser in die Lüftungsöff-
nungen giessen, da dies zur Beschädigung des
Gerätes führt (24 – 25).
Wichtig: keine kratzenden Gegenstände (Messer
etc.) oder Schwämme für die Reinigung der Ver-
dampferschale verwenden.
Gerät nie ins Wasser oder in andere Flüssig-
keiten tauchen (16).
• Eine regelmässige Reinigung ist Voraussetzung für
einen hygienischen, störungsfreien Betrieb.
• Gerät je nach Wasserqualität regelmässig entkalken
(siehe Entkalkungsmodus).

13
de
Lagerung bei längerem Nichtgebrauch
Gerat wie beschrieben reinigen, vollständig trocknen lassen
und vorzugsweise in der Originalverpackung an einem tro-
ckenen, nicht zu heissen Ort aufbewahren.
Entsorgen
Übergeben Sie das ausgediente Gerät Ihrem
Händler zur fachgerechten Entsorgung. Weitere
Entsorgungsmöglichkeiten erfahren Sie von Ih-
rer Gemeinde- oder Stadtverwaltung.
Zubehör
Zubehör können Sie über Ihren Fachhändler beziehen und
selbst am Gerät austauschen. Es dürfen nur Originalteile
des Herstellers verwendet werden.
Garantie
Die Garantiebestimmungen sind von unserer Landesvertre-
tung festgelegt. Wenden Sie sich vertrauensvoll an Ihren
Fachhändler, wenn am Gerät trotz strenger Qualitätskon-
trollen ein Mangel auftritt. Für eine Garantieleistung ist die
Vorlage des Kaufbelegs unbedingt erforderlich. Repara-
turen an Elektrogeräten dürfen nur Fachkräfte durchführen.
Durch unsachgemässe Reparaturen können erhebliche
Gefahren für den Benutzer entstehen und der Garantiean-
spruch erlischt.
Rechtliche Hinweise
Das Gerät ist CE-konform und entspricht den folgenden
Richtlinien:
• 2006/95/EG für elektrische Sicherheit
• 2004/108/EG für elektromagnetische Verträglichkeit
• 2011/65/EU zur Beschränkung der Verwendung be-
stimmter gefährlicher Stoffe in Elektro- und Elektronik-
geräten
• 2002/96/EG über Elektro- und Elektronik-Altgeräte
Technische Änderungen vorbehalten. Die Gebrauchsan-
leitung ist urheberrechtlich geschützt.
• 2004/40/EG für elektromagnetische Felder
Seriennummer
Die Seriennummer befindet sich auf der Unterseite des
Gerätes.
*@ 230 V~ / 50 Hz
Technische Daten
Netzspannung 220-240 V ~ / 50/60 Hz
Leistungsaufnahme 160 / 360 / 480 W*
Befeuchtungsleistung bis 550 g/h*
Geeignet für Raumgrössen bis 60 m
2
/ 150 m
3
Fassungsvermögen 7 Liter
Abmessungen 355 x 240 x 334 mm
Leergewicht ca. 4.5 kg
Betriebsgeräusch 35 / 39 / 42 dB(A)
Zubehör Anti-Kalk-Pad A451
CalcOff A7417

14
de

15
en
Instructions for use

16
en
Foreword
Congratulations on choosing the S450 appliance. In do-
ing so, you have taken an important step towards healthy
indoor air and more wellbeing.
Proper use:
The appliance must only be used for the humidification of
the air indoors.
Caution: Hot steam and boiling water!
Do not allow the appliance to be used by children.
Steam and boiling water can lead to burns.
Safety instructions
• Read the operating instructions carefully before using
the appliance and keep them in a safe place for later
reference.
• Connect the appliance only to AC – with voltage
indicated on the rating label.
• Always plug the power cord into the appliance first
before connecting it to the electrical outlet. CAUTION: A
sound from the unit indicates that the appliance is sup-
plied with power.
• Only use the appliance indoors and within the param-
eters stated in the technical specifications. Using the
appliance for a purpose for which it is not intended
could pose a serious hazard to health and life.
• This appliance is not to be used by persons (including
children) with impaired physical, sensory or mental
capacities or insufficient experience and knowledge,
unless they are supervised by someone who is respon-
sible for their safety or given assistance with the use of
this appliance. Children should be supervised to ensure
that they do not play with the appliance (fig. 1).
• Never use the appliance if there is any damage to the
appliance or cable, after malfunction has occurred,
after the appliance has been dropped (2) or damaged
in any other way.
• Only use the original power cord.
• In case the power cord is damaged, it must be
replaced by the manufacturer, an authorized service
dealer or a similarly qualified person, in order to avoid
a hazard.
• Only operate the appliance when it is completely
assembled.
• Repairs to electrical appliances may only be carried out
by qualified service engineers (3). Improper repair work
can pose a considerable hazard to the user.
• Never pull the plug from the mains socket by the cable
or with wet hands.
• Do not operate the appliance with wet hands.
• Always place the appliance on a dry, level surface.
•
Do not immerse the main body in water or other
liquids
(16).
• Position the appliance where it cannot be easily
knocked over (4).
• Do not run the power cord under a carpet or other
objects. Position the appliance so that you will not trip
over the cord.
• Do not use the appliance in areas where combustible
materials, gases or vapours are present.
• Ventilation openings must be kept free of obstructions.
• Do not sit, stand or place any heavy objects on the ap-
pliance (keep the steam outlet clear).
• Caution: The surfaces of the unit are hot during
operation.
• During operation, do not put the power cable on top
of the appliance because of danger of fire and short
circuit.
• Do not use an extension cord.
• Do not place the unit on hot surfaces or near open
flames. Keep a minimum distance of 1m.
• Never immerse the appliance or cable into water or
any other liquids because of danger of injury, fire or
electro shock.
• Only use original spare parts.
• Before cleaning, unplug the power cord and let the unit
cool completely off.
• Do not move the appliance during operation.
• The manufacturer rejects all liability for damage
caused by nonobservance of these instructions for use.
Unpacking
• Carefully remove the unit from its box.
• Remove the unit from the wrapping.
Note: the top cover of the unit is loose.
• Remove the accessories from inside the unit (5).
• Remove all packaging materials.

17
en
Description of the appliance/
Scope of delivery
Only operate the appliance when it is completely
assembled.
Putting into operation
Please make sure to observe all safety instruc-
tions!
Use the appliance only on flat, stable, water- and
heat-resistant surfaces. Keep a minimum dis-
tance of 1m from walls, furniture, and curtains
(risk of moisture damage) (6). Caution: Knock-
ing the unit over can cause scalding due to hot
water.
Always plug the power cord into the appliance
first, before connecting it to the electrical outlet
(7). Caution: Insert the plug fully into the unit!
A sound from the unit indicates that the
appliance is supplied with power.
Please note that the appliance will produce
louder operating noises for the first few minutes
during commissioning.
Filling and refilling the tank with water
Caution: Only fill the water tank with fresh, cold
tap water. Do not use carbonated mineral water
or any other liquids.
Caution: Hot after usage!
Caution: Never pour any water into the ventila-
tion openings since this can damage the appli-
ance.
Always fill water right into the tank. Never pour water
directly into the unit or into the steam pipe (8).
Control Panel
Ventilation opening
Ventilation openings
Water tank cap
Steam pipe
Anti-Mineral-Pad
Water level indicator
Steam outlet
Steam pipe cover with fragrance container
Top cover
Water tank
Power cord
Optional
Water level sensor
Steam tray
Anti-Mineral-Pad
Water base

18
en
• Make sure that the unit is turned off.
• Remove the top cover of the unit (Note: formation of
condensation may occur after use on the inside of the
cover) and take the water tank from the unit by using
the tank handle (9).
• Turn the water tank upside down, unscrew the cap and
fill with water (9 – 10).
• Close the tank cap securely, place the tank into the unit
and put the cover back on (11).
SLEEP-Mode
By pressing button B, the AUTO-Mode can be changed to
SLEEP-Mode (symbol K) and vise versa. In the SLEEP-Mode,
the desired relative humidity (rH) is preset to 45%. The unit
chooses the appropriate output level Low “L” / Medium “M”
(symbol G), in order to attain the value of 45% rH as energy-
efficiently as possible.
In SLEEP-Mode, the rH can be changed at any time by using
button C; see C) Setting humidity level. If the output level
is changed by using button D, the SLEEP-Mode turns off
and the unit is operated manually; see D) Manual operation.
By pressing button B two times, the SLEEP-Mode can be
reactivated.
C) Setting humidity level
The appliance is fitted with a hygrostat. This measures the
relative humidity and switches the appliance off automati-
cally when the desired value is reached. The internal ven-
tilation remains turned on, to ensure an accurate reading of
the relative humidity. If the relative humidity falls below the
desired value, humidification resumes automatically. The
desired relative humidity can be adjusted in steps of 5% by
pressing button B. While selecting the desired humidity out-
put, the value display is blinking. The word DESIRED appears
on the display (symbol H). After a few seconds, the display
automatically changes to show the current value (symbol
H). Upon reaching the desired relative humidity, the display
shows DESIRED and CURRENT.
A relative humidity of between 40 and 60% is recom-
mended. The setting for the relative humidity ranges from a
minimum of 30% to a maximum of 70% relative humidity or
“CO” continuous mode.
Symbol E2
When the display shows “E2”, the current relative humid-
ity has reached 90%. For safety reasons, the appliance
switches off automatically. The appliance switches back
on, when the relative humidity falls below 85%.
A) Switch on/off
Pressing button A switches the appliance either on or off.
Button A is also used to start the decalcification mode. See
the section about “Decalcification Mode” (18 – 25). After
the unit is switched on, it is in AUTO-Mode (symbol J).
B) AUTO- / SLEEP-Mode
AUTO-Mode:
After the unit is switched on, it is in AUTO-Mode (symbol J).
The desired relative humidity (rH) is preset to 50%. The unit
chooses the appropriate output level Low “L” / Medium “M”
/ High “H” (symbol G), in order to attain the value of 50% rH
as quickly as possible.
In AUTO-Mode, the rH can be changed at any time by using
button C; see C) Setting humidity level. If the output level
is changed by using button D, the AUTO-Mode turns off
and the unit is operated manually; see D) Manual operation.
By pressing button B, the AUTO-Mode can be reactivated.
Operation S450
L
M
H
AUTO
CURRENT
DESIRED
I
J K
L

19
en
Quick display of the current relative humidity
When the unit is switched off (power cable is connected),
the current relative humidity can be shown on the display
by briefly pressing one of the C buttons. This display goes
out automatically after a few seconds.
D) Manual operation
The appliance can be operated on 3 levels. The output levels
Low “L” (night operation), Medium “M” (normal operation),
and High “H” (power operation) can be selected by press-
ing button D (AUTO- and SLEEP-Mode are deactivated). The
desired output level is shown on the display via symbol G.
E) Timer
The appliance has an OFF- and an ON-Timer.
OFF-Timer:
The OFF-Timer is set by pressing button E on the switched-
on appliance. The blinking display shows the hours until the
unit will be switched off: 0h. By pressing button C, the
switch-off time can be selected from between 0h -9h. With-
out any input, the set value is enabled after 3 seconds and
symbol L indicates that the timer is turned on. The display
once again shows the current relative humidity. By pressing
button E, the remaining time until switch-off is displayed
and can also be adjusted.
ON-Timer
By pressing button E on the turned-off appliance, the ON-
timer is set. The blinking display now shows the hours until
the unit will be switched on: 0h. By pressing button C, the
switch-on time can be selected from between 0h-9h. With-
out any input, the set value is enabled after 3 seconds. The
display shows the set switch-on time and the symbol L is
blinking. After the unit is switched on, the unit is in AUTO-
Mode (symbol J).
F) Cleaning symbol (see also section about
Decalcification-Mode)
The letter F in the display indicates that the appliance must
be cleaned. The symbol appears until the Decalcification-
Mode is completed. By pressing both C buttons simultane-
ously and holding them down for approx. 5 seconds, the
cleaning symbol can be manually reset.
G) Output level symbol
H) Current and desired relative humidity
symbol
I) Automatic shut-off „Water Tank empty“
If the water level falls below minimum level, the humidi-
fication switches off automatically. The red blinking
symbol I appears on the display. If water is not added within
5 minutes, the display turns off, except for the symbol I.
If water is added, symbol I turns off and the appliance
continues operating.
J) AUTO-Mode symbol
K) SLEEP-Mode symbol
L) Timer symbol
Fragrance container
• The steam pipe cover contains an integrated fragrance
container.
• Fill only a small amount of fragrance into the fragrance
container and do not overfill (12).
• Caution! Do not put any fragrance directly into the wa-
ter tank, water base or steam tray, as this can damage
the material and consequently the appliance (13).
Anti-Mineral-Pad
CAUTION: The steam tray contains boiling water!
Remove the Anti-Mineral-Pad only when the wa-
ter in the steam tray has cooled off. Place only one
Anti-Mineral-Pad into the steam tray.
The Anti-Mineral-Pad absorbs a large part of the resulting
lime while in operation. The Anti-Mineral-Pad reduces ex-
cessive calcification of the steam tray as well as the fre-
quency of necessary decalcification. In order to insert the
Anti-Mineral-Pad, remove the top cover as well as the water
tank and the steam pipe from the unit (14). Now insert the
supplied Anti-Mineral-Pad directly into the steam tray and
reassemble the appliance in the reversed order (14). The
Anti-Mineral-Pad needs to be replaced as soon as it is com-
pletely full of lime (Anti-Mineral-Pad hardens). Depending
on the hardness of the water, this needs to be done every
2 to 4 weeks. The Anti-Mineral Pad can be disposed with
the Household waste.

20
en
Cleaning of water tank and covers –
weekly (15 – 25)
Clean the water tank, top cover, fragrance
container and steam pipe with a soft plastic
brush and dish detergent and rinse well (17).
Decalcification-Mode
Only use CalcOff for decalcification. Damage that is caused
by the use of other cleaning agents is not covered by the
warranty.
The Decalcification-Mode enables simple cleaning and
decalcification of the steam tray, water base, and steam
pipe.
The Anti-Mineral-Pad needs to be removed, before starting
the Decalcification-Mode (18) (see section about Anti-
Mineral-Pad). Dissolve the CalcOff decalcification agent in
1 L of hot water and pour into the water base (19). Then
reinsert the steam pipe and top cover (20). Pressing and
holding button A for 5 seconds switches the appliance to
Decalcification-Mode (21). Decalcification-Mode is shown
on the display by the flashing symbol E (22). The value “4h”
is shown flashing on the display. Button C can be used to
change the decalcification period from 1h to 9h, depending
on the level of soiling (22). After 3 seconds without further
input, the set value is taken as “desired value” and the flash-
ing display changes back to “CURRENT”. The unit heats up
the CalcOff-water solution during Decalcification-Mode and
shuts off after it is finished. The heating of the water takes
place every 30 minutes while the Decalcification-Mode is
active. The cleaning period is now permanently displayed
and switches to minutes when the time falls below the 1
hour mark. The cleaning period can be changed at any time
by pressing button C. At the end of the cleaning period, a
short double signal is sounded, the display shows the value
“0h” and the cleaning symbol F will rapidly flash (23). Press-
ing button A ends the Decalcification-Mode and switches
off the appliance (23).
CAUTION: The water base must now be emptied of the
CalcOff and rinsed (24 – 25). Make sure no water enters
through the ventilation opening (25). Tip: In case of very
tough lime, decalcify overnight (12 to 15 hours).
Cleaning the housing – once or twice
annually (26).
Clean the housing with a damp cleaning rag and wipe it
dry; use a cleaning agent suitable for plastic if needed.
After usage
• Switch the appliance off by pressing button A (27).
• Disconnect power plug (15).
• Wait until the appliance has completely cooled off.
• Empty any remaining water and clean the water tank
and the water base. Decalcify if necessary.
• Let the appliance dry.
Cleaning
Always disconnect the power plug of the appli-
ance, before cleaning or rinsing (15).
The unit has to be completely emptied and
cooled off. Caution: Danger of burning!
Caution: Never pour any water into the ventila-
tion openings since this can damage the appli-
ance (24 – 25).
Important: Do not use any abrasive objects
(knives etc.) or sponges to clean the steam tray.
Never immerse the appliance in water or any
other liquids (16).
• Regular cleaning is essential for hygienic, fault-free
operation.
• Depending on water quality, regular decalcification of
the appliance is recommended (see Decalcification-
Mode).
Strona jest ładowana ...
Strona jest ładowana ...
Strona jest ładowana ...
Strona jest ładowana ...
Strona jest ładowana ...
Strona jest ładowana ...
Strona jest ładowana ...
Strona jest ładowana ...
Strona jest ładowana ...
Strona jest ładowana ...
Strona jest ładowana ...
Strona jest ładowana ...
Strona jest ładowana ...
Strona jest ładowana ...
Strona jest ładowana ...
Strona jest ładowana ...
Strona jest ładowana ...
Strona jest ładowana ...
Strona jest ładowana ...
Strona jest ładowana ...
Strona jest ładowana ...
Strona jest ładowana ...
Strona jest ładowana ...
Strona jest ładowana ...
Strona jest ładowana ...
Strona jest ładowana ...
Strona jest ładowana ...
Strona jest ładowana ...
Strona jest ładowana ...
Strona jest ładowana ...
Strona jest ładowana ...
Strona jest ładowana ...
Strona jest ładowana ...
Strona jest ładowana ...
Strona jest ładowana ...
Strona jest ładowana ...
Strona jest ładowana ...
Strona jest ładowana ...
Strona jest ładowana ...
Strona jest ładowana ...
Strona jest ładowana ...
Strona jest ładowana ...
Strona jest ładowana ...
Strona jest ładowana ...
Strona jest ładowana ...
Strona jest ładowana ...
Strona jest ładowana ...
Strona jest ładowana ...
Strona jest ładowana ...
Strona jest ładowana ...
Strona jest ładowana ...
Strona jest ładowana ...
Strona jest ładowana ...
Strona jest ładowana ...
Strona jest ładowana ...
Strona jest ładowana ...
Strona jest ładowana ...
Strona jest ładowana ...
Strona jest ładowana ...
Strona jest ładowana ...
Strona jest ładowana ...
Strona jest ładowana ...
Strona jest ładowana ...
Strona jest ładowana ...
Strona jest ładowana ...
Strona jest ładowana ...
Strona jest ładowana ...
Strona jest ładowana ...
Strona jest ładowana ...
Strona jest ładowana ...
Strona jest ładowana ...
Strona jest ładowana ...
Strona jest ładowana ...
Strona jest ładowana ...
Strona jest ładowana ...
Strona jest ładowana ...
Strona jest ładowana ...
Strona jest ładowana ...
Strona jest ładowana ...
Strona jest ładowana ...
Strona jest ładowana ...
Strona jest ładowana ...
Strona jest ładowana ...
Strona jest ładowana ...
Strona jest ładowana ...
Strona jest ładowana ...
Strona jest ładowana ...
Strona jest ładowana ...
Strona jest ładowana ...
Strona jest ładowana ...
Strona jest ładowana ...
Strona jest ładowana ...
Strona jest ładowana ...
Strona jest ładowana ...
Strona jest ładowana ...
Strona jest ładowana ...
Strona jest ładowana ...
Strona jest ładowana ...
Strona jest ładowana ...
Strona jest ładowana ...
-
 1
1
-
 2
2
-
 3
3
-
 4
4
-
 5
5
-
 6
6
-
 7
7
-
 8
8
-
 9
9
-
 10
10
-
 11
11
-
 12
12
-
 13
13
-
 14
14
-
 15
15
-
 16
16
-
 17
17
-
 18
18
-
 19
19
-
 20
20
-
 21
21
-
 22
22
-
 23
23
-
 24
24
-
 25
25
-
 26
26
-
 27
27
-
 28
28
-
 29
29
-
 30
30
-
 31
31
-
 32
32
-
 33
33
-
 34
34
-
 35
35
-
 36
36
-
 37
37
-
 38
38
-
 39
39
-
 40
40
-
 41
41
-
 42
42
-
 43
43
-
 44
44
-
 45
45
-
 46
46
-
 47
47
-
 48
48
-
 49
49
-
 50
50
-
 51
51
-
 52
52
-
 53
53
-
 54
54
-
 55
55
-
 56
56
-
 57
57
-
 58
58
-
 59
59
-
 60
60
-
 61
61
-
 62
62
-
 63
63
-
 64
64
-
 65
65
-
 66
66
-
 67
67
-
 68
68
-
 69
69
-
 70
70
-
 71
71
-
 72
72
-
 73
73
-
 74
74
-
 75
75
-
 76
76
-
 77
77
-
 78
78
-
 79
79
-
 80
80
-
 81
81
-
 82
82
-
 83
83
-
 84
84
-
 85
85
-
 86
86
-
 87
87
-
 88
88
-
 89
89
-
 90
90
-
 91
91
-
 92
92
-
 93
93
-
 94
94
-
 95
95
-
 96
96
-
 97
97
-
 98
98
-
 99
99
-
 100
100
-
 101
101
-
 102
102
-
 103
103
-
 104
104
-
 105
105
-
 106
106
-
 107
107
-
 108
108
-
 109
109
-
 110
110
-
 111
111
-
 112
112
-
 113
113
-
 114
114
-
 115
115
-
 116
116
-
 117
117
-
 118
118
-
 119
119
-
 120
120


w innych językach
- čeština: Boneco S450 Návod k obsluze
- español: Boneco S450 El manual del propietario
- italiano: Boneco S450 Manuale del proprietario
- Deutsch: Boneco S450 Bedienungsanleitung
- eesti: Boneco S450 Omaniku manuaal
- français: Boneco S450 Le manuel du propriétaire
- English: Boneco S450 Owner's manual
- русский: Boneco S450 Инструкция по применению
- Nederlands: Boneco S450 de handleiding