
You should read this user manual carefully before
using the appliance
Bevor Sie das Gerät in Betrieb nehmen, sollten
Sie diese Gebrauchsanweisung aufmerksam lesen
Alvorens de apparatuur in gebruik te nemen dient
u deze gebruiksaanwijzing aandachtig te lezen
Przed uruchomieniem urządzenia należy koniecznie
dokładnie przeczytać niniejszą instrukcję obsługi
Lisez attentivement ce mode d’emploi avant d’utiliser
l’appareil .
Prima di utilizzare l’apparecchio in funzione leggere
attentamente le istruzioni per l’uso.
Citiţi cu atenţie prezentul manual de utilizare înainte
de folosirea aparatului
Внимательно прочитайте руководство пользователя
перед использованием прибора
User manual
Gebrauchsanweisung
Gebruiksaanwijzing
Instrukcja obsługi
Mode d’emploi
Istruzioni per l’utente
Instrucţiunile utilizatorului
Руководство по эксплуатации
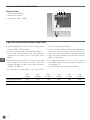
Item: 143087
226001
KEBAB GRILL GAS
PROFI LINE
KEBAB GAZOWY PROFI LINE

Keep this manual with the appliance.
Diese Gebrauchsanweisung bitte beim Gerät aufbewahren.
Bewaar deze handleiding bij het apparaat.
Zachowaj instrukcję urządzenia.
Gardez ces instructions avec cet appareil.
Conservate le istruzioni insieme all’apparecchio.
Păstraţi manualul de utilizare alături de aparat.
Хранить руководство вместе с устройством.
For indoor use only.
Nur zur Verwendung im Innenbereich.
Alleen voor gebruik binnenshuis.
Do użytku wewnątrz pomieszczeń.
Pour l’usage à l’intérieur seulement.
Destinato solo all’uso domestico.
Numai pentru uz casnic.
Использовать только в помещениях.
CONTENTS
1. IMPORTANT SAFETY REGULATIONS ......................3
2. INTENDED USE .......................................................4
3. DESIGN AND TECHNICAL SPECIFICATION .............5
4. INSTALLATION AND ADJUSTMENT ........................6
5. OPERATION .............................................................9
6. CLEANING AND MAINTENANCE ...........................10
7. TROUBLESHOOTING ............................................. 11
8. TECHNICAL FEATURES .........................................11
9. INJECTOR REPLACEMENT .................................... 13
10. ELECTRICAL CIRCUIT DIAGRAM ...........................14
11. WARRANTY ............................................................ 15
12. DISCARDING & ENVIRONMENT ............................ 15

3
EN
Dear Customer,
Thank you for purchasing this Hendi appliance. Before using the appliance for the first time, please read
this manual carefully, paying particular attention to the safety regulations outlined below.
1. IMPORTANT SAFETY REGULATIONS
• This appliance is intended for commercial use only and must not be used for
household use.
• The appliance must only be used for the purpose for which it was intended and
designed. The manufacturer is not liable for any damage caused by incorrect
operation and improper use.
• Keep the appliance and electrical plug away from water and any other liquids. In
the event that the appliance should fall into water, immediately remove plug from
the socket and do not use until the appliance has been checked by a certified
technician. Failure to follow these instructions could cause a risk to lives.
• Never attempt to open the casing of the appliance yourself.
• Do not insert any objects in the casing of the appliance.
• Do not touch the plug with wet or damp hands.
• Danger of electric shock! Do not attempt to repair the appliance yourself. In case
of malfunctions, repairs are to be conducted by qualified personnel only.
• Never use a damaged appliance! Disconnect the appliance from the electrical
outlet and contact the retailer if it is damaged.
• Warning! Do not immerse the electrical parts of the appliance in water or other
liquids. Never hold the appliance under running water.
• Regularly check the power plug and cord for any damage. If the power plug or
power cord is damaged, it must be replaced by a service agent or similarly quali-
fied persons in order to avoid danger or injury.
• Make sure the cord does not come in contact with sharp or hot objects and keep
it away from open fire. To pull the plug out of the socket, always pull on the plug
and not on the cord.
• Ensure that the cord (or extension cord) is positioned so that it will not cause a trip
hazard.
• Always keep an eye on the appliance when in use.
• Warning! As long as the plug is in the socket the appliance is connected to the
power source.
• Turn off the appliance before pulling the plug out of the socket.
• Never carry the appliance by the cord.

4
EN
• Do not use any extra devices that are not supplied along with the appliance.
• Only connect the appliance to an electrical outlet with the voltage and frequency
mentioned on the appliance label.
• Connect the power plug to an easily accessible electrical outlet so that in case of
emergency the appliance can be unplugged immediately. To completely switch off
the appliance pull the power plug out of the electrical outlet.
• Always turn the appliance off before disconnecting the plug.
• Never use accessories other than those recommended by the manufacturer. Fail-
ure to do so could pose a safety risk to the user and could damage the appliance.
Only use original parts and accessories.
• This appliance is not intended for use by persons (including children) with reduced
physical, sensory or mental capabilities, or lack of experience and knowledge.
• This appliance must not be used by children under any circumstances.
• Keep the appliance and its cord out of reach of children.
• Always disconnect the appliance from the mains if it is left unattended or is not in
use, and before assembly, disassembly or cleaning.
• Never leave the appliance unattended during use.
• A qualified installer should be called in to install the appliance, if necessary to
convert it for use with other gases.
• Allow at least 40 cm surrounding for ventilation purposes.
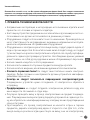
2. INTENDED USE
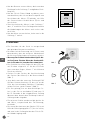
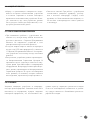
The appliance is supplied with gas (natural gas or
LPG). It consists of a stainless steel frame, a safe-
ty valve, a movable lower plate and a top-mounted
motor.
• This appliance is designed for professional use
only and it should be used by the qualified people.
• This appliance is only intended for grilling food
such as Doner kebab meat on skewer for com-
mercial purposes.
• This appliance is intended for indoor use only.
• Use the appliance only as described in this in-
struction manual.
• Any other use might lead to damage of the appli-
ance, property or personal injury.
• A qualified installer should be called in to install
the appliance, if necessary to convert it for use
with other gases.

5
EN
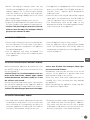
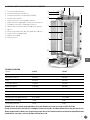
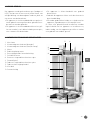
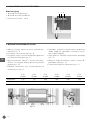
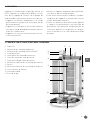
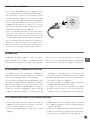
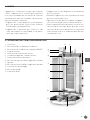
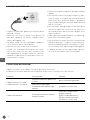
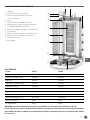
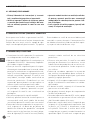
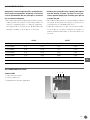
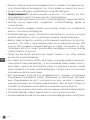
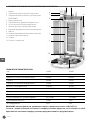
3. DESIGN AND TECHNICAL SPECIFICATION
1. Fixed frame
2. Heater mechanism (burner)
3. Heater mechanism (On / Off knob)
4. Motor
5. Motor control knob
6. Motor body fixing lever
7. Motor guide rail
8. Upper-skewer locking mechanism
9. Sword (skewer)
10. Bottom-skewer locking mechanism
11. Bottom fixing lever
12. Meat tray
13. Gas connection
4
5 6
7
8
2
1
9
10
12
11
3
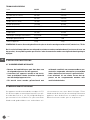
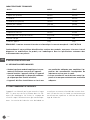
TECHNICAL DATA
Item 226001 143087
Width 470 mm 470 mm
Width (with meat tray) 550 mm 550 mm
Depth 550 mm 550 mm
Depth (with meat tray) 700 mm 700 mm
Height (with motor) 1120 mm 960 mm
Maximal dimension of meat Ø 400x(H)670 mm Ø 400x(H)510 mm
Meat input 40 - 60 kg 20 - 40 kg
Skewer length 900 mm 740 mm
Number/gas output of burners 4x 3,25 kW 3x 3,25kW
Power 13 kW 9 kW
Appliance weight 30 kg 25 kg
NOTE: The motor used to rotate the skewer is supplied by 230 V/ single phase / 50 Hz.
It is our policy to improve the products continuously, and therefore we reserve the right to modify the
product, packaging and specifications provided in documentation without prior notice.

6
EN
4. INSTALLATION AND ADJUSTMENT
4.1 PRELIMINARY INFORMATION
• Keep the Instruction Manual and give it to the
next owner of the appliance.
• Check the appliance before installation for any
visible damage. Do not install or use any dam-
aged appliance.
• The appliance need to be installed with sufficient
ventilation to prevent the occurrence of unac-
ceptable concentrations of substances harmful
to health in the room in which they are installed.
• Leave about at least 20 cm between the ap-
pliance and the adjacent walls for ventilation
purposes.
4.2 WORKING PRINCIPLE OF THE APPLIANCE
The appliance is heated by natural gas or LPG. In
case flame on heating elements is out due to any
reason, there is a safety valve switching off gas
automatically. The Doner kebab skewer is rotated
by a double-direction reversible AC motor. Doner
kebab meat is closed up by moving the upper and
lower-skewer locking mechanisms.
4.3 MOUNTING AND CONNECTION
• Make electrical connection of your appliance in
accordance with the circuit diagram on page 14.
• The appliance must be earthed in compliance
with the EN 60335-1 standard. Ensure mainte-
nance of the earthing on a regular basis.
• Electrical safety of the appliance may be ensured
only by means of a protected cable system in ac-
cordance with relevant regulations. It is very im-
portant to ensure this essential safety measure.
If in any doubt, have the installation checked by a
professional electrician. The manufacturer shall
not be liable for any damage that may arise from
a missing or broken fuse cable.
• When performing the electric connection of the
appliance, never use an extension cord. Appli-
ance safety cannot be ensured when an exten-
sion cord is used.
• Do not use your appliance in a multi-plug socket
outlet.
• Check the appliance before installation for any
visible damage. Do not install or use any dam-
aged appliance.
• Before connection of your appliance to the
mains, make sure that the data on the manufac-
turer’s name plate complies with the data of your
local main circuit (voltage, frequency, safety de-
vices). If in any doubt, please consult a qualified
electrician.
• In order to avoid hazards, if the main cord is dam-
aged, it must be replaced by the manufacturer,
technical service authorised by the manufacturer
or a similarly qualified professional.
• Before performing a gas connection of the appli-
ance, check if local gas distribution requirements
(type and pressure of the gas) and adjustment of
the appliance are appropriate.
• Ensure that the gas connection of the appliance
is done in accordance with valid standards.
• During installation, never squeeze the gas hose
under the frame.
• Keep the gas hose away from heated parts of the
product.
• Connect your appliance to the LPG tube or the
natural gas supply valve as close as possible. The
connection must be leak-proof.

7
EN
• Before checking gas leakage, make sure any
switches on the appliance are set to “off” position
and gas supply is on. To check the gas leakage,
cover the connector of the hose with soap foam.
If there is gas leakage, bubbles will occur. Check
gas leakage again.
• While checking gas leakage, never use fire.
• Especially if operated with LPG, make sure the re-
lief valve complies with appliance requirements.
• Caution: The operating gas pressure in the ap-
pliance is max. 50 mbar. Gas leakage is likely if
gas pressure exceeds 50 mbar.
• The appliance is equipped with a LPG controlling
device set to 50 mbar. The LPG pipe must be fit-
ted with “level 1” adjuster device designed for
higher pressure.
• Defective parts may only be replaced by original
spare parts. The manufacturer shall be liable for
safety of operation only if such parts are used.
• The manufacturer shall not be liable for any
damage that may be caused by improper mount-
ing or connection of the appliance.
4.4 RULES OF OPERATION
• Please read carefully the Instruction Manual be-
fore first operation. This will make it possible to
protect the operator and prevent the appliance
from being damaged.
• Use the appliance only when assembled. This
will avoid possible contact with conductive parts
of the appliance.
• Use the appliance only on a flat surface.
• Use the appliance only for grilling Doner kebab
meat. The manufacturer shall not be liable for
any damage arising from use of the appliance for
any other purpose.
4.5 PROTECTING APPLIANCE AGAINST DAMAGE
While installing the appliance, be careful not to hit
the ON/OFF knob of the heater mechanism (2) or
the motor body (4).
Caution: There is a risk of burning due to hot sur-
faces of the fixed frame, skewer, upper-skewer
locking mechanism and motor guide rail. Clean
the surfaces once cooled.
Prevent any metal and similar parts entering into
the ventilation openings on the appliance body as
they may damage gas fittings and electrical parts.
Caution: The operating gas pressure in the appli-
ance is max. 50 mbar. Gas leakage is likely if gas
pressure exceeds 50 mbar.
Immediately clean any dirt that may occur on the
surfaces of the appliance to prevent them from
burning and sticking on the surface.
Never use water and steam under pressure as
cleaning tools. Such cleaning tools may damage
the appliance.
When transporting the appliance, wrap it up with
foil for protection against dust.
4.6 PROTECTION AGAINST BURNS
• The fixed frame and the adjoining areas become
hot during use and remain so for a certain time
after switching off. Consequently, the place for
using the appliance should not be accessible to
customers and children, except for the user.
• Burning risk! While using your appliance, protect
your hands with heat-resistant gloves. Addition-
ally, make sure that they are not wet or damp,
as dampness and wetness increase thermal con-
ductivity of the gloves. Your hands may burn.

8
EN
4.7 IN CASE OF TROUBLE
• In case of any trouble with your appliance, switch
off your appliance, disconnect the power cable
from the mains socket and call the Customer
Service. Make sure that electrical connection is
not made before the repair process is completed.
• In case of any malfunction of the appliance, turn
off the LPG tube or natural gas valve and contact
the Customer Service. Do not open the gas con-
nection until repair of the appliance is completed.
• All repair operations should be performed by an
Authorised Service Centre. Any repairs to be per-
formed by persons other than Authorised Service
Centres may cause personal injury and appliance
damage. Repairs should be performed by the
Authorised Service Centre during the warranty
period. Otherwise, malfunctions that may subse-
quently occur shall not be covered by the warranty.
4.8 PACKAGING
Packaging protects the appliance against possible
damage during transport. The packaging is made
of a recyclable material, which preserves raw ma-
terials and reduces the quantity of waste. If you
want to dispose of the packaging material on your
own, please call the nearest recycling centre.
4.9 RELOCATION, TRANSPORT AND STORAGE
• If you have to transport the appliance, place it in
its original container. Follow the handling marks
on the container.
• If the original container of the appliance is not
available, fix the moving parts (skewer, fixing le-
ver, kebab meat tray and motor body) with tape to
prevent any clearance during transport.
• Take necessary protective measures for possible
strokes against the ON/OFF knobs of the heater
mechanism, motor body, cable outlet sleeve and
relief valve connection sleeve and other surfaces.
Do not put any load on the appliance.
• Keep the product in normal position during
transport and relocation.
• If the equipment is not used for an extended
period of time, store it indoors in dry, dust- and
damp-free conditions.
4.10 FIRST CLEANING AND FIRST HEATING
• Before first operation, remove the nylon film
from your appliance and wipe inner and outer
parts with a wet cloth and then wipe dry.
• Do not use any detergent for wiping.
• Odour and smoke may temporarily occur at the
heated parts of your appliance during the first
heating.
• Odour and smoke should disappear soon. Odour
and smoke are not an indication of an incorrect
connection or defective appliance.

9
EN
5. OPERATION
Important: This appliance is designed for professional use only and it should be used by the qualified
people.
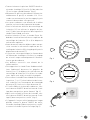
5.1 SWITCHING ON/OFF
• Use the ON/OFF knobs on the fixed frame (3) to
turn on the heaters (burners).
• Press and turn the top knob to the “high flame”
setting (aligned with the triangle – arrow) and ig-
nite the burner.
• When the burner is on, hold the knob pressed for
10-15 seconds.
• A large flame sign indicates “normal burner op-
eration”, and the small sign indicates “low burn-
er operating”.
• Turn the knob to “0” position and release it to
turn the burner off.
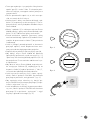
• To turn rotation of Doner Kebab meat, turn on/off
the motor located at the guide rail (7) using the
control switch (5).
• Select “I” or “II” position to turn the motor on.
Respective positions indicate right and left
rotations.
• Go back to “0” position to turn the motor off.
5.2 OPERATION
• Ensure that the gas supply of the appliance is
performed in accordance with valid standards.
• Especially if operated with LPG, make sure the re-
lief valve complies with appliance requirements.
• Caution: The operating gas pressure in the ap-
pliance is max. 50 mbar. Gas leakage is likely if
gas pressure exceeds 50 mbar.
• The appliance is equipped with a LPG controlling
device set to 50 mbar. The LPG pipe must be fit-
ted with a “level 1” adjuster device designed for
higher pressure.
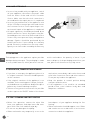
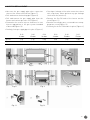
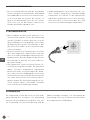
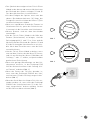
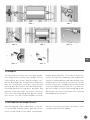
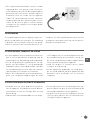
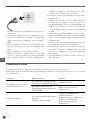
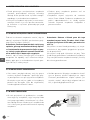
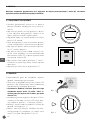
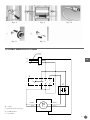
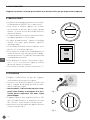
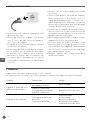
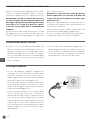
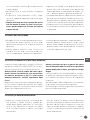
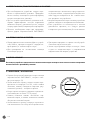
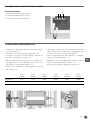
• Plug the appliance (motor) in
(Figure 1).
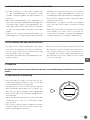
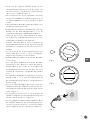
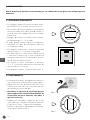
• Turn the lowest ON/OFF knob of the heater
mechanism (3) on a side of the fixed frame (1)
to align it with the “large flame” sign
(Figure 2).
• Now, the gas is flowing out of the heater. Imme-
diately ignite gas (2), hold for 10-15 seconds and
release the knob in this position.
Fig. 1
Fig. 2

10
EN
• Ignite other burners as suitable for the portion
of meat.
• Lock the lower skewer mechanism (10) using the
fixing lever (11) in the position in which Doner Ke-
bab meat is inserted.
• Insert the skewer (9) with Doner Kebab meat into
the lower and upper locking mechanisms (10 and
8). Lock the upper mechanism.
• Before inserting the skewer, move the upper
skewer locking mechanism (8) along the guide
rail (7) to the position in the middle.
• In case flame on the heating element is out due
to any reason, there is a safety valve switching off
gas automatically.
• Follow the same procedure to ignite subsequent
burners.
• To move Doner Kebab meat closer to burners
(heaters), loosen the fixing levers (6 and 11) and
move the skewer locking mechanisms (10 and 8)
towards the heaters. Lock the levers again.
• To rotate Doner Kebab meat, select “I” or “II”
position at the control switch (5) on the motor
body (4), accordingly to the desired direction of
rotation.
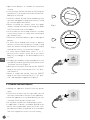
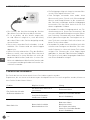
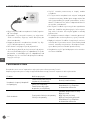
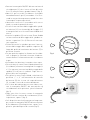
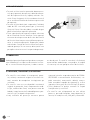
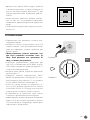
• To reduce the number of operating burners, turn
the ON/OFF knob of the heater mechanism to the
“low flame” position
(Figure 3).
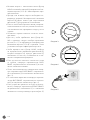
• When meat roasting is finished, turn the ON/OFF
knob of the heater mechanism (3) to “off” posi-
tion
(Figure 4).
• Before a longer idle period, turn the ON/OFF
knob of the heater mechanism (3) to “off” posi-
tion” and unplug the appliance
(Figure 5).
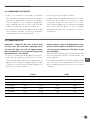
6. CLEANING AND MAINTENANCE
• Unplug the appliance (motor) from the power
outlet.
• Ensure that all valves are off. If possible, turn off
the valve connected to the inlet of the appliance.
• Allow the appliance to cool down before you start
cleaning. Clean any dirt using a cloth.
• Do not pour used fat into the drainage system.
• If applicable, oil bottles should be placed in the
bin for non-compostable waste (not in the com-
postable waste bin) or disposed of in accordance
with local regulations in force in your country.
Fig. 3
Fig. 4
Fig. 5

11
EN
• Clean the appliance using warm water with soap
• Never use steam and water under pressure to
clean the appliance. Steam and water may en-
ter the current conducting sections, and cause
damage. The manufacturer shall not be liable
any resulting damage.
• Do not use cleaning agents such as stain remov-
ers and anti-corrosive agents that are abrasive.
Do not use sponges with hard surfaces.
• After each wet cleaning operation, wipe your ap-
pliance dry with a clean cloth.
• Never use chemicals or steel cleaning materials.
Wipe any dirt immediately. Long-remaining dirt
may damage the surface.
• Clean your appliance after each time Doner kebab
has been made.
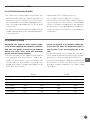
7. TROUBLESHOOTING
The appliance must be repaired only by an Authorised Service Centre.
Any improper repair operations performed by unqualified persons may cause a risk to the user.
Problem Possible cause Solution
The appliance does not heat
or the burners do not operate
The inlet valve connected to the inlet
of the appliance is closed
Open the inlet valve
The burner is out of order
The burner gas supply valve
is out of order
Please contact our Customer
Service Team
The motor does not work
The motor switch is out of order
The motor is out of order
Check the main fuse
Turn the motor off
Unplug the appliance
Turn all switches off
Please contact our Customer
Service Team
8. TECHNICAL FEATURES
8.1 ELECTRICAL CONNECTIONS
• Electrical connections must be performed by
a suitably qualified electrician. The electrician
should be aware of regulations and additional
conditions imposed by local power distribution
companies and must strictly observe the same.
• The electrical connection of the appliance must
be performed by an authorised and suitably qual-
ified electrician.
• Voltage AC 230 V / Frequency 50 Hz
• It is mandatory to earth your appliance.
• Regularly check the power plug and power cord
for damage. If the supply cord is damaged, it
must be replaced by the manufacturer, its retail-
er or similarly qualified persons in order to avoid
a danger or injury.

12
EN
8.2 GAS CONNECTIONS
Important: To connect the appliance in a suitably
ventilated environment. Make sure a permanent
supply of fresh air is ensured and there is no ac-
cumulation of un-burnt gases.
• Gas connections of the appliance must be made
by a qualified gas technician. The gas technician
should be aware of regulations and additional
conditions imposed by local power distribution
companies and must strictly observe the same.
• Caution: The operating gas pressure in the ap-
pliance is max. 50 mbar. Gas leakage is likely if
gas pressure exceeds 50 mbar.
• The gas connection of the appliance must be
made by an authorised and suitably qualified
technician, in accordance with EN 203-1.
• The gas supply tubing or hose should com-
ply with the national requirement in force and
shall be periodically examined and replaced as
necessary.
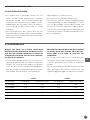
226001 143087
Type of gas Output [kW] Consumption [m
3
/hour] Output [kW] Consumption [m
3
/hour]
G-20 20 mbar 11.12 1.156 8,34 0,867
G-20 25 mbar 12.36 1.278 9,27 0,959
G-30 30 mbar 11.52 0.909 8,64 0,682
G-30 36 mbar 11.80 0.908 8,885 0,681
G-30 50 mbar 12.12 0.955 9,09 0,716
G-31 37 mbar 11.40 0.885 8,55 0,664
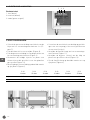
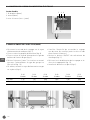
8.3 ELECTRICAL CONNECTION
Flexible cable
1: live (brown)
2: neutral (blue)
3: earth (green and yellow)
1 2 3

13
EN
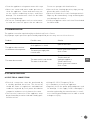
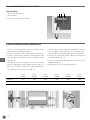
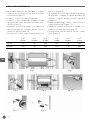
9. INJECTOR REPLACEMENT
• Unscrew the gas supply pipe-valve connection
sleeve of the heater mechanism (Figure 7).
• Pull and remove the bushing pin (Figure 8).
• Pull and remove the gas supply pipe from the
heater mechanism gas inlet slot (Figure 9).
• Dismantle the current injector and insert a new
injector appropriate to the gas system intended
to be used (Figure 10).
• Similarly, fix the gas supply pipe in its place (Figure 6).
• Check gas leakage of the valve connection sleeve
with soap foam. Never perform any gas leakage
check with fire (matches).
• Remove the On-Off knob of the heater mecha-
nism (Figure 11).
• Remove the valve by-pass screw and insert an ap-
propriate screw (Figure 12).
• Similarly, fix the On-Off knob in its place (Figure 6).
G-20
20 mbar
G-20
25 mbar
G-30
30 mbar
G-30
36 mbar
G-30
50 mbar
G-31
37 mbar
injector 1.30 1.30 0.88 0.85 0.80 0.88
by-pass 1.45 1.45 0.85 0.80 0.80 0.85
Fig. 6
Fig. 8
Fig. 11
Fig. 7
Fig. 9
Fig. 12
Fig. 10

14
EN
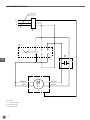
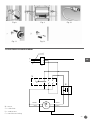
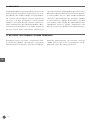
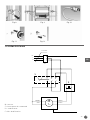
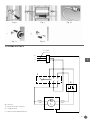
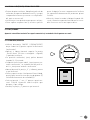
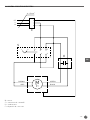
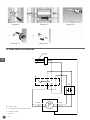
10. ELECTRICAL CIRCUIT DIAGRAM
PE
C
S
K
3x 1.5 mm
2
L
N
1
BROWN
GREY
GREEN
M
1~
BLACK
135
024
2
M = motor
S = control switch
K = capacitor
C = connecting device

15
EN
11. WARRANTY
Any defect affecting the functionality of the ap-
pliance which becomes apparent within one year
after purchase will be repaired by free repair or re-
placement provided the appliance has been used
and maintained in accordance with the instructions
and has not been abused or misused in any way.
Your statutory rights are not affected. If the appli-
ance is claimed under warranty, state where and
when it was purchased and include proof of pur-
chase (e.g. receipt). In line with our policy of contin-
uous product development we reserve the right to
change the product, packaging and documentation
specifications without notice.
12. DISCARDING & ENVIRONMENT
At the end of the life of the appliance, please dis-
pose of the appliance according to the regulations
and guidelines applicable at the time. Throw packing
materials like plastic and boxes in the appropriate
containers.

16
EN

17
DE
INHALTSVERZEICHNIS
1. SICHERHEITSREGELN ................................................ 17
2. VERWENDUNGSZWECK .............................................. 19
3. AUFBAU UND TECHNISCHE DATEN DES GERÄTES .. 20
4. MONTAGE UND EINSTELLUNG ................................... 21
5. OPERATION ................................................................. 24
6. REINIGUNG UND WARTUNG ....................................... 27
7. ENTDECKUNG VON MÄNGELN ................................... 27
8. TECHNISCHE INFORMATIONEN ................................. 28
9. WECHSEL DER EINSPRITZVORRICHTUNG (DÜSE) .... 29
10. GARANTIE ................................................................... 30
11. ENTSORGUNG UND UMWELTSCHUTZ ........................ 30
12. ELEKTROSCHALTPLAN ............................................... 31

18
DE
Sehr geehrte Kundin, sehr geehrter Kunde,
wir danken Ihnen für den Kauf des Gerätes Hendi. Machen Sie sich bitte mit dieser Anleitung noch vor der
Inbetriebnahme des Gerätes vertraut, um Schäden durch die unsachgemäße Bedienung zu vermeiden.
Den Sicherheitsregeln ist besondere Aufmerksamkeit zu widmen.
1. SICHERHEITSREGELN
• Die unsachgemäße Bedienung des Geräts kann zur schweren Beschädigung des
Geräts sowie zu Verletzungen führen.
• Das vorliegende Gerät ist ausschließlich für den gewerblichen Gebrauch be-
stimmt und darf nicht im Haushalt verwendet werden.
• Das Gerät ist ausschließlich zu dem Zweck zu benutzen, zu dem es hergestellt
wurde. Der Hersteller haftet nicht für Schäden, die auf unsachgemäße Bedie-
nung des Geräts zurückzuführen sind.
• Den Kontakt des Gerätes und des Steckers mit Wasser oder einer anderen Flüs-
sigkeit vermeiden. Den Stecker unverzüglich aus dem Stecker ziehen und das
Gerät von einem anerkannten Fachmann prüfen lassen, wenn das Gerät unbeab-
sichtigterweise ins Wasser fällt. Bei Nichteinhaltung dieser Sicherheitsvorschrif-
ten besteht Lebensgefahr.
• Nie eigenständig das Gehäuse des Gerätes zu öffnen versuchen.
• In das Gehäuse des Gerätes keine Gegenstände einführen.
• Den Stecker nicht mit nassen oder feuchten Händen berühren.
• Gefahr eines Stromschlags! Das Gerät darf nicht selbstständig repariert werden.
Sämtliche Mängel und Unzulänglichkeiten sind ausschließlich durch qualifizier-
tes Personal zu beseitigen.
• Niemals ein beschädigtes Gerät benutzen! Das beschädigte Gerät vom Netz tren-
nen und sich mit dem Verkäufer in Verbindung setzen.
• Warnung: Die Elektroteile des Gerätes dürfen weder in Wasser noch in andere
Flüssigkeiten getaucht werden. Ebenso ist das Gerät nicht unter fließendes Was-
ser zu halten.
• Der Stecker und die Stromversorgungsleitung sind regelmäßig auf Beschädigun-
gen zu prüfen. Der beschädigte Stecker oder Leitung sind an eine Servicestelle
oder einer anderen qualifizierten Person zur Reparatur zu übergeben, um even-
tuellen Gefahren und Verletzungen des Körpers vorzubeugen.

19
DE
• Man muss sich davon überzeugen, ob die Stromversorgungsleitung weder mit
scharfkantigen noch mit heißen Gegenständen in Berührung kommt; halten Sie
die Leitung weit entfernt von einer offenen Flamme. Um den Stecker aus der
Netzsteckdose zu nehmen, muss man immer am Stecker und nicht an der Lei-
tung ziehen.
• Die Stromversorgungsleitung (oder Verlängerungsleitung) ist vor dem zufälli-
gen Herausziehen aus der Steckdose zu schützen. Die Stromversorgungsleitung
muss so geführt werden, dass niemand zufällig darüber stolpern kann.
• Das Gerät muss während seiner Anwendung ständig kontrolliert werden.
• Warnung! Wenn der Stecker in der Netzsteckdose ist, muss man das Gerät als an
die Stromversorgung angeschlossen betrachten.
• Bevor der Stecker aus der Netzsteckdose genommen wird, ist das Gerät
auszuschalten.
• Das Gerät darf beim Tragen nicht an der Leitung gehalten werden.
• Benutzen Sie kein Zubehör, das nicht mit diesem Gerät mitgeliefert wurde.
• Das Gerät muss man ausschließlich an die Steckdose mit solch einer Spannung
und Frequenz anschließen, wie auf dem Typenschild angegeben wird.
• Stecken Sie den Stecker in die Steckdose, die an einem leicht und bequem zu-
gänglichen Ort angeordnet ist, und zwar so, dass das Gerät bei einer Störung
sofort abgeschaltet werden kann. Um das Gerät vollständig auszuschalten, muss
man es von der Stromquelle trennen. Zu diesem Zweck muss man den Stecker,
der sich am Ende der vom Gerät getrennten Leitung befindet, aus der Netzsteck-
dose ziehen.
• Vor dem Abtrennen des Steckers ist das Gerät auszuschalten!
• Benutzen Sie kein Zubehör, das nicht vom Hersteller empfohlen wird. Die Anwen-
dung vom nicht empfohlenen Zubehör stellt eine Gefahr für den Nutzer dar und
kann zur Beschädigung des Gerätes führen. Benutzen Sie ausschließlich Ersatz-
teile und Zubehör im Original.
• Dieses Gerät eignet sich nicht für den Gebrauch durch Personen (gilt auch für
Kinder) mit geringerer Motorik, Sensorik oder geistiger Fähigkeit oder mangel-
hafter Erfahrung und Wissen.
• Auf keinen Fall darf das Bedienen des Gerätes durch Kinder zugelassen werden.
• Das Gerät mit Stromversorgungsleitung ist außerhalb der Reichweite von Kin-
dern zu lagern.

20
DE
• Ebenso muss dafür gesorgt werden, dass die Kinder das Gerät nicht zum Spielen
benutzen.
• Das Gerät ist immer dann von der Stromversorgung zu trennen, wenn es ohne
Aufsicht bleiben soll bzw. auch vor der Montage, Demontage und Reinigung.
• Während der Nutzung darf das Gerät nicht ohne Aufsicht gelassen werden.
• Sämtliche Installationstätigkeiten am Gerät, darunter sein Umbau in Bezug auf
die Nutzung einer anderen Art des Gases, darf ausschließlich ein berechtigter
Techniker ausführen, und zwar gemäß den lokal geltenden Vorschriften und der
vorliegenden Anleitung.
• Lassen Sie einen Freiraum von mindestens 40 cm rund um das Gerät zur Sicher-
stellung einer ausreichenden Belüftung.
2. VERWENDUNGSZWECK
Das Gerät wird mit Gas (Erdgas oder LPG) versorgt.
Es besteht aus dem Gehäuse aus Edelstahl, einem
Sicherungsventil, einer demontierbaren unteren
Platte und einem oben eingebauten Motor.
• Das Gerät ist ausschließlich für den professi-
onellen Gebrauch geeignet und darf nur durch
qualifiziertes Personal bedient werden.
• Das Gerät ist zum Grillen von Lebensmitteln (z.B.
Fleisch für Kebab am Spieß) für kommerzielle
Zwecke bestimmt.
• Das Gerät darf ausschließlich innerhalb der Räu-
me verwendet werden.
• Verwenden Sie das Gerät ausschließlich gemäß
dieser Anleitung.
• Die Verwendung des Geräts für andere Zwecke
kann zu seiner Beschädigung sowie zu Körper-
verletzungen oder Sachschäden führen
• Sämtliche Installationstätigkeiten am Gerät,
darunter sein Umbau in Bezug auf die Nutzung
einer anderen Art des Gases, darf ausschließlich
ein berechtigter Techniker ausführen, und zwar
gemäß den lokal geltenden Vorschriften und der
vorliegenden Anleitung.
Strona się ładuje...
Strona się ładuje...
Strona się ładuje...
Strona się ładuje...
Strona się ładuje...
Strona się ładuje...
Strona się ładuje...
Strona się ładuje...
Strona się ładuje...
Strona się ładuje...
Strona się ładuje...
Strona się ładuje...
Strona się ładuje...
Strona się ładuje...
Strona się ładuje...
Strona się ładuje...
Strona się ładuje...
Strona się ładuje...
Strona się ładuje...
Strona się ładuje...
Strona się ładuje...
Strona się ładuje...
Strona się ładuje...
Strona się ładuje...
Strona się ładuje...
Strona się ładuje...
Strona się ładuje...
Strona się ładuje...
Strona się ładuje...
Strona się ładuje...
Strona się ładuje...
Strona się ładuje...
Strona się ładuje...
Strona się ładuje...
Strona się ładuje...
Strona się ładuje...
Strona się ładuje...
Strona się ładuje...
Strona się ładuje...
Strona się ładuje...
Strona się ładuje...
Strona się ładuje...
Strona się ładuje...
Strona się ładuje...
Strona się ładuje...
Strona się ładuje...
Strona się ładuje...
Strona się ładuje...
Strona się ładuje...
Strona się ładuje...
Strona się ładuje...
Strona się ładuje...
Strona się ładuje...
Strona się ładuje...
Strona się ładuje...
Strona się ładuje...
Strona się ładuje...
Strona się ładuje...
Strona się ładuje...
Strona się ładuje...
Strona się ładuje...
Strona się ładuje...
Strona się ładuje...
Strona się ładuje...
Strona się ładuje...
Strona się ładuje...
Strona się ładuje...
Strona się ładuje...
Strona się ładuje...
Strona się ładuje...
Strona się ładuje...
Strona się ładuje...
Strona się ładuje...
Strona się ładuje...
Strona się ładuje...
Strona się ładuje...
Strona się ładuje...
Strona się ładuje...
Strona się ładuje...
Strona się ładuje...
Strona się ładuje...
Strona się ładuje...
Strona się ładuje...
Strona się ładuje...
Strona się ładuje...
Strona się ładuje...
Strona się ładuje...
Strona się ładuje...
Strona się ładuje...
Strona się ładuje...
Strona się ładuje...
Strona się ładuje...
Strona się ładuje...
Strona się ładuje...
Strona się ładuje...
Strona się ładuje...
Strona się ładuje...
Strona się ładuje...
Strona się ładuje...
Strona się ładuje...
Strona się ładuje...
Strona się ładuje...
Strona się ładuje...
Strona się ładuje...
Strona się ładuje...
Strona się ładuje...
Strona się ładuje...
Strona się ładuje...
Strona się ładuje...
Strona się ładuje...
Strona się ładuje...
-
 1
1
-
 2
2
-
 3
3
-
 4
4
-
 5
5
-
 6
6
-
 7
7
-
 8
8
-
 9
9
-
 10
10
-
 11
11
-
 12
12
-
 13
13
-
 14
14
-
 15
15
-
 16
16
-
 17
17
-
 18
18
-
 19
19
-
 20
20
-
 21
21
-
 22
22
-
 23
23
-
 24
24
-
 25
25
-
 26
26
-
 27
27
-
 28
28
-
 29
29
-
 30
30
-
 31
31
-
 32
32
-
 33
33
-
 34
34
-
 35
35
-
 36
36
-
 37
37
-
 38
38
-
 39
39
-
 40
40
-
 41
41
-
 42
42
-
 43
43
-
 44
44
-
 45
45
-
 46
46
-
 47
47
-
 48
48
-
 49
49
-
 50
50
-
 51
51
-
 52
52
-
 53
53
-
 54
54
-
 55
55
-
 56
56
-
 57
57
-
 58
58
-
 59
59
-
 60
60
-
 61
61
-
 62
62
-
 63
63
-
 64
64
-
 65
65
-
 66
66
-
 67
67
-
 68
68
-
 69
69
-
 70
70
-
 71
71
-
 72
72
-
 73
73
-
 74
74
-
 75
75
-
 76
76
-
 77
77
-
 78
78
-
 79
79
-
 80
80
-
 81
81
-
 82
82
-
 83
83
-
 84
84
-
 85
85
-
 86
86
-
 87
87
-
 88
88
-
 89
89
-
 90
90
-
 91
91
-
 92
92
-
 93
93
-
 94
94
-
 95
95
-
 96
96
-
 97
97
-
 98
98
-
 99
99
-
 100
100
-
 101
101
-
 102
102
-
 103
103
-
 104
104
-
 105
105
-
 106
106
-
 107
107
-
 108
108
-
 109
109
-
 110
110
-
 111
111
-
 112
112
-
 113
113
-
 114
114
-
 115
115
-
 116
116
-
 117
117
-
 118
118
-
 119
119
-
 120
120
-
 121
121
-
 122
122
-
 123
123
-
 124
124
-
 125
125
-
 126
126
-
 127
127
-
 128
128
-
 129
129
-
 130
130
-
 131
131


Hendi 226001 Instrukcja obsługi
- Typ
- Instrukcja obsługi
- Niniejsza instrukcja jest również odpowiednia dla
w innych językach
- italiano: Hendi 226001 Manuale utente
- Deutsch: Hendi 226001 Benutzerhandbuch
- français: Hendi 226001 Manuel utilisateur
- Nederlands: Hendi 226001 Handleiding
- română: Hendi 226001 Manual de utilizare