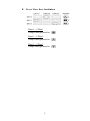
Janus TX2000 Instrukcja obsługi
- Kategoria
- Czytniki kontroli dostępu
- Typ
- Instrukcja obsługi

In
s
In
s
sp
e
Pow
e
Ope
r
Ope
r
Mo
d
W
i
r
s
tallatio
n
s
truction
e
cificati
o
e
r : 4.5V (AA
A
r
ating Freq :
r
ating Power
c
d
ulation Type :
1
r
eless K
e
n
o
n
A
*3)
315MHz
c
onsumption:
ASK
e
ypad
14mA
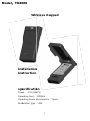
Model:TX2000

V1.
N
Bo
x
To b
com
p
inst
r
Di
g
Ke
y
N
ov 2020
x
Contents
egin use, firs
t
p
artment. Ple
a
r
uctions.
Remo
v
insulat
i
g
ital Wireless
y
pa
d
For C
Keypa
d
2
t
ly
r
emove in
s
a
se refer to 6
.
v
e
i
on
onvenience,
p
d
BEFORE
m
s
ulation from
.
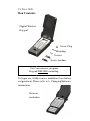
Changing B
a
Scr
Mounti
n
Screws
Screw Anch
o
p
rogram
m
ounting.
battery
a
tteries
ew Plug
n
g
o
rs

1. S
e
N
O
A.
A
IMP
O
b
elo
w
futur
e
If M
a
requi
r
e
ttin
g
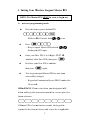
Your
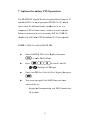
W
O
TE: The Mast
e
A
ctivate progr
a
Press the fac
t
- While in
P
Press
- Beep to s
i
flashing f
o
Enter your
N
numbers oth
Re-Enter yo
u
then press
Two beeps t
o
successfully
- Keypad
w
20 secon
d
O
RTANT: Plea
s
w
and keep this i
e
reference.
a
ster PIN is lost
a
r
ed to be return
t
3
W
ireless Ke
yp
e
r PIN MUST
b
a
mming mode:
t
ory preset defa
u
P
ROG mode, bo
i
gnal Master PI
N
o
r PIN input
N
ew PIN (4 to 8
d
er than 1234
),t
h
u
r New PIN to c
o
again.
o
signal Master
P
changed
w
ill automaticall
y
d
s
s
e write down y
o
n
struction man
u
a
nd unrecovera
b
t
o factory and a
p
ad Master
P
b
e reset to begi
n
u
lt PIN
th & are o
n
N
selected,
&
d
igits–
M
UST B
E
h
en press
o
nfirm,
P
IN has now be
e
y
exit PROG m
o
o
ur designated
P
u
al in a secure pl
b
le, the keypad i
s
reset fee is appl
i
P
IN
n
use.
n
&
E
e
n
o
de after
P
IN
ace for
s
i
cable.

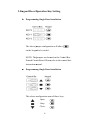
2.K
e
A
B
ey
pad Door
O
A
.
Programm
i
The above j
u
on the keyp
a
NOTE: The
j
Printed Circ
u
instruction
m
B
.
Programm
i
This above
c
4
O
peration K
e
i
ng Single Door
u
mper configur
a
a
d to be coded.
j
umpers are loc
a
u
it Board. Pleas
e
m
anual.
i
ng Single Door
c
onfiguration us
e
Open
Stop
Close
ey
Setting
Installation
a
tion will allow
a
ted on the Con
t
e
refer to the co
n
Installation
e
s all three keys
t
rol Box
n
trol box
.

C
C
.
Two or Thr
Door 1 –
Jumper c
o
Door 2 –
Jumper c
o
Door 3 –
Jumper c
o
5
ee Door Install
a
C/Box1
o
nfiguration for
C/Box2
o
nfiguration for
C/Box3
o
nfiguration for
a
tions

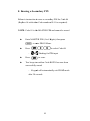
3. C
o
Once
secur
N
c
I
p
p
o
de Settin
g
t
o
the key config
u
ity code from y
o
On the contr
o
Learn LED i
n
Enter your P
I
Press the do
o
door. e.g.: fo
r
press
Learn LED
w
The wireless
control box
N
OTE: To progr
a
c
ontrol box, rep
e
I
MPORTANT:
I
p
lease refer to c
o
p
rocedures to er
a
6
o
Controller
u
ration is set, yo
u
o
ur keypad.
o
l box, press th
e
n
dicator will lig
h
I
N, then press
o
r operation key
r
A. single door
w
ill go ou
t
keypad is now
p
a
m more than o
n
e
at the above ins
t
I
f a wireless ke
y
o
ntrol box instru
c
a
se the code me
m
u
can now progr
a
e
LEARN code
k
h
t
that will operat
e
installation, yo
u
p
rogrammed to
t
n
e wireless key
p
t
ructions.
y
pad is lost or st
o
c
tion manual fo
r
m
ory.
a
m in the
k
ey once
e
the
u
would
t
he
p
ad to the
o
len,
r

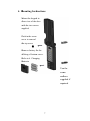
4.
M
M
c
l
w
s
u
R
a
f
R
B
P
c
o
t
h
M
ountin
g
Ins
t
M
ount the keypa
d
l
ear view of the
w
ith the two scre
w
u
pplied
R
emove battery
f
f
fixing of botto
m
R
efer to 6. Chan
g
B
atteries
P
ush in the scre
w
o
ver to conceal
h
e top screw
7
t
ructions
d
in
door
w
s
f
or the
m
screw.
g
ing
w
Us
e
scr
e
anc
h
sup
p
req
u
e
the
e
w
h
ors
p
lied if
u
ired

5.
K
6. C
h
1
K
e
y
pad Oper
a
Enter the ke
y
- LED
i
Press the de
s
- LED
w
consecut
i
the PIN.
h
an
g
in
g
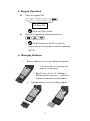
Bat
t
4-8
. Remove th
e
4.
Repla
c
3.
I
l
i
8
a
tion
y
pad PIN
i
s on if PIN corr
e
s
ignated keypad
w
ill remain on f
o
i
ve door operati
o
t
eries
digits PIN
e
battery cover
b
c
e battery cover
2. Remove
t
dispose of i
t
I
nstall 3 new A
A
ithium batteries
,
ndicated in the
b
e
ct
operation key
o
r 20 seconds fo
o
ns, without re-
e
b
y sliding down
w
b
y sliding upw
a
t
he low batterie
s
t
properly
A
A 1.5V alkalin
e
,
note the +/- pol
a
b
atterycompart
m
r
e
ntering
w
ards
a
rds
s
and
e
or
a
rities
m
ent

7. O
The
G
indiv
i
can b
temp
o
Belo
w
(Rep
l
NO
T
ptional Seco
n
G
LIDEROL Dig
i
dual PIN’s to b
e
e used for diffe
r
o
rary PIN for h
o
w
is instruction
t
l
ace 06 with oth
e
T
E: CODE 01 is
Enter MAS
T
to e
n
Press
- &
Enter your P
I
Two beeps t
o
successfully
- Keypad
w
20 seco
n
9
n
dar
y
PIN
O
ital Wireless ke
y
e
programmed (
C
r
ent family mem
b
o
use-sitters, visi
t
t
o set a seconda
r
e
r CODE numb
e
the MASTER P
I
T
ER PIN (4 to 8
d
n
ter PROG Mo
d
flashing for PI
N
I
N for Code 06
(
o
signal Code 0
6
set
w
ill automatical
l
n
ds
O
perations
y
pad allows for
u
C
ODE 01-10),
w
b
ers or to act as
t
ors or service p
e
r
y PIN for COD
E
e
rs 02-10 as req
u
I
N
d
igits), then pre
s
d
e
to select Code
0
N
input
(
4 to 8 digits), t
h
6
PIN has now b
e
l
y exit PROG m
o
u
p to 10
w
hich
a
e
ople.
E
06
u
ired)
.
s
s
0
6
h
en press
e
en
o
de after

8. E
r
Belo
w
(Rep
l
NO
T
r
asin
g
a Sec
o
w
is instruction
t
l
ace 06 with oth
e
T
E: Code 01 is t
h
Enter MAS
T
to e
n
Press
-&
Press
Two beeps t
o
successfully
-Keyp
a
after 20 s
10
o
ndar
y
PIN
t
o erase a secon
d
e
r Code number
s
h
e MASTER PI
N
T
ER PIN (4 to 8
d
n
ter PROG Mo
d
flashing for
P
to erase
o
confirm Code
0
erased
a
d will automati
c
econds
d
ary PIN for Co
d
s
02-10 as requi
r
N
and cannot be
d
igits), then pre
s
d
e
to select Code
0
P
IN input
0
6 PIN has now
c
ally exit PRO
G
d
e 06
r
ed).
erased
s
s
0
6
been
G
mode

FCC STATEMENT :
This device complies with Part 15 of the FCC Rules. Operation is subject
to the following two conditions:
(1) This device may not cause harmful interference, and
(2) This device must accept any interference received, including
interference that may cause undesired operation.
Warning: Changes or modifications not expressly approved by the party
responsible for compliance could void the user's authority to operate the
equipment.
NOTE: This equipment has been tested and found to comply with the
limits for a Class B digital device, pursuant to Part 15 of the FCC Rules.
These limits are designed to provide reasonable protection against
harmful interference in a residential installation. This equipment
generates uses and can radiate radio frequency energy and, if not
installed and used in accordance with the instructions, may cause harmful
interference to radio communications. However, there is no guarantee
that interference will not occur in a particular installation. If this equipment
does cause harmful interference to radio or television reception, which
can be determined by turning the equipment off and on, the user is
encouraged to try to correct the interference by one or more of the
following measures:
Reorient or relocate the receiving antenna.
Increase the separation between the equipment and receiver.
Connect the equipment into an outlet on a circuit different from that to
which the receiver is connected.
Consult the dealer or an experienced radio/TV technician for help.
RF warning statement:
The device has been evaluated to meet general RF exposure
requirement. The device can be used in portable exposure condition
without restriction.
11
-
 1
1
-
 2
2
-
 3
3
-
 4
4
-
 5
5
-
 6
6
-
 7
7
-
 8
8
-
 9
9
-
 10
10
-
 11
11


Janus TX2000 Instrukcja obsługi
- Kategoria
- Czytniki kontroli dostępu
- Typ
- Instrukcja obsługi
w innych językach
- English: Janus TX2000 User manual