
18211
Instructions
Útmutató
Pokyny
Instrucţiuni
Notice de montage
Instrucciones de
construcción
Bauanleitung
Bouwinstructie
Instrukcja
Istruzioni
Instruções
Инструкции
10+10+
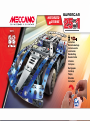
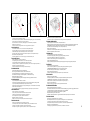
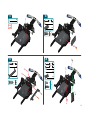
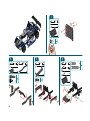
SUPERCAR
2525
11
EN
IN
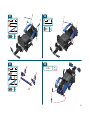
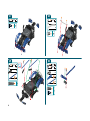
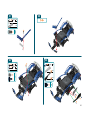
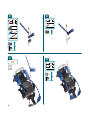
MODELS•MODÈLES
MOTORIZED
MOTORISÉ

CONSTRUCTION TIPS / ASTUCES DE CONSTRUCTION
TIPS DE CONSTRUCCIÓN / TIPPS ZUM BAUEN
MONTAGETIPS
/ SUGGERIMENTI PER COSTRUIRE
DICAS DE MONTAGEM / РЕКОМЕНДАЦИИ ПО СБОРКЕ
CONSTRUCTION TIPS / ASTUCES DE CONSTRUCTION
TIPS DE CONSTRUCCIÓN / TIPPS ZUM BAUEN / MONTAGETIPS / SUGGERIMENTI PER COSTRUIRE
DICAS DE MONTAGEM / РЕКОМЕНДАЦИИ ПО СБОРКЕ / WSKAZÓWKI DO BUDOWANIA
KONSTRUKČNÍ TIPY / TIPY NA MONTÁŽ / ÖSSZESZERELÉSI TIPPEK / SFATURI PENTRU CONSTRUIRE
2

CONSTRUCTION TIPS / ASTUCES DE CONSTRUCTION
TIPS DE CONSTRUCCIÓN / TIPPS ZUM BAUEN
MONTAGETIPS
/ SUGGERIMENTI PER COSTRUIRE
DICAS DE MONTAGEM / РЕКОМЕНДАЦИИ ПО СБОРКЕ
CONSTRUCTION TIPS / ASTUCES DE CONSTRUCTION
TIPS DE CONSTRUCCIÓN / TIPPS ZUM BAUEN / MONTAGETIPS / SUGGERIMENTI PER COSTRUIRE
DICAS DE MONTAGEM / РЕКОМЕНДАЦИИ ПО СБОРКЕ / WSKAZÓWKI DO BUDOWANIA
KONSTRUKČNÍ TIPY / TIPY NA MONTÁŽ / ÖSSZESZERELÉSI TIPPEK / SFATURI PENTRU CONSTRUIRE
2
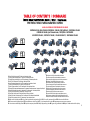
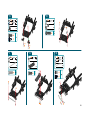
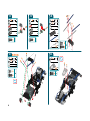
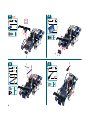
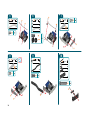
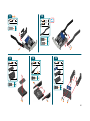
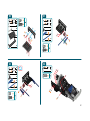
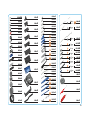
EN. Only one model can be built at a time. FR. Les pièces fournies ne permettent de monter qu'un seul modèle à la fois. ES. Solo es posible construir un modelo a la vez. DE. Jeweils nur eins der Modelle baubar.
NL. Er kan maar een model tegelijk worden gebouwd. IT. Permette di realizzare un solo modello per volta. PT. Só é possível montar um modelo de cada vez. RU. Одновременно можно построить только одну модель.
PL. Jednocześnie można zbudować tylko jeden model. CZ. Najednou lze sestavit pouze jeden model. SK. Modely sa dajú vytvoriť len po jednom. HU. Egyszerre csak egy modell rakható össze. RO. Nu pot construite mai multe modele în acelaşi timp.
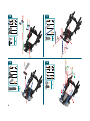
AVA I L A B L E O N L I N E / DISPONIBLES EN LIGNE
DISPONIBLES EN LÍNEA/ONLINE VERFÜGBAR/ ONLINE VERKRIJGBAAR / DISPONIBILI ONLINE
DISPONÍVEL ONLINE/ДОСТУПНЫ ОНЛАЙН /
DOSTĘPNE W INTERNECIE
K DISPOZICI ONLINE / DOSTUPNÝ ONLINE / ONLINE ELÉRHET
Ő / DISPONIBILE ONLINE
SPIS TREŚCI / OBSAH / TARTALOMJEGYZÉK / CUPRINS
33
6
22
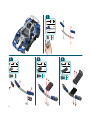
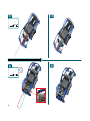
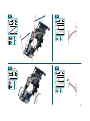
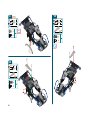
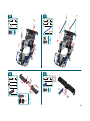
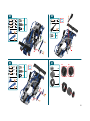
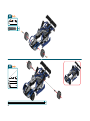
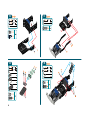
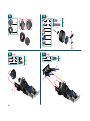
EN. Content: 343 parts, 6V electrical motor with LED, 2 real tools and 1 instruction sheet for 3 models.
FR. Contenu: 343 pièces, moteur électrique 6V avec LED, 2vrais outils et 1notice de montage pour 3modèles.
ES. Contenido: 343 piezas, motor eléctrico de 6V con luces LED, 2 herramientas reales y 1 guía de instrucciones para 3 modelos.
DE. Inhalt: 343 Teile, 6-V-Elektromotor mit LED, 2echte Werkzeuge, 1Bauanleitung für 3Modelle.
NL. Inhoud: 343 onderdelen, elektrische motor van 6 V met LED, 2 stuks gereedschap en 1 bouwinstructie voor 3 modellen.
IT. Contenuto: 343 pezzi, motore elettrico 6V con LED, 2 attrezzi e 1 guida per l'uso per 3 modelli.
PT. Conteúdo: 343 peças, motor elétrico de 6 V com LED, 2 ferramentas reais e 1 folha de instruções para 3 modelos.
RU. В комплекте: 343 детали электрический двигатель мощностью 6В со светодиодами, 2 настоящих инструмента и 1 инструкция по сборке 3 моделей.
PL. Zawartość: 343 elementy silnik elektryczny o mocy 6V z podświetleniem LED, 2 prawdziwe narzędzia, 1 karta z instrukcjami dla 3 modeli.
CZ. Obsah: 343 dílů, 6V elektrický motorek sLED, 2skutečné nástroje a1list spokyny pro 3modely.
SK. Obsah: 343 dielov, 6V elektrický motor s LED diódou, 2skutočné nástroje a1hárok spokynmi pre 3modely.
HU. Tartalom: 343 db alkatrész, 6 V-os elektromos motor LED-del, 2 db valódi szerszám és 1 db 3 modellhez tartozó felhasználói útmutató.
RO. Conţinut: 343 de piese, motor electric de 6 V cu LED, 2 instrumente reale şi 1 fişă cu instrucţiuni pentru 3 modele.
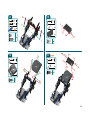
EN. Building instructions for the 22 other models are available at www.meccano.com.
FR. Les notices de montage des 22 autres modèles sont disponibles sur www.meccano.com.
ES. Hay instrucciones de construcción disponibles para los otros 22 modelos en www.meccano.com.
DE. Bauanleitungen für die anderen 22 Modelle sind auf ww.meccano.com zu finden.
NL. Bouwinstructies voor de andere 22 modellen zijn beschikbaar op www.meccano.com.
IT. Le istruzioni di montaggio degli altri 22 modelli sono disponibili alla pagina www.meccano.com.
P T. Instruções de montagem dos restantes 22 modelos disponíveis em www.meccano.com.
RU. Инструкции по сборке 22 других моделей можно найти на сайте www.meccano.com.
PL. Instrukcje montażu pozostałych 22 modeli można znaleźć na stronie www.meccano.com.
CZ. Sestavovací pokyny dalších 22 modelů naleznete na webu www.meccano.com.
SK. Pokyny na stavanie ďalších 22 modelov sú dostupné na webovej lokalite www.meccano.com.
HU. A www.meccano.com weboldalon további 22 egyéb modellhez tartozó összerakási útmutatót talál.
RO. Instrucţiunile de construire pentru celelalte 22 de modele sunt disponibile la adresa www.meccano.com.
3

EN: FCC STATEMENT: This device complies with Part 15 of the FCC rules. Operation is subject to the following two conditions: (1) This device may not cause harmful interference, and (2) This device must accept
any interference received, including interference that may cause undesired operation.
This equipment has been tested and found to comply with the limits for Class B digital devices pursuant to Part 15 of the FCC rules.
These limits are designed to provide reasonable protection against harmful interference to radio communications. This equipment generates, uses and can radiate radio frequency energy and, if not installed and
used in accordance with the instruction, may cause harmful interference to radio communication.
However, there is no guarantee that interference will not occur in a particular installation. If this toy does cause interference to radio or television reception (you can check this by turning the toy off and on while
listening for the interference), one or more of the following measures may be useful:
• Reorient or relocate the receiving antenna
• Increase the separation between the toy and the radio or the TV
• Consult the dealer or an experienced TV-radio technician for help.
NOTE: Changes, adjustments or modifications to this unit, including but not limited to, replacement of any transmitter component (crystal, semiconductor, etc) could result in a violation of FCC rules under part 15
and/or 95 and must be expressly approved by Spin Master Ltd or they could void the user’s
authority to operate the equipment.
FR : DÉCLARATION FCC : Le présent appareil est conforme à l’article 15 de la réglementation de la FCC. L'exploitation est autorisée aux deux conditions suivantes : (1) l'appareil ne doit pas produire de brouillage,
et (2) l'appareil doit accepter tout brouillage radioélectrique subi, même si le brouillage est susceptible d'en compromettre le fonctionnement.
Cet équipement a été testé et jugé conforme aux limites de la classe B pour les équipements numériques en vertu de l’article 15 de la réglementation de la FCC. Ces limites ont été instaurées pour assurer une
protection raisonnable contre toute interférence nuisible avec les communications radio. Cet équipement génère, utilise et peut émettre de l’énergie de fréquence radio. S’il n’est pas installé et utilisé selon le mode
d’emploi, il peut causer des interférences nuisibles aux communications radio. Cependant, il n'existe aucune garantie contre ces interférences dans le cas où l'installation ne serait pas conforme. Si ce jouet cause
des interférences à la réception radio ou télévisée (ce qui est vérifiable en l’éteignant, puis en le rallumant tout en écoutant s’il y a des interférences), suivre une ou plusieurs des recommandations suivantes :
• Réorienter ou déplacer l’antenne réceptrice
• Augmenter la distance entre le jouet et la radio ou la télévision
• Consulter le revendeur ou demander l’aide d’un technicien radio/T.V. expérimenté.
REMARQUE : tout changement, réglage ou modification de cet appareil, incluant mais ne se limitant pas au remplacement de tout composant du transmetteur (cristal, semi-conducteur, etc.), pourrait constituer
une violation de l’article 15 et/ou 95 de la règlementation de la FCC, et doit être expressément approuvé par Spin Master Ltd., sous peine d’entraîner l’annulation du droit de l’utilisateur d’exploiter l’équipement.
ES: DECLARACIÓN DE LA FCC: Este dispositivo cumple con la sección 15 de la normativa de la FCC. El funcionamiento está sujeto a estas dos siguientes condiciones: (1) el dispositivo no debe causar
interferencias dañinas, y (2) el dispositivo debe admitir la recepción de cualquier tipo de interferencia, incluidas aquellas que puedan causar un funcionamiento indeseado.
Este equipo ha sido probado y cumple los límites para dispositivos de clase B digital establecidos en la sección 15 de la normativa de la FCC. Estos límites han sido diseñados para proporcionar una protección
razonable contra la interferencia dañina en las comunicaciones por radio. Este equipo genera, utiliza y emite energía en forma de radiofrecuencias, por lo que si no se instala y utiliza como indican las
instrucciones, podría provocar interferencias dañinas en comunicaciones de radio. No obstante, no se puede garantizar que no habrá interferencias en una instalación determinada. Si este juguete provoca
interferencias en la recepción de radio o televisión (puede comprobarlo apagando y encendiendo el juguete mientras escucha si se producen interferencias), puede tomar alguna de las siguiente medidas:
• Reorientar o cambiar de lugar la antena receptora
• Aumentar la separación entre el juguete y la radio o el televisor
• Consultar con el vendedor o un técnico de televisión y radio si necesita asistencia adicional.
NOTA: Los cambios, los ajustes o las modificaciones realizadas en este dispositivo, como, entre otros, la sustitución de cualquier componente transmisor (cristal, semiconductor, etc.) podría suponer la infracción
de las secciones 15 o 95 de la normativa de la FCC, y debe ser explícitamente aprobada por Spin Master Ltd.; en caso contrario, el usuario podría verse privado del derecho de operar el equipo.
CAN ICES-3(B) / NMB-3(B)
4

e
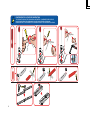
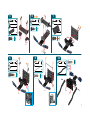
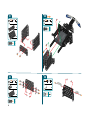
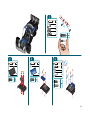
HOW TO INSTALL BATTERIES:
f�
INSTALLATION DES PILES :
d
EINLEGEN DER BATTERIEN:
n
DE BATTERIJEN PLAATSEN:
COMO COLOCAR AS PILHAS:
i
COME INSTALLARE LE PILE:
E
INSTALACIÓN DE LAS PILAS:
p
��������
1. Open the battery door with a Meccano wrench.
2. If used batteries are present, remove these batteries from the unit by pulling up on one end of each battery.
DO NOT remove or install batteries using sharp or metal tools.
3. Install new batteries as shown in the polarity diagram (+/-) inside the battery compartment.
4. Replace battery door securely.
5. Check your local laws and regulations for correct recycling and/or battery disposal.
1. À l'aide d'une clé Allen Meccano, ouvrir le couvercle du compartiment des piles.
2. Si des piles usagées sont présentes, les extraire en tirant sur l'une des extrémités.
NE PAS utiliser d’objet coupant ou métallique pour extraire ou installer les piles.
3. Installer des piles neuves comme indiqué sur le schéma de polarité (+/-) du compartiment des piles.
4. Bien refermer le compartiment des piles.
5. Consulter la législation locale concernant le recyclage et/ou l’élimination des piles.
1. Abra el compartimento de las pilas con la llave Meccano.
2. Si las pilas están gastadas, tire hacia arriba de uno de sus extremos para extraerlas.
NO utilice herramientas metálicas o puntiagudas para instalar o extraer las pilas.
3. Coloque las pilas nuevas en el compartimento correspondiente, tal y como se indica en el diagrama de polaridad (+/-).
4. Cierre bien la tapa del compartimento de las pilas.
5. Consulte la normativa local relativa al reciclaje y a la eliminación de las pilas.
1. Batteriefachabdeckung mit einem Meccano Werkzeug önen.
2. Wenn sich gebrauchte Batterien darin benden, diese einzeln herausziehen.
Batterien NICHT mit scharfen oder metallenen Gegenständen entfernen oder einlegen.
3. Neue Batterien unter Beachtung des Polaritätsdiagramms (+/-) in das Batteriefach einlegen.
4. Batteriefachabdeckung wieder anbringen.
5. Örtliche Gesetze und Bestimmungen für das Recycling bzw. die Entsorgung von Altbatterien beachten.
1. Open het batterijdeksel met een Meccano-moersleutel.
2. Verwijder eventueel gebruikte aanwezige batterijen uit de unit door één kant van elke batterij omhoog te trekken.
Verwijder of plaats batterijen NIET met behulp van scherpe of metalen voorwerpen.
3. Plaats de nieuwe batterijen zoals weergegeven op het polariteitsdiagram (+/-) aan de binnenkant van het batterijvak.
4. Sluit het vak af met het batterijdeksel.
5. Lees de plaatselijke voorschriften en regelgeving om de batterijen op de juiste wijze te recyclen of af te voeren.
1. Aprire lo scomparto pile con una chiave Meccano.
2. Se sono presenti pile usate, rimuoverle dall'unità sollevandole da un'estremità.
NON usare oggetti metallici o appuntiti per rimuovere o installare le pile.
3. Inserire le pile nuove con le polarità (+/-) direzionate come indicato.
4. Richiudere correttamente lo scomparto pile.
5. Eliminare e/o riciclare le pile secondo quanto previsto dalle normative locali vigenti.
1. Abra a tampa do compartimento das pilhas com uma chave Meccano.
2. Se houver pilhas usadas, retire-as da unidade individualmente, puxando pela extremidade de cada uma.
NÃO retire ou coloque pilhas com qualquer acessório pontiagudo ou metálico.
3. Instale pilhas novas seguindo o diagrama de polaridade (+/-) dentro do compartimento das pilhas.
r
УСТАНОВКА ЭЛЕМЕНТОВ ПИТАНИЯ:
P
WKŁADANIE BATERII:
c
VLOŽENÍ BATERIÍ:
s
INŠTALÁCIA BATÉRIÍ:
h
AZ ELEMEK BEHELYEZÉSÉNEK MÓDJA:
R
INSTALAREA BATERIILOR:
1.Откройте крышку отсека элементов питания с помощью ключа Meccano.
2. Извлеките старые или истощенные элементы питания из отсека (при их наличии), подняв каждый элемент питания за край.
ЗАПРЕЩАЕТСЯ извлекать или устанавливать элементы питания с помощью острых или металлических предметов.
3. Установите новые элементы питания внутри отсека, соблюдая полярность (+/-).
4. Надежно закройте крышку отсека.
5. Ознакомьтесь с законами и нормативами вашей страны, установленными в отношении правил
переработки и/или утилизации элементов питания.
1. Otwórz drzwiczki komory baterii za pomocą narzędzia Meccano.
2. Jeśli w komorze znajdują się zużyte baterie, wyjmij je, podważając każdą za jeden z końców.
Do wyjmowania i wkładania baterii NIE wolno stosować ostrych narzędzi.
3. Umieść nowe baterie w komorze zgodnie z oznaczeniami biegunowości (+/-).
4. Starannie zamknij drzwiczki komory baterii.
5. Zapoznaj się z lokalnymi przepisami izaleceniami prawnymi dotyczącymi prawidłowego recyklingu i/lub utylizacji baterii.
1. Pomocí klíče Meccano otevřete dvířka baterií.
2. Jestliže se zde nacházejí použité baterie, vyndejte je zjednotky postupným vytahováním za jejich konec.
NEVYNDÁVEJTE ANI NEVKLÁDEJTE baterie pomocí ostrých nebo kovových nástrojů.
3. Nové baterie vkládejte podle schématu polarity (+/-) uvnitř oddílu pro baterie.
4. Pevně nasaďte dvířka baterií zpět na místo.
5. Seznamte se smístními zákony apředpisy ohledně správné recyklace či likvidace baterií.
1. Dvierka batérií otvorte kľúčom Meccano.
2. Ak sú prítomné použité batérie, odstráňte ich zjednotky tak, že každú batériu vytiahnete za jeden koniec.
NEODSTRAŇUJTE ani nevkladajte batérie pomocou ostrého alebo kovového predmetu.
3. Vložte nové batérie do priestoru pre batérie, ako je zobrazené na diagrame polarity (+/–).
4. Pevne znova nasaďte dvierka batérií.
5. Pozrite si miestne predpisy a nariadenia osprávnej recyklácii alebo likvidácii batérií.
1. Nyissa ki az elemtartó fedelét egy Meccano csavarkulccsal.
2. Ha használt elemek vannak benne, távolítsa el ezeket az elemeket a készülékből úgy, hogy az elemeket egyik végüknél felfelé emeli.
Az elemek eltávolításához vagy behelyezéséhez NE használjon éles vagy fémeszközöket.
3. Helyezze az új elemeket az elemtartóba a polaritási ábrának (+/-) megfelelően.
4. Helyezze vissza biztonságosan az elemtartó fedelét.
5. Ellenőrizze az elemek újrahasznosítására és/vagy ártalmatlanítására vonatkozó helyi törvényeket és rendelkezéseket.
1. Deschideţi usa compartimentului bateriilor cu o cheie Meccano.
2. Dacă sunt prezente baterii uzate, scoateţi-le pe acestea din unitate trăgând în sus de capătul ecărei baterii.
NU demontaţi sau instalaţi bateriile cu ajutorul unor instrumente ascuţite sau metalice.
3. Instalaţi bateriile noi după cum indică marcajele de polaritate (+/-) din interiorul compartimentului bateriei.
4. Închideţi bine uşa compartimentului bateriei.
5. Consultaţi legile şi reglementările locale pentru reciclarea şi/sau eliminarea corectă a bateriei.
4. Coloque de novo a porta do compartimento com cuidado.
5. Consulte as leis, as normas e os regulamentos locais de reciclagem e/ou descarte de pilhas e baterias.
AAA
AAA
AAA
AAA
5

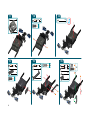
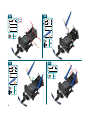
1
x1
x2
x2
2
x2
x2
S2
x2
S2
9 5 mm
,,
3/8
,
3
x2
S2
x2
S2
9 5 mm
,,
3/8
,
x1
4
x2
S2
x2
S2
9 5 mm
,,
3/8
,
x1
S1
5 8 mm
,,
15/64
,
x2
S1
S1
S2
S2
S2
S2
S2
S2
6

7
x2
S2
x2
S2
9 5 mm
,,
3/8
,
5
x4
S2
x4
S2
9 5 mm
,,
3/8
,
x1
x2
6
x2
S2
x2
S2
9 5 mm
,,
3/8
,
54
8
x2
x2
x1
x2
B1
14 7 mm
,,
37/64
,
B1
B1
B1
S2
S2
S2
S2
S2
S2
S2
S2
9
x2
S3
12 mm
,,
1/2
x2
x1
S3
S3
S3
10
x2
S3
12 mm
,,
1/2
x2
x2
S3
S3
S3
7

12
S2
x2
S2
9 5 mm
,,
3/8
,
11
x2
x1
S2
S2
13
x1
14
S2
x1
S2
9 5 mm
,,
3/8
,
x1
x1
S2
15
x2
x1
x2
S3
12 mm
,,
1/2
S3
S3
S3
16
x1
S2
9 5 mm
,,
3/8
,
x1
x1
x2
S1
5 8 mm
,,
15/64
,
x1
S2
S1
S1
S2
8

19
x2
x1
17
x1
18
S2
x1
S2
9 5 mm
,,
3/8
,
x1
x1
20
x1
S2
9 5 mm
,,
3/8
,
x1
x1
x2
x2
S3
12 mm
,,
1/2
S3
S1
5 8 mm
,,
15/64
,
x1
S2
S3
S3
S2
S2
9

21
S2
x2
S2
9 5 mm
,,
3/8
,
x1
x2
23
S2
x4
S2
9 5 mm
,,
3/8
,
x2
x1
22
S2
x2
S2
9 5 mm
,,
3/8
,
2120
x2
x4
24
x2
x2
S1
5 8 mm
,,
15/64
,
x2
S2
S2
S2
S2
S2
S2
S2
S2
x2
10

25
x2
B3
23 mm
,,
15/16
x2
S5
25 4 mm
,,
1
x2
x2
26
S2
x2
x2
2422
x2
S2
9 5 mm
,,
3/8
,
27
x2
x2
x1
x1
,
A238
S5
28
x1
x1
x2
S1
5 8 mm
,,
15/64
,
x2
S2
S2
2625
x1
S5
S5
11

29
x1
x1
x2
S1
5 8 mm
,,
15/64
,
x2
32
x2
S1
5 8 mm
,,
15/64
,
x2
30
S1
5 8 mm
,,
15/64
,
x1
D1
11 25mm
,,
7/16
,
x1
x1
x1
x1
31
S1
5 8 mm
,,
15/64
,
x1
D1
11 25mm
,,
7/16
,
x1
x1
x1
x1
12

33
S2
x2
x2
x2
S2
9 5 mm
,,
3/8
,
x2
35
S2
x1
x2
x2
x2
S2
9 5 mm
,,
3/8
,
x2
36
3534
S2
S2
S2
S2
34
x2
S1
5 8 mm
,,
15/64
,
x2
13

38
x1
x2
S1
5 8 mm
,,
15/64
,
x2
39
x2
x2
x2
B1
14 7 mm
,,
37/64
,
B1
x2
37
D1
11 25mm
,,
7/16
,
x2
40
S2
x1
x1
x1
x1
S2
9 5 mm
,,
3/8
,
x1
S2
D1
11 25mm
,,
7/16
,
x1
14
B1
B1

41
S2
x1
x1
S2
9 5 mm
,,
3/8
,
x1
43
S1
5 8 mm
,,
15/64
,
x1
x1
S2
42
4139
D1
11 25mm
,,
7/16
,
x1
44
x1
x1
D1
11 25mm
,,
7/16
,
x4
15

45
x1
x1
x1
x1
S2
9 5 mm
,,
3/8
,
x1
46
S2
x1
x1
S2
9 5 mm
,,
3/8
,
x1
47
4644
S2
S2
D1
11 25mm
,,
7/16
,
x1
S2
48
S1
5 8 mm
,,
15/64
,
x1
x1
D1
11 25mm
,,
7/16
,
x1
16

49
x1
x1
50
x2
x1
x2
x2
S3
12 mm
,,
1/2
S3
51
S1
5 8 mm
,,
15/64
,
x2
x2
x1
S3
S3
D1
11 25mm
,,
7/16
,
x4
17

53
55
52
x2
120 mm
,,
4
47/64
54
x2
120 mm
,,
4
47/64
18

58
S1
5 8 mm
,,
15/64
,
x4
x4
x2
x4
59
S1
5 8 mm
,,
15/64
,
x2
x2
x2
x1
57
5655
60
S1
5 8 mm
,,
15/64
,
x2
x2
x2
x1
x2
56
S1
5 8 mm
,,
15/64
,
x2
x2
x1
x1
D1
11 25mm
,,
7/16
,
x3
19

62
40
m m
,,
1
/
9 16
x1
x1
x1
63
x4
x4
x4
61
x2
6057
x2
S3
12 mm
,,
1/2
S3
X2 X2
x1
S3
S3
D1
11 25mm
,,
7/16
,
x2
x1
20
Strona się ładuje...
Strona się ładuje...
Strona się ładuje...
Strona się ładuje...
Strona się ładuje...
Strona się ładuje...
Strona się ładuje...
Strona się ładuje...
Strona się ładuje...
Strona się ładuje...
Strona się ładuje...
Strona się ładuje...
Strona się ładuje...
Strona się ładuje...
Strona się ładuje...
Strona się ładuje...
Strona się ładuje...
Strona się ładuje...
Strona się ładuje...
Strona się ładuje...
Strona się ładuje...
Strona się ładuje...
Strona się ładuje...
Strona się ładuje...
-
 1
1
-
 2
2
-
 3
3
-
 4
4
-
 5
5
-
 6
6
-
 7
7
-
 8
8
-
 9
9
-
 10
10
-
 11
11
-
 12
12
-
 13
13
-
 14
14
-
 15
15
-
 16
16
-
 17
17
-
 18
18
-
 19
19
-
 20
20
-
 21
21
-
 22
22
-
 23
23
-
 24
24
-
 25
25
-
 26
26
-
 27
27
-
 28
28
-
 29
29
-
 30
30
-
 31
31
-
 32
32
-
 33
33
-
 34
34
-
 35
35
-
 36
36
-
 37
37
-
 38
38
-
 39
39
-
 40
40
-
 41
41
-
 42
42
-
 43
43
-
 44
44


Spin Master 18211 Instrukcja obsługi
- Typ
- Instrukcja obsługi
- Niniejsza instrukcja jest również odpowiednia dla
w innych językach
- español: Spin Master 18211 Manual de usuario
- italiano: Spin Master 18211 Manuale utente
- slovenčina: Spin Master 18211 Používateľská príručka
- français: Spin Master 18211 Manuel utilisateur
- română: Spin Master 18211 Manual de utilizare
Inne dokumenty
-
Meccano Rally Racer Instrukcja obsługi
-
-
-
Meccano Meccano - MeccaSpider Instrukcja obsługi
-
-
-
-
Equation EM716-W Instrukcja obsługi
-
-