Cabletech URZ0339 Instrukcja obsługi
- Kategoria
- Ochronniki przeciwprzepięciowe
- Typ
- Instrukcja obsługi

TV set
URZ0339
DE
EN
PL
RO
BEDIENUNGSANLEITUNG
OWNER’S MANUAL
INSTRUKCJA OBSŁUGI
MANUAL DE UTILIZARE

2 3
DE DE
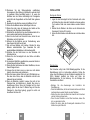
WICHTIGE SICHERHEITSINFORMATIONEN
UM DAS RISIKO EINES ELEKTRISCHEN SCHLAGS ZU
VERMEIDEN, ENTFERNEN SIE NICHT DIE ABDECKUNG
(ODER DIE RÜCKSEITE). ES SIND KEINE VOM BENUTZER ZU
WARTENDE TEILE IM INNEREN. ÜBERLASSEN SIE DIE
WARTUNG QUALIFIZIERTEM PERSONAL.
Dieses Symbol weist auf das Vorhandensein von nicht
isolierter, gefährlicher Spannung hin.
Dieses Symbol weist auf wichtige Bedienungs- und
Wartungsarbeiten hin.
Dieses Symbol weist darauf hin, dass dieses Gerät ein
Elektrogerät der Klasse II oder doppelt isoliert ist. Es ist so
konzipiert, dass es keine Sicherheitserdung benötigt.
1. Lesen Sie diese Bedienungsanleitung sorgfältig durch und
bewahren diese zum späteren Nachschlagen auf.
2. Achten Sie besonders auf Warnhinweise, die mit den oben
dargestellten Symbolen gekennzeichnet sind, und befolgen
unbedingt die daneben angezeigten Informationen.
3. Verwenden Sie dieses Gerät nicht in der Nähe von Wasser
oder anderen Feuchtigkeitsquellen.
4. Blockieren Sie keine Belüftungsönungen. Installieren Sie
dieses Gerät gemäß dieser Anleitung.
5. Installieren Sie dieses Gerät nicht in der Nähe von
Wärmequellen wie Heizkörpern, Öfen oder anderen Geräten,
die Wärme erzeugen.
6. Wenn der mitgelieferte Stecker nicht in Ihre Steckdose passt,
versuchen Sie nicht, ihn mit Gewalt einzustecken, und wenden
sich für weitere Ratschläge an einen Elektriker.
7. Schützen Sie das Netzkabel davor, dass man darauf tritt oder
dass es eingeklemmt wird, insbesondere in der Nähe von
Steckern.
8. Verwenden Sie nur vom Hersteller bereitgestellte/angegebene
Anbau- und Zubehörteile.
9. Trennen Sie dieses Gerät während eines Gewitters oder wenn
das Gerät längere Zeit nicht verwendet wird, von der
Steckdose.

4 5
DE DE
INSTALLATION
Montage der Ständer
1. Legen Sie das Fernsehgerät mit der Vorderseite nach unten
auf. Stellen Sie sicher, dass die Frontplatte auf einem weichen
Tuch, weichen Pads oder einem anderen weichen Material
liegt.
2. Stecken Sie die Ständer in die Löcher an der Unterseite des
Fernsehers (L für links, R für rechts).
3. Setzen Sie die Schrauben in die Buchsen ein und ziehen diese
fest.
Wandmontage
Der Fernseher verfügt über VESA Befestigungslöcher für die
Wandhalterung (nicht im Lieferumfang enthalten). Stellen Sie
sicher, dass Ihre Halterung mit dem Fernseher kompatibel ist. Der
VESA Standard bestimmt die Breite und Höhe der
Befestigungslöcher für die Halterung. Vor der Montage des
Fernsehers an der Wand:
• Befolgen Sie alle Anweisungen des Herstellers der
Wandhalterung.
• Wenn Sie Zweifel haben, ob Sie den Fernseher sicher an der Wand
montieren können, wenden Sie sich an einen Fachmann.
• Stellen Sie sicher, dass die Wand das Gewicht des Fernsehers
und der Halterung tragen kann.
• Wenn Sie den Fernseher an der Wand montieren, lassen Sie
sich von jemandem helfen.
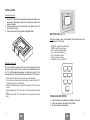
• Stellen Sie sicher, dass das Fernsehgerät mindestens 20 cm
Abstand von jeder Seite hat.
10. Überlassen Sie alle Wartungsarbeiten qualiziertem
Servicepersonal. Eine Wartung ist erforderlich, wenn das Gerät
in irgendeiner Weise beschädigt wurde, z. B. wenn das
Netzkabel oder der Stecker beschädigt sind, Flüssigkeiten
verschüttet oder Gegenstände auf das Gerät fallen gelassen
wurden.
11. Bewahren Sie das Gerät an einem gut belüfteten Ort auf.
12. Setzen Sie die Batterien keiner übermäßigen Hitze aus.
13. Stellen Sie sicher, dass die Spannung des Geräts und die
Spannung in der Steckdose übereinstimmen.
14. Schließen Sie das Gerät nicht an eine Steckdosenleiste mit zu
vielen anderen elektronischen Komponenten an.
15. Wenn Sie das Gerät vom Stromnetz trenne, ziehen Sie am
Netzstecker und nicht am Kabel.
16. Entfernen Sie die Batterien aus der Fernbedienung, wenn
diese längere Zeit nicht benutzt wird.
17. Alte und neue Batterien nicht mischen. Mischen Sie keine
Batterien unterschiedlichen Typs. Verwenden Sie nicht
wiederauadbare Alkalibatterien in Verbraucherqualität.
18. Schließen Sie das Gerät immer an eine Steckdose mit
Schutzkontakt an.
19. Stellen Sie das Fernsehgerät auf eine ache und stabile
Oberäche.
20. Um maximale Stabilität zu gewährleisten, verwenden Sie die im
Lieferumfang enthaltenen Ständer.
21. Stellen Sie das Gerät immer auf stabile Oberächen, die sein
Gewicht tragen können.
22. Verlegen Sie die Kabel immer so, dass man nicht darüber
stolpern, daran ziehen oder greifen kann.
23. Üben Sie keinen starken Druck auf den LCD-Bildschirm aus.
Dies kann dazu führen, dass der Bildschirm zerbricht oder
bleibende Spuren hinterlässt.
24. Wenn der Bildschirm zerbricht, kommen Sie nicht mit der
Flüssigkeit des der Bildschirms in Kontakt. Dies kann zu
Hautreizungen führen. Wenn die Flüssigkeit auf Ihre Haut
gelangt, spülen Sie die Haut 15 Minuten lang ab. Wenn die
Flüssigkeit in Ihren Mund gelangt, gurgeln Sie sofort und
konsultieren Sie Ihren Arzt.

6 7
DE DE
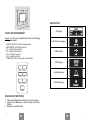
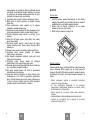
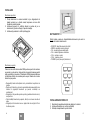
TASTEN AM FERNSEHGERÄT
Hinweis: Ort, Name und Verfügbarkeit der Tasten sind abhängig
vom Fernsehermodell.
• SOURCE [QUELLE]: önet das Eingangsmenü
• MENU [MENÜ]: önet das Hauptmenü
• CH-: vorheriger Sender/Option
• CH+: nächster Sender/Option
• VOL-: Lautstärke verringern
• VOL+: Lautstärke erhöhen
• POWER [EIN/AUS]: Fernsehgerät ein/ausschalten
EINLEGEN DER BATTERIEN
1. Önen Sie das Batteriefach indem Sie es zur Seite schieben.
2. Legen Sie neue Batterien ein, unter Beachtung der korrekten
Polarität.
3. Schließen Sie das Batteriefach.
ANSCHLÜSSE
20
cm
20
cm
20
cm
20
cm
INPUT
CH+
VOL+
MENU
CH-
VOL-
POWER
AV Eingang
DVB-T2 Antenneneingang
USB Steckplatz
HDMI Eingang
Kopfhörerausgang
COAXIAL Eingang

8 9
DE DE
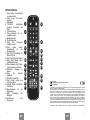
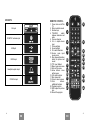
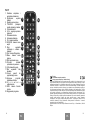
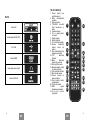
FERNBEDIENUNG
1. Taste Ein/Aus: Fernsehgerät
ein-/ausschalten.
2. Taste Ton aus: Ton stumm
schalten
3. Zierntasten
4. TV/RADIO: Umschalten
zwischen Fernsehen und
Radio
5. Vorheriger Kanal
6. Taste Lautstärke [Vol -/+]:
Lautstärke regeln
7. Bildeinstellungen
8. Ton-Einstellungen
9. Taste CH: Vorheriger/
nächster Sender
10. Taste Quelle [Input]:
Auswahlmenü für die
Eingangsquelle
11. Disp: zeigt Informationen zu
Bild und Ton an
12. Taste Text: önet den Teletext
13. Taste Menü [Menu]: önet
das Bildschirmmenü
14. Taste Beenden [Exit]: Menü
oder Anwendung verlassen
15. Pfeiltasten: bewegen in
Menüs
16. Taste OK: Eingabe
bestätigen
17. Taste Mix: Senderliste
18. Taste Zurück: zurück zum
vorherigen Menü
19. Farbige Tasten: Zusätzliche
Funktionen
20. Steuerelemente für die
Wiedergabe
21. SIZE: Einstellung der
Bildgröße
22. Aufzeichnung des
Programms
1
4
6
7
11
13
17 18
20
10
14
16
9
2
3
5
8
12
15
19
21 22
Deutsch
Korrekte Entsorgung dieses Produkts
(Elektromüll)
(Anzuwenden in den Ländern der Europäischen Union und anderen europäischen Ländern
mit einem separaten Sammelsystem)
Die Kennzeichnung auf dem Produkt bzw. auf der dazugehörigen Literatur gibt an, dass es
nach seiner Lebensdauer nicht zusammen mit dam normalem Haushaltsmüll entsorgt
werden darf. Entsorgen Sie dieses Gerät bitte getrennt von anderen Abfällen, um der
Umwelt bzw. der menschlichen Gesundheit nicht durch unkontrollierte Müllbeseitigung zu
schaden. Recyceln Sie das Gerät, um die nachhaltige Wiederverwertung von stofflichen
Ressourcen zu fördern. Private Nutzer sollten den Händler, bei dem das Produkt gekauft
wurde, oder die zuständigen Behörden kontaktieren, um in Erfahrung zu bringen, wie sie das
Gerät auf umweltfreundliche Weise recyceln können. Gewerbliche Nutzer sollten sich an
Ihren Lieferanten wenden und die Bedingungen des Verkaufsvertrags konsultieren. Dieses
Produkt darf nicht zusammen mit anderem Gewerbemüll entsorgt werden.
Hergestellt in China für Lechpol Electronics Leszek Sp.k., ul. Garwolińska 1, 08-400 Miętne.

EN
10
IMPORTANT SAFETY INFORMATION
TO REDUCE THE RISK OF ELECTRIC SHOCK, DO NOT
REMOVE THE COVER (OR BACK). THERE ARE NO USER-
SERVICEABLE PARTS INSIDE. REFER SERVICING TO
QUALIFIED PERSONNEL.
This symbol indicates the presence of non-insulated,
dangerous voltage.
This symbol indicates important operating and maintenance.
This symbol indicates that this equipment is a Class II or double
insulated electrical appliance. It has been designed in such
a way that it does not require a safety connection to
electrical earth.
1. Read this manual carefully and keep it for future reference.
2. Pay special attention to warnings marked with symbols
presented above and make sure to follow information
presented next to them.
3. Do not use this device near water or other sources of moisture.
4. Do not block any ventilation openings. Install this device
according to this manual.
5. Do not install this device near heat sources such as radiators,
stoves or other appliances that produce heat.
6. If the provided plug does not t into your outlet, do not try to force
it and consult an electrician for further advice.
7. Protect the power cord from being walked on or pinched,
especially near plugs.
8. Only use attachments and accessories provided/specied by
the manufacturer.
9. Unplug this device from outlet during storms, or when the
device is not going to be used in a long time.
10. Refer all servicing to qualied service personnel. Servicing is
required when the device has been damaged in any way, for
example if the power cord or plug is damages, liquid has been
spilled or objects has been dropped on the device.
11. Keep the device in a well ventilated area.
12. Do not expose the batteries to excessive heat.
13. Make sure that the voltage of the device and voltage in the
outlet matches.
14. Do not connect the device to a power strip with too many other
electronic components.
15. When unplugging the device, hold the main plug, not the wire.
16. Remove the batteries from the remote if it not going to be used
in a long time.
17. Do not mix old and new batteries. Do not mix batteries of a
dierent kind. Use consumer grade, non-rechargable alkaline
batteries.
18. Place the TV on at and stable surface.
19. Always connect the device to a power outlet with protective
ground connection.
20. To provide maximum stability, use the stands that are included
in the box.
21. Always place the device on stable surfaces that can support its
weight.
22. Always route the cables in a way, so that they cannot be tripped
over, pulled or grabbed.
23. Do not press hard or put pressure on the LCD panel. It can cause
the panel to brake, shatter or make permanent marks.
24. If the panel does brake, do not make contact with the liquid in
the panel. This can cause skin irritation. If the liquid gets on
your skin, rinse the skin for 15 minutes. If the liquid gets in your
mouth, immediately gargle and consult your doctor.

EN EN
12 13
INSTALLATION
Mounting the stand
1. Place the TV with the front panel facing downwards. Make sure
to place the front panel on soft cloth, soft pads or another soft
piece of material.
2. Insert the stand into the holes located on the bottom of the TV
(L for left, R for right).
3. Insert the screws into the sockets and tighten them.
Mounting on the wall
The TV has VESA mounting holes for wall mounting bracket (not
included). Make sure that your bracket is the compatible one with
the TV. VESA standard determines the width and height of the
mounting holes for the bracket. Before mounting the TV on the wall:
• Follow all instructions from the wall mount manufacturer.
• If you have any doubts about your ability to safely install the TV
on the wall, contact a professional.
• Make sure that the wall can support the weight of the TV and the
mount.
• When installing the TV on the wall, do it with someone to help
you.
• Make sure that the TV has at least 20 cm clearance from each
side.
BUTTONS ON THE TV
Note: the location, name and availability of the buttons may vary
according to the TV model.
• SOURCE: opens the inputs menu.
• MENU: open the main menu.
• CH-: previous channel/option.
• CH+: next channel/option.
• VOL-: decrease volume.
• VOL+: increase volume.
• POWER: turn on or o the TV.
INSTALLING BATTERIES
1. Open the battery compartment by sliding it to the side.
2. Insert new batteries, according to the polarity.
3. Close the battery compartment.
20
cm
20
cm
20
cm
20
cm
INPUT
CH+
VOL+
MENU
CH-
VOL-
POWER

EN EN
14 15
REMOTE CONTROL
1. Power: turn on or o the
TV.
2. Mute: mutes the sound
3. Number keys
4. TV/RADIO: switch
between television and
radio
5. Previous channel
6. Vol -/+: adjust volume
level
7. Picture settings
8. Sound settings
9. CH: switch channels
10. Source: open input
source menu
11. Disp: shows information
about the picture and
sound
12. TXT: open Teletext
13. Menu: open main menu
14. Exit: exit the menu
15. Arrow buttons: move
within menus
16. OK: conrm entries
17. Mix: channel list
18. Cancel: cancel a menu
19. Color buttons:
additional functions
20. Playback controls
21. SIZE: adjust the picture
size
22. Record the program
1
4
6
7
11
13
17 18
20
10
14
16
9
2
3
5
8
12
15
19
21 22
AV input
DVB-T2/C antenna input
USB port
HDMI input
Headphone jack output
COAXIAL input
SOCKETS

EN EN
16 17
English
Correct Disposal of This Product
(Waste Electrical & Electronic Equipment)
(Applicable in the European Union and other European countries with separate collection
systems) This marking shown on the product or its literature, indicates that it should not be
disposed with other household wastes at the end of its working life. To prevent possible harm
to the environment or human health from uncontrolled waste disposal, please separate this
from other types of wastes and recycle it responsibly to promote the sustainable reuse of
material resources. Household users should contact either the retailer where they purchased
this product, or their local government oce, for details of where and how they can take this
item for environmentally safe recycling. Business users should contact their supplier and
check the terms and conditions of the purchase contract. This product should not be mixed
with other commercial wastes for disposal.
Made in China for Lechpol Electronics Leszek Sp.k., ul. Garwolińska 1, 08-400 Miętne.
1717
PL PL
WAŻNE INFORMACJE DOTYCZĄCE
BEZPIECZEŃSTWA
ABY ZMNIEJSZYĆ RYZYKO PORAŻENIA PRĄDEM, NIE ZDEJMUJ
POKRYWY (ANI TYŁU). W ŚRODKU NIE MA CZĘŚCI
NADAJĄCYCH SIĘ DO SERWISOWANIA PRZEZ UŻYTKOWNIKA.
SERWIS URZĄDZENIA NALEŻY POWIERZYĆ
WYKWALIFIKOWANEMU PERSONELOWI.
Ten symbol oznacza obecność nieizolowanego,
niebezpiecznego napięcia.
Ten symbol oznacza ważną obsługę i konserwację.
Ten symbol oznacza, że to urządzenie jest urządzeniem
elektrycznym klasy II lub podwójnie izolowanym. Został
zaprojektowany w taki sposób, aby nie wymagał
podłączenia do uziemienia elektrycznego.
1. Niniejszą instrukcję należy uważnie przeczytać i zachować ją
do wykorzystania w przyszłości.
2. Należy zwrócić szczególną uwagę na ostrzeżenia oznaczone
symbolami przedstawionymi powyżej i przestrzegać informacji
przedstawionych obok nich.
3. Nie używać tego urządzenia w pobliżu wody lub innych źródeł
wilgoci.
4. Nie blokować otworów wentylacyjnych. Urządzenie należy
zamontować zgodnie z niniejszą instrukcją.
5. Urządzenia nie należy montować w pobliżu źródeł ciepła, takich
jak grzejniki, piece lub inne urządzenia wytwarzające ciepło.
6. Jeśli dostarczona wtyczka nie pasuje do gniazdka, nie należy
próbować podłączać jej na siłę. Należy skonsultować się z
elektrykiem w celu uzyskania dalszych porad.
7. Chronić przewód zasilający przed nadepnięciem lub
ściśnięciem, szczególnie w pobliżu wtyczek.
8. Używać wyłącznie dodatków i akcesoriów dostarczonych/
określonych przez producenta.
9. Odłączyć urządzenie od gniazdka w czasie burzy lub gdy
urządzenie nie będzie używane przez dłuższy czas.
10. Wszystkie czynności serwisowe należy powierzyć
wykwalikowanemu personelowi serwisowemu. Serwisowanie

18 19
PL PL
jest wymagane, gdy urządzenie zostało w jakikolwiek sposób
uszkodzone, na przykład jeśli przewód zasilający lub wtyczka
są uszkodzone, na obudowę została wylana ciecz lub ciężki
przedmiot został upuszczony na urządzenie.
11. Urządzenie należy trzymać w dobrze wentylowanym miejscu.
12. Baterii pilota nie należy wystawiać na działanie wysokiej
temperatury.
13. Przed podłączeniem należy upewnić się, że napięcie
urządzenia i gniazdka są takie same.
14. Urządzenia nie należy podłączać do listwy zasilającej ze zbyt
dużą ilością podłączonych innych urządzeń elektronicznych.
15. Podczas odłączania należy trzymać za wtyczkę, nie za
przewód.
16. Jeżeli pilot nie będzie używany przez dłuższy czas, należy
wyjąć z niego baterie.
17. Nie należy mieszać starych i nowych baterii. Nie należy
mieszać rodzajów baterii. Należy używać zwykłych baterii
alkalicznych.
18. Telewizor należy umieścić na płaskiej i stabilnej powierzchni.
19. Urządzenie należy zawsze podłączać do gniazdka
elektrycznego z uziemieniem.
20. Aby zapewnić maksymalną stabilność, należy użyć nóżek
dołączonych do telewizora.
21. Urządzenie należy zawsze stawiać na stabilnych
powierzchniach, które mogą utrzymać jego ciężar.
22. Przewody należy zawsze poprowadzić tak, aby nie można było
się o nie potknąć, pociągnąć lub złapać.
23. Nie należy naciskać panelu LCD. Może to spowodować
uszkodzenie lub rozbicie panelu.
24. Jeżeli panel zostanie uszkodzony, nie należy dotykać cieczy
znajdującej się w nim. Może to spowodować podrażnienie
skóry. Jeśli ciecz dostanie się na skórę, należy ją płukać przez
15 minut. Jeśli ciecz dostanie się do ust, należy natychmiast
przepłukać gardło i skonsultować się z lekarzem.
MONTAŻ
Montaż nóżek
1. Umieścić telewizor panelem skierowanym do dołu. Należy
pamiętać, aby umieścić panel na miękkiej ściereczce, miękkich
podkładkach lub innym miękkim kawałku materiału.
2. Włożyć nóżki do otworów znajdujących się na spodzie
telewizora (L po lewej, R po prawej).
3. Włożyć śruby do otworów i przykręcić je.
Montaż na ścianie
Telewizor posiada otwory montażowe VESA do uchwytu ściennego
(brak w zestawie). Należy upewnić się, że uchwyt pasuje do
telewizora. Standard VESA określa szerokość i wysokość otworów
montażowych dla uchwytu. Przed zamontowaniem telewizora na
ścianie:
• Należy postępować zgodnie ze wszystkimi instrukcjami
producenta uchwytu ściennego.
• W razie jakichkolwiek wątpliwości co do możliwości
bezpiecznego zainstalowania telewizora na ścianie, należy
skontaktować się z profesjonalistą.
• Należy upewnić się, że ściana utrzyma ciężar telewizora i
uchwytu.
• Instalację telewizora na ścianie najlepiej wykonać w dwie osoby.
• Upewnić się, że telewizor ma co najmniej 20 cm wolnej
przestrzeni z każdej strony.

20 21
PL PL
PRZYCISKI NA TELEWIZORZE
Uwaga: lokalizacja, nazwa i dostępność przycisków mogą się
różnić w zależności od modelu telewizora.
• SOURCE: otwiera menu wejść
• MENU: otwiera menu główne
• CH-: poprzedni kanał/opcja
• CH+: następny kanał/opcja
• VOL-: zmniejszenie głośności
• VOL+: zwiększenie głośności
• POWER: włączanie i wyłączanie telewizora
MONTAŻ BATERII
1. Otworzyć pokrywę gniazda baterii, przesuwając ją na bok.
2. Włożyć nowe baterie, zgodnie z polaryzacją.
3. Zamknąć komorę baterii.
GNIAZDA
20
cm
20
cm
20
cm
20
cm
Wejście AV
Wejście anteny DVB-T2/C
Port USB
Gniazdo HDMI
Wyjście słuchawkowe
Wyjście COAXIAL
INPUT
CH+
VOL+
MENU
CH-
VOL-
POWER

22 23
PL PL
PILOT
1. Zasilanie: włączanie i
wyłączanie telewizora
2. Wyciszenie: wycisza
dźwięk
3. Klawisze numeryczne
4. TV/RADIO: przełącza
między telewizją i radiem
5. Poprzedni kanał
6. Vol -/+: regulacja poziomu
głośności
7. Ustawienia obrazu
8. Ustawienia dźwięku
9. CH: zmiana kanałów
10. SOURCE: otwiera menu
wejść
11. Disp: wyświetla
informacje o obrazie i
dźwięku
12. Text: otwiera Telegazetę
13. Menu: otwiera menu
główne
14. Exit: zamykanie menu
15. Przyciski strzałek:
poruszanie się w menu
16. OK: potwierdza opcje
17. Mix: wyświetla listę
kanałów
18. Cancel: powrót do
poprzedniego menu
19. Kolorowe przyciski:
dodatkowe funkcje
20. S t e r o w a n i e
odtwarzaniem
21. SIZE: zmiana formatu
obrazu
22. Nagrywanie programu
1
4
6
7
11
13
17 18
20
10
14
16
9
2
3
5
8
12
15
19
21 22
Polska
Prawidłowe usuwanie produktu
(zużyty sprzęt elektryczny i elektroniczny)
Oznaczenie przekreślonego kosza umieszczone na produkcie lub w odnoszących się do
niego tekstach wskazuje, że po upływie okresu użytkowania nie należy usuwać go z innymi
odpadami pochodzącymi z gospodarstw domowych. Aby uniknąć szkodliwego wpływu na
środowisko naturalne i zdrowie ludzi wskutek niekontrolowanego usuwania odpadów,
prosimy o oddzielenie produktu od innego typu odpadów oraz odpowiedzialny recykling w
celu promowania ponownego użycia zasobów materialnych, jako stałej praktyki. W celu
uzyskania informacji na temat miejsca i sposobu bezpiecznego dla środowiska recyklingu
tego produktu użytkownicy w gospodarstwach domowych powinni skontaktować się z
punktem sprzedaży detalicznej, w którym dokonali zakupu produktu, lub z organem władz
lokalnych. Użytkownicy w rmach powinni skontaktować się ze swoim dostawcą i sprawdzić
warunki umowy zakupu. Produktu nie należy usuwać razem z innymi odpadami
komunalnymi. Taki sprzęt podlega selektywnej zbiórce i recyklingowi. Zawarte w nim
szkodliwe substancje mogą powodować zanieczyszczenie środowiska i stanowić
zagrożenie dla życia i zdrowia ludzi.
Wyprodukowano w CHRL dla Lechpol Electronics Leszek Sp.k., ul. Garwolińska 1, 08-400
Miętne.

24
RO RO
INFORMAȚII IMPORTANTE PRIVIND SIGURANȚA
PENTRU A REDUCE RISCUL DE ELECTROCUTARE, NU
DEMONTAȚI CAPACUL (SAU PARTEA DIN SPATE). NU EXISTĂ
COMPONENTE CARE POT FI REPARATE DE UTILIZATOR ÎN
INTERIOR. CONSULTAȚI UN SERVICE AUTORIZAT PENTRU
REPARAȚII.
Acest simbol indică prezența unei tensiuni periculoase
neizolate.
Acest simbol indică existența unor instrucțiuni importante
privind funcționarea și întreținerea.
Acest simbol indică faptul că acest echipament este un
aparat electric de Clasa II sau dublu izolat. Citiți cu atenție
acest manual și păstrați-l pentru consultări ulterioare.
1. Acordați atenție deosebită avertismentelor marcate cu
simbolurile prezentate mai sus și asigurați-vă că respectați
informațiile prezentate lângă acestea.
2. Nu utilizați acest dispozitiv lângă apă sau alte surse de
umiditate.
3. Nu blocați oriciile de ventilație. Instalați acest dispozitiv
conform acestui manual.
4. Nu instalați acest dispozitiv lângă surse de căldură, cum ar
calorifere, sobe sau alte aparate care produc căldură.
5. Dacă ștecherul furnizat nu se potrivește în priză, nu încercați să
îl forțați și consultați un electrician pentru sfaturi suplimentare.
6. Nu călcați și nu ciupiți cablul de alimentare.
7. Utilizați doar atașamente și accesorii furnizate/specicate de
producător.
8. Deconectați acest dispozitiv de la priză în timpul furtunilor sau
când dispozitivul nu va folosit pentru o perioadă lungă de
timp.
9. Adresați-vă personalului de service calicat pentru toate
lucrările de întreținere. Întreținerea este necesară atunci când
dispozitivul a fost deteriorat în vreun fel, de exemplu dacă
cablul de alimentare sau ștecherul sunt deteriorate, s-a vărsat
lichid sau s-au scăpat obiecte pe dispozitiv, etc.
10. Păstrați dispozitivul într-o zonă bine ventilată.
11. Nu expuneți bateriile la căldură excesivă.
12. Adigurați-vă că tensiunea dispozitivului și tensiunea de la priză
corespund.
13. Nu conectați dispozitivul la o priză cu prea multe alte
componente electronice.
14. Când deconectați dispozitivul, prindeți și tregeți de ștecher, nu
de cablu.
15. Scoateți bateriile de la telecomandă dacă nu va folosită o
perioadă lungă de timp.
16. Nu amestecați bateriile vechi cu cele noi. Nu amestecați baterii
de alt fel. Folosiți baterii alcaline nereîncărcabile de calitate
pentru consumatori.
17. Așezați televizorul pe o suprafață plană și stabilă.
18. Conectați întotdeauna dispozitivul la o priză cu împământare de
protecție.
19. Pentru a oferi stabilitate maximă, utilizați suporturile care sunt
incluse în cutie.
20. Puneți întotdeauna dispozitivul pe suprafețe stabile care îi pot
suporta greutatea.
21. Dirijați întotdeauna cablurile adtfel încât să nu vă împiedicați, să
nu le trageți sau prindeți.
22. Nu apăsați puternic și nu apăsați mai ales pe panoul LCD.
Poate cauza spargerea, distrugerea saupoate lăsa urme
permanente.
23. Dacă ecranul se sparge, nu intrați în contact cu lichidul din
ecran. Acest lucru poate provoca iritații ale pielii. Dacă lichidul
ajunge pe piele, clătiți pielea timp de 15 minute. Dacă lichidul
ajunge în gură, faceți imediat gargară și consultați un medic.

26 27
RO RO
INSTALARE
Montarea suportului
1. Puneți televizorul cu ecranul orientat în jos. Asigurați-vă că
plasați ecranul pe o pânză moale, tampoane moi sau altă
bucată de material moale.
2. Introduceți suportul în oriciile situate în partea de jos a
televizorului (L pentru stânga, R pentru dreapta).
3. Introduceți șuruburile în oricii și strângeți-le.
Montarea pe perete
Televizorul are orifcii de montare VESA pentru suportul de montare
pe perete (nu este inclus). Asigurați-vă că suportul dumneavoastră
este compatibil cu televizorul. Standardul VESA determină lățimea
și înălțimea oriciilor de montare pentru suport. Înainte de a monta
televizorul pe perete:
• Respectați toate instrucțiunile de la producătorul suportului de
perete.
• Dacă aveți îndoieli cu privire la capacitatea dumneavoastră de a
instala în siguranță televizorul pe perete, contactați un
profesionist.
• Asigurați-vă că peretele poate suporta greutatea televizorului și
a suportului.
• Când instalați televizorul pe perete, faceți-o cu cineva care să vă
ajute.
• Asigurați-vă că televizorul are un spațiu liber de cel puțin 20 cm
de ecare parte.
BUTOANE PE TV
Notă: locația, numele și disponibilitatea butoanelor pot varia în
funcție de modelul televizorului.
• SOURCE: deschide meniul de intrări
• MENU: deschide meniul principal
• CH-: canalul/opțiunea anterioară
• CH+: canalul/opțiunea următoare
• VOL-: reducere volum
• VOL+: creștere volum
• POWER: porniți sau opriți televizorul
INSTALAREA BATERIILOR
1. Deschideți compartimentul bateriei glisându-l în lateral.
2. Introduceți bateriile noi, conform polarității.
3. Închideți compartimentul pentru baterii.
20
cm
20
cm
20
cm
20
cm
INPUT
CH+
VOL+
MENU
CH-
VOL-
POWER

28 29
RO RO
TELECOMANDĂ
1. Power: porniți sau
opriți televizorul.
2. Mute: dezactivează
sunetele
3. Taste numerice
4. TV/RADIO: comutați
între televiziune și
radio
5. Canalul anterior
6. Vol -/+: reglați nivelul
volumului
7. Setări imagine
8. Setări de sunet
9. CH: schimbă canalele
10. Source: deschideți
meniul sursă de
intrare
11. Disp: informații privind
imaginea și sunetul
12. TXT: deschide
Teletext
13. Menu: deschide
meniul de pe ecran
14. Exit: ieșiți din meniu
15. Butoane săgeți: mutați
în cadrul meniului
16. OK: conrmați intrările
17. Mix: lista de canale
18. Cancel: reveniți la
meniul anterior
19. Color buttons: funcții
suplimentare
20. Control de redare
21. SIZE: reglați
dimensiunea imaginii
22. Î n r e g i s t r e a z ă
programul
Intrare AV
Intrare antenă DVB-T2/C
Port USB
Intrare HDMI
Ieșire jack pentru căști
Intrare COAXIAL
MUFE
1
4
6
7
11
13
17 18
20
10
14
16
9
2
3
5
8
12
15
19
21 22

30 31
RO RO
Romania
Reciclarea corecta a acestui produs
(reziduuri provenind din aparatura electrica si electronica)
Marcajale de pe acest produs sau mentionate in instructiunile sale de folosire indica faptul
ca produsul nu trebuie aruncat impreuna cu alte reziduuri din gospod arie atunci cand nu mai
este in stare de functionare. Pentru a preveni posibile efecte daunatoare asupra mediului
inconjurator sau a san ata tii oamenilor datorate evacuarii necontrolate a reziduurilor, vă
rugăm să separați acest produs de alte tipuri de reziduuri si să-l reciclati in mod responsabil
pentru a promova refolosirea resurselor materiale. Utilizatorii casnici sunt rugati să ia
legatura fie cu distribuitorul de la care au achizitionat acest produs, fie cu autoritatile locale,
pentru a primi informatii cu privire la locul si modul in care pot depozita acest produs in
vederea reciclarii sale ecologice. Utilizatorii institutionali sunt rugati să ia legatura cu
furnizorul și să verifice condițiile stipulate in contractul de vanzare. Acest produs nu trebuie
amestecat cu alte reziduuri de natura comerciala.
Distribuit de Lechpol Electronic SRL, Republicii nr. 5, Resita, CS, ROMANIA.

www.rebelelectro.com
-
 1
1
-
 2
2
-
 3
3
-
 4
4
-
 5
5
-
 6
6
-
 7
7
-
 8
8
-
 9
9
-
 10
10
-
 11
11
-
 12
12
-
 13
13
-
 14
14
-
 15
15
-
 16
16
-
 17
17


Cabletech URZ0339 Instrukcja obsługi
- Kategoria
- Ochronniki przeciwprzepięciowe
- Typ
- Instrukcja obsługi
w innych językach
- Deutsch: Cabletech URZ0339 Bedienungsanleitung
- English: Cabletech URZ0339 Owner's manual
- română: Cabletech URZ0339 Manualul proprietarului
Powiązane artykuły
Inne dokumenty
-
Kruger Matz KM0232-T4 Instrukcja obsługi
-
Kruger Matz FHD Smart TV Instrukcja obsługi
-
Kruger Matz KM0232-S6 Instrukcja obsługi
-
Rebel LEC-16437 Instrukcja obsługi
-
 Kruger&Matz KM0224 Instrukcja obsługi
-
 Kruger&Matz KM0815 Instrukcja obsługi
-
Rebel LUT0085 Instrukcja obsługi
-
 Kruger&Matz EAGLE KM0975 Instrukcja obsługi
-
Kruger & Matz MOVE 10 black Instrukcja obsługi
-
Rebel URZ1226-3 Instrukcja obsługi


