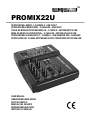
HQ Power PROMIX22U Instrukcja obsługi
- Kategoria
- Miksery audio
- Typ
- Instrukcja obsługi

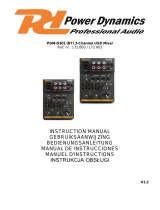
PROMIX22U
PROFESSIONAL MIXER - 5 CHANNELS - USB IN/OUT
PROFESSIONELE MENGTAFEL - 5 KANALEN - USB-IN/UIT
TABLE DE MIXAGE PROFESSIONNELLE - 5 CANAUX - ENTRÉE/SORTE USB
MESA DE MEZCLAS PROFESIONAL - 5 CANALES - ENTRADA/SALIDA USB
PROFESSIONELLES MISCHPULT - 5 KANÄLE - USB-EINGANG UND –AUSGANG
PROFESJONALNY 5 KANAŁOWY MIKSER AUDIO Z WEJŚCIEM I WYJŚCIEM USB
USER MANUAL
GEBRUIKERSHANDLEIDING
NOTICE D’EMPLOI
MANUAL DEL USUARIO
BEDIENUNGSANLEITUNG
INSTRUKCJA OBSŁUGI

PROMIX22U_v3 HQPOWER
2
PROMIX22U – PROFESSIONAL MIXER - 5 CHANNELS - USB IN/OUT
1. Introduction
To all residents of the European Union
Important environmental information about this product
This symbol on the device or the package indicates that disposal of the device after its lifecycle could harm
the environment.
Do not dispose of the unit (or batteries) as unsorted municipal waste; it should be taken to a specialized
company for recycling.
This device should be returned to your distributor or to a local recycling service.
Respect the local environmental rules.
If in doubt, contact your local waste disposal authorities.
Thank you for choosing HQPOWER! Please read the manual thoroughly before bringing this device into service. If the
device was damaged in transit, don't install or use it and contact your dealer.
2. Safety Instructions
• Damage caused by disregard of certain guidelines in this manual is not covered by the warranty and the dealer
will not accept responsibility for any ensuing defects or problems.
• A qualified technician should install and service this device.
• Do not switch the device on immediately after it has been exposed to changes in temperature. Protect the device
against damage by leaving it switched off until it has reached room temperature.
• Do not expose the device to liquids and make sure not to place any object containing liquid on top of the device.
• Note that damage caused by user modifications to the device is not covered by the warranty.
• Keep the device away from children and unauthorised users.
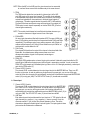
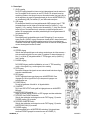
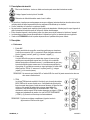
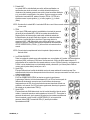
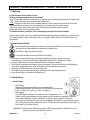
3. Description
a. Mono Input
1. MIC Input
Each mono input channel offers a balanced microphone input via the XLR
connector. The XLR jack is configured for pin 1 (ground), pin 2 (positive (+))
and pin 3 (negative (-)).
2. LINE Input
The LINE input is designed to accept balanced or unbalanced line level
signals such as those from keyboards, drum machines or samplers. There is
enough gain available on the line input to accept even lower level signals such
as those from an unbalanced microphone or guitar output. If a balanced signal
is to be connected to the line input, then a ¼” TRS (stereo) phone plug should
be wired for the tip (positive (+)), the ring (negative (-)) and the sleeve
(ground).
Be very careful during the installation: touching live wires can cause life-threatening electroshocks.
Keep this device away from rain and moisture.
Unplug the mains lead before opening the housing.

PROMIX22U_v3 HQPOWER
3
NOTE: Either the MIC or the LINE input of a given channel can be connected
at one time. Never connect both simultaneously to the same channel.
3. TRIM
The TRIM control adjusts the input sensitivity (channel gain) of the MIC
and LINE inputs on the mono input channels. This control can be adjusted
to accommodate input signals from a wide variety of sources, from the high
outputs from keyboards or drum machines to the small signal outputs of
microphones. This wide range eliminates the need for MIC / LINE switching.
The best S/N balance and dynamic range will be achieved if you adjust the
TRIM control on each channel separately so that the PEAK LED (6) for that
channel lights occasionally.
NOTE: This control should always be turned fully anticlockwise whenever you
connect or disconnect a signal source to one of the inputs.
4. EQUALIZER
All mono input channels are fitted with three-band EQ. The upper (HIGH) and
lower (LOW) shelving controls have their frequencies fixed at 12kHz and 80Hz
respectively. The midrange control has a peaking response, with Q fixed at 2
octaves and the frequency at 2.5kHz. All three bands have up to 15dB of cut
and boost with a centre detent for “off”.
5. PAN Control
The channel PAN positions the output of the channel in the stereo field of the
Master Mix. Its constant-power design ensures there are no level
discrepancies whether a signal is hard-panned, centre-stage or
somewhere in-between.
6. PEAK LED
The PEAK LED illuminates when a channel is going into overload. It detects the peak level after the EQ
and will light at 3dB before clipping to warn that the signal is approaching overload. You do not want the
PEAK LED to light except very intermittently during a take or a mix. If it does light persistently, reduce input
gain with the TRIM control (3).
7. Channel LEVEL Controls
The channel LEVEL controls determine the output signal level to the MASTER MIX bus. There is no PFL
function on the mixer. In order to audition any single channel for proper gain, you can turn off the gain
control of all the other channels (fully anticlockwise) and set both the auditioned channel and MASTER MIX
control (16) to unity gain (0dB). The LED OUTPUT meter (15) should read around 0dB.
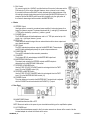
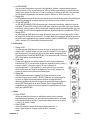
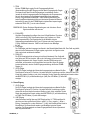
b. Stereo Input
7. Channel LEVEL Controls
The channel LEVEL controls determine the output signal level to the MASTER MIX
bus. There is no PFL function on the mixer. In order to audition any single channel
for proper gain, you can turn off the gain control of all the other channels (fully
anticlockwise) and set both the auditioned channel and MASTER MIX control (16) to
unity gain (0dB). The LED OUTPUT meter (15) should read around 0dB.
8. LINE Input
Each stereo channel has two balanced line level inputs on ¼” TRS jacks for left and
right channels (tip = positive (+), ring = negative (-), sleeve = ground). If only the
connector marked “L” (left) is used, the channel operates in mono. The stereo
channels are designed to handle typical line level signals. The input signals to these
jacks can be either balanced or unbalanced.

PROMIX22U_v3 HQPOWER
4
9. BAL Control
For a mono input to the L (MONO) input the function of the control is the same as the
PAN controls (5) of the mono channels. However, when a channel is run in stereo,
this control functions as a BALANCE control, determining the relative balance of the
left and right channel signals being sent to the left and right MASTER MIX buses. For
example, with the BALANCE control turned fully clockwise, only the right portion of
the channel’s stereo signal will be routed to the MASTER MIX.
c. Master
10. STEREO Output
Use these jacks to connect to an external power amplifier if extra output power for a
larger PA system is required. The stereo outputs are left (L) and right (R) unbalanced
¼” TRS jacks, wired as tip = positive (+), sleeve = ground.
11. PHONES Output
The PHONES output will feed headphones and is a ¼” TRS jack, wired as tip = left
signal, ring = right signal, sleeve = ground.
12. TAPE Input
These jacks will accept the signal from an external device with a stereo output such
as a cassette recorder.
13. REC Output
The REC outputs also provide an output of the MASTER MIX. These outputs
are RCA jacks and designed primarily for inputs to tape recorders etc.
14. POWER ON LED
The red LED indicates that the console is powered on.
15. VU METER
The 4-stage LED VU meter displays the MASTER MIX output level.
16. MASTER MIX GAIN Control
The output level routed to the STEREO outputs and REC outputs is
determined by the MASTER MIX GAIN control.
17. TAPE/REC to PHONES Switch
Use the TAPE / ECHO TO PHONES switch to route signals from the TAPE
input (12) to the PHONES control (19).
18. TAPE/REC to MASTER Switch
Use the TAPE / ECHO TO MASTER switch to route signals from the TAPE
input (12) to the MASTER MIX GAIN control (16).
19. PHONES Control
The mixer allows you to monitor the MASTER MIX. The signal level is adjusted
with the PHONES control and routed to the PHONES (11) output.
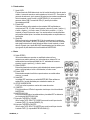
d. Rear Panel
20. MAIN POWER Switch
This switches the mixer ON or OFF.
NOTE: Be sure to switch on the power to your mixer before switching on the amplification system.
21. AC POWER Input
Connect the enclosed power supply to the 3-pin mains connector on the rear of the console. Use the
included adapter to connect the console to the mains.

PROMIX22U_v3 HQPOWER
5
e. USB
22. USB Connection
The USB connection can be used for playing MP3 or other audio files from a computer or for recording your
performance to a computer. The signal is sent to channels 4/5/USB.
NOTE: Be sure to turn channels 4/5/USB all the way down before connecting/disconnecting the USB cable.
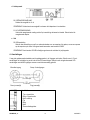
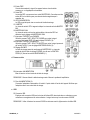
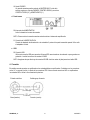
4. Connections
Unbalanced equipment may be connected to balanced inputs/outputs. Either use mono ¼” jacks or connect the ring
and sleeve of TRS jacks. Never use unbalanced XLR connectors on the MIC input connectors when using a
phantom power supply.
Headphones
1. Tip = left signal
2. Ring = right signal
3. Sleeve = ground
4. Tip
5. Ring
6. Sleeve
7. Strain relief clamp
Unbalanced use of mono ¼” plugs
1. Tip = signal
2. Sleeve = ground
3. Tip
4. Sleeve
5. Strain relief clamp
Balanced use of stereo ¼” plugs
1. Tip = hot (+)
2. Ring = cold (-)
3. Sleeve = ground
4. Tip
5. Ring
6. Sleeve
7. Strain relief clamp
Microphone input Group & mix outputs
Socket (female) Plug (male)

PROMIX22U_v3 HQPOWER
6
5. Technical Specifications
INPUT
Input Connector Input Impedance Nominal Level Max. Level
MIC MONO XLR > 1.3k Ω + 2dBm + 14dBm
LINE MONO ¼” TRS > 10k Ω + 4dBm + 22dBm
LINE STEREO ¼” TRS > 10k Ω + 4dBm + 22dBm
TAPE IN RCA > 10k Ω + 2dBm + 22dBm
OUTPUT
Output Connector Input Impedance Nominal Level Max. Level
STEREO OUT L/R ¼” TRS 120Ω + 4~6dBm + 22dBm
REC OUT RCA 1k Ω + 4~6dBm + 22dBm
PHONES ¼” TRS 100Ω - 40mW * 2
FREQUENCY RESPONSE
Any Input to Any Output 20Hz~20kHz
TOTAL HARMONIC DISTORTION
Any Input to Any Output 0.02%, 20Hz~20kHz @ 1kHz, 0dBm
INPUT CHANNEL EQUALIZATION
High Shelving 10kHz, +/- 15dB, Q fixed at 2 oct.
Low Shelving 100kHz, +/- 15dB, Q fixed at 2 oct.
GAIN CONTROL RANGE
Input Channel Trim Control stop to stop, MIC + 10dB~+60dB, LINE +10dB~+40dB
Channel/Master Faders -∞ to +15dB
CROSSTALK @ 1kHz
Adjacent Channel Inputs -78dB~-68dB
Input to Output -78dB~-68dB
HUM AND NOISE
20Hz~20kHz, Rs = 150Ω, input TRIM @ 0dB, input sensitivity @ -60dB
Equivalent Input Noise -129dBm
Residual Output Noise < 90dBm
USB
A/D & D/A 16-bit ∆ Σ
Playback Distortion < 0.05%
S/N 80dB
Recording Distortion < 0.1%
Interface USB1.1 or USB2.0 w/ full-duplex operation
(playback and recording)
VU METERS
4-segment LED x 2
POWER SUPPLY
18VAC/300mA

PROMIX22U_v3 HQPOWER
7
POWER CONSUMPTION
11W
DIMENSIONS AND WEIGHT
212 x 179 x 52mm, 1.6kg
Use this device with original accessories only. Velleman nv cannot be held responsible in the event of
damage or injury resulted from (incorrect) use of this device.
For more info concerning this product, please visit our website www.hqpower.com.
The information in this manual is subject to change without prior notice.
PROMIX22U – PROFESSIONELE MENGTAFEL - 5 KANALEN - USB-IN/UIT
1. Inleiding
Aan alle ingezetenen van de Europese Unie
Belangrijke milieu-informatie betreffende dit product
Dit symbool op het toestel of de verpakking geeft aan dat, als het na zijn levenscyclus wordt weggeworpen,
dit toestel schade kan toebrengen aan het milieu.
Gooi dit toestel (en eventuele batterijen) niet bij het gewone huishoudelijke afval; het moet bij een
gespecialiseerd bedrijf terechtkomen voor recyclage.
U moet dit toestel naar uw verdeler of naar een lokaal recyclagepunt brengen.
Respecteer de plaatselijke milieuwetgeving.
Hebt u vragen, contacteer dan de plaatselijke autoriteiten inzake verwijdering.
Dank u voor uw aankoop! Lees deze handleiding grondig voor u het toestel in gebruik neemt. Werd het toestel
beschadigd tijdens het transport, installeer het dan niet en raadpleeg uw dealer.
2. Veiligheidsinstructies
• De garantie geldt niet voor schade door het negeren van bepaalde richtlijnen in deze handleiding en uw dealer zal
de verantwoordelijkheid afwijzen voor defecten of problemen die hier rechtstreeks verband mee houden.
• Laat dit toestel installeren en onderhouden door een geschoolde technicus.
• Om beschadiging te vermijden, zet u het toestel best niet aan onmiddellijk nadat het werd blootgesteld aan
temperatuurschommelingen. Wacht tot het toestel op kamertemperatuur gekomen is.
• Houd het toestel uit de buurt van vloeistoffen en plaats geen drank op het mengpaneel.
• Schade door wijzigingen die de gebruiker heeft aangebracht aan het toestel vallen niet onder de garantie.
• Houd dit toestel uit de buurt van kinderen en onbevoegden.
Wees voorzichtig bij de installatie: raak geen kabels aan die onder stroom staan om dodelijke elektroshocks
te vermijden.
Bescherm dit toestel tegen regen en vochtigheid.
Verzeker u ervan dat het toestel niet aangesloten is op een stroombron alvorens het te openen.

PROMIX22U_v3 HQPOWER
8
3. Omschrijving
a. Mono-ingang
1. MIC-ingang
Elk mono ingangskanaal bestaat uit een gebalanceerde microfooningang
via de XLR-aansluiting. De XLR-aansluiting is geconfigureerd voor pin 1
(aarding), pin 2 (positief (+)) en pin 3 (negatief (-)).
2. LINE-ingang
De LINE-ingang is ontworpen om gebalanceerde en niet-gebalanceerde line-
signalen te ontvangen zoals die van een keyboard, drumcomputer of sampler.
Er is voldoende versterking aanwezig op de line-ingang om zelfs zwakkere
signalen zoals die van een ongebalanceerde microfoon of een gitaarsignaal te
ontvangen. Wenst u een gebalanceerd signaal aan de line-ingang te sluiten,
bedraad een ¼” TRS-plug (stereo) als volgt: tip (positief (+)), de ring (negatief
(-)) en de huls (aarding).
OPMERKING: U kunt of de MIC-ingang of de LINE-ingang aansluiten. Sluit nooit beide tegelijkertijd op
eenzelfde kanaal.
3. TRIM
Met de TRIM-regeling regelt u de ingangsgevoeligheid (kanaalversterking)
van de MIC-ingang en de LINE-ingang van de mono ingangskanalen.
Regel deze knop zodat u het ingangssignaal van verscheidene bronnen
kunt ontvangen, van de sterke uitgangssignalen ven een keyboard of
drumcomputer tot de zwakke signalen van een microfoon. Het grote bereik
maakt MIC / LINE-schakeling overbodig. De beste S/R-verhouding en
dynamisch bereik verkrijgt u wanneer u de TRIM-regeling op elk kanaal
afzonderlijk regelt zodanig dat de PEAK LED (7) maar af en toe oplicht.
OPMERKING: Draai deze regelknop volledig naar links voordat u een signaal
aansluit of ontkoppelt.
4. EQUALIZER
Alle mono ingangskanalen beschikken over een driebands equalizer. De
bovenste (HIGH) en onderste (LOW) potmeters hebben een frequentie van
12kHz respectievelijk 80Hz. De regelknop voor de middentonen heeft een
piekrespons met een Q van 2 octaven en een frequentie van 2.5kHz. Alle drie
banden hebben tot 15dB versterking of verzwakking met een centernok voor
‘off’.
5. PAN-regeling
De PAN-regeling plaatst de uitgang van een kanaal in het stereobeeld van de
mix. Het toestel zorgt ervoor dat er zich geen discrepanties in het niveau
voorkomen, of een signaal nu langs een kant, centraal of ergens tussenin
staat
6. PEAK-led
De PEAK-aanduiding licht op wanneer een kanaal overstuurt. Het toestel neemt een piek waar na de EQ,
licht op 3dB voor de vervorming en waarschuwt u wanneer het signaal wordt overstuurd. Zorg dat de
PEAK-aanduiding niet oplicht uitgenomen af en toe tijdens een mix. Licht de aanduiding op een constante
basis, verminder de ingangsversterking door middel van de TRIM-regeling (3).
7. LEVEL-regeling
De LEVEL-regeling bepaalt het niveau van het uitgangssignaal naar de master mix bus. De mengtafel is
niet voorzien van een PFL-functie. Om elk apart kanaal op versterking te testen, draai de gain-knop van
alle andere kanalen toe (naar links) en stel de regelknop van zowel het gewenste kanaal als die van de
MASTER MIX (16) op nulversterking (0dB). De ledmeter (15) zou 0dB moeten aanwijzen.

PROMIX22U_v3 HQPOWER
9
b. Stereo Input
7. LEVEL-regeling
De LEVEL-regeling bepaalt het niveau van het uitgangssignaal naar de master mix
bus. De mengtafel is niet voorzien van een PFL-functie. Om elk apart kanaal op
versterking te testen, draai de gain-knop van alle andere kanalen toe (naar links) en
stel de regelknop van zowel het gewenste kanaal als die van de MASTER MIX (16)
op nulversterking (0dB). De ledmeter (15) zou 0dB moeten aanwijzen.
8. LINE-ingang
Elk stereokanaal beschikt over twee gebalanceerde LINE-ingangen langs ¼” TRS
jackaansluitingen voor het linkse en het rechtse kanaal (tip = positief (+), ring =
negatief (-), huls = aarding). Gebruikt u enkel de aansluiting ‘L’ (links), dan werkt het
kanaal in mono. De stereokanalen zijn ontworpen om typische signalen aan te
pakken. De ingangssignalen naar deze jackaansluitingen kunnen gebalanceerd of
niet-gebalanceerd zijn.
9. BAL-regeling
Deze regeling werkt op dezelfde manier als de PAN-regeling (5) voor een mono-
ingang naar de L (MONO) ingang. Wanneer een kanaal echter in stereo functioneert,
dan werkt deze knop als een balansregeling tussen het linker- en rechterkanaal.
Voorbeeld: Draai de BAL-regeling volledig naar rechts om enkel het rechtse gedeelte
van een stereosignaal hoorbaar te maken.
c. Master
10. STEREO-uitgang
Gebruik deze jackaansluitingen om de externe versterker aan te sluiten wanneer u
extra vermogen nodig hebt voor een groter PA-systeem. De stereo uitgangen zijn
links (L) en rechts (R) niet-gebalanceerde ¼” TRS-pluggen, met tip = positief (+),
huls = aarding.
11. PHONES-uitgang
De PHONES-uitgang voedt de hoofdtelefoon en is een ¼” TRS-aansluiting,
met tip = links signaal, ring = rechts signaal, huls = aarding.
12. TAPE-ingang
Deze jacks ontvangen het signaal van een externe toestel met stereo uitgang
zoals een cassetterecorder.
13. REC-uitgang
De REC-uitgangen leveren een uitgang voor de MASTER MIX. Deze
uitgangen zijn van het type RCA en zijn ontworpen als ingangen voor
bandrecorders enz.
14. POWER ON-led
De rode led geeft weer of de tafel in- of uitgeschakeld is.
15. VU-METER
De 4-traps LED OUTPUT-meter geeft het uitgangsniveau van de MASTER
MIX weer.
16. MASTER MIX GAIN-regeling
Regel het signaal naar de STEREO- en REC-ingangen met deze schakelaar.
17. TAPE/REC naar PHONES schakelaar
Gebruik deze schakelaar om de signalen van de TAPE-ingang (12) naar de
PHONES-regeling (19) te zenden.
18. TAPE/REC to MASTER Switch
Gebruik deze schakelaar om de signalen van de TAPE-ingang (12) naar de
MASTER MIX GAIN (16) te zenden.
19. PHONES-regeling
Met de mengtafel kunt u de MASTER MIX controleren. Het signaalniveau
wordt met PHONES geregeld en verzonden naar de PHONES (11).

PROMIX22U_v3 HQPOWER
10
d. Achterpaneel
20. VOEDINGSSCHAKELAAR
Schakel de mengtafel in- of uit.
OPMERKING: Schakel eerst uw mengtafel in alvorens de luidsprekers in te schakelen.
21. AC-VOEDINGSINGANG
Verbind de meegeleverde voeding met de 3-pin aansluiting achteraan het toestel. Gebruik enkel de
meegeleverde adapter
e. Usb
22. USB-aansluiting
Gebruik deze aansluiting om mp3- en andere bestanden van uw computer af te spelen, en om een opname
op de computer op te slaan. Het signaal wordt verzonden naar kanalen 4/5/USB.
OPMERKING: Draai kanalen 4/5/USB volledig terug alvorens de usb-kabel te (ont)koppelen.
4. Aansluitingen
U mag niet-gebalanceerde toestellen met de gebalanceerde in- of uitgangen verbinden. Gebruik mono 1/4” jack-
aansluitingen of verbind de ring en de huls van de TRS-aansluitingen. Gebruik nooit niet-gebalanceerde XLR-
aansluitingen met de MIC-ingangen wanneer u een fantoomvoeding gebruikt.
Hoofdtelefoon
1. Tip = signaal links
2. Ring = signaal rechts
3. Huls = aarding
4. Tip
5. Ring
6. Huls
7. Snoerontlastingsklem
Microfooningang Groep- & mixuitgangen
Doos (vrouwelijk) Plug (mannelijk)

PROMIX22U_v3 HQPOWER
11
Niet-gebalanceerde mono ¼” pluggen
1. Tip = signaal
2. Huls = aarding
3. Tip
4. Huls
5. Snoerontlastingsklem
Gebalanceerde stereo ¼” pluggen
1. Tip = hot (+)
2. Ring = cold (-)
3. Huls = aarding
4. Tip
5. Ring
6. Huls
7. Snoerontlastingsklem
5. Technische specificaties
INGANG
Ingang Aansluiting Ingangsimpedantie Nominaal niveau Max. niveau
MIC MONO XLR > 1.3k Ω + 2dBm + 14dBm
LINE MONO ¼” TRS > 10k Ω + 4dBm + 22dBm
LINE STEREO ¼” TRS > 10k Ω + 4dBm + 22dBm
TAPE IN RCA > 10k Ω + 2dBm + 22dBm
UITGANG
Uitgang Aansluiting Ingangsimpedantie Nominaal niveau Max. niveau
STEREO OUT L/R ¼” TRS 120Ω + 4~6dBm + 22dBm
REC OUT RCA 1k Ω + 4~6dBm + 22dBm
PHONES ¼” TRS 100Ω - 40mW * 2
FREQUENTIERESPONS
Ingang naar uitgang 20Hz~20kHz
TOTALE HARMONISCHE OVERSTURING
Ingang naar uitgang 0.02%, 20Hz~20kHz @ 1kHz, 0dBm
EQUALIZER INGANGSKANAAL
High 10kHz, +/- 15dB, Q vast op 2 octaven
Low 100kHz, +/- 15dB, Q vast op 2 octaven
VERSTERKINGSBEREIK
Trim-regeling ingangskanaal stop tot stop, MIC + 10dB~+60dB, LINE +10dB~+40dB
Kanaal/master-faders -∞ to +15dB

PROMIX22U_v3 HQPOWER
12
CROSSTALK @ 1kHz
Aangrenzende kanaalingangen -78dB~-68dB
Ingang naar uitgang -78dB~-68dB
BROM EN RUIS
20Hz~20kHz, Rs = 150Ω, input TRIM @ 0dB, ingangsgevoeligheid @ -60dB
Equivalente ingangsruis -129dBm
Uitgangsruis < 90dBm
USB
A/D & D/A 16-bit ∆ Σ
Afspelen Oversturing < 0.05%
S/N 80dB
Opname Oversturing < 0.1%
Interface USB1.1 of USB2.0 met fullduplexbediening
(Afspelen en opnemen)
VU-METERS
4-segment led x 2
VOEDING
18VAC/300mA
VERBRUIK
11W
AFMETINGEN EN GEWICHT
212 x 179 x 52mm, 1.6kg
Gebruik dit toestel enkel met originele accessoires. Velleman nv is niet aansprakelijk voor schade of
kwetsuren bij (verkeerd) gebruik van dit toestel.
Voor meer informatie omtrent dit product, zie www.hqpower.com.
De informatie in deze handleiding kan te allen tijde worden gewijzigd zonder voorafgaande kennisgeving.
PROMIX22U – TABLE DE MIXAGE PROFESSIONNELLE - 5 CANAUX - ENTRÉE/SORTE USB
1. Introduction
Aux résidents de l'Union européenne
Des informations environnementales importantes concernant ce produit
Ce symbole sur l'appareil ou l'emballage indique que l’élimination d’un appareil en fin de vie peut polluer
l'environnement.
Ne pas jeter un appareil électrique ou électronique (et des piles éventuelles) parmi les déchets municipaux
non sujets au tri sélectif ; une déchèterie traitera l’appareil en question.
Renvoyer les équipements usagés à votre fournisseur ou à un service de recyclage local.
Il convient de respecter la réglementation locale relative à la protection de l’environnement.
En cas de questions, contacter les autorités locales pour élimination.
Nous vous remercions de votre achat ! Lire la présente notice attentivement avant la mise en service de l’appareil. Si
l’appareil a été endommagé pendant le transport, ne pas l’installer et consulter votre revendeur.

PROMIX22U_v3 HQPOWER
13
2. Prescriptions de sécurité
• La garantie ne s’applique pas aux dommages survenus en négligeant certaines directives de cette notice et votre
revendeur déclinera toute responsabilité pour les problèmes et les défauts qui en résultent.
• Confier l’installation et l’entretien à un personnel qualifié.
• Ne pas brancher l’appareil après exposition à des variations de température. Attendre jusqu’à ce que l’appareil ait
atteint la température ambiante avant de l’utiliser afin d’éviter des dommages.
• Éviter d’exposer l’appareil à des liquides et veillez à ne placer aucun objet contenant un liquide sur l’appareil.
• Les dommages occasionnés par des modifications à l'appareil par le client, ne tombent pas sous la garantie.
• Garder votre PROMIX22U hors de la portée de personnes non qualifiées et de jeunes enfants.
3. Description
a. Entrée mono
1. Entrée MIC
Chaque canal d’entrée mono offre une entrée symétrique pour microphone
à partir d’une connexion XLR. La connexion XLR est configurée comme suit :
broche 1 (masse), broche 2 (positif (+)) et broche 3 (négatif (-)).
2. Entrée LINE
L’entrée LINE a été conçue pour accepter des signaux à niveau en ligne
symétriques ou asymétriques comme ceux d’un clavier, d’un module de
batterie électronique ou d’échantillonneurs. Il y a suffisamment de gain pour y
brancher de faibles signaux comme ceux d’un microphone asymétrique ou
d’une guitare. Si vous désirez connecter un signal symétrique à l’entrée LINE,
câblez une fiche TRS de ¼” comme suit : la pointe (positif (+)), la bague
(négatif (-)) et le manche (masse).
REMARQUE : Ne connecter que l’entrée MIC ou l’entrée LINE d’un canal. Ne jamais connecter les deux aux
deux canaux simultanément.
3. TRIM
Le réglage TRIM ajuste la sensibilité à l’entrée (le gain du canal) des entrées
MIC et LINE sur les canaux d’entrée mono. Il est possible de régler de telle
façon à accepter des signaux d’entrée de sources diverses, du signal fort d’un
clavier ou d’un module de batterie électronique au signal faible d’un
microphone. Cette étendue élimine la commutation MIC / LINE. Vous
obtiendrez le meilleur rapport S/B et étendue dynamique en réglant le TRIM de
chaque canal séparément de manière à ce que la LED DE SURCHARGE
(« PEAK ») (6) du canal ne s’illumine que occasionnellement.
REMARQUE : Positionnez ce réglage complètement à gauche lors de la
(dé)connexion d’une source de signal.
Être lors de l'installation : toucher un câble sous tension peut causer des électrochocs mortels.
Protéger l’appareil contre la pluie et l’humidité.
Débrancher le câble d'alimentation avant d’ouvrir le boîtier.

PROMIX22U_v3 HQPOWER
14
4. Les ÉGALISEURS
Tous les canaux d’entrée mono sont munis d’une égalisation 3 bandes. Les potentiomètres supérieur
(HIGH) et inférieur (LOW) on tune fréquence de 12kHz et de 80Hz respectivement. Le potentiomètre des
moyens a une réponse en crête, avec un Q fixé à 2 octaves et une fréquence de 2.5kHz. Les trois bandes
ont une intensité d’augmentation et de diminution jusqu’à 15dB avec un déclic central pour « off ».
5. Réglage PAN
Le PAN positionne le signal de sortie du canal dans le champ stéréo du mixage général. Ses spécifications
éliminent les décalages de niveau de volume, qu’il soit situé sur un côté, au centre ou entre-deux.
6. LED de SURCHARGE
La LED de SURCHARGE (PEAK) s’illumine dès que le canal atteint la surcharge. Il détecte le niveau de
crête après l’EQ et la LED s’illumine à partir de 3dB avant la saturation pour avertir que le signal approche
la surcharge. Veillez à ce que la LED ne s’illumine pas excepté de manière intermittente pendant une prise
ou le mixage. Si la LED s’illumine régulièrement, diminuez le gain d’entrée avec le potentiomètre TRIM (3).
7. Réglage LEVEL
Le potentiomètre du GAIN détermine le niveau du signal de sortie vers le bus de mixage maître. La table
de mixage n’est pas munie de la fonction PFL. Pour régler le gain de chaque canal, tournez le gain de tous
les autres canaux complètement vers la gauche et placez le canal et le MASTER MIX (16) à gain unitaire
(0dB). L’échelle à LED (15) doit afficher aux alentours de 0dB.
b. Entrée stéréo
7. Réglage LEVEL
Le potentiomètre du GAIN détermine le niveau du signal de sortie vers le bus de
mixage maître. La table de mixage n’est pas munie de la fonction PFL. Pour régler le
gain de chaque canal, tournez le gain de tous les autres canaux complètement vers
la gauche et placez le canal et le MASTER MIX (16) à gain unitaire (0dB). L’échelle à
LED (15) doit afficher aux alentours de 0dB.
8. Entrée LINE
Chaque canal stéréo est muni de deux entrées à niveau en ligne symétriques en
forme de prise TRS ¼” pour les canaux de gauche et de droite (la pointe = positif (+),
la bague = négatif (-), le manche = masse). Si vous n’utilisez que la
connexion marquée « L » (left ou gauche), le canal opère en mono. Les canaux
stéréo ont été conçus pour accepter des signaux à niveau en ligne typiques. Les
signaux d’entrée sont soit symétriques soit asymétriques.
9. Réglage BAL
Cette fonction est identique aux réglages PAN (6) des canaux mono si vous
connecter un signal mono à l’entrée L (MONO). Cependant, si un canal fonctionne
en stéréo, ce réglage fonctionne de manière identique au réglage BALANCE,
déterminant la balance relative entre les signaux de gauche et de droite routés vers
les bus MASTER de gauche et de droite. Exemple : avec le réglage BALANCE
complètement vers la droite vous routerez uniquement la partie de droite d’un signal
stéréo vers le MASTER MIX.
c. Master
10. Sortie STEREO
Utilisez ces sorties pour y brancher un amplificateur externe si de la puissance
supplémentaire est nécessaire, p.ex. pour alimenter un système de sono de façade.
Les sorties stéréo sont des sorties ¼” asymétriques, câblées comme suit : la pointe
= positif (+), la manche = masse.
11. Sortie PHONES
Cette sortie alimente le casque d’écoute et est câblée comme suit : la
pointe = signal de gauche, la bague = signal de droite, la manche =
masse.

PROMIX22U_v3 HQPOWER
15
12. Entrée TAPE
Ces entrées acceptent le signal d’un appareil externe à sortie stéréo
comme p.ex. un magnétophone à cassettes.
13. Sortie REC
Les sorties REC vous procurent une sortie MASTER MIX. Ces sorties sont des
sorties RCA et ont été conçues pour des entrées de magnétoscope à
cassettes, etc.
14. LED D’ALIMENTATION
La LED rouge indique la mise en marche de la table de mixage.
15. VUMÈTRE
Le niveau de sortie à LED 4 segments indique le niveau de sortie du MASTER
MIX.
16. MASTER MIX GAIN
Le niveau de sortie routé vers les sorties stéréo et les sorties REC est
déterminé par le réglage du MASTER MIX GAIN.
17. Interrupteur TAPE/REC vers PHONES
Utilisez le poussoir TAPE / ECHO TO PHONES pour router le signal
provenant de l’entrée TAPE (12) vers le réglage PHONES (19).
18. Interrupteur TAPE/REC vers MASTER
Utilisez le poussoir TAPE / ECHO TO MASTER pour router le signal provenant
de l’entrée TAPE (12) vers le réglage MASTER MIX GAIN (16).
19. Réglage PHONES
La table de mixage permet le monitorage du MASTER MIX. Le niveau de
signal est réglé à l’aide du réglage PHONES et routé vers le CONTROL
ROOM (16) comme les sorties HEADPHONES (11).
d. Panneau arrière
20. Interrupteur d’ALIMENTATION
Mise en tension ou hors tension de la table de mixage.
REMARQUE : Allumer d’abord la table de mixage avant d’allumer le système d’amplification.
21. Prise d’ALIMENTATION CA
Connectez l’adaptateur d’alimentation à l’entrée à 3 points située à l’arrière de l’appareil. N’utilisez que
l’adaptateur fourni avec votre table de mixage.
e. USB
22. Connexion USB
Employer cette connexion USB pour la lecture de fichiers MP3 mémorisés dans un ordinateur ou pour
mémoriser un enregistrement sur votre ordinateur. Le signal est envoyé vers les canaux 4/5/USB.
REMARQUE : Veiller à diminuer les canaux 4/5/USB au minimum avant la (dé)connexion du câble USB.

PROMIX22U_v3 HQPOWER
16
4. Raccordement
Il est possible de brancher des appareils asymétriques aux entrées/sorties symétriques. Connectez-les à l’aide de
fiches mono 1/4” ou connectez la bague et le manche des fiches TRS. Ne branchez jamais des connecteurs XLR
asymétriques aux entrées MIC si vous utilisez une alimentation fantôme.
Casque d’écoute
1. Pointe = signal de gauche
2. Bague = signal de droite
3. Manche = masse
4. Pointe
5. Bague
6. Manche
7. Étrier de retenue de câble
Fiches mono ¼” asymétriques
1. Pointe = signal
2. Manche = masse
3. Pointe
4. Manche
5. Étrier de retenue de câble
Fiche stéréo ¼” symétriques
1. Pointe = point chaud (+)
2. Bague = point froid (-)
3. Manche = masse
4. Pointe
5. Bague
6. Manche
7. Étrier de retenue de câble
Entrée microphone Sorties groupe & mix
Embase (femelle) Fiche (mâle)

PROMIX22U_v3 HQPOWER
17
5. Spécifications techniques
ENTRÉE
Entrée Connexion Impédance entrée Niveau nominal Niveau max.
MIC MONO XLR > 1.3k Ω + 2dBm + 14dBm
LINE MONO ¼” TRS > 10k Ω + 4dBm + 22dBm
LINE STEREO ¼” TRS > 10k Ω + 4dBm + 22dBm
TAPE IN RCA > 10k Ω + 2dBm + 22dBm
SORTIE
Sortie Connexion Impédance entrée Niveau nominal Niveau max.
STEREO OUT L/R ¼” TRS 120Ω + 4~6dBm + 22dBm
REC OUT RCA 1k Ω + 4~6dBm + 22dBm
PHONES ¼” TRS 100Ω - 40mW * 2
RÉPONSE EN FRÉQUENCE
Entrée vers sortie 20Hz~20kHz
DISTORSION HARMONIQUE TOTALE
Entrée vers sortie 0.02%, 20Hz~20kHz @ 1kHz, 0dBm
ÉGALISATION DU CANAL D’ENTRÉE
High 10kHz, +/- 15dB, Q fixé à 2 octaves
Low 100kHz, +/- 15dB, Q fixé à 2 octaves
GAMME DU NIVEAU DE GAIN
Réglage TRIM du canal d’entrée stop à stop, MIC + 10dB~+60dB, LINE +10dB~+40dB
Glissières canal/master -∞ to +15dB
CROSSTALK @ 1kHz
Entrées des canaux -78dB~-68dB
Entrée vers sortie -78dB~-68dB
RONFLEMENT ET PARASITES
20Hz~20kHz, Rs = 150Ω, input TRIM @ 0dB, sensibilité à l’entrée @ -60dB
Parasites à l’entrée -129dBm
Parasites à la sortie < 90dBm
USB
A/D & D/A 16-bit ∆ Σ
Lecture Distorsion < 0.05%
S/B 80dB
Enregistrement Distorsion < 0.1%
Interface USB1.1 or USB2.0 avec full-duplex
(lecture et enregistrement)
VUMÈTRES
LED, 4 segments x 2
ALIMENTATION
18VCA/300mA

PROMIX22U_v3 HQPOWER
18
CONSOMMATION
11W
DIMENSIONS ET POIDS
212 x 179 x 52mm, 1.6kg
N’employer cet appareil qu’avec des accessoires d’origine. SA Velleman ne sera aucunement responsable
de dommages ou lésions survenus à un usage (incorrect) de cet appareil.
Pour plus d’information concernant cet article, visitez notre site web www.hqpower.com.
Toutes les informations présentées dans cette notice peuvent être modifiées sans notification préalable.
PROMIX22U – MESA DE MEZCLAS PROFESIONAL - 5 CANALES - ENTRADA/SALIDA USB
1. Introducción
A los ciudadanos de la Unión Europea
Importantes informaciones sobre el medio ambiente concerniente este producto
Este símbolo en este aparato o el embalaje indica que, si tira las muestras inservibles, podrían dañar el
medio ambiente.
No tire este aparato (ni las pilas eventuales) en la basura doméstica; debe ir a una empresa especializada
en reciclaje. Devuelva este aparato a su distribuidor o a la unidad de reciclaje local.
Respete las leyes locales en relación con el medio ambiente.
Si tiene dudas, contacte con las autoridades locales para eliminación.
Gracias por haber comprado la PROMIX22U! Lea atentamente las instrucciones del manual antes de usarla. Si el
aparato ha sufrido algún daño en el transporte no lo instale y póngase en contacto con su distribuidor.
2. Instrucciones de seguridad
• Daños causados por descuido de las instrucciones de seguridad de este manual invalidarán su garantía y su
distribuidor no será responsable de ningún daño u otros problemas resultantes.
• La instalación y el mantenimiento deben ser realizados por personal especializado.
• No conecte el aparato si ha estado expuesto a grandes cambios de temperatura. Espere hasta que el aparato
llegue a la temperatura ambiente.
• No exponga el aparato a líquidos y asegúrese de que no ponga bebidas encima del aparato.
• Los daños causados por modificaciones no autorizadas, no están cubiertos por la garantía.
• Mantenga la PROMIX22U lejos del alcance de personas no capacitadas y niños.
3. Descripción
a. Entrada mono
1. Entrada MIC
Cada canal de entrada mono ofrece una entrada equilibrada para micrófono por una conexión XLR. La
conexión XLR se ajusta de la siguiente manera: polo 1 (masa), polo 2 (positivo (+)) y polo 3 (negativo (-)).
Cuidado durante la instalación: puede sufrir una peligrosa descarga eléctrica al tocar los cables con un
voltaje peligroso.
No exponga este equipo a lluvia ni humedad.
Desconecte el cable de alimentación de la red antes de abrir la caja.

PROMIX22U_v3 HQPOWER
19
2. Entrada LINE
La entrada LINE ha sido diseñada para recibir señales equilibradas o no
equilibradas como las de un teclado, un módulo de batería electrónico o
muestrarios. Hay bastante ganancia para recibir incluso las señales débiles de
p.ej. un micrófono no equilibrado o una guitarra. Si quiere conectar una señal
equilibrada a la entrada LINE, cablee un conector TRS de 1/4" TRS de la
siguiente manera: la punta (positiva (+)), el anillo (negativo (-)) y la funda
(masa).
NOTA: Conecte sólo la entrada MIC o la entrada LINE de un canal. Nunca conecte ambas simultáneamente al
mismo canal.
3. TRIM
Con el ajuste TRIM puede regular la sensibilidad en la entrada (la ganancia
del canal) de las entradas MIC y LINE de los canales de entrada mono.
Regula el botón de tal manera que pueda recibir señales de entrada de
fuentes diferentes, de la señal fuerte de un teclado o un módulo de batería
electrónico a la señal débil de un micrófono. El gran rango elimina la
conmutación MIC / LINE. Obtendrá la mejor relación señal/ruido y el rango
dinámico al ajustar el TRIM de cada canal por separado de tal manera que el
LED DE SOBRECARGA (« PEAK ») (7) del canal sólo se ilumina de vez en
cuando.
NOTA: Gire este ajuste completamente hacia la izquierda al (des)conectar una
fuente de señal.
4. Los ECUALIZADORES
Todos los canales de entrada mono están equipados con un ecualizador de 3 bandas. Los potenciómetros
superiores (HIGH) e inferiores (LOW) tienen una frecuencia de 12kHz y de 80Hz respectivamente. El
potenciómetro de los medios tiene una repuesta máxima, con una Q fija de 2 octavos y una frecuencia de
2.5KHz. Las tres bandas tienen una intensidad de subida y disminución (cut & boost) hasta 15dB con
muesca central (centre detent) central para « off ».
5. Ajuste PAN
El ajuste PAN posiciona la señal de salida del canal en el campo estéreo de la mezcla general. Sus
especificaciones eliminan las discrepancias de nivel de volumen, sea que se encuentre en el lado, sea en
el medio o entre los dos.
6. LED de SOBRECARGA
El LED de SOBRECARGA (PEAK) se ilumina en cuanto el canal alcance
la sobrecarga. Detecta el nivel de cresta después EQ y el LED se ilumina a partir de
3dB antes de la saturación para avisar que la señal alcanza la sobrecarga.
Asegúrese de que el LED no se ilumina salvo de manera intermitente durante una
grabación o una mezcla. Si el LED se ilumina regularmente, disminuya la ganancia
de entrada con el potenciómetro TRIM (3).
7. Ajuste LEVEL
El potenciómetro de GAIN determina el nivel de la señal de salida al bus de mezcla
maestro. La mesa de mezclas no está equipada con la función PFL. Para ajustar la
ganancia de cada canal, gire la ganancia de todos los otros canales completamente
hacia la izquierda y ponga el canal y el MASTER MIX (16) en la posición de
ganancia unitaria (0dB). La escala de LEDs (15) tendrá que visualizar
aproximadamente 0dB.

PROMIX22U_v3 HQPOWER
20
b. Entrada estéreo
7. Ajuste LEVEL
El potenciómetro de GAIN determina el nivel de la señal de salida al bus de mezcla
maestro. La mesa de mezclas no está equipada con la función PFL. Para ajustar la
ganancia de cada canal, gire la ganancia de todos los otros canales completamente
hacia la izquierda y ponga el canal y el MASTER MIX (16) en la posición de
ganancia unitaria (0dB). La escala de LEDs (15) tendrá que visualizar
aproximadamente 0dB.
8. Entrada LINE
Cada canal estéreo está equipado con dos entradas LINE equilibradas por
conexiones jack TRS 1/4” para el canal izquierdo y derecho (la punta = positiva (+),
el anillo = negativo (-), la funda = masa). Si utiliza sólo la conexión « L » (left o
izquierda), el canal funcionará en mono. Los canales estéreo han sido diseñados
para aceptar señales típicas. Las señales de entrada pueden ser equilibradas o no
equilibradas
9. Ajuste BAL
Esta función equivale a los ajustes PAN (6) de los canales mono si conecta una
señal mono a la entrada L (MONO). Sin embargo, si un canal funciona en estéreo,
este ajuste funcionará como ajuste de balance entre el canal izquierdo y el canal
derecho. Ejemplo: gire el ajuste BALANCE completamente hacia la derecha para
que oiga sólo la parte derecha de la señal estéreo al MASTER MIX.
c. Master
10. Salida STEREO
Utilice estas salidas para conectar un amplificador externo si fuera
necesaria una potencia adicional, p.ej. para alimentar un sistema PA. Las
salidas estéreo son salidas equilibradas de 1/4”, cableadas de la manera
siguiente: la punta = positiva (+), la funda = masa.
11. Salida PHONES
Esta salida alimenta los auriculares y está cableada de la manera siguiente: la
punta = señal izquierda, el anillo = señal derecha, la funda = masa.
12. Entrada TAPE
Estas entradas aceptan la señal de un aparato externo con salida estéreo
como p.ej. un casete.
13. Salida REC
Las salidas REC suministran una salida MASTER MIX. Estas salidas son
salidas RCA y han sido diseñadas para entradas de casetes, etc.
14. LED DE ALIMENTACIÓN
El LED rojo indica la puesta en marcha de la mesa de mezclas.
15. VÚMETRO
El nivel de salida con LEDs de 4 segmentos visualiza que el nivel de salida del
MASTER MIX.
16. MASTER MIX GAIN
El nivel de salida enviado a las salidas estéreo y las salidas REC se determina
por el ajuste del MASTER MIX GAIN.
17. Interruptor TAPE/REC a PHONES
Utilice la tecla TAPE / ECHO TO PHONES para enviar la señal que viene de
la entrada TAPE (12) al ajuste PHONES (19).
18. Interruptor TAPE/REC a MASTER
Utilice la tecla TAPE / ECHO TO MASTER para enviar la señal que viene de
la entrada TAPE (12) al ajuste MASTER MIX GAIN (16).
Strona się ładuje...
Strona się ładuje...
Strona się ładuje...
Strona się ładuje...
Strona się ładuje...
Strona się ładuje...
Strona się ładuje...
Strona się ładuje...
Strona się ładuje...
Strona się ładuje...
Strona się ładuje...
Strona się ładuje...
Strona się ładuje...
Strona się ładuje...
Strona się ładuje...
Strona się ładuje...
-
 1
1
-
 2
2
-
 3
3
-
 4
4
-
 5
5
-
 6
6
-
 7
7
-
 8
8
-
 9
9
-
 10
10
-
 11
11
-
 12
12
-
 13
13
-
 14
14
-
 15
15
-
 16
16
-
 17
17
-
 18
18
-
 19
19
-
 20
20
-
 21
21
-
 22
22
-
 23
23
-
 24
24
-
 25
25
-
 26
26
-
 27
27
-
 28
28
-
 29
29
-
 30
30
-
 31
31
-
 32
32
-
 33
33
-
 34
34
-
 35
35
-
 36
36


HQ Power PROMIX22U Instrukcja obsługi
- Kategoria
- Miksery audio
- Typ
- Instrukcja obsługi
w innych językach
- español: HQ Power PROMIX22U Manual de usuario
- Deutsch: HQ Power PROMIX22U Benutzerhandbuch
- français: HQ Power PROMIX22U Manuel utilisateur
- English: HQ Power PROMIX22U User manual
- Nederlands: HQ Power PROMIX22U Handleiding
Inne dokumenty
-
DeLOCK 84626 Karta katalogowa
-
-
IMG STAGELINE bee Instrukcja obsługi
-
 Power Dynamics PDM-D301BT Instrukcja obsługi
-
Velleman HQMX11010 Instrukcja obsługi
-
HQ-Power HQMX11009 Instrukcja obsługi
-
Power Dynamics PDM-M604A Instrukcja obsługi
-
 Power Dynamics PDZM700 Instrukcja obsługi
-
Behringer SX2442FX Skrócona instrukcja obsługi
-
Yamaha MX4 Instrukcja obsługi

