Tescoma 909060 Instrukcja obsługi
- Kategoria
- Blendery
- Typ
- Instrukcja obsługi
Niniejsza instrukcja jest również odpowiednia dla

Instructions for use / Návod k použití / Istruzioni per l’uso / Instrucciones de uso
Instruções de utilização / Gebrauchsanleitung / Mode d‘emploi
Instrukcja użytkowania / Návod na použitie / Használati útmutató
Инструкция по использованию / Інструкція для користувача

1 3 4
6 7
max. 5 s
8 9
10 11 12 13 14
1.
45 °C
2.
2
5
Stand mixer
Kuchyňský robot
Impastatrice planetaria
Robot multifunción
Robô de cozinha
Küchenmaschine
Robot multifonctions
Robot kuchenny
Kuchynský robot
Konyhai robot
Кухонный комбайн
Кухонна машина Art.: 909060

15 16 17 18 19
20 21 22 23 24
25 26 27 28 29
max.

Stand mixer PRESIDENT
Kuchyňský robot PRESIDENT
Impastatrice planetaria PRESIDENT
Robot multifunción PRESIDENT
Robô de cozinha PRESIDENT
Küchenmaschine PRESIDENT
Robot multifonctions PRESIDENT
Robot kuchenny PRESIDENT
Kuchynský robot PRESIDENT
PRESIDENT Konyhai robot
Кухонный комбайн PRESIDENT
Кухонна машина PRESIDENT
Art.: 909060

a Instructions for use 4
s Návod k použití 10
g Istruzioni per l‘uso 16
h Instrucciones de uso 22
j Instruções de utilização 28
d Gebrauchsanleitung 34
f Mode d‘emploi 40
k Instrukcja użytkowania 46
l Návod na použitie 52
o Használati útmutató 58
p Инструкция по использованию 64
u Інструкція для користувача 70

4
a Instructions for use
Safety instructions
Before use, please read these instructions carefully, and operate the machine strictly according to the Instructions for use. The user
is liable for any damage to the machine or personal injury caused by using the machine at variance with the instructions in the
manual.
When using an electrical appliance, always keep in mind basic precautions including the following:
Do not immerse the power cord of the appliance in water or any other liquid.
Close supervision is necessary when the appliance is used by or near children. Unplug the appliance from the grid when not using
it, changing accessories or before cleaning.
If the original power cord is damaged, for safety reasons it must be replaced by the manufacturer or its service agent or a similar
qualifi ed person.
The use of accessories not recommended or sold by the manufacturer may result in fi re, electric shock or personal injury.
Do not use the machine outdoors.
Do not let the cord hang over the edge of a table or counter.
Keep hands and utensils away from moving parts and blades or disks while processing food to reduce the risk of severe personal
injury or damage to the appliance.
The blades are sharp; protect your hands against injury.
To reduce the risk of injury, never set the blades aside onto the machine. Never push food using your hands, always use a tamper.
Switch off the machine before replacing accessories or handling parts that move in use.
This appliance is not intended for use by persons (including children) with reduced physical, sensory or mental capabilities, or lack
of experience and knowledge, unless they have been given supervision or instruction concerning use of the appliance by a person
responsible for their safety.
Children should be supervised by an adult when using the machine in order to ensure that they do not play with it.
The machine meets the applicable safety standards. The power cord may be repaired or replaced only by authorised service centres;
contact details are available at www.tescoma.com. Incorrectly or inexpertly performed repairs cannot be claimed.
Technical parameters
Voltage: AC 220–240 V
Power input: 1,500 W
Frequency: 50–60 Hz
Power cord length: 120 cm
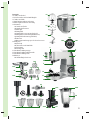
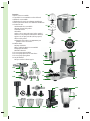
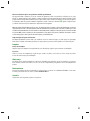
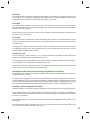
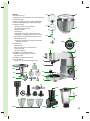
Legend
Body of the machine
1. Unfolding top of the machine
2. Cover of the meat mincer and grater connecting piece
3. Meat mincer and grater connecting piece
4. Cover of the blender connecting piece
5. Blender connecting piece with safety lock
6. Fixture for stainless steel bowl lid
7. Flat beater, whisk and hook connecting piece
8. Base of the machine
9. Lever for unfolding/folding the top of the machine
10. Control knob
10a Pulse mode
10b Switched off position
10c Positions 1 and 6 for setting speed and switching the machine on
11. Area for fastening the stainless steel bowl
12. Power cord with plug
13. Suction knobs
1
1

5
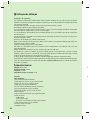
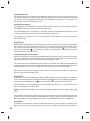
Accessories
14. Stainless steel bowl 6 l
15. Lid of the stainless steel bowl with fi lling hole
16. Stainless steel whisk
17. Metal fl at beater with non-stick coating
18. Metal dough hook with non-stick coating
19. Meat mincer
19a Stainless steel feeder
19b Metal body of the mincer
19c Metal auger
19d Cutting blade
19e Cutting disk for coarse mincing (large holes)
19f Cutting disk for normal mincing (medium holes)
19g Cutting disk for fi ne mincing (small holes)
19h Mincer nut
19i Mincer tamper with storage space for selected accessories
20. Drum grater
20a Grater body
20b Three stainless steel drum blades
20c Grater tamper
20d Arresting collar
21. Attachment for making sausages
22. Attachment for making stuff ed meat rolls
23. Attachment for making cookies
24. Blender jar
24a Lid with fi lling hole and cover
1
14
15
9
10
13
24
24a20c
20a
5
4
2
17
16
18
6
7
8
23
222119i
11
12
3
2020b 20d
10b
10c10a
19c
19g19f
19h
19d
19
19a
19b
19
f
19e

6
Before fi rst use
Unwrap the machine and remove transport packaging and fi lms. Wash the accessories under running water and dry. Wipe the body
of the machine with a moistened cloth and dry.
Important notices
Always use the machine with only one set of accessories attached.
When attaching and replacing accessories, always make sure that the machine has stopped entirely; the connecting pieces
continue to rotate for a short while after the machine has been switched off . Therefore, we recommend always unplugging the
machine from the grid when attaching or replacing accessories.
The machine will be automatically switched off after 15 minutes of continuous operation.
Do not leave the blender in operation for more than 2 minutes at a time.
Do not operate the machine in the pulse mode for more than 5 seconds at a time.
Placement of the machine
Place the body of the machine onto a cleaned fl at and smooth area near a 230 V power socket with enough free space for operation
and handling.
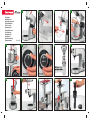
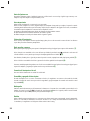
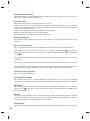
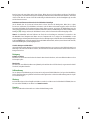
Whipping, mixing and kneading
Move the lever for unfolding the top of the machine downwards and unfold the top of the mixer (1).
Place the lid of the stainless steel bowl into the fi xture so that the symbol for releasing the lid is aligned with the mark on the
metal collar of the fi xture and attach the lid to the body of the machine by rotating it all the way to the tightening symbol (2).
Attach the whisk, fl at beater or dough hook to the connecting piece, push upwards and connect to the connecting piece by
rotating (3).
Place the stainless steel bowl onto the base and tighten the bowl in the base by rotating it counter-clockwise (4).
Put an appropriate amount of ingredients into the stainless steel bowl. Press down the lever for folding the top of the machine, fold
the top of the machine and make sure that the lever has returned to a horizontal position (5).
Connecting the machine to the grid
Connect the power cord with plug to 230 V grid.
Switching the machine on and off
Switch on the machine with properly attached accessories and ingredients inside by setting the control knob to the required speed.
Once the ingredients are processed, switch the machine off by setting the control knob to the OFF position (6).
Pulse mode
For a brief intense whipping or mixing of food in the stainless steel bowl or for blending it in the blender, set the control knob to
the position for a maximum of 5 seconds and release it again. The control knob will return to the OFF position and the pulse
mode will be discontinued (7).
Whisk
Use the whisk for preparing thin food such as whipped egg whites, whipped cream, butter creams, dressings, etc. For whipping,
we recommend setting the speed control to 5 or 6, the recommended usual whipping time is 5 to 10 minutes and the ingredients
in the bowl/jar should not exceed 200 to 1,000 g.
Flat beater
Use the fl at beater with non-stick coating for mixing and stirring food of medium thickness such as thin batters and salads. For
mixing, we recommend setting the speed control to 3 or 4; the recommended usual mixing time is 5 minutes and the ingredients
in the bowl should not exceed 200 to 1,000 g.

7
Dough hook
Use the dough hook with non-stick coating for kneading thick dough, meat mixtures, etc. For kneading, we recommend setting
the speed control to 3 or 4; the recommended usual kneading time is 5 to 10 minutes and the ingredients in the bowl should not
exceed 200 to 1,000 g.
After whipping, mixing or kneading, remove the whisk, fl at beater or dough hook and remove the bowl with food from the base.
Meat mincer
Assemble the meat mincer before attaching it to the machine. Put into the body of the mincer, in the following order, the auger,
cutting blade and the cutting disk. Screw the nut to the mincer thread and tighten it well (8).
Remove the cover of the mincer connecting piece (9) and attach the assembled mincer to the mincer connecting piece at an angle
of 45 degrees. Attach the mincer to the machine by rotating it 45 degrees counter-clockwise (10) and set the feeder on (11).
Mincing meat
Cut meat free of bones and tough parts (tendons etc.) into approx. 2 × 2 cm chops and place it into the feeder (12). Place
a container under the mincer to collect the minced meat.
Select the required mincing speed by setting the control knob and switch on the mincer; we recommend setting the speed control
to 3 to 6 for mincing meat.
Always use the tamper to fi ll the mincer as well as the mincer with attachments; never push food with your fi ngers or other
unauthorised tools (13).
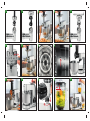
Attachment for making sausages and stuff ed meat rolls
Remove the attachment for making sausages or the attachment for making stuff ed meat rolls from the storage compartment in
the tamper of the mincer (14).
Connect the chosen attachment to the mincer before attaching it to the machine. Place the auger into the body of the mincer and
set on it the assembled attachment for making sausages (15) or the assembled attachment for making stuff ed meat rolls (16).
Screw the nut to the thread and tighten it well. Attach the assembled mincer with attachment to the machine in the same way as
the meat mincer and set the feeder on.
Making sausages and stuff ed meat rolls
Put the previously minced meat mixture for making sausages or stuff ed meat rolls into the feeder.
Select the speed required for preparing sausages or stuff ed meat rolls by setting the control knob and then switch on the machine;
for making sausages and meat rolls, we recommend setting the speed control to 5 (sausages) and 4 or 5 (meat rolls).
When making sausages, pull the casing onto the attachment (17) before you switch on the machine and proceed as usual.
When making stuff ed meat rolls, separate and collect approx. 8 cm long rolls (18). Stuff the rolls with the chosen meat mixture
before thermal treatment.
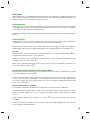
Attachment for making cookies
Connect the attachment for making cookies to the meat mincer before attaching it to the machine. Place the auger into the body
of the mincer and place on it the attachment for making cookies (19). Screw the nut to the mincer thread and tighten it well.
Attach the assembled mincer with the attachment for making cookies to the machine in the same way as the meat mincer and
set the feeder on.
Making cookies
Place the shaping bar into the attachment for making cookies and move it to select the desired shape of cookies (20). Put dough
for making cookies into the feeder.

8
Select the speed required for making cookies by setting the control knob and switch on the machine; we recommend setting the
speed control to 4 to 5 for making cookies.
Take out the cookies coming from the attachment and set them aside onto a prepared tray (21).
Drum grater
Assemble the grater before attaching it to the machine. Place the chosen stainless steel blade for coarse grating, fi ne grating
or slicing into the body of the grater and make sure that it is fi rmly attached to the protrusions inside the grater (22). Set the
arresting collar onto the grater so that the protrusion is aligned with the releasing symbol and arrest the collar by rotating it to
the tightening position (23). Attach the assembled drum grater to the machine in the same way as the meat mincer.
Grating and slicing food
The drum blade with large holes and the drum blade with small holes are intended for coarsely and fi nely grating vegetables, fruit,
nuts, chocolate, cheese, as well as for preparing bread crumbs (only the blade with small holes). The slicing blades are used for
evenly slicing fruit and vegetables.
Place a container under the end of the grater to collect the grated food (24). Select the speed required for grating or slicing and
switch on the machine; we recommend setting the speed control to 3 to 4 for grating and slicing. The maximum permitted period
of grating is 6 minutes at a time.
Always use the tamper to fi ll the grater; never push food with your fi ngers or other unauthorised tools (25).
Blender
Remove the cover of the blender connecting piece (26). Attach the blender jar to the connecting piece so that the mark in the
bottom part is aligned with the releasing symbol . Rotate the jar so that the arrow is aligned with the tightening symbol and
attach the blender jar to the body of the machine (27).
Remove the lid, pour at least 200 ml of liquid into the blender jar and fi ll the jar with ingredients cut into pieces no larger than
2 × 2 cm; do not exceed the 1,250 ml mark (28).
Notice: Never blend in the jar without liquid inside; the minimum amount of liquid is 200 ml.
Set the cap onto the jar. Select the required blending speed by setting the control knob and switch on the machine; we recommend
setting the speed control to 6 for blending. The maximum period of blending is 2 minutes at a time. Set the control knob to the
OFF position to stop blending.
Safety lock
The blender connecting piece has a safety lock activated by removing the cover of the blender connecting piece. If the blender jar
is not attached to the blender connecting piece while the cover is removed, the machine cannot be switched on. Do not remove
the cover of the blender connecting piece while whipping, mixing, kneading, making sausages and meat rolls, making cookies
and grating, otherwise the machine will stop. If the machine stops, set the cover of the connecting piece back on and switch the
machine on again by setting the control knob.
Pulse blending with gradually added ingredients
To prepare drinks or food with a high content of solid ingredients such as root vegetables, pumpkins, nuts, yogurt, ice cream, etc.,
use the pulse function with gradually added ingredients. After blending the liquid with a small amount of ingredients using the
pulse function, remove the closure of the fi lling hole from the lid of the jar by rotating counter-clockwise and add another small
amount of cut ingredients through the opening (29). Set the closure back on and continue running the pulse function with
gradually added ingredients.
Notice: Do not use the blender to chop ice and meat. Do not place into the blender jar any liquids and ingredients that have
a temperature exceeding 50 °C. Do not use the glass blender jar in a microwave oven. If the fruit or vegetables being blended are too
hard or cut into pieces that are too large, the blender will stop. Set the speed control to the OFF position and remove the pieces that are

9
too hard or too large from the blender jar, dispose of them or cut them into smaller pieces, place them back into the jar and continue
blending.
Quickly cleaning the blender jar
For quickly cleaning pulp residues etc. from the glass jar and the cutting blades, fi ll the jar with clean water up to the 1,250 ml mark
as a maximum, set the cap with closure on and repeatedly press and release the pulse function switch.
Cleaning
Body of the machine
Clean the body of the machine with a moistened cloth and dry. Do not wash under running water or in dishwasher.
Accessories
Wash the accessories of the machine under running water with detergent and dry. All the accessories except for the metal meat
mincer are dishwasher safe.
Storage
To save space, store the machine with the stainless steel bowl on. When not in use, store the attachments for making sausages and
stuff ed meat rolls and cutting disks in the storage compartment of the mincer tamper.
Maintenance
Do not repair a faulty product yourself; instead contact a TESCOMA retail centre or TESCOMA service centre; for contact details, go
to www.tescoma.com.
Warranty
A 3-year warranty period applies to this product.

10
s Návod k použití
Bezpečnostní pokyny
Před použitím si pečlivě pročtěte tyto pokyny a při používání přístroje postupujte důsledně podle pokynů v Návodu k použití.
V případě poškození přístroje nebo zranění osob v důsledku používání přístroje v rozporu s pokyny v příručce je odpovědnost na
straně uživatele.
Při používání elektrického spotřebiče je vždy nutné dodržovat základní bezpečnostní opatření, zejména:
Neponořujte přívodní kabel spotřebiče do vody ani jiných kapalin.
Dbejte na bezpečnost dětí, které používají spotřebič nebo se nacházejí v jeho blízkosti. Po používání, při výměně příslušenství nebo
před čištěním spotřebič odpojte od elektrické sítě.
Pokud je původní napájecí kabel poškozen, je z bezpečnostních důvodů nezbytné, aby výměnu provedl výrobce, jeho servis nebo
jiná způsobilá osoba.
Použití příslušenství, které není doporučeno nebo prodáváno výrobcem, může způsobit požár, úraz elektrickým proudem nebo
zranění.
Nepoužívejte přístroj ve venkovních prostorech.
Nenechávejte přívodní kabel viset přes okraj stolu nebo pultu.
Během zpracování potravin nepřibližujte ruce ani nářadí k pohybujícím se dílům a čepelím, hrozí vážné zranění osob nebo
poškození spotřebiče.
Čepele jsou ostré, chraňte ruce před zraněním.
Nikdy neodkládejte čepele na přístroj, nebezpečí úrazu. Nikdy nepěchujte potraviny rukama, vždy používejte pěchovadlo.
Před výměnou příslušenství nebo manipulací s částmi, které se při používání pohybují, přístroj vypněte.
Osoby (včetně dětí) se sníženými tělesnými, smyslovými nebo duševními schopnostmi nebo s nedostatkem zkušeností a znalostí
smějí tento spotřebič používat pouze v případě, že je zajištěn dohled nebo poučení týkající se používání tohoto spotřebiče ze strany
osoby odpovědné za jejich bezpečnost.
Děti při používání přístroje musí být pod dohledem dospělé osoby, nesmějí si s přístrojem hrát.
Přístroj splňuje příslušné bezpečnostní normy. Opravu nebo výměnu elektrického kabelu smějí provádět pouze pracovníci
autorizovaného servisu, kontakt na www.tescoma.cz. Chybně nebo neodborně provedené opravy nemohou být předmětem
reklamace.
Technické parametry
Napájení: AC 220–240 V
Příkon: 1 500 W
Frekvence: 50–60 Hz
Délka přívodního kabelu: 120 cm
Popis
Tělo přístroje
1. Výklopná horní část přístroje
2. Kryt konektoru mlýnku na maso a struhadla
3. Konektor mlýnku na maso a struhadla
4. Kryt konektoru mixéru
5. Konektor mixéru s bezpečnostní pojistkou
6. Úchyt pro víko nerezové mísy
7. Konektor mísicí metly, šlehací metly a háku
8. Základna přístroje
9. Páčka pro vyklopení/sklopení horní části přístroje
10. Otočný ovladač
10a Pulzní pohon
10b Poloha pro vypnutí
10c Polohy 1 a 6 pro nastavení rychlosti a spuštění přístroje
11. Prostor pro uchycení nerezové mísy
12. Přívodní kabel se zástrčkou
13. Přísavky
1
1

11
Příslušenství
14. Nerezová mísa 6 l
15. Víko nerezové mísy s plnicím otvorem
16. Nerezová šlehací metla
17. Kovová mísicí metla s antiadhezním povrchem
18. Kovový hnětací hák s antiadhezním povrchem
19. Mlýnek na maso
19a Nerezový plnicí zásobník
19b Kovové tělo mlýnku
19c Kovový šnek
19d Krájecí nůž
19e Krájecí disk pro hrubé mletí (velké otvory)
19f Krájecí disk pro běžné mletí (střední otvory)
19g Krájecí disk pro jemné mletí (malé otvory)
19h Matice mlýnku
19i Pěchovadlo mlýnku s úložným prostorem pro vybrané příslušenství
20. Bubnové struhadlo
20a Tělo struhadla
20b Tři bubnové nerezové čepele
20c Pěchovadlo struhadla
20d Aretační objímka
21. Nástavec pro výrobu klobás
22. Nástavec pro výrobu plněných masových rolek
23. Nástavec pro výrobu cukroví
24. Nádoba mixéru
24a Víko s plnicím otvorem a krytem
1
14
15
9
10
13
24
24a20c
20a
5
4
2
17
16
18
6
7
8
23
222119i
11
12
3
2020b 20d
10b
10c10a
19c
19g19f
19h
19d
19
19a
19b
19
f
19e

12
Před prvním použitím
Přístroj vybalte a odstraňte přepravní obaly a fólie. Příslušenství umyjte pod tekoucí vodou a osušte. Tělo přístroje otřete vlhkou
utěrkou a osušte.
Důležitá upozornění
Přístroj používejte vždy jen s jedním připojeným příslušenstvím.
Při nasazování a výměně příslušenství se vždy ujistěte, že je přístroj zcela zastavený, konektory se po vypnutí ještě krátkou chvíli
otáčí. Při každém nasazování nebo výměně příslušenství doporučujeme proto přístroj odpojit z elektrické sítě.
Spuštěný přístroj vypne automaticky po 15 minutách nepřetržitého chodu.
Mixér nechávejte nepřetržitě zapnutý nejdéle 2 minuty.
Funkci pulzního mixování nechávejte nepřetržitě zapnutou nejdéle 5 vteřin.
Umístění přístroje
Tělo přístroje postavte na vyčištěnou rovnou plochu s hladkým povrchem v blízkosti zásuvky elektrické sítě 230 V s dostatkem
volného prostoru pro obsluhu a manipulaci.
Šlehání, mísení a hnětení
Páčku pro vyklopení horní části přístroje posuňte dolů a horní část robota vyklopte (1).
Víko nerezové mísy vložte do úchytu tak, aby značka pro uvolnění víka lícovala s ryskou na kovové objímce úchytu a pootočením
na značku pro upevnění víko připojte k tělu přístroje (2).
Šlehací metlu, mísicí metlu nebo hnětací hák nasaďte na konektor, zatlačte nahoru a pootočením připojte ke konektoru (3).
Nerezovou mísu vložte do základny a pootočením mísy proti směru hodinových ručiček ji upevněte v základně (4).
Do nerezové mísy vložte odpovídající množství surovin. Páčku pro sklopení horní části přístroje stlačte dolů, horní část přístroje
sklopte a ujistěte se, že se páčka vrátila do vodorovné polohy (5).
Zapojení přístroje do sítě
Přívodní kabel se zástrčkou zapojte do sítě 230 V.
Spuštění a zastavení přístroje
Přístroj se správně připojeným příslušenstvím a vloženými surovinami spusťte nastavením ovladače na požadovanou rychlost.
Po ukončení přípravy pokrmu přístroj zastavte nastavením ovladače do polohy OFF (6).
Pulzní pohon
Pro krátké intenzivní prošlehání či promísení pokrmu v nerezové míse nebo pro jeho promixování v mixéru nastavte ovladač
na nejdéle 5 sekund do polohy a poté jej uvolněte. Ovladač se vrátí do polohy OFF a pulzní pohon se zastaví (7).
Šlehací metla
Šlehací metlu používejte k přípravě řídkých pokrmů, např. bílkového sněhu, šlehačky, máslových krémů, dresinků apod. Pro šlehání
doporučujeme nastavený ovladač rychlosti na stupeň 5 nebo 6, doporučený obvyklý čas šlehání je 5 až 10 minut a doporučené
plnění mísy 200 až 1 000 g.
Mísicí metla
Mísicí metlu s antiadhezním povrchem používejte pro mísení a promíchávání středně hustých pokrmů, např. řidších těst a salátů.
Pro mísení doporučujeme ovladač rychlosti nastavený na stupeň 3 nebo 4, doporučený obvyklý čas mísení je 5 minut a doporučené
plnění mísy 200 až 1 000 g.

13
Hnětací hák
Hnětací hák s antiadhezním povrchem používejte pro hnětení hustých těst, masových směsí apod. Pro hnětení doporučujeme
ovladač rychlosti nastavený na stupeň 3 nebo 4, doporučený obvyklý čas hnětení je 5 až 10 minut a doporučené plnění mísy
200 až 1 000 g.
Po ukončení šlehání, mísení nebo hnětení sejměte šlehací metlu, mísicí metlu nebo hnětací hák a mísu s pokrmem vyjměte
ze základny.
Mlýnek na maso
Mlýnek na maso sestavte před připojením k přístroji. Do těla mlýnku vložte postupně šneka, krájecí nůž a krájecí disk. Na závit
mlýnku našroubujte matici a pevně ji dotáhněte (8).
Sejměte kryt konektoru mlýnku (9) a sestavený mlýnek nasaďte pod úhlem 45 stupňů na konektor mlýnku. Pootočením
o 45 stupňů proti směru hodinových ručiček mlýnek připojte k přístroji (10) a nasaďte plnicí zásobník (11).
Mletí masa
Maso zbavené kostí a tuhých částí (šlach apod.) naporcujte na kostky o velikosti cca 2 × 2 cm a vložte je do plnicího zásobníku (12).
Pod mlýnek umístěte nádobu pro zachytávání umletého masa.
Nastavením ovladače zvolte požadovanou rychlost mletí a mlýnek spusťte, pro mletí masa doporučujeme ovladač rychlosti
nastavený na stupeň 3 až 6.
K plnění mlýnku i mlýnku s nástavci používejte vždy pěchovadlo, potraviny nikdy nepěchujte prsty ani jinými nepovolenými
pomůckami (13).
Nástavce pro výrobu klobás a plněných masových rolek
Nástavec pro výrobu klobás nebo nástavec pro výrobu plněných masových rolek vyjměte z úložného prostoru v pěchovadle
mlýnku (14).
Zvolený nástavec spojte s mlýnkem před připojením k přístroji. Do těla mlýnku vložte šneka a na něj nasaďte složený nástavec
pro výrobu klobás (15) nebo složený nástavec pro výrobu plněných masových rolek (16). Na závit našroubujte matici a pevně ji
dotáhněte. Sestavený mlýnek s nástavcem připojte k přístroji stejně jako mlýnek na maso a nasaďte plnicí zásobník.
Výroba klobás a plněných masových rolek
Předem umletou masovou směs pro výrobu klobás nebo plněných masových rolek vložte do plnicího zásobníku.
Nastavením ovladače zvolte požadovanou rychlost potřebnou k přípravě klobás nebo plněných masových rolek a přístroj spusťte,
pro výrobu klobás a masových rolek doporučujeme ovladač rychlosti nastavený na stupeň 5 (klobásy) a 4 nebo 5 (masové rolky).
Při výrobě klobás nasuňte před spuštěním přístroje na nástavec střívko (17) a dále postupujte obvyklým způsobem.
Při výrobě plněných masových rolek oddělujte a odebírejte rolky o délce cca 8 cm (18). Před tepelnou úpravou rolky naplňte
zvolenou směsí.
Nástavec pro výrobu cukroví
Nástavec pro výrobu cukroví spojte s mlýnkem na maso před připojením k přístroji. Do těla mlýnku vložte šneka a na něj umístěte
nástavec pro výrobu cukroví (19). Na závit mlýnku našroubujte matici a pevně ji dotáhněte. Sestavený mlýnek s nástavcem pro
výrobu cukroví připojte k přístroji stejně jako mlýnek na maso a nasaďte plnicí zásobník.
Výroba cukroví
Do nástavce pro výrobu cukroví vložte tvarovací lištu a jejím posunutím zvolte požadovaný tvar cukroví (20). Do zásobníku vložte
těsto pro přípravu cukroví.

14
Nastavením ovladače zvolte požadovanou rychlost k přípravě cukroví a přístroj spusťte, pro výrobu cukroví doporučujeme ovladač
rychlosti nastavený na stupeň 4 nebo 5.
Cukroví vycházející z nástavce odebírejte a odkládejte na připravený podnos (21).
Bubnové struhadlo
Struhadlo před připojením k přístroji sestavte. Do těla struhadla vložte zvolenou nerezovou čepel pro hrubé strouhání, jemné
strouhání nebo plátkování a ujistěte se, že je pevně přichycena do výstupků uvnitř struhadla (22). Na struhadlo nasaďte aretační
objímku tak, aby výstupek lícoval se značkou pro uvolnění a pootočením do polohy pro upevnění objímku aretujte (23).
Sestavené bubnové struhadlo připojte k přístroji stejně jako mlýnek na maso.
Strouhání a plátkování pokrmů
Bubnová čepel s velkými otvory a bubnová čepel s malými otvory jsou určené pro hrubé a jemné strouhání zeleniny, ovoce, ořechů,
čokolády, sýrů, případně pro výrobu strouhanky (pouze čepel s malými otvory). Plátkovací čepele slouží pro rovnoměrné plátkování
ovoce a zeleniny.
Pod konec struhadla umístěte nádobu pro zachytávání nastrouhaných potravin (24). Nastavením ovladače zvolte rychlost
potřebnou pro strouhání nebo plátkování a přístroj spusťte, pro strouhání a plátkování doporučujeme ovladač rychlosti nastavený
na stupeň 3 nebo 4. Maximální povolená doba nepřetržitého strouhání je 6 minut.
K plnění struhadla používejte vždy pěchovadlo, potraviny nikdy nepěchujte prsty ani jinými nepovolenými pomůckami (25).
Mixér
Sejměte kryt konektoru mixéru (26). Na konektor nasaďte nádobu mixéru tak, aby ryska v jeho spodní části lícovala se značkou pro
uvolnění . Nádobou otočte tak, aby šipka lícovala se značkou pro upevnění a mixovací nádobu připojte k tělu přístroje (27).
Sejměte víko, do mixovací nádoby nalijte nejméně 200 ml tekutiny a vložte nejvýše po rysku 1 250 ml suroviny naporcované
na velikost nejvýše 2 × 2 cm (28).
Upozornění: V nádobě nikdy nemixujte bez vložené tekutiny, minimální množství tekutiny je 200 ml.
Nádobu uzavřete víčkem. Nastavením ovladače zvolte požadovanou rychlost mixování a přístroj spusťte, pro mixování
doporučujeme ovladač rychlosti nastavený na stupeň 6. Maximální povolená doba nepřetržitého mixování je 2 minuty. Pro
ukončení mixování nastavte ovladač do polohy OFF.
Bezpečnostní pojistka
Konektor mixéru je vybavený bezpečnostní pojistkou, která se aktivuje sejmutím krytu konektoru mixéru. Pokud při sejmutém
krytu není na konektor mixéru připevněna nádoba mixéru, přístroj nelze spustit. Během šlehání, mísení, hnětení, výroby klobás
a masových rolek, výroby cukroví a během strouhání nesnímejte kryt konektoru mixéru, přístroj se zastaví. V takovém případě
nasaďte kryt konektoru zpět a nastavením otočného ovladače spuštění přístroje obnovte.
Pulzní mixování s postupným přidáváním surovin
K přípravě nápojů nebo pokrmů s vyšším podílem pevných částí, např. kořenové zeleniny, dýně, ořechů, jogurtu, zmrzliny apod.
používejte funkci pulzního pohonu s postupným přidáváním surovin. Po rozmixování tekutiny s menší dávkou surovin pulzním
pohonem sejměte pootočením proti směru hodinových ručiček z víka nádoby uzávěr plnicího otvoru, kterým doplňte další menší
část naporcovaných surovin (29). Uzávěr nasaďte zpět a pokračujte v pulzním mixování s postupným přidáváním surovin.
Upozornění: Mixér nepoužívejte k sekání ledu a masa. Do mixovací nádoby nevkládejte tekutiny a suroviny o teplotě vyšší než 50 °C.
Skleněnou mixovací nádobu nepoužívejte v mikrovlnné troubě. Pokud jsou mixované ovoce nebo zelenina příliš tvrdé nebo jejich porce
příliš velké, mixér se zastaví. Ovladač rychlosti nastavte do polohy OFF a příliš tvrdé nebo velké kusy vyjměte z mixovací nádoby,
odstraňte je nebo naporcujte na menší díly, vložte zpět a pokračujte v mixování.
Rychlé čištění mixovací nádoby
Pro rychlé vyčištění skleněné nádoby a mixovacích nožů od zbytků dužiny apod. naplňte nádobu nejvýše po rysku 1 250 ml čistou
vodou, nasaďte víčko s uzávěrem a opakovaně stiskněte a uvolněte spínač pulzního mixování.

15
Čištění
Tělo přístroje
Tělo přístroje čistěte vlhkou utěrkou a osušte, nemyjte pod tekoucí vodou ani v myčce.
Příslušenství
Příslušenství přístroje čistěte pod tekoucí vodou s přídavkem saponátu a osušte. Veškeré příslušenství s výjimkou kovového mlýnku
na maso je vhodné do myčky.
Skladování
Pro úsporu místa skladujte přístroj s nasazenou nerezovou mísou. Nástavce pro výrobu klobás a plněných masových rolek
a nepoužívaný krájecí disk mlýnku skladujte v úložném prostoru pěchovadla mlýnku.
Údržba
V případě poruchy výrobek sami neopravujte, obraťte se na Prodejní centrum TESCOMA nebo na Servisní středisko TESCOMA,
kontakty na www.tescoma.cz.
Záruka
Na tento výrobek je poskytována záruka 3 roky.

16
g Istruzioni per l’uso
Istruzioni di sicurezza
Prima dell’uso, raccomandiamo di leggere queste indicazioni con attenzione, e di utilizzare il prodotto attenendosi scrupolosamente
alle Istruzioni per l’uso. L’utilizzatore è da ritenersi responsabile per qualunque danno al prodotto e per le lesioni personali
provocate da un uso non conforme alle istruzioni in questo manuale.
Quando si utilizza un elettrodomestico, adottare sempre le precauzioni basilari, fra cui le seguenti:
Non immergere il cavo di alimentazione dell‘apparecchio in acqua o in altri liquidi.
L’utilizzo da parte di bambini o vicino ad essi richiede una attenta supervisione. Scollegare la spina dalla rete elettrica quando
l’apparecchio non è in uso, durante il cambio degli accessori o prima della pulizia.
Se il cavo di alimentazione è danneggiato, per ragioni di sicurezza deve essere sostituito dal produttore, da un centro servizi
autorizzato o da personale qualifi cato.
L’utilizzo di accessori non originali o non forniti dal produttore può provocare incendio, elettrocuzione o lesioni personali.
Non utilizzare l’apparecchio all’aperto.
Non lasciare il cavo di alimentazione a penzoloni dal piano di lavoro.
Non avvicinare le mani o utensili alle parti in movimento e alle lame o ai dischi durante la preparazione delle pietanze per ridurre
il rischio di gravi lesioni personali o di danni all’apparecchio.
Le lame sono molto affi late; si raccomanda di proteggere le mani.
Per ridurre il rischio di lesioni, non lasciare le lame staccate dall’apparecchio. Non caricare gli ingredienti con le mani, servirsi
sempre di un pestello.
Spegnere l’apparecchio prima di cambiare gli accessori o quando si maneggiano parti che durante l’uso sono in movimento.
Questo elettrodomestico non è destinato all‘uso da parte di persone (compresi i bambini) con ridotte capacità fi siche, sensoriali
o mentali, o prive di esperienza e formazione, a meno che non abbiano ricevuto supervisione o istruzioni relative all‘uso
dell‘apparecchio da parte di una persona responsabile della loro sicurezza.
L’uso da parte di bambini richiede la supervisione di un adulto. L’elettrodomestico non è un giocattolo.
L‘apparecchio è conforme agli standard di sicurezza applicabili. Il cavo di alimentazione può essere riparato o sostituito solo da
centri assistenza autorizzati; per i recapiti consultare il sito www.tescoma.it. Le riparazioni non autorizzate o eseguite in modo
non corretto non possono essere contestate.
Parametri tecnici
Voltaggio: AC 220–240 V
Potenza assorbita: 1 500 W
Frequenza: 50–60 Hz
Lunghezza del cavo di alimentazione: 120 cm
Legenda
Corpo dell’apparecchio
1. Parte superiore apribile dell’apparecchio
2. Coperchio dell’attacco per accessori tritacarne e grattugia
3. Attacco per accessori tritacarne e grattugia
4. Coperchio dell’attacco per accessorio frullatore
5. Attacco per accessorio frullatore con blocco di sicurezza
6. Attacco al coperchio della ciotola in acciaio inossidabile
7. Attacco frusta piatta, frusta a fi lo e gancio impastatore
8. Base dell’apparecchio
9. Leva per aprire/chiudere la parte superiore dell’apparecchio
10. Manopola di controllo
10a Modalità pulse
10b Posizione spenta
10c Posizioni 1 e 6 per regolare la velocità e accendere l’apparecchio
11. Area di fi ssaggio della ciotola in acciaio inox
12. Cavo di alimentazione con spina
13. Ventose
1
1

17
Accessori
14. Ciotola in acciaio inox 6 l
15. Coperchio della ciotola in acciaio inox con foro di riempimento
16. Frusta a fi lo in acciaio inossidabile
17. Frusta piatta in metallo con rivestimento antiaderente
18. Gancio impastatore in metallo con rivestimento antiaderente
19. Tritacarne in metallo
19a Caricatore in acciaio inox
19b Corpo in metallo del tritacarne
19c Coclea in metallo
19d Lama
19e Disco per macinatura grossa (fori grandi)
19f Disco per macinatura normale (fori medi)
19g Disco per macinatura fi ne (fori piccoli)
19h Ghiera del tritacarne
19i Pressino del tritacarne con spazio per riporre gli accessori
20. Grattugia a tamburo
20a Corpo della grattugia
20b Tre lame a tamburo in acciaio inox
20c Pressino della grattugia
20d Ghiera di fi ssaggio
21. Accessorio per salsicce
22. Accessorio per arrotolati di carne
23. Accessorio per biscotti
24. Boccale del frullatore
24a Coperchio con foro di riempimento e misurino
1
14
15
9
10
13
24
24a20c
20a
5
4
2
17
16
18
6
7
8
23
222119i
11
12
3
2020b 20d
10b
10c10a
19c
19g19f
19h
19d
19
19a
19b
19
f
19e

18
Prima del primo utilizzo
Scartare l’apparecchio e rimuovere l’imballo e le pellicole protettive. Lavare gli accessori sotto acqua corrente e asciugare. Passare
il corpo dell’impastatrice con un panno umido e asciugare.
Avvisi importanti
Utilizzare sempre l’impastatrice con un solo set di accessori applicato.
Quando si applicano e cambiano gli accessori, assicurarsi sempre che l’apparecchio si sia arrestato completamente; le parti di
collegamento continuano a girare brevemente dopo che l’apparecchio è stato spento. Quindi, raccomandiamo di scollegare sempre
la spina dalla rete di alimentazione per applicare o cambiare gli accessori.
L’apparecchio si spegne automaticamente dopo 15 minuti di funzionamento continuativo.
Non utilizzare la funzione frullatore per più di 2 minuti consecutivi.
Non utilizzare la funzione pulse per più di 5 secondi continuativi.
Posizionare l’apparecchio
Posizionare il corpo dell’impastatrice su una superfi cie piana, pulita e liscia in prossimità di una presa di corrente 230 V con spazio
circostante suffi ciente per mettere in funzione e maneggiare l’apparecchio.
Frullare, amalgamare e impastare
Abbassare la leva ed aprire la parte superiore dell’impastatrice (1).
Applicare il coperchio della ciotola in acciaio inox all’apparecchio in modo che il simbolo dello sblocco del coperchio sia
allineato al segno sull’anello in metallo dell’accessorio, e applicare il coperchio al corpo dell’impastatrice ruotandolo tutto verso il
simbolo (2).
Applicare la frusta a fi lo, la frusta piatta o il gancio impastatore al raccordo, spingere verso l’alto e collegare al raccordo ruotando
l’accessorio (3).
Posizionare la ciotola in acciaio inox sulla base e fi ssarla ruotandola in senso antiorario (4).
Inserire un’idonea quantità di ingredienti nella ciotola in acciaio inox. Abbassare la leva della parte superiore, chiuderla ed
assicurarsi che la leva sia ritornata in posizione orizzontale (5).
Collegare l’impastatrice alla rete elettrica
Collegare la spina alla rete elettrica 230 V.
Accendere e spegnere l’impastatrice
Accendere l’impastatrice, con un accessorio applicato correttamente e con gli ingredienti all’interno, impostando la manopola di
controllo alla velocità desiderata. Al termine della lavorazione degli ingredienti, spegnere l’impastatrice riportando la manopola
di controllo in posizione OFF (6).
Modalità pulse
Per frullare in modo rapido e intensivo gli ingredienti nella ciotola in acciaio inox o per amalgamarli nel frullatore, impostare la
manopola di controllo in posizione per un massimo di 5 secondi e rilasciarla. La manopola di controllo ritornerà in posizione
OFF e la modalità pulse verrà interrotta (7).
Frusta a fi lo
Utilizzare la frusta a fi lo per lavorare ingredienti fl uidi come panna montata, albumi d’uovo, creme al burro, salse, ecc. Per montare,
consigliamo una velocità di 5 o 6; il tempo di lavorazione per montare solitamente va da 5 a 10 minuti, con una quantità di
ingredienti all’interno della ciotola in acciaio inox compresa fra 200 e 1 000 g.
Frusta piatta
Utilizzare la frusta piatta con rivestimento antiaderente per amalgamare e mescolare ingredienti di media densità come pastelle
Strona się ładuje...
Strona się ładuje...
Strona się ładuje...
Strona się ładuje...
Strona się ładuje...
Strona się ładuje...
Strona się ładuje...
Strona się ładuje...
Strona się ładuje...
Strona się ładuje...
Strona się ładuje...
Strona się ładuje...
Strona się ładuje...
Strona się ładuje...
Strona się ładuje...
Strona się ładuje...
Strona się ładuje...
Strona się ładuje...
Strona się ładuje...
Strona się ładuje...
Strona się ładuje...
Strona się ładuje...
Strona się ładuje...
Strona się ładuje...
Strona się ładuje...
Strona się ładuje...
Strona się ładuje...
Strona się ładuje...
Strona się ładuje...
Strona się ładuje...
Strona się ładuje...
Strona się ładuje...
Strona się ładuje...
Strona się ładuje...
Strona się ładuje...
Strona się ładuje...
Strona się ładuje...
Strona się ładuje...
Strona się ładuje...
Strona się ładuje...
Strona się ładuje...
Strona się ładuje...
Strona się ładuje...
Strona się ładuje...
Strona się ładuje...
Strona się ładuje...
Strona się ładuje...
Strona się ładuje...
Strona się ładuje...
Strona się ładuje...
Strona się ładuje...
Strona się ładuje...
Strona się ładuje...
Strona się ładuje...
Strona się ładuje...
Strona się ładuje...
Strona się ładuje...
Strona się ładuje...
-
 1
1
-
 2
2
-
 3
3
-
 4
4
-
 5
5
-
 6
6
-
 7
7
-
 8
8
-
 9
9
-
 10
10
-
 11
11
-
 12
12
-
 13
13
-
 14
14
-
 15
15
-
 16
16
-
 17
17
-
 18
18
-
 19
19
-
 20
20
-
 21
21
-
 22
22
-
 23
23
-
 24
24
-
 25
25
-
 26
26
-
 27
27
-
 28
28
-
 29
29
-
 30
30
-
 31
31
-
 32
32
-
 33
33
-
 34
34
-
 35
35
-
 36
36
-
 37
37
-
 38
38
-
 39
39
-
 40
40
-
 41
41
-
 42
42
-
 43
43
-
 44
44
-
 45
45
-
 46
46
-
 47
47
-
 48
48
-
 49
49
-
 50
50
-
 51
51
-
 52
52
-
 53
53
-
 54
54
-
 55
55
-
 56
56
-
 57
57
-
 58
58
-
 59
59
-
 60
60
-
 61
61
-
 62
62
-
 63
63
-
 64
64
-
 65
65
-
 66
66
-
 67
67
-
 68
68
-
 69
69
-
 70
70
-
 71
71
-
 72
72
-
 73
73
-
 74
74
-
 75
75
-
 76
76
-
 77
77
-
 78
78


Tescoma 909060 Instrukcja obsługi
- Kategoria
- Blendery
- Typ
- Instrukcja obsługi
- Niniejsza instrukcja jest również odpowiednia dla
w innych językach
- čeština: Tescoma 909060 Uživatelský manuál
- español: Tescoma 909060 Manual de usuario
- italiano: Tescoma 909060 Manuale utente
- Deutsch: Tescoma 909060 Benutzerhandbuch
- slovenčina: Tescoma 909060 Používateľská príručka
- português: Tescoma 909060 Manual do usuário
- français: Tescoma 909060 Manuel utilisateur
- English: Tescoma 909060 User manual
- русский: Tescoma 909060 Руководство пользователя
Inne dokumenty
-
Zelmer ZKR1300W Instrukcja obsługi
-
-
eta GRATUS Instructions For Use Manual
-
eta Gustus Gulliver 1128 90010 Instrukcja obsługi
-
-
eta 0028 Instructions For Use Manual
-
-
-
-