
Mikrowagi i wagi analityczne
IMMB-15-03-08-23-EN-PL
Szybki start
Start Up Guide
Microbalances
and Analytical Balances
Microbalances:
Mikrowagi:
•XA 5Y.M.A
•XA 5Y.M.A.P
Analytical Balances:
Wagi analityczne
•XA 5Y.A

Aby wyświetlić pełną instrukcję obsługi, przejdź do strony internetowej lub zeskanuj kod QR:
To view the complete User Manual, go to the website or scan the QR code:
USER MANUAL
radwag.com/en/manuals/14352
VIDEO TUTORIAL
vimeo.com/827974665

*Rodzaj wtyczki może się różnić w zależności od kraju.
XA 5Y.M.A.P
XA 5Y.M.A
*The plug type may vary by country.
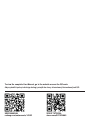
1. CONTENT
ZAWARTOŚĆ
Microbalance Weighing pan Weighing
pan shield Base Bottom ring Glass vessel Pipette calibra-
tion adapter
Mikrowaga Szalka Osłona szalki Podstawa Pierścień
dolny
Szklane
naczynko
Adapter do
kalibracji pipet
×1 ×1 ×1 ×1 ×1 ×1 x1
Microbalance Weighing pan Weighing pan
shield Power supply* Brush Fabric dust cover
Mikrowaga Szalka Osłona szalki Zasilacz sieciowy* Pędzelek Pokrowiec
×1 ×1 ×1 ×1 ×1 ×1
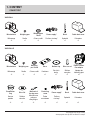
Evaporation
ring Glass lid Mechanical
closing cover
Protecting
screw Power supply* Brush Fabric dust cover
Kurtyna
parowa
Szklane
wieczko
Mechaniczna
pokrywa
domykająca
Śruba
montażowa
Zasilacz
sieciowy* Pędzelek Pokrowiec
×1 ×1 ×1 ×1 ×1 x1 x1

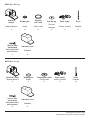
XA 5Y.A (d = 0.01 mg)
XA 5Y.A (d = 0.1 mg)
*Rodzaj wtyczki może się różnić w zależności od kraju.
*The plug type may vary by country.
Analytical
balance Weighing pan Weighing
pan shield Centring ring Power supply* Brush
Waga analityczna Szalka Osłona szalki Pierścień
centrujący Zasilacz sieciowy* Pędzelek
×1 ×1 ×1 ×1 ×1 x1
Analytical balance Weighing pan Weighing pan shield Power supply* Brush
Waga analityczna Szalka Osłona szalki Zasilacz sieciowy* Pędzelek
×1 ×1 ×1 ×1 x1
Hook for under
-pan weighing Fabric dust cover
Haczyk do ważenia
podszalkowego Pokrowiec
×1 x1
Hook for under
-pan weighing Fabric dust cover
Haczyk do ważenia
podszalkowego Pokrowiec
×1 x1

1 2
5 643
+10 oC
+50 oF
+104oF
+40 oC
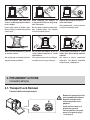
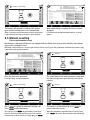
Urządzenie należy użytkować w pomieszczeniach niezapylonych o temperaturze
powietrza: 10 – 40 °C (50 – 104 °F) i optymalnej wilgotności względnej poniżej 80 %.
Ewentualne zmiany temperatury powinny następować stopniowo i bardzo powoli.
Waga powinna być ustawiona na stabilnym stole lub konsoli ściennej. Dla osiągnię-
cia najbardziej stabilnych i powtarzalnych wyników zaleca się użycie stołu antywi-
bracyjnego.
Operate the device in a room where the temperature ranges between
10 – 40 °C (50 – 104 °F) and where the relative humidity is below 80 %.
Place the balance on a solid surface to ensure stability. To obtain stable
and repeatable weighing results, an anti-vibration table is recommended.
Zachowaj opakowanie do celów
gwarancyjnych i serwisowych.
Keep the packaging for
warranty and service purposes.
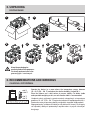
2. UNPACKING
ROZPAKOWANIE
3. RECOMMENDATIONS AND WARNINGS
ZALECENIA I OSTRZEŻENIA

Nie używaj w miejscu zagrożonym
wybuchem. Nie odważaj materiałów
wybuchowych i łatwopalnych.
Nie używaj wagi na nierównym lub nie-
wypoziomowanym podłożu.
Nie używaj w miejscach niestabilnych,
narażonych na wstrząsy i wibracje.
Make sure that the balance is placed
on an even surface.
Do not place the balance in a haz-
ardous area. Do not weigh explosive
materials.
Do not place the balance on an un-
stable ground exposed to shocks
and vibrations.
Przed montażem wagi usuń
blokadę transportową.
Zachowaj blokady transporto-
we do celów gwarancyjnych
i serwisowych.
Remove the transport lock be-
fore assembling the balance.
Keep the transport locks
for warranty and service
purposes.
Unikaj podmuchów i ruchu powietrza
w miejscu eksploatacji wagi.Używaj wagi z dala od źródeł ciepła.
Nie wystawiaj jej na działanie promieni
słonecznych.
Nie wystawiaj urządzenia na działanie
pola magnetycznego. Nie odważaj
substancji magnetycznych.
Place the balance away from heat
sources. Avoid exposing the balance
to the sunlight.
Avoid air drafts and air movements
at the workstation.
Avoid exposing the balance to
amagnetic field. Do not weigh mag-
netic substances.
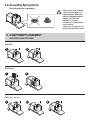
4. PRELIMINARY ACTIONS
CZYNNOŚCI WSTĘPNE
4.1. Transport Lock Removal
Usunięcie blokad transportowych

21
1 32
XA 5Y.M.A.P
Sprawdź czy sprężyna
uziemiająca jest odpowiednio
umiejscowiona.
Upewnij się, że sprężyna uzie-
miająca wystaje lekko z otworu.
XA 5Y.M.A
Check to see if the earthing
spring is placed where it is
supposed to be. Make sure
that the earthing spring juts
slightly out of the hole.
XA 5Y.A (d = 0.01 mg)
21
4.2. Grounding Spring Check
Kontrola sprężyny uziemiającej
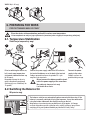
5. COMPONENTS ASSEMBLY
MONTAŻ ELEMENTÓW WAGI

1 2
1 2 3
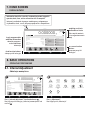
up to 12 h
1
Nie podłączaj wagi aż do osią-
gnięcia temperatury pokojowej
(orientacyjny czas stabilizacji: do
12 godzin).
Podłącz przewód zasilacza do gniazda DC z tyłu
wagi lub z tyłu terminala.
Podłącz zasilacz do
gniazda elektrycznego.
The balance switches on automatically when connected to the mains. If the
balance is manually switched off using the top menu, it must be switched on
using the button underneath the display housing on the left.
Waga włącza się automatycznie po podłączeniu jej do prądu. Jeśli waga
zostanie wyłączona ręcznie z górnego menu, należy ją włączyć przyciskiem
znajdującym się pod spodem obudowy wyświetlacza z lewej strony.
Nie podłączaj równocześnie wagi
i terminala do zasilania.
Ustaw urządzenie w miejscu jego użytkowania i pozostaw je do osiągnięcia temperatury pokojowej.
Place the device at the workstation, wait until it reaches room temperature.
Prior to switching the device on,
let it reach room temperature
(estimated stabilization time: up
to 12 hours).
Connect the power supply cable to the DC socket on
the back of the balance or on the back of the terminal.
Connect the power
supply to the mains.
XA 5Y.A (d = 0.1 mg)
Do not connect the balance and the termi-
nal to the power supply at the same time.
6. PREPARING FOR WORK
PRZYGOTOWANIE WAGI DO PRACY
6.1. Temperature Stabilization
Stabilizacja temperatury wagi
6.2. Switching the Balance On
Włączenie wagi

0.000000
Netto weight
Gross weight
Tare
Product name Calcium
Minimum sample weight
MSW status Good
0.000000 g
0.000000 g
0.000000 g
0.003 g Vibrations
13%
Temperature
Air Density
1.158 kg/m3
Air Preasure
980.1 hPa
Air Humidity
45%
19°C
09:30:00Wed 14.07.2021
ast Dosing
Weighing
g
0 Max
John Smith
F
DWA
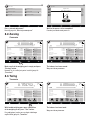
Leveling - Auto leveling
2 3
Po zakończeniu autopoziomowania pokaże się ekran
główny.
The balance with automatic levelling starts the pro-
gram and the levelling process runs automatically.
Waga z automatycznym poziomowaniem uruchomi program
i waga automatycznie rozpocznie proces poziomowania.
Mikrowagi i wagi analityczne zostały wyposażone w Reflex Level System, który zapewnia monitorowanie poziomu wagi
i automatycznego jej poziomowania.
When autolevelling is complete, the home screen is
displayed.
0.000000
Netto weight
Gross weight
Tare
Product name Calcium
Minimum sample weight
MSW status Good
0.000000 g
0.000000 g
0.000000 g
0.003 g Vibrations
13%
Temperature
Air Density
1.158 kg/m3
Air Preasure
980.1 hPa
Air Humidity
45%
19°C
09:30:00Wed 14.07.2021
ast Dosing
Weighing
g
0 Max
John Smith
F
DWA
Leveling
21
Nacisnąć ikonę stanu poziomowania. Wyświetlacz wagi pokaże panel kontrolny funkcji pozio-
mowania.
Press the level status pictogram. The control panel of the levelling function is displayed.
Microbalances and analytical balances are equipped with the Reflex Level System, which monitors and automati-
cally corrects the balance level.
0.000000
Netto weight
Gross weight
Tare
Product name Calcium
Minimum sample weight
MSW status Good
0.000000 g
0.000000 g
0.000000 g
0.003 g Vibrations
13%
Temperature
Air Density
1.158 kg/m3
Air Preasure
980.1 hPa
Air Humidity
45%
19°C
09:30:00Wed 14.07.2021
ast Dosing
Weighing
g
0 Max
John Smith
F
DWA
Leveling - Auto leveling
0.000000
Netto weight
Gross weight
Tare
Product name Calcium
Minimum sample weight
MSW status Good
0.000000 g
0.000000 g
0.000000 g
0.003 g Vibrations
13%
Temperature
Air Density
1.158 kg/m3
Air Preasure
980.1 hPa
Air Humidity
45%
19°C
09:30:00Wed 14.07.2021
ast Dosing
Weighing
g
0 Max
John Smith
F
DWA
Leveling
43
Nacisnąć przycisk , aby potwierdzić rozpoczęcie
procesu automatycznego poziomowania. Proces pozio-
mowania można przerwać po naciskając przycisk .
Waga jest prawidłowo wypoziomowana. Nacisnąć przy-
cisk , aby wrócić do wyświetlania okna głównego.
Press to confirm the automatic levelling start.
Press to abort the process.
The balance is levelled correctly. Press to
return to the home screen.
6.3 Manual Levelling
Ręczne poziomowanie wagi

0.000000
Netto weight
Gross weight
Tare
Product name Calcium
Minimum sample weight
MSW status Good
0.000000 g
0.000000 g
0.000000 g
0.003 g Vibrations
13%
Temperature
Air Density
1.158 kg/m3
Air Preasure
980.1 hPa
Air Humidity
45%
19°C
09:30:00Wed 14.07.2021
ast Dosing
Weighing
g
0 Max
FJohn Smith
DWA
Adjustment Operators Profiles Database Communication
Scheduled tasksAmbient
conditions
MiscellaneousAdministrator
panel
Peripherals
Update About
09:30:00Wed 14.07.2021
ast Dosing
Weighing
FJohn Smith
Netto weight
Gross weight
Tare
Product name Calcium
Minimum sample weight
MSW status Good
0.000000 g
0.000000 g
0.000000 g
0.003 g Vibrations
13%
Temperature
Air Density
1.158 kg/m3
Air Preasure
980.1 hP
Air Humidity
45%
19°C
09:30:00Wed 14.07.2021
ast Dosing
Weighing
g0.000000
0 Max
a
John Smith
F
DWA
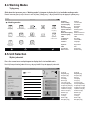
21
informacja o aktualnie używanym modzie pracy, zalogowanym
użytkowniku, dacie, czasie, aktywnym połączeniu z komputerem.
Okno wyniku ważenia
i stan wypoziomowania
wagi
dowolnie programo-
walne dodatkowe
informacje
ekranowe przyciski
funkcyjne
stałe przyciski funkcyjne
Naciśnij przycisk funkcyjny „Adiustacja wewnętrzna” lub
naciśnij .
Naciśnij przycisk „Adiustacja”.
information about the currently used working mode, logged-in
operator, date, time, active connection with a computer.
weighing result win-
dow and level status
freely programmable
additional information
on-screen function
buttons
fixed function buttons
Press „Internal adjustment” function button or .Press „Adjustment”.
7. HOME SCREEN
EKRAN GŁÓWNY
8. BASIC OPERATIONS
OPERACJE PODSTAWOWE
8.1. Internal Adjustment
Adiustacja wewnętrzna

-0.000048
Netto weight
Gross weight
Tare
Product name Calcium
Minimum sample weight
MSW status Good
0.000000 g
0.000000 g
0.000000 g
0.003 g Vibrations
13%
Temperature
Air Density
1.158 kg/m3
Air Preasure
980.1 hPa
Air Humidity
45%
19°C
09:30:00Wed 14.07.2021
ast Dosing
Weighing
g
0 Max
John Smith
F
DWA
0.000000
Netto weight
Gross weight
Tare
Product name Calcium
Minimum sample weight
MSW status Good
0.000000 g
0.000000 g
0.000000 g
0.003 g Vibrations
13%
Temperature
Air Density
1.158 kg/m3
Air Preasure
980.1 hPa
Air Humidity
45%
19°C
09:30:00Wed 14.07.2021
ast Dosing
Weighing
g
0 Max
John Smith
F
DWA
Internal adjustment Adjustment test
Adjustment weights Report printout
Adjustment historyGLP projekt
Adjustment
09:30:00Wed 14.07.2021
ast Dosing
Weighing John Smith
F
Internal adjustment Adjustment test
Adjustment weights Report printout
Adjustment historyGLP projekt
Adjustment
09:30:00Wed 14.07.2021
ast Dosing
Weighing John Smith
F
Adjustment
Mass determination
21
Netto weight
Gross weight
Tare
Product name Calcium
Minimum sample weight
MSW status Good
0.000000 g
0.000000 g
0.000000 g
0.003 g Vibrations
13%
Temperature
Air Density
1.158 kg/m3
Air Preasure
980.1 hPa
Air Humidity
45%
19°C
09:30:00Wed 14.07.2021
ast Dosing
Weighing
g0.154752
0 Max
John Smith
F
DWA
0.000000
Netto weight
Gross weight
Tare
Product name Calcium
Minimum sample weight
MSW status Good
0.000000 g
0.000000 g
0.154752 g
0.003 g Vibrations
13%
Temperature
Air Density
1.158 kg/m3
Air Preasure
980.1 hPa
Air Humidity
45%
19°C
09:30:00Wed 14.07.2021
ast Dosing
Weighing
g
0 Max
John Smith
F
DWA
3 4
21
Upewnij się, że szalka jest pusta i naciśnij przycisk
„Zerowanie”.
Waga została wyzerowana.
Naciśnij przycisk „Adiustacja wewnętrzna”.
Przy obciążonej szalce: po uzyskaniu stabilnego
wyniku kliknij przycisk „Tarowanie”.
Waga została wytarowana.
Poczekaj na zakończenie procesu.
Make sure that the weighing pan is empty and press
“Zeroing” button.
The balance has been zeroed.
With loaded weighing pan: upon stabilization
of the weighing result, press “Tare” button.
The balance has been tared.
Press „Internal adjustment”. Wait for the process to be completed.
8.3. Taring
Tarowanie
8.2. Zeroing
Zerowanie

Working modes
Weighing Parts counting Checkweighing Dosing
StatisticsFormulationsAnimal weighingDensity
Percent
weighing
Pipettes
calibrations
Differential
weighing
SQC Peak hold
09:30:00Wed 14.07.2021
ast Dosing
Weighing
John Smith
F
0.000000
Netto weight
Gross weight
Tare
Product name Calcium
Minimum sample weight
MSW status Good
0.000000 g
0.000000 g
0.000000 g
0.003 g Vibrations
13%
Temperature
Air Density
1.158 kg/m3
Air Preasure
980.1 hPa
Air Humidity
45%
19°C
09:30:00Wed 14.07.2021
ast Dosing
Weighing
g
0 Max
John Smith
F
DWA
Unit
g
mg
kg
ct
oz
ozt
dwt
Naciśnij ikonę aktualnej jednostki masy, aby wyświetlić listę dostępnych jednostek.
Rozwiń menu w górnej części ekranu i naciśnij ikonę „Mody pracy”, aby wyświetlić listę dostępnych trybów pracy.
Ważenie
Liczenie sztuk
Doważanie
Dozowanie
Odchyłki
Kalibracja pipet
Gęstość
Ważenie różnicowe
Ważenie zwierząt
SQC
Receptury
Zatrzask Max
Statystyka
Opcjonalnie:
KTP
Komparator
Kontrola masy
Gram [g]
Miligram [mg]
Kilogram [kg]
Karat [c]
Funt [funt]
Uncja [oz]
Uncja troy [ozt]
Pennyweight [dwt]
Hongkong Tael [tlh]
Singapore Tael [tls]
Tajwański Tael [tlt]
Chiński tael [tlc]
Momme [m]
Ziarno [gr]
Tical [ti]
Newton [N]
Mesghal [msg]
Weighing
Parts counting
Checkweighing
Dosing
Percent weighing
Pipette calibration
Density
Differential weighing
Animal weighing
SQC
Formulations
Peak hold
Statistics
Optional:
PGC
Comparator
Mass control
Gram [g]
Miligram [mg]
Kilogram [kg]
Carat [c]
Pound [lb]
Ounce [oz]
Troy ounce [ozt]
Pennyweight [dwt]
Hong Kong Tael [tlh]
Singapore tael [tls]
Taiwanese tael [tlt]
Chinese tael [tlc]
Momme [m]
Grain [gr]
Tical [ti]
Newton [N]
Mesghal [msg]
Press the current mass unit pictogram to display the list of available units.
Slide down the top menu, press “Working modes” pictogram to display the list of available working modes.
8.5. Unit Selection
Wybór jednostek
8.4. Working Modes
Tryby pracy

Enter password
09:30:00Wed 14.07.2021
ast Dosing
Weighing Not login
F
****
q w e r t y u i o p
lkjhgfdsa
z
&123*/a
x
English
c v b n m , .
0.000000
Netto weight
Gross weight
Tare
Product name Calcium
Minimum sample weight
MSW status Good
0.000000 g
0.000000 g
0.000000 g
0.003 g Vibrations
13%
Temperature
Air Density
1.158 kg/m3
Air Preasure
980.1 hPa
Air Humidity
45%
19°C
09:30:00Wed 14.07.2021
ast Dosing
Weighing
g
0 Max
FNot login
DWA
Shut down Profile Settings Manual Log in
Working
mode
Last adjustment: 21/01/2022 14:46:22
Software version: LL2.0 S qt14
Weighing firmware version: 1.0.0
Light Dark
Admin
Operators
09:30:00Wed 14.07.2021
ast Dosing
Weighing
FNot login
2
0.000000
Netto weight
Gross weight
Tare
Product name Calcium
Minimum sample weight
MSW status Good
0.000000 g
0.000000 g
0.000000 g
0.003 g Vibrations
13%
Temperature
Air Density
1.158 kg/m3
Air Preasure
980.1 hPa
Air Humidity
45%
19°C
09:30:00Wed 14.07.2021
ast Dosing
Weighing
g
0 Max
John Smith
F
DWA
1
3 4
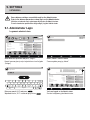
Rozwiń menu w górnej części wyświetlacza i naciśnij pole
„Zaloguj”.
Z menu wybierz pozycję „Admin”.
Wprowadź hasło „1111” i zatwierdź przyciskiem .
Niektóre ustawienia wagi są dostępne wyłącznie dla Administratora.
Przed ustawieniem parametrów wagi zaloguj się jako Administrator.
Zostałeś zalogowany jako Administrator.
Some balance settings are available only for the Administrator.
Prior to the balance parameters setup, log in as the Administrator.
Slide down the top menu and press „Log in”. Select „Admin” from the menu.
Enter password „1111” and press . You have logged as the Administrator.
9. SETTINGS
USTAWIENIA
9.1. Administrator Login
Logowanie administratora

Adjustment Operators Profiles Database Communication
Scheduled tasksAmbient
conditions
MiscellaneousAdministrator
panel
Peripherals
Update About
09:30:00Wed 14.07.2021
ast Dosing
Weighing
FAdmin
Admin
Operators
09:30:00Wed 14.07.2021
ast Dosing
Weighing
FAdmin
21
Name and Surname
Code
Default profile None
Fingerprint
Face profile
Name
Password ********
Permissions Operator
Card no.
Language English
Theme Dark
Account active
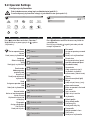
Wejdź do Menu za pomocą przycisku i wybierz
„Użytkownicy”. Naciśnij przycisk dodaj i wypełnij potrzebne pola dla
nowego użytkownika.
Przed konfiguracją użytkowników zaloguj się jako Administrator (patrz punkt 9.1).
3
Prior to balance users setup, log in as Administrator (point 9.1.).
Press to enter Menu and select „Operators”. Press add button and fill in the necessary fields for
a new operator.
9.2. Operator Settings
Konfiguracja użytkowników
Name:
Set an operator name
Nazwa:
Nadaj nazwę użytkownikowi
Language
Select a language
Język
Nadaj język wyświetlania
Card number
Add an operator
proximity card
Numer karty
Dodaj kartę zbliżeniową
użytkownika
Code
Assign an operator code
Kod
Nadaj kod użytkownikowi
Account active
Active or inactive operator
Konto aktywne
Użytkownik aktywny lub
nieaktywny
Fingerprint
Assign a fingerprint
Odcisk palca
Nadaj odcisk palca
Password:
Assign an operator password
Hasło:
Nadaj hasło użytkownikowi
Permissions
Assign permissions (guest,
operator, advanced opera-
tor, administrator)
Uprawnienia
nadaj uprawnienia (gość,
użytkownik, użytkownik
zaawansowany, Administrator)
Theme
Select theme (dark, light)
Motyw
nadaj motyw (ciemny, jasny)
Name and surname
Enter an operator’s first and
last name
Imię i nazwisko
Wpisz imię i nazwisko
użytkownika
Default profile
Set a default profile
Profil domyślny
Nadaj profil domyślny
Face profile
Add an operator’s face
Profil twarzy
Dodaj twarz użytkownika

0.000000
Netto weight
Gross weight
Tare
Product name Calcium
Minimum sample weight
MSW status Good
0.000000 g
0.000000 g
0.000000 g
0.003 g Vibrations
13%
Temperature
Air Density
1.158 kg/m3
Air Preasure
980.1 hPa
Air Humidity
45%
19°C
09:30:00Wed 14.07.2021
ast Dosing
Weighing
g
0 Max
John Smith
F
DWA
Settings
Weighing
Buttons
Information
Printouts
Soft key 1 Soft key 2
Soft key 3 Soft key 4
Soft key 6Soft key 5
Soft key 7 Left proximity sensor
Right proximity sensor
Header printout Footer printout
Product Set tare
AdjustmentProfile
None Close door
Open door
Buttons
09:30:00Wed 14.07.2021
ast Dosing
Weighing John Smith
F
Soft key 1 Soft key 2
Soft key 3 Soft key 4
Soft key 6Soft key 5
Soft key 7 Left proximity sensor
Right proximity sensor
Header printout Footer printout
Product Set tare
AdjustmentProfile
None Close door
Open door
Buttons
09:30:00Wed 14.07.2021
ast Dosing
Weighing John Smith
F
Right proximity
Sensor
None
Profile
Adjustment
Zero
Tare
Set tare
Disable tare
3
21
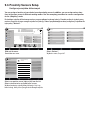
Do każdego czujnika zbliżeniowego możesz przyporządkować wybraną funkcję. Ponadto w różnych trybach pracy
możesz przypisać do tego samego czujnika inną funkcję. Zobacz przykładową procedurę konfiguracji czujników dla
trybu pracy “Ważenie”.
Rozwiń boczne menu. Wybierz z menu „Przyciski”.
Wybierz konkretny czujnik (prawy lub lewy) z listy i wy-
bierz funkcję, którą chcesz przypisać do danego czujnika.
You can assign a function of your choice to each proximity sensor. In addition, you can assign various func-
tions to the same sensor in different working modes. See the exemplary procedure for sensors configuration
for the „Weighing” mode.
Slide out the menu. Select „Buttons”.
Select a respective sensor (right or left) from the list.
Select a function to be assigned to the sensor.
9.3. Proximity Sensors Setup
Konfiguracja czujników zbliżeniowych

hotspot
HDMI USB
(Free Link)
USB-C
RJ45
HDMI
Display SpreadsheetComputer* Printer Barcode
scanner
Ekran Arkusz
kalkulacyjny
Komputer* Drukarka Skaner kodów
kreskowych
Computer Printer Computer Printer
Smartfon
Tablet
Komputer Drukarka Komputer Drukarka
Smartphone
Tablet
Wi-Fi ® jest zarejestrowanym znakiem towarowym będącym własnością organizacji Wi-Fi Alliance.
*Do poprawnego podłączenia należy użyć konwertera USB na RS232.
Wi-Fi ® is a registered trademark of Wi-Fi Alliance.
*A USB to RS232 converter must be used for proper connection.
10. CONNECTING PERIPHERALS
PODŁĄCZENIE URZĄDZEŃ PERYFERYJNYCH

Nie używaj agresywnych środków
czyszczących (np. rozpuszczalników,
preparatów zawierających chlor,
substancje żrące i wybielacze).
Nie używaj środków czyszczących
zawierających substancje o ostrej
strukturze oraz preparatów przezna-
czonych do szorowania.
Uważaj, żeby do układu wagowego
(do wnętrza urządzenia) nie dostał
się żaden pył ani ciecz.
Przed rozpoczęciem czyszczenia
koniecznie odłącz wagę od źródła
zasilania! Wyjmij wtyczkę z gniazda
elektrycznego i odłącz wszystkie inne
przewody podłączone do wagi.
Do czyszczenia stosuj wyłącznie
miękkie ściereczki z mikrowłókien,
włókien naturalnych lub sztucznych.
Nie używaj ściereczek o ostrej
strukturze ani żadnych materiałów
mogących zarysować powierzchnię!
Środek czyszczący nanoś najpierw na
ściereczkę. Nigdy nie aplikuj środka
czyszczącego bezpośrednio na
urządzenie!
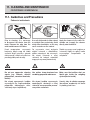
Prior to cleaning, it is necessary
to disconnect the device from the
mains! Remove the plug from the
outlet and disconnect all cables.
Use soft cloth made of either natural
or synthetic fibers exclusively. Avoid
using stiff or hard fabric, as this may
cause scratches on the surface!
Apply the cleanser to the cloth. Re-
member not to apply the cleanser
directly onto the device!
Do not use aggressive cleaning
agents (e.g. solvents, chlorine
preparations, corrosive chemicals,
bleach).
Use neither sharp-structured nor
scrubbing-purposed substances.
Make sure that neither dust nor
liquid gets inside the weighing
system (device inside).
11. CLEANING AND MAINTENANCE
CZYSZCZENIE I KONSERWACJA
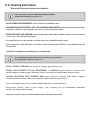
11.1. Guidelines and Precautions
Zalecenia i ostrzeżenia

• SZYBY I ELEMENTY SZKLANE możesz wyczyścić, używając płynu do mycia szyb.
• SZALKĘ ORAZ ELEMENTY ZE STALI NIERDZEWNEJ I ALUMINIUM możesz wyczyścić ściereczką lekko
zwilżoną łagodnym roztworem wody i delikatnego środka czyszczącego (np. mydła lub płynu do mycia naczyń).
• GŁOWICĘ ODCZYTOWĄ ORAZ OBUDOWĘ WAGI możesz wyczyścić ściereczką lekko zwilżoną łagodnym
roztworem wody i delikatnego środka czyszczącego (np. mydła lub płynu do mycia naczyń).
• Suche resztki próbek możesz usunąć za pomocą pędzla lub małego ręcznego odkurzacza.
• Wyczyszczone elementy możesz osuszyć miękką, suchą ściereczką lub użyć bezpyłowego papierowego
ręcznika, aby wchłonął pozostałą wilgoć.
• Zamontuj wszystkie elementy urządzenia dopiero po ich całkowitym wysuszeniu.
Wprzypadku konieczności demontażu elementów komory ważenia,
postępuj zgodnie zopisem wsekcji 11.3.
• GLASS PANES AND COMPONENTS can be cleaned using window cleaner.
• WEIGHING PANS AND STAINLESS STEEL OR ALUMINIUM COMPONENTS can be cleaned using a cloth slightly
soaked in a solution of water and gentle cleanser (e.g. soap or dishwashing liquid).
• OPERATION PANEL AND HOUSING can be cleaned using a cloth slightly soaked in a solution of water and gentle
cleanser (e.g. soap or dishwashing liquid).
• Dry sample leftovers can be removed using either a brush or a handheld vacuum cleaner.
• Clean components can be dried using a soft cloth or a dust-free paper towel. With this, the remaining moisture will
be absorbed.
• Install all the components, providing they are completely dry.
If it is necessary to disassemble the weighing chamber,
follow the instructions in section 11.3.
11.2. Cleaning Instructions
Wskazówki dotyczące czyszczenia urządzenia

1 2
3 4
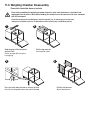
Naciśnij zatrzask pod drzwiami aby zwolnić blokadę. Wysuń drzwi boczne.
Chwyć za wypustki listwy tylnej
i wyciągnij ją.
Wysuń górną szybę.
Grab the grips of the back pane
and pull it out.
Pull the top pane out.
Press the latch under the door to release the lock. Pull the side door out.
11.3. Weighing Chamber Disassembly
Demontaż elementów komory ważenia
Przed demontażem elementów komory ważenia upewnij się, że mikrowaga jest wyłączona
i odłączona od źródła zasilania. Do demontażu elementów używaj standardowej pęsety.
Prior to disassembling the weighing chamber elements, make sure the balance is turned off and
unplugged from the mains. When disassembling the elements, use the tweezers that come standard
with the instrument.

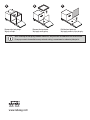
5 6 7
Wyjmij zaślepki. Wyciągnij ramkę górną. Wyciągnij przednią szybę do góry.
Po wyczyszczeniu elementów komory ważenia należy je zamontować w odwrotnej kolejności.
www.radwag.com
Remove the hole plugs. Remove the top frame. Pull the front pane up.
After cleaning the weighing chamber elements, they must be assembled in the reverse order.
-
 1
1
-
 2
2
-
 3
3
-
 4
4
-
 5
5
-
 6
6
-
 7
7
-
 8
8
-
 9
9
-
 10
10
-
 11
11
-
 12
12
-
 13
13
-
 14
14
-
 15
15
-
 16
16
-
 17
17
-
 18
18
-
 19
19
-
 20
20


RADWAG XA 6.5Y.M Instrukcja obsługi
- Typ
- Instrukcja obsługi
- Niniejsza instrukcja jest również odpowiednia dla
w innych językach
- English: RADWAG XA 6.5Y.M User manual
Powiązane artykuły
Inne dokumenty
-
Canon MAXIFY MB2050 Instrukcja obsługi
-
Canon IXUS 133 Instrukcja obsługi
-
Indesit IWB 5103 (CIS) instrukcja
-
 Minebea Intec Transmitter in field housing PR 5230 Instrukcja obsługi
-
Canon PIXMA MG2940 Instrukcja obsługi
-
Canon EOS 100D Instrukcja obsługi
-
 Minebea Intec X3 Process Indicator PR 5410 Instrukcja obsługi
-
Canon PIXMA MX725 Instrukcja obsługi
-
Yamaha CS01 Instrukcja obsługi

