
YVRD2700/2700G
取扱説明書
Owner’s Manual
Bedienungsanleitung
Mode d’emploi
Manual de instrucciones
Manual do Proprietário
Руководство пользователя
使用手册
사용설명서
組み立ての前に、「安全上のご注意」、「ガススプリング取り扱いに関する注意事項」を必ずお読みください。
Make sure to read “Precautions” and “Precautions for Handling Gas Spring” before assembling.
Lesen Sie vor dem Zusammenbau unbedingt die Vorsichtsmaßnahmen und die Vorsichtshinweise für
die Handhabung der Gasfeder.
Assurez-vous de lire les “Précautions” et les “Précautions de manipulation des ressorts à gaz” avant
le montage.
Antes de efectuar el montaje, lea sin falta las “Precauciones” y las “Precauciones para la
manipulación del muelle de gas”.
Certique-se de ler as “Precauções” e as “Precauções ao manusear a mola a gás” antes de montar.
Перед началом сборки обязательно прочтите разделы “Правила техники безопасности” и
“Предосторожности при обращении с пневматической пружиной”.
安装前请务必阅读“注意事项”的“气弹簧操作注意事项”。
조립하시기 전에 반드시 “ 안전 주의사항” 과 “ 가스 스프링 취급상의 주의사항” 을 읽어 주십시오 .
日本語
EnglishРусский Français
한국어
Deutsch
中文
Español
Português
マルチパーカッションラックビブラフォン
/
Multi-Frame Vibraphones / Multi-Rahmen-Vibraphon /
Vibraphones multi-cadre / Vibráfonos de multi-bastidor /
Vibrafones com Multipla Armação
/
Вибрафоны с универсальной рамой
/
多用框颤音琴
/
멀티 프레임 비브라폰
01_YVRD2700_J.indd 1 2015/06/08 14:04:12

1
SPECIAL MESSAGE SECTION
This product utilizes an external power supply (adaptor). DO NOT
connect this product to any power supply or adaptor other than
one described in the manual, on the name plate, or specically
recommended by Yamaha.
WARN ING: Do not place this product in a position where anyone
could walk on, trip over, or roll anything over power or connecting
cords of any kind. The use of an extension cord is not recommended!
If you must use an extension cord, the minimum wire size for a 25"
cord (or less) is 18 AWG. NOTE: The smaller the AWG number, the
larger the current handling capacity. For longer extension cords, con-
sult a local electrician.
This product should be used only with the components supplied
or a cart, rack, or stand that is recommended by Yamaha. If a cart,
etc., is used, please observe all safety markings and instructions
that accompany the accessory product.
SPECIFICATIONS SUBJECT TO CHANGE: The informa-
tion contained in this manual is believed to be correct at the time
of printing. However, Yamaha reserves the right to change or
modify any of the specications without notice or obligation to
update existing units.
NOTICE: Service charges incurred due to lack of knowledge
relating to how a function or effect works (when the unit is operat-
ing as designed) are not covered by the manufacturer’s warranty,
and are therefore the owners responsibility. Please study this man-
ual carefully and consult your dealer before requesting service.
ENVIRONMENTAL ISSUES: Yamaha strives to produce
products that are both user safe and environmentally friendly. We
sincerely believe that our products and the production methods
used to produce them meet these goals. In keeping with both the
letter and the spirit of the law, we want you to be aware of the fol-
lowing:
Disposal Notice: Should this product become damaged beyond
repair, or for some reason its useful life is considered to be at an
end,
please observe all local, state, and federal regulations that
relate to the disposal of products that contain lead, batteries,
plastics, etc. If your dealer is unable to assist you, please contact
Yamaha directly.
NAME PLATE LOCATION: The name plate is located on the
player side of the product. The model number, serial number,
power requirements, etc., are located on this plate. You should re-
cord the model number, serial number, and the date of purchase in
the spaces provided below and retain this manual as a permanent
record of your purchase.
Model
Serial No.
Purchase Date
PLEASE KEEP THIS MANUAL
Name Plate
Information for Users on Collection and Disposal of Old Equipment
This symbol on the products, packaging, and/or accompanying documents means that used electrical and electronic
products should not be mixed with general household waste.
For proper treatment, recovery and recycling of old products, please take them to applicable collection points, in ac-
cordance with your national legislation and the Directives 2002/96/EC.
By disposing of these products correctly,
you will help to save valuable resources and prevent any potential negative effects
on human health and the environment which could otherwise arise from inappropriate waste handling.
For more information about collection and recycling of old products, please contact your local municipality, your
waste disposal service or the point of sale where you purchased the items.
[For business users in the European Union]
If you wish to discard electrical and electronic equipment, please contact your dealer or supplier for further information.
[Information on disposal in other countries outside the European Union]
This symbol is only valid in the European Union. If you wish to discard these items, please contact your local au-
thorities or dealer and ask for the correct method of disposal.
(weee_eu_en_01)
English
Multi-Frame Vibraphones
YVRD2700/2700G
Owner’s Manual
02_YVRD2700_E.indd 1 2015/06/08 14:04:34

2
PRECAUTIONS
PLEASE READ CAREFULLY BEFORE PROCEEDING
Please keep this manual in a safe and handy place for future reference.
WARNING
Always follow the basic precautions listed below to avoid the possibility of serious injury or even death
from electrical shock, short-circuiting, damages, fire or other hazards. These precautions include, but are
not limited to, the following:
Assembly
•
Assembling/disassembling the rack and/or mounting/re-
movingtheinstrumentshouldalwaysbedoneonaoor
thatisatandstable.Doingsoonanunstable,sloped,or
steppedsurfacecanresultintheinstrumentfallingover.
• Whenadjustingtheheightwithpercussioninstruments
otherthanthevibes(cymbals,snare,etc.)attachedto
therack,removetheinstrumentsbeforeadjusting,then
reattachafteradjustmentiscomplete.Adjustingheight
withtheinstrumentsontherackcanresultinpinched
ngers,hands,etc.,causinginjury.
Do not open
• Donotdismantleormodifythevibraphone’scontrolleror
driver.Doingsocancausereorelectricalshock.
• Repairsorpartreplacementshouldnotbeattempted
unlessinstructionsareprovidedinthemanual.
Handling caution
• Neverplaceyourhandsorfeetwheretheycanget
pinched,etc.,inmovingpartssuchasunderthecasters
orpedal.Inadditiontobecomingpinched,doingsocan
causeseriousinjury.
• Nevertouchtherotatingfans.Doingsocanresultin
pinchedngers,etc.
• Donotuseorstoretheinstrumentinanyofthefollowing
locations.Doingsocancausereorelectricalshock.
- Inplacessubjecttohightemperatures(nearaheating
deviceorindirectsunlight,etc.).
- Inplaceswheretheinstrumentmaybeexposedto
moisture(bathroom,onwetoors,etc.)andexcessive
humidity.
- Inplaceswheretheinstrumentmaybeexposedto
rain.
- Inplaceswithexcessivedust.
- Inplacessubjecttovibrations.
• Donotplayorroughhousearoundtheinstrument.
Bumpingintotheinstrumentcancauseinjury.Itcanalso
causetheinstrumenttooverturn.Donotallowchildren
toplayaroundtheinstrument.
• Donotleanagainstorclimbontotheinstrument.Doing
socancausetheinstrumenttooverturn,resultingin
seriousinjury.
Power supply/AC power adaptor
• WhenusingtheACadaptor,donotexcessivelybendthe
powercordorplaceheavyobjectsonthecord.Doingso
maydamagethecordcausingreorelectricalshock.
• Neverputforeignobjects(combustibleobjects,coins,
wire,etc.)orliquids(water,juice,etc.)inthedriveunit.
Doingsocancausereandelectricshock.
• Ifoneofthefollowingoccurs,turnoffthepower,unplug
theACadaptorandrequestrepairassoonaspossible.
- IftheACadaptororpowercordbecomesdamaged.
- Ifforeignobjectsorliquidshavegottenintothedrive
unit.
- Ifthedriveunitgetswet(rain,etc.).
- Ifthedriveunitoperatesabnormallyorisbroken.
Transporting/Placing
• Alwaysengagethetwocasterbrakeswheneverthe
instrumentisnotbeingmoved.Notdoingsocanresult
intheinstrumentfallingoverormoving,causinginjury.
• Neverplacetheinstrumentonaslopingorunstablesur-
faceorplatform,etc.Doingsocancausetheinstrument
tofallover,resultingininjury.
• Whenmovingtheinstrumentonitscasters,onlymove
acrosssmooth,atsurfaces.Holdtheinstrumentbyits
sideframesandpushforwardslowly.
Whenmovingtheinstrumentonitscasters:
1.Avoidmovingtheinstrumentonsurfacesthatare
slopedoruneven.Theinstrumentcanoverturn,run
outofcontrol,andbeadanger.
2.Neverrunwiththeinstrument.Theinstrumentmay
becomeimpossibletocontrolandcrashintoawall
causingseriousinjury.
• Iftheinstrumentmustbeliftedorcarried,dosowith
twoormorepeopleusingbothhandstoliftitbytheside
frames.
*Vibraphoneweight
YVRD2700/2700G:73.4kg(161lbs13oz)
02_YVRD2700_E.indd 2 2015/06/08 14:04:35

3
Assembly
• Alwaysfollowtheinstructionsprovidedinthismanual
when assembling/disassembling the rack and/or mount-
ing/removingtheinstrument.Notfollowingthepro-
cedurescanresultinpartsfallingoff,etc.,creatinga
dangerwhileworkingwiththeinstrument.Itmayalso
degradefunctionandcausenoise.
• Nevermountaninstrumentusingaclampthatdoesnot
ttherackpipesize.Doingsocancreateadangerand
causetheinstrumenttofalloff.
• Neverloosentheslideguidexingscrewswhenthelegs
arenotattachedtotherack.Thesideframecansud-
denlyriseupfromtheframecreatingadangerthatcould
causeinjuryordamage.
• Tightenboltssecurelyafterdeterminingthedesired
height.Usingtheinstrumentwithlooseboltscanresult
intheinstrumentcollapsing,noise,orothertroubles.
Tightentheboltsoccasionally.
Handling caution
• Neverplaceanobjectontopoftheinstrument.Doingso
candamagethetonebarsandframe.
• Neverusetheinstrumentinanenvironmentthatlacks
ventilation.
• Neverusethemalletsforanythingotherthanplayingthe
instrument.Doingsocanresultininjuryoraccidents.Do
not allow children to use the mallets in any way that may
poseadangertothemselvesorothers.
• Neveruseglockenspielmalletsorotherhardobjectson
theinstrument.Doingsocandentandscratchthetone
barsanddamagethetuning.
• Donotusethecontrollerordriverinaroughmanner.
Doingsocandamagetheinternalcircuitry.
• Cleantonebarswithasoft,dryclothorsiliconcloth.For
hardtoremovestains,useaclothmoistenedwithsmall
amountofethylalcohol.Neverusethinner,benzeneor
awetclothontheinstrument.Doingsocandamagethe
coatingonthesoundbarsanddamagetheinstrument.
• Pleaseconsultthedealerfromwhomyoupurchasedthe
instrumentwhenreplacingparts.Switches,controls,ter-
minals,andothersuchpartsareconsideredconsumable
componentsthatwilldeterioratewithuse.Deterioration
isimpossibletoavoid,andtheamountandrateofdeteri-
oration will vary according to usage and the environment
inwhichtheinstrumentisused.
CAUTION
Always follow the basic precautions listed below to avoid the possibility of physical injury to you or others, or
damage to the instrument or other property. These precautions include, but are not limited to, the following:
Yamahacannotbeheldresponsiblefordamagecausedbyimproperuseormodicationstotheinstrument.
Alwaysturnthepoweroffwhentheinstrumentisnotinuse.
Makesuretodiscardusedbatteriesaccordingtolocalregulations.
Power supply/AC power adaptor
• NeverpullonthecordwhendisconnectingtheACadap-
torfromtheoutlet.AlwaysholdtheACadaptorwhen
connectingordisconnectingthepower.
• AlwaysdisconnecttheACadaptorfromtheoutletwhen
theinstrumentisnotusedforanyextendedperiodof
time.
• AlwaysuseanACadaptorthatmeetsYamahaspecica-
tions.TheuseofanyotherACadaptormaycausedam-
age.
Transport/Placing
• Alwaysdisconnectthepowercordwhenmovingthein-
strument.Notdoingsocandamagethecord,orpersons
cantripandfall.
• Alwaysreleasethecasterbrakeswhenmoving.Also,
slightlylifttheinstrumentwhenmovingacrossuneven
surfacestomovetheinstrumentinastablemanner.
• Iftheinstrumentistobetransportedinavehicle,com-
pletelydisassembletheinstrumentandrack,andpack
securely.Movingtheinstrumentasismayresultindam-
age.Todisassembletheinstrument,reversetheorderof
theassemblyinstructions.
• Movetheinstrumentgentlysoasnottoshocktheinstru-
ment.Notdoingsomaydamagetheinstrument.
• Heightadjustmentshouldalwaysbedonewithatleast
twopersons.Ifdoingitaloneisunavoidable,adjustthe
heighttwounitsontheslideguideatatime.
• Frequentlymovingtheinstrumentcanloosenpartsand
bolts.Alwayscheckforloosebolts/partsaftermoving
andtightenifneeded.
• Lockthebrakesonthecasterswhentheinstrumentis
notinuse.
02_YVRD2700_E.indd 3 2015/06/08 14:04:35

4
Make sure to observe the following instructions when discarding the gas spring.
As pressurized nitrogen gas is sealed in the gas spring, be sure to release before discarding it, or an explo-
sion may occur, causing an injury.
Danger
2. Instructions for discarding the gas
[Precautions]
Do not crash.
Do not cut.
Do not make a hole anywhere other than the
specied positions (
q
and
w
in the Fig.1).
Do not throw it in the re.
[Discarding procedure]
1. Putthegasspringinaplasticbag.Usingadrill of 2 to 3
mm,makeahole
q
fromoutsideoftheplasticbagatthe
positionasspeciedintheguretoreleasethegasandoil
and then make a hole
w
atthepositionasspecied.
(Be sure to make holes in the order of
q
and
w
. )
2. Ifavinylbagisnotused,theoilanddrillchipswillspread.(In
suchacase,weareyeprotectionglasses.)
* Drill 2 holes as shown above to release
the gas before discarding the gas spring.
q
w
35mm15mm
Please observe the following instructions for proper handling of the gas spring.
● Donotapplyahightensileloadtothegasspringasitwillcausedamagetothegasspring.
● In the event of a failure, stop using the instrument and contact the shop of its pur-
chase. If your dealer is unable to assist you, please contact Yamaha directly.
Caution
Thisgasspringrequiresnooilsupplytoitsslidingsection.Additionaloilwillreducethesealingdurability
andcausetheoiltoleak.
Neverapplyanyimpacttothegasspring.Itwillcauseoilleakage,malfunctionorbreakage.
Neverdisassemblethegasspring.Asahighpressuregasissealedinit,disassemblingitwillcausea
highrisk.
Thegasspringisnotrigidenoughtopreventbendingduetounbalancedloads.Donotattempttobend
it.Apoorlybalancedloadwillcausetherodtobend,resultingindefectiveoperation.
Notethatanickinthepistonrodorcylinderwillshortentheservicelifeofthesealorresultindefective
operation.Donothitthepistonrodorcylinder.
Do not expose the gas spring to anexcessively highor lowtemperature.The allowable temperature
rangeforuseis-20°Cto50°C.
Avoidusingtheinstrumentwhereitisexposedtotorain,waterormuchdust.Itwillcausemalfunction.
Donotapplyanexcessiveforcetolifttheframeendandpulloffthegasspringfromtheleg.Itwillcause
malfunctionorbreakage.
1. Precautions for handling the gas spring
Precautions for Handling Gas Spring
Fig. 1
Plastic bag
Drill
02_YVRD2700_E.indd 4 2015/06/08 14:04:35

5
t
l
Driver
l
Controller (Right Side)
l
Controller (Player Side)
n
Vibes Drive Unit
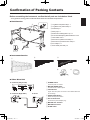
Conrmation of Packing Contents
Before assembling the instrument, conrm that all parts are included as listed.
* If any parts are missing, please contact the dealer where the instrument was purchased.
q
LegBaseUnit(Bassside)x1
w
LegBaseUnit(Trebleside)x1
e
PedalStayx1
r
Rackpipex1
t
Multi-FrameClamp(RDC-10)x4
y
KnobHeadBolt/SpringWasher/Washerx4set
u
VibesMainUnitx1
i
Resonators(Naturaltoneside)x1
o
Resonators(Accidentaltoneside)x1
!0
ACAdaptorx1
!1
RoundBelt(FanBelt)x2
n
Rack Section
n
Instrument Section
z
POWER Switch
Turnsthepoweronandoff.
x
MOTOR SPEED Slider
Controlsthefanrotationspeed.
c
LED Indicator
Lightswhenthepoweristurnedonandasheswhilethe
fanisrotating.
v
START/STOP Button
Startsandstopsfanrotation.
b
DC 12-15V IN Jack
Connectsthepoweradaptorplug.
n
MOTOR OUT Terminal
m
MOTOR IN Terminal
,
8P DIN Cable
zxcv
q
w
e
r
u
i
o
!0 !1
y
02_YVRD2700_E.indd 5 2015/06/08 14:04:36

6
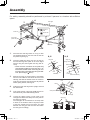
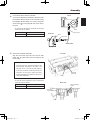
Assembly
1.
Place the bass side leg section on a rug or other
softmaterialspreadontheoorwiththeholefor
thepedalstayfacingup.
2.
Insertthepedalstayallthewayintotheholeon
thebasssidelegbaseplate so the notchaligns
withthewingbolt,thentighten the wing boltse-
curely.
* Please note the orientation of the pedal stay
when attaching. Make sure that the stay is at-
tached with the bolt heads connecting the rein-
forcement stay to the pedal stay facing the audi-
ence. (See the gure above.)
3.
Removethe wing nut,springwasher,and washer
fromthe boltlocatedon thecenterrail of thebass
sideleg, and slidethe slotted endofthe reinforce-
mentstayontothebolt,thensecurethestaywiththe
washer,springwasher,andwingnut.
4.
Position the bassside legsection upright,and lock
thecasterbrake.
5.
Inthesamemanner,connectthepedalstayandre-
inforcementstaytothetreblesidelegsection.
6.
Loosentheclampscrewsonbothendsofthe
rackpipeandfastentheclampsontothepoleson
theupperlegsection.
Therackpipecanbeattachedsoitsclampside
iseitherontheaudiencesideortheplayer’sside
ofthepole.Decidehowmuch space youneed
betweentherackpipeandtone bars andattach
therackpipeaccordingly.
Forsafety, assemblyshouldbeperformedbyatleast2 personsinalocationwithsufcient
space.
Legsection
(bassside)
Pedal stay
Rackpipe
Centerrail
Reinforcementstay
Audience
side
Player side
4
2
4
3
5
5
2, 5
6
3, 5
6
6
7
7
Pedal stay
Hole
Notch
Wingbolt
Wingnut
Springwasher
Washer
Reinforcementstay
Centerrail
Clamp
Pole
Clampscrew
Rackpipe
Rackpipe
02_YVRD2700_E.indd 6 2015/06/08 14:04:37

7
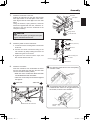
Resonator
holders
x
z
Accidental tone side resonators
Treble side
Bass side
Resonator
holders
z
First,placethetreblesideontothecorresponding
resonatorholders.
x
Toengagethebassside,liftitovertheresonator
holdersandtheninsertitintothegapbetweenthe
twoholders,asshownintheillustration.
Assembly
7.
Attachtheinstrumenttotherack.
Position the instrument on the rack with the bolt
holes (A)locatedonthesideplate of the instru-
ment aligned with the holes (B)ontherackside
frame.
Usingthewashers,springwashers,andknob
headbolts suppliedwith therack, attachthe in-
strumenttotherackfromtheunderside ofthe
rack(fourlocations).
8.
Attachthepedalrodtotheinstrument.
1. Loosenthecenterrodxingboltstoextendthe
centerrod.
2. Connectthecenterrodwith the fittingofthe
rodconnectorbyrmlyholdingthecenterrod
whileturningtherodconnector.
3. Tightenthe rodconnectoruntilit stops,and
thensecurewiththelocknut.
9.
Attachtheresonators.
Insertthe resonatorsfromunderneath the frame
and rest the treble side and then the bass side
ontotheresonatorholders(rubber).
* Make sure not to confuse the natural tone side
and accidental tone side resonators.
* Take care not to bump the resonators against
the legs etc.
Washer
Springwasher
Knob head bolt
B
Instrument
A
Rodconnector
2
Turn(screwon)
3
Secure
Locknut
Centerrodxingbolt
Centerrodxingbolt
1
Loosen
1
Loosen
Centerrod
Pedal rod
Sideplate
Sideframe
Take care not to pinch your ngers when plac-
ing the instrument onto the rack.
CAUTION
02_YVRD2700_E.indd 7 2015/06/08 14:04:37

8
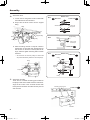
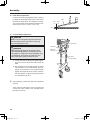
10
.
Attachthedriver.
1. Loosenthetwowingboltslocatedunderneath
thetreblesideoftheinstrument.
2. Fully insertthe drivermount into thesupport
tting.
3. Slide thefittingsmovedinstep10-1 back in
thedirectionofthetrebleside.Engagethetwo
sidemountsonthedriversecurelywiththet-
tings,andthentightenthexingboltstofasten
thedriver.
* Setthe driverso that the pulleys oneither side
arepositioneddirectlybelowthefansidepulleys.
11
.
Attachthecontroller.
Thereare twocontrollermounting pinslocatedon
theplayer’ssideofthetrebleendoftheinstrument.
Align the two holes in the controller mounts with
thesepinsandhookthecontrollerontothepinsone
sideatatime.
Bottom view
Bottom view
10-2
10-1
10-3
Insertmount
untilitstops
Driver
Supporttting
Slidethettings.
Loosenthe
xingbolts.
Fixingbolts
Fitting
Fitting
Fitting
Tightenx-
ing bolts
Assembly
Treble side
Controllermountingpins
Controller
Pulley
Fitting
Fixingbolts
Driver
Supporttting
Fitting
Treble side
Treble side
Treble side
Bass side
Bass side
02_YVRD2700_E.indd 8 2015/06/08 14:04:39

9
Assembly
Controller
Driver
Screw
Arrow mark
8P DIN cable
Arrow mark
Screw
12
.
Connectthedriverwiththecontroller.
ConnecttheMOTORINterminalofthedriverwith
the MOTOR OUT terminalof thecontroller using
thesupplied8PDINcable*.Toconnect,alignthe
arrow mark (
)ontheplugwiththescrewnextto
thejack.
*Incasethe8PDINcableismisplaced,thefollowing
sparepartmaybeordered:
Part No. Part Name
W5172200 8PDINCable
13
.
Attachtheroundbelt(fanbelt)*.
Sliptheroundbelt(fanbelt)overthefanside
pulleyrst,andthenpullitovertheangeofthe
driverpulley.
* Note For Service Personnel
Ifthebeltcannotbemountedbecausethedis-
tancebetween the pulleys is toowide, or the
beltslips due to atoonarrow pulley distance,
loosenthe two driver positioning screws(see
illustrationtotheright)toadjustthepulley
distance(belttension).Tightenthescrewsse-
curelyafteradjustment.
*Incasethebeltismisplacedor worn, the following
sparepartmaybeordered:
Fan side
Driver side
Pulley
Roundbelt
(Fanbelt)
Driverpositioning
screws
Roundbelt
(Fanbelt)
Pulley
Part No. Part Name
W5128041 FanBelt
02_YVRD2700_E.indd 9 2015/06/08 14:04:39

10
14. Pedal Stroke Adjustment
Loosenthecenterrodxingbolts(refertopage7)
toadjusttheprotrudinglengthofthecenterrodto
the desired pedal stroke,and retightenthe bolts.
Therecommendedstroke(distancebetweenped-
alandoor)is9/16"to13/16"(1.5to2cm).
15. Tone Bar Height Adjustment
1. Loosentheslidelegxingboltswhilesupport-
ingboththebassandtreblesideframesby
hand.
2. Gasspringsintherackslideguideswillcause
theinstrument torise automatically.Afterad-
justingtheinstrumenttotherequired height,
tightenthexingboltsrmly.Usetheguideson
theslide guidesto adjustthe playingsurface
soitisparalleltotheoor.
16
.
Afterassembly,conrmthateachboltistightened
securely.
Then,followtheinstructionsonthenextpageand
connectthepower supplyto thecontroller power
jack(DC12-15VIN).
Never loosen the slide guide xing bolts without the
tone bars attached to the rack frame or on the legs
when not attached to the rack.
When adjusting the height of the playing surface,
make sure that adjustment is carried out by at least
two people. If a single person must unavoidably carry
out adjustment, do not move the guides any more
than 2 slide guide memory positions at a time.
Assembly
Pedal
9/16”–13/16”
(1.5–2cm)
Floor
Slideguide
xingbolt
Sideframe
Slideguide
Gasspring
(insidethelegs)
CAUTION
CAUTION
02_YVRD2700_E.indd 10 2015/06/08 14:04:40

11
CAUTION
Make sure to use the supplied AC adaptor. Use of different adaptors may cause damage
not covered by the warranty.
*WrappingtheACadaptorcord
oncearoundoneofthelegs
willpreventaccidentaldiscon-
nectionoftheadaptorplug.
Controller
DC12-15VIN
ACadaptor
AC
Power Supply
PreparethesuppliedACadaptor.
z
ConnectthesmallplugoftheACadaptortotheDC12-15VINjackonthecontroller.
x
PlugtheACadaptorintoapoweroutlet.
02_YVRD2700_E.indd 11 2015/06/08 14:04:40

12
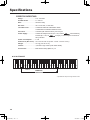
Specications
YVRD2700/YVRD2700G
Range
......................................
f–f3,3Octaves
Standard Pitch
......................
A=442Hz
Bars
.........................................
Aluminum Alloy
Bar sizes
................................
39–57mmwide,13mmthick
Tone Bar Finish
....................
YVRD2700:MatteAnodizedSilverFinish
YVRD2700G:AnodizedGoldMirrorFinish
Drive Unit
...............................
YVM-200(withPausefunction),25–145rpm
Power Supply
.......................
YamahaACAdaptorPA130(D.C.12V,700mA ,NorthAmerica),
PA-D05(D.C.15V,1A
,Europe),orotheradaptorrecommend-
edbyYamaha.
Power Consumption..........4.7W
Dimensions (W x D x H)....167x95x81–89cm(6-9/16”x3-3/4”x3-3/16”–3/1/2”)
Weight.................................73.4kg(161lbs13oz)
Casters................................
φ
150mmLargeCaster(withdoublebrake)
Accessories........................Multi-FrameClamp(RDC-10)x4
*Specicationssubjecttochangewithoutnotice.
l
SCALE RANGE
27 28 30 32 33 35 37 39 40 42 44 45 47 49 51 52 54 56 57 59 61 63 64 66 68 69 71 73 75 76 78 80 81 83 85 87 88
Middle C
YVRD2700 /
YVRD2700G
02_YVRD2700_E.indd 12 2015/06/08 14:04:41

〒 430-8650 静岡県浜松市中区中沢町 10-1
ZS87090
版次 :
15xx R0 Printed in Japan
10_YVRD2700_backcover.indd 2 2015/06/08 14:06:18
-
 1
1
-
 2
2
-
 3
3
-
 4
4
-
 5
5
-
 6
6
-
 7
7
-
 8
8
-
 9
9
-
 10
10
-
 11
11
-
 12
12
-
 13
13
-
 14
14


w innych językach
- čeština: Yamaha YVRD-2700 Návod k obsluze
- español: Yamaha YVRD-2700 El manual del propietario
- italiano: Yamaha YVRD-2700 Manuale del proprietario
- Deutsch: Yamaha YVRD-2700 Bedienungsanleitung
- svenska: Yamaha YVRD-2700 Bruksanvisning
- português: Yamaha YVRD-2700 Manual do proprietário
- français: Yamaha YVRD-2700 Le manuel du propriétaire
- Türkçe: Yamaha YVRD-2700 El kitabı
- English: Yamaha YVRD-2700 Owner's manual
- dansk: Yamaha YVRD-2700 Brugervejledning
- русский: Yamaha YVRD-2700 Инструкция по применению
- suomi: Yamaha YVRD-2700 Omistajan opas
- Nederlands: Yamaha YVRD-2700 de handleiding
- română: Yamaha YVRD-2700 Manualul proprietarului
Powiązane artykuły
-
Yamaha RD-500 Instrukcja obsługi
-
-
-
-
-
-
-
-
-
Inne dokumenty
-
 Williams-Sonoma Truman Round Bar Cart Assembly Instructions
-
Tripp Lite SR12UB Instrukcja obsługi
-
Panasonic TY-ST65VX300 Karta katalogowa
-
Escali DS115B Instrukcja obsługi
-
 VintageView W Series Stemware Rack Instrukcja instalacji
-
Shimano FD-6100 Exploded View
-
-
 CalAmp DIN Rail Mount Skrócona instrukcja obsługi
-


