Indesit CE6VP6 (A) U instrukcja
- Kategoria
- Piekarniki
- Typ
- instrukcja

CE6VP6 U
CE6VP6 X U
Contents
Installation, 2-3
Positioning and levelling
Electrical connection
Technical data
Description of the appliance, 4
Overall view
Control panel
Start-up and use, 5-9
Starting the oven
Cooking modes
Practical cooking advice
Planning cooking with the electronic programmer
Oven cooking advice table
Using the glass ceramic hob, 10
Switching the cooking zones on and off
Cooking zones
Precautions and tips, 11
General safety
Disposal
Respecting and conserving the environment
Care and maintenance, 12-13
Switching the appliance off
Cleaning the appliance
Replacing the oven light bulb
Cleaning the glass ceramic hob
Assistance
Assembling the sliding rack kit
Operating Instructions
COOKER AND OVEN
GB
English, 1
GB
Polski, 14
PL

2
GB
Before operating your new appliance please read
this instruction booklet carefully. It contains important
information concerning the safe installation and
operation of the appliance.
Please keep these operating instructions for future
reference. Make sure that the instructions are kept with
the appliance if it is sold, given away or moved.
The appliance must be installed by a qualified
professional according to the instructions provided.
Any necessary adjustment or maintenance must be
performed after the appliance has been disconnected
from the electricity supply.
Positioning and levelling
It is possible to install the appliance alongside
cupboards whose height does not exceed that of the
hob surface.
Make sure that the wall in contact with the back of
the appliance is made from a non-flammable, heat-
resistant material (T 90°C).
To install the appliance correctly:
Place it in the kitchen, dining room or the bed-sit
(not in the bathroom).
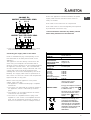
If the top of the hob is higher than the cupboards,
the appliance must be installed at least 200 mm
away from them.
If the cooker is
installed underneath a wall
cabinet, there must be a
minimum distance of 420
mm between this cabinet
and the top of the hob.
This distance should be
increased to 700 mm if
the wall cabinets are
flammable (see figure).
Do not position blinds behind the cooker or less
than 200 mm away from its sides.
Any hoods must be installed according to the
instructions listed in the relevant operating manual.
Levelling
If it is necessary to level the
appliance, screw the adjustable
feet* into the places provided on
each corner of the base of the
cooker (see figure).
The legs* provided with the
appliance fit into the slots on
the underside of the base of the
cooker.
Electrical connection
Fitting the power supply cable
Opening the terminal board:
Using a screwdriver, prise on the side tabs of the
terminal board cover;
Pull open the cover
of the terminal board.
To install the cable, proceed as follows:
unscrew the wire clamp screw and the contact
screws
The jumpers are factory-set for a single-phase
230V connection (see figure).
NL
220-230V 1N~
H07RR-F 3x6 CEI-UNEL 35363
1
3
2
4
5
to make the electrical connections illustrated in
figure, use the two jumpers housed in the box
(see figure - reference P)
N
L2
L1
L3
P
HOOD
420
Min.
min.
650
mm. with hood
min.
700
mm. without hood
mm.
600
Min. mm.
420
Min. mm.
Installation
*
Only available in certain models.

GB
3
TECHNICAL DATA
Oven dimensions
(HxWxD)
32x43,5x40 cm
Volume
56 l
Useful
measurements
relating to the oven
compartment
width 42 cm
depth 44 cm
height 8,5 cm
Power supply
voltage and
frequency
see data plate
Electric hob
Front left
Back left
Back right
Front right
Maximum absorption
of the electric hob
1700 W
1200 W
2100 W
1200 W
6200 W
ENERGY LABEL
Directive 2002/40/EC on the
label of electric ovens.
Standard EN 50304
Energy consumption for Natural
convection – heating mode:
Traditional mode;
Declared energy consumption
for Forced convection Class –
heating mode:
Baking
mode.
EC Directives: 73/23/EEC dated
19/02/73 (Low Voltage) and
subsequent amendments -
89/336/EEC dated 03/05/89
(Electromagnetic Compatibility)
and subsequent amendments -
93/68/EEC dated 22/07/93 and
subsequent amendments -
2002/96/EC.
NL1L2
380-400V 2N~
H05RR-F 4x4 CEI-UNEL 35363
1
3
2
4
5
NL1L3L2
380-400V 3N~
H05RR-F 5x2.5 CEI-UNEL 35363
1
3
2
4
5
fasten the supply cable in place with the clamp
and close the cover of the terminal board.
Connecting the supply cable to the mains
Install a standardised plug corresponding to the
load indicated on the data plate located on the
appliance.
The appliance must be directly connected to the
mains using an omnipolar circuit-breaker with a
minimum contact opening of 3 mm installed between
the appliance and the mains. The circuit-breaker
must be suitable for the charge indicated and must
comply with current electrical regulations (the
earthing wire must not be interrupted by the circuit-
breaker). The supply cable must be positioned so
that it does not come into contact with temperatures
higher than 50°C at any point.
Before connecting the appliance to the power
supply, make sure that:
The appliance is earthed and the plug is compliant
with the law.
The socket can withstand the maximum power of
the appliance, which is indicated by the data
plate.
The voltage is in the range between the values
indicated on the data plate.
The socket is compatible with the plug of the
appliance. If the socket is incompatible with the
plug, ask an authorised technician to replace it.
Do not use extension cords or multiple sockets.
Once the appliance has been installed, the power
supply cable and the electrical socket must be
easily accessible.
The cable must not be bent or compressed.
The cable must be checked regularly and replaced
by authorised technicians only.
The manufacturer declines any liability should
these safety measures not be observed.

4
GB
Description of the appliance
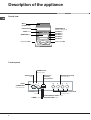
Overall view
Control panel
THERMOSTAT
knob
ACTIVE HOTPLATE
indicator light
ELECTRIC HOTPLATE
control knobs
SELECTOR
knob
THERMOSTAT
indicator light
Electronic
cooking
programmer*
TIMER button
COOKING END TIME button
COOKING TIME button
OVEN
OPERATION
indicator light
Control panel
GRILL rack
Glass
ceramic hob
DRIPPING pan
GUIDE RAILS
for the sliding racks
position 3
position 2
position 1
Adjustable foot
Adjustable foot
position 5
position 4

GB
5
Start-up and use
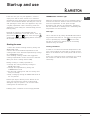
The first time you use your appliance, heat the
empty oven with its door closed at its maximum
temperature for at least half an hour. Ensure that the
room is well ventilated before switching the oven off
and opening the oven door. The appliance may emit
a slightly unpleasant odour caused by protective
substances used during the manufacturing process
burning away.
Should the appliance be equipped with an
electronic programmer, to use the electric oven, just
press buttons
and at the same time (the
symbol will appear on the display) before selecting
the desired cooking function.
Starting the oven
1. Select the desired cooking mode by turning the
SELECTOR knob.
2. Select the recommended temperature for the
cooking mode or the desired temperature by turning
the THERMOSTAT knob.
A list detailing cooking modes and suggested
cooking temperatures can be found in the relevant
table (see Oven cooking advice table).
During cooking it is always possible to:
Change the cooking mode by turning the
SELECTOR knob.
Change the temperature by turning the
THERMOSTAT knob.
Set the total cooking time and the cooking end
time (see below).
Stop cooking by turning the SELECTOR knob to
the 0 position.
Never put objects directly on the bottom of the
oven; this will avoid the enamel coating being
damaged. Only use position 1 in the oven when
cooking with the rotisserie spit.
Always place cookware on the rack(s) provided.
THERMOSTAT indicator light
When this is illuminated, the oven is generating heat. It
switches off when the inside of the oven reaches the
selected temperature. At this point the light
illuminates and switches off alternately, indicating
that the thermostat is working and is maintaining the
temperature at a constant level.
Oven light
This is switched on by turning the SELECTOR knob to
any position other than 0. It remains lit as long as the
oven is operating. By selecting
with the knob,
the light is switched on without any of the heating
elements being activated.
Cooling ventilation
In order to cool down the external temperature of the
oven, some models are fitted with a cooling fan that
blows out air between the control panel and the oven
door.
! Once the cooking has been completed, the cooling
fan remains on until the oven has cooled down
sufficiently.

6
GB
Cooking modes
! A temperature value can be set for all cooking
modes between 50°C and Max, except for
BARBECUE (recommended: set only to MAX
power level);
GRATIN (recommended: do not exceed 200°C).
TRADITIONAL OVEN mode
Both the top and bottom heating elements will come
on. With this traditional cooking mode, it is best to
use one cooking rack only: if more than one rack is
used, the heat distribution will be uneven.
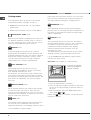
BAKING mode
The rear heating element and the fan come on,
guaranteeing the distribution of heat delicately and
uniformly throughout the oven. This mode is ideal for
baking and cooking temperature sensitive foods
such as cakes that need to rise and to prepare
certain tartlets on 3 shelves simultaneously.
FAST COOKING mode
The heating elements and the fan come on,
guaranteeing the distribution of heat consistently
and uniformly throughout the oven.
Pre-heating is not necessary for this cooking mode.
This mode is especially recommended for cooking
pre-packed food quickly (frozen or pre-cooked). The
best results are obtained if you use one cooking
rack only.
MULTI-COOKING mode
All the heating elements (top, bottom and circular),
as well as the fan, will come on. Since the heat
remains constant throughout the oven, the air cooks
and browns food uniformly. A maximum of two racks
may be used at the same time.
PIZZA mode
The heating elements (bottom and circular) and the
fan come on. This combination heats the oven
rapidly by producing a considerable amount of heat,
particularly from the bottom element. If you use more
than one rack simultaneously, switch the position of
the dishes halfway through the cooking process.
BARBECUE mode
The top heating element and the rotisserie (where
present) come on. The high and direct temperature of
the grill is recommended for food that requires high
surface temperature.
GRATIN mode
The top heating element as well as the fan and the
rotisserie (where present) come on. This combination
of features increases the effectiveness of the
unidirectional thermal radiation of the heating
elements through forced circulation of the air
throughout the oven.
This helps prevent food from burning on the surface,
allowing the heat to penetrate right into the food.
! In the BARBECUE and GRATIN cooking modes
with the oven door closed.
Spit roast (only available in certain models)
To operate the spit roast
function (see diagram)
proceed as follows:
1. Place the dripping pan in position 1.
2. Place the rotisserie support in position 3 and insert
the spit in the hole provided on the back panel of
the oven.
3. Start the rotisserie using the SELECTOR knob to
select mode
or .
! When the
mode is activated, the spit will stop if
the door is opened.
* Only available in certain models.

GB
7
Practical cooking advice
! Do not place racks in position 1 and 5 during fan-
assisted cooking. Excessive direct heat can burn
temperature sensitive foods.
! In the BARBECUE and GRATIN cooking modes,
particularly when using the rotisserie, place the
dripping pan in position 1 to collect cooking
residues (fat and/or grease).
MULTI-COOKING
Use position 2 and 4, placing the food that
requires more heat on 2.
Place the dripping pan on the bottom and the rack
on top.
BARBECUE
Insert the rack in position 3 or 4. Place the food in
the centre of the rack.
We recommend that you set the maximum power
level. The top heating element is regulated by a
thermostat and may not always be on.
PIZZA MODE
Use a light aluminium pizza pan. Place it on the
rack provided.
For a crispy crust, do not use the dripping pan
(prevents crust from forming by extending
cooking time).
If the pizza has a lot of toppings, we recommend
adding the mozzarella cheese on top of the pizza
halfway through the cooking process.
Planning cooking with the electronic
programmer
Setting the clock
After the appliance has been connected to the power
supply, or after a blackout, the display will automatically
reset to 0:00 and begin to blink. To set the time:
1. Press the COOKING TIME button
$
and the
COOKING END TIME
%
simultaneously.
2. Within 4 seconds of having pressed these buttons, set
the exact time by pressing the
*
and
)
buttons. The
*
button advances the hours and the
)
button decreases
the hours.
Once the time has been set, the programmer
automatically switches to manual mode.
Setting the timer
The timer enables a countdown to be set, when the time
has elapsed a buzzer sounds.
To set the timer proceed as follows:
1. press the TIMER button
H. The display shows:
N.
2. Press the
*
and
)
buttons to set the desired time.
3. When the buttons are released the timer begins
counting down and the current time appears on the
display.
R
4. After the time has elapsed a buzzer will sound,
and this can be switched off by pressing any button
(except the
*
and
)
buttons). The symbol
H
will
switch off.
!!
!!
! The timer does not switch the oven on or off.
Adjusting the volume of the buzzer
After selecting and confirming the clock settings, use the
)
button to adjust the volume of the alarm buzzer.
Setting the cooking time with a delayed start
First decide which cooking mode you wish to use and set
a suitable temperature using the SELECTOR and
THERMOSTAT knobs on the oven.
At this point it is possible to set the cooking time:
1. Press the COOKING TIME button
$
.
2. Within 4 seconds of having pressed this button, set the
desired amount of time by pressing the
*
and
)
buttons.
If, for example, you wish to set a cooking time of 30
minutes, the display will show:
N.
3. 4 seconds after the buttons are released, the
current time (for example 10.00) reappears on the
display with the symbol
m
and the letter A (AUTO).
Next the desired cooking end time must be set:
4. Press the END COOKING TIME button
%
.
5. Within 4 seconds of having pressed this button,
adjust the cooking end time by pressing the
*
and
)
buttons. If, for example, you want cooking to end
at 13.00, the display shows:
O
6. 4 seconds after the buttons are released, the
current time (for example 10.00) reappears on the
display with the letter A (AUTO).
P
At this point, the oven is programmed to switch on
automatically at 12:30 and switch off after 30
minutes, at 13.00.

8
GB
Setting the cooking time with an immediate start
Follow the above procedure for setting the cooking time
(points 1-3).
When the letter A appears, this indicates that both the
cooking time and the end cooking time have been
programmed in AUTO mode. To restore the oven to
manual operation, after each AUTO cooking mode press
the COOKING TIME
$
and END COOKING TIME
%
buttons simultaneously.
The symbol
m
will remain lit, along with the oven, for
the entire duration of the cooking programme.
The set cooking duration can be displayed at any time by
pressing the COOKING TIME button
$>$
, and the
cooking end time may be displayed by pressing the END
COOKING TIME button
%
. When the cooking time has
elapsed a buzzer sounds. To stop it, press any button
apart from the
*
and
)
buttons.
Cancelling a previously set cooking programme
Press the COOKING TIME button
$
and the
COOKING END TIME
%
simultaneously.
Correcting or cancelling previously set data
The data entered can be changed at any time by
pressing the corresponding button (TIMER, COOKING
TIME or COOKING END TIME) and the
*
or
)
button.
When the cooking time data is cancelled, the cooking end
time data is also cancelled automatically, and vice versa.
If the oven has already been programmed, it will not
accept cooking end times which are before the start of the
programmed cooking process.

GB
9
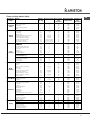
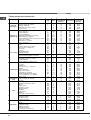
Oven cooking advice table
Cooking
modes
Foods Weight
(in kg)
Rack Position Pre-heating
time
(minutes)
Recommended
temperature
Cooking
time
(minutes)
Traditional
Oven
Duck
Roast veal or beef
Pork roast
Biscuits (short pastry)
Tarts
1
1
1
-
1
3
3
3
3
3
15
15
15
15
15
200
200
200
180
180
65-75
70-75
70-80
15-20
30-35
Baking
Mode
Tarts
Fruit cakes
Plum cake
Sponge cake
Stuffed pancakes (on 2 racks)
Small cakes (on 2 racks)
Cheese puffs (on 2 racks)
Cream puffs (on 3 racks)
Biscuits (on 3 racks)
Meringues (on 3 racks)
0.5
1
0.7
0.5
1.2
0.6
0.4
0.7
0.7
0.5
3
2 or 3
3
3
2 and 4
2 and 4
2 and 4
1 and 3 and 5
1 and 3 and 5
1 and 3 and 5
15
15
15
15
15
15
15
15
15
15
180
180
180
160
200
190
210
180
180
90
20-30
40-45
40-50
25-30
30-35
20-25
15-20
20-25
20-25
180
Frozen food
Pizza
Courgette and prawn pie
Country style spinach pie
Turnovers
Lasagne
Golden Rolls
Chicken morsels
0.3
0.4
0.5
0.3
0.5
0.4
0.4
2
2
2
2
2
2
2
-
-
-
-
-
-
-
250
200
220
200
200
180
220
12
20
30-35
25
35
25-30
15-20
2re-cooked food
Golden chicken wings
0.4
2
-
200
20-25
Fast
cooking
Fresh Food
Biscuits (short pastry)
Plum cake
Cheese puffs
0.3
0.6
0.2
2
2
2
-
-
-
200
180
210
15-18
45
10-12
Multi-
cooking
Pizza (on 2 racks)
Lasagne
Lamb
Roast chicken + potatoes
Mackerel
Plum cake
Cream puffs (on 2 racks)
Biscuits (on 2 racks)
Sponge cake (on 1 rack)
Sponge cake (on 2 racks)
Savoury pies
1
1
1
1+1
1
1
0.5
0.5
0.5
1
1.5
2 and 4
3
2
2
and 4
2
2
2 and 4
2 and 4
2
2 and 4
3
15
10
10
15
10
10
10
10
10
10
15
230
180
180
200
180
170
190
180
170
170
200
15-20
30-35
40-45
60-70
30-35
40-50
20-25
10-15
15-20
20-25
25-30
Pizza Mode
Pizza
Roast veal or beef
Chicken
0.5
1
1
3
2
2 or 3
15
10
10
220
220
180
15-20
25-30
60-70
Soles and cuttlefish
Squid and prawn kebabs
Cuttlefish
Cod filet
Grilled vegetables
Veal steak
Sausages
Hamburgers
Mackerels
Toasted sandwiches (or toast)
0.7
0.6
0.6
0.8
0.4
0.8
0.6
0.6
1
4 and 6
4
4
4
4
3 or 4
4
4
4
4
4
-
-
-
-
-
-
-
-
-
-
Max
Max
Max
Max
Max
Max
Max
Max
Max
Max
10-12
8-10
10-15
10-15
15-20
15-20
15-20
10-12
15-20
3-5
Barbecue
With rotisserie
(where present)
Veal on the spit
Chicken on the spit
Lamb on the spit
1.0
1.5
1.0
-
-
-
5
5
5
Max
Max
Max
80-90
70-80
70-80
Grilled chicken
Cuttlefish
1.5
1.5
2
2
10
10
200
200
55-60
30-35
Gratin
With rotisserie
(where present)
Veal on the spit
Lamb on the spit
Chicken (on the spit) +
potatoes (roasted)
1.5
1.5
1.5
-
-
2
2
2
5
5
5
5
200
200
200
200
70-80
70-80
70-75
70-75

10
GB
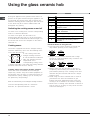
Using the glass ceram ic hob
The glue applied on the gaskets leaves traces of
grease on the glass. Before using the appliance, we
recommend you remove these with a special non-
abrasive cleaning product. During the first few hours
of use there may be a smell of rubber which will
disappear very quickly.
Switching the cooking zones on and off
To switch on a cooking zone, turn the corresponding
knob in a clockwise direction.
To switch it off again, turn the knob in an
anticlockwise direction until it is in the "0" position.
If the ELECTRIC HOTPLATE ON indicator light is lit,
this shows that at least one hotplate on the hob is
switched on.
Cooking zones
The hob is equipped with electric halogen heating
elements. When they are in use the following items
on the hob become red.
A. The cooking zone with
halogen heating elements.
B. The residual heat indicator
light: this indicates that the
temperature of the
corresponding cooking zone
is greater than 60°C, even when the heating element
has been switched off but is still hot.
Cooking zones with halogen heating elements
These emit heat via radiation from the halogen
lamps they contain. They have similar properties to
gas burners: they are easy to control and reach set
temperatures quickly, allowing you to actually see
the power they are providing.
Do not stare directly at the halogen heating elements.
Turn the corresponding knob in a clockwise
direction, to a position between 1 and 6.
Setting Normal or Fast Plate
0
Off
1
Cooking vegetables, fish
2
Cooking potatoes (using steam) soups,
chickpeas, beans.
3
Continuing the cooking of large quantities
of food, minestrone
4
For roasting (average)
5
For roasting (above average)
6
For browning and reaching a boil in a
short time.
Practica l advice on using the hob
Use pans with a thick, flat base to ensure that
they adhere perfectly to the cooking zone.
Always use pans with a diameter that is large
enough to cover the hotplate fully, in order to use
all the heat produced.
Always make sure that the base of the pan is
completely clean and dry: this ensures that the
pans adhere perfectly to the cooking zones and
that both the pans and the hob last for a longer
period of time.
Avoid using the same cookware that is used on
gas burners: the heat concentration on gas
burners may have warped the base of the pan,
causing it not to adhere to the surface correctly.
Never leave a cooking zone switched on without a
pan on top of it, as doing so may cause the zone
to become damaged.
A
A
A
A
B

GB
11
Precautions and tips
This appliance has been designed and manufactured in
compliance with international safety standards.
The following warnings are provided for safety reasons and
must be read carefully.
General safety
These instructions are only valid for the countries
whose symbols appear in the manual and on the
serial number plate.
The appliance was designed for domestic use inside the
home and is not intended for commercial or industrial
use.
The appliance must not be installed outdoors, even
in
covered areas. It is extremely dangerous to leave the
appliance exposed to rain and storms.
Do not touch the appliance with bare feet or with wet or
damp hands and feet.
The appliance must be used by adults only for the
preparation of food, in accordance with the instructions
provided in this booklet.
The
instruction booklet accompanies a class 1
(insulated) or class 2 - subclass 1 (recessed between 2
cupboards) appliance.
When the appliance is in use, the heating elements
and some parts of the oven door become extremely
hot. Make sure you don'
t touch them and keep
children well away.
Make sure that the power supply cables of other
electrical appliances do not come into contact with the
hot parts of the oven.
The openings used for the ventilation and dispersion of
heat must never be covered.
Do not place unstable or
misshapen pans on the
electric hotplates; this will help to avoid spills. Position
them on the hob with the handles turned towards the
centre of the appliance.
Always use oven gloves when placing cookware in the
oven or when removing it.
Do not use flammable liquids (alcohol, petrol, etc...) near
the appliance while it
is in use.
Do not place flammable material in the lower storage
compartment or in the oven itself. If the appliance is
switched on accidentally, it could catch fire.
Always make sure the knobs are in the 0 position when
the appliance is not in use.
When unplugging the appliance, always pull the
plug
from the mains socket; do not pull on the cable.
Never perform any cleaning or maintenance work
without having disconnected the appliance from the
electricity mains.
If the appliance breaks down, under no circumstances
should you attempt to repair the appliance yourself.
Repairs carried out by inexperienced persons may
cause injury or further malfunctioning
of the appliance.
Contact Assistance.
Do not rest heavy objects on the open oven door.
The internal surfaces of the compartment (where
present) may become hot.
The glass ceramic hob is resistant to mechanical
shocks, but it may crack (or even break) if hit with a
sharp object such as a tool. If this
happens, disconnect
the appliance from the electricity mains immediately and
contact a Service Centre.
If the surface of the hob is cracked, switch off the
appliance to prevent electric shocks from occurring.
Remember that the temperature of the cooking zones
remains relatively high for at least thirty minutes after
they have been switched off.
Keep any object that could melt away from the hob, for
example plastic and aluminium objects, or products with
a high sugar content. Keep plastic or aluminium objects
away from the hob: if you forget them on surfaces that
are still hot, they may cause serious damage to the hob.
Do not place
metal objects (knives, spoons, pan lids,
etc.) on the hob as they may become hot.
Disposal
When disposing of packaging material: observe local
legislation so that the packaging may be reused.
The European Directive 2002/96/EC relating to Waste
Electrical and Electronic Equipment (WEEE) states that
household appliances should not be disposed of using
the normal solid urban waste cycle. Exhausted
appliances should be collected separately in order to
optimise the
cost of re-using and recycling the materials
inside the machine, while preventing potential damage
to the atmosphere and to public health. The crossed-out
dustbin is marked on all products to remind the owner of
their obligations regarding separated waste collection.
Exhausted appliances may be collected by the public
waste collection service, taken to suitable
collection
areas in the area or, if permitted by current national
legislation, they may be returned to the dealers as part of
an exchange deal for a new equivalent product.
All major manufacturers of household appliances
participate in the creation and organisation of systems
for the collection and disposal of old and disused
appliances.
Respecting and conserving the
environment
You can help to reduce the peak load of the electricity
supply network companies by using the oven in the
hours between late afternoon and the early hours of the
morning.
Always keep the oven door closed when using the
BARBECUE and GRATIN modes: to attain best results
and to save energy (approximately
10%).
Check the door seals regularly and wipe them clean to
ensure they are free of debris so that they adhere
properly to the door, thus avoiding heat dispersion.

12
GB
Switching the appliance off
Disconnect your appliance from the electricity supply
before carrying out any work on it.
Cleaning the appliance
Never use steam cleaners or pressure cleaners on
the appliance.
Clean the glass part of the oven door using a
sponge and a non-abrasive cleaning product, then
dry thoroughly with a soft cloth. Do not use rough
abrasive material or sharp metal scrapers as these
could scratch the surface and cause the glass to
crack.
The stainless steel or enamel-coated external parts
and the rubber seals may be cleaned using a
sponge that has been soaked in lukewarm water
and neutral soap. Use specialised products for the
removal of stubborn stains. After cleaning, rinse and
dry thoroughly. Do not use abrasive powders or
corrosive substances.
The inside of the oven should ideally be cleaned
after each use, while it is still lukewarm. Use hot
water and detergent, then rinse well and dry with a
soft cloth. Do not use abrasive products.
The accessories can be washed like everyday
crockery, and are even dishwasher safe.
Dirt and grease should be removed from the control
panel using a non-abrasive sponge or a soft cloth.
Stainless steel can be marked by hard water that
has been left on the surface for a long time, or by
aggressive detergents containing phosphorus. After
cleaning, rinse well and dry thoroughly. Any
remaining drops of water should also be dried.
Inspecting the oven seals
Check the door seals around the oven regularly. If the
seals are damaged, please contact your nearest After-
sales Service Centre. We recommend that the oven is
not used until the seals have been replaced.
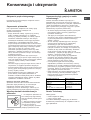
Replacing the oven light bulb
1. After disconnecting the oven
from the electricity mains,
remove the glass lid covering
the lamp socket (see figure).
2. Remove the light bulb and
replace it with a similar one:
voltage 230 V, wattage 25 W,
cap E 14.
3. Replace the lid and reconnect the oven to the
electricity supply.
Cleaning the glass ceramic hob
Do not use abrasive or corrosive detergents (for example,
products in spray cans for cleaning barbecues and ovens),
stain removers, anti-rust products, powder detergents or
sponges with abrasive surfaces: these may scratch the
surface beyond repair.
It is usually sufficient simply to wash the hob using
a damp sponge and dry it with absorbent kitchen
roll.
If the hob is particularly dirty, rub it with a special
glass ceramic cleaning product, then rinse well and
dry thoroughly.
To remove more stubborn dirt, use a suitable
scraper (this is not supplied
with the appliance).
Remove spills as soon as possible, without waiting
for the appliance to cool, to avoid residues forming
crusty deposits. You can obtain excellent results by
using a rustproof steel wire sponge - specifically
designed for glass ceramic surfaces - soaked in
soapy water.
If plastic or sugary substances have accidentally
been melted
on the hob, remove them immediately
with the scraper, while the surface is still hot.
Once it is clean, the hob may be treated with a
special protective maintenance product: the
invisible film left by this product protects the
surface from drips during cooking. This
maintenance should be carried out while the
appliance is
warm (not hot) or cold.
Always remember to rinse the appliance well with
clean water and dry it thoroughly: residues can
become encrusted during subsequent cooking
processes.
Glass ceramic hob
cleaners
Available from
Window scraper Razor blade
scrapers
DIY Stores
Replacement blades DIY Stores,
supermarkets,
chemists
COLLO luneta
HOB BRITE
Hob Clean
SWISSCLEANER
Boots, Co-op stores,
department stores, Regional
Electricity Company shops,
supermarkets
Assistance
Please have the following information to hand:
The appliance model (Mod.).
The serial number (S/N).
This information can be found on the data plate located
on the appliance and/or on the packaging.
Care and maintenance

GB
13
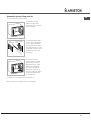
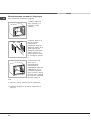
Assembling the sliding rack kit
To assemble the sliding racks:
1. Remove the two
frames, lifting them
away from the spacers
A (see figure).
2. Choose which shelf
to use with the sliding
rack. Paying attention
to the direction in which
the sliding rack is to be
extracted, position joint
B and then joint C on
the frame.
3. Secure the two
frames with the guide
rails using the holes
provided on the oven
walls (see diagram).
The holes for the left
frame are situated at
the top, while the holes
for the right frame are
at the bottom.
4. Finally, fit the frames on the spacers A.
Do not place the sliding racks in position 5.
D
A
B
C
Left
guide rail
Right guide
rail
Direction
of extraction

PL
KUCHENKA I PIEKARNIK
Spis treci
Instalacja, 15-16
Ustawienie i wypoziomowanie
Pod³¹czenie do sieci elektrycznej
Tabela charakterystyk
Opis urz¹dzenia, 17
Widok ogólny
Panel kontrolny
Uruchomienie i u¿ytkowanie, 18-22
Uruchomienie piekarnika
Programy pieczenia
Praktyczne porady dotycz¹ce pieczenia
Programowanie pieczenia z u¿yciem programatora
elektronicznego
Tabela pieczenia w piekarniku
U¿ytkowanie p³yty grzejnej ze szk³a
ceramicznego, 23
W³¹czanie i wy³¹czanie stref pieczenia
Strefy pieczenia
Zalecenia i rodki ostro¿noci, 24
Ogólne zasady bezpieczeñstwa
Zalecenia dotycz¹ce odpadów
Oszczêdnoæ i ochrona rodowiska
Konserwacja i utrzymanie, 25-26
Od³¹czenie pr¹du elektrycznego
Czyszczenie urz¹dzenia
Wymiana ¿arówki owietleniowej w piekarniku
Czyszczenie p³yty grzejnej ze szk³a ceramicznego
Serwis Techniczny
Monta¿ zestawu prowadnic lizgowych
Instrukcja obs³ugi
CE6VP6 U
CE6VP6 X U
English, 1
PL
Polski, 14
GB

15
PL
Nale¿y zachowaæ niniejsz¹ instrukcjê, aby móc z
niej korzystaæ w ka¿dej chwili. W przypadku
sprzeda¿y, odst¹pienia lub przeniesienia urz¹dzenia,
nale¿y upewniæ siê, czy instrukcja zosta³a
przekazana wraz z nim.
Nale¿y uwa¿nie przeczytaæ instrukcjê: zawiera ona
wa¿ne informacje dotycz¹ce instalacji, u¿ytkowania i
bezpieczeñstwa.
Instalacja urz¹dzenia powinna zostaæ wykonana
zgodnie z niniejszymi instrukcjami i przez
wykwalifikowany personel.
Wszelkie dzia³ania w zakresie regulacji lub
konserwacji musz¹ byæ wykonywane przy kuchence
od³¹czonej od zasilania elektrycznego.
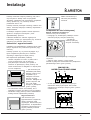
Ustawienie i wypoziomowanie
Mo¿liwe jest zainstalowanie urz¹dzenia obok mebli,
których wysokoæ nie przekracza wysokoci p³yty
roboczej.
Nale¿y upewniæ siê, czy ciana stykaj¹ca siê z
ty³em urz¹dzenia wykonana jest z materia³u
niepalnego i odpornego na ciep³o (T 90°C).
Dla zapewnienia prawid³owej instalacji:
ustawiæ urz¹dzenie w kuchni, w jadalni lub w
innym pomieszczeniu (nie w ³azience);
jeli p³aszczyzna kuchenki jest wy¿sza w
stosunku do p³aszczyzny mebli, powinny one
zostaæ umieszczone w odleg³oci co najmniej 600
mm od urz¹dzenia;
jeli kuchenka jest
instalowana pod szafk¹
wisz¹c¹, powinna ona
znajdowaæ siê w
odleg³oci minimum
420 mm od p³yty
kuchenki. Odleg³oæ ta
powinna wynosiæ 700
mm, jeli szafki
wisz¹ce s¹ ³atwopalne
(patrz rysunek);
nie umieszczaæ zas³on za kuchenk¹, ani w
odleg³oci mniejszej ni¿ 200 mm od jej krawêdzi;
ewentualne okapy powinny zostaæ zainstalowane
wed³ug zaleceñ odpowiedniej instrukcji.
Wypoziomowanie
Jeli konieczne jest
wypoziomowanie urz¹dzenia,
nale¿y przykrêciæ nó¿ki
regulacyjne, dostarczane jako
wyposa¿enie, w odpowiednich
gniazdach umieszczonych w
rogach podstawy kuchenki
(patrz rysunek).
Nó¿ki* mocowane s¹ w
otworach pod podstaw¹
kuchenki.
Pod³¹czenie do sieci elektrycznej
Monta¿ przewodu zasilaj¹cego
Otwarcie skrzynki zaciskowej:
Pos³uguj¹c siê rubokrêtem podwa¿yæ boczne
zatrzaski pokrywy skrzynki zaciskowej;
Poci¹gn¹æ i
otworzyæ pokrywê
skrzynki zaciskowej.
Zamontowaæ przewód wykonuj¹c nastêpuj¹ce
czynnoci:
odkrêciæ rubê zacisku i ruby styków
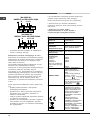
Mostki s¹ fabrycznie dostosowane do pod³¹czenia
jednofazowego 230 V (patrz rysunek).
NL
220-230V 1N~
H07RR-F 3x6 CEI-UNEL 35363
1
3
2
4
5
w celu wykonania pod³¹czeñ elektrycznych
elementów nale¿y wykorzystaæ dwa mostki
znajduj¹ce siê wewn¹trz skrzynki (patrz rysunek -
odnonik P)
Instalacja
HOOD
420
Min.
min. 650 mm. with hood
min.
700 mm. without hood
mm.
600
Min. mm.
420
Min. mm.
*
Znajduje siê tylko w niektórych modelach.
N
L2
L1
L3
P

16
PL
zamocowaæ przewód zasilaj¹cy w odpowiednim
zacisku i zamkn¹æ pokrywê.
Pod³¹czenie przewodu zasilaj¹cego do sieci.
Zamocowaæ na przewodzie znormalizowan¹ wtyczkê
dostosowan¹ do obci¹¿eñ wskazanych na tabliczce
znamionowej umieszczonej na urz¹dzeniu (patrz
tabela Dane techniczne).
W przypadku bezporedniego pod³¹czenia do sieci
konieczne jest zainstalowanie pomiêdzy
urz¹dzeniem a sieci¹ wy³¹cznika wielobiegunowego z
minimalnym otwarciem pomiêdzy stykami
wynosz¹cym 3 mm, dostosowanego do obci¹¿enia i
odpowiadaj¹cego obowi¹zuj¹cym normom krajowym
(przewód uziemienia nie powinien byæ przerywany
przez wy³¹cznik). Przewód zasilania powinien byæ
umieszczony tak, aby w ¿adnym punkcie jego
temperatura nie przekracza³a temperatury otoczenia
o 50°C.
Przed wykonaniem pod³¹czenia nale¿y upewniæ siê,
czy:
gniazdko posiada uziemienie i jest zgodne z
obowi¹zuj¹cymi przepisami;
gniazdko jest w stanie wytrzymaæ maksymalne
obci¹¿enie mocy urz¹dzenia, wskazane na
tabliczce znamionowej;
napiêcie zasilania odpowiada wartociom podanym
na tabliczce znamionowej;
gniazdko jest kompatybilne z wtyczk¹ urz¹dzenia.
Jeli gniazdko nie jest kompatybilne, wymieniæ
gniazdko lub wtyczkê; nie stosowaæ przed³u¿aczy
ani rozga³êników.
NL1L2
380-400V 2N~
H05RR-F 4x4 CEI-UNEL 35363
1
3
2
4
5
NL1L3L2
380-400V 3N~
H05RR-F 5x2.5 CEI-UNEL 35363
1
3
2
4
5
Po zainstalowaniu urz¹dzenia przewód elektryczny i
gniazdko pr¹du powinny byæ ³atwo dostêpne.
Kabel nie powinien byæ zginany ani przygniatany.
Przewód musi byæ okresowo sprawdzany i
wymieniany wy³¹cznie przez autoryzowany personel
techniczny.
Producent nie ponosi ¿adnej
odpowiedzialnoci za skutki wynik³e z
nieprzestrzegania powy¿szych zasad.
TABELA CHARAKTERYSTYK
Wymiary piekarnika
W x D x G
32x43,5x40 cm
Objêtoæ
lt. 56
Wymiary u¿ytkowe
szuflady do
podgrzewania potraw
szerokoæ 42 cm, g³êbokoæ
44 cm, wysokoæ 8,5 cm
Napiêcie i
czêstotliwoæ zasilania
elektrycznego
patrz tabliczka znamionowa
P³yta grzejna ze szk³a
ceramicznego
Przód lewa
Ty³ lewa
Ty³ prawa
Przód prawa
MAX moc poch³aniana
przez ceramiczne p³yty
grzejne
1700 W
1200 W
2100 W
1200 W
6200 W
ENERGY LABEL
Dyrektywa 2002/40/WE na
etykiecie piekarników
elektrycznych Norma EN
50304
Zu¿ycie energii konwekcja
naturalna - funkcja
ogrzewania: Tradycyjny;
Zu¿ycie energii deklaracja
Klasy konwekcja wymuszona -
funkcja ogrzewania:
Piekarnictwo
Niniejsze urz¹dzenie zosta³o
wyprodukowane zgodnie z
nastêpuj¹cymi dyrektywami
unijnymi: 73/23/EWG z dnia
19/02/73 (niskie napiêcie) z
póniejszymi zmianami
-
89/336/EWG z dnia 3/05/89
(zgodnoæ
elektromagnetyczna) z
póniejszymi zmianami
-
93/68/EWG z dnia 22/07/93 z
póniejszymi zmianami,
90/369/EWG z dnia 29/06/90
(gaz) z póniejszymi
zmianami, -93/68/EWG z dnia
22/07/93 z póniejszymi
zmianami, - 2002/96/WE.

17
PL
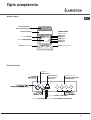
Opis urz¹dzenia
Widok ogólny
Panel kontrolny
Panel kontrolny
Poziom RUSZT
Poziom BRYTFANNA
PROWADNICE
ślizgu półek
pozycja 3
pozycja 2
pozycja 1
Płyta grzejna ze
szkła ceramicznego
Nóżka regulowana
Nóżka regulowana
pozycja 5
pozycja 4
Lampka kontrolna
FUNKCJONOWANIE
PIEKARNIKA
Kontrolka
TERMOSTAT
Elektroniczny
programator
pieczenia*
Przycisk MINUTNIK
Przycisk KONIEC PIECZENIA
Przycisk CZAS TRWANIA PIECZENIA

18
PL
Uruchomienie i u¿ytkowanie
Przy pierwszym w³¹czeniu nale¿y uruchomiæ pusty
piekarnik na przynajmniej jedn¹ godzinê, z
termostatem ustawionym na maksimum i z
zamkniêtymi drzwiczkami. Nastêpnie wy³¹czyæ go,
otworzyæ drzwiczki piekarnika i przewietrzyæ
pomieszczenie. Zapach, który siê wytworzy³, jest
skutkiem parowania substancji stosowanych w celu
zabezpieczenia piekarnika.
Aby skorzystaæ z piekarnika elektrycznego w
urz¹dzeniach wyposa¿onych w programator
elektroniczny, nale¿y nacisn¹æ równoczenie
przyciski
i (na wywietlaczu pojawi siê
symbol
), a nastêpnie wybraæ ¿¹dan¹ funkcjê
pieczenia.
Uruchomienie piekarnika
1. Wybraæ ¿¹dany program pieczenia obracaj¹c
pokrêt³em PROGRAMY.
2. Wybraæ temperaturê zalecan¹ dla danego
programu lub inn¹ ¿¹dan¹ temperaturê obracaj¹c
pokrêt³em TERMOSTAT.
Wykaz potraw z zalecanymi dla nich temperaturami
znajduje siê w odpowiedniej tabeli (patrz Tabela
pieczenia w piekarniku).
Podczas pieczenia mo¿na zawsze:
zmieniæ program pieczenia pos³uguj¹c siê
pokrêt³em PROGRAMY;
zmieniæ temperaturê pos³uguj¹c siê pokrêt³em
TERMOSTAT;
zaprogramowaæ czas trwania pieczenia i godzinê
jego zakoñczenia (patrz ni¿ej);
przerwaæ pieczenie przestawiaj¹c pokrêt³o
PROGRAMY na pozycjê 0.
Nie stawiaæ nigdy ¿adnych przedmiotów na dnie
piekarnika, gdy¿ grozi to uszkodzeniem emalii.
Wykorzystywaæ pozycjê 1 piekarnika jedynie w
przypadku pieczenia z u¿yciem ro¿na.
Naczynia do pieczenia stawiaæ zawsze na ruszcie
znajduj¹cym siê w wyposa¿eniu piekarnika.
Kontrolka TERMOSTAT
Jej zawiecenie siê sygnalizuje, ¿e piekarnik
wytwarza ciep³o. Ganie, kiedy wewn¹trz piekarnika
osi¹gniêta zostaje ustawiona temperatura. W tym
momencie kontrolka zapala siê i ganie
naprzemiennie, wskazuj¹c, ¿e termostat pracuje i
utrzymuje sta³¹ temperaturê.
Owietlenie piekarnika
W³¹cza siê przy ustawieniu pokrêt³a PROGRAMY na
dowoln¹ pozycjê, ró¿n¹ ni¿ 0, i pozostaje w³¹czone
tak d³ugo, jak d³ugo piekarnik pracuje. Po wybraniu
8
przy pomocy pokrêt³a, wiate³ko zapala siê bez
uruchamiania ¿adnego z elementów grzejnych.
Ch³odzenie poprzez wentylacjê
W celu zmniejszenia temperatury zewnêtrznej wentylator
ch³odz¹cy wytwarza strumieñ powietrza, który wychodzi
miêdzy panelem kontrolnym a drzwiczkami piekarnika.
Po zakoñczeniu gotowania wentylator pracuje dopóty,
dopóki piekarnik wystarczaj¹co siê nie och³odzi.

19
PL
Programy pieczenia
Dla wszystkich programów mo¿liwe jest ustawienie
temperatury w zakresie od 50 °C do MAX, z
wyj¹tkiem:
GRILL (zaleca siê ustawiaæ jedynie na MAX);
ZAPIEKANKA (zaleca siê, aby nie przekraczaæ
temperatury 200°C).
Program PIEKARNIK TRADYCYJNY
Uruchamiane s¹ dwa elementy grzewcze: dolny i
górny. Przy tym tradycyjnym sposobie pieczenia
lepiej jest stosowaæ tylko jeden poziom: przy
zastosowaniu wiêkszej liczby poziomów wystêpuje
niekorzystny rozk³ad temperatur.
Program PIEKARNIK DO WYPIEKU CIAST
W³¹cza siê tylny element grzejny oraz uruchamia siê
wentylator, zapewniaj¹c wewn¹trz piekarnika
delikatne i równomierne ciep³o. Ten program jest
przeznaczony do pieczenia delikatnych potraw (na
przyk³ad ciast dro¿d¿owych), przygotowywania
filetów mignon na trzech poziomach jednoczenie.
Program FAST COOKING
W³¹czaj¹ siê elementy grzejne i uruchamia siê
wentylator, zapewniaj¹c utrzymywanie sta³ej i
równomiernej temperatury w piekarniku.
Program nie wymaga wstêpnego nagrzewania.
Program ten jest szczególnie wskazany do
szybkiego pieczenia potraw wstêpnie
przygotowanych (mro¿onych lub podgotowanych).
Program MULTIPIECZENIE
W³¹czaj¹ siê wszystkie elementy grzejne (górny,
dolny oraz obwodowe) i uruchamia siê wentylator.
Poniewa¿ temperatura jest równomierna w ca³ym
piekarniku, powietrze piecze i przyrumienia ¿ywnoæ
w sposób równomierny. Jednoczenie mo¿na u¿ywaæ
maksymalnie dwóch poziomów.
Program PIEKARNIK DO PIZZY
W³¹czaj¹ siê dolny i obwodowy element grzejny oraz
uruchamia siê wentylator. To po³¹czenie umo¿liwia
szybkie nagrzanie piekarnika z silnym dop³ywem
ciep³a, zw³aszcza od do³u. W przypadku, gdy
wykorzystuje siê wiêcej ni¿ jeden poziom
równoczenie, konieczna jest ich zamiana miejscami
w po³owie pieczenia.
Program GRILL
Uruchamia siê centralna czêæ górnego elementu
grzewczego oraz ro¿en (jeli jest w danym modelu).
Wysoka temperatura skierowana bezporednio na
grill jest zalecana dla potraw wymagaj¹cych wysokiej
temperatury na powierzchni (befsztyki wo³owe i
cielêce, polêdwica, antrykot). Jest to program o
umiarkowanym zu¿yciu energii, idealny do pieczenia
niewielkich potraw. Umieciæ potrawê na rodku
rusztu, gdy¿ umieszczona w naro¿nikach nie
zosta³aby upieczona.
Program ZAPIEKANKA
W³¹cza siê górny element grzejny i uruchamia siê
wentylator oraz ro¿en (jeli jest w danym modelu).
£¹czy wymuszon¹ cyrkulacjê powietrza wewn¹trz
piekarnika z jednokierunkowym promieniowaniem
cieplnym. Zapobiega to przypaleniu powierzchni
potraw, zwiêkszaj¹c moc penetracji cieplnej.
Pieczenia GRILL oraz ZAPIEKANKA powinny byæ
wykonywane przy zamkniêtych drzwiczkach.
Ro¿en (tylko w niektórych modelach)
Aby uruchomiæ ro¿en
(patrz rysunek) nale¿y
postêpowaæ w nastêpuj¹cy
sposób:
1. umieciæ brytfannê w pozycji 1;
2. umieciæ uchwyt ro¿na w pozycji 3, a nastêpnie
umieciæ ro¿en w odpowiednim otworze
znajduj¹cym siê w tylnej ciance piekarnika;
3. uruchomiæ ro¿en, wybieraj¹c pokrêt³em
PROGRAMY
lub ;
Kiedy program
jest uruchomiony, otwarcie
drzwiczek powoduje zatrzymanie ro¿na.

20
PL
Praktyczne porady dotycz¹ce pieczenia
Podczas pieczenia z wentylatorem nie u¿ywaæ
poziomów 1 i 5: gor¹ce powietrze dzia³a na nie
bezporednio, co mog³oby spowodowaæ przypalenie
delikatnych potraw.
MULTIPIECZENIE
Stosowaæ pó³ki na pozycjach 2 i 4, a na pozycji 2
umieszczaæ potrawy wymagaj¹ce wy¿szej
temperatury.
Ustawiaæ brytfannê na dole, a ruszt na górze.
GRILL
Podczas pieczenia GRILL umieszczaæ ruszt w
po³o¿eniu 5, a brytfannê w po³o¿eniu 1 w celu
zebrania pozosta³oci po pieczeniu (sosy i/lub
t³uszcze). Podczas pieczenia ZAPIEKANKA
ustawiaæ ruszt w po³o¿eniu 2 lub 3, a brytfannê w
po³o¿eniu 1 w celu zebrania pozosta³oci po
pieczeniu.
Zaleca siê ustawiaæ poziom energii na wartoæ
maksymaln¹. Nie nale¿y siê niepokoiæ, jeli górny
grzejnik nie bêdzie stale w³¹czony: jego prac¹
steruje termostat;
PIEKARNIK DO PIZZY
Stosowaæ blachê z lekkiego aluminium, stawiaj¹c
j¹ na ruszcie znajduj¹cym siê w wyposa¿eniu
kuchenki. Korzystanie z brytfanny wyd³u¿a czas
pieczenia, a pizza rzadko jest chrupi¹ca.
W przypadku pizzy z wieloma dodatkami, zaleca
siê dodanie mozzarelli dopiero w po³owie
pieczenia.
Programowanie pieczenia z u¿yciem
programatora elektronicznego
Ustawianie zegara
Po pod³¹czeniu do sieci elektrycznej lub po black-out
na wywietlaczu pojawiaj¹ siê pulsuj¹ce cyfry 0.00.
W celu ustawienia godziny:
1. wcisn¹æ jednoczenie przyciski CZAS TRWANIA
PIECZENIA
$
oraz KONIEC PIECZENIA
%
;
2. w ci¹gu 4 sekund ustawiæ dok³adn¹ godzinê
wciskaj¹c przyciski
*
oraz
)
Za pomoc¹ przycisku
*
zwiêksza siê wartoæ czasu; za pomoc¹
przycisku
)
zmniejsza siê j¹ .
Po ustawieniu godziny programator przechodzi
automatycznie w tryb rêczny.
Ustawianie minutnika
Przy pomocy minutnika mo¿na ustawiæ odliczanie
wsteczne, po którego zakoñczeniu emitowany jest
sygna³ akustyczny.
W celu ustawienia minutnika:
1. wcisn¹æ przycisk MINUTNIK
H
. Na wywietlaczu pojawia
siê: N.
2. wcisn¹æ przyciski
*
oraz
)
w celu ustawienia
¿¹danego czasu;
3. po zwolnieniu przycisków rozpoczyna siê
odliczanie wsteczne, a na wywietlaczu pojawia siê
aktualna godzina: R
4. po up³ywie ustawionego czasu emitowany jest
sygna³ akustyczny, który mo¿na wy³¹czyæ wciskaj¹c
dowolny przycisk (z wyj¹tkiem przycisków
*
e
)
):
symbol
H
wy³¹cza siê.
Minutnik nie kontroluje w³¹czania i wy³¹czania
piekarnika.
Regulowanie g³onoci sygna³u akustycznego
Po dokonaniu wyboru i zatwierdzeniu ustawieñ
zegara, przy pomocy przycisku
)
, mo¿liwe jest
wyregulowanie g³onoci sygna³u akustycznego.
Programowanie czasu trwania pieczenia z
opónionym rozpoczêciem
Przede wszystkim nale¿y wybraæ ¿¹dany program
pieczenia oraz temperaturê, pos³uguj¹c siê
pokrêt³ami PROGRAMY i TERMOSTAT piekarnika.
Teraz mo¿liwe jest zaprogramowanie czasu trwania
pieczenia:
1. wcisn¹æ przycisk CZAS TRWANIA PIECZENIA
$
;
2. w ci¹gu 4 sekund ustawiæ ¿¹dany czas trwania
pieczenia wciskaj¹c przyciski
*
oraz
)
. Jeli, na
przyk³ad,czas trwania pieczenia zostanie
zaprogramowany na 30 minut, na wywietlaczu pojawi
siê: N
3. po zwolnieniu przycisków i up³ywie 4 sekund na
wywietlaczu ponownie pojawi siê aktualny czas (na
przyk³ad 10.00) wraz z symbolem
m
oraz liter¹ A
(AUTO):
Nastêpnie nale¿y zaprogramowaæ godzinê zakoñczenia
pieczenia:
4. wcisn¹æ przycisk KONIEC PIECZENIA
%
;
5. w ci¹gu 4 sekund ustawiæ ¿¹dan¹ godzinê zakoñczenia
pieczenia wciskaj¹c przyciski
*
oraz
)
. Jeli, na
przyk³ad, zamierza siê zakoñczyæ pieczenie o godzinie
13.00, na wywietlaczu pojawi siê: O
6. po zwolnieniu przycisków i up³ywie 4 sekund na
wywietlaczu ponownie pojawia siê aktualny czas
(na przyk³ad 10.00) wraz z liter¹ A (AUTO): P
Zgodnie z przedstawionym przyk³adem, piekarnik
w³¹czy siê automatycznie o godzinie 12.30 i
zakoñczy pracê po 30 minutach, o godzinie 13.00.
Strona jest ładowana ...
Strona jest ładowana ...
Strona jest ładowana ...
Strona jest ładowana ...
Strona jest ładowana ...
Strona jest ładowana ...
Strona jest ładowana ...
Strona jest ładowana ...
-
 1
1
-
 2
2
-
 3
3
-
 4
4
-
 5
5
-
 6
6
-
 7
7
-
 8
8
-
 9
9
-
 10
10
-
 11
11
-
 12
12
-
 13
13
-
 14
14
-
 15
15
-
 16
16
-
 17
17
-
 18
18
-
 19
19
-
 20
20
-
 21
21
-
 22
22
-
 23
23
-
 24
24
-
 25
25
-
 26
26
-
 27
27
-
 28
28


Indesit CE6VP6 (A) U instrukcja
- Kategoria
- Piekarniki
- Typ
- instrukcja
w innych językach
- English: Indesit CE6VP6 (A) U User guide
Powiązane dokumenty
-
Indesit CE6VP6 (A) U /HA instrukcja
-
-
-
-
-
-
-
HOTPOINT/ARISTON C 3V P6 (X) R /HA instrukcja
-
-