AAT NV-WIFISET-1 Instrukcja obsługi
- Kategoria
- Cyfrowe rejestratory wideo (DVR)
- Typ
- Instrukcja obsługi

RXCamView
U s e r ’s m a n u a l

All rights reserved © AAT Holding S.A.
RXCamView User’s manual ver. 1.0
2
FOREWORD INFORMATION
1. RXCamView - foreword information
RXCamView is mobile application available for Android and IOS. It allows for maintaining Novus
AHD DVRs. It can be downloaded from Google Play, or Apple Store for mobile device.
Main features of the application are:
“Live” view.
Remote search and playback.
Playback locally recorded video.
Operate PTZ function..
View locally saved captured pictures.
Capture the video and images.
Multiple devices supported.
Alarm manager, Push notification.
After launching the application, press the button to display main menu. It is shown below
Depending the OS version application can differ on few aspects.
Displaying „live” streams.
Playback the recordings.
Browse local recorded clips.
Browse local captured images.
Device Manager
Alarm panel
Help

RXCamView User’s manual ver. 1.0
All rights reserved © AAT Holding S.A.
3
ADDING NEW DEVICES
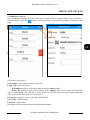
2. Adding new devices.
Open the Device manager from the main menu to add, delete or edit the DVRs. List of devices is
presented below. Press the button to add new device.. It opens device window as shown on the
right.
Fill the device properties:
Device name - name which is shown on the list.
Login Type - user can choose
IP/ Domain require to enter the IP address into the Address field.
Device ID requires to enter P2P identifier in the Address field. ID is written in DVR Main
menu / System panel / Info/ P2P ID or on the sticker on the DVR. ID can be also scanned using QR
code located in the same menu or on the sticker.
Client port consistent to one set in DVR (default 9000).
User Name - default admin.
Password - dafault none.
Press Save to keep settings and open the Live view window.

All rights reserved © AAT Holding S.A.
RXCamView User’s manual ver. 1.0
4
LIVE VIEW
Press the button to launch QR scanner (QR code scanner application is necessary). Scanner and
QR code from the main menu is shown below.
To remove the device from the list, drag the device to the left. Then button is displayed. Press it
and confirm.
3. Live view
Live view window can be opened from main menu. It consist the video screen and navigation buttons.
Opens device list to choose DVR or channel for displaying the video. Press the device to
expand channel list. Tick the the channels and press Select to display video from them.
Opens device list to choose DVR and channel for displaying the video. Press the device to
expand channel list. Selecting channel displays it in chosen window.
Press and hold channel window to drag it into another positon.
Pressing and holding channel window displays Trash bin icon. Drag the channel on the icon to
remove channel from the window.
Informs about currently displayed screen. Slide left or right video window to
change division screen.
Selection of the division type.

RXCamView User’s manual ver. 1.0
All rights reserved © AAT Holding S.A.
5
LIVE VIEW
Captures image. Press this button to capture and save image from selected channel. Press the
Capture All to save images from all channels. Open the Image from the main menu to browse
saved images.
Captures the video clip. Press the button display icons on the video window. Press the icon on the
channel to start recording clip. Press it again to end. Record All starts recording from all
channels. Stop All ends recording from all channels.
Intercom (not available)
Displays PTZ panel.
Allows to change the stream type (Mainstream or Substream) for selected channel.
Switches off live view from all channels. Press it again to return displaying.
Switches off/ on audio. For receiving the audio it is necessary to switch on Audio for particular
stream (main or substream).
Changes video proportion. Video may be streched to window, original proportion, 4:3, 16:9.

All rights reserved © AAT Holding S.A.
RXCamView User’s manual ver. 1.0
6
PLAYBACK
4. Playback
RXCamView allows to playback the recording saved in the DVR. Please select the Playback from the
Main Menu.
In order to playback the channel:
1. Press the or
to add device or channel.
2. Select the device or channel on the list.
3. Select year, month and day with recordings.
4. Select type of recordings:
All - all recordings.
Normal - recorded manually or according to schedule.
Alarm - recordings connected with motion detection or alarm input activation.
Motion - recordings connected with motion detection.
IO Record - recordings connected with alarm input activation.
5. press Confirm.
1
2
1

RXCamView User’s manual ver. 1.0
All rights reserved © AAT Holding S.A.
7
PLAYBACK
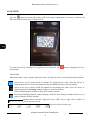
Playback window consists of video window, navigation buttons and chart.
Type of the recordings determine colors of the bar. Green color means normal recording. Blue color
means alarm input recording. Yellow color means motion detection recordings.
User can slide the chart to change the playbacked time. Yellow marker show actual time.
Navigation buttons allow for:
play / pause
Stop the playback
Play forward slower, playing with decreased speed of the video (x1/2, x1/4, x1/8, x1/16)
Play forward faster - playing with increased speed of the video. (x2, x4, x8, x16)
Display frame by frame.
Captures image. Press this button to capture and save image from selected channel. Press
the Capture All to save images from all channels. Open the Image from the main menu
to browse saved images.
Captures the video clip. Press the button display icons on the video window. Press the
icon on the channel to start recording clip. Press it again to end. Record All starts
recording from all channels. Stop All ends recording from all channels.
3
4
5

All rights reserved © AAT Holding S.A.
RXCamView User’s manual ver. 1.0
8
PLAYBACK RECORDED CLIPS
Switch off/ on audio. For receiving the audio it is necessary to switch on Audio for
particular stream (main or substream) in DVR menu.
Changes video proportion. It may be streched to window, original, 4:3, 16:9.
5. Playback recorded clips
Open the Record from the main menu to playback locally recorded clips. Device list contain
information about quantity of the recorded videos. Select the device to display video list. Tap on the
video to run playback. The Edit button allows to delete selected videos. Press the Clear button to
remove all the video clips from the memory.
6. Browse captured images
Open the Image from the main menu to browse captured images. It displays device list . Select the
device to display all images captured from this device. The Edit button allows to delete selected
videos. Press the Clear button to remove all the video clips from the memory.
Sending the image via other apps (email. Etc).
Display slideshow.
Delete image.

RXCamView User’s manual ver. 1.0
All rights reserved © AAT Holding S.A.
9
ALARM SUBSCRIPTION
7. Alarm subscription
Application allow to subscribe alarm from devices. Press the Alarm from the main menu. Then press
the button to display device list. On the list user can switch on subscription (off / Push). Push
notification is received when application is working in background.

All rights reserved © AAT Holding S.A.
RXCamView User’s manual ver. 1.0
10
ALARM SUBSCRIPTION
On the list there are displayed alarms with related devices, type of alarm, time of event.
Playback video ralated with the alarm.
Quantity of the new alarms (not handled) alarm.
Clear reset the alarm list.

2016-07-04 JM, MK
AAT Holding S.A., ul. Puławska 431, 02-801 Warszawa, Polska
tel.: 22 546 07 00, faks: 22 546 07 59

RXCamView
i ns t r u k cj a o b sł ug i

Wszelkie prawa zastrzeżone © AAT Holding S.A.
RXCamView instrukcja obsługi ver. 1.0
2
INFORMACJE WSTĘPNE
1. RXCamView- informacje wstępne
RXCamView jest aplikacją na urządzenia mobilne dla systemów Android i IOS. Umożliwia podgląd
wideo z rejestratorów AHD marki Novus. Aplikację można pobrać z Google Play, lub Apple Store
w zależności od systemu operacyjnego.
Główne cechy aplikacji:
Podgląd „na żywo”.
Zdalne wyszukiwanie i odtwarzanie nagrań.
Odtwarzanie lokalnych nagrań.
Obsługa kamer PTZ.
Podgląd lokalnie zapisanych obrazów.
Pobieranie wideo i zrzut obrazów.
Obsługa wielu urządzeń.
Obsługa alarmów, powiadomienia Push.
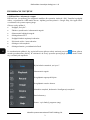
Po uruchomieniu aplikacji, aby wyświetlić menu główne należy nacisnąć przycisk .Menu główne
zostało przedstawione poniżej. W zależności od wersji systemu operacyjnego aplikacja może różnić
się, w niektórych aspektach.
Wyświetlanie strumieni „na żywo”.
Odtwarzanie nagrań.
Przeglądanie nagranych klipów.
Przeglądanie zrzutów obrazu.
Menadżer urządzeń, dodawanie i konfiguracja urządzeń
Panel alarmowy
Pomoc - opis funkcji programu (ang.)

RXCamView instrukcja obsługi ver. 1.0
Wszelkie prawa zastrzeżone © AAT Holding S.A.
3
DODAWANIE NOWYCH URZĄDZEŃ
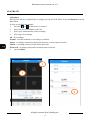
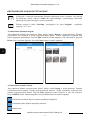
2. Dodawanie nowych urządzeń
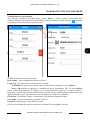
Aby otworzyć menadżera urządzeń proszę wybrać Device z menu. Zostanie wyświetlona lista
urządzeń dodanych do programu. W celu dodania urządzenia należy nacisnąć przycisk . Zostanie
wyświetlony ekran jak poniżej po prawej stronie.
Dodając urządzenie należy wprowadzić:
Device name - nazwa urządzenia widoczna na liście.
Login Type -Typ logowania, użytkownik może wybrać:
IP/ Domain wymaga wprowadzenia adresu IP lub domeny urządzenia w pole Address.
Device ID umożliwia połączenie z urządzeniem przez identyfikator P2P. W polu Address
należy podać ID urządzenia. ID znajduje się w menu głównym rejestratora w panelu System /
Informacje / P2P ID. Identyfikator urządzenia może zostać również dodany poprzez skanowanie kodu
QR znajdującego się we wspomnianym menu lub naklejce na obudowie rejestratora.
Client port - port klienta, zgodny z ustawionym w rejestratorze (domyślnie 9000).
User Name - nazwa użytkownika (domyślnie „admin”).
Password - hasło dostępu (domyślnie bez hasła).
Proszę nacisnąć Save aby zapisać ustawienia i uruchomić okno podglądu „na żywo”.

Wszelkie prawa zastrzeżone © AAT Holding S.A.
RXCamView instrukcja obsługi ver. 1.0
4
PODGLĄD “NA ŻYWO”
Naciśnięcie uruchamia skanowanie kodu QR. Wymagana jest osobna aplikacja umożliwiająca
skanowanie kodów QR. Poniżej przedstawiono przykładowy skaner i kod QR w menu rejestratora.
Aby usunąć urządzenie w menadżerze należy przesunąć urządzenie z listy w lewo. Zostanie
wyświetlony przycisk . Naciśnięcie go powoduje usunięcie urządzenia.
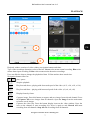
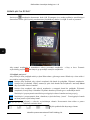
3. Podgląd „na żywo”
Aby otworzyć okno podglądu należy wybrać Live view z głównego menu. Składa się z okna wideo i
przycisków nawigacyjnych.
Otwiera listę urządzeń, aby wybrać urządzenie lub kanał do podglądu. Wybranie urządzenia,
rozwija listę z kanałami. Należy zaznaczyć pole obok kanału lub urządzenia i nacisnąć Select
aby wyświetlić obraz z kanałów.
Otwiera listę urządzeń, aby wybrać urządzenie a następnie kanał do podglądu. Wybranie
urządzenia, rozwija listę z kanałami. Wybranie kanału wyświetla go we wskazanym oknie.
Naciśnięcie i przytrzymanie umożliwia przeciągnięcie okna z kanałem na inną pozycję.
Naciśnięcie i przytrzymanie okna z kanałem, wyświetla ikonę „kosza” . Przeciągnięcie kanału
na ikonę usuwa wyświetlany kanał.
Informuje o obecnie wyświetlanym ekranie. Przesuwanie okna wideo w prawo
bądź lewo zmienia ekran.
Wybór podziału dla aktywnego ekranu

RXCamView instrukcja obsługi ver. 1.0
Wszelkie prawa zastrzeżone © AAT Holding S.A.
5
PODGLĄD “NA ŻYWO”
Zrzut obrazu. Aby zapisać obraz należy nacisnąć ikonę na wybranym kanale. Naciśnięcie
Capture All zapisuje obrazu ze wszystkich kanałów. Aby przeglądać zapisane obrazy w menu
głównego należy wybrać Image.
Nagrywa klip wideo. Aby rozpocząć nagrywanie należy nacisnąć ikonę na wybranym kanale.
Ponowne naciśnięcie kończy nagrywanie. Record All rozpoczyna nagrywanie klipu ze
wszystkich kanałów. Stop All kończy nagrywanie klipu dla wszystkich kanałów.
Interkom (funkcjonalność niedostępna)
Wyświetla panel PTZ.
Umożliwia wybór rodzaju strumienia dla wskazanego kanału MainStream - strumień główny,
SubStream- strumień pomocniczy.
Wyłącza podgląd wideo ze wszystkich kanałów. Ponowne naciśnięcie przywraca wyświetlanie.
Wyłączenie / włączenie odtwarzania dźwięku odbieranego przez rejestrator. Aby dźwięk był
odbierany należy włączyć Audio dla odpowiedniego, wyświetlanego strumienia (głównego lub
pomocniczego).
Zmiana proporcji wideo. Streching -rozciągnięcie do okna, Original - oryginalne proporcje, 4:3,
16:9.

Wszelkie prawa zastrzeżone © AAT Holding S.A.
RXCamView instrukcja obsługi ver. 1.0
6
ODTWARZANIE
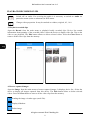
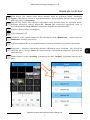
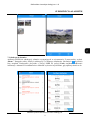
4. Odtwarzanie
Aplikacja RXCamView umożliwia odtwarzanie nagrań z rejestratora. Aby skorzystać z tej funkcji
należy wybrać Playback z głównego menu.
Aby odtwarzać kanał należy
1. Nacisnąć lub
aby wskazać kanał do odtwarzania.
2. Wybrać urządzenie lub kanał z listy.
3. Wybrać rok, miesiąc i dzień z nagraniami.
4. Wybrać typ nagrań :
All - wszystkie nagrania
Normal - nagrywanie normalne wg harmonogramu lub włączone ręcznie
Alarm - nagrywanie alarmowe (wywołane detekcją ruchu lub aktywacją wejścia alarmowego)
Motion - nagrywania wywołane detekcją ruchu
IO Record - nagrania wywołane aktywacją wejścia alarmowego.
5. potwierdzić Confirm.
1
2
1

RXCamView instrukcja obsługi ver. 1.0
Wszelkie prawa zastrzeżone © AAT Holding S.A.
7
ODTWARZANIE
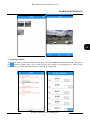
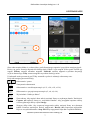
Okno odtwarzania składa się z okna wideo, grafu ilustrującego nagrania i przycisków nawigacyjnych.
Kolory na grafie ilustrują nagrania dla danego dnia, kanału i typu nagrań. Kolor grafu określa typ
nagrań. Zielony oznacza normalne nagrania. Niebieski oznacza nagrania wywołane aktywacją
wejścia alarmowego. Żółty oznacza nagrania wywołane detekcją ruchu.
Użytkownik może przesuwać graf. Żółty znacznik w połowie wskazuje odtwarzany czas.
Przyciski nawigacyjne umożliwiają:
Odtwarzanie / pauza
Zatrzymanie odtwarzania
Odtwarzanie w zwolnionym tempie (x1/2, x1/4, x1/8, x1/16)
Odtwarzanie w przyspieszonym tempie (x2, x4, x8, x16)
Wyświetlanie “klatka po klatce”
Zrzut obrazu. Aby zapisać obraz należy nacisnąć ikonę na wybranym kanale. Naciśnięcie
Capture All zapisuje obrazy ze wszystkich kanałów. Aby przeglądać zapisane obrazy
w menu głównego należy wybrać Image.
Nagrywa klip wideo. Aby rozpocząć nagrywanie należy nacisnąć ikonę na wybranym
kanale. Ponowne naciśnięcie kończy nagrywanie. Record All rozpoczyna nagrywanie
klipu ze wszystkich kanałów. Stop All kończy nagrywanie klipu dla wszystkich kanałów.
3
4
5

Wszelkie prawa zastrzeżone © AAT Holding S.A.
RXCamView instrukcja obsługi ver. 1.0
8
ODTWARZANIE LOKALNYCH NAGRAŃ
Wyłączenie / włączenie odtwarzania dźwięku odbieranego przez rejestrator. Aby dźwięk
był odbierany należy włączyć Audio dla odpowiedniego, wyświetlanego strumienia
(głównego lub pomocniczego) w menu rejestratora.
Zmiana proporcji wideo. Streching -rozciągnięcie do okna, Original - oryginalne
proporcje , 4:3, 16:9.
5. Odtwarzanie lokalnych nagrań
Aby odtwarzać lokalnie zarejestrowane klipy, należy wybrać Record z menu głównego. Zostanie
wyświetlona lista urządzeń z liczbą zarejestrowanych klipów. Wybór urządzenia wyświetla listę
klipów pogrupowanych dniami. Przycisk Edit umożliwia wybór nagrań w celu ich usunięcia. Przycisk
Delete usuwa wybrane nagrania. Przycisk Clear usuwa wszystkie nagrania.
6. Odtwarzanie zrzutów obrazu
Aby odtwarzać lokalnie zarejestrowane obrazy, należy wybrać Image z menu głównego. Zostanie
wyświetlona lista urządzeń z liczbą zarejestrowanych obrazów. Wybór urządzenia wyświetla listę
zrzutów pogrupowanych dniami. Przycisk Edit umożliwia wybór obrazów w celu ich usunięcia.
Przycisk Delete usuwa wybrane nagrania. Przycisk Clear usuwa wszystkie nagrania.
Umożliwia przesłanie zdjęcia za pomocą aplikacji urządzenia.
Uruchamia pokaz slajdów zapisanych obrazów.
Usuwa zrzut.

RXCamView instrukcja obsługi ver. 1.0
Wszelkie prawa zastrzeżone © AAT Holding S.A.
9
SUBSKRYPCJA ALARMÓW
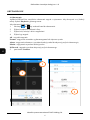
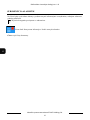
7. Subskrypcja alarmów
Aplikacja umożliwia subskrypcję alarmów występujących w rejestratorach. Z menu należy wybrać
Alarm . Następnie należy włączyć subskrypcję z wybranego urządzenia. Naciśnięcie wyświetla
listę urządzeń Przełączenie przycisku z pozycji OFF do pozycji Push uruchamia odbieranie
informacji o alarmach. Powiadomienia o alarmach są również wyświetlane, gdy aplikacja działa w tle.
Strona się ładuje...
Strona się ładuje...
-
 1
1
-
 2
2
-
 3
3
-
 4
4
-
 5
5
-
 6
6
-
 7
7
-
 8
8
-
 9
9
-
 10
10
-
 11
11
-
 12
12
-
 13
13
-
 14
14
-
 15
15
-
 16
16
-
 17
17
-
 18
18
-
 19
19
-
 20
20
-
 21
21
-
 22
22


AAT NV-WIFISET-1 Instrukcja obsługi
- Kategoria
- Cyfrowe rejestratory wideo (DVR)
- Typ
- Instrukcja obsługi
w innych językach
- English: AAT NV-WIFISET-1 User manual