JANOME 1200d Instruction book
- Kategoria
- Maszyny do szycia
- Typ
- Instruction book

Instruction Book
Manual de Instrucciones
Instrukcja obsługi


1
Please note that on disposal, this product must be safely recycled in accordance with relevant National
legislation relating to electrical/electronic products. If in doubt please contact your retailer for guidance.
(European Union only)
IMPORTANT SAFETY INSTRUCTIONS
This appliance is not intended for use by persons (including children) with reduced physical, sensory or
mental capabilities, or lack of experience and knowledge, unless they have been given supervision or
instruction concerning use of the appliance by a person responsible for their safety.
Children should be supervised to ensure that they do not play with this sewing machine.
When using an electrical appliance, basic safety precautions should always be followed, including the
following:
This sewing machine is designed and manufactured for household use only.
Read all instructions before using this sewing machine.
DANGER— To reduce the risk of electric shock:
1. An appliance should never be left unattended when plugged in. Always unplug this sewing
machine from the electric outlet immediately after using and before cleaning.
WARNING— To reduce the risk of burns, fire, electric shock, or injury to persons:
1. Do not allow to be used as a toy. Close attention is necessary when this sewing machine is used
by or near children.
2. Use this appliance only for its intended use as described in this owner’s manual.
Use only attachments recommended by the manufacturer as contained in this owner’s manual.
3. Never operate this sewing machine if it has a damaged cord or plug, if it is not working properly, if
it has been dropped or damaged, or dropped into water.
Return this sewing machine to the nearest authorized dealer or service center for examination,
repair, electrical or mechanical adjustment.
4. Never operate the appliance with any air opening blocked. Keep ventilation openings of this
sewing machine and foot controller free from accumulation of lint, dust and loose cloth.
5. Never drop or insert any object into any opening.
6. Do not use outdoors.
7. Do not operate where aerosol (spray) products are being used or where oxygen is being
administered.
8. To disconnect, turn all controls to the off (“O”) position, then remove plug from outlet.
9. Do not unplug by pulling on cord. To unplug, grasp the plug, not the cord.
10. Keep fingers away from all moving parts. Special care is required around the sewing machine
needle and/or cutting blade.
11. Always use the proper needle plate. The wrong plate can cause the needle to break.
12. Do not use bent needles.
13. Do not pull or push fabric while stitching. It may deflect the needle causing it to break.
14. Switch this sewing machine off (“O”) when making any adjustment in the needle area, such as
threading the needle, changing the needle, threading the bobbin or changing the presser foot, and
the like.
15. Always unplug this sewing machine from the electrical outlet when removing covers, lubricating, or
when making any other adjustments mentioned in this owner’s manual.
SAVE THESE INSTRUCTIONS
The design and specifications are subject to change without a prior noticece.

2
El diseño y las especificaciones están conforme a cambio sin un aviso anterior.
INSTRUCCIONES IMPORTANTES DE SEGURIDAD
Esta máquina no fue concebida para ser usada por personas (incluyendo a los niños) con
capacidades físicas, sensoriales o mentales reducidas, o bien con falta de experiencia y
conocimientos, salvo si están supervisadas o han recibido instrucciones relativas al uso de la máquina
por parte de una persona encargada de su seguridad.
Los niños deben ser vigilados para asegurarse de que no jueguen con la máquina.
Cuando se utiliza un aparato eléctrico es necesario tomar ciertas precauciones básicas de seguridad,
como las siguientes:
Lea todas las instrucciones antes de utilizar este aparato.
PELIGRO — Para reducir el riesgo de choque eléctrico:
1. No deje nunca el aparato sin vigilancia mientras esté enchufado. Desenchufe siempre la
máquina de la toma eléctrica inmediatamente después de utilizarla y antes de limpiarla.
AVISO — Para reducir el riesgo de quemaduras, incendio, choque eléctrico o heridas a
personas:
1. No deje que nadie utilice la máquina como si fuera un juguete. Preste especial atención cuando
la máquina de coser sea utilizada por niños o cerca de ellos.
2. Utilice el aparato únicamente para los usos descritos en este manual del usuario.
Utilice únicamente los accesorios recomendados por el fabricante e indicados en este manual
del usuario.
3. Nunca utilice esta máquina de coser si tiene un enchufe o un cable en mal estado, si no funciona
correctamente, si se ha golpeado o está dañada, o si ha caído en agua.
Envíe esta máquina de coser a la tienda o centro de mantenimiento más próximo si es necesario
examinarla, repararla o someterla a ajustes eléctricos o mecánicos.
4. No utilice nunca el aparato si tiene bloqueada alguna vía de ventilación. Mantenga las vías de
ventilación de esta máquina de coser y el pedal de control libres de pelusa, polvo y trozos de
tela.
5. No deje caer ni introduzca ningún tipo de objeto en ninguna abertura.
6. No utilice la máquina en exteriores.
7. No utilice la máquina donde se empleen productos de aerosol (spray) o donde se administre
oxígeno.
8. Para desconectar, ponga todos los controles en la posición OFF (“0”) y desenchufe la máquina.
9. No tire del cable para desenchufar. Para desenchufar hay que agarrar el enchufe, no el cable.
10. Mantenga los dedos alejados de todas las piezas móviles. Tenga especial cuidado alrededor de
la aguja de la máquina de coser.
11. Utilice siempre la placa de agujas adecuada. Una placa incorrecta puede hacer que se rompa la
aguja y/o lámina de corte.
12. No utilice agujas que estén dobladas.
13. No tire de la tela ni la empuje mientras esté cosiendo. La aguja podría desviarse y romperse.
14. Apague esta máquina de coser (“0”) cada vez que tenga que hacer ajustes en la zona de la
aguja, como enhebrar la aguja, cambiar la aguja, enhebrar la bobina, cambiar el prensatelas y
operaciones similares.
15. Desenchufe esta máquina de coser cada vez que tenga que desmontar cubiertas, engrasar, o
hacer cualquier otro de los ajustes mencionados en este manual del usuario.
CONSERVE ESTAS INSTRUCCIONES
Rogamos tenga en cuenta que para la destruccion y/o reciclado de este producto debe seguir las normas
de la legislacion nacional relativa a productos electricos y/o electronicos. En caso de duda Pregunte a su
distribuidor. (Sólo Unión Europea)

3
:$ĩ1(:6.$=Ï:.,'27<&=Ą&(%(=3,(&=(ē67:$
Podczas użytkowania urządzeń elektrycznych powinny być zachowane podstawowe środki bezpieczeństwa,
włącznie z następującymi:
Ten owerlok został zaprojektowany tylko do użytku domowego. Przeczytaj wszystkie instrukcje przed
rozpoczęciem pracy z owerlokiem.
1.
Urządzenia podłączonego do źródła zasilania nie wolno pozostawiać bez nadzoru.
Owerlok należy wyłączyć niezwłocznie po zakończeniu pracy oraz przed czyszczeniem.
2675=(ĩ(1,(
—
Aby wyeliminować ryzyko poparzenia, pożaru, porażenia prądem lub obrażeń:
1.
Owerlok nieprzeznaczona jest do zabawy. Gdy urządzenie używane jest przez dzieci lub w ich
obecności, konieczny jest ścisły nadzór osoby dorosłej.
2.
Maszyna powinna być używana zgodnie z jej przeznaczeniem opisanym w niniejszej instrukcji. Należy
używać tylko wyposażenia rekomendowanego przez producenta i opisanego w niniejszej instrukcji.
3.
Nie wolno używać maszyny, gdy: uszkodzony jest przewód lub wtyczka, urządzenie działa
niewłaściwie na skutek upuszczenia lub zniszczenia, urządzenie wcześniej wpadło do wody. Gdy
zaistnieją powyższe okoliczności, maszynę należy dostarczyć do najbliższego autoryzowanego
przedstawiciela lub centrum serwisowego, aby tam dokonano przeglądu, naprawy lub regulacji.
4.
Nie wolno używać urządzenia jeśli którykolwiek z otworów wentylacyjnych jest zablokowany.
Należy dbać o to by otwory wentylacyjne maszyny oraz rozrusznika nożnego były wolne od
zalegającego kurzu.
5.
Nie wolno wtykać ani wkładać żadnych obcych obiektów do otworów w maszynie.
6.
Nie wolno używać maszyny na wolnym powietrzu.
7.
Nie wolno obsługiwać maszyny w miejscach, gdzie używane są produkty w aerozolu
(sprayu) oraz tam, gdzie stosowano tlen.
8.
Aby odłączyć urządzenie od zasilania, należy wyłączyć wszystkie przełączniki a następnie wyjąć wtyczkę.
9.
Nie wolno odłączać urządzenia od zasilania ciągnąc za przewód. Aby wyłączyć maszynę z sieci należy
chwycić za wtyczkę, nie za przewód.
10.
Należy trzymać palce z daleka od ruchomych części urządzenia szczególnie od igły i ostrza
obcinającego.
11.
Zawsze należy używać odpowiedniej płytki ściegowej. Użycie niewłaściwej płytki może złamać igłę.
12.
Nie wolno używać wygiętych igieł.
13.
Nie wolno ciągnąć ani popychać materiału podczas szycia gdyż może to spowodować wygięcie się
lub złamanie igły.
14.
Należy wyłączyć maszynę (“O”), zanim dokona się jakiekolwiek regulacji przy igle. Szczególnie
dotyczy to czynności takich jak: nawlekanie igły, zmiana igły, nawlekania szpulki czy zmiany
stopki dociskowej..
15.
Zawsze należy odłączyć urządzenie od źródła zasilania, zanim przystąpi do zdjęcia obudowy,
smarowania lub innej czynności regulującej ujętej w niniejszej instrukcji.
,16758.&-ĉ1$/(ĩ<=$&+2:$û
W przypadku wyzbycia się maszyny, musi być ona bezpiecznie zutylizowana zgodnie z
prawem krajowym odnośnie produktów elektrycznych. W razie wątpliwości skontaktuj się ze
sprzedawcą.
1,(%(=3,(&=(ē67:2Aby wyeliminować ryzyko porażenia prądem:
Projekt i specyfikacja mogą ulec zmianie bez wcześniejszego powiadomienia.uprzedniego powiadomienia.

4
TABLE OF CONTENTS
SECTION I
Machine Parts
Front View .................................................................. 8
Side Cover ............................................................... 10
Front Cover .............................................................. 10
Standard Accessories .............................................. 12
SECTION II
Machine Set-up
Attaching the Thread Guide Pole ............................ 14
Placing the Foam Pads and Spool Holders............. 14
Connecting Machine to Power Supply..................... 16
How To Set Up Machine Using the
Program Display Panel ......................................... 18
What the Symbols Represent .................................. 20
C. Program Number.............................................. 22
D. Differential Feed ............................................... 22
E. Stitch Length .................................................... 22
F. Needle Position ................................................. 24
G. Cutting Width ................................................... 24
H. Upper Knife ...................................................... 26
I. 2-Thread Converter ........................................... 26
J. Overlock Cover or Sewing Table ...................... 28
K. Presser Foot ..................................................... 30
L. Needle Plate Setting Knob ............................... 30
M. Chain Looper Tension ...................................... 32
Needles .................................................................... 32
SECTION III
Threading
Thread Guide Bar .................................................... 34
Accessories For Decorative Threads ...................... 36
Tension Release Clips ............................................. 36
Snap-on Thread Guide ............................................ 36
Quick Reference Threading Charts ....................38-54
TOP COVER STITCHES ......................................... 56
Preparing Machine for Top Cover Stitch ............... 56
Spreader Device Threading.................................. 58
Threading the Needle with
the Needle Threader ............................................ 60
Tension Release Lever ............................................ 60
DETAILED THREAD ROUTE CHARTS .............62-72
SECTION IV
Test Sewing
Setting Foot Pressure .............................................. 74
Controlling Sewing Speed ....................................... 74
Waste Tray ............................................................... 74
Starting to Sew ........................................................ 76
Back-Tack Device .................................................... 78
Securing the End of Seam ....................................... 80
SECTION V
Adjustments
Thread Tension ........................................................ 82
Balanced Tension................................................82-86
Differential Feed....................................................... 88
Stitch Length ............................................................ 90
Sewing Overlock Stitches on Extra
Heavyweight Fabrics ............................................ 92
SECTION VI
Sewing Techniques
Overlocking Outside Corners .................................. 94
Overlocking Inside Corners ..................................... 94
Sewing Curved Edges ............................................. 94
Removing Stitches from Fabric ............................... 96
Chainstitch – Turning Corners ................................. 96
Cover Hem ............................................................... 98
Turning Corners ..................................................... 100
Triple Cover Hem –
Topstitching an Overlock Seam .......................... 102
SECTION VII
Maintenance
Cleaning and Oiling ............................................... 104
Replacing the Upper knife ..................................... 106
TROUBLESHOOTING .......................................... 108
INDEX .................................................................... 111
NOTE:
Information found in this instruction manual is current
at the time of printing. We reserve the right to change
and update specifications and information as needed.

5
SECCIÓN I
Partes de la máquina
Vista frontal ................................................................9
Cubierta lateral ........................................................ 11
Cubierta frontal ........................................................ 11
Accesorios estándar ................................................13
SECCIÓN II
Instalación de la máquina
Fijación del brazo guía del hilo ................................15
Fijación de las almohadillas y los portacarretes ......15
Conexión de la máquina a la alimentación..............17
Configuración de la máquina utilizando el panel
del visor de programas .........................................19
Significado de los símbolos .....................................21
C. Número del programa ......................................23
D. Arrastre diferencial ...........................................23
E. Longitud de la puntada .....................................23
F. Posición de la aguja ..........................................25
G. Ancho del corte ................................................25
H. Cuchilla superior...............................................27
I. Convertidor de dos hilos ....................................27
J. Cubierta de sobrehilado o mesa de coser ........29
K. Pie prensatelas .................................................31
L. Perilla de ajuste de la placa de la aguja ...........31
M. Tensión del áncora de cadeneta (marrón) .......33
Aguja ........................................................................33
SECCIÓN III
Enhebrado
Barra guía del hilo....................................................35
Accesorios para hilos decorativos ...........................37
Presillas de liberación de tensión ............................37
Enganche de la guía del hilo ...................................37
Tablas de referencia rápida para el enhebrado . 39-55
PUNTADA DE CUBIERTA SUPERIOR ...................57
Preparación de la máquina para puntada
de cubierta superior ..............................................57
Enhebrado del extensor...........................................59
Enhebrado de la aguja con el enhebrador ..............61
Palanca de liberación de tensión.............................61
GRÁFICOS DETALLADOS DE TRAYECTO
DE ENHEBRADO ........................................... 63-73
SECCIÓN IV
Cosido de prueba
Ajuste de la presión del prensatelas .......................75
Control de la velocidad de costura ..........................75
Bandeja de restos ....................................................75
Empezando a coser .................................................77
Dispositivo para costura de presilla .........................79
Fijación del extremo de la costura ...........................81
SECCIÓN V
Ajustes
Tensión del hilo ........................................................83
Equilibrado de la tensión ................................... 83-87
Arrastre diferencial...................................................89
Longitud de la puntada ............................................91
Puntada de sobrehilado en tejidos extra gruesos ...93
SECCIÓN VI
Técnicas de costura
Sobrehilado en el exterior de las esquinas .............95
Sobrehilado en el interior de las esquinas ..............95
Costura de bordes curvos........................................95
Retirada de puntadas del tejido ...............................97
Costura de cadeneta: giro de esquinas ...................97
Dobladillo .................................................................99
Giro de esquinas ................................................... 101
Dobladillo triple: sobrehilado de una costura
de contorno ........................................................ 103
SECCIÓN VII
Mantenimiento
Limpieza y engrasado........................................... 105
Sustitución de la cuchilla superior ........................ 107
DETECCIÓN Y RESOLUCIÓN
DE PROBLEMAS .............................................. 109
ÍNDICE ................................................................... 112
NOTA:
La información contenida en este manual de
instrucciones está actualizada en el momento de su
impresión. Nos reservamos el derecho a modificar y
actualizar la información y las especificaciones en caso
necesario.
ÍNDICE

SPIS TREŚCI
CZĘŚĆ I CZĘŚĆ IV
Części maszyny Szycie testowe
Widok z przodu .................................................................. 9 Ustawianie docisku stopki ............................................... 75
Pokrywa boczna .............................................................. 11 Kontrola prędkości szycia ................................................ 75
Pokrywa przednia ........................................................... 11 Pojemnik na odpadki ....................................................... 75
Standardowe akcesoria .................................................. 13 Rozpoczęcie szycia ......................................................... 77
Urządzenie do wzmacniania szwu .................................. 79
CZĘŚĆ II
Wzmacnianie zakończenia szwu ..................................... 81
Ustawianie maszyny
Mocowanie masztu prowadnicy nici ................................ 15
CZĘŚĆ V
Umieszczanie podkładek oraz uchwytów do szpulek ...... 15
Regulowanie maszyny
Podłączanie maszyny do prądu ....................................... 17 Naprężenie nici ............................................................... 83
Jak ustawić maszynę, używając panelu wyboru programu Właściwe naprężenie ................................................. 83-87
…………………………………………............................... 19 Podawanie materiału ...................................................... 89
Znaczenie symboli ……................................................... 21 Długość ściegu ................................................................ 91
C. Numer programu ........................................................ 23 Wykonywanie ściegów owerlokowych na bardzo
D. Podawanie materiału .................................................. 23 ciężkich materiałach ........................................................ 93
E. Długość ściegu ............................................................ 23
F. Pozycja igły ................................................................. 25
CZĘŚĆ VI
G. Szerokość cięcia ......................................................... 25
Techniki szycia
H. Nożyk górny ................................................................ 27 Obrębianie rogów zewnętrznych ..................................... 95
I. Przetwornik na dwie nici ............................................... 27 Obrębianie rogów wewnętrznych .................................... 95
J. Pokrywa owerloku lub stolik ......................................... 29 Szycie zakrzywionych krawędzi ...................................... 95
K. Stopka dociskowa ....................................................... 31 Usuwanie ściegów z materiału ........................................ 97
L. Dźwignia ustawiająca płytkę ściegową ........................ 31 Ścieg łańcuszkowy - obracanie pod kątem prostym ........ 97
M. Naprężenie chwytacza łańcuszkowego ...................... 33 Ścieg drabinkowy ............................................................ 99
Igły .................................................................................. 33 Obracanie pod kątem prostym ...................................... 101
Potrójny ścieg drabinkowy - stebnowanie ściegiem
CZĘŚĆ III
owerlokowym ................................................................ 103
Nawlekanie
Pręt prowadnicy nici ........................................................ 35
CZĘŚĆ VII
Akcesoria dla nici dekoracyjnych ..................................... 37
Konserwacja maszyny
Zaciski uwalniające naprężenie ....................................... 37 Czyszczenie i oliwienie ................................
.................. 105
Prowadnica zatrzaskowa ................................................ 37 Wymiana nożyka górnego ............................................. 107
Podręczne karty pomocnicze dla nawlekania ............ 39-55
ŚCIEGI Z GÓRNYM PRZEPLOTEM ............................... 57
ROZWIĄZYWANIE PROBLEMÓW .............................. 110
Przygotowanie maszyny do szycia ściegiem z
górnym przeplotem ......................................................... 57
SPIS ALFABETYCZNY ................................................ 113
Nawlekanie rozszerzacza ............................................... 59
Nawlekanie igły przy pomocy nawlekacza ...................... 61
UWAGA:
Dźwignia zwalniająca naprężenie ................................... 61
Informacje zawarte w instrukcji są aktualne na moment jej
wydrukowania. Zastrzegamy sobie prawo do zmiany i
aktualizacji specyfikacji i informacji w razie potrzeby.
SZCZEGÓŁOWY WYKRES ŚCIEŻKI NICI ................ 63-73
6

7

8
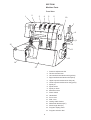
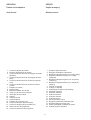
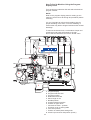
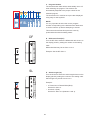
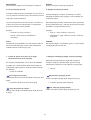
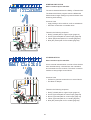
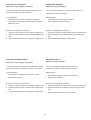
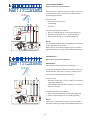
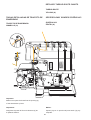
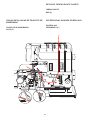
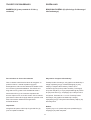
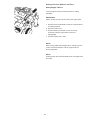
SECTION I
Machine Parts
Front View
1. Pressure adjustment dial
2. Tension release lever
3. Left needle thread tension dial (yellow)
4. Right needle thread tension dial (blue)
5. Upper looper thread tension dial (red)
6. Lower looper thread tension dial (green)
7. Spool pin
8. Spool holder
9. Spool pin base
10. Machine socket
11. Power switch
12. Handwheel
13. Front cover
14. Side cover
15. Cutting width window
16. Differential feed dial (DF)
17. Stitch length dial (SL)
18. Program display panel
19. Program selection dial
1
2
3
45
6
7
8
9
10
11
12
13
14
15
16
17
18
19

9
CZĘŚĆ I
Części maszyny
Widok z przodu
1.
Pokrętło regulacji docisku
2.
Dźwignia zwalniająca naprężenie
3.
Regulator naprężenia lewej nici od igły (żółty)
4.
Regulator naprężenia prawej nici od igły
(niebieski)
5.
Regulator naprężenia górnej nici chwytacza
(czerwony)
6.
Regulator naprężenia dolnej nici chwytacza
(zielony)
7.
Trzpień na szpulkę
8.
Uchwyt na szpulkę
9.
Podstawa dla trzpienia (na szpulkę)
10.
Gniazdko maszyny
11.
Włącznik zasilania
12.
Koło zamachowe
13.
Pokrywa czołowa
14.
Pokrywa boczna
15.
Okno szerokości cięcia
16.
Regulator podawania materiału (DF)
17.
Regulator długości ściegu (SL)
18.
Panel wyświetlający aktualny program
19.
Pokrętło wyboru programu
1. Control de ajuste de presión
2. Palanca de liberación de tensión
3. Control de tensión del hilo de la aguja izquierda
(amarillo)
4. Control de tensión del hilo de la aguja derecha
(azul)
5. Control de tensión del hilo del áncora superior
(rojo)
6. Control de tensión del hilo del áncora inferior
(verde)
7. Pasador de carrete
8. Portacarretes
9. Base del pasador del carrete
10. Toma de corriente de la máquina
11. Interruptor de encendido
12. Volante
13. Cubierta frontal
14. Cubierta lateral
15. Ventana de ancho de corte
16. Control de arrastre diferencial (DF)
17. Control de longitud de la puntada (SL)
18. Panel del visor de programas
19. Control de selección de programas
SECCIÓN I
Partes de la máquina
Vista frontal

10
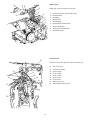
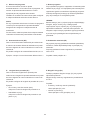
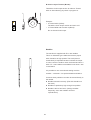
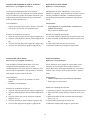
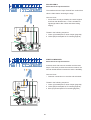
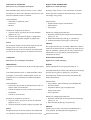
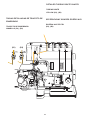
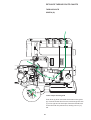
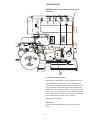
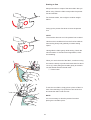
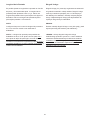
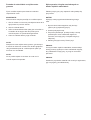
Side Cover
Grasp the cover and open it to the left.
1. Presser foot lever and thread cutter
2. Needle clamp
3. Needle(s)
4. Presser foot
5. Needle plate
6. Needle plate release lever
7. Cutting width dial
8. Upper knife release knob
9. Spreader holder
Front Cover
Pull the cover to the right and open it towards you.
10. Top cover lever
11. 2-thread converter
12. Upper looper
13. Lower looper
14. Chain looper
15. Upper knife
16. Lower knife
17. Back-tack device
18. Needle plate setting knob
11
12
13
14
15
16
17
18
1
2
3
4
5
6
7
8
9
10

11
Pokrywa boczna
Chwyć za pokrywę i otwórz ją w lewo.
1.
Dźwignia stopki dociskowej oraz przycinarka do nici
2.
Zacisk igły
3.
Igła/y
4. Stopka dociskowa
5.
Płytka ściegowa
6.
Dźwignia uwalniająca płytkę ściegową
7.
Pokrętło regulacji szerokości cięcia
8.
Dźwignia uwalniająca górny nożyk
9.
Uchwyt dla rozszerzarki
Cubierta lateral
Tome la cubierta y ábrala hacia la izquierda.
1. Palanca del pie prensatelas y cortahilos
2. Palanca de la cubierta superior
3. Sujeción de la aguja
4. Aguja(s)
5. Pie prensatelas
6. Placa de la aguja
7. Palanca de liberación de la placa de la aguja
8. Control de ancho del corte
9. Perilla de liberación de la cuchilla superior
Cubierta frontal
Tire de la cubierta hacia la derecha y ábrala hacia
usted.
11.
Convertidor de dos hilos
12.
Áncora superior
13.
Áncora inferior
14.
Áncora de cadeneta
15.
Cuchilla superior
16.
Cuchilla inferior
17.
Dispositivo para pespuntes
18.
Perilla de ajuste de la placa de la aguja
Pokrywa przednia
Pociągnij pokrywę w prawą stronę i otwórz ją w
kierunku do siebie.
10. Dźwignia pokrywy wierzchniej
11. Przetwornik na dwie nici
12. Chwytacz (górny)
13. Chwytacz (dolny)
14. Chwytacz łańcuszkowy
15. Nożyk górny
16. Nożyk dolny
17. Urządzenie do wykonywania wstecznej fastrygi
18.
Pokrętło regulacji płytki ściegowej
10. Soporte del extensor

12
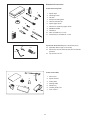
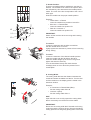
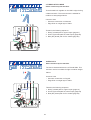
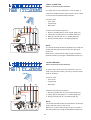
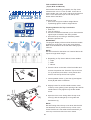
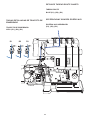
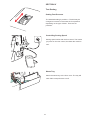
Standard Accessories
In the Accessory Box
1. Spool caps
2. Cleaning brush
3. Oil tube
4. Snap-on thread guide
5. Tension release clip
6. Spare upper knife
7. Wrench for replacing upper knife
8. Needle threader
9. Tweezers
10. Allen screwdriver 1.5 mm
11. Assortment of needles EL x 705
Top Cover Accessories (In the accessory box)
12. Spreader Device (top cover hook)
13. Round Top Cover Guide (insert into R2 needle
position)
14. Top Cover Foot “R”
9
10
11
12
13
14
In the Carton Box
1. Dust cover
2. Spool holders
3. Foam pads
4. Sewing table
5. Waste tray
6. Thread guide pole
7. Foot control
3
4
5
2
1
6
7
8
1
4
2
3
5
7
6

13
Standardowe akcesoria
W pudełku na akcesoria znajdują się:
1. Nakrętki na szpulkę
2. Pędzelek do czyszczenia
3. Tubka z olejem
4. Prowadnica nici (na zatrzask)
5. Zacisk
6. Zapasowy nożyk górny
7. Klucz nasadowy do wymiany nożyka górnego
8. Nawlekacz nici
9. Pęseta
10. Śrubokręt 1.5 mm
11. Zestaw igieł EL x 705
Accesorios Estándar
En la caja de accesorios
1. Tapones de carrete
2. Cepillo de limpieza
3. Tubo de aceite
4. Enganche de la guía del hilo
5. Presillas de liberación de tensión
6. Cuchilla superior de repuesto
7. Llave para sustituir la cuchilla superior
8. Enhebrador de la aguja
9. Pinzas
10. Destornillador Allen de 1,5 mm
11. Surtido de agujas EL x 705
Accesorios de cubierta superior
12. Extensor (gancho de cubierta superior)
13. Guía redonda de cubierta superior (insertar en la
posición R2 de la aguja)
14. Pie “R” de cubierta superior
En la caja de cartón
1. Cubierta antipolvo
2. Portacarretes
3. Almohadillas
4. Mesa de coser
5. Bandeja de restos
6. Brazo guía del hilo
7. Pedal
Akcesoria w pokrywie górnej (w pojemniku na
akcesoria)
12. Rozszerzacz
13. Okrągła prowadnica (nakłada się ją w pozycji igły
R2)
14. Stopka dociskowa “R”
W kartonie znajdują się:
1. Pokrowiec
2. Uchwyty do szpulek
3. Podkładki
4. Stolik
5. Pojemnik na strzępki
6. Maszt prowadnicy nici
7. Rozrusznik nożny

14
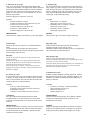
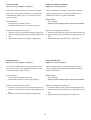
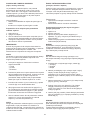
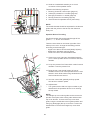
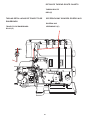
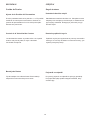
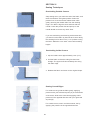
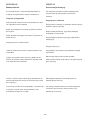
SECTION II
Machine Set-up
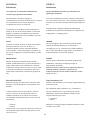
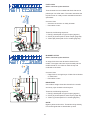
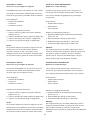
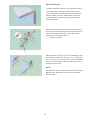
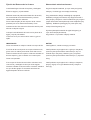
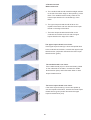
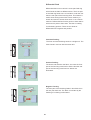
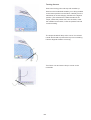
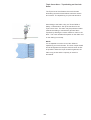
Attaching the Thread Guide Pole
1. Insert the thread guide pole into the spool pin
base located at the back of the machine. Make
sure the slot of the thread guide pole grips the rib
in the base hole.
2. Pull the thread guide pole to its highest position.
Align the thread guide portion with the spool pins.
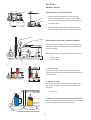
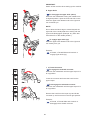
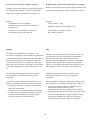
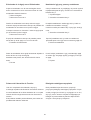
Placing the Foam Pads and Spool Holders
Remove the spool holders. Place the foam pads and
the spool holders. The foam pads help stabilizing the
spools of thread.
Both thread cones and spools of thread can be used.
q Foam pads
w Spool holder
1. Thread cones
For thread cones, use the spool holders. Place the
thread cone on the spool holder and push the cone as
far as it will go.
2. Spools of thread
For spools of thread, remove the spool holder. Place
the spool of thread on the spool pin and attach the
spool cap.
e Spool cap
3. Spools of decorative thread (specialty threads)
Place the spool directly on the foam pad to prevent the
thread from slipping underneath the spool.
w
q
e
3
1
2

15
CZĘŚĆ II
Ustawianie maszyny
Mocowanie masztu prowadnicy nici
1.
Umieść maszt w odpowiednim miejscu na podstawie,
znajdującej się przy trzpieniu szpulki (z tyłu
maszyny). Upewnij się, że spód masztu poprawnie
zazębił się we właściwym otworze, znajdującym się
na podstawie.
2. Wyciągnij maszt do jego najwyższej pozycji.
Wyrównaj części prowadnicy ze szpulkami.
Umieszczanie podkładek oraz uchwytów do
szpulek
Zdejmij uchwyty szpulek. Umieść podkładki, po czym
nałóż uchwyty szpulek. Podkładki pomagają
stabilizować szpulki, by podawanie nici odbywało się
we właściwy sposób.
Można stosować zarówno stożki, jak i szpulki nici.
q Podkładki
w Uchwyt na szpulkę
1.
Nici w stożkach
Dla nici w stożkach, użyj uchwytów na szpulkę.
Umieść stożek na uchwycie i wepchnij go do oporu.
2.
Nici w szpulkach
Dla nici w szpulkach: zdejmij uchwyt szpulki. Umieść
szpulkę na trzpieniu i załóż pokrywę.
e Pokrywa
3.
Szpulka z nicią dekoracyjną (specjalną nicią)
Umieść szpulkę bezpośrednio na podkładkę, aby
ochronić nić przed osunięciem się pod szpulkę.
SECCIÓN II
Instalación de la Máquina
Fijación del Brazo Guía del Hilo
1. Inserte el brazo guía del hilo en la base del
pasador del carrete situada en la parte posterior
de la máquina. Compruebe que la ranura del
brazo guía del hilo agarre la lengüeta del orificio
de la base.
2. Coloque el brazo guía del hilo en la posición más
elevada. Alinee la guía del hilo con los pasadores
del carrete.
Fijación de las Almohadillas y los
Portacarretes
Coloque las almohadillas y los portacarretes. Las
almohadillas ayudan a estabilizar los carretes del hilo.
Es posible utilizar carretes cónicos y carretes de hilo.
q Almohadillas
w Portacarretes
1. Carretes cónicos
Utilice los portacarretes con los carretes cónicos.
Coloque el carrete cónico en el portacarretes y
empújelo hasta que haga tope.
2. Carretes de hilo
Para utilizar carretes de hilo, retire el portacarretes.
Coloque el carrete de hilo en el pasador del carrete y
ponga el tapón del carrete.
e Tapón de carrete
3. Carretes de hilo decorativo (hilos especiales)
Coloque el carrete directamente sobre la almohadilla
para evitar que el hilo se deslice bajo el carrete.

16
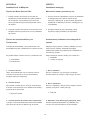
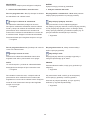
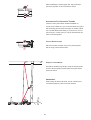
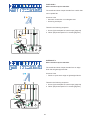
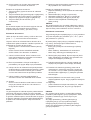
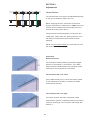
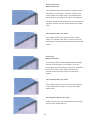
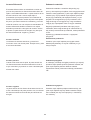
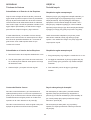
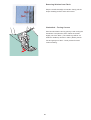
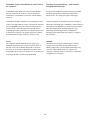
Connecting Machine to Power Supply
The power switch should be off. Before connecting the
power cord/foot control, make sure the voltage and
frequency shown on the machine are identical to your
electrical power. Insert the machine/foot control plug
into the machine socket and the power supply plug into
the wall outlet.
For Your Safety
1. While the machine is in operation, always keep your
eye on the sewing area and do not touch any
moving parts – needle(s), handwheel, upper knife,
loopers, etc.
2. Always turn off the power switch and unplug the
machine from the power supply:
• when leaving the machine unattended
• when attaching or removing parts
• when cleaning the machine.
3. Do not place anything on the foot control.
Must use foot control YC-482M.
The symbol "O" of a switch indicates the "off" position of
a switch.

17
Podłączanie maszyny do prądu
Włącznik zasilania powinien być w pozycji off. Zanim
podłączysz kabel (lub rozrusznik nożny), upewnij się,
że napięcie i częstotliwość sieci wskazane na
maszynie, odpowiadają napięciu i częstotliwości
gniazdka.
Podłącz kabel maszyny/rozrusznik nożny do maszyny
oraz włóż wtyczkę do kontaktu.
Dla Twojego bezpieczeństwa
1.
Kiedy maszyna szyje, zawsze obserwuj obszar szycia i
nie dotykaj żadnej z ruchomych części - igieł, koła
zamachowego, górnego noża, chwytacza itp.
2.
Zawsze wyłączaj maszynę oraz wyciągaj kabel z
prądu, gdy:
• pozostawiasz maszynę bez nadzoru
• zakładasz lub zdejmujesz ruchome części maszyny
• czyścisz maszynę
3. Nie umieszczaj niczego na rozruszniku nożnym.
Należy korzystać z rozrusznika nożnego model YC-482M.
Symbol "O" na włączniku wskazuje pozycję "off" (wyłączony).
Conexión de la máquina a la alimentación
El interruptor de encendido debe estar apagado. Antes
de conectar el cable de alimentación/pedal, cerciórese
de que la tensión y la frecuencia que muestra la
máquina sean idénticas a las de la red eléctrica de su
hogar. Enchufe el conector de la máquina/pedal en la
toma de la máquina y conéctelo al enchufe de la
pared.
Para su seguridad
1. Mientras tenga la máquina en funcionamiento, no
pierda de vista la zona de costura y no toque
ninguna pieza móvil, como la aguja(s), el volante, la
cuchilla superior o las áncoras.
2. Apague siempre el interruptor de encendido y
desenchufe la máquina de la corriente:
• cuando vaya a dejar la máquina sin vigilancia.
• cuando vaya a fijar o a retirar una pieza.
• cuando vaya a limpiar la máquina.
3. No ponga ningún objeto sobre el pedal.
Utilice el pedal YC-482M.
El símbolo “O” en un interruptor indica que está en la
posición “OFF” (apagado).

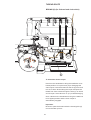
18
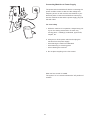
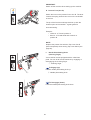
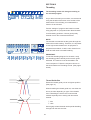
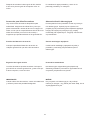
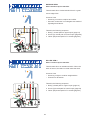
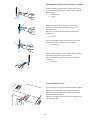
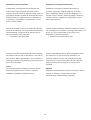
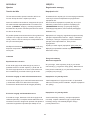
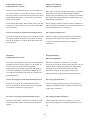
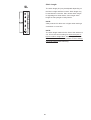
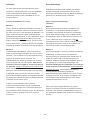
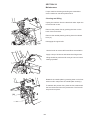
A. Program display
B. Program selection dial
C. Program number
D. Differential feed ratio
E. Stitch length in mm
F. Needle position
G. Cutting width dial position
H. Position of upper knife
I. 2-thread converter - up/down
J. Overlock cover or sewing table
K. Foot lever position
L. Position of needle plate setting knob
M. Chain looper tension dial position (brown)
A
B
C
DE
F
G
I
J
K
M
H
L
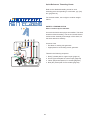
How To Set Up Machine Using the Program
Display Panel
Turn the program selection dial and select the desired
program number.
NOTE:
Refer to the program display panel for setting up the
machine. Set the items D through M (see below) before
threading.
It is very important to refer to the threading chart for
proper threading of the stitch. Incorrect threading or
thread order may lead to skipped stitches and/or thread
breakage.
To remove the thread chain, cut threads at looper and
needle eyes and hand pull threads to the rear.
Do not sew out threads to remove the thread chain.
Strona się ładuje...
Strona się ładuje...
Strona się ładuje...
Strona się ładuje...
Strona się ładuje...
Strona się ładuje...
Strona się ładuje...
Strona się ładuje...
Strona się ładuje...
Strona się ładuje...
Strona się ładuje...
Strona się ładuje...
Strona się ładuje...
Strona się ładuje...
Strona się ładuje...
Strona się ładuje...
Strona się ładuje...
Strona się ładuje...
Strona się ładuje...
Strona się ładuje...
Strona się ładuje...
Strona się ładuje...
Strona się ładuje...
Strona się ładuje...
Strona się ładuje...
Strona się ładuje...
Strona się ładuje...
Strona się ładuje...
Strona się ładuje...
Strona się ładuje...
Strona się ładuje...
Strona się ładuje...
Strona się ładuje...
Strona się ładuje...
Strona się ładuje...
Strona się ładuje...
Strona się ładuje...
Strona się ładuje...
Strona się ładuje...
Strona się ładuje...
Strona się ładuje...
Strona się ładuje...
Strona się ładuje...
Strona się ładuje...
Strona się ładuje...
Strona się ładuje...
Strona się ładuje...
Strona się ładuje...
Strona się ładuje...
Strona się ładuje...
Strona się ładuje...
Strona się ładuje...
Strona się ładuje...
Strona się ładuje...
Strona się ładuje...
Strona się ładuje...
Strona się ładuje...
Strona się ładuje...
Strona się ładuje...
Strona się ładuje...
Strona się ładuje...
Strona się ładuje...
Strona się ładuje...
Strona się ładuje...
Strona się ładuje...
Strona się ładuje...
Strona się ładuje...
Strona się ładuje...
Strona się ładuje...
Strona się ładuje...
Strona się ładuje...
Strona się ładuje...
Strona się ładuje...
Strona się ładuje...
Strona się ładuje...
Strona się ładuje...
Strona się ładuje...
Strona się ładuje...
Strona się ładuje...
Strona się ładuje...
Strona się ładuje...
Strona się ładuje...
Strona się ładuje...
Strona się ładuje...
Strona się ładuje...
Strona się ładuje...
Strona się ładuje...
Strona się ładuje...
Strona się ładuje...
Strona się ładuje...
Strona się ładuje...
Strona się ładuje...
Strona się ładuje...
Strona się ładuje...
Strona się ładuje...
Strona się ładuje...
-
 1
1
-
 2
2
-
 3
3
-
 4
4
-
 5
5
-
 6
6
-
 7
7
-
 8
8
-
 9
9
-
 10
10
-
 11
11
-
 12
12
-
 13
13
-
 14
14
-
 15
15
-
 16
16
-
 17
17
-
 18
18
-
 19
19
-
 20
20
-
 21
21
-
 22
22
-
 23
23
-
 24
24
-
 25
25
-
 26
26
-
 27
27
-
 28
28
-
 29
29
-
 30
30
-
 31
31
-
 32
32
-
 33
33
-
 34
34
-
 35
35
-
 36
36
-
 37
37
-
 38
38
-
 39
39
-
 40
40
-
 41
41
-
 42
42
-
 43
43
-
 44
44
-
 45
45
-
 46
46
-
 47
47
-
 48
48
-
 49
49
-
 50
50
-
 51
51
-
 52
52
-
 53
53
-
 54
54
-
 55
55
-
 56
56
-
 57
57
-
 58
58
-
 59
59
-
 60
60
-
 61
61
-
 62
62
-
 63
63
-
 64
64
-
 65
65
-
 66
66
-
 67
67
-
 68
68
-
 69
69
-
 70
70
-
 71
71
-
 72
72
-
 73
73
-
 74
74
-
 75
75
-
 76
76
-
 77
77
-
 78
78
-
 79
79
-
 80
80
-
 81
81
-
 82
82
-
 83
83
-
 84
84
-
 85
85
-
 86
86
-
 87
87
-
 88
88
-
 89
89
-
 90
90
-
 91
91
-
 92
92
-
 93
93
-
 94
94
-
 95
95
-
 96
96
-
 97
97
-
 98
98
-
 99
99
-
 100
100
-
 101
101
-
 102
102
-
 103
103
-
 104
104
-
 105
105
-
 106
106
-
 107
107
-
 108
108
-
 109
109
-
 110
110
-
 111
111
-
 112
112
-
 113
113
-
 114
114
-
 115
115
-
 116
116


JANOME 1200d Instruction book
- Kategoria
- Maszyny do szycia
- Typ
- Instruction book
w innych językach
- español: JANOME 1200d
- English: JANOME 1200d
Powiązane artykuły
Inne dokumenty
-
Tristar SM-6000 Instrukcja obsługi
-
-
-
Silvercrest SON 90 A1 Operating Instructions Manual
-
 Thumbs Up IP4CASCROSS Instrukcja obsługi
-
Kompernass KH 4001 Instrukcja obsługi
-
Menuett 809-031 Operating Instructions Manual
-
Silvercrest SNM 33 A1 Instrukcja obsługi
-
ELNA EXCELLENCE 780 Instrukcja obsługi
-
Klein Tools 1201R Specyfikacja
