
EN: You should read this user manual carefully before
using the appliance.
PL: Przed użyciem urządzenia należy uważnie
przeczytać niniejszą instrukcję obsługi.
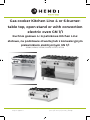
Gas cooker Kitchen Line 4 or 6-burner:
table top, open stand or with convection
electric oven GN 1/1
Kuchnie gazowe 4 i 6 palnikowe Kitchen Line:
stołowe, na podstawie otwartej lub z konwekcyjnym
piekarnikiem elektrycznym GN 1/1
225882/ 225899/ 227589/ 226094/ 227381/ 227398

2
EN
EN: Keep these instructions with the appliance.
PL: Przechowuj tę instrukcję razem z urządzeniem.
EN: For indoor use only.
PL: Tylko do użytku w pomieszczeniach.

3
EN
Dear Customer,
Thank you for purchasing this Hendi appliance. Read this manual carefully, paying particular attention to
the safety regulations outlined below, before installing and using this appliance for the first time.
1. Safety regulations
• This appliance is not intended for household use.
• Only use the appliance for the intended purpose it was designed for as described in this
manual.
• The manufacturer is not liable for any damage caused by incorrect operation and
improper use.
• Keep the appliance and electrical plug away from water and other liquids. In the event
the appliance falls into water, immediately remove the power plug from the socket. Do
not use the appliance until it has been checked by a certified technician. Failure to follow
these instructions will cause life threatening risks.
• Never attempt to open the housing of the appliance by yourself.
• Do not insert objects into the housing of the appliance.
• Do not touch the plug with wet or damp hands.
• Danger of electric shock! Do not attempt to repair the appliance by yourself, repairs
are only to be conducted by qualified personnel.
• Never use a damaged appliance! When it’s damaged, disconnect the appliance from the
socket and contact the retailer.
• Warning! Do not immerse the electrical parts of the appliance in water or other liquids.
• Never hold the appliance under running water.
• Regularly check the power plug and cord for any damage. When damaged it must be
replaced by a service agent or similarly qualified person in order to avoid danger or injury.
• Make sure the cord does not come in contact with sharp or hot objects and keep it away
from open fire. Never pull the power cord to unplug it from the socket, always pull the
plug instead.
• Make sure that the power cord and/or extension cord do not cause a trip hazard.
• Never leave the appliance unattended during use.
• Warning!
As long as the plug is in the socket the appliance is connected to the power
source.
• Turn off the appliance before unplugging it from the socket.
• Connect the power plug to an easily accessible electrical socket so that in case of emergency
the appliance can be unplugged immediately.
• Never carry the appliance by the cord.
• Do not use any extra devices that are not supplied together with the appliance.
• Only connect the appliance to an electrical outlet with the voltage and frequency mentioned
on the appliance label.
• Never use accessories other than those recommended by the manufacturer. Failure to do
so could pose a safety risk to the user and could damage the appliance. Only use original

4
EN
parts and accessories.
• This appliance should not be operated by persons with reduced physical, sensory or mental
capabilities, or persons that have a lack of experience and knowledge.
• This appliance should, under any circumstances, not be used by children.
• Keep the appliance and its power cord out of reach of children.
• WARNING: ALWAYS switch off the appliance and unplug from power socket before
cleaning, maintenance or storage.
2. DANE TECHNICZNE I RYSUNKI
4-burner gas cooker
CODE 225882 227589 227381
External dimensions 800x700x(H)900 mm 800x700x(H)900 mm 800x700x(H)310 mm
Top burner power 2x 3,5kW + 2x 6kW 2x 3,5kW + 2x 6kW 2x 3,5kW + 2x 6kW
Oven type Electric fan oven - -
Oven dimensions 640x370x(H)350 mm - -
Oven power 3kW - -
Weight 82kg 72kg 35kg
6-burner gas cooker
CODE 225899 226094 227398
External dimensions 1200x700x(H)900 1200x700x(H)900 1200x700x(H)310
Top burner power 3x 3,5kW + 3x 6kW 3x 3,5kW + 3x 6kW 3x 3,5kW + 3x 6kW
Oven type Electric fan oven - -
Oven dimensions 640x370x(H)350 mm - -
Oven power 3kW - -
Weight 105kg 95kg 45kg

5
EN
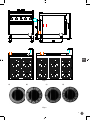
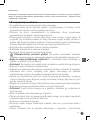
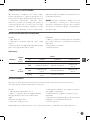
Fig. 1
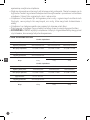
A) B) C) D)
Fig. 2

6
EN
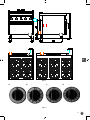
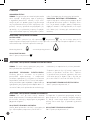
Fig. 3
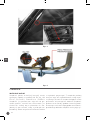
Fig. 4
3. INSTALLATION
GENERAL INSTRUCTION
The appliance described in this manual has been
built to meet 2014/35/EU (Safety), 2014/30/EU
(EMC), Re 2016/426/EU (GAR), Re 1935/2004/EC,
Re 2023/2006/EC directives; and UNI EN 203…, UNI
EN 437, EN 60335-1, EN60335-2-36 and EN55014
standards. This appliance has been designed exclu-
sively for cooking food, any other use is considered
improper: be careful that no live animal, person or
“dangerous” objects are placed inside the oven. It
should only be used by qualified personnel in pro-
fessional kitchens. Materials in contact with food-
stuffs are suitable for use. The unit must never be
left unattended when it is being used! The appliance
should be checked once a year by a qualified techni-
cian. Switch the appliance off in the case of a failure
or malfunction.

7
EN
NOTE: The appliance should be installed under an
extractor hood for removing any cooking fumes.
Care must be taken when using the appliance be-
cause the cooking surfaces are very hot. The ap-
pliance must be installed, connected and serviced
properly by qualified personnel according to the
regulations and directives in force in the country
where it is installed, as well as the instructions in
this manual.
UNIT CHARACTERISTICS
These installation and user’s instructions refer to
the category II2H3+ gas ranges. The data plate is
outside the back panel to the appliance. The sup-
plementary plate is also made of self-adhesive pol-
yester and is affixed near the data plate; it contains
all information regarding the appliance. The
gas distribution network fitting fig.1 meets ISO 7/1
and ISO 228/1 standards with a ø ½” connection,
situated at the back of the machine. The struc-
ture of the appliance is made of stainless steel,
the burners are made of cast iron and the oven is
made of stainless steel. All models have adjustable
feet. The main gas pipe is made of galvanized steel.
The pipes between the tap and burner are made
of copper.
NOTE: Install a shut-off cock in the line between
the appliance and the gas distribution network.
Install an omnipolar switch between the appliance
and the electrical distribution network.
CONNECTION TO THE GAS DISTRIBUTION NETWORK
CAUTION: Before you install the appliance, make
sure that the gas company has authorised the in-
stallation, compare the data relevant of the appli-
ance (data plate) with the local supply.
Remove the packaging from the appliance as well
as the protective plastic sheet, and, if necessary,
remove traces of glue with a suitable solvent. To
dispose of the packaging, follow local directives
(for more details refer to the chapter “ECOLOGY
AND THE ENVIRONMENT”. Prior to connecting
the unit to the gas network, check the data plate
to see if the unit has been set and tested for the
type of gas supplied. If the gas type indicated on the
data plate is not the same as that supplied, please
refer to the paragraph “CONVERSION AND ADAP-
TATION”. Connect the appliance to the gas distri-
bution network using metal pipes with a suitable
diameter; install a homologated shut-off cock be-
tween the appliance and the distribution network.
If flexible pipes are used, they must be made of
stainless steel according to the standards in force.
When installing the appliance, all the regulations in
force must be observed, such as:
• Installation and safety standards in force,
• Regional and/or local regulations, such as build-
ing codes,
• Directives and regulations of the electricity board,
• Fire prevention regulations,
• Applicable I.E.C. regulations.
We recommend installing the appliance in a
well-ventilated environment, or under an extrac-
tion hood to remove the fumes or vapors produced
during the cooking cycle. All models have an equi-
potential earth terminal fig.1 in the bottom.
The appliances with an electric oven have a hole for
the cable fig.1. The appliance can be installed
alone or in line. Respect a minimum distance of
80mm between the appliance and any walls made
of flammable material, partitions, kitchen furniture
or nearby equipment. The contact surfaces must
be covered with non-combustible heat insulating
material. The appliance, and especially the power
lead, must not be installed anywhere near heat
sources and the temperature of the place in which
the appliance is installed must not rise above 50°C.
After installing the appliance check for any leaks in
the fittings. Use non-corrosive foam products, such
as leak detection sprays, to look for any leaks.
NOTE: When checking for leaks do not use na-
ked flames! The manufacturer shall not be held
responsible and the guarantee is void in the case
of damage caused by negligence in following the
operating and installation instructions or by im-
proper use. The guarantee is void in the case of
connections which have been made in a way which
doesn’t meet the current standards and fire-fight-
ing regulations.

8
EN
EVACUATION OF BURNT GASES: A1 APPLIANCE
Appliances must be installed under an extraction
hood with forced draught, subjected to gas supply.
CHECKING THE PRESSURE
The distribution network pressure must meet the following specifications:
LPG
ALLOWED from 20/25 to 35/45 mbar
NOT ALLOWED below 20/25 above 35/40 mbar
METHANE - H
ALLOWED from 17 to 25 mbar
NOT ALLOWED below 17 above 25 mbar
If the gas distribution network pressure on the in-
stallation site doesn’t meet the above values, inform
the gas board and do not turn the unit on until the
cause and a solution have been found. The distri-
bution network pressure can be taken with a U ma-
nometer (min. definition 0.1 mbar), connected to the
pressure outlet behind control panel fig.4.
1. Remove the control panel.
2. Remove the screw and sealing washer from the
pressure outlet and connect the manometer.
3. Turn the unit on following the enclosed instruc-
tions and check that the pressure is within the per-
mitted pressure range.
4. Disconnect the manometer and replace the screw
and the sealing washer in the pressure outlet.
5. Replace the control panel
.
ELECTRICAL CONNECTION
CAUTION: Before proceeding with the electrical
connection, check the specifications on the data
plate. The appliance is supplied with a power cable
(3x1,5 H07RN-F).
The installer must make the connection after hav-
ing installed a standard plug connected to an easy-
to-reach socket, or in case of a permanent connec-
tion, after having installed a main switch, which, as
well as being easy to reach, must disconnect all of
the contacts supplying electrical energy to the ap-
pliance, with a minimum distance of at least 3mm
between the poles. The earth wire must never be
disconnected.
The power cable must not be installed near heat
sources and the temperature of the place in which
the appliance is installed must not rise above 50°C.
The appliance must also be connected to an equi-
potential earth. This connection can be made using
the equipotential terminal marked with the symbol
, placed under the appliance near the right rear
foot. The equipotential wire must have a section of
10mm2.
4. TRANSFORMATION AND ADAPTATION
To convert the appliance to another type of gas, e.g.
from natural gas to LPG, the nozzles of the main
burner, by-pass and pilot light have to be changed.
All the nozzles are marked with a number that in-
dicates the diameter in 1/100 of a mm and are sup-
plied in a bag. After each conversion or adaptation,
the unit must undergo an operating test and the
supplementary plate must be updated according to
the conversion or adaptation carried out.
NOTE: Connection to the distribution network, in-
stallation, and maintenance of the appliance must
only be carried out by qualified technicians only, in
observance of all applicable regulations!

9
EN
COOKTOP BURNER, NOZZLES AND AIR ADJUSTMENT
BURNER:
1. Pull the knobs off.
2. Remove the control panel by unscrewing the fix-
ing screws at the rear.
3. Replace nozzle with a suitable one for the new
type of gas indicated in the “MAX” nozzles table.
MINIMUM:
4. Unscrew and replace or adjust the minimum by-
pass nozzle fig.8 on the basis of the indications in
the nozzles table.
5. Remove the control panel.
6. Replace the knob
Nozzles table:
Cat.
P (mbar)
G20
G30-31
Burners
kW 3,5kW [R] 6,0kW [UR] 4,0kW [OVEN]
Dim. 1/100 mm 1/100 mm 1/100 mm
II2H3+
20
28.30/37
MAX 1,40 G20 / 0,92 G30-31 1,85 G20 / 1,20 G30-31
1,60 G20 / 1,02
G30-31
MIN
REG G20 / 0,40
G30-31
REG G20 / 0,55 G30-31
REG G20 / 0,55
G30-31
H [mm]
0,00 G20 / 3,00
G30-31
1,00 G20 / 2,00 G30-31 -
OVEN BURNER
To replace the nozzle of the oven burner, the pilot light and adjust the primary air, follow the instructions below:
BURNER:
1. Remove the base of the oven fig.7.
2. Unscrew and replace the nozzle with a suitable
one for the new type of gas indicated in the “MAX”
nozzles table.
ADJUSTING THE AIR:
3. Loosen fixing screw
4. Adjust the primary air mount the bush a distance
indicated in nozzles table.
5. Block the bush, by screwing in fixing screw.
MINIMUM:
6.Adjust the minimum by-pass nozzle fig.16 on the
basis of the indications in the nozzles table.
7. Replace the knob.
If the bottom of the oven chamber is removed, it must be put back in exactly the same position.
5. USE
PUTTING THE RANGE INTO SERVICE
UWAGA: The first time the oven is switched on you
will notice a bad smell due to production residues
such as grease, oil and resin. When using the oven
for the first time you should switch it on at the high-
est temperature for at least 1 hour, making sure
that it is empty. After this time has elapsed, the
oven is ready for use. Clean the oven after every
time you use it.
RECOMMENDATIONS FOR USE: For best results,
it is a good rule never to put food in a cold oven.
It is best to wait for the oven to reach the chosen
temperature first. Never line the oven walls with
aluminum sheets, especially the bottom part of the
cooking chamber.

10
EN
TURNING THE BURNERS ON AND OFF
COOKTOP BURNERS
Press and turn the knob fig.2A from position to , keeping it pressed in. After the flame has lit, hold
the knob down for roughly 10 seconds; so the thermocouple heats up and keeps the safety valve open.
Burner min: Burner MAX:
TURNING THE BURNER OFF:
Turn the knob to the position.
TURNING THE ELECTRIC OVEN ON AND OFF
CAUTION: All the cooking must be done with the
oven door closed.
TURNING THE OVEN ON:
The heating elements are controlled by a selector
switch, while the temperature inside the cham-
ber is controlled by a thermostat (50-270°C). The
selector lets you choose the most suitable type of
heating using the appropriate heating elements.
The green indicator light will come on to indicate
that the oven is connected to the mains.
Set the knob (Fig. 2C) to the desired temperature
50-270°C. The orange light indicate that the heating
elements are on. Select manual or the cooking time
10-120 min (Fig. 2D).
TURNING THE ELECTRIC OVEN OFF:
Turn the knobs to 0.
TURNING THE GAS OVEN ON AND OFF
CAUTION: All the cooking must be done with the
oven door closed. The burner has a safety valve that
cuts off the gas supply if the flame should acciden-
tally go out.
TURNING THE OVEN ON:
Open the oven door. Set the knob to the desired tem-
perature 125-250°C (fig. 2B). At the same time press
piezoelectric igniter several times, to light the pilot
flame. After the flame has lit, hold the knob down for
roughly 10 seconds; so the thermocouple heats up
and keeps the safety valve open. Through the hole in
inspection cover fig.3 check that the flame is alight.
TURNING THE GAS OVEN OFF:
Turn the knob to position “0” pressing it slightly so it
goes past the stop at the minimum position.
WHAT TO DO IF THE UNIT IS NOT GOING TO BE USED FOR A LONG TIME
Turn the gas shut-off cock installed upstream of
the appliance off. Clean the unit thoroughly follow-
ing the instructions and dry it carefully.
MALFUNCTIONS
In any case, if you suspect the presence of anom-
alies, ALWAYS CLOSE the gas shut-off cock and
inform the authorized after-sales service.
CAUTION: Unauthorized persons should never at-
tempt to repair the appliance, or carry out main-
tenance. Tampering with the appliance voids the
warranty!

11
EN
OPERATIONAL CHECKS
NOTE: Before the unit is delivered to the user the
following checks must be carried out:
THERMAL CAPACITY:
Check that the pressure and type of gas supplied
where the unit is to be used is the same as that
indicated on the plate. If it is not, the unit must ei-
ther be converted or adapted. In this case please
refer to the paragraph: “Conversion or Adaptation”.
Check that the right nozzles have been installed.
Refer to the nozzle table and check that the noz-
zles indicated in the table are the same as those
installed on the unit. An additional check of ther-
mal capacity entails verifying the gas consumed
with the volumetric method: light the burner and
after approximately 10 minutes (operating condi-
tions) check that the gas flow (in m3/h or in kg/h)
corresponds to that indicated in nozzle table.
APPEARANCE OF THE FLAME AND PRIMARY AIR-
FLOW:
The flame should be blue and there should be no
yellow dots in it; it must be stable at its base. If the
colour of the flame tends towards yellow, it means
the primary airflow is not adjusted properly. If the
primary airflow is too fast the flame will be short
and tend to burn above the burner. The appearance
of the flame must also be checked 15 minutes af-
ter the appliance has been running at full power.
The flame must remain stable even when passing
quickly from minimum to maximum.
USER’S INSTRUCTIONS:
The user must be trained on the correct use and
functions of the appliance. We would like to point
out that any alterations made to the room where
the unit is installed could influence the amount
of air used for combustion and for this reason the
function of the unit must be checked again. When
these checks have been done, test the unit for leaks
6. MAINTENANCE & CLEANING
REPLACING PARTS
Only qualified personnel should replace faulty parts.
Prior to commencing any kind of work, disconnect
the unit from the gas distribution network and the
electrical power supply.
CLEANING AND CARE OF THE APPLIANCE
CAUTION: The unit must be cold to clean it.
Keeping the appliance clean is very important for
a long and trouble-free working life. The remova-
ble parts should be washed separately with warm
water and detergent, then rinsed in running wa-
ter. The steel parts may be cleaned with a damp
cloth and with a non-abrasive detergent and then
dried by using a soft, dry cloth. For very resist-
ant stains, use hot water and vinegar. Do not use
harsh or abrasive detergents to clean the stainless
steel parts. Iron cleaning pads should not be used
as they cause the formation of rust. For the same
reason, avoid contact with ferrous materials. When
cleaning, avoid using abrasive paper or cloth; in-
stead and only in special cases you can use pumice
stone powder; we recommend using sponges (ex.
Scotch) to remove stubborn deposits. You can also
use common sprays for cleaning ovens and grills
to remove stubborn deposits. If spray products are
used, follow the manufacturer’s instructions. The
enamelled parts should not be cleaned with abra-
sive or acid products. Avoid using steel wool or
metal pads for cleaning. It is important to clean the
oven each time you use it; this way it will be eas-
ier to remove cooking residues and avoid burning
them the next time the oven is used, which would
also result in a bad smell. To minimise the emis-
sion of polluting substances in the environment we
suggest cleaning the appliance with products that
are at least 90% biodegradable.

12
EN
CLEANING INSIDE THE OVEN
Turn the electric power off or make sure you have
turned the burner of the oven of before doing any
work on it. Let the oven cool down and clean it
thoroughly with a damp cloth and warm water us-
ing a non-abrasive detergent (or with the special
products readily available for cleaning ovens). Do
not use abrasive cloths or pads or other products
that could irreparably damage the enamel. Normal
cooking temperatures help transform grease and
oil splashes into a mist of residual dust that can be
easily removed at the end of the cooking process
when the oven has cooled down by simply using a
damp sponge. We recommend heating the oven pe-
riodically to the maximum temperature so that the
residual dust can be removed once it has cooled
down. Be careful not to damage the thermostat
sensor inside the oven while you are cleaning it.
MAINTENANCE
The appliance needs no specific maintenance be-
sides normal cleaning; we do however suggest
having it checked once a year by the assistance
centre for which, we recommend drawing up a
maintenance contract.
SAFETY PRECAUTIONS
REMEMBER THAT THE APPLIANCE:
Must never be left unattended when it is being used!
When the unit is switched on, its surfaces get very
hot so please take great care!
The appliance is intended for professional use and
therefore only qualified personnel should use it!
Installation as well as any conversion or adaptation
to a different type of gas must be carried out in ac-
cordance with current laws and only by qualified and
authorized personnel.
In the case of fire, close the shut-off cock to cut off
the gas supply immediately, then use a suitable fire
extinguisher to fight the fire
7. DISCARDING & ENVIRONMENT
When decommissioning the appliance, the prod-
uct must not be disposed of with other household
waste. Instead, it is your responsibility to dispose to
your waste equipment by handing it over to a des-
ignated collection point. Failure to follow this rule
may be penalized in accordance with applicable
regulations on waste disposal. The separate col-
lection and recycling of your waste equipment at
the time of disposal will help conserve natural re-
sources and ensure that it is recycled in a manner
that protects human health and the environment.
For more information about where you can drop off
your waste for recycling, please contact your local
waste collection company. The manufacturers and
importers do not take responsibility for recycling,
treatment and ecological disposal, either directly
or through a public system.

13
EN
8. WARRANTY
Any defect affecting the functionality of the ap-
pliance which becomes apparent within one year
after purchase will be repaired by free repair or re-
placement provided the appliance has been used
and maintained in accordance with the instructions
and has not been abused or misused in any way.
Your statutory rights are not affected. If the appli-
ance is claimed under warranty, state where and
when it was purchased and include proof of pur-
chase (e.g. receipt).
In line with our policy of continuous product devel-
opment we reserve the right to change the product,
packaging and documentation specifications with-
out notice.

14
PL
EN: Keep these instructions with the appliance.
PL: Przechowuj tę instrukcję razem z urządzeniem.
EN: For indoor use only.
PL: Tylko do użytku w pomieszczeniach.

15
PL
Drogi Kliencie,
Dziękujemy za zakup tego urządzenia marki Hendi. Przeczytaj uważnie tę instrukcję, zwracając szczególną
uwagę na przepisy bezpieczeństwa przedstawione poniżej, przed zainstalowaniem i używaniem tego
urządzenia po raz pierwszy.
1. Przepisy bezpieczeństwa
• To urządzenie nie jest przeznaczone do użytku domowego.
• Urządzenie należy używać wyłącznie zgodnie z przeznaczeniem, do którego zostało
zaprojektowane zgodnie z opisem w niniejszej instrukcji.
• Producent nie ponosi odpowiedzialności za jakiekolwiek szkody spowodowane
nieprawidłowym działaniem i niewłaściwym użyciem.
• Przechowywać urządzenie i wtyczkę elektryczną z dala od wody i innych płynów. W
przypadku, gdy urządzenie wpadnie do wody, natychmiast wyjmij wtyczkę zasilającą z
gniazda. Nie używać urządzenia, dopóki nie zostanie sprawdzone przez certyfikowanego
technika. Nieprzestrzeganie tych instrukcji spowoduje zagrożenie dla życia.
• Nigdy nie próbuj samodzielnie otwierać obudowy urządzenia.
• Nie wkładaj przedmiotów do obudowy urządzenia.
• Nie dotykać wtyczki mokrymi lub wilgotnymi dłońmi.
• Niebezpieczeństwo porażenia prądem! Nie próbuj samodzielnie naprawiać
urządzenia, naprawy mogą być wykonywane wyłącznie przez wykwalifikowany personel..
• Nigdy nie używaj uszkodzonego urządzenia! Po uszkodzeniu odłącz urządzenie od
gniazda i skontaktuj się ze sprzedawcą.
• Ostrzeżenie! Nie zanurzaj części elektrycznych urządzenia w wodzie lub innych płynach.
• Nigdy nie trzymaj urządzenia pod bieżącą wodą.
• Regularnie sprawdzaj wtyczkę zasilającą i przewód pod kątem uszkodzeń. W przypadku
uszkodzenia musi zostać zastąpiony przez agenta serwisowego lub podobnie
wykwalifikowaną osobę w celu uniknięcia niebezpieczeństwa lub obrażeń.
• Upewnij się, że przewód nie styka się z ostrymi lub gorącymi przedmiotami i trzymaj go
z dala od otwartego ognia. Nigdy nie pociągaj za przewód zasilający, aby odłączyć go od
gniazda, zawsze za wtyczkę.
• Upewnij się, że przewód zasilający i/lub przedłużacz nie powodują zagrożenia przejazdem.
• Nigdy nie pozostawiaj urządzenia bez nadzoru podczas użytkowania.
• Ostrzeżenie!
Dopóki wtyczka znajduje się w gnieździe, urządzenie jest podłączone do
źródła zasilania.
• Wyłącz urządzenie przed odłączeniem go od gniazda.
• Podłącz wtyczkę do łatwo dostępnego gniazdka elektrycznego, aby w nagłych wypadkach
urządzenie mogło zostać natychmiast odłączone.
• Nigdy nie noś urządzenia za przewód.
• Nie należy używać żadnych dodatkowych urządzeń, które nie są dostarczane razem z
urządzeniem.
• Podłącz urządzenie tylko do gniazdka elektrycznego z napięciem i częstotliwością

16
PL
wymienioną na etykiecie urządzenia.
• Nigdy nie używaj akcesoriów innych niż zalecane przez producenta. Niezastosowanie się do
tego może stanowić zagrożenie dla bezpieczeństwa użytkownika i spowodować uszkodzenie
urządzenia. Używaj tylko oryginalnych części i akcesoriów.
• Urządzenie to nie powinno być obsługiwane przez osoby o ograniczonych możliwościach
fizycznych, sensorycznych lub umysłowych, ani osoby, które mają brak doświadczenia i
wiedzy.
• Urządzenie to w żadnym wypadku nie powinno być używane przez dzieci.
• Przechowywać urządzenie i jego przewód zasilający w miejscu niedostępnym dla dzieci.
• OSTRZEŻENIE: ZAWSZE wyłączyć urządzenie i odłączyć od gniazdka elektrycznego przed
czyszczeniem, konserwacją lub przechowywaniem.
2. DANE TECHNICZNE I RYSUNKI
Kuchnie 4-palnikowe
KOD 225882 227589 227381
Wymiary zewnętrzne 800x700x(H)900 mm 800x700x(H)900 mm 800x700x(H)310 mm
Moc górnych palników 2x 3,5kW + 2x 6kW 2x 3,5kW + 2x 6kW 2x 3,5kW + 2x 6kW
Typ piekarnika Electric fan oven - -
Wymiary piekarnika 640x370x(H)350 mm - -
Moc piekarnika 3kW - -
Waga 82kg 72kg 35kg
Kuchnie 6-palnikowe
KOD 225899 226094 227398
Wymiary zewnętrzne 1200x700x(H)900 1200x700x(H)900 1200x700x(H)310
Moc górnych palników 3x 3,5kW + 3x 6kW 3x 3,5kW + 3x 6kW 3x 3,5kW + 3x 6kW
Typ piekarnika Electric fan oven - -
Wymiary piekarnika 640x370x(H)350 mm - -
Moc piekarnika 3kW - -
Waga 105kg 95kg 45kg

17
PL
Rys. 1
A) B) C) D)
Rys. 2

18
PL
Rys. 3
Rys. 4
3. INSTALACJA
INSTRUKCJE OGÓLNE
Urządzenie opisane w niniejszej instrukcji zostało
wytworzone zgodnie z normami UNI EN 203, UNI
EN 437, EN 60335-1, EN60335-2-36 i EN55014.
Urządzenie jest przeznaczone wyłącznie do got-
owania żywności, wszelkie inne zastosowanie jest
niewłaściwe: uważaj aby w piekarniku nie zna-
jdowały się żywe zwierzta, osoby czy niebezpieczne
przedmioty. Można urzywa materiałów do kontaktu
z artykułami spoyżwczymi. Z urządzenia powinny
korzystać wyłącznie wykwalifikowane osoby w pro-
fesjonalnych kuchniach. Urządzenia nigdy nie wolno
pozostawiać włączonego bez nadzoru! Urządzenie
powinno raz w roku być poddane kontroli wykwali-
fikowanego serwisanta. W przypadku awarii lub nie-
prawidłowego działania urządzenie należy wyłączyć.

19
PL
WAŻNE: Urządzenie należy zainstalować pod
okapem, aby usunąć wyziewy powstające podczas
gotowania. Podczas użytkowania urządzenia należy
zachować ostrożność, ponieważ powierzchni kuchni
może nagrzewać się. Czynności związane z instalac-
ją, podłączeniem i serwisowaniem urządzenia pow-
inien wykonywać odpowiednio wyszkolony personel,
zgodnie z przepisami i dyrektywami obowiązującymi
w kraju instalacji, a także z niniejszą instrukcją.
CHARAKTERYSTYKA URZĄDZENIA
Instrukcja instalacji i użytkowania dotyczy kuchni
kategorii gazowej II2H3+. Tabliczka znamionowa
znajduje się na tylnym panelu urządzenia. W po-
bliżu tabliczki znamionowej znajduje się także do-
datkowa tabliczka wykonana z samoprzylepnego
poliestru, zawiera wszystkie informacje dotyczące
urządzenia. Połączenie gazowe wskazane na
rysunku 1 spełnia wymogi norm ISO 7/1 i ISO 228/1
(DK), wraz ze złączem Ø ½, które znajduje się z tyłu
urządzenia. Urządzenie wykonane jest ze stali ni-
erdzewnej, palnik z żeliwa a piekarnik wykonany
jest ze stali nierdzewnej.
Wszystkie modele wyposażone są w regulowane
nóżki. Główny przewód gazowy wykonany jest ze
stali ocynkowanej. Rury znajdujące się pomiędzy
kurkiem a palnikiem wykonane są z miedzi.
WAŻNE: Na linii pomiędzy urządzeniem a instalac-
ją gazową należy zainstalować kurek odcinający.
Pomiędzy urządzenie a instalacją elektryczną na-
leży zainstalować przełącznik wielobiegunowy.
PODŁĄCZENIE DO SIECI GAZOWEJ
UWAGA: Przed podłączeniem urządzenia należy
upewnić się, że spółka gazowa dokonała autoryzac-
ji instalacji, porównując dane dotyczące urządzenia
(tabliczka znamionowa) z parametrami dostarcza-
nego gazu.
Usunąć opakowanie urządzenia łącznie z ochron-
ną folią, w razie potrzeby usunąć pozostałości
kleju za pomocą odpowiedniego rozpuszczalnika.
Aby zutylizować opakowanie należy stosować się
do lokalnych przepisów (więcej szczegółowych
informacji w rozdziale „OCHRONA ŚRODOWIS-
KA”). Przed podłączeniem urządzenia do sieci
gazowej należy sprawdzić tabliczkę znamionową i
skontrolować, czy urządzenie zostało ustawione i
przetestowane dla typu dostarczanego gazu. Jeś-
li typ gazu wskazany na tabliczce nie jest zgodny
z typem gazu dostarczanego, należy zapoznać
się z częścią „MODYFIKACJE I DOSTOSOWANIE”.
Podłączyć urządzenie do sieci gazowej za pomocą
stalowych rurek o odpowiedniej średnicy, zainsta-
lować posiadający homologację kurek odcinający
pomiędzy urządzeniem a siecią. W przypadku zas-
tosowania elastycznych rurek, muszą być wyko-
nane ze stali nierdzewnej, zgodnie z obowiązujący-
mi normami. Podczas instalacji urządzenia, należy
przestrzegać wszelkich przepisów, np.:
• Normy bezpieczeństwa UNI-CIG 8723, Ustawa nr
46 z dnia 5 marca 1990 r., okólnik nr 68,
• Regionalnych lub lokalnych przepisów, np. prawa
budowlanego,
• Przepisów zakładu energetycznego,
• Obowiązujących przepisów dotyczących zapobie-
gania wypadkom,
• Przepisów przeciwpożarowych, odpowiednich
przepisów Międzynarodowej Komisji elektrotech-
nicznej.
Zalecamy zainstalowanie urządzenia w
pomieszczeniu o dobrej wentylacji lub pod okapem,
w celu usuwania wyziewów lub oparów powstają-
cych w czasie gotowania.
Wszystkie modele wyposażone są w ekwipo-
tencjalny styk uziemienia (rys. 1) znajdują-
cy się u dołu urządzenia. Urządzenia z pieka-
rnikiem elektrycznym wyposażone są w otwór
na kabel (rys. 1). Urządzenie może być
instalowane samodzielnie lub jako element
ciągu. Należy zachować minimalną odległość
80 mm pomiędzy urządzeniem a ścianami wyko-
nanymi z materiałów łatwopalnych, ścianek
działowych, mebli kuchennych lub innych urządzeń.
Powierzchnie wchodzące w kontakt muszą być
pokryte niepalnym materiałem termoizolacyjnym.
Urządzenia, a w szczególności przewodu zasilania,
nie wolno instalować w pobliżu źródeł ciepła,
a temperatura w miejscu instalacji urządzenia nie

20
PL
może przekraczać 50°C. Po zainstalowaniu
urządzenia należy sprawdzić złącza pod kątem
szczelności. Podczas kontroli szczelności używać
obojętnych środków w postaci pianki, np. aerozoli
do wykrywania wycieków.
WAŻNE: Podczas kontroli szczelności nie używać
otwartego ognia! Producent nie ponosi odpowied-
zialności za nieprzestrzeganie instrukcji obsłu-
gi i instalacji oraz za niewłaściwe użytkowanie.
W takim przypadku gwarancja nie obowiązuje.
Gwarancja traci ważność także wtedy, gdy wyko-
nane podłączenia nie spełniają obowiązujących
norm i przepisów przeciwpożarowych.
ODPROWADZANIE SPALIN
Urządzenia należy instalować pod okapem z wy-
muszonym ciągiem, poddanym dopływowi gazu.
Przepływ powietrza wymagany do spalania wynosi
2m³/h dla każdego kW mocy zainstalowanej.
SPRAWDZANIE CIŚNIENIA
Ciśnienie w sieci musi odpowiadać poniższej specyfi kacji:
LPG
Dozwolone od 20/25 do 35/45 mbar
NIEDOZWOLONE poniżej 20/25 i powyżej 35/40 mbar
METAN - H
Dozwolone od 17 do 25 mbar
NIEDOZWOLONE poniżej 17 i powyżej 25 mbar
Jeśli ciśnienie w sieci gazowej w miejscu instalacji
nie zawiera się w wyżej określonych przedziałach,
należy poinformować zakład gazowniczy i nie
włączać urządzenia dopóki przyczyna i rozwiązanie
problemu nie zostaną znalezione. Ciśnienie w sieci
można zmierzyć za pomocą manometru U-ru-
rkowego (z rozdzielczością minimum 0,1 mbar),
podłączonego do ujścia ciśnienia za panelem (rys.
4) .
1. Zdjąć panel sterowania.
2. Zdjąć śrubę i podkładkę z ujścia ciśnienia i
podłączyć manometr.
3. Włączyć urządzenie zgodnie z dołączonymi in-
strukcjami i sprawdzić, czy ciśnienie zawiera się
w dozwolonym przedziale.
4. Odłączyć manometr i założyć śrubę z podkładką.
5. Założyć ponownie panel sterowania.
PODŁĄCZENIE ELEKTRYCZNE
UWAGA: Przed podłączeniem urządzenia do in-
stalacji elektrycznej sprawdzić specyfikację na
tabliczce znamionowej. Urządzenie dostarczane
jest z kablem zasilającym (3x1,5 H07RN-F).
Instalator musi podłączyć urządzenie po zain-
stalowaniu wyłącznika głównego, który musi być
łatwo dostępny i umożliwiać odłączenie wszyst-
kich styków zasilających urządzenie, z minimalną
odległością 3 mm pomiędzy biegunami. Nigdy nie
wolno odłączać przewodu uziemiającego.
Kabla nie wolno umieszczać w pobliżu źródeł cie-
pła, a temperatura w miejscu instalacji urządzenia
nie może przekraczać 50°C. Urządzenie musi być
uziemione. Urządzenie należy także podłączyć do
uziemienia ekwipotencjalnego. Podłączenie na-
leży wykonać przy użyciu stylu ekwipotencjalnego
oznaczonego symbolem , który znajduje się pod
urządzenie, w pobliżu prawej tylnej nóżki. Przewód
ekwipotencjalny musi mieć przekrój 10 mm2.
Strona się ładuje...
Strona się ładuje...
Strona się ładuje...
Strona się ładuje...
Strona się ładuje...
Strona się ładuje...
-
 1
1
-
 2
2
-
 3
3
-
 4
4
-
 5
5
-
 6
6
-
 7
7
-
 8
8
-
 9
9
-
 10
10
-
 11
11
-
 12
12
-
 13
13
-
 14
14
-
 15
15
-
 16
16
-
 17
17
-
 18
18
-
 19
19
-
 20
20
-
 21
21
-
 22
22
-
 23
23
-
 24
24
-
 25
25
-
 26
26


Hendi 225899 Instrukcja obsługi
- Kategoria
- Mikrofale
- Typ
- Instrukcja obsługi
w innych językach
- English: Hendi 225899 User manual
Powiązane artykuły
Inne dokumenty
-
Mora 389613 Karta katalogowa
-
-
Electrolux EKK601304W Instrukcja obsługi
-
Whirlpool K3G2(W)/U instrukcja
-
-
Ariston K3E11/G Instrukcja obsługi
-
Indesit K6G52(W)/U instrukcja
-
Indesit K3G20S(W)/U instrukcja
-
-