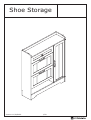
FUFU GAGA LJY-WFKF210049-01 3-Tiered Shoe Storage Instrukcja instalacji
- Typ
- Instrukcja instalacji

1/22
Shoe Storage
Version:11/30/2022

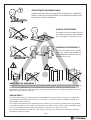
please read the entire manual before starting to assemble
and/or using this product.follow the manual thoroughly and
keep it for further reference.
IMPORTANT INFORMATION!
It is important that any product which is assembled using any kind of screw is re-tightened
2 weeks after assembly,and once every 3 months - in order to assure stability through-out
the lifespan of the product.
For regular maintenance and cleaning of the product, for the frame, please use a rag dipped
in neutral detergent to fully wipe it, and then dry it with a clean rag.For glass materials, wipe
with a rag dampened with water glass cleaner, and then dry with a dry rag.
Do not use an electric screwdriver, and do not use too much force when installing, because
the board is easy to break.
IMPORTANT !
Overturned furniture can cause serious or fatal crush injuries. To prevent tipping over, be sure
to use the wall attachment, if not included with this product. Please purchase the wall
attachment that fit your wall. If unsure, seek professional advice. Please read and follow each
step of the instructions carefully.
ANTI-TOPPLE WARNING !
Try to find a partner to install
with you, which can speed up
the installation efficiency and
shorten the time.
IMPROVE EFFICIENCY !
In order to avoid scratching this
furnuture should be assembled
on a soft layer-could be a rug.
AVOID SCRATCHES!
2/22

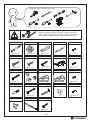
When installing, please carefully confirm whether
each screw corresponds to the manual, accessories
with similar shapes can be distinguished by size
Please prepare the following tools
3/22
A x 32 B x 32
15 x 10 mm
C x 26 D x 3
G x 2
6 x 30 mm
6 x 35 mm
I x 2 J x 28
H x 4
E x 4
F x 7
4x16 mm
3 x 12 mm
L x 4
4x30 mm
4x35 mm
4 x10 mm
K x 4 N
-1
-2 -3
x 2 O x 1
M x 2
4 x 14 mm
Q x 1
P x 1 S x 12 T x 12
R x 1
4x40 mm
4x12 mm
V x 2 W x 12
U x 1
3x16 mm
4x25 mm

4/22

11
5/22
6 x 35 mm
A x 22 L-2 x 4 L-3 x 4
A
A
A
A
A
A
A
A
A
A
A
A A
A
A
A
A
AA
A
A
AA
L-3
L-3
L-3
L-2
L-2
L-2
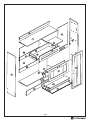
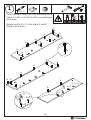
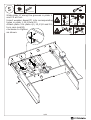
Insert quickfit screw(A) into corresponding
holes in plate 2,3 and 9 with a screwdriver
as shown.
Knock part(L-2,L-3) into plate 2 and 9
slightly as shown.

2
6/22
6 x 35 mm 3 x 12 mm
A x 6 E x 4 V x 2
180
o
A
A
A
AA
A
A
A
A
A
A
A
A
AA
A A
V
V
V
V
E
E
E
E
E
E
1
2
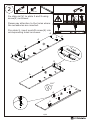
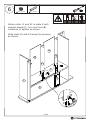
Fix slide rail(V) to plate 2 and 9 using
screw(E) as shown.
Please pay attention to the holes where
the accessories are inserted.
Flip plate 9, insert quickfit screw(A) into
corresponding holes as shown.

3
9
7/22
6 x 35 mm 6 x 30 mm 4 x 35 mm15 x 10 mm
A x 2 B x 6 C x 4 K x 2
IIIIII
B
BB
BB
B
B
K
K
K
C
C
C
C
C
C
1
4
12
12
13
A
A
A
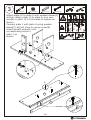
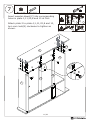
Attach plate 12 to plate 9 with wooden dowel(C)
at first; attach plate 13 to plate 9, turn cam
lock(B) in plate 12,13 clockwise to tighten as
shown.
Connect plate 1 with plate 4 using wooden
dowel(C) at first, then fix using screw(K).
Insert quickfit screw(A) into
corresponding holes in
plate 1 as
shown.

4
8/22
B x 2
15 x
10 mm
C x 4
6 x
30 mm
IIIIII
1
9
8
4 x 35 mm
K x 2
B
B
B
K
K
K
C
C
C
C
C
C
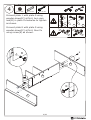
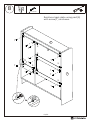
Connect plate 1 with plate 9 using
wooden dowel(C) at first, turn cam
lock(B) in plate 9 clockwise to tighten
as shown.
Connect plate 8 with plate 9 using
wooden dowel(C) at first, then fix
using screw(K) as shown.

5
9/22
B x 12
15 x 10 mm
IIIIII
C x 7
6 x 30 mm
1
9
13
12
12
3
17
8
10
B
B
B
B
B
B
B
B
B
B
B B
B
C
C
C
C
C
C
C
C
Slide plate 17 along the grooves in plate 1
and 13 at first.
Insert wooden dowel(C) into corresponding
holes in plate 1,12,8 and 10.
Attach plate 3 to plate 4,1,12,13,8 and 10,
turn cam lock(B)
clockwise to tighten
as shown.
C

C
6
10/22
1
17
23
16
13
11
22
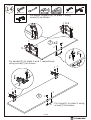
6 x 30 mm15 x 10 mm
B x 2 C x 2
9
Attach plate 11 and 22 to plate 9 with
wooden dowel(C), turn cam lock(B)
clockwise to tighten as shown.
Slide plate 16 and 23 along the grooves
as shown.
C
C
C
B
B
B

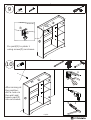
11/22
7
IIIIII
B
C
2
B x 8
15 x
10 mm
C x 7
6 x 30 mm
1
11
22
10
8
Insert wooden dowel(C) into corresponding
holes in plate 1,11,22,8 and 10 at first.
Attach plate 2 to plate 4,1,11,22,8 and 10,
turn cam lock(B) clockwise to tighten as
shown.
B
B
B
B
B
BB
B
CC
C
C
CC
C

8
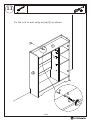
12/22
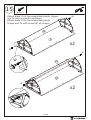
S x 12 T x 12
3 x 16 mm
2
S
T
T
T
TT
T
T
T
T
T
T
T
T
S
S
S
SS
S
S
S
1
Reinforce back plate using part(S)
with screw(T) as shown.
S
S
S
S

9
13/22
10
P
R
RR
O
O
P
Px 1
Ox 1 Rx 1
4x12 mm
Fix part(R) to plate 1
using screw(O) as shown.
After aiming at
the position,
drill a hole on
the wall and
knock part(P)
into as shown.

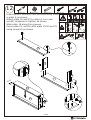
11
Q
x 1
14/22
4 x 40 mm
Q
Q
R
R
P
P
Fix the unit to wall using screw(Q) as shown.

12
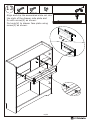
15/22
A x 2 B x 2 C x 2 H x 4
6x35 mm 4x30 mm6x30 mm15 x10 mm
IIIIII
6
20
19
19
6
18
21
A
A
A
H
HH
HH
B
B
B
C
C
C
Insert quickfit screw(A) into corresponding holes
in plate 6 as shown.
Attach plate 19 and 20 to plate 6, turn cam
lock(B) clockwise to tighten as shown.
Slide plate 18 along the grooves.
Cover plate 21, and fix with plate 19,20 and 21
using screw(H) as shown.

13
F x 1 G x 2 U x 1
4x16 mm 4x10 mm
16/22
G
F
F
U
U
Align and clip the assembled slide rail into
the slots of the drawer side plate and
fix with screw(G) as shown.
Fix knob(U) to drawer face plate using
screw(F) as shown.

14
17/22
F x 6
I x 2
D x 3 M x 2 N x 2 J x 16
4x16 mm
L R
4x14 mm
M-L
N-R
7x2
J
J
JJ
J
JJ
J
FF
D
5
I
I
J
J
JJ
I
JJ
Fix plastic hinge(M,N) to plate 7 using
screw(J) as shown.
Fix handle(D) to plate 5 and 7 respectively
using screw(F) as shown.
Fix hinge(I) to plate 5 using
screw(J) as shown.
F
F
D
F
F
D

15
18/22
W
W
W
W
W
W
W
x 8
4x25 mm
x2
14
15
7
7
x2
Attach plate 15 to the assembled plastic hinges
and fix with screw(W) as shown.
Attach plate 14 to the assembled plastic
hinges and fix with screw(W) as shown.

16
19/22
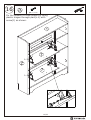
L-1 x 4 J x 4
7
7
J
J
L-1
L-1
J
J
J
L-1
L-1
L-1
4 x 14 mm
Fix the drawers to side plates by fixing
plastic hinges through part(L-1) with
screw(J) as shown.

17
20/22
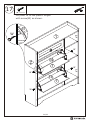
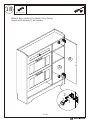
W
W
W
W
W
W
x 4
4 x 25 mm
7
7
14
14
14
Fix plate 14 to the plastic hinges
with screw(W) as shown.
Strona się ładuje...
Strona się ładuje...
Strona się ładuje...
Strona się ładuje...
-
 1
1
-
 2
2
-
 3
3
-
 4
4
-
 5
5
-
 6
6
-
 7
7
-
 8
8
-
 9
9
-
 10
10
-
 11
11
-
 12
12
-
 13
13
-
 14
14
-
 15
15
-
 16
16
-
 17
17
-
 18
18
-
 19
19
-
 20
20
-
 21
21
-
 22
22
-
 23
23
-
 24
24


FUFU GAGA LJY-WFKF210049-01 3-Tiered Shoe Storage Instrukcja instalacji
- Typ
- Instrukcja instalacji
w innych językach
Inne dokumenty
-
Wren Kitchens 2070 & 2250mm Walk-in Tower Unit Assembly Guide
-
Yamaha PX-2 Instrukcja obsługi
-
ELNA EXCELLENCE 780 Instrukcja obsługi
-
Samsung DW60A6082BB Instrukcja obsługi
-
Samsung DW60R7050FS Instrukcja obsługi
-
Yamaha YV-2700 Instrukcja obsługi
-
Samsung DW60A8060IB Instrukcja obsługi
-
-
-