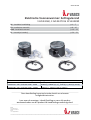
Vasco 11VE44260 Electric Preheater Instrukcja instalacji
- Typ
- Instrukcja instalacji

90.01.06.63.B
Vasco
Kruishoefstraat 50
3650 Dilsen-Stokkem
België
Tel.: +32(0)89790411
__________________________________________________________________________
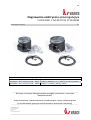
Elektrische Voorverwarmer: Zelfregulerend
11VE44260, 11VE44270 & 11VE44280
NL - Installatie handleiding p. 1 – 7
FR - Installation manuelle p. 8 – 15
ENG - Installation manual p. 16 – 23
PL - Instrukcja instalacji p. 24 – 31
Elektrische Voorverwarmer: Zelfregulerend Aangeraden ventilatie unit
11VE44260 – Elec. Preheater D150 – 700W D275EP, D275EP II, D275(EP) III (E)
11VE44270 – Elec. Preheater D180 – 700W D300E (II), D400EP (II), D_T_X350 (E), D_X425 (E), DX4 (E)
11VE44280 – Elec. Preheater D180 – 1400W D500E (II), T_X500 (E), DX5 (E), DX6 (E)
Deze handleiding bevat technische details en relevante
veiligheidsinstructies.
Lees voor de montage, inbedrijfstelling en voor alle andere
werkzaamheden aan dit product de handleiding aandachtig door!

1
Vasco
Kruishoefstraat 50
3650 Dilsen-Stokkem
België
Tel.: +32(0)89790411
__________________________________________________________________________
Inhoudsopgave
1. Introductie .................................................................................................................................... 2
2. Veiligheid ...................................................................................................................................... 2
3. Onderhoud .................................................................................................................................... 3
4. Technische informatie .................................................................................................................. 3
5. Installatie handleiding .............................................................................................................. 4-6
A) Verpakking inhoud ................................................................................................... 4
B) Installatievoorwaarden ............................................................................................ 4
C) Montage ............................................................................................................... 4-6
6. Garantievoorwaarden ................................................................................................................... 7
7. Conformiteitsverklaring ………………………………………………………………………………………………………….7

2
Vasco
Kruishoefstraat 50
3650 Dilsen-Stokkem
België
Tel.: +32(0)89790411
__________________________________________________________________________
1. Introductie
Het voorverwarmingselement is gespecificeerd voor inbouw in een Vasco ventilatiesysteem. In
onderlinge werking kan de buitenlucht worden opgewarmd tot een gewenste streeftemperatuur. De
max. doeltemperatuur wordt beperkt door het max. verwarmingsvermogen van het
voorverwarmingselement en is afhankelijk van de toegevoerde luchttemperatuur en hoeveelheid.
Omdat dit dient als een preventief apparaat, heeft het geen aan / uit-schakelaar. De bewoner moet
ervoor zorgen dat als er een stekker op het apparaat aanwezig is deze altijd in het stopcontact zit en
dat het stopcontact onder spanning staat.
2. Veiligheid
Elektrische componenten
Alleen de professionele installateur is bevoegd om het voorverwarmingselement te installeren. De
installateur moet voor elk werk het juiste gereedschap gebruiken. De elektronische componenten
van het voorverwarmingselement kunnen onder elektrische spanning staan. Raak het apparaat
niet aan tijdens het gebruik, brandwonden- en brandgevaar. Neem in geval van een defect
contact op met een professionele installateur en laat reparaties alleen door deskundig personeel
uitvoeren.
Veiligheidsinstructies
Dit apparaat is niet bedoeld voor gebruik door personen (inclusief kinderen) met verminderde
fysieke, sensorische of mentale vermogens, of gebrek aan ervaring en kennis, tenzij ze onder
toezicht staan of instructies hebben over het gebruik van het apparaat door een persoon die
verantwoordelijk is voor hun veiligheid. Kinderen moeten onder toezicht staan om te voorkomen
dat ze met het apparaat spelen. Houd kinderen jonger dan 3 jaar uit de buurt, tenzij ze continu
onder toezicht staan. Als het netsnoer beschadigd is, moet het worden vervangen door de
fabrikant, de klantenservice of personen met vergelijkbare kwalificaties om gevaar te voorkomen.
De gebruiker is verantwoordelijk voor de veilige verwijdering van het voorverwarmingselement
aan het einde van zijn levensduur, volgens de plaatselijk geldende wet- of regelgeving. U kunt het
apparaat ook inleveren bij een inzamelpunt voor gebruikte elektrische apparaten.
Onderhoud
Het voorverwarmingselement moet periodiek worden gecontroleerd op vervuiling. Voor inspectie
dient de ventilatie-unit en indien van toepassing het voorverwarmingselement uitgeschakeld te
zijn door de stekker(s) uit het stopcontact(en) te halen. Het voorverwarmingselement bevat
verwarmde onderdelen, als u de stekker van het apparaat/de apparaten uit het stopcontact haalt,
blijft het apparaat heet, wacht dus ca. 10 minuten na het verwijderen van de stekker(s) om het
voorverwarmingselement te laten afkoelen.
Zorg ervoor dat de stekker(s) niet door iemand anders weer in het stopcontact(en) kan worden
gestoken voordat u klaar bent met uw werk. Steek de stekker(s) niet in het stopcontact(en)
voordat het voorverwarmingselement en alle toebehoren zijn geïnstalleerd.
Garantie
Vasco is niet aansprakelijk voor schade ontstaan door het niet naleven van de
veiligheidsinstructies of het niet opvolgen van de instructies in de handleiding. De
garantievoorwaarden vindt u op pagina 7 van deze handleiding.

3
Vasco
Kruishoefstraat 50
3650 Dilsen-Stokkem
België
Tel.: +32(0)89790411
__________________________________________________________________________
3. Onderhoud
Vasco adviseert om het elektrisch voorverwarmingselement elke 4 jaar te reinigen.
1) Haal de stekkers van de ventilatie-unit en het voorverwarmingselement uit de stopcontacten.
2) Wacht 10 minuten totdat het voorverwarmingselement is afgekoeld
3) Neem het voorverwarmingselement van de installatie
4) Reinig de metalen elementen in het voorverwarmingselement*
5) Installeer het voorverwarmingselement terug op de installatie
6) Plaats de stekkers van de ventilatie-unit en het voorverwarmingselement terug in de
stopcontacten.
*Schoonmaken kan met perslucht en/of een kleine borstel.
Gebruik geen chemische/vloeibare reinigingsmiddelen.
Het niet op tijd uitvoeren van de onderhoudswerkzaamheden zal er uiteindelijk toe leiden dat het
toestel niet meer optimaal functioneert.
4. Technische informatie
De voorverwarmingselementen bestaan in wezen uit een geïsoleerd PTC-verwarmingsregister dat is
ingebouwd in een behuizing van metaal en kunststof. Het voorverwarmingselement wordt
aangestuurd door de software op de printplaat van de ventilatie-unit.
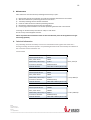
Technische data:
Naam Elec. Preheater D150 – 700W
Nominaal vermogen Pnom
600W
Max. vermogen Pmax 700W
Drukverschil Δp* 17,5Pa *21°C; 275m³/u
Aansluitdiameter DN150 (vrouwelijk)
Buitendiameter 167 x 215 x 170mm (H x B x D)
Naam Elec. Preheater D180 – 700W
Nominaal vermogen Pnom
600W
Max. vermogen Pmax 700W
Drukverschil Δp** 13,7Pa **21°C; 400m³/u
Aansluitdiameter DN180 (vrouwelijk)
Buitendiameter 168 x 240 x 200mm (H x B x D)
Naam Elec. Preheater D180 – 1400W
Nominaal vermogen Pnom
1200W
Max. vermogen Pmax 1400W
Drukverschil Δp*** 48,3Pa ***21°C; 600m³/u
Aansluitdiameter DN180 (vrouwelijk)
Buitendiameter 168 x 240 x 200mm (H x B x D)

4
Vasco
Kruishoefstraat 50
3650 Dilsen-Stokkem
België
Tel.: +32(0)89790411
__________________________________________________________________________
5. Installatie handleiding
A) Inhoud verpakking
Het elektrische voorverwarmingselement wordt geleverd in een doos.
Verwijder de verpakking en controleer de inhoud:
- Zwarte stroomkabel
- Elektrisch voorverwarmingselement
Het apparaat moet met de nodige voorzichtigheid worden vervoerd en uitgepakt.
Zorg voor een milieuvriendelijke manier om het verpakkingsmateriaal te verwijderen.
B) Installatievoorwaarden
De klant dient ervoor te zorgen dat de aangevoerde lucht geen ruwe verontreinigingen bevat die het
ingebouwde voorverwarmingselement kunnen blokkeren of permanent kunnen vervuilen/bedekken.
Het wordt aanbevolen om dit apparaat te gebruiken in een deeltjes-/stofvrije omgeving of gebruik een
geschikt luchtfilter vóór het voorverwarmingselement. Elk uniek gebruik buiten het beoogde gebruik
van het voorverwarmingselement moet worden geëvalueerd en verzekerd zoals vereist door de
fabrikant.
Om te bepalen of de installatie van het voorverwarmingselement in een specifieke ruimte
mogelijk is, moet met de volgende aspecten rekening gehouden worden:
De ruimte moet vorstvrij zijn
Het voorverwarmingselement moet zich binnen een straal van 2m afstand van de printplaat van
de ventilatie-unit bevinden (zwarte stroomkabelaansluiting)
De installatie moet worden uitgevoerd conform met de algemene en lokale voorschriften,
veiligheids- en installatievoorschriften, inclusief ventilatie en elektriciteit, en in overeenstemming
met de instructies in deze handleiding
In de ruimte dienen de volgende voorzieningen aanwezig te zijn:
- Luchtkanaalaansluitingen
- 230V ± 10%, eenfasig, 50Hz stopcontact
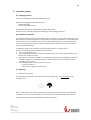
C) Montage
Installatie positionering
Het voorverwarmingselement moet op het kanaal worden geïnstalleerd dat de verse lucht van buiten
naar de ventilatie-unit brengt.
Houd er rekening mee dat de max. afstand tussen voorverwarmingselement en printplaat van de
ventilatie-unit 2m is, dit voor de kabelverbinding die gemaakt moet worden tussen de 2 apparaten.
Het voorverwarmingselement kan horizontaal of verticaal gemonteerd worden.

5
Vasco
Kruishoefstraat 50
3650 Dilsen-Stokkem
België
Tel.: +32(0)89790411
__________________________________________________________________________
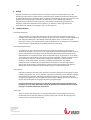
Dimensionale tekeningen
Installatie
De stappen voor het installeren van een van de 3 voorverwarmingselementen zijn als volgt:
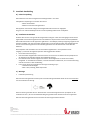
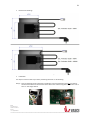
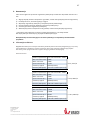
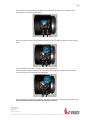
Stap 1) Sluit de zwarte voedingskabel aan op de printplaat van de ventilatie unit op aansluiting X17.
Gebruik de zwarte wartel als doorvoer voor de zwarte kabel in de metalen behuizing van de
ventilatie unit zoals te zien op onderstaande afbeeldingen.

6
Vasco
Kruishoefstraat 50
3650 Dilsen-Stokkem
België
Tel.: +32(0)89790411
__________________________________________________________________________
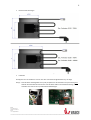
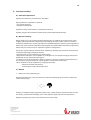
Stap 2) Open de kabeldoos van het voorverwarmingselement.
De meeste kabels zijn al aangesloten op het schakelrelais en wago-klemmen.
Stap 3) Gebruik de reeds voorziene zwarte wartel als doorvoer voor de meegeleverde zwarte kabel.
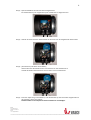
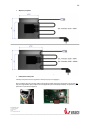
Stap 4) [Aansluitend op de zwarte stroomkabel]
Verbind de bruine fasedraad met de +A1 connector van het schakelrelais en
verbind de blauwe nuldraad met de -A2 connector van het schakelrelais.
Stap 5) Doe alles netjes terug in de kabeldoos, sluit de kabeldoos op het voorverwarmingselement en
de installatie is klaar voor gebruik.
Steek de stekker in het stopcontact om de installatie te vervolledigen.

7
Vasco
Kruishoefstraat 50
3650 Dilsen-Stokkem
België
Tel.: +32(0)89790411
__________________________________________________________________________
6. Garantievoorwaarden
Vasco verklaart gedurende 2 jaar na aankoopdatum, garantie te verlenen op de Vasco Elec. Preheater
D150 - 700W, Elec. Preheater D180 - 700W en Elec. Preheater D180 - 1400W. De factuurdatum van
het installatiebedrijf geldt als bewijs van aankoopdatum. Als er geen factuur beschikbaar is, geldt de
productiedatum als aankoopdatum. De garantie heeft géén betrekking op:
Demontage- en montagekosten.
Gebreken die naar ons oordeel het gevolg zijn van onjuiste behandeling, onachtzaamheid of
ongeluk.
Gebreken die zijn ontstaan door behandeling of herstel door derden zonder onze toestemming.
Gebreken die het gevolg zijn van onregelmatig en/of niet-vakkundig onderhoud.
Gebreken die het gevolg zijn van gebruik in een ongeschikte omgeving.
Er zal geen garantie verleend worden indien het voorverwarmingselement(en) wordt gebruikt in deze
omschreven condities. Voor de retourzending van de defecte onderdelen moet de installateur contact
opnemen met Vasco. De installateur ontvangt dan een garantieretournummer. De defecte onderdelen
moeten onder vermelding van dit retournummer worden verzonden naar Vasco.
7. Conformiteitsverklaring
Vasco Group nv, Kruishoefstraat 50, B-3650 Dilsen
Verklaart, dat het hier beschreven product,
Elec. Preheater D150 – 700W/D180 – 700W/D180 – 1400W
Voldoet aan de volgende Richtlijnen:
• Richtlijn 2014/35/EU (laagspanningsrichtlijn)
IEC 60335-2-30:2009, COR1:2014, AMD1:2016 used in conjunction with IEC 60335-1:2010,
COR1:2010, COR2:2010, AMD1:2013, COR1:2014, AMD2:2016, COR1:2016, EN 60335-2-
30:2009 + A11:2012 + A1:2020 + A12:2020 used in conjunction with EN 60335-1:2012 +
AC:2014 + A11:2014 + A13:2017 + A1:2019 + A14:2019 + A2:2019 + A14:2019 + A2:2019
EN 62233:2008 + AC:2008
• Richtlijn 2014/30/EU (EMC-Richtlijn)
• Richtlijn 2011/65/EU
Het product is voorzien van het CE-label.
Oktober, 2022
C. Schmitz-Eckert,
CEO VASCO GROUP

8
Vasco
Kruishoefstraat 50
3650 Dilsen-Stokkem
Belgique
Tel.: +32(0)89790411
__________________________________________________________________________
Préchauffeur Electrique : Autorégulateur
11VE44260, 11VE44270 & 11VE44280
Installation Manuelle FR
Préchauffeur Electrique : Autorégulateur Unité de ventilation recommandée
11VE44260 – Elec. Preheater D150 – 700W D275EP, D275EP II, D275(EP) III (E)
11VE44270 – Elec. Preheater D180 – 700W D300E (II), D400EP (II), D_T_X350 (E), D_X425 (E), DX4 (E)
11VE44280 – Elec. Preheater D180 – 1400W
D500E (II), T_X500 (E), DX5 (E), DX6 (E)
Ce manuel d'utilisation contient des détails techniques et des consignes de
sécurité pertinentes.
Avant le montage, la mise en service et avant tout autre type de travail sur
cet élément chauffant, lisez attentivement le manuel!

9
Vasco
Kruishoefstraat 50
3650 Dilsen-Stokkem
Belgique
Tel.: +32(0)89790411
__________________________________________________________________________
Table des matières
1. Introduction ............................................................................................................................... 10
2. Sécurité ...................................................................................................................................... 10
3. Entretien .................................................................................................................................... 11
4. Informations techniques ........................................................................................................... 11
5. Installation manuelle ........................................................................................................... 12-14
A) Contenu de l’emballage ......................................................................................... 12
B) Conditions d’installation ........................................................................................ 12
C) Emplacement ................................................................................................... 12-14
6. Conditions de garantie .............................................................................................................. 15
7. Déclaration de conformité …………………………………………………………………………………………………..15

10
Vasco
Kruishoefstraat 50
3650 Dilsen-Stokkem
Belgique
Tel.: +32(0)89790411
__________________________________________________________________________
1. Introduction
L'élément de préchauffage est conçu pour être installé dans un système de ventilation double-flux
Vasco. En fonctionnement normal, il permet à l'air extérieur d'être préchauffé à une température cible
souhaitée. La température max. est limitée par la puissance max. de l'élément de préchauffage et en
fonction de la température souhaitée et de la quantité d'air fourni. Comme il sert de dispositif
préventif, il n'a pas d'interrupteur marche / arrêt. Le résident doit s'assurer qu'en cas de présence
d'une fiche d'alimentation sur l'appareil, celle-ci est toujours branchée dans la prise et que la prise est
sous tension.
2. Sécurité
Composants électriques
Seul l'installateur professionnel est autorisé à installer l'élément de préchauffage. L'installateur
doit utiliser les outils appropriés pour chaque travail. Les parties électroniques de l'élément de
préchauffage peuvent être sous tension électrique. Ne touchez pas l'appareil pendant l'utilisation,
risque de brûlures et d'incendie. En cas de défaut, contactez un installateur professionnel et faites
effectuer les réparations uniquement par du personnel qualifié.
Consignes de sécurité
Cet appareil n'est pas destiné à être utilisé par des personnes (y compris des enfants) ayant des
capacités physiques, sensorielles ou mentales réduites, ou un manque d'expérience et de
connaissances, à moins qu'elles ne soient supervisées ou aient des instructions concernant
l'utilisation de l'appareil par une personne responsable de leur sécurité. Les enfants doivent être
surveillés pour s'assurer qu'ils ne jouent pas avec l'appareil. Les enfants de moins de 3 ans doivent
être tenus à l'écart à moins d'être surveillés en permanence. Si le cordon d'alimentation est
endommagé, il doit être remplacé par le fabricant, le service après-vente ou des personnes ayant
des qualifications similaires pour éviter tout danger. L'utilisateur est responsable de l'élimination
en toute sécurité de l'élément de préchauffage à la fin de sa durée de vie, conformément aux lois
ou réglementations locales en vigueur. Vous pouvez également retourner l'appareil à un point de
collecte des appareils électriques usagés.
Maintenance
L'élément de préchauffage doit être inspecté périodiquement pour détecter toute contamination.
Avant l'inspection, l'unité de ventilation et, en cas de nécessité, l'élément de préchauffage doivent
être mis hors tension en retirant la (les) fiche (s) d'alimentation de la (des) prise (s). L'appareils de
préchauffage contient des éléments qui pourraient être chauds. Si vous débranchez le ou les
appareils, l'appareil restera chaud, attendez donc env. 10 minutes après avoir retiré la ou les
fiches d'alimentation pour que l'élément de préchauffage refroidisse.
Assurez-vous que la ou les fiches ne peuvent pas être rebranchées dans la ou les prises par
quelqu'un d'autre avant d'avoir terminé votre travail. Ne branchez pas la ou les fiches
d'alimentation tant que le préchauffeur et tous les accessoires ne sont pas installés.
Garantie
Vasco n'est pas responsable des dommages causés par le non-respect des consignes de sécurité
ou par le non-respect des instructions du manuel. Les conditions de garantie se trouvent à la page
15 de ce manuel.

11
Vasco
Kruishoefstraat 50
3650 Dilsen-Stokkem
Belgique
Tel.: +32(0)89790411
__________________________________________________________________________
3. Entretien
Vasco conseille de nettoyer l'élément de préchauffage électrique tous les 4 ans.
1) Retirez les fiches de l'unité de ventilation et de l'élément de préchauffage des prises.
2) Attendez 10 minutes que l'élément de préchauffage refroidisse
3) Retirez l'élément de préchauffage de l'installation
4) Nettoyez les éléments métalliques à l'intérieur de l'élément de préchauffage*
5) Réinstaller l'élément de préchauffage sur l'installation
6) Remettez les fiches du groupe de ventilation et de l'élément de préchauffage dans les prises.
*Le nettoyage peut être effectué avec de l'air sous pression et / ou une petite brosse.
N'utilisez pas de nettoyants chimiques / liquides.
Si les travaux d'entretien ne sont pas effectués à temps, l'appareil ne fonctionnera plus de manière
optimale.
4. Informations techniques
Les éléments de préchauffage sont essentiellement constitués d'un registre thermique PTC isolé qui
est intégré dans un boîtier constitué de métal et de plastique. L'élément de préchauffage sera contrôlé
par le logiciel sur le circuit imprimé de l'unité de ventilation.
Données techniques :
Nom Elec. Preheater D150 – 700W
Puissance nominale Pnom 600W
Puissance max. Pmax 700W
Pression différentielle Δp* 17,5Pa *21°C; 275m³/h
Diamètre de connexion DN150 (femelle)
Diamètre extérieur 167 x 215 x 170mm (H x L x D)
Nom Elec. Preheater D180 – 700W
Puissance nominale Pnom 600W
Puissance max. Pmax 700W
Pression différentielle Δp** 13,7Pa **21°C; 400m³/h
Diamètre de connexion DN180 (femelle)
Diamètre extérieur 168 x 240 x 200mm (H x L x D)
Nom Elec. Preheater D180 – 1400W
Puissance nominale Pnom 1200W
Puissance max. Pmax 1400W
Pression différentielle Δp***
48,3Pa ***21°C; 600m³/h
Diamètre de connexion DN180 (femelle)
Diamètre extérieur 168 x 240 x 200mm (H x L x D)

12
Vasco
Kruishoefstraat 50
3650 Dilsen-Stokkem
Belgique
Tel.: +32(0)89790411
__________________________________________________________________________
5. Installation manuelle
A) Contenu de l'emballage
L'élément de préchauffage électrique est livré dans une boîte.
Retirez l'emballage et vérifiez le contenu :
- Câble d'alimentation noir
- Élément de préchauffage électrique
L'appareil doit être transporté et déballé avec précaution.
Veillez à une manière écologique d'éliminer les matériaux d'emballage.
B) Conditions d'installation
Le client doit s'assurer que l'air fourni ne contient pas de contaminants rugueux qui pourraient
bloquer l'élément de préchauffage intégré ou l'encrasser / le recouvrir de manière permanente. Il est
recommandé de fonctionner dans un environnement exempt de particules / poussières ou d'utiliser
un filtre à air approprié devant l'élément de préchauffage. Toute utilisation unique au-delà des
utilisations prévues de l'élément de préchauffage doit être évaluée et assurée conformément aux
exigences du fabricant.
Pour déterminer si l'installation de l'élément de préchauffage dans une pièce spécifique est
possible, les aspects suivants doivent être pris en compte :
La pièce doit être à l'abri du gel
L'élément de préchauffage doit être à moins de 2 m de la carte de circuit imprimé de l'unité de
ventilation (raccordement du câble d'alimentation noir)
L'installation doit être effectuée conformément aux réglementations générales et locales en
matière de sécurité et d'installation, y compris la ventilation et l'électricité, ainsi que
conformément aux instructions de ce manuel
Les équipements suivants doivent être présents dans la salle:
- Connexions des conduits d'air
- 230V ± 10%, monophasé, prise 50Hz
C) Emplacement
Positionnement dans l'installation
L'élément de préchauffage doit être installé sur la gaine apportant l'air extérieur (air neuf = pulsion)
dans l'unité de ventilation.
Gardez à l'esprit que le max. la distance entre l'élément de préchauffage et le circuit imprimé de
l'unité de ventilation est de 2m, ceci pour le raccordement par câble qui doit être réalisé entre les 2
appareils.
L'élément de préchauffage peut être monté horizontalement ou verticalement.

13
Vasco
Kruishoefstraat 50
3650 Dilsen-Stokkem
Belgique
Tel.: +32(0)89790411
__________________________________________________________________________
Dessins cotés
Installation
Les étapes d'installation de l'un des 3 éléments de préchauffage sont les suivantes:
Etape 1) Branchez le câble d'alimentation noir sur la carte de circuit imprimé de l'unité de ventilation
sur la connexion X17. Utilisez le pivot noir comme passage pour le câble noir dans le boîtier
métallique de l'unité de ventilation comme indiqué sur les images ci-dessous.

14
Vasco
Kruishoefstraat 50
3650 Dilsen-Stokkem
Belgique
Tel.: +32(0)89790411
__________________________________________________________________________
Etape 2) Ouvrez la boîte de jonction de l'élément de préchauffage.
La plupart des câbles sont déjà connectés au relais et pinces wago.
Etape 3) Utilisez le pivot noir déjà prévu pour utiliser le passage du câble noir.
Etape 4) [En cours sur le câble d'alimentation noir]
Connectez le fil de phase marron au connecteur +A1 du relais de commutation et connectez
le fil de neutre bleu au connecteur -A2 du relais de commutation.
Etape 5) Remettez le tout joliment dans la boîte de jonction, fermez la boîte de jonction sur l'élément
de préchauffage et l'installation est terminée.
Branchez le cordon d'alimentation dans la prise pour terminer l'installation.

15
Vasco
Kruishoefstraat 50
3650 Dilsen-Stokkem
Belgique
Tel.: +32(0)89790411
__________________________________________________________________________
6. Conditions de garantie
Vasco déclare accorder une garantie sur le Vasco Elec. Preheater D150 - 700W, Elec. Preheater D180 -
700W et Elec. Preheater D180 - 1400W pendant 2 ans à compter de la date d'achat. La date de
facturation de la société d'installation sert de preuve de la date d'achat. Si aucune facture n'est
disponible, la date de production compte comme date d'achat. La garantie ne couvre pas :
Frais de démontage et d'assemblage
Les défauts qui, à notre avis, résultent d'une mauvaise manipulation, d'une négligence ou d'un
accident
Défauts résultant d'un traitement ou d'une réparation par des tiers sans notre autorisation
Défauts résultant d'un entretien non régulier et / ou inapproprié
Les défauts résultant d'une utilisation dans un environnement inapproprié.
Aucune garantie ne sera donnée si ces éléments de préchauffage sont utilisés dans ces conditions
spécifiées. L'installateur doit contacter Vasco pour le retour des pièces défectueuses. L'installateur
recevra alors un numéro de retour de garantie. Les pièces défectueuses doivent être renvoyées à
Vasco en indiquant ce numéro de retour.
7. Déclaration de conformité
Vasco Group nv, Kruishoefstraat 50, B-3650 Dilsen
Déclare que le produit décrit ci-dessous,
Elec. Preheater D150 – 700W/D180 – 700W/D180 – 1400W
Répond aux directives suivantes:
• Directive 2014/35/UE (directive basse tension)
IEC 60335-2-30:2009, COR1:2014, AMD1:2016 used in conjunction with IEC 60335-1:2010,
COR1:2010, COR2:2010, AMD1:2013, COR1:2014, AMD2:2016, COR1:2016, EN 60335-2-
30:2009 + A11:2012 + A1:2020 + A12:2020 used in conjunction with EN 60335-1:2012 +
AC:2014 + A11:2014 + A13:2017 + A1:2019 + A14:2019 + A2:2019 + A14:2019 + A2:2019
EN 62233:2008 + AC:2008
• Directive 2014/30/UE (directive CEM)
• Directive 2011/65/UE
Le produit porte le label CE.
Octobre, 2022
C. Schmitz-Eckert,
CEO VASCO GROUP

16
Vasco
Kruishoefstraat 50
3650 Dilsen-Stokkem
Belgium
Tel.: +32(0)89790411
__________________________________________________________________________
Electrical Preheater: Self-regulating
11VE44260, 11VE44270 & 11VE44280
Installation Manual ENG
Electrical Preheater: Self-regulating Recommended ventilation unit
11VE44260 – Elec. Preheater D150 – 700W D275EP, D275EP II, D275(EP) III (E)
11VE44270 – Elec. Preheater D180 – 700W D300E (II), D400EP (II), D_T_X350 (E), D_X425 (E), DX4 (E)
11VE44280 – Elec. Preheater D180 – 1400W
D500E (II), T_X500 (E), DX5 (E), DX6 (E)
This operating manual contains technical details and relevant safety
instructions.
Prior to assembly, commissioning and before every other type of work on
this heating element, read the manual carefully!

17
Vasco
Kruishoefstraat 50
3650 Dilsen-Stokkem
Belgium
Tel.: +32(0)89790411
__________________________________________________________________________
Table of contents
1. Introduction ............................................................................................................................... 19
2. Safety ......................................................................................................................................... 19
3. Maintenance ............................................................................................................................. 20
4. Technical information ............................................................................................................... 20
5. Installation manual .............................................................................................................. 22-25
A) Packaging content .................................................................................................. 22
B) Installation conditions ........................................................................................... 22
C) Mounting ......................................................................................................... 20-25
6. Warranty conditions .................................................................................................................. 26
7. Declaration of Conformity……………………………………………………………………………………………………27

18
Vasco
Kruishoefstraat 50
3650 Dilsen-Stokkem
Belgium
Tel.: +32(0)89790411
__________________________________________________________________________
1. Introduction
The preheating element is specified for installation in a Vasco ventilation system. In mutual
operation, it enables outside air to be heated to a desired target temperature. The max. target
temperature is limited by the max. heating power of the preheating element and depending on the
supplied air temperature and flow rate. Since this serves as a preventive device, it has no on/off
switch. The resident must ensure in case a power plug on the appliance is present this is always
plugged into the socket and that the socket is live.
2. Safety
Electrical components
Only the professional installer is authorized to install the preheating element. The installer must
use the appropriate tools for each work. The electronic components of the preheating element
may be under electrical voltage. Do not touch the appliance during employment, risk of burns and
fire. In the event of a defect, contact a professional installer and have repairs carried out only by
expert personnel.
Safety instructions
This appliance is not intended for use by persons (including children) with reduced physical,
sensory or mental capabilities, or lack of experience and knowledge, unless they are supervised or
have instructions regarding the use of the appliance by a person responsible for their safety.
Children should be supervised to ensure that they do not play with the appliance. Children of less
than 3 years old should be kept away unless continuously supervised. If the power cord is
damaged, it must be replaced by the manufacturer, after-sales service or persons with similar
qualifications to avoid danger. The user is responsible for the safe disposal of the preheating
element at the end of its service life, according to the locally applicable laws or regulations. You
can also return the appliance to a collection point for used electrical appliances.
Maintenance
The preheating element should be periodically inspected for contamination. Before inspection,
the ventilation unit and in case of relevance the preheating element must be switched off by
removing the power plug(s) from the socket(s). The preheating element contains heated parts. If
you unplug the appliance(s), the appliance will remain hot, so wait approx. 10 minutes after
removing the power plug(s) for the preheating element to cool down.
Make sure that the power plug(s) cannot be plugged back into the socket(s) by anyone else
before you have finished your work. Do not insert the power plug(s) into the socket(s) until the
preheating element and all parts are installed.
Guarantee
Vasco is not liable for damage caused by failure to observe the safety instructions or by not
following the instructions in the manual. The warranty conditions can be found on page 23 of this
manual.

19
Vasco
Kruishoefstraat 50
3650 Dilsen-Stokkem
Belgium
Tel.: +32(0)89790411
__________________________________________________________________________
3. Maintenance
Vasco advices to clean the electric preheating element every 4 years.
1) Remove the plugs of the ventilation unit and the preheating element from the sockets.
2) Wait 10 minutes for the preheating element to cool down
3) Take the preheating element off the installation
4) Clean the metal elements inside the preheating element*
5) Reinstall the preheating element onto the installation
6) Put the plugs of the ventilation unit and the preheating element back in the sockets.
*Cleaning can be done with pressurized air and/or a small brush.
Do not use any chemical/liquids cleaners.
Failure to perform the maintenance work on time will ultimately result in the appliance no longer
functioning optimally.
4. Technical information
The preheating elements essentially consist of an insulated PTC heat register that is built into a
housing consisting of metal and plastic. The preheating element will be controlled by the software on
the circuit board of the ventilation unit.
Technical data:
Name Elec. Preheater D150 – 700W
Nominal power Pnom 600W
Max. power Pmax 700W
Differential pressure Δp* 17,5Pa *21°C; 275m³/h
Connection diameter DN150 (female)
Outside diameter 167 x 215 x 170mm (H x W x D)
Name Elec. Preheater D180 – 700W
Nominal power Pnom 600W
Max. power Pmax 700W
Differential pressure Δp** 13,7Pa **21°C; 400m³/h
Connection diameter DN180 (female)
Outside diameter 168 x 240 x 200mm (H x W x D)
Name Elec. Preheater D180 – 1400W
Nominal power Pnom 1200W
Max. power Pmax 1400W
Differential pressure Δp***
48,3Pa ***21°C; 600m³/h
Connection diameter DN180 (female)
Outside diameter 168 x 240 x 200mm (H x W x D)
Strona się ładuje...
Strona się ładuje...
Strona się ładuje...
Strona się ładuje...
Strona się ładuje...
Strona się ładuje...
Strona się ładuje...
Strona się ładuje...
Strona się ładuje...
Strona się ładuje...
Strona się ładuje...
Strona się ładuje...
-
 1
1
-
 2
2
-
 3
3
-
 4
4
-
 5
5
-
 6
6
-
 7
7
-
 8
8
-
 9
9
-
 10
10
-
 11
11
-
 12
12
-
 13
13
-
 14
14
-
 15
15
-
 16
16
-
 17
17
-
 18
18
-
 19
19
-
 20
20
-
 21
21
-
 22
22
-
 23
23
-
 24
24
-
 25
25
-
 26
26
-
 27
27
-
 28
28
-
 29
29
-
 30
30
-
 31
31
-
 32
32


Vasco 11VE44260 Electric Preheater Instrukcja instalacji
- Typ
- Instrukcja instalacji
w innych językach
Powiązane artykuły
Inne dokumenty
-
Whirlpool MWI 424 (MR) instrukcja
-
Hotpoint Ariston MWK 431.1 X/HA instrukcja
-
HOTPOINT/ARISTON MWHA 424.1 X instrukcja
-
GYS MULTIWELD 200M Instrukcja obsługi
-
Hotpoint-Ariston MWK 434.1 X/HA Instrukcja obsługi
-
Dimplex 2IN1 PTC HEATER CH2000VH Instrukcja obsługi
-
LG MC12AHV Instrukcja obsługi
-
Panasonic NN-A813 Instrukcja obsługi
-
-
Panasonic NN-CT870S Instrukcja obsługi