PNI Clementine 8428BT Instrukcja obsługi
- Kategoria
- Przenośne głośniki
- Typ
- Instrukcja obsługi

PNI Clementine 8428BT
Car MP3 player / MP3 плейър за кола / MP3-Player im Auto / Reproductor
de MP3 para coche / Lecteur MP3 de voiture / Autós MP3 lejátszó / Lettore
MP3 per auto / Auto MP3-speler / Samochodowy odtwarzacz MP3
Radio MP3 player auto
EN User manual ......................................................... 3
BG Ръководство за употреба................................ 10
DE Benutzerhandbuch .............................................. 17
ES Manual de usuario ............................................... 24
FR Manuel utilisateur ............................................... 31
HU Használati utasítás .............................................. 38
IT Manuale utente .................................................. 45
NL Handleiding ........................................................ 52
PL Instrukcja obsługi ............................................... 59
RO Manual de utilizare ............................................. 66


3User manual
English
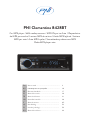
Warnings
• Do not use the product in very high or very low temperature conditions.
• Do not insert metal objects (screws or coins) inside the unit to avoid
shorting the internal components.
• The player can play MP3/WMA files. Do not try to play photo or video
files.
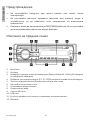
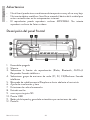
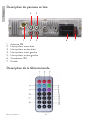
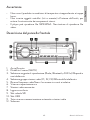
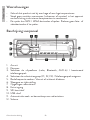
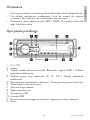
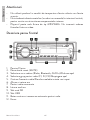
Front panel description
1. On/O
2. Mute
3. Select playback source (Radio, Bluetooth, AUX-In)/Answer phone call
4. Select radio station group (F1, F2, F3)/Reject phone call
5. Search radio frequency/Scroll forward or backward
6. Time setting
7. Stored radio stations
8. Auxiliary input
9. SD card slot
10. USB slot
11. Automatic search and Save button for radio stations
12. Display

User manual 4
English
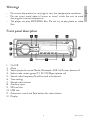
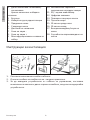
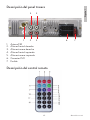
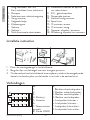
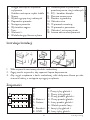
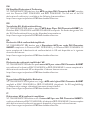
Rear panel description
1 2 3
4 5
6 7
1. FM antenna
2. Right front speaker
3. Right rear speaker
4. Left front speaker
5. Left rear speaker
6. ISO connector
7. Fuse
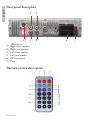
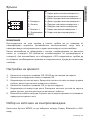
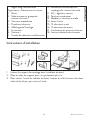
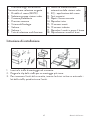
Remote control description

5User manual
English
1. Long press: on/o
Short press: select source
2. Mute
3. Select radio station group
4. Previous song
5. Next song
6. Clock display
7. Volume -
8. Volume +
9. Multifunction selection key
10. Automatic search and storage of
radio stations
11. EQ - equalizer
12. Numeric keys
13. Repeat current song
14. Play intro
15. 10 songs before
16. 10 songs back
17. Play/pause song
18. Random playback
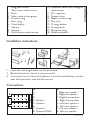
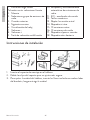
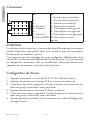
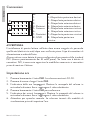
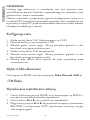
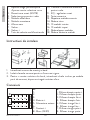
Installation instructions
1
2
3
1. Insert the mounting bracket into the dashboard.
2. Bend the bracket’s clips for a more secure fit.
3. To remove the unit from the dashboard, insert the included keys on both
sides of the brackets, then pull the unit out.
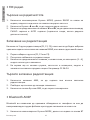
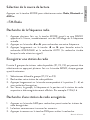
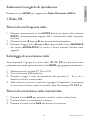
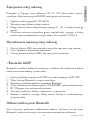
Connections
A
B1 3 5 7
2 4 6 8
1 3 5 7
2 4 6 8
FUSE
A:
1-
2-
3-
4- Battery +
5- Antenna
6-
7- Contact +
8- Ground (GND)
B:
1- Right rear speaker +
2- Right rear speaker -
3- Right front speaker +
4- Right front speaker -
5- Left front speaker +
6- Left front speaker -
7- Left rear speaker +
8- Left rear speaker -

User manual 6
English
WARNING
The installation of this player must be performed by qualified personnel only
(car electrician). Before installation, please check the power supply and the
audio connectors on the car.
Some cars are equipped with sockets that do not comply with the ISO standard
(dierent organisation of wires inside the socket). If the car is not equipped
with ISO connectors, the necessary modifications must be performed before
the installation of the player.
Time setup
1. Briefly press the CLK key. 00:00 will show on the screen.
2. Press and hold the CLK key again.
3. The hour indicator will flash. Turn the volume knob in both directions until
you reach the desired value.
4. Briefly press the CLK key to confirm.
5. The minute indicator will flash. Turn the volume knob in both directions
until you reach the desired value.
6. Wait a few seconds. The screen will return to the initial display mode.
Playback source selection
Press the MODE key to select between: Radio, Bluetooth and AUX-in.
• FM Radio
Searching for the radio frequency
1. Press the MODE key repeatedly until RADIO appears on the screen,
immediately followed by the display of the current frequency.
2. Press the ◄ or ► key to search for another frequency.
3. Long press the ◄ or ► key to switch between MANUAL search and
AUTO search (the search stops when the radio reaches a valid signal).

7User manual
English
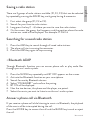
Saving a radio station
There are 3 groups of radio stations available (F1, F2, F3) that can be selected
by repeatedly pressing the BAND key, each group having 6 memories.
1. First select the group (F1, F2 or F3).
2. Search for your favorite radio station.
3. Long press the key (1 - 6) where you want to save the radio station.
4. On the screen, the group, the frequency and the position where the radio
station was saved will be displayed. For example: F1 96.0 6
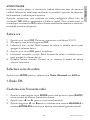
Searching for a saved radio station
1. Press the AMS key to search through all saved radio stations.
2. The player will start scanning the memories.
3. Press the AMS key again to stop scanning.
• Bluetooth AD2P
Through Bluetooth function you can answer phone calls or play audio files
through your car’s audio system.
1. Press the MODE key repeatedly until BT OFF appears on the screen.
2. Activate the Bluetooth function on your smartphone.
3. Search for nearby Bluetooth devices.
4. Select “PNI 8428BT” and confirm the pairing.
5. BT ON will be displayed.
6. Now the two devices, the phone and the player, are paired.
7. Select the music you want to listen to on the car’s audio system.
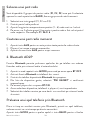
Answer a phone call via Bluetooth
If you receive a phone call while listening to music via Bluetooth, the playback
of the music will be interrupted during the call.
Press the MODE key to answer the call and the BAND key to end or reject
the call.

User manual 8
English
• AUX-in
1. Press the MODE key repeatedly until AUX IN appears on the screen.
2. Connect your phone to the player using an auxiliary cable (3.5mm).
3. Select from the phone the music you want to listen to on the car’s audio
system.
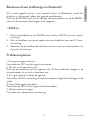
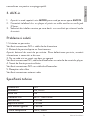
Troubleshooting
1. The unit does not turn on.
Check the ISO connection and power cords.
2. The on/o button does not work.
Press the reset button on the unit. If the fault persists, disconnect the power
supply and reconnect it.
3. There is no sound or just a noise.
Check the ISO connection, speaker cords, or sound settings in the player.
4. Very poor quality sound.
Check the ISO connection or speaker cables.
5. Poor radio reception.
Check the radio antenna connection.
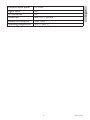
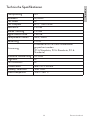
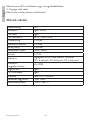
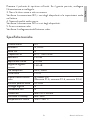
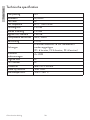
Technical specifications
Power voltage 12V
Bluetooth Yes, AD2P
FM radio Yes
FM frequency 87.5 - 108.0 MHz
Sensibility ≤ 20 dB
Stereo separation ≥ 25 dB
Signal-to-noise rate ≥ 60 dB
Compatible files MP3, WMA
Distortion ≤ 0.3%
Memory up to 18 FM radio stations can be stored
(F1- 6 locations, F2-6 locations, F3-6 locations)

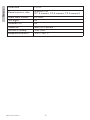
9User manual
English
Maximum audio power 4 x 45W
Digital clock Yes
ISO connector Yes
Dimensions 188 x 122 x 58 mm
Standby consumption max. 5mA
Operating temperature -26°C~+80°C

Ръководство
Български
10
Предупреждения
• Не използвайте продукта при много високи или много ниски
температури.
• Не поставяйте метални предмети (винтове или монети) вътре в
устройството, за да избегнете късо съединение на вътрешните
компоненти.
• Плейърът може да възпроизвежда MP3/WMA файлове. Не се опитвайте
да възпроизвеждате фото или видео файлове.
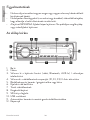
Описание на предния панел
1. Вкл./Изкл
2. Без звук
3. Изберете източник на възпроизвеждане (Радио, Bluetooth, AUX-In)/Отговорете
на телефонно обаждане
4. Изберете група радиостанции (F1, F2, F3)/Отхвърлете телефонното обаждане
5. Търсене на радиочестоти/Превъртане напред или назад
6. Настройка на дисплея и часа
7. Съхранявани радиостанции
8. Спомагателен вход
9. Слот за SD карта
10. USB слот
11. Бутон за автоматично търсене и запазване на радиостанции
12. Дисплей

Ръководство
Български
11
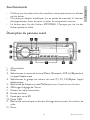
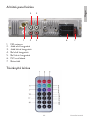
Описание на задния панел
1 2 3
4 5
6 7
1. FM антена
2. Десен преден високоговорител
3. Заден десен високоговорител
4. Ляв преден високоговорител
5. Заден ляв високоговорител
6. ISO конектор
7. Предпазител
Описание на дистанционното управление

Ръководство
Български
12
1. Дълго натискане: включване/
изключване
Кратко натискане: изберете
източник
2. Без звук
3. Изберете група радиостанции
4. Предишна песен
5. Следваща песен
6. Дисплей на часовника
7. Сила на звука -
8. Сила на звука +
9. Многофункционален клавиш за
избор
10. Автоматично търсене и
съхранение на радиостанции
11. EQ - звуков еквалайзер
12. Цифрови клавиши
13. Повторете текущата песен
14. Пуснете интро
15. 10 песни преди това
16. 10 песни назад
17. Възпроизвеждане/пауза на
песен
18. Случайно възпроизвеждане на
песни
Инструкции за инсталация
1
2
3
1. Поставете монтажната скоба в таблото.
2. Огънете скобите на скобата за по -сигурно прилягане.
3. За да извадите устройството от таблото за управление, поставете
включените ключове от двете страни на скобите, след което издърпайте
устройството.

Ръководство
Български
13
Връзки
A
B
1 3 5 7
2 4 6 8
1 3 5 7
2 4 6 8
FUSE
A:
1-
2-
3-
4- Батерия +
5- Антена
6-
7- Контакт +
8- Заземяване
(GND)
B:
1- Заден десен високоговорител +
2- Заден десен високоговорител -
3- Десен преден високоговорител +
4- Десен преден високоговорител -
5- Преден ляв високоговорител +
6- Преден ляв високоговорител -
7- Заден ляв високоговорител +
8- Заден ляв високоговорител -
ВНИМАНИЕ
Инсталирането на този плейър в колата трябва да се извърши от
квалифициран персонал (автомобилен електротехник), след като е
проверил вида на захранването и аудио конекторите на автомобила.
Някои автомобили са оборудвани с гнезда, конфигурирани по различен
начин от стандарта ISO (различно позициониране на проводниците в
гнездото). Ако автомобилът не е оборудван с ISO съединители, трябва да
се направят необходимите промени в съединителите, преди да се монтира
плейъра.
Настройка на времето
1. Натиснете за кратко клавиша CLK. 00:00 ще се покаже на екрана.
2. Натиснете и задръжте отново клавиша CLK.
3. Индикаторът за час ще мига. Завъртете копчето за сила на звука в двете
посоки, докато достигнете желаната стойност.
4. Натиснете за кратко клавиша CLK, за да потвърдите.
5. Индикаторът за минути ще мига. Завъртете копчето за сила на звука в
двете посоки, докато достигнете желаната стойност.
6. Изчакайте няколко секунди. Екранът ще се върне в режим на показване,
преди да настроите часа.
Избор на източник на възпроизвеждане
Натиснете бутона MODE, за да изберете между: Радио, Bluetooth и AUX-
вход.

Ръководство
Български
14
• FM радио
Търсене на радиочестота
1. Натиснете неколкократно бутона MODE, докато RADIO се появи на
екрана, веднага след което се показва текущата честота.
2. Натиснете бутона ◄ или ►, за да търсите друга честота.
3. Натиснете продължително клавиша ◄ или ►, за да превключите между
РЪЧНО търсене и AUTO търсене (търсенето спира, когато радиото
достигне сигнал).
Запазване на радиостанция
Налични са 3 групи радиостанции (F1, F2, F3), които могат да бъдат избрани
чрез многократно натискане на клавиша BAND, като всяка група има 6 памет.
1. Първо изберете групата (F1, F2 или F3).
2. Потърсете любимата си радиостанция.
3. Натиснете продължително клавиша, съответстващ на позицията (1 - 6),
където искате да го запишете.
4. На екрана ще се покаже групата, честотата и позицията, където е
записана съответната радиостанция. Например: F1 96.0 6
Търсите запазена радиостанция
1. Натиснете клавиша AMS, за да търсите във всички запазени
радиостанции.
2. Плейърът ще започне да сканира спомените.
3. Натиснете отново бутона AMS, за да спрете сканирането.
• Bluetooth AD2P
Bluetooth ви позволява да приемате обаждания от телефона си или да
възпроизвеждате аудио файлове през аудио системата на колата си.
1. Натиснете неколкократно бутона MODE, докато на екрана се появи BT

Ръководство
Български
15
OFF.
2. Активирайте функцията Bluetooth във вашия смарт телефон.
3. Търсете в телефона си Bluetooth устройства в близост.
4. От списъка с намерени устройства изберете „PNI 8428BT“ и потвърдете
сдвояването.
5. BT ON ще се появи на екрана на плейъра.
6. Сега двете устройства, телефонът и плейърът, са сдвоени.
7. Изберете от телефона музиката, която искате да слушате от аудио
системата на автомобила .
Отговорете на телефонно обаждане чрез Bluetooth
Ако получите телефонно обаждане, докато слушате музика чрез Bluetooth,
възпроизвеждането на музиката ще бъде прекъснато по време на
разговора.
Натиснете бутона MODE, за да отговорите на повикването, и клавиша BAND,
за да прекратите разговора или да го отхвърлите.
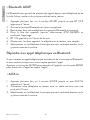
• AUX-in
1. Натиснете неколкократно бутона MODE, докато на екрана се появи AUX
IN.
2. Свържете телефона си към плейъра с помощта на допълнителен кабел
с 3,5 мм жак.
3. Изберете от телефона музиката, която искате да слушате от аудио
системата на автомобила.
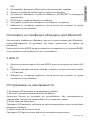
Отстраняване на неизправности
1. Проверете ISO връзката и захранващите кабели.
2. Бутонът за включване/изключване не работи.
Натиснете бутона за нулиране на устройството. Ако неизправността
продължава, изключете захранването и го свържете отново.
3. Няма звук или само шум.
Проверете ISO връзката, кабелите на високоговорителите или настройките
на звука в плейъра.
4. Много лошо качество на звука.
Проверете ISO връзката или кабелите на високоговорителите.

Ръководство
Български
16
5. Лош радиоприем.
Проверете връзката на радио антената.
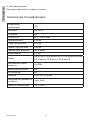
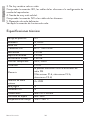
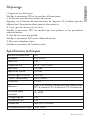
Технически спецификации
Захранващо
напрежение 12V
Bluetooth Да, AD2P
FM радио Да
FM честота 87.5 - 108.0 MHz
Чувствителност ≤ 20 dB
Стерео разделяне ≥ 25 dB
Скорост сигнал-шум ≥ 60 dB
Съвместими файлове MP3, WMA
Изкривяване ≤ 0.3%
Памет могат да се съхраняват до 18 FM радиостанции
(F1- 6 места, F2-6 места, F3-6 места)
Максимална аудио
мощност 4 x 45W
Дигитален часовник Да
ISO конектор Да
Размери 188 x 122 x 58 mm
Консумация в режим на
готовност max. 5mA
Работна температура -26°C~+80°C

Benutzerhandbuch
Deutsche
17
Warnungen
• Verwenden Sie das Produkt nicht bei sehr hohen oder sehr niedrigen
Temperaturen.
• Führen Sie keine Metallgegenstände (Schrauben oder Münzen) in das
Gerät ein, um einen Kurzschluss der internen Komponenten zu vermeiden.
• Der Player kann MP3/WMA-Dateien abspielen. Versuchen Sie nicht,
Foto- oder Videodateien wiederzugeben.
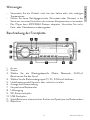
Beschreibung der Frontplatte
1. An aus
2. Stumm
3. Wählen Sie die Wiedergabequelle (Radio, Bluetooth, AUX-In)/
Beantworten Sie den Anruf
4. Wählen Sie die Radiosendergruppe (F1, F2, F3)/Anruf ablehnen
5. Hochfrequenzsuche/Vorwärts oder rückwärts scrollen
6. Anzeige und Zeiteinstellung
7. Gespeicherte Radiosender
8. Hilfseingang
9. SD-Kartensteckplatz
10. USB-Steckplatz
11. Schaltfläche zum automatischen Suchen und Speichern von Radiosendern
12. Bildschirm

Benutzerhandbuch
Deutsche
18
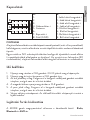
Beschreibung der Rückseite
1 2 3
4 5
6 7
1. FM-Antenne
2. Rechter Frontlautsprecher
3. Rechter hinterer Lautsprecher
4. Linker Frontlautsprecher
5. Linker hinterer Lautsprecher
6. ISO-Anschluss
7. Sicherung
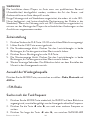
Beschreibung der Fernbedienung

Benutzerhandbuch
Deutsche
19
1. Langes Drücken: Ein/Aus
Kurz drücken: Quelle auswählen
2. Stumm
3. Wählen Sie die
Radiosendergruppe
4. Vorheriges Lied
5. Nächstes Lied
6. Uhranzeige
7. Lautstärke -
8. Lautstärke +
9. Multifunktions-Auswahltaste
10. Automatische Suche und
Speicherung von Radiosendern
11. EQ - Sound Equalizer
12. Zierntasten
13. Wiederhole den aktuellen Song
14. Intro spielen
15. 10 Songs vorher
16. 10 Songs zurück
17. Song abspielen/pausieren
18. Zufälliges Abspielen von Liedern
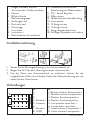
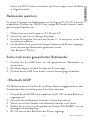
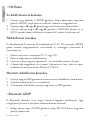
Installationsanleitung
1
2
3
1. Setzen Sie die Montagehalterung in das Armaturenbrett ein.
2. Biegen Sie die Clips der Halterung für einen sichereren Sitz.
3. Um das Gerät vom Armaturenbrett zu entfernen, stecken Sie die
mitgelieferten Schlüssel auf beiden Seiten der Kabinenhalterung ein und
ziehen Sie das Gerät heraus.
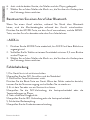
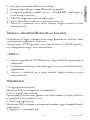
Verbindungen
A
B1 3 5 7
2 4 6 8
1 3 5 7
2 4 6 8
Sicherung
A:
1-
2-
3-
4- Batterie +
5- Antenne
6-
7- Kontakt +
8- GND
B:
1- Rechter hinterer Lautsprecher+
2- Rechter hinterer Lautsprecher-
3- Rechter Frontlautsprecher +
4- Rechter Frontlautsprecher -
5- Lautsprecher vorne links +
6- Lautsprecher vorne links -
7- Linker hinterer Lautsprecher +
8- Linker hinterer Lautsprecher -

Benutzerhandbuch
Deutsche
20
WARNUNG
Die Installation dieses Players im Auto muss von qualifiziertem Personal
(Autoelektriker) durchgeführt werden, nachdem die Art der Strom- und
Audioanschlüsse am Auto überprüft wurde.
Einige Fahrzeuge sind mit Steckdosen ausgestattet, die anders als in der ISO-
Norm konfiguriert sind (unterschiedliche Positionierung der Drähte in der
Steckdose). Wenn das Fahrzeug nicht mit ISO-Anschlüssen ausgestattet ist,
müssen vor der Montage des Players die erforderlichen Änderungen an den
Anschlüssen vorgenommen werden.
Zeiteinstellung
1. Drücken Sie kurz die CLK-Taste. 00:00 wird auf dem Bildschirm angezeigt.
2. Halten Sie die CLK-Taste erneut gedrückt.
3. Die Stundenanzeige blinkt. Drehen Sie den Lautstärkeregler in beide
Richtungen, bis Sie den gewünschten Wert erreicht haben.
4. Drücken Sie zur Bestätigung kurz die CLK-Taste.
5. Die Minutenanzeige blinkt. Drehen Sie den Lautstärkeregler in beide
Richtungen, bis Sie den gewünschten Wert erreicht haben.
6. Warten Sie einige Sekunden. Der Bildschirm kehrt vor dem Einstellen der
Uhrzeit in den Anzeigemodus zurück.
Auswahl der Wiedergabequelle
Drücken Sie die MODE-Taste, um zwischen zu wählen : Radio, Bluetooth and
AUX-in.
• FM Radio
Suche nach der Funkfrequenz
1. Drücken Sie die MODE-Taste wiederholt, bis RADIO auf dem Bildschirm
angezeigt wird, unmittelbar gefolgt von der Anzeige der aktuellen Frequenz.
2. Drücken Sie die Taste ◄ oder ►, um nach einer anderen Frequenz zu
suchen.
3. Drücken Sie lange die Taste ◄ oder ►, um zwischen MANUELLER
Strona jest ładowana ...
Strona jest ładowana ...
Strona jest ładowana ...
Strona jest ładowana ...
Strona jest ładowana ...
Strona jest ładowana ...
Strona jest ładowana ...
Strona jest ładowana ...
Strona jest ładowana ...
Strona jest ładowana ...
Strona jest ładowana ...
Strona jest ładowana ...
Strona jest ładowana ...
Strona jest ładowana ...
Strona jest ładowana ...
Strona jest ładowana ...
Strona jest ładowana ...
Strona jest ładowana ...
Strona jest ładowana ...
Strona jest ładowana ...
Strona jest ładowana ...
Strona jest ładowana ...
Strona jest ładowana ...
Strona jest ładowana ...
Strona jest ładowana ...
Strona jest ładowana ...
Strona jest ładowana ...
Strona jest ładowana ...
Strona jest ładowana ...
Strona jest ładowana ...
Strona jest ładowana ...
Strona jest ładowana ...
Strona jest ładowana ...
Strona jest ładowana ...
Strona jest ładowana ...
Strona jest ładowana ...
Strona jest ładowana ...
Strona jest ładowana ...
Strona jest ładowana ...
Strona jest ładowana ...
Strona jest ładowana ...
Strona jest ładowana ...
Strona jest ładowana ...
Strona jest ładowana ...
Strona jest ładowana ...
Strona jest ładowana ...
Strona jest ładowana ...
Strona jest ładowana ...
Strona jest ładowana ...
Strona jest ładowana ...
Strona jest ładowana ...
Strona jest ładowana ...
Strona jest ładowana ...
Strona jest ładowana ...
Strona jest ładowana ...
Strona jest ładowana ...
-
 1
1
-
 2
2
-
 3
3
-
 4
4
-
 5
5
-
 6
6
-
 7
7
-
 8
8
-
 9
9
-
 10
10
-
 11
11
-
 12
12
-
 13
13
-
 14
14
-
 15
15
-
 16
16
-
 17
17
-
 18
18
-
 19
19
-
 20
20
-
 21
21
-
 22
22
-
 23
23
-
 24
24
-
 25
25
-
 26
26
-
 27
27
-
 28
28
-
 29
29
-
 30
30
-
 31
31
-
 32
32
-
 33
33
-
 34
34
-
 35
35
-
 36
36
-
 37
37
-
 38
38
-
 39
39
-
 40
40
-
 41
41
-
 42
42
-
 43
43
-
 44
44
-
 45
45
-
 46
46
-
 47
47
-
 48
48
-
 49
49
-
 50
50
-
 51
51
-
 52
52
-
 53
53
-
 54
54
-
 55
55
-
 56
56
-
 57
57
-
 58
58
-
 59
59
-
 60
60
-
 61
61
-
 62
62
-
 63
63
-
 64
64
-
 65
65
-
 66
66
-
 67
67
-
 68
68
-
 69
69
-
 70
70
-
 71
71
-
 72
72
-
 73
73
-
 74
74
-
 75
75
-
 76
76


PNI Clementine 8428BT Instrukcja obsługi
- Kategoria
- Przenośne głośniki
- Typ
- Instrukcja obsługi
w innych językach
- español: PNI Clementine 8428BT Manual de usuario
- italiano: PNI Clementine 8428BT Manuale utente
- Deutsch: PNI Clementine 8428BT Benutzerhandbuch
- français: PNI Clementine 8428BT Manuel utilisateur