DREAME V12 Pro Instrukcja obsługi
- Kategoria
- Odkurzacze
- Typ
- Instrukcja obsługi

Cordless Stick Vacuum
User Manual
V12 Pro

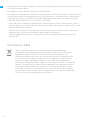
THANK YOU
FOR PURCHASING THIS DREAME
VACUUM CLEANER.
With it you are obtaining a high quality product that is engineered for
optimal performance. If you have any questions on the product, please
contact us: aftersales@dreame.tech.
Registration Quick Start
Welcome to register a Dreame account
by scanning the QR code.
You are available for the User Manual
and Special Oers.

User Manual
Benutzerhandbuch
Manuel d'utilisation
Manuale utente
Manual de usuario
Руководство пользователя
1
23
45
67
89
111
134
156
179
201
EN
IT
DE
ES
SA
PL
FR
RU
HE
PT

1
EN
Safety Instructions
Warning
To prevent accidents including electric shock or re caused by improper use, please
read this manual carefully before use and retain it for future reference.
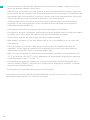
Safety Instructions
Warning
• This product can be used by children aged from 8 years and above and persons with
physical, sensory, intellectual deciencies, or limited experience or knowledge under
the supervision of a parent or guardian to ensure safe operation and to avoid any
risk of hazards. Cleaning and maintenance shall not be made by children without
supervision.
• The vacuum is not a toy. Children shall not play with or operate this product. Please
exercise caution when using the vacuum near children. Do not allow children to clean
or maintain the vacuum unless supervised by a parent or guardian.
• Do not use the vacuum outdoors or on wet surfaces. Only use the vacuum on dry
indoor surfaces. Do not touch the plug or any part of the vacuum with wet hands.
• To reduce the risk of re, explosion, or injury, check to make sure the lithium battery
and charging adapter are undamaged before use. Do not use the vacuum if either the
lithium battery or charger is damaged.
• The smart multi-brush bar, mini motorized brush, battery, carbon ber rod, and
vacuum are electrically conductive and should not be immersed in water or other
liquid. Make sure to dry all lters after cleaning.
• Prevent injury caused by moving parts. Turn o the vacuum before cleaning the smart
multi-brush bar. The smart multi-brush bar, dust cup and lter must all be properly
installed before using the vacuum.
• Only use the original charging adapter. Never use an unoriginal adapter.
• Do not use the vacuum to pick up ammable or combustible liquids, such as gasoline,
or bleach, ammonia, drain cleaners or other liquids.
• Do not use the vacuum to pick up drywall particles, ashes like replace ash, or
smoking or burning materials such as coal, cigarette butts or matches.
• Check the area to be cleaned before use. To prevent the openings from being
blocked, clear the larger paper, spitball, plastic cloth or sharp objects such as glass,
nails, screws, coins, etc. and any object which is larger than openings.
• Keep hair, loose clothing, ngers and other parts of the body away from the vacuum's
openings and moving parts. Do not point the hose, wand or tools at your eyes or ears
or put them in your mouth.
• Do not put any object into the vacuum's openings. Do not use the vacuum
with any opening blocked. Keep free of dust, lint, hair, or other items which may
reduce airow.
• Do not lean the vacuum against a chair, table, or other unstable surface, as this may

2
EN
Smart
Multi-Brush Bar
• cause damage to the machine or personal injury. If the vacuum becomes damaged or
is otherwise malfunctioning, please contact our authorized service department. Never
attempt to disassemble the device on your own.
• All instructions in the manual for recharging the battery must be strictly followed.
Failure to properly charge the battery within the specied temperature range could
damage the battery.
• Only use accessories and replacement parts that are approved by Dreame.
• Make sure the vacuum is unplugged when not used for extended periods as well as
prior to performing any maintenance or repairs.
• Please be extra careful when using the vacuum to clean stairs.
• Do not install, charge, or use this product outdoors, in bathrooms, or around a pool.
• Fire Hazard Warning: Do not apply any type of fragrance to the vacuum's lter. These
types of products are known to contain ammable chemicals which may cause the
vacuum to catch re.
• Do not use and store in extremely hot or cold environments (below 0℃ /32° F or above
40℃ /104° F). Please charge the cordless vacuum in temperature above 0℃ /32° F and
below 40℃ /104° F.
• Use only the rotating mop nozzle (not included, model: VRM01) approved by Dreame.
See the Rotating Mop Nozzle User Manual for safety information and user instructions.
• This product is designed for home use only.
We, Dreame Trading (Tianjin) Co., Ltd., hereby, declares that this equipment is in
compliance with the applicable Directives and European Norms, and amendments.
The full text of the EU declaration of conformity is available at the following internet
address: www.dreame-technology.com
For detailed e-manual, please go to https://www.dreame-technology.com/pages/
user-manuals-and-faqs

3
EN
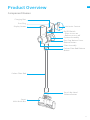
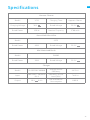
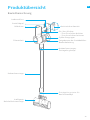
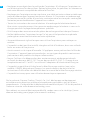
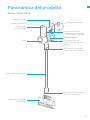
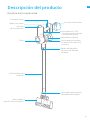
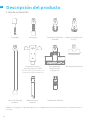
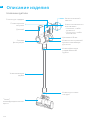
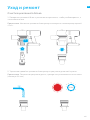
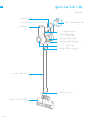
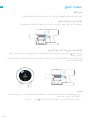
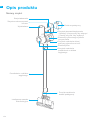
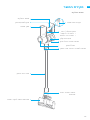
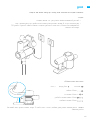
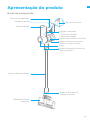
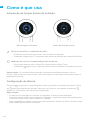
Product Overview
Component Names
Charging Port
Dust Plug
Display Screen
Carbon Fiber Rod
Smart
Multi-Brush Bar
Antistatic Contact
On/O Switch
• Press to turn on
• Release to turn o
Cyclone Assembly
Brush Bar Head
Release Button
Carbon Fiber Rod Release
Button
Dust Cup Bottom Cover
Release Button
Filter Assembly

Note: The images in this manual are for illustrative purposes only. The actual product may
dier.
4
EN
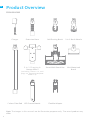
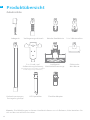
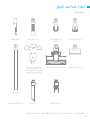
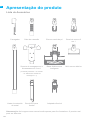
LED Crevice Nozzle
Smart Multi-Brush Bar
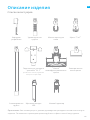
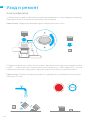
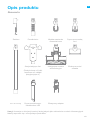
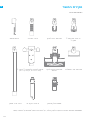
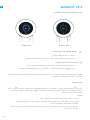
Product Overview
Accessories
Charger Extension Hose Soft Dusting Brush 2-in-1 Brush Nozzle
(Including screws ×2, wall
plugs ×2, mounting template
sticker ×1 )
2-in-1 Charging &
Storage Mount
Carbon Fiber Rod Flexible Adapter
Mini Motorized
Brush

5
EN
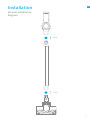
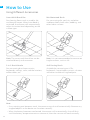
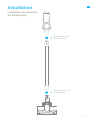
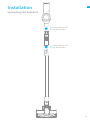
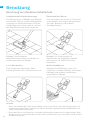
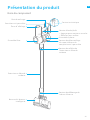
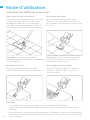
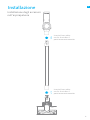
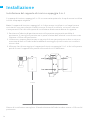
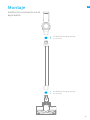
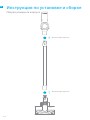
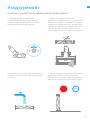
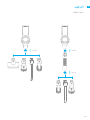
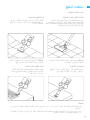
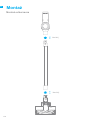
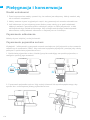
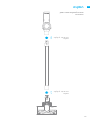
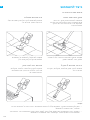
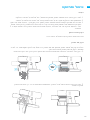
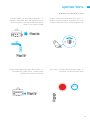
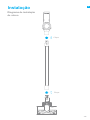
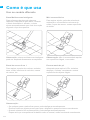
Installation
Vacuum Installation
Diagram
Click
Click

6
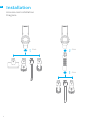
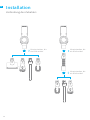
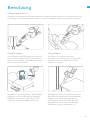
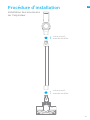
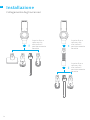
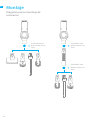
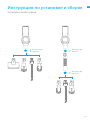
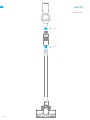
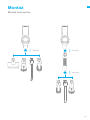
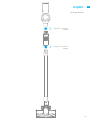
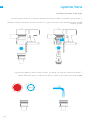
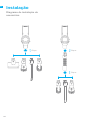
EN Installation
Click Click
Click
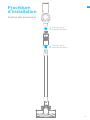
Accessories Installation
Diagram

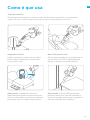
7
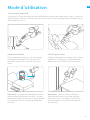
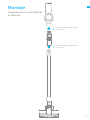
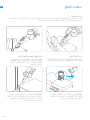
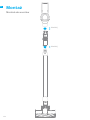
EN
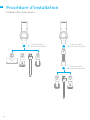
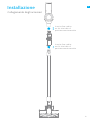
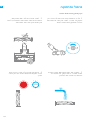
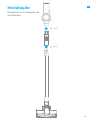
Click
Click
Installation
Accessories Installation
Diagram

8
EN
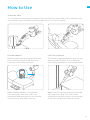
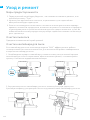
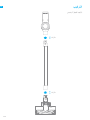
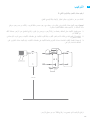
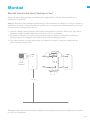
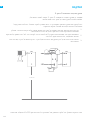
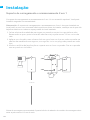
119 cm
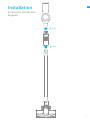
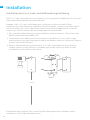
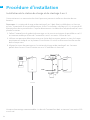
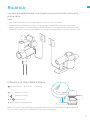
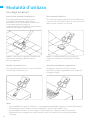
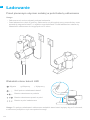
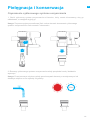
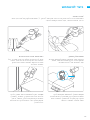
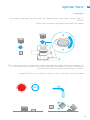
Installation
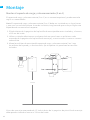
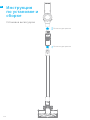
2-in-1 Charging & Storage Mount Installation Diagram
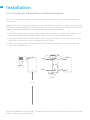
The 2-in-1 charging & storage mount is an optional accessory. You can install it based on
your needs.
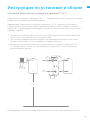
Note: The 2-in-1 charging & storage mount should be installed in a cool, dry place with
an electrical outlet nearby. Prior to installing, ensure that there are no electrical wires or
pipes in the space directly behind where the mount will be installed.
Recommended mounting height: The bottom of the mounting template sticker should be
at least 119 cm from the ground.
1. Paste the mounting template sticker on the wall and keep it parallel to the ground. It is
recommended that the bottom of the sticker is at least 119 cm o the ground.
2. Use a power drill with an 8mm drill bit to drill a hole into each marker on the mounting
template sticker, then insert a wall plug into each hole.
3. Align the locating holes on the mount with the holes on the wall. Fasten it to the wall
with the included screws.

9
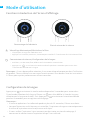
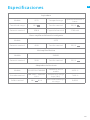
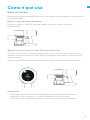
EN
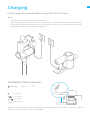
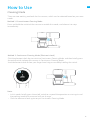
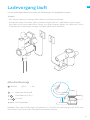
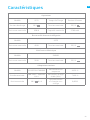
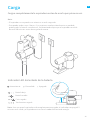
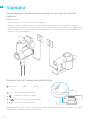
Low battery
Half battery
Nearly full
Fully charged
Fully charge the vacuum before using it for the rst time.
LED Battery Status Indicator
Note:
• The vacuum cannot be used while charging.
• A full charge will take about 4 hours. Vacuuming in Turbo Mode for a prolonged period
will cause the battery to heat up, which increases charging time. Allow the vacuum to
cool down for 30 minutes before charging it.
Note: Once the vacuum is fully charged, the indicator will turn o after 5 minutes, and the
vacuum will enter the energy-saving mode.
Charging
Blinking On O

10
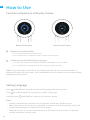
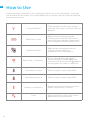
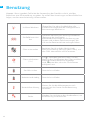
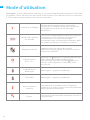
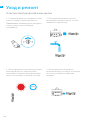
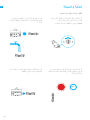
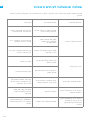
EN How to Use
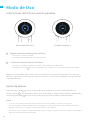
Function introduction of Display Screen
Note: If you need to pay attention to any abnormality during the use of the product, a
prompt will appear on the screen. You should follow the instructions on the screen to keep
the performance normal.
Setting Language
Press and hold for 3 seconds to enter the language selection interface
Click to scroll through the language list, select a language
And then press and hold for 3 seconds to save your setting
Note:
• If there is no operation for more than 15 seconds, the display will be turn o.
• When the smart multi-brush bar is attached, the vacuum will automatically switch the
suction level between the oor/tile and the carpet.
• Stop the vacuum at any time while cleaning. It will continue to use the last selected
suction level when starting again.
Electronic Lock/Reset Filter
• Press briey to enter/exit the lock status
• Press and hold for 1.5 seconds to enter the lter reset interface
Switching Suction Level/Setting Language
• Click to switch between Eco Mode, Auto Mode, Med Mode, and Turbo Mode
• Press and hold for 3 seconds to enter the language setting interface
Battery Percentage Suction Level Status

11
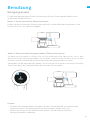
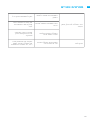
EN
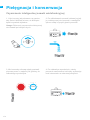
Cleaning Mode
Method 1: Discontinuous Cleaning Mode
Press and hold the switch of the vacuum to enable this mode, and release it to stop
immediately.
Method 2: Continuous Cleaning Mode (Electronic Lock)
Click the electronic lock key to switch to Continuous Cleaning Mode, and then briey press
the on/o switch to keep the vacuum in Continuous Cleaning Mode.
Use the electronic lock to free your nger from fatigue caused by holding the switch.
How to Use
There are two working methods for the vacuum, which can be selected based on your own
needs.
Note:
• In this mode, briey press the on/o switch to suspend the operation or start again and
the working mode of the vacuum will not change.
• Click the electronic lock again to quit Continuous Cleaning Mode.

12
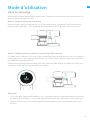
EN
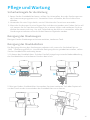
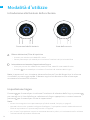
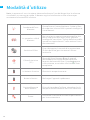
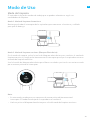
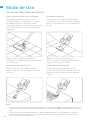
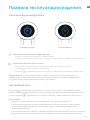
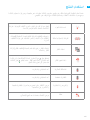
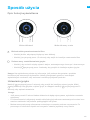
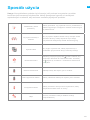
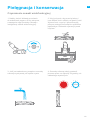
Smart Multi-Brush Bar
For cleaning oors such as marble, tile,
and low pile carpet. When Auto Mode is
activated, the vacuum will automatically
adjust its suction level depending on the
surface type.
2-in-1 Brush Nozzle
For vacuuming dust from curtains,
keyboards, ceilings, sofas, vehicle interiors,
coee tables, etc.
Soft Dusting Brush
Suitable for vacuuming on LCDs,
keyboards, lampshades, curtains, shutters
and other surfaces of fragile objects.
Mini Motorized Brush
For vacuuming dirt, pet hair, and other
stubborn debris from sofas, bedding, and
other fabric surfaces.
Note: The smart multi-brush bar can be
attached directly to the vacuum.
Note: It is not recommended to vacuum on
fragile surfaces, such as silk.
How to Use
Using Dierent Accessories
Note:
• If any rotating part becomes stuck, the vacuum may shut o automatically. Remove any
trapped objects so the device can function normally.
• When the battery becomes overheated, the vacuum will automatically shut o. Wait
until the battery temperature returns to normal, then the vacuum will work normally.

13
EN
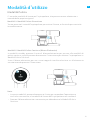
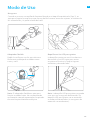
Flexible Adapter
Bending and extending the rod with one
click can easily reach under low-lying
furniture, such as bed and sofa.
LED Crevice Nozzle
The nozzle is equipped with a thin suction
opening and LED light. It is suitable for
vacuuming the debris in the narrow places.
Extension Hose
It is suitable for vacuuming the corners that are not easily accessible such as drawers and
cars interior when used with soft dusting brush or 2-in-1 brush nozzle.
How to Use
Note: Flexible adapter is suitable for
vacuuming low furniture, and is not
recommended to connect to the vacuum
all the time in daily oor cleaning.
Note: The LED crevice nozzle can be used
with extension hose (The LED crevice
nozzle does not light when it is connected
to the non-conductive extension hose).

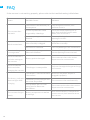
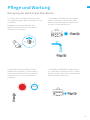
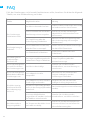
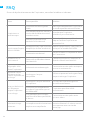
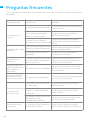
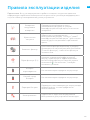
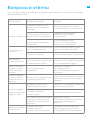
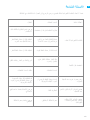
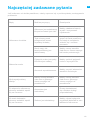
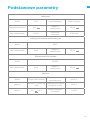
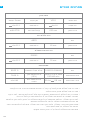
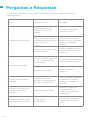
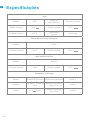
Air duct blocked Check whether the dust cup, carbon
ber rod, and smart multi-brush bar are
blocked.
Roller brush stuck
Refer to the maintenance guide
[Cleaning the Smart Multi-Brush Bar]
section to clean the ber material and
hairs wrapped around the oller brush.
Replace the lter Refer to the maintenance manual
[Cleaning Filter] section to
remove the lter and replace it.
Reset Filter(5 seconds)
Press and hold the button for 5
seconds to enter the countdown to
reset the lter. Wait and until appears
on the screen, the reset is successful.
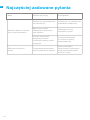
The battery runs out Please charge as soon as possible.
Low battery capacity Please charge as soon as possible.
Battery is overheating Please wait and continue to use after
battery temperature is normal.
Error Please contact our after-sales service
department for maintenance.
14
EN
If you need to pay attention to any abnormality during the use of the product, a prompt
will be shown on the screen. You should follow the instructions on the screen to keep the
performance normal.
How to Use

15
EN
Tips:
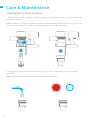
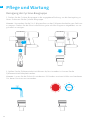
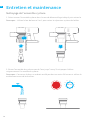
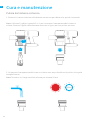
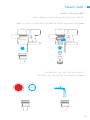
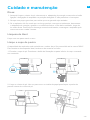
Cleaning the Vacuum
Cleaning the Dust Cup
1. Before cleaning the dust cup, disconnect the adapter and keep the vacuum's power
switch in the o position. And do not press its power button.
2. Always use genuine parts to keep your warranty from becoming void.
3. If the vacuum is not used for an extended period, fully charge it, unplug its power
adapter, and store it in a cool, low-humidity environment away from direct sunlight. To
avoid over-discharging the battery, recharge the vacuum at least once every 3 months.
Wipe the vacuum with a soft dry cloth.
The vacuum's cleaning ability will be reduced if the dust cup is lled to the "MAX" mark. To
retain performance, remember to empty the cup.
1. Empty the dust cup: Press the release button on the bottom of the cup, then empty its
contents.
2. Clean the dust cup: Use a dry cloth or paper towel to wipe the dust from the inner wall
of the dust cup.
Care & Maintenance

16
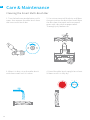
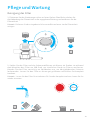
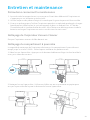
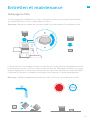
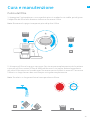
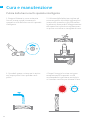
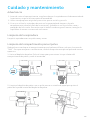
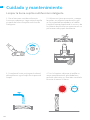
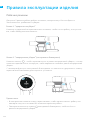
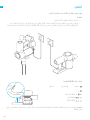
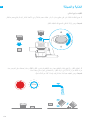
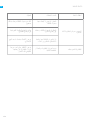
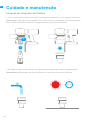
EN Care & Maintenance
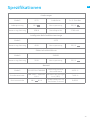
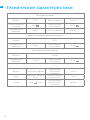
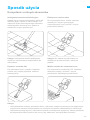
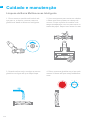
Cleaning the Cyclone Assembly
1. Rotate the cyclone assembly in the direction as illustrated to unlock it, then remove the
cyclone assembly.
Note: Use the 2-in-1 brush nozzle to remove cyclone separator from the housing. Turn the
nozzle in the direction as shown in the diagram for a thorough cleaning.
2. Rinse the cyclone assembly with water until it is clean. Thoroughly dry the cyclone
assembly.
Note: Keep it in a ventilated or cool place for at least 24 hours.
12
6
111
57
210
48
39 24 hrs
2
3
1

17
EN
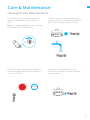
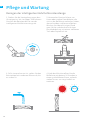
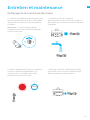
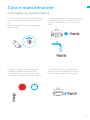
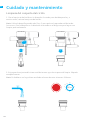
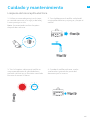
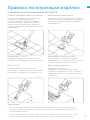
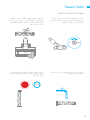
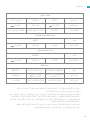
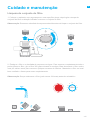
Care & Maintenance
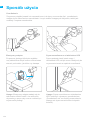
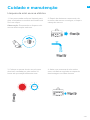
Cleaning the Filter Assembly
1. Place the vacuum securely on a at surface, then turn the lter assembly cover in the
direction indicated and remove the lter assembly.
Note: Remove the built-in foam pad before cleaning the lter assembly.
Note: Fully dry the lter (at least 24 hours) before reinstalling it.
2. Rinse the lter and foam pad with water. To thoroughly remove all the dust caught in
the filter, rotate the filter 360 degrees while rinsing. Lightly tap the filter against a sink
several times to remove any excess debris. Keep the filter in a well-ventilated and cool
place to fully dry.
3
12
6
111
57
210
48
924 hrs
1
2
3
Strona się ładuje...
Strona się ładuje...
Strona się ładuje...
Strona się ładuje...
Strona się ładuje...
Strona się ładuje...
Strona się ładuje...
Strona się ładuje...
Strona się ładuje...
Strona się ładuje...
Strona się ładuje...
Strona się ładuje...
Strona się ładuje...
Strona się ładuje...
Strona się ładuje...
Strona się ładuje...
Strona się ładuje...
Strona się ładuje...
Strona się ładuje...
Strona się ładuje...
Strona się ładuje...
Strona się ładuje...
Strona się ładuje...
Strona się ładuje...
Strona się ładuje...
Strona się ładuje...
Strona się ładuje...
Strona się ładuje...
Strona się ładuje...
Strona się ładuje...
Strona się ładuje...
Strona się ładuje...
Strona się ładuje...
Strona się ładuje...
Strona się ładuje...
Strona się ładuje...
Strona się ładuje...
Strona się ładuje...
Strona się ładuje...
Strona się ładuje...
Strona się ładuje...
Strona się ładuje...
Strona się ładuje...
Strona się ładuje...
Strona się ładuje...
Strona się ładuje...
Strona się ładuje...
Strona się ładuje...
Strona się ładuje...
Strona się ładuje...
Strona się ładuje...
Strona się ładuje...
Strona się ładuje...
Strona się ładuje...
Strona się ładuje...
Strona się ładuje...
Strona się ładuje...
Strona się ładuje...
Strona się ładuje...
Strona się ładuje...
Strona się ładuje...
Strona się ładuje...
Strona się ładuje...
Strona się ładuje...
Strona się ładuje...
Strona się ładuje...
Strona się ładuje...
Strona się ładuje...
Strona się ładuje...
Strona się ładuje...
Strona się ładuje...
Strona się ładuje...
Strona się ładuje...
Strona się ładuje...
Strona się ładuje...
Strona się ładuje...
Strona się ładuje...
Strona się ładuje...
Strona się ładuje...
Strona się ładuje...
Strona się ładuje...
Strona się ładuje...
Strona się ładuje...
Strona się ładuje...
Strona się ładuje...
Strona się ładuje...
Strona się ładuje...
Strona się ładuje...
Strona się ładuje...
Strona się ładuje...
Strona się ładuje...
Strona się ładuje...
Strona się ładuje...
Strona się ładuje...
Strona się ładuje...
Strona się ładuje...
Strona się ładuje...
Strona się ładuje...
Strona się ładuje...
Strona się ładuje...
Strona się ładuje...
Strona się ładuje...
Strona się ładuje...
Strona się ładuje...
Strona się ładuje...
Strona się ładuje...
Strona się ładuje...
Strona się ładuje...
Strona się ładuje...
Strona się ładuje...
Strona się ładuje...
Strona się ładuje...
Strona się ładuje...
Strona się ładuje...
Strona się ładuje...
Strona się ładuje...
Strona się ładuje...
Strona się ładuje...
Strona się ładuje...
Strona się ładuje...
Strona się ładuje...
Strona się ładuje...
Strona się ładuje...
Strona się ładuje...
Strona się ładuje...
Strona się ładuje...
Strona się ładuje...
Strona się ładuje...
Strona się ładuje...
Strona się ładuje...
Strona się ładuje...
Strona się ładuje...
Strona się ładuje...
Strona się ładuje...
Strona się ładuje...
Strona się ładuje...
Strona się ładuje...
Strona się ładuje...
Strona się ładuje...
Strona się ładuje...
Strona się ładuje...
Strona się ładuje...
Strona się ładuje...
Strona się ładuje...
Strona się ładuje...
Strona się ładuje...
Strona się ładuje...
Strona się ładuje...
Strona się ładuje...
Strona się ładuje...
Strona się ładuje...
Strona się ładuje...
Strona się ładuje...
Strona się ładuje...
Strona się ładuje...
Strona się ładuje...
Strona się ładuje...
Strona się ładuje...
Strona się ładuje...
Strona się ładuje...
Strona się ładuje...
Strona się ładuje...
Strona się ładuje...
Strona się ładuje...
Strona się ładuje...
Strona się ładuje...
Strona się ładuje...
Strona się ładuje...
Strona się ładuje...
Strona się ładuje...
Strona się ładuje...
Strona się ładuje...
Strona się ładuje...
Strona się ładuje...
Strona się ładuje...
Strona się ładuje...
Strona się ładuje...
Strona się ładuje...
Strona się ładuje...
Strona się ładuje...
Strona się ładuje...
Strona się ładuje...
Strona się ładuje...
Strona się ładuje...
Strona się ładuje...
Strona się ładuje...
Strona się ładuje...
Strona się ładuje...
Strona się ładuje...
Strona się ładuje...
Strona się ładuje...
Strona się ładuje...
Strona się ładuje...
Strona się ładuje...
Strona się ładuje...
Strona się ładuje...
Strona się ładuje...
Strona się ładuje...
Strona się ładuje...
Strona się ładuje...
Strona się ładuje...
Strona się ładuje...
Strona się ładuje...
Strona się ładuje...
Strona się ładuje...
Strona się ładuje...
Strona się ładuje...
-
 1
1
-
 2
2
-
 3
3
-
 4
4
-
 5
5
-
 6
6
-
 7
7
-
 8
8
-
 9
9
-
 10
10
-
 11
11
-
 12
12
-
 13
13
-
 14
14
-
 15
15
-
 16
16
-
 17
17
-
 18
18
-
 19
19
-
 20
20
-
 21
21
-
 22
22
-
 23
23
-
 24
24
-
 25
25
-
 26
26
-
 27
27
-
 28
28
-
 29
29
-
 30
30
-
 31
31
-
 32
32
-
 33
33
-
 34
34
-
 35
35
-
 36
36
-
 37
37
-
 38
38
-
 39
39
-
 40
40
-
 41
41
-
 42
42
-
 43
43
-
 44
44
-
 45
45
-
 46
46
-
 47
47
-
 48
48
-
 49
49
-
 50
50
-
 51
51
-
 52
52
-
 53
53
-
 54
54
-
 55
55
-
 56
56
-
 57
57
-
 58
58
-
 59
59
-
 60
60
-
 61
61
-
 62
62
-
 63
63
-
 64
64
-
 65
65
-
 66
66
-
 67
67
-
 68
68
-
 69
69
-
 70
70
-
 71
71
-
 72
72
-
 73
73
-
 74
74
-
 75
75
-
 76
76
-
 77
77
-
 78
78
-
 79
79
-
 80
80
-
 81
81
-
 82
82
-
 83
83
-
 84
84
-
 85
85
-
 86
86
-
 87
87
-
 88
88
-
 89
89
-
 90
90
-
 91
91
-
 92
92
-
 93
93
-
 94
94
-
 95
95
-
 96
96
-
 97
97
-
 98
98
-
 99
99
-
 100
100
-
 101
101
-
 102
102
-
 103
103
-
 104
104
-
 105
105
-
 106
106
-
 107
107
-
 108
108
-
 109
109
-
 110
110
-
 111
111
-
 112
112
-
 113
113
-
 114
114
-
 115
115
-
 116
116
-
 117
117
-
 118
118
-
 119
119
-
 120
120
-
 121
121
-
 122
122
-
 123
123
-
 124
124
-
 125
125
-
 126
126
-
 127
127
-
 128
128
-
 129
129
-
 130
130
-
 131
131
-
 132
132
-
 133
133
-
 134
134
-
 135
135
-
 136
136
-
 137
137
-
 138
138
-
 139
139
-
 140
140
-
 141
141
-
 142
142
-
 143
143
-
 144
144
-
 145
145
-
 146
146
-
 147
147
-
 148
148
-
 149
149
-
 150
150
-
 151
151
-
 152
152
-
 153
153
-
 154
154
-
 155
155
-
 156
156
-
 157
157
-
 158
158
-
 159
159
-
 160
160
-
 161
161
-
 162
162
-
 163
163
-
 164
164
-
 165
165
-
 166
166
-
 167
167
-
 168
168
-
 169
169
-
 170
170
-
 171
171
-
 172
172
-
 173
173
-
 174
174
-
 175
175
-
 176
176
-
 177
177
-
 178
178
-
 179
179
-
 180
180
-
 181
181
-
 182
182
-
 183
183
-
 184
184
-
 185
185
-
 186
186
-
 187
187
-
 188
188
-
 189
189
-
 190
190
-
 191
191
-
 192
192
-
 193
193
-
 194
194
-
 195
195
-
 196
196
-
 197
197
-
 198
198
-
 199
199
-
 200
200
-
 201
201
-
 202
202
-
 203
203
-
 204
204
-
 205
205
-
 206
206
-
 207
207
-
 208
208
-
 209
209
-
 210
210
-
 211
211
-
 212
212
-
 213
213
-
 214
214
-
 215
215
-
 216
216
-
 217
217
-
 218
218
-
 219
219
-
 220
220
-
 221
221
-
 222
222
-
 223
223
-
 224
224
-
 225
225
-
 226
226
-
 227
227


DREAME V12 Pro Instrukcja obsługi
- Kategoria
- Odkurzacze
- Typ
- Instrukcja obsługi
w innych językach
- español: DREAME V12 Pro Manual de usuario
- italiano: DREAME V12 Pro Manuale utente
- português: DREAME V12 Pro Manual do usuário
- français: DREAME V12 Pro Manuel utilisateur
Inne dokumenty
-
Xiaomi MJWXCQ03DY Instrukcja obsługi
-
Amica Aqua Joran VM 9003 Vacuum Cleaner Instrukcja obsługi
-
Mi Handheld Vacuum Cleaner 1С (SCWXCQ02ZHM) Instrukcja obsługi
-
eta Magic X-treme 7235 90000 Instrukcja obsługi
-
Hoover HF322YHM 011 Instrukcja obsługi
-
-
-
-
 Lauben 22BL Instrukcja obsługi
-
Zelmer ZSVC622 Instrukcja obsługi
