VintageView W Series Shelf Instrukcja instalacji
- Typ
- Instrukcja instalacji

W Series Shelf
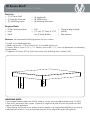
Installation Instructions for WS-SH-2, WS-SH-3
• (1) W Series Shelf
• (1) Non-slip silicon mat
• (2) Self-drilling screws
Parts List
1
SHELF & MAT
Fasteners We recommend the following fasteners for these surfaces:
• Drywall: Use included toggle bolts
• Wood/stud (must be 1/2 inch (19mm) thick): Use included wood screws
• Concrete, Brick or Stucco: 3/16” x 1 ¼” masonry screw or #8 x 1 ¼” screw with appropriate size expanding
concrete anchor
• VintageView W Frames (FCF-xx): Each Frame comes with self-drilling screws to attach Shelf
• (4) Toggle bolts
• (4) Wood screws
• (4) Mounting hole covers
• Phillips head screwdriver
• Level
• Pencil
Required Tools
• Drill
• 1/2 inch (12.7mm) & 3/32
inch (2.4mm) drill bits
IMPORTANT NOTES:
• Leave enough clearance above the Shelf for whatever you are storing (a magnum bottle stands 15” tall!!!)
• Each shelf is designed to safely support 25 pounds of weight into drywall or at least 50 pounds into solid
wood or steel frame applications.
• When aligning Shelves next to one another, fasten the together with the provided self-drilling screws prior to
installing for ease of access. Using a clamp helps keep the shelves aligned during the drilling process.
• Clamp (to align multiple
shelves)
• Tape measure

Instructions: W Series Shelf
1
W SHELF pencil
Figure A
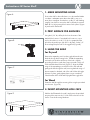
1. MARK MOUNTING HOLES
Position the shelf on the wall where it is to be installed. Make
sure there is adequate space above the shelf to store your
items (Hint: a magnum wine bottle is usually 15” tall standing
upright). Use a level to ensure the shelf is perfectly horizontal.
Mark all four (4) mounting hole locations with a pencil (Figure
A), and set the Shelf aside.
2. PREP SURFACE FOR ANCHORS
Using the 3/32” bit, drill a pilot hole in the center of the
marked hole locations. If a marked hole location is over a
stud or the surface is wood (1/2” thick or greater) drill the
pilot hole only and skip to step 3B. For drywall, use the 1/2”
bit to enlarge the pilot hole for the toggle bolt (Figure B).
3. HANG THE SHELF
for Drywall
Remove the expanding nuts from the toggle bolts and insert
the bolts through the mounting holes. Thread the expanding
nuts back onto the bolts until the tip of the bolt is slightly
protruding from the nut with the wings positioned so they will
fold toward the head of the bolt (Figure C). Align the folded
wings of the expanding nuts with the holes in the wall and
gently push them through the wall, ensuring that both wings of
the nut expand on the back side of the wall. When all toggle
bolts are in place, gently tighten them using a screwdriver.
Check that the shelf is level and fully tighten the toggle bolts.
for Wood
Fasten the shelf through the mounting holes using the provided
wood screws. (Figure D)
4. INSERT MOUNTING HOLE CAPS
With the shelf fastened to the wall, simply press the provided
mounting hole caps into the 1/2 inch holes in the face of the
shelf to cover the mounting hardware.
1
W SHELF drill
1
Screws in Shelf
Figure B
Figure C
Figure D

Instructions: W Series Shelf
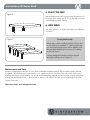
5. PLACE THE MAT
Remove the protective film from the non-slip mat and rest it on
the surface of the shelf (Figure E). This food grade silicon mat
will help keep your items in place.
6. ADD WINE
Only the good stuff — or anything else that looks really good
on a shelf.
Maintenance and Care:
Like every VintageView product, the W Series Shelf is backed by a lifetime warranty. They should be regularly checked
for tightness. Should any piece to be found to be loose, tighten until secure. If the face of the wall surface shows signs of
breakage, discontinue use immediately until the wall may be adequately repaired. W Series products may be cleaned with
a damp cloth and mild dish soap — abrasive pads or steel wool should NOT be used as they will damage the finished
surfaces of the parts.
Need more help? Visit VintageView.com
1
SHELF & MAT
Figure E
1
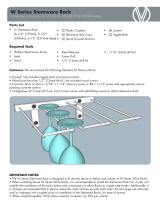
2 SHELVES
Figure F Lining Shelves Up
When plans call for installing multiple Shelves next
to one another at standard 13” spacing (touching),
we recommend fastening the shelves together with
the provided self-drilling screws prior to installing
for ease of access.
Using a clamp helps keep the shelves aligned
during the drilling process (Figure F).
-
 1
1
-
 2
2
-
 3
3


VintageView W Series Shelf Instrukcja instalacji
- Typ
- Instrukcja instalacji
w innych językach
Powiązane artykuły

Inne dokumenty
-
Amana MVH240W Instrukcja obsługi
-
Strasser 51.924 Instrukcja instalacji
-
ATHLETIC Prestige Pro Instrukcja obsługi
-
Moen DN0790CH Specyfikacja
-
Sanus VMA401 Instrukcja instalacji
-
Classic Exhibits ECO-1067 Setup Instructions
-
-
-
OmniMount Blade1 Instrukcja obsługi