
V22134LW
OPERATING INSTRUCTIONS
NÁVOD K POUŽITÍ
NÁVOD NA POUŽITIE
BEDIENUNGSANLEITUNG
INSTRUKCJA OBS£UGI
ODBIORNIK TELEWIZJI KOLOROWEJ
COLOUR TELEVISION WITH REMOTE CONTROL
BAREVNÝ LCD TELEVIZNÍ PØIJÍMAÈ
FAREBNÝ LCD TELEVÍZNY PRIJÍMAÈ
FARB-TV-GERÄT MIT FERNBEDIENUNG

English - 1 -
Safety Information
To operate your TV in extreme ambient conditions
may cause the damage of the device.
CAUTION
RISK OF ELECTRIC SHOCK
DO NOT OPEN
CAUTION: TO REDUCE THE RISK OF ELECTRIC SHOCK DO
NOT REMOVE COVER (OR BACK).
NO USER-SERVICEABLE PARTS INSIDE. REFER
SERVICING TO QUALIFIED SERVICE PERSONNEL.
Note : Follow the on screen instructions for operating the
related features.
If there is lightning or storms, or if the TV is not
going to be used for a while (e.g. if going away
on holiday), disconnect the TV set from the
mains. The mains plug is used to disconnect TV
set from the mains and therefore it must remain
readily operable.
The exclamation point within an equilateral
triangle is intended to alert the user to
the presence of important operating and
maintenance (servicing) instructions in the
literature accompanying the appliance.
IMPORTANT - Please read these
instructions fully before installing or
operating
WARNING: Never let people (including
children) with reduced physical, sensory or
Contents
mental capabilities or lack of experience and / or
knowledge use electrical devices unsupervised.
•For ventilation purposes, leave a free space of at
least 10 cm all around the set.
•Do not block ventilation holes.
•Do not place the TV on sloping or unstable surfaces,
the TV may tip over.
•Use this device in moderate climates.
•The power cord plug should be easily accessible. Do
not place the TV, furniture, etc. on the power cord.
Adamagedpowercord/plugcancausereorgive
you an electric shock. Handle the power cord by the
plug, do not unplug the TV by pulling the power cord.
Never touch the power cord/plug with wet hands
as this could cause a short circuit or electric shock.
Never make a knot in the power cord or tie it with
other cords. When damaged it must be replaced,
thisshouldonlybedonebyqualiedpersonnel.
•Do not use this TV in a humid or damp place. Do
not expose the TV to liquids. If any liquid falls into
the cabinet unplug the TV and have it checked by
qualiedpersonnelbeforeoperatingitanyfurther.
•Do not expose the TV to direct sunlight or other heat
sources.
•The TV should not be placed near to open
amesorsourcesofintenseheatsuchas
an electric heater.
•Excessive sound pressure from earphones and
headphones can cause hearing loss.
•Ensurethatnoopenamesources,such
as lit candles, are placed on top of the TV.
•To prevent injury, this TV must be securely
attached to the wall in accordance with the
installation instructions (if the option is available).
•Occasionally, a few non-active pixels may appear
onthescreenasaxedblue,greenorredpoint.
Please note that this does not affect the performance
of your product. Take care not to scratch the screen
withngernailsorotherhardobjects.
•Before cleaning, unplug the TV from the wall socket.
Only use a soft, dry cloth while cleaning.
Warning
Serious injury or death risk
Risk of electric shock
Dangerous voltage risk
Caution
Injury or property damage risk
Important
Correctly the system operate
Notice
Additional notes marked
Safety Information ..................................................1
Getting Started .......................................................2
Notications&Features&Accessories .................. 2
Features .................................................................2
Control Buttons on the TV ......................................2
Connect Power ...................................................... 3
Remote Control .....................................................4
Connections............................................................5
Media Browser Menu..............................................6
TV Menu Features and Functions ..........................7
General TV Operation ............................................9
Using the Channel List ...........................................9
ConguringParentalSettings .................................9
Electronic Programme Guide (EPG) ......................9
Software Upgrade.................................................10
Troubleshooting&Tips ......................................... 10
PC Input Typical Display Modes .......................... 11
Supported File Formats for USB Mode ................ 11
AV and HDMI Signal Compatibility ...................... 11

Getting Started
English - 2 -
Notications&Features&Accessories
Environmental Information
This television is designed to consume less energy
to help save the environment. To reduce energy
consumption, you should take the following steps:
If you set the Power Save Mode as Eco, the TV will
switch to energy-saving mode. The Power Save Mode
settings can be found In the ‘Picture’ section of the
Main Menu. Note that some picture settings will be
unavailable to be changed.
If Picture Off is selected, “Screen will be off in
3 seconds.” message will be displayed. Select
PROCEED and press OK to continue. The screen
will be off immediately.
When the TV is not in use, please switch off or
disconnect the TV from the mains plug. This will also
reduce energy consumption.
StandbyNotications
1. If the TV does not receive any input signal (e.g.
from an aerial or HDMI source) for 5 minutes, the
TV will go into standby. When you next switch-
on, the following message will be displayed:
“Standby Cause No Signal” Press OK to
continue.
2. If the TV has been left on and not been operated
for a while, the TV will go into standby. When
you next switch-on, the following message will
be displayed. “Standby Cause No Operation”
Press OK to continue.
Features
•Remote controlled colour TV.
•Fully integrated digital/cable TV (DVB-T/C)
•HDMI inputs are for connecting a device that has
a HDMI socket.
•USB input.
•OSD menu system.
•Scart socket for external devices (such as DVD
Players, PVR, video games, etc.)
•Stereo sound system.
•Teletext.
•Headphone connection.
•Automatic programming system.
•Manual tuning.
•Automatic power down after up to six hours.
•Sleep timer.
•Child lock.
•Automatic sound mute when no transmission.
•NTSC playback.
•AVL (Automatic Volume Limiting).
•PLL (Frequency Search).
•PC input.
•Plug&PlayforWindows98,ME,2000,XP, Vista,
Windows 7.
•Game Mode (Optional).
Accessories Included
•Remote Control
•Batteries: 2 x AAA
•Instruction Book
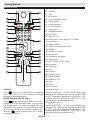
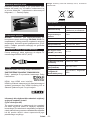
TVControlSwitch&Operation
1. Up direction
2. Down direction
3. Programme/Volume / AV / Standby-On selection
switch
The Control button allows you to control the Volume/
Programme/ Source and Standby-On functions of
the TV.
To change volume: Increase the volume by pushing
the button up. Decrease the volume by pushing the
button down.
To change channel: Press the middle of the button,
the channel information banner will appear on screen.
Scroll through the stored channels by pushing the
button up or down
To change source: Press the middle of the button
twice, the source list will appear on screen. Scroll
through the available sources by pushing the button
up or down.
To turn the TV off: Press the middle of the button down
and hold it down for a few seconds, the TV will turn
into standby mode.
Inserting the Batteries into the Remote
Lift the cover on the back of the remote upward gently.
Install two AAA batteries. Make sure to match the +
Getting Started

English - 3 -
and - ends of the batteries in the battery compartment
(observe the correct polarity) Replace the cover.
Connect Power
IMPORTANT: The TV set is designed to operate on
220-240V AC, 50 Hz socket. After unpacking, allow
the TV set to reach the ambient room temperature
before you connect the set to the mains. Plug the
power cable to the mains socket outlet.
Antenna/Cable Connection
Connect the “aerial” or “cable TV” plug to the AERIAL
INPUT (ANT) socket located on the back of the TV.
Notication
Manufactured under license from Dolby Laboratories.
TRADEMARK ACKNOWLEDGMENT
“Dolby” and the double-D symbol are
trademarks of Dolby Laboratories.
“HDMI,theHDMIlogoandHigh-DenitionMultimedia
Interface are trademarks or
registered trademarks of HDMI
Licensing LLC.”
Information for Users on Disposal of Old
Equipment and Batteries
[European Union only]
These symbols indicate that equipment with these
symbols should not be disposed of as general
household waste. If you want to dispose of the product
or battery, please consider the collection systems or
facilities for appropriate recycling.
Notice: The sign Pb below the symbol for batteries indicates
that this battery contains lead.
Products
Battery
Specication
TV Broadcasting PAL B/G D/K K
Receiving Channels
VHF (BAND I/III) - UHF
(BAND U) - HYPERBAND
Number of Preset
Channels
1000
Channel Indicator On Screen Display
RF Aerial Input 75 Ohm (unbalanced)
Operating Voltage 220-240V AC, 50Hz.
Audio German+Nicam Stereo
Audio Output Power
(WRMS.) (10% THD)
2 x 2,5
Power Consumption 45W
Weight 3,00
TV Dimensions DxLxH
(with foot)
134 x 517 x 352
TV Dimensions DxLxH
(without foot)
35 x 517 x 317
Operation
temperature and
operation humidity:
0ºCupto40ºC,85%
humidity max

Getting Started
English - 4 -
Teletext
Press " ” button to enter. Press again to activate mix
mode. Press once more to exit. Follow the instructions
displayed on digital teletext screen.
Digital Teletext (for UK only)
Press " ” button to view digital teletext information.
Operate it with the coloured buttons, cursor buttons
and the OK button. The operation method may differ
depending on the contents of the digital teletext. Follow
the instructions displayed on the digital teletext screen.
When the " ” button is pressed again, the TV returns
to television broadcast.
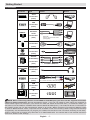
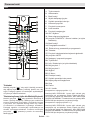
Remote Control
4
7
8
9
P+
P-
V+
V-
1
.,/@
2
3
5
6
0
OK
Q.MENU
EXIT
BACK
LANG.
SOURCE
2
/
1
/
1. Standby
2. Play
3. No function
4. Current language select
5. Rapid reverse
6. Colored buttons
7. Numeric buttons
8. Channel list
9. Navigation buttons
10. OK /Select
11. Menu on / off
12. Backbutton/Indexpage(inTXTmode)
13. No function*
14. Media browser**
15. Electronic Programme Guide
16. Teletext
17. Volume up / down
18. Mute button
19. Programme up / down
20. Screen mod
21. Info/Reveal(inTXTmode)
22. My button 1
23. My button 2
24. Exit
25. Q. Menu
26. Channel swap
27. Rapid advance
28. Subtitle on / off
29. Stop
30. Pause
31. AV / Source
Using My button 1 (**)
PressMYBUTTON1forvesecondswhenona
desired source, channel or link, until the “MY BUTTON
IS SET” message is displayed on the screen. This
confirms that the selected MY BUTTON is now
associated with the selected function.
Using My Button 2 (***)
PressMYBUTTON2forvesecondswhenona
desired source, channel or link, until the “MY BUTTON
IS SET” message is displayed on the screen. This
confirms that the selected MY BUTTON is now
associated with the selected function.

Getting Started
English - 5 -
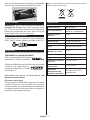
NOTE: When connecting a device via the YPbPr or Side AV input, you must use the supplied connection
cables to enable connection. See the illustrations above. | You can use YPbPr to VGA cable (not supplied) to
enable YPbPr signal via VGA input. |You cannot use VGA and YPbPr at the same time. | To enable PC audio, you
will need to use the SIDE AV CONNECTION cable’s WHITE & RED inputs. | If an external device is connected via
the SCART socket, the TV will automatically switch to AV mode.| When receiving DTV channels (Mpeg4 H.264)
or while in Media Browser mode, output will not be available via the scart socket. | When using the wall mounting
kit (optional), we recommend that you plug all your cables into the back of the TV before mounting on the wall. |
Insert or remove the CI module only when the TV is SWITCHED OFF. You should refer to the module instruction
manual for details of the settings.
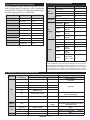
Connector Type Cables Device
Scart
Connection
(back)
VGA
Connection
(back)
SIDE AV
PC/YPbPr
Audio
Connection
(side)
Side Audio
YPbPr or PC Connection Cable
(Not supplied)
HDMI
Connection
(back)
SPDIFF
Connection
(back)
SIDE AV
Side AV
(Audio/Video)
Connection
(side)
(Not supplied)
HEADPHONE
Headphone
Connection
(side)
YPbPr Video
Connection
(back)
PC to YPbPr Connection Cable (Not supplied)
USB
Connection
(side)
CI
Connection
(side)
CAM
module
Connections

Getting Started
English - 6 -
Switching On/Off
To Switch the TV On
Connect the power cord to the 220-240V AC, 50 Hz.
To switch on the TV from standby mode either:
Press the “ ” button, P+ / P- or a numeric button on
the remote control.
Press the “ ” button, P+ / P- or a numeric button on
the TV. The TV will then switch on.
To Switch the TV Off
Press the “ ” button on the remote control or hold
the “ ” switch on the Tv until shut down, so the TV
will switch to standby mode. (Depends model)
To power down the TV completely, unplug the
power cord from the mains socket.
Note: When the TV is switched to standby mode, standby LED
can blink to indicate that features such as Standby Search,
Over Air Download or Timer is active. The LED can also blink
when you switch on the TV from standby mode.
First Time Installation
When turned on for the first time, the language
selection screen is displayed. Select the desired
language and press OK.
The First Time Installation (FTI) screen will be displayed
next. Set your preferences using the navigation buttons
andwhennished,pressOKtocontinue.
If Store Mode (optional) is selected, Store mode
option will be available in other settings menu and
your TV’s settings will be optimized for best display
quality.Aconrmationscreenwillbedisplayed.Select
YES to proceed.
If Home Mode is selected, Store mode will not be
available after the First Time Installation. Press OK
button to continue.
Default PIN code can change depending on the
selected country.
If you are asked to enter a PIN code for viewing a
menu option, use one of the following codes: 4725,
0000 or 1234.
Aerial Installation
If you select AERIAL option from the Search Type
screen, the television will search for digital terrestrial
TV broadcasts.
NOTE: You can press MENU button to cancel.
After all the available stations are stored, the Channel
List will be displayed on the screen. If you like how the
channels are sorted according to the LCN (*), please
select “Yes” and than press OK.
Press MENU button to quit channel list and watch TV.
(*) LCN is the Logical Channel Number system that
organizes available broadcasts in accordance with a
recognizable channel sequence (if available).
Cable Installation
If you select CABLE option and press OK button on
the remote control. To continue, please select YES
and press OK. To cancel operation, select NO and
press OK. You can select frequency ranges from
this screen.
Enter the frequency range manually by using the
numeric button.
Note: Searching duration will change depending on the
selected search step.
Media Playback via USB Input
You can connect a 2.5” and 3.5” inch (hdd with external power
supply) external hard disk drives or USB memory stick to your
TV by using the USB inputs of the TV.
IMPORTANT! Back up your files before making
any connections to the TV. Manufacturer will not be
responsibleforanyledamageordataloss.Certain
types of USB devices (e.g. MP3 Players) or USB hard
disk drives/memory sticks may not be compatible
with this TV.
While formatting a USB hard disk that has 1TB (Tera
Byte) or more file capacity, you can experience
problems with the formatting process. Do not
repeatedly quickly plug and unplug the drive. This
may cause physical damage to the USB player and
USB device itself. Do not pull out USB module while
playingale.
Media Browser Menu
Youcanplayphoto,music,andmovielesstoredona
USB disk by connecting it to your TV. Connect a USB
disk to one of the USB inputs located on the side of
the TV. Pressing the MENU button while in the Media
Browser mode will access the Picture, Sound and
Settings menu options. Pressing the MENU button
again will exit from this screen. You can set your Media
Browser preferences by using the Settings Menu.
Loop/Shufe Mode Operation
Start playback with and
activate
TV plays next file and loop
the list.
Start playback with OK and
activate
thesamelewillbeplayedina
loop (repeat).
Start playback with OK/ and
activate
thelewillbeplayedinashufe.
First Time Installation - USB Connections

English - 7 -
TV Menu Features and Functions
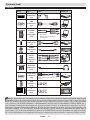
Picture Menu Contents
Mode
You can change the picture mode to suit your preference or requirements. Picture mode
can be set to one of these options: Cinema, Game, Dynamic and Natural.
Contrast
Sets the lightness and darkness values of the screen.
Brightness
Sets the brightness value for the screen.
Sharpness
Sets the sharpness value for the objects displayed on the screen.
Colour
Sets the colour value, adjusting the colors.
Power Save Mode
To set the Power Save Mode as Eco, Picture Off and Disabled.
(When the Mode is Dynamic, Power Save mode is automatically set as disabled.)
Backlight
(Optional)
This setting controls the backlight level. The backlight function will be inactive if the
Power Save Mode is set to Eco. The backlight cannot be activated in VGA, Media
Browser mode or while the picture mode is set to Game.
Noise Reduction
If the broadcast signal is weak and the picture is noisy, use the Noise Reduction
setting to reduce the amount of noise.
Advanced Settings
Dynamic Contrast
You can change the Dynamic Contrast ratio to desired value.
Colour Temp
Sets the desired colour tone.
Picture Zoom
Sets the desired picture size from picture zoom menu.
Note: Auto (Only available in Scart mode with SCART PIN8 high voltage/low voltage
switching)
Film Mode
Films are recorded at a different number of frames per second to normal television
programmes.Turnthisfeatureonwhenyouarewatchinglmstoseethefastmotion
scenes clearly.
Skin Tone
Skin tone can be changed between -5 and 5.
Colour Shift
Adjust the desired colour tone.
RGB Gain
YoucancongurethecolourtemperaturevaluesusingtheRGBGainfeature.
Reset
Resets the picture settings to factory default settings.(Except Game Mode)
Autoposition (in
PC mode)
Automatically optimizes the display. Press OK to optimize.
H Position (in PC
mode)
This item shifts the image horizontally to the right hand side or left hand side of the
screen.
V Position (in PC
mode)
This item shifts the image vertically towards the top or bottom of the screen.
Dot Clock (in PC
mode)
Dot Clock adjustments correct the interference that appear as vertical banding in dot
intensive presentations like spreadsheets or paragraphs or text in smaller fonts.
Phase (in PC
mode)
Depending on the resolution and scan frequency that you input to the TV set, you may
see a hazy or noisy picture on the screen. In such a case you can use this item to get a
clear picture by trial and error method.
While in VGA (PC) mode, some items in Picture menu will be unavailable. Instead, VGA mode settings will be added to the
Picture Settings while in PC mode.

English-8-
TV Menu Features and Functions
Sound Menu Contents
Volume
Adjusts the volume level.
Equalizer
Selects the equalizer mode. Custom settings can be made only when in user mode.
Balance
This setting is used for emphasizing left or right speaker balance.
Headphone
Sets headphone volume.
Sound Mode
You can select a sound mode. (If the selected channel supports).
AVL (Automatic
Volume Limiting)
Functionsetsthesoundtoobtainxedoutputlevelbetweenprogrammes.
Digital Out
Sets digital out audio type.
Settings Menu Contents
Conditional Access
Controls conditional access modules when available.
Language
Congureslanguagesettings(maychangedependingonthecountryselected)
Preferred and current settings will be available. Current settings can be changed
only if the broadcaster supports.
Parental
Enter correct password to change parental settings. You can easily adjust menu
lock, maturity lock (may change depending on the country selected) and child lock
in this menu. You can also set new pin number.
Timers
Sets sleep timer to turn off the TV after a certain time. Sets timers for selected
programmes.
Date/Time
Sets date and time.
Sources
Enables or disables selected source options.
Other Settings: Displays other setting options of the TV set:
Menu Timeout
Changes timeout duration for menu screens.
Scan Encrypted
Channels
When this setting is on, the search process will locate the encrypted channels as
well.
Blue Background
Activates or deactivates the blue background system when the signal is weak or
absent.
Software Upgrade
ToensurethatyourTValwayshasthemostuptodatermware.
Application Version
Displays application version.
Hard of Hearing
Enables any special feature sent from the broadcaster.
Audio Description
Audio description refers to an additional narration track for blind and visually
impaired viewers of visual media, including television and movies. You can use this
feature, only if the broadcaster supports that additional narration track.
Note: Audio description sound feature cannot be available in recording or time shifting mode.
Auto TV Off
You can set the timeout value of auto off feature. When the timeout value is
reached and the TV has not been operated for a selected time, the TV will go into
standby mode.
Standby Search
(Optional)
If the Standby Search is set to On, when the TV is in standby mode, available
broadcasts will be searched. If the TV locates any new or missing broadcasts,
a menu screen will be displayed, asking you whether or not to execute these
changes. Channel list will be updated and changed after this process.
Store Mode (Optional)
If you are displaying the TV in a store, you can activate this mode. Whilst Store
Mode is enabled, some items in the TV menu may not be available.
Power Up Mode
Thissettingconguresthepowerupmodepreference.

English - 9 -
TV Menu Features and Functions
Install and Retune Menu Contents
Automatic Channel
Scan (Retune)
(If available)
Displays automatic tuning options. Digital Aerial: Searches and stores aerial
DVB stations. Digital Cable: Searches and stores cable DVB stations. Analogue:
Searchesandstoresanaloguestations.DigitalAerial&Analogue:Searchesand
storesaerialDVBandanaloguestations.DigitalCable&Analogue:Searchesand
stores cable DVB and analogue stations.
Manual Channel Scan
This feature can be used for direct broadcast entry.
Network Channel
Scan
Searches for the linked channels in the broadcast system.
Analogue Fine Tune
Youcanusethissettingfornetuninganaloguechannels.Thisfeatureisnot
available if no analogue channels are stored.
First Time Installation
Deletes all stored channels and settings, resets TV to factory settings.
General TV Operation
Using the Channel List
The TV sorts all stored stations in the Channel List. You can edit this channel list, set favourites or set active
stations to be listed by using the Channel List options.
ConguringParentalSettings
To prohibit viewing of certain programmes, channels and menus can be locked by using the parental control system.
To display parental lock menu options, the PIN number should be entered. The factory default PIN number is
0000. After coding the correct PIN number, parental settings menu will be displayed.
Menu Lock: Menu lock setting enables or disables the menu access.
Maturity Lock: When set, this option gets the maturity information from the broadcast and if this maturity level
is disabled, disables access to the broadcast.
Child Lock: When Child Lock is set, the TV can only be controlled by the remote control. In this case the
control panel buttons will not work.
Set PIN:DenesanewPINnumber.
Default PIN code can change depending on the selected country.
If you are asked to enter a PIN code for viewing a menu option, use one of the following codes: 4725, 0000
or 1234.
Electronic Programme Guide (EPG)
Some, but not all channels send information about the current and next programmes. Press the GUIDE button
to view the EPG menu.
Red button (Prev Day): Displays the programmes of previous day.
Green button (Next day): Displays the programmes of the next day.
Yellow button (Zoom): Expands programme information.
Blue button (Filter): Viewslteringoptions.
SUBTTL: Press SUBTITLE button to view Select Genre menu. Using this feature, you can search the
programme guide database in accordance with the genre. Info available in the programme guide will be
searched and results matching your criteria will be listed.
INFO: Displays, in detailed, information on the programme selected.
Numeric buttons (Jump): Jumps to the preferred channel directly via numeric buttons.
OK: Displays programme options.
Text (Search): Displays “Guide Search” menu.
(Now) : Shows the current programme.

English - 10 -
Software Upgrade
YourTViscapableofndingandupdatingautomatically
via the Aerial/Cable signal.
Software upgrade search via user interface
Simply navigate on your main menu. Choose Settings
and select Other Settings menu. In Other Settings
menu navigate on to the Software for Upgrade item
and press OK button to check for a new software
upgrade.
3 AM search and upgrade mode
While the TV is connected to an aerial signal. If
Automatic scanning in the Upgrade Options menu
is enabled, the TV wakes up at 03:00 and searches
broadcast channels for new software upgrades. If
new software is found and downloaded successfully,
the next time the TV powers up , it will have the new
software version.
Note: If the TV fails to come on after the upgrade unplug the
TV for 2 minutes and plug in again.
Troubleshooting&Tips
Tv will not turn on
Make sure the power cord is plugged in securely to
wall outlet. The batteries in the remote control may
be exhausted. Press the Power button on the TV.
Poor picture
• Have you selected the correct TV system?
• Low signal level can cause picture distortion. Please
check antenna access.
• Check if you have entered the correct channel
frequency if you have done manual tuning.
• The picture quality may degrade when two devices
are connected to the TV at the same time. In such
a case, disconnect one of the devices.
No picture
•No Picture means that your TV is not receiving a
transmission. Have you selected the correct button
on the remote control? Try once more. Also make
sure the correct input source has been selected.
•Is the antenna connected properly?
•Is the antenna cable damaged?
•Are suitable plugs used to connect the antenna?
•If you are in doubt, consult your dealer.
No sound
•Has the TV been set to mute? To cancel mute, press
the “ ” button, or increase the volume level.
•Sound is coming from only one speaker. Is the
balance set to one extreme? See Sound Menu
section.
Remote control - does not operate
•The batteries may be exhausted. Replace the
batteries.
Input sources - can not be selected
•If you cannot select an input source, it is possible
that no device is connected. if not
•Check the AV cables and connections if you have
tried to connect a device.
Quick Menu
Quick Settings menu allows you to access some
options quickly. This menu includes Power Save
Mode, Picture Mode, Equalizer Settings, Favourites
and Sleep Timer options. Press Q.MENU button
on the remote control to view quick menu. See the
following chapters for the details of the listed features.

English - 11 -
AV and HDMI Signal Compatibility
Source
Supported Signals
Available
EXT
(SCART)
PAL 50/60 O
NTSC 60 O
RGB 50 O
RGB 60 O
Side AV
PAL 50/60 O
NTSC 60 O
PC/
YPbPr
480I,480P 60Hz O
576I, 576P 50Hz O
720P 50Hz,60Hz O
1080I 50Hz,60Hz O
1080P 50Hz,60Hz O
HDMI1
480I 60Hz O
480P 60Hz O
576I, 576P 50Hz O
720P 50Hz,60Hz O
1080I 50Hz,60Hz O
1080P
24Hz, 25Hz
30Hz, 50Hz,
60Hz
O
(X: Not Available, O: Available)
In some cases a signal on the TV may not be displayed
properly. The problem may be an inconsistency with standards
from the source equipment (DVD, Set-top box, etc. ). If you
do experience such a problem please contact your dealer and
also the manufacturer of the source equipment.
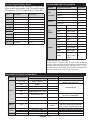
PC Input Typical Display Modes
The following table is an illustration of some of the
typical video display modes. Your TV may not support
all resolutions. Your TV supports up to 1920x1080.
Index Resolution Frequency
1 800x600 56 Hz
2 800x600 60 Hz
3 1024x768 60 Hz
4 1280x768 60 Hz
5 1360x768 60 Hz
6 1280x1024 60 Hz
7 1280x960 60 Hz
8 1280x1024 60 Hz
9 1400x1050 60 Hz
10 1600x1200 60 Hz
11 1920x1080 60 Hz
Supported File Formats for USB Mode
Media File Extension
Format
Remarks
Video
Audio
(Maximum resolution/Bit rate etc.)
Movie
mpg, mpeg MPEG1, MPEG2
MPEG1: 768x576 @30P
MPEG2:1920x1080 @ 30P
vob MPEG2
1920x1080 @ 30P
mp4 MPEG4, Xvid , H.264
mkv H.264, MPEG4,VC-1
avi MPEG2, MPEG4, Xvid , H.264
v H.264/VP6/Sorenson
H.264/VP6:1920x1080 @ 30P
Sorenson: 352x288 @30P
3gp MPEG4 , H.264 1920x1080 @ 30P
wmv,asf MPEG4 , VC-1 1920x1080 @ 30P
Music
.mp3 -
MPEG 1 Layer 1 /
2 (MP3)
32Kbps ~ 320Kbps(Bit rate)
32K, 44.1k, 48k Hz,16K, 22.05K, 24K
Hz,8K, 11.025K, 12K Hz(Sampling rate)
Photo
.jpg .jpeg Baseline JPEG - max WxH = 17000x10000 4147200bytes
.
Progressive JPEG
-
max WxH = 4000x4000 3840000bytes
.bmp
-
-
max WxH = 5760x4096 3840000bytes
Subtitle
.sub .srt
-
-
-

Čeština - 12 -
Bezpečnostní informace
Používání vaší TV v extrémních podmínkách
může způsobit poškození vašeho přístroje.
VAROVÁNÍ
NEBEZPEÈÍ ÚRAZU
ELEKTŘINOU NEOTEVÍRAT
UPOZORNĚNÍ: PRO SNÍŽENÍ RIZIKA ÚRAZU ELEKTŘINOU
NEODSTRAŇUJTE KRYT (NEBO ZADNÍ ČÁST)
UVNITŘ PŘÍSTROJE SE NENACHÁZEJÍ ŽÁDNÉ
DÍLY, KTERÉ SI MŮŽE UŽIVATEL SÁM OPRAVIT.
PRO OPRAVU KONTAKTUJTE KVALIFIKOVANÝ
SERVIS.
Poznámka : K obsluze souvisejících funkcí následujte
pokyny na obrazovce.
TV vypojte z elektřiny v případě bouřky nebo
pokud nebudete TV po delší dobu používat
(dovolená).Síťová zástrčka slouží k odpojení TV
ze sítě, a proto musí zůstat snadno přístupná.
Symbol vykřičníku v rovnostranném trojúhelníku
má za úkol upozornit uživatele zařízení na
přítomnost důležitých informací o provozu a
údržbě v dokumentaci, která je přiložena k
zařízení.
Obsah
Bezpečnostní informace .......................................12
Začínáme..............................................................14
Upozornění, funkce a příslušenství ......................14
Vlastnosti ..............................................................14
Připojení napájení ................................................15
Dálkové ovládání .................................................16
Připojení ...............................................................17
Menu Prohlížeč médií ...........................................18
Menu Funkce a vlastnosti .....................................19
Obsluha TV ...........................................................21
Ovládání seznamu kanálů ....................................21
Kongurace Rodičovského nastavení ..................21
Elektronický průvodce programy (EPG) ...............22
Aktualizace softwaru.............................................22
Řešení problémů a rady .......................................22
Rychlá nabídka .....................................................22
PC vstup typické zobrazovací režimy ..................23
Podporované formáty souboru pro USB režim .....23
Kompatibilita AV a HDMI .....................................23

Čeština - 13 -
Varování
Nebezpečí vážného poranění
či smrti.
Nebezpečí zranění
elektrickým proudem
Nebezpečí poranění vysokým
napětím
Upozornění:
Nebezpečí zranění nebo
poškození majetku
Důležité:
Systém funguje správně
Upozornění!
Další poznámky
Před zahájením instalace a
používání si prosím pečlivě přečtěte
návod k použití.
UPOZORNĚNÍ: Tento přístroj není určen
pro použití osobami (včetně dětí) se sníženými
fyzickými, smyslovými či duševními schopnostmi
nebo osobami bez zkušeností a znalostí použití
kromě těch, nad kterými je dohlíženo nebo kteří
jsou naváděni osobou zodpovědnou za jejich
bezpečnost.
• Po všech stranách přístroje nechte nejméně 10 cm
volného prostoru pro ventilaci.
• Neblokujte větrací otvory.
• Nepokládejte na nakloněné nebo vratké povrchy,
TV může přepadnout.
• Používejte toto zařízení v průměrných klimatických
podmínkách.
• Síťový kabel by měl být snadno přístupný. Na
síťový kabel nepokládejte nábytek, TV nebo jiné
věci. Poškozený síťový kabel může způsobit požár,
nebo elektrický šok. Kabel odpojujte vytažením za
zástrčku, nikoli zatažením za kabel. Nikdy nesahejte
na síťový kabel mokrýma rukama, může to způsobit
zkrat nebo elektrický šok. Nikdy kabel neuzlujte nebo
nevažte s jinými kabely. Pokud je kabel poškozený,
musí být vyměněn kvalikovanou osobou.Takovou
TV nepoužívejte na vlhkém místě. Nevystavujte TV
jakékoli kapalině. Pokud spadne nějaký předmět
nebo kapalina na kryt, vypojte TV ze zásuvky, a před
dalším použitím nechte zkontrolovat oprávněnou
osobou.
• Nevystavujte přímému slunečnímu svitu ani
zdrojům tepla.
• Neumisťujte TV blízko otevřeného ohně a
zdrojů tepla, jako třeba elektrické topení.
• Nadměrná hladina zvuku ze sluchátek může
způsobit ztrátu sluchu.
• Ujistěte se, že žádné zdroje otevřeného
ohně, jako třeba zapálené svíčky, neleží
na povrchu TV.
• Pokud chcete připevnit zařízení na stěnu, pro
zabránění úrazu je nutno následovat montážní
pokyny.
• Někdy se může stát, že se na obrazovce objeví
několik stálých pixelů v barvě modré, zelené nebo
červené. Toto neovlivní výkon vašeho výrobku.
Dbejte na to, abyste nepoškrábali obrazovku nehtem
nebo jiným tvrdým předmětem.
• Před čištěním odpojte přístroj z elektrické zásuvky
ve zdi. Používejte měkký, suchý hadřík.

Začínáme
Čeština - 14 -
Upozornění, funkce a příslušenství
Informace o životním prostředí
Tato televize je zkonstruována pro menší spotřebu
energie za účelem ochrany životního prostředí.
Pro snížení spotřeby energie postupujte podle
následujících kroků:
Při nastavení Úsporného režimu na EKO se TV
přepne na režim , který spoří energii. Nastavení
Úsporného režimu naleznete v části Obraz v hlavním
menu. Některá nastavení obrazu není možné změnit.
Pokud je vybráno Vypnout obraz, zobrazí se
zpráva: “Obrazovka se za 3 vteřin vypne.” Vyberte
POKRAČOVAT a stiskněte OK Obrazovka se ihned
vypne.
Když se TV nepoužívá, vypněte ji nebo ji odpojte ze
sítě. Toto také sníží spotřebu energie.
Upozornění o pohotovostním režimu
1. Pokud TV nepřijímá žádný signál (př. od antény
nebo HDMI zdroje) po pět minut, TV se přepne
do pohotovostního režimu. Po opětovném zapnutí
TV se zobrazí následující zpráva: “Pohotovostní
režim z důvodu nulového signálu” Stiskněte
OK.
2. Pokud není TV nějakou dobu použita, přepne se
do pohotovostního režimu. Po opětovném zapnutí
TV se zobrazí následující zpráva: “Pohotovostní
režim z důvodu nulového signálu” Stiskněte
OK .
Vlastnosti
• Barevný televizor s dálkovým ovládáním.
• Plně integrovaná digitální /kabel TV (DVB-T/C)
• Vstupy HDMI slouží k připojení zařízení, které má
konektor HDMI.
• USB vstup
• OSD soustava menu
• Dvě SCART zdířky pro externí zařízení (jako video,
video hry, audio set, atd.).
• Stereo zvukový systém.
• Teletext
• Připojení sluchátek
• Automatické programování.
• Ruční ladění
• Automatické vypnutí po šesti hodinách.
• Časovač spánku.
• Dětská pojistka.
• Automatické ztlumení zvuku, pokud není přenos.
• Přehrávání NTSC.
• AVL (Automatické omezení hlasitosti).
• PLL (Hledání frekvence)
• PC vstup
• Zapoj&Hraj pro Windows 98, ME, 2000, XP, Vista,
Windows 7.
• Režim pro hry (volitelný).
Příslušenství
• Dálkové ovládání
• Baterie: 2 X AAA
• Návod k použití
Kontrolní tlačítka a obsluha
1. Směr nahoru
2. Směr dolů
3. Program / hlasitost / AV / přepínač výběru
pohotovostního režimu
Kontrolní přepínač vám umožní ovládat hlasitost/
programy/zdroje a funkce pohotovostního režimu
na TV.
Pro změnu hlasitosti: Stisknutím tlačítka směrem
nahoru zvýšíte hlasitost. Stisknutím tlačítka směrem
dolů snížíte hlasitost.
Ke změně kanálů: Stiskněte prostřední tlačítko a
informace o kanále se zobrazí. Mezi uloženými
programy se pohybujete stisknutím tlačítek nahoru
a dolů.
Pro změnu zdroje: Stiskněte prostřední tlačítko a
informace o kanále se zobrazí. Mezi uloženými
programy se pohybujete stisknutím tlačítek nahoru
a dolů.
Vypínání televizoru: Stiskněte prostřední tlačítko
a na pár vteřin ho podržte, TV se tak přepne do
pohotovostního pořadu.
Vložení baterií do dálkového ovladače
Jemně nadzdvihněte kryt v zadní části dálkového
ovládání. Vložte dvě baterie AAA. Zkontrolujte, zda
jsou konce baterií + a - do prostoru pro baterie vloženy
správně (zkontrolujte správnou polaritu).
Začínáme

Čeština - 15 -
Připojení napájení
DŮLEŽITÉ: Televizor je určen k použití s napětím
220-240V AC, 50 Hz. Po vybalení nechte televizor
získat pokojovou teplotu, než přístroj připojíte do sítě.
Zapojte napájecí kabel do zásuvky napájení ve zdi.
Připojení /Antény Kabel
Připojte zástrčku "antény" nebo kabelové televize
do konektoru ANTÉNNÍ VSTUP na zadní straně
televizoru.
Oznámení
Vyráběno pod licencí Dolby Laboratories.
OZNÁMENÍ O OCHRANNÉ ZNÁMCE
“Dolby” a symbol dvojitého D jsou
pod ochrannou známkou Dolby
Laboratories.
“HDMI, HDMI logo a High-Definition Multimedia
Interface jsou. ochranné známky HDMI licence LLC.”
Informace pro uživatele o zneškodňování starého
vybavení a baterií
Pouze Evropská Unie
Tyto znaky znamenají, že vybavení by nemělo být
vyhozeno s domácím odpadem. Pokud potřebujete
zneškodnit produkt nebo baterie, zjistěte si vhodná
recyklační centra.
UPOZORNĚNÍ: Značka Pb pod symbolem baterie označuje:
že baterie obsahuje olovo.
Produkty
Baterie
Technické údaje
Televizní vysílání PAL B/G D/K K
Příjem kanálů
VHF (BAND I/III) UHF
(BAND U) HYPERBAND
Počet
přednastavených
kanálů
1000
Indikátor kanálu Zobrazení na obrazovce
RF anténní vstup 75 Ohm (unbalanced)
Napětí
220 – 240 V střídavého
proudu
Audio: German+Nicam Stereo
ZVUKOVÝ VÝKON
(WRMS.) (10% THD)
2 x 2,5
Spotřeba energie
45W
Hmotnost
3,00
Rozměry (s
podstavcem)
134 x 517 x 352 mm
Rozměry (bez
podstavce)
35 x 517 x 317 mm
Provozní teplota a
vlhkost vzduchu
0ºC až 40ºC, 85% max.
vlhkost.

Začínáme
Čeština - 16 -
Teletext
Stiskněte tlačítko " ". Pro aktivaci režimu mix
stiskněte znovu. Pro opuštění stiskněte ještě jednou.
Následujte instrukce zobrazené na obrazovce.
Digitální teletext (pouze pro UK)
Pro shlédnutí informací z digitálního teletextu stiskněte
“ “. Ovládejte ho pomocí barevných tlačítek, šipek
a tlačítka OK. Možnosti se mohou měnit v závislosti
na obsahu digitálního teletextu. Následujte instrukce
zobrazené na obrazovce. Když stisknete tlačítko “ ”,
TV se vrátí na sledování televizního vysílání.
Dálkové ovládání
4
7
8
9
P+
P-
V+
V-
1
.,/@
2
3
5
6
0
OK
Q.MENU
EXIT
BACK
LANG.
SOURCE
2
/
1
/
1. Pohotovostního režimu (Standby)
2. Přehrát
3. Žádné funkce.
4. Aktuální jazyk Zvolením
5. Rychlé přetáčení
6. Barevná tlačítka
7. Číselná tlačítka
8. Listă canale
9. Butoane de navigare
10. OK / Vybrat
11. Meniu pornit / oprit
12. Tlačítko ZPĚT / Stránka seznamu (v Režimu
teletextu)
13. Žádné funkce*
14. Prohlížeč médií**
15. Elektronický programový průvodce
16. Teletext
17. Snížení hlasitosti/Zvýšení hlasitosti
18. Tlačítko ztlumit
19. Program Sus/Jos
20. obrazovce módy
21. Info / Odkrytí (v Režimu teletextu)
22. Moje tlačítko 1
23. Moje tlačítko 2
24. Ieşire
25. Q. MENU
26. Přehození kanálů
27. Rychle dopředu
28. Titulky Zap. - Vyp.
29. Stop
30. Pauza
31. AV/Sursă
Použití funkce MOJE TLAČÍTKO 1(**)
Pokud jste na požadovaném zdroji, kanálu či odkazu,
stiskněte Moje tlačítko 1 nebo 2 po dobu tří vteřin,
dokud se na obrazovce nezobrazí MOJE TLAČÍTKO JE
NASTAVENO. Toto potvrzuje, že bylo MOJE TLAČÍTKO
přiřazeno k vybrané funkci.
Použití funkce Moje tlačítko 2(**)
Pokud jste na požadovaném zdroji, kanálu či odkazu,
stiskněte Moje tlačítko 2 nebo 2 po dobu tří vteřin,
dokud se na obrazovce nezobrazí MOJE TLAČÍTKO JE
NASTAVENO. Toto potvrzuje, že bylo MOJE TLAČÍTKO
přiřazeno k vybrané funkci.

Začínáme
Čeština - 17 -
POZNÁMKA: Při připojování zařízení skrz YPbPr nebo bočního AV vstupu použijte dodané kabely. Viz
ilustrace níže. |Můžete použít YPbPr na VGA kabel (není dodáván) pro propojení YPbPr signálu skrz VGA vstup.
|VGA a YPbPr nelze použít najednou. | Pro povolení PC audia, použijte červený a bílý vstup PC/YPBPR AUDIO
kabelu. | Pokud je skrz zdířku Scart připojeno externí zařízení, TV se automaticky přepne do režimu AV.| Při přijímání
kanálů DTV (Mpeg4 H.264) nebo při aktivním režimu Prohlížeče médií nebude výstup zdířky Scart dostupný. |
Pokud montujete TV ke stěně, doporučujeme zapojit všechny kabely do zadní strany TV. | Vložte nebo vyjměte CI
jednotku, pouze pokud je TV vypnutá. ¨Pro podrobnosti nastavení , pročtěte návod k použití jednotky.
Konektor Typ Kabely Zařízení
Scart
Zapojení
(vzadu)
VGA
Zapojení
(vzadu)
Boční -AV
PC/YPbPr
Audio
Zapojení
(strana)
Boční audio vstup
Připojovací YPbPr nebo PC kabel
(není součástí dodávky)
HDMI
Zapojení
(vzadu)
SPDIFF
Zapojení
(vzadu)
Boční -AV
Boční AV
Audio +
Video
Zapojení
(strana)
(není součástí dodávky)
SLUCHÁTKA
Sluchátka
Zapojení
(strana)
YPbPr Video
Zapojení
(vzadu)
Připojovací YPbPr nebo PC kabel (není
součástí dodávky)
USB
Zapojení
(strana)
CI
Zapojení
(strana)
CAM
module
Připojení

Začínáme
Čeština - 18 -
Zapínání a vypínání
Zapnutí TV
Připojte síťový kabel do zásuvky se střídavým
proudem 220-240V s frekvencí 50 Hz.
K zapnutí televizoru z pohotovostního režimu můžete
zvolit jednu z možností:
Na dálkovém ovládání stiskněte tlačítka " ", P+ /
P- nebo numerická tlačítkal.
Stiskněte boční přepínač funkcí, TV se přepne z
pohotovostního režimu.
Vypnutí TV
Stiskněte tlačítko “ “ na ovladačí nebo boční
přepínač funkcí, TV se přepne do pohotovostního
režimu.
Pro úplné vypnutí televizoru vypojte napájecí
kabel ze zásuvky.
Poznámka: Pokud je TV vypnutá do pohotovostního
režimu, LED může blikat. Tímto ukazuje, že funkce jako
třeba Hledání aktualizace, Stahování, anebo Časovač jsou
aktivní. Kontrolka LED může také blikat když TV přepnete z
pohotovostního režimu.
První instalace
Při prvním zapnutí TV se zobrazí obrazovka s výběrem
jazyka. Vyberte požadovaný jazyk a stiskněte OK.
Zobrazí se Počáteční instalace. Pomocí navigačních
tlačítek nastavte priority a stiskněte OK.
Pokud je vybrán režim prodejny, funkce režimu
prodejny budou dostupné v jiných nastaveních a
možnosti TV se zobrazí na obrazovce. Zobrazí se
dialogové okno pro potvrzení. Pro pokračování
vyberte Ano.
Je-li vybrán režim domácí, po první instalaci nebude
k dispozici režim prodejna. Stisknutím tlačítka OK
pokračujte.
Přednastavený PIN se může v různých zemích lišit.
Potřebujete-li navolit PIN v hlavním menu, použijte
jeden z těchto: 4725, 0000 nebo 1234.
Instalace antény
Pokud si na obrazovce zvolíte možnost ANTÉNA,
digitální televize zahájí vyhledávání digitálního
pozemního televizního vysílání.
POZNÁMKA: Pro zrušení stiskněte tlačítko MENU.
Poté co se uloží všechny dostupné stanice, zobrazí
se seznam kanálů. Pokud chcete kanály třídit podle
LCN (*), vyberte "Ano" a stiskněte OK.
Pro opuštění seznamu kanálů a sledování TV
stiskněte MENU
(*) LCN je systém, který organizuje dostupná
vysílání podle rozpoznatelného pořadí kanálů.
Instalace kabelu
Vyberte možnost KABEL a pro pokračování stiskněte
OK na ovladači. Pro pokračování vyberte ANO a
stiskněte OK. Pro zrušení operace vyberte NE a
stiskněte OK. Na obrazovce si můžete zvolit frekvenční
pásmo.
S použitím numerických tlačítek zadejte číslo kanálu
nebo frekvenci.
Poznámka: V závislosti na vybraném způsobu vyhledávání
se liší délka vyhledávání.
Přehrávání médií prostřednictvím USB portu
Do bočního USB vstupu TV lze připojit 2.5” a 3.5” palcový
externí hardisk (hardisk s externím připojením) nebo USB
paměť.
DŮLEŽITÉ! Před připojením k TV zálohujte data.
Výrobce není zodpovědný za poničení souborů
nebo ztrátu dat. Je možné, že některé typy USB
zařízení (např. MP3 přehrávače)nebo USB hardisky/
paměťové karty nebudou s touto TV kompatibilní.
Pokud formátujete USB hardisk, který má 1TB
(Tera Byte) nebo více, mohou nastat problémy s
formátováním. Obzvláště opakovaně nevytahujte a
znovu nezapojujte USB paměť. Může to poškodit
USB přehrávač a samotné USB zařízení. Během
přehrávání souboru USB paměť nevytahujte.
Menu Prohlížeč médií
Můžete přehrávat fotograe, hudbu a lmy uložené
na USB disku a to zapojením do vaší TV a použitím
nabídky Prohlížeč médií. Zapojte USB disk do vstupu
USB, který se nachází na straně TV. Stisknutí tlačítka
MENU v Prohlížeči médií Vám umožní přístup
do menu Obraz, Zvuk a Nastavení. Opětovným
stisknutím MENU opustíte tuto obrazovku. Použitím
okna Nastavení můžete nastavit předvolby Prohlížeče
medií.
Smyčka / Obsluha režimu Náhodně
Přehrávání spustíte pomocí
( )
TV přehraje následující soubor
a seznam promíchá.
Přehrávání spustíte pomocí OK
( )
Stejný soubor se přehraje ve
smyčce (bude se opakovat).
Přehrávání spustíte pomocí OK/
( )
Soubory se budou přehrávat
náhodně.
Počáteční instalace - připojení USB

Čeština - 19 -
Menu Funkce a vlastnosti
Menu Obraz
Režim
Obrazový režim lze změnit podle vašich potřeb. Režim obrazu lze nastavit na jednu z
těchto možností: Kino, Hra, Dynamický a Přírozený.
Kontrast
Nastaví světlost a tmavost obrazovky.
Jas
Nastaví jas obrazovky.
Ostrost
Nastaví ostrost objektu zobrazeného na obrazovce.
Barva
Nastaví barvu.
Úsporný režim
Stiskem tlačítka nastavte Úsporný režim jako Ekonomický,Vypnutý obraz nebo Vypnutý.
(Pokud jste v režimu Dynamický, úsporný režim je automaticky vypnut).
Podsvícení
obrazovky
(volitelné)
Toto nastavení ovládá úroveň podsvícení obrazovky. Pokud je ekologický režim zapnutý,
nelze nastavit funkci Podsvícení. Podsvícení nemůže být aktivní ve VGA a režimu
prohlížeče médií nebo když je nastaven režim Hra.
Redukce šumu
Pokud je vysílaný signál slabý a obraz je šumivý, použijte nastavení Redukce šumu.
Pokročilá nastavení
Dynamický
kontrast
Dynamický poměr kontrastu lze nastavit na požadovanou hodnotu.
Náhrada barvy
Nastaví požadovaný tón barvy.
Obrazový Zoom
Nastaví požadovanou velikost obrazu.
Poznámka: Automatický (dostupné pouze v režimu Scart PIN8 přepínače napětí)
HDMI True Black
Při sledování ze zdroje HDMI se tato funkce zobrazí v menu Nastavení obrazu. Tuto funkci
můžete použít pro zesílení černé v obraze.
Filmový režim
Filmy jsou nahrávány s různým počtem snímků za sekundu z normálních televizních
programů. Zapněte tuto funkci při sledování lmů, aby se lépe zobrazovali rychle se
pohybující scény.
Tón pleti
Tón pleti lze nastavit mezi hodnotou -5 a 5.
Barevnı posun
Nastaví požadovaný tón barvy.
RGB
Použitím funkce RGB upravte teplotu barev.
Resetovat
Nastaví obraz na tovární nastavení.
Automatická
pozice (v režimu
PC)
Automaticky upraví display. Potvrďte stisknutím tlačítka OK.
H pozice (v
režimu PC)
Tato funkce umístí obraz horizontálně na pravou nebo levou stranu obrazovky.
V pozice (v
režimu PC)
Tato funkce otočí obraz vertikálně směrem nahoru či dolů.
Bodové hodiny (v
režimu PC)
Nastavení Bodových hodin upraví rušení, které se zobrazí jako svislé pruhy
v prezentacích s intenzivní hustotou. Např. tabulky, odstavce nebo text v malém fontu.
Fáze (v režimu
PC)
V závislosti na rozlišení a frekvenci, kterou připojíte do TV, můžete vidět šumivý nebo
mlhavý obraz. V takovémto případě použijte tuto funkci, dosáhnete čistšího obrazu.
Pokud jste v VGA (PC) režimu, některé položky v nabídce obrazu nebudou dostupné. Namísto toho zatímco jste v PC režimu,
nastavení VGA režimu bude přidáno do Nastavení obrazu.
Strona się ładuje...
Strona się ładuje...
Strona się ładuje...
Strona się ładuje...
Strona się ładuje...
Strona się ładuje...
Strona się ładuje...
Strona się ładuje...
Strona się ładuje...
Strona się ładuje...
Strona się ładuje...
Strona się ładuje...
Strona się ładuje...
Strona się ładuje...
Strona się ładuje...
Strona się ładuje...
Strona się ładuje...
Strona się ładuje...
Strona się ładuje...
Strona się ładuje...
Strona się ładuje...
Strona się ładuje...
Strona się ładuje...
Strona się ładuje...
Strona się ładuje...
Strona się ładuje...
Strona się ładuje...
Strona się ładuje...
Strona się ładuje...
Strona się ładuje...
Strona się ładuje...
Strona się ładuje...
Strona się ładuje...
Strona się ładuje...
Strona się ładuje...
Strona się ładuje...
Strona się ładuje...
Strona się ładuje...
Strona się ładuje...
Strona się ładuje...
Strona się ładuje...
Strona się ładuje...
Strona się ładuje...
Strona się ładuje...
Strona się ładuje...
-
 1
1
-
 2
2
-
 3
3
-
 4
4
-
 5
5
-
 6
6
-
 7
7
-
 8
8
-
 9
9
-
 10
10
-
 11
11
-
 12
12
-
 13
13
-
 14
14
-
 15
15
-
 16
16
-
 17
17
-
 18
18
-
 19
19
-
 20
20
-
 21
21
-
 22
22
-
 23
23
-
 24
24
-
 25
25
-
 26
26
-
 27
27
-
 28
28
-
 29
29
-
 30
30
-
 31
31
-
 32
32
-
 33
33
-
 34
34
-
 35
35
-
 36
36
-
 37
37
-
 38
38
-
 39
39
-
 40
40
-
 41
41
-
 42
42
-
 43
43
-
 44
44
-
 45
45
-
 46
46
-
 47
47
-
 48
48
-
 49
49
-
 50
50
-
 51
51
-
 52
52
-
 53
53
-
 54
54
-
 55
55
-
 56
56
-
 57
57
-
 58
58
-
 59
59
-
 60
60
-
 61
61
-
 62
62
-
 63
63
-
 64
64
-
 65
65


w innych językach
- Deutsch: Ferguson V22134LW Benutzerhandbuch
- slovenčina: Ferguson V22134LW Užívateľská príručka
Inne dokumenty
-
Haier LEF65V200S Operating Instructions Manual
-
Hyundai FLP22T100 Instrukcja obsługi
-
-
-
-
-
-
OK B-D4 Instrukcja obsługi
-
Cabletec DVB-T2 Instrukcja obsługi
-
Sony KDL-40EX1 Instrukcja obsługi