
DVB-T2 HD tuner
Bedienungsanleitung
User’s manual
Instrukcja obsługi
Manual de utilizare

DE DE
2 3
SICHERHEITSANLEITUNGEN
Lesen Sie diese Bedienungsanleitung vor Inbetriebnahme sorgfältig durch, und
bewahren diese auf zum späteren Nachschlagen. Der Hersteller übernimmt keine
Haftung für Schäden, verursacht durch unsachgemäße Bedienung und Benutzung
des Gerätes.
• Bevor Sie das Gerät an die Netzsteckdose anschließen, vergewissern Sie sich, dass
die auf dem Gerät angegebene Spannung mit der Spannung in der Netzsteckdose
übereinstimmt.
• Stellen Sie das Gerät auf eine ache, stabile Oberäche.
• Schützen Sie dieses Produkt vor Feuchtigkeit, Wasser und anderen Flüssigkeiten.
Vermeiden Sie die Verwendung / Aufbewahrung in extremen Temperaturen. Setzen
Sie es nicht direktem Sonnenlicht und Wärmequellen aus.
• Das Gerät ist nur für den Innenbereich bestimmt.
• Trennen Sie das Gerät von der Stromversorgung, wenn es für eine lange Zeit nicht
verwendet wird.
• Schützen Sie das Netzkabel, vor scharfen Kanten und andere Faktoren die zu
seiner Beschädigung führen.
• Wenn Sie das Gerät von der Netzsteckdose trennen, ziehen Sie am Stecker und
nicht am Kabel.
• Achten Sie darauf, das Gerät an einem gut belüfteten Ort aufzustellen.
• Die Belüftungsönungen nicht verdecken.
• Stellen Sie keine schweren Gegenstände auf das Gerät!
• Verwenden Sie niemals dieses Gerät, wenn dieses beschädigt ist oder abnormal
funktioniert.
• Das Gerät nicht zerlegen, ändern oder versuchen dieses zu reparieren. Bei
Beschädigung, wenden Sie sich an einen autorisierten Kundendienst für
Überprüfung / Reparatur.
• Das Gerät kann von Kindern benutzt werden, die älter als 8 Jahre alt sind und von
Personen mit eingeschränkten physischen, sensorischen oder geistigen Fähigkeiten
oder Mangel an Erfahrung und Wissen, wenn sie von einer Person beaufsichtigt und
geleitet werden, die für ihre Sicherheit zuständig ist, in einer vorsichtigen Art und
Weise und die alle Sicherheitsvorkehrungen verstanden hat und befolgen wird. Kinder
sollten nicht mit diesem Gerät spielen. Kinder sollten nicht die Reinigung und Wartung
des Gerätes ohne Aufsicht durchführen.
• Beschädigtes Netzkabel darf nur von einem autorisierten Kundendienst ersetzt
werden.
• Vor dem Reinigen, Gerät immer vom Netz trennen.
• Reinigen Sie dieses Gerät mit einem weichen leicht feuchten Tuch. Verwenden Sie
keine Scheuermittel oder Chemikalien um das Produkt zu reinigen.

DE DE
4 5
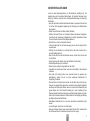
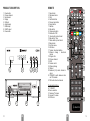
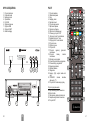
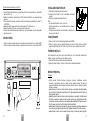
PRODUKTBESCHREIBUNG
1. Netztaste
2. Vorheriger Sender
3. Nächster Sender
4. Display
5. USB Steckplatz
6. Antenneneingang
7. HDMI Ausgang
8. SCART Ausgang
9. Netzkabel
13245
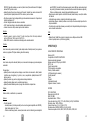
FERNBEDIENUNG
1. Taste Ein/Aus
2. Taste Wiedergabe/Pause
3. Taste Stopp
4. Taste Nächster Titel
5. Taste Vorheriger Titel
6. Taste Aufnahme
7. Taste Untertitel
8. Taste Ton aus
9. Taste Audiospur wählen
10. Rote Taste: PVR
11. Grüne Taste: Bildformat
12. Blaue Taste: Timer
13. Gelbe Taste: Bildformat
14. Taste Menü
15. Taste Menü verlassen
16. Taste OK
17. Lautstärke / Richtungstasten
18. Sender wechseln / Richtungstasten
19. Programm Info
20. Vorheriger Sender
21. EPG
22. Lautstärkeregler
23. Sender wechseln
24. Teletext
25. Zahlen (0-9): Sender oder Option
auswählen
26. Taste TV/RADIO: Wechseln
zwischen Radio und TV-Sender
27. Taste FAV: Favorit-Sender
Programmierbare Tasten
A. TV EIN/AUS
B. Quelle
C. TV Lautstärke verringern
D. TV Lautstärke erhöhen
E. Taste SET
A
B C D E 1
5
4
8
9
13
15
16
17
20
23
21
24
25
27
2
3
6
7
10
14
18
19
22
26
11 12
6 7 98

DE DE
6 7
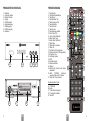
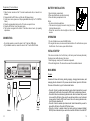
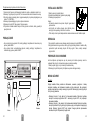
Antenne Netzkabel
TV
Programmierung der TV Steuertasten
1.Stellen Sie die Tuner-Fernbedienung und die TV-Fernbedienung in einem Abstand
von etwa 4 cm zueinander.
2.Halten Sie die Taste SET gedrückt, bis die rote LED stärker leuchtet.
3.Drücken Sie auf der Tuner-Fernbedienung eine der programmierbaren Tasten (im
Rahmen TV Steuerung [TV CONTROL]).
4.Drücken Sie die entsprechende Taste auf der TV-Fernbedienung einige Male.
5.Drücken Sie die Taste SET, um den Kopplungs-Modus zu verlassen.
6.Der Taste wird die Funktion zugewiesen. Wenn die Taste nicht funktioniert,
wiederholen Sie die obigen Schritte.
ANSCHLIESSEN
• Um eine hohe Auösung zu erhalten, benutzen Sie ein HDMI Kabel um den Tuner
mit dem TV zu verbinden.
• Um eine Standard Auösung zu erhalten, benutzen Sie ein SCART Kabel um den
Tuner mit dem TV zu verbinden.
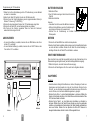
BATTERIEN EINLEGEN
1.Batteriefach önen.
2.Zwei “AA” Batterien einlegen. Achten Sie auf die korrekte
Polarität.
3.Batteriefach schließen.
Hinweise:
• Verwenden Sie nicht neue und alte Batterien zusammen.
• Entfernen Sie die Batterien, wenn die Fernbedienung für
einen längeren Zeitraum nicht verwendet wird.
• Schützen Sie die Fernbedienung vor direktem Sonnenlicht und andere
Wärmequellen.
BETRIEB
1.Drücken Sie die Taste MENU zum Aufrufen des Hauptmenüs.
2.Benutzen Sie die Tasten Lautstärke erhöhen/verringern und Vorheriger/Nächster Sender
um durch das Menü zu blättern. Drücken Sie die Taste OK um eine Einstellung zu
bestätigen. Drücken Sie die Taste EXIT um das Menü zu verlassen.
ERSTE INBETRIEBNAHME
Wenn das Gerät zum ersten Mal eingeschaltet wird (oder das Zurücksetzen auf die
Werkseinstellungen durchgeführt wurde), wird der Einstellungs-Bildschirm angezeigt.
1.Wählen Sie Sprache, Land und Antennen-Stromversorgung.
2.Drücken Sie die Taste Beginnen. Der Tuner sucht nach verfügbaren Sendern.
HAUPTMENÜ
Programm
• Sender bearbeiten: Ermöglicht das Blockieren, Löschen, Überspringen, Ändern von
Sendernamen und das Verwalten der Liste der Favorit-Sender. Drücken Sie die
Taste OK, um eine Vorschau des ausgewählten Senders anzuzeigen. Drücken Sie
eine der Tasten, um in den Sender-Bearbeitungsmodus zu gelangen:
• Drücken Sie die Taste 1, um den Senderlöschmodus zu aktivieren. Wählen Sie
Sender, die Sie löschen möchten, mit der Taste OK aus und drücken dann die Taste
EXIT, um diese Sender zu löschen.
• Drücken Sie die Taste 2, um den Modus zum Verschieben von Sendern zu
aktivieren. Wählen Sie mit der Taste OK einen Sender aus, den Sie verschieben
möchten, und verschieben den Sender dann mit der Taste Aufwärts und Abwärts an
eine neue Position. Drücken Sie zum Speichern die Taste EXIT. Hinweis: Im
bewegten Sendermodus sollte die Funktion LCN ausgeschaltet sein.

DE DE
8 9
• Drücken Sie die Taste 3, um den Modus zum Überspringen von Sendern zu
aktivieren. Wählen Sie die Sender, die Sie überspringen möchten, mit der Taste OK
aus. Drücken Sie zum Speichern die Taste EXIT.
• Drücken Sie die Taste 4, um den Sendersperrmodus zu aktivieren und geben das
Passwort ein (Standard: 000000). Wählen Sie Sender, die Sie sperren möchten, mit
der Taste OK aus. Drücken Sie zum Speichern die Taste EXIT.
• Drücken Sie die Taste 5, um den Favoritenmodus zu aktivieren. Wählen Sie einen
Sender mit der Taste OK und wählen die Liste aus. Drücken Sie zweimal die Taste
EXIT, um zu speichern.
• Programmführer: Funktion auch über die Fernbedienung verfügbar. Ermöglicht das
Durchsuchen von Fernsehprogrammen.
• Sortieren: Wählen Sie die Sendersortiermethode.
• LCN: Logische Kanalnummer; sortiert die Sender nach ihrer Nummer.
• Lautstärkebereich: Stellen Sie die Lautstärke für alle Sender ein.
Bild
• Seitenverhältnis, Auösung, TV-Format: Anzeigeeinstellungen. Hinweis: Die
Standardauösung für HDMI ist 1080i, für SCART 576i.
• OSD-Einstellungen: Einstellungen für die Infoansicht für den ausgewählten Sender.
Suche
Dieses Menü ermöglicht das Suchen und Speichern von Sendern. Wählen Sie Modus,
Land, Antennenleistung und FTA-Option (nur Suche nach freien Sendern).
Zeit
Dieses Menü ermöglicht die Einstellung von Datum und Uhrzeit, Schlaf-Timer und
automatischem Ein-/Ausschalten.
Timer:
• Drücken Sie die grüne Taste, um dem Timer einen neuen Eintrag hinzuzufügen.
Stellen Sie Modus (Benachrichtigung oder Aufzeichnung), Typ, Datum und Uhrzeit
und Sender ein. Drücken Sie zum Speichern die Taste EXIT.
• Drücken Sie die rote Taste, um den markierten Timer-Eintrag zu löschen.
• Drücken Sie die gelbe Taste, um den markierten Timer-Eintrag zu bearbeiten.
• Drücken Sie die blaue Taste, um alle Timer-Einträge zu löschen.
Optionen
Einstellen der Sprache, Untertitel und Ton.
System
• Kindersicherung:
◦ Gehen Sie zum Einschalten in das Menü „Kindersicherung“ (das
Standardpasswort lautet 000000). Stellen Sie das Alter von 4 bis 18 ein.
◦ Um die Optionen zu ändern, gehen Sie zum Sperrsteuerungsmenü (das
Standardpasswort ist 000000). Wechseln Sie zwischen Menüsperre (Menü
„Sender bearbeiten“ wird durch das Passwort geschützt) und Sendersperre
(gesperrte Sender erfordern die Eingabe des Passworts). Um das Passwort zu
ändern, wählen Sie die Option Passwort ändern.
• Zurücksetzen auf Werkseinstellungen: Alle Daten zurücksetzen und auf
Werkseinstellungen zurücksetzen.
• Systeminformationen: Informationen über das System anzeigen.
• Software aktualisieren: Neue Software installieren. Achtung: Trennen Sie das Gerät
nicht während der Aktualisierung.
• Einschaltsteuerung: Wählen Sie die Aktion aus, die das Gerät ausführen soll,
nachdem es an die Stromversorgung angeschlossen wurde.
USB
• Media Center: Wiedergabe von Filmen, Musik und Bildern, die sich auf dem USB-
Laufwerk benden.
• Internet: Wetter- und YouTube-Anwendungen (Optional).
TECHNISCHE DATEN
HAUPTMERKMALE
LED-Anzeige
Voll kompatibel mit DVB-T2/DVB-T/DVB-C
Automatische/manuelle Suche
Medienwiedergabe und PVR über USB 2.0 Steckplatz
7 Tage EPG
Zeitverschiebung
PVR Aufnahmeprogrammierung
Signalstärke und Qualität
Logische Kanalnummerierung
Kindersicherung
Timer
Teletext
Favoritenliste
Optional: Wetter, Youtube
SYSTEM
CPU: GX6702H5

DE DE
10 11
Interner Speicher: 32 Mb
RAM: 512 MB
Eingangsimpedanz: 75 Ohm
Eingangsfrequenz: (VHF) 177,5~226,5 MHz; (UHF) 474~858 MHz
Videoauösung: 1920 x 1080 px
Videoformat: Auto, 16:9, 4:3 LB, 4:3 PS
Videodekodierung: MPEG-2, MPEG-4, H.264, H.265
Unterstützte Formate: H.264, HEVC, MP3, MP4, MKV, JPEG, AVI
Audiodekodierung: MPEG-1 Layer I/II, MPEG-2 layer I/II, AAC
Dateisystem: FAT16, FAT32, NTFS
ANSCHLÜSSE
SCART
HDMI
USB 2.0
1x IEC Anschluss (ANT)
NETZGERÄT
Eingangsspannung: 100-240 V~; 50/60 Hz
Fernbedienung: 2x AAA Batterien
Energieverbrauch: Max. 7,5 W
Energieverbrauch im Bereitschaftsmodus: Max. 1 W
PHYSISCHE PARAMETER
Abmessungen: 131 x 78 x 30 mm
Kabellänge: 1 m
Gewicht: 230 g
Deutsch
Korrekte Entsorgung dieses Produkts
(Elektromüll)
(Anzuwenden in den Ländern der Europäischen Union und anderen europäischen Ländern mit
einem separaten Sammelsystem) Die Kennzeichnung auf dem Produkt bzw. auf der
dazugehörigen Literatur gibt an, dass es nach seiner Lebensdauer nicht zusammen mit dam
normalem Haushaltsmüll entsorgt werden darf. Entsorgen Sie dieses Gerät bitte getrennt von
anderen Abfällen, um der Umwelt bzw. der menschlichen Gesundheit nicht durch unkontrollierte
Müllbeseitigung zu schaden. Recyceln Sie das Gerät, um die nachhaltige Wiederverwertung von
stoichen Ressourcen zu fördern. Private Nutzer sollten den Händler, bei dem das Produkt
gekauft wurde, oder die zuständigen Behörden kontaktieren, um in Erfahrung zu bringen, wie sie
das Gerät auf umweltfreundliche Weise recyceln können. Gewerbliche Nutzer sollten sich an
Ihren Lieferanten wenden und die Bedingungen des Verkaufsvertrags konsultieren. Dieses
Produkt darf nicht zusammen mit anderem Gewerbemüll entsorgt werden.
Hergestellt in China für Lechpol Electronics Leszek Sp.k., ul. Garwolińska 1, 08-400 Miętne.
EN EN
10 11
SAFETY INSTRUCTIONS
Read this instruction manual and keep it for future reference. Producer does not take
responsibility for damages caused by inappropriate handling and use of the product.
• Before connecting the device to power supply socket, make sure the voltage
indicated on the device corresponds to the voltage in the power supply socket.
• Place the device on at, stable surface.
• Protect this device from humidity, water and other liquid. Avoid using/storing it in
extreme temperatures. Do not expose it to direct sunlight and other sources of heat.
• Device is intended for indoor use only.
• Disconnect from power outlet if the device is not going to be used for a long time.
• Protect power cord from sharp edges and other factors which could lead to their
damage.
• When you disconnect the power cord of the device, grasp and pull the plug, not the
cord/cable.
• Position the device in a properly ventilated place.
• Do not cover ventilation outlets of the device!
• Do not place heavy objects on the device.
• Do not use this device if it has been damaged or its operation is abnormal.
• Do not attempt to repair this device yourself. In case of damage, contact authorized
service point for check-up or repair.
• This appliance may be used by children who are above 8 years old and by persons
with reduced physical, sensory or mental capabilities, or lack of experience and
knowledge, if they are supervised and guided by a person who is responsible for
their safety in a cautious manner for all the safety precautions being understood and
followed. Children should be supervised to ensure that they do not play with the
appliance. Children should not perform cleaning and servicing of the device
unsupervised.
• Fixed power cable may only be replaced in an authorized service point.
• Always disconnect the product from the power source before cleaning.
• Clean this device with a soft, slightly damp cloth. Do not use any chemical agents to
clean this device.

EN EN
12 13
PRODUCT DESCRIPTION
1. Power button
2. Previous channel
3. Next channel
4. Display
5. USB port
6. Antenna input
7. HDMI output
8. SCART output
9. Power cable
13245
REMOTE
1. Power button
2. Play/pause button
3. Stop
4. Next track button
5. Previous track button
6. Record button
7. Subtitles
8. Mute button
9. Choose audio track
10. Red button: PVR
11. Green button: picture format
12. Blue button: Timer
13. Yellow button: picture format
14. Menu button
15. Exit from menu
16. OK button
17. Volume / directional buttons
18. Channel change / directional
buttons
19. Program info
20. Previous channel
21. EPG
22. Volume control
23. Channel change
24. Teletext
25. Numbers (0-9): select channel or
option
26. TV/RADIO: switch between radio
and TV channels
27. FAV button: favorite channels
Programmable buttons
A. TV ON/OFF
B. Source selection
C. Decrease TV volume
D. Increase TV volume
E. SET button
A
B C D E 1
5
4
8
9
13
15
16
17
20
23
21
24
25
27
2
3
6
7
10
14
18
19
22
26
11 12
6 7 98

EN EN
14 15
Antenna
Power
supply
TV
Programming TV control buttons
1. Place the tuner remote and the TV remote towards each other, at around 4 cm
distance.
2. Press and hold the SET button, until the red LED glows stronger.
3. On the tuner remote, press one of the programmable buttons (in the TV CONTROL
frame).
4. Press the corresponding button on the TV remote a couple of times.
5. Press the SET button, to exit the pairing mode.
6. The function is assigned to the button. If the button does not work, try repeating
steps above.
CONNECTING
• To get high resolution, connect the tuner to the TV with an HDMI cable.
• To get standard resolution, connect the tuner to the TV with a SCART cable.
BATTERY INSTALLATION
1.Open the battery compartment.
2.Place two AA batteries, according to polarity.
3.Close the battery compartment cover.
Notes:
• Do not mix old and new batteries.
• If the remote is not going to be used in a long time, store
it without batteries inside.
• Protect the remote from direct sunlight and other heat
sources.
OPERATION
1.To enter the Main menu, press the MENU button.
2.To navigate the menu, use volume and channel buttons. To conrm choices, press
the OK button. To exit a menu, press the Exit button.
INITIAL STARTUP
If the device is turned on for the rst time (or the factory reset has been performed),
the setup screen will be shown on the screen.
1.Select language, country and if the antenna is powered.
2.Press the Begin button. The tuner will now search for available channels.
MAIN MENU
Program
Channel edit: Allows for blocking, deleting, skipping, changing channel names, and
managing favorite channels list. To preview selected channel, press the OK button.
Press one of the buttons, to go to the channel edit mode:
• Press the 1 button to enable channel deleting mode. Select channels that you want
to delete with the OK button, then press the EXIT button to delete these channels.
• Press the 2 button to enable moving channels mode. Select a channel that you want
to move with the OK button, then using the up and down button, move the channel
to new position. Press the EXIT button to save. Note: in the moving channels mode,
the LCN function should be o.
• Press the 3 button to enable skip channel mode. Select channels that you want to
skip with the OK button. Press the EXIT button to save.
• Press the 4 button to enable channel lock mode and input password (default:
000000). Select channels that you want to block with the OK button. Press the EXIT

EN EN
16 17
button to save.
• Press the 5 button to enable favorites mode. Select a channel with the OK button,
and select the list. Press the EXIT button twice to save.
• Program guide: function also available from the remote. Allows for browsing through
TV programs.
• Sort: select channel sorting method.
• LCN: Logical Channel Number; sorts the channels by their numbers.
• Volume scope: set the volume for all the channels.
Picture
• Aspect ratio, Resolution, TV format: display settings. Note: default resolution for
HDMI is 1080i, for SCART 576i.
• OSD settings: settings for info view for selected channel.
Search
This menu allows for searching and saving channels. Select mode, country, antenna
power, and FTA option (searching for free channels only).
Time
This menu allows for setting the date and time, sleep timer and automatic turn on/o.
Timer:
• Press the green button to add new entry to the timer. Set the mode (notication or
recording), type, date and time and channel. Press the EXIT button to save.
• Press the red button to delete highlighted timer entry.
• Press the yellow button to edit highlighted timer entry.
• Press the blue button to delete all timer entries.
Option
Settings for language, subtitles and sound.
System
• Parental Control:
◦ To turn it on, go to the Parental Control menu (default password is 000000). Set
the age from 4 to 18.
◦ To change the options, go to the Lock control menu (default password is 000000).
Switch the menu lock (edit channel menu will be protected by the password) and
channel lock (locked channels will require inputting the password). To change the
password, select the Change password option.
• Factory reset: reset all the data and set it to factory settings.
• System information: view information about the system.
• Software upgrade: install new software. Caution: do not unplug the device while the
upgrade is in progress.
• Power on control: select the action that the device will take after plugging it to the
power.
USB
• Media Center: playing movies, music and pictures that are on the USB drive.
• Internet: Weather and YouTube apps (optional).
SPECIFICATION
MAIN FEATURES
LED display
Fully compliant with DVB-T2/DVB-T/DVB-C
Automatic/manual scan
Media playback and PVR by USB 2.0 port
7 days EPG
Timeshift
PVR schedule recording
Signal strength and quality display
LCN (Logical Channel Number)
Parental control
Timer
Teletext
Favorite channel list
Optional: Weather, Youtube app
SYSTEM
CPU: GX6702H5
Internal memory: 32 Mb
RAM: 512 MB
Input impedance: 75 Ohm
Input frequency range: (VHF) 177,5~226,5 MHz; (UHF) 474~858 MHz
Video resolution: 1920 x 1080 px
Video format: Auto, 16:9, 4:3 LB, 4:3 PS

EN EN
18 19
Video decoding: MPEG-2, MPEG-4, H.264, H.265
Supported formats: H.264, HEVC, MP3, MP4, MKV, JPEG, AVI
Audio decoding: MPEG-1 Layer I/II, MPEG-2 layer I/II, AAC
File system: FAT16, FAT32, NTFS
INPUT/OUTPUT
SCART
HDMI
USB 2.0
1x IEC connector (ANT IN)
POWER SUPPLY
Input voltage: 100-240 V~; 50/60 Hz
Remote control: 2x AAA battery
Power consumption: Max. 7,5 W
Power consumption in standby mode: Max. 1 W
PHYSICAL PARAMETERS
Dimensions: 131 x 78 x 30 mm
Power cord length: 1 m
Weight: 230 g
English
Correct Disposal of This Product
(Waste Electrical & Electronic Equipment)
(Applicable in the European Union and other European countries with separate collection
systems) This marking shown on the product or its literature, indicates that it should not be
disposed with other household wastes at the end of its working life. To prevent possible harm to
the environment or human health from uncontrolled waste disposal, please separate this from
other types of wastes and recycle it responsibly to promote the sustainable reuse of material
resources. Household users should contact either the retailer where they purchased this product,
or their local government oce, for details of where and how they can take this item for
environmentally safe recycling. Business users should contact their supplier and check the terms
and conditions of the purchase contract. This product should not be mixed with other commercial
wastes for disposal.
Made in China for Lechpol Electronics Leszek Sp.k., ul. Garwolińska 1, 08-400 Miętne.
PL PL
18 19
KWESTIE BEZPIECZEŃSTWA
Przed użyciem należy dokładnie zapoznać się z treścią instrukcji obsługi oraz
zachować ją w celu późniejszego wykorzystania. Producent nie ponosi
odpowiedzialności za nieprawidłowe użycie produktu.
• Przed podłączeniem urządzenia, należy sprawdzić zgodność napięcia prądu
gniazda sieciowego i urządzenia.
• Urządzenie należy umieścić na płaskiej, suchej i stabilnej powierzchni.
• Urządzenie należy chronić przed wilgocią, wodą oraz innymi płynami. Nie należy
używać ani przechowywać urządzenia w zbyt wysokich temperaturach. Urządzenie
należy chronić przed bezpośrednim nasłonecznieniem oraz źródłami ciepła.
• Urządzenie wyłącznie do użytku wewnątrz pomieszczeń.
• Jeśli urządzenie nie jest używane przez dłuższy czas, należy odłączyć je od źródła
zasilania.
• Należy chronić kabel zasilający przed ostrymi krawędziami i innymi czynnikami,
które mogłyby doprowadzić do jego uszkodzenia.
• Odłączając urządzenie od źródła zasilania, należy chwycić i pociągnąć za wtyczkę,
nigdy za kabel/sznur.
• Urządzenie należy umieścić w miejscu z prawidłową cyrkulacją powietrza.
• Nie należy zakrywać otworów wentylacyjnych urządzenia.
• Nie należy umieszczać na urządzeniu ciężkich przedmiotów.
• Nie należy używać urządzenia, jeśli zostało uszkodzone lub nie działa poprawnie.
• Zabrania się własnoręcznej naprawy sprzętu. W wypadku uszkodzenia, należy
skontaktować się z autoryzowanym punktem serwisowym w celu sprawdzenia/
naprawy.
• Niniejszy sprzęt może być użytkowany przez dzieci w wieku co najmniej 8 lat i przez
osoby o obniżonych możliwościach zycznych, czuciowych lub umysłowych, a także
te, które nie posiadają doświadczenia i nie są zaznajomione ze sprzętem, jeżeli
zapewniony zostanie nadzór lub instruktaż odnośnie użytkowania sprzętu w
bezpieczny sposób, tak aby związane z tym zagrożenia były zrozumiałe. Należy
poinstruować dzieci, aby nie traktowały urządzenia jako zabawki. Dzieci nie powinny
wykonywać czyszczenia i konserwacji sprzętu bez nadzoru.
• Przewód zasilający nieodłączalny może być wymieniany wyłącznie w
autoryzowanym punkcie serwisowym.
• Należy ZAWSZE odłączyć urządzenie od źródła zasilania przed czyszczeniem.
• Urządzenie należy czyścić jedynie za pomocą miękkiej, lekko wilgotnej ściereczki.
Nie należy używać środków chemicznych lub detergentów do czyszczenia tego
urządzenia.

PL PL
20 21
OPIS URZĄDZENIA
1. Przycisk zasilania
2. Poprzedni kanał
3. Następny kanał
4. Wyświetlacz
5. Port USB
6. Wejście antenowe
7. Wyjście HDMI
8. Wyjście SCART
9. Kabel zasilający
13245
PILOT
1. Przycisk zasilania
2. Odtwarzanie/pauza
3. Stop
4. Następny utwór
5. Poprzedni utwór
6. Przycisk nagrywania
7. Włączenie napisów
8. Wyciszenie dźwięku
9. Wybór ścieżki dźwiękowej
10. Czerwony przycisk: PVR
11. Zielony przycisk: Format obrazu
12. Niebieski przycisk: Timer
13. Żółty przycisk: Format obrazu
14. Przycisk menu
15. Wyjście z menu
16. Przycisk OK
17. Przyciski regulacji głośności/
kierunkowe
18. Przyciski zmiany kanału/
kierunkowe
19. Informacje o programie
20. Powrót do poprzedniego programu
21. Przewodnik po programach
22. Regulacja głośności
23. Zmiana kanałów
24. Telegazeta
25. Numery (0-9): wybór kanału lub
opcji
26. TV/RADIO: zmiana kanałów
radiowych i TV
27. Przycisk FAV: ulubione programy
Przyciski programowalne
A. Włączanie/wyłączanie telewizora
B. Wybór źródła
C. Zmniejszenie głośności telewizora
D. Zwiększenie głośności telewizora
E. Przycisk SET
A
B C D E 1
5
4
8
9
13
15
16
17
20
23
21
24
25
27
2
3
6
7
10
14
18
19
22
26
11 12
6 7 98

PL PL
22 23
Antena Zasilanie
TV
Programowanie przycisków do kontroli telewizora
1.Umieścić pilot tunera i pilot telewizora diodami do siebie, w odległości około 4 cm.
2.Nacisnąć i przytrzymać przycisk SET, aż czerwona dioda zacznie świecić mocniej.
3.Na pilocie tunera nacisnąć jeden z programowalnych przycisków (znajdujące się w
ramce TV CONTROL).
4.Nacisnąć odpowiadający przycisk na pilocie telewizora.
5.Nacisnąć przycisk SET, aby opuścić tryb parowania.
6.Przyciskowi została nadana funkcja. Jeżeli przycisk nie działa, należy powtórzyć
powyższe kroki.
PODŁĄCZANIE
• Aby uzyskać obraz w jakości HD, należy podłączyć urządzenie do telewizora przy
pomocy kabla HDMI.
• Aby uzyskać obraz w standardowej jakości, należy podłączyć urządzenie do
telewizora przy pomocy kabla SCART.
INSTALACJA BATERII
1.Należy otworzyć gniazdo baterii.
2. Umieścić dwie baterie AAA, zgodnie z polaryzacją.
3.Zamknąć pokrywę baterii.
Uwagi:
• Nie należy umieszczać w pilocie różnych typów baterii
jednocześnie.
• Jeżeli pilot nie będzie używany przez dłuższy czas,
należy przechowywać go bez baterii w środku.
• Pilot należy chronić przed bezpośrednim nasłonecznieniem oraz źródłami ciepła.
OBSŁUGA
1.Aby przejść do widoku menu głównego należy nacisnąć przycisk MENU.
2.Aby przemieszczać się po menu, należy użyć przycisków głośności i kanałów. Aby
potwierdzić wybór nacisnąć przycisk OK. Aby wyjść z Menu, należy nacisnąć
przycisk Exit.
PIERWSZE URUCHOMIENIE
Jeżeli urządzenie jest włączone po raz pierwszy lub został wykonany reset do
ustawień fabrycznych, na telewizorze pojawi się ekran powitalny.
1.Należy wybrać język, kraj i zaznaczyć zasilanie anteny.
2.Nacisnąć przycisk Rozpocznij. Urządzenie wyszuka dostępne kanały.
MENU GŁÓWNE
Program
Edycja kanałów: Menu pozwala na blokowanie, usuwanie, pomijanie i zmianę
kolejności kanałów, oraz dodawanie kanałów na listę ulubionych. Aby podejrzeć
wybrany kanał na liście, należy nacisnąć przycisk OK. Nacisnąć przycisk, aby przejść
do trybu edycji kanałów:
• Nacisnąć przycisk 1, aby włączyć tryb usuwania kanałów. Zaznaczyć wybrane
kanały do usunięcia przyciskiem OK i nacisnąć przycisk EXIT, aby rozpocząć
kasowanie kanałów.
• Nacisnąć przycisk 2, aby włączyć tryb przesuwania kanałów. Zaznaczyć wybrany
kanał przyciskiem OK i przy pomocy przycisków w górę i w dół wybrać nową pozycję
kanału. Nacisnąć przycisk EXIT, aby zapisać. Uwaga: podczas przesuwania
kanałów, funkcja LCN powinna być wyłączona.

PL PL
24 25
• Nacisnąć przycisk 3, aby włączyć tryb pomijania kanałów. Zaznaczyć kanały do
pominięcia przy pomocy przycisku OK. Nacisnąć przycisk EXIT, aby zapisać.
• Nacisnąć przycisk 4, aby włączyć tryb blokowania kanałów i wprowadzić hasło
(domyślnie: 000000). Zaznaczyć kanały do zablokowania przy pomocy przycisku
OK. Nacisnąć przycisk EXIT, aby zapisać.
• Nacisnąć przycisk 5, aby włączyć tryb dodawania do ulubionych. Wybrać kanał przy
pomocy przycisku OK, a następnie wybrać listę ulubionych. Nacisnąć przycisk EXIT
dwa razy, aby zapisać zmiany.
• Przewodnik po programach: funkcja dostępna z pilota przy pomocy przycisku EPG.
Umożliwia przeglądanie programów telewizyjnych.
• Sortuj: wybór metody sortowania kanałów.
• LCN: ustawianie kanałów po ich numerze.
• Zakres głośności: ustawianie poziomu głośności dla wszystkich kanałów.
Obraz
• Proporcje obrazu, Rozdzielczość, Format TV: ustawienia wyświetlania obrazu.
Uwaga: domyślną rozdzielczością dla HDMI jest 1080i, dla SCART 576i.
• Ustawienia OSD: ustawienia wyświetlania informacji o wybranym kanale.
Szukaj
Menu pozwala na wyszukiwanie i zapisywanie kanałów. Należy wybrać tryb, kraj,
zasilanie anteny i opcję FTA (wyszukiwanie tylko bezpłatnych kanałów).
Czas
Menu pozwala na ustawianie daty i czasu, uśpienia oraz automatycznego włączania i
wyłączania urządzenia.
Timer:
• Nacisnąć zielony przycisk, aby dodać wpis do timera. Ustawić tryb, typ, datę i
godzinę rozpoczęcia oraz kanał. Nacisnąć przycisk EXIT, aby zapisać.
• Nacisnąć czerwony przycisk, aby usunąć podświetlony wpis.
• Nacisnąć żółty przycisk, aby edytować wpis.
• Nacisnąć niebieski przycisk, aby usunąć wszystkie wpisy timera.
Opcje
Ustawienia języka, napisów i dźwięku.
System
• Kontrola rodzicielska:
◦ Aby ją włączyć, należy przejść do menu Kontrola rodzicielska i podać hasło
(domyślne to 000000). Ustawić wiek od 4 do 18.
◦ Aby zmienić opcje, należy przejść do menu Kontrola blokady i podać hasło
(domyślne to 000000). Należy włączyć Blokadę menu (edycja listy kanałów będzie
chroniona hasłem) oraz Blokadę kanału (zablokowane kanały będą wymagały
podania hasła). Aby zmienić hasło, należy wybrać opcję Zmień hasło.
• Przywracanie ustawień fabrycznych: kasowanie wszystkich ustawień i przywracanie
ich do wartości fabrycznych.
• Informacje o systemie: wyświetla informacje o systemie.
• Aktualizacja oprogramowania: instalacja nowego oprogramowania systemowego.
Uwaga: podczas aktualizacji oprogramowania nie należy odłączać zasilania.
• Sterowanie włączaniem: wybieranie zachowania urządzenia po podłączeniu do
zasilania.
USB
• Centrum medialne: odtwarzanie lmów, muzyki i obrazów znajdujących się na dysku
USB.
• Internet: aplikacje Pogoda i YouTube (opcjonalne).
SPECYFIKACJA
GŁÓWNE FUNKCJE
Wyświetlacz LED
W pełni kompatybilny z DVB-T2/DVB-T/DVB-C
Automatyczne/ręczne wyszukiwanie kanałów
Odtwarzanie multimediów oraz PVR przez port USB
7-dniowy przewodnik po programach (EPG)
Timeshift
Programowanie nagrywania (PVR)
Wyświetlanie siły i jakości sygnału
LCN (Logiczny Numer Kanału)
Kontrola rodzicielska
Timer
Telegazeta
Lista ulubionych kanałów
Opcjonalnie: Aplikacja Pogoda, Youtube
SYSTEM
Procesor: GX6702H5
Pamięć wewnętrzna: 32 Mb
Pamięć RAM: 512 MB
Impedancja wejściowa: 75 Ohm

RO RO
26 27
PL PL
26 27
Zakres częstotliwości: (VHF) 177,5~226,5 MHz; (UHF) 474~858 MHz
Rozdzielczość wideo: 1920 x 1080 px
Format wideo: Auto, 16:9, 4:3 LB, 4:3 PS
Dekoder wideo: MPEG-2, MPEG-4, H.264, H.265
Obsługiwane formaty: H.264, HEVC, MP3, MP4, MKV, JPG, AVI
Dekoder audio: MPEG-1 Layer I/II, MPEG-2 layer I/II, AAC
Formatowanie dysku: FAT16, FAT32, NTFS
WEJŚCIA/WYJŚCIA
SCART
HDMI
USB 2.0
1x IEC konektor (ANT IN)
ZASILANIE
Napięcie wejściowe: 100-240 V~; 50/60 Hz
Pilot: 2x bateria AAA
Pobór mocy: Maks. 7,5 W
Pobór mocy w trybie czuwania: Maks. 1 W
PARAMETRY FIZYCZNE
Wymiary: 131 x 78 x 30 mm
Długość przewodu zasilającego: 1 m
Waga: 230 g
Poland
Prawidłowe usuwanie produktu
(zużyty sprzęt elektryczny i elektroniczny)
Oznaczenie przekreślonego kosza umieszczone na produkcie lub w odnoszących się do niego
tekstach wskazuje, że po upływie okresu użytkowania nie należy usuwać go z innymi odpadami
pochodzącymi z gospodarstw domowych. Aby uniknąć szkodliwego wpływu na środowisko
naturalne i zdrowie ludzi wskutek niekontrolowanego usuwania odpadów, prosimy o oddzielenie
produktu od innego typu odpadów oraz odpowiedzialny recykling w celu promowania ponownego
użycia zasobów materialnych, jako stałej praktyki. W celu uzyskania informacji na temat miejsca
i sposobu bezpiecznego dla środowiska recyklingu tego produktu użytkownicy w gospodarstwach
domowych powinni skontaktować się z punktem sprzedaży detalicznej, w którym dokonali
zakupu produktu, lub z organem władz lokalnych. Użytkownicy w rmach powinni skontaktować
się ze swoim dostawcą i sprawdzić warunki umowy zakupu. Produktu nie należy usuwać razem
z innymi odpadami komunalnymi. Taki sprzęt podlega selektywnej zbiórce i recyklingowi. Zawarte
w nim szkodliwe substancje mogą powodować zanieczyszczenie środowiska i stanowić
zagrożenie dla życia i zdrowia ludzi.
Wyprodukowano w CHRL dla Lechpol Electronics Leszek Sp.k., ul. Garwolińska 1, 08-400 Miętne.
INSTRUCȚIUNI PRIVIND SIGURANȚA
Citiți acest manual de instrucțiuni și păstrați-l pentru consultări ulterioare. Producătorul
nu își asumă responsabilitatea pentru daunele cauzate de manipularea și utilizarea
necorespunzătoare a produsului.
• Înainte de a conecta dispozitivul la priza de alimentare, asigurați-vă că tensiunea
indicată pe dispozitiv corespunde cu tensiuneade la priza de alimentare.
• Așezați dispozitivul pe o suprafață plană și stabilă.
• Protejați acest dispozitiv de umiditate, apă și alte lichide. Evitați utilizarea /
depozitarea la temperaturi extreme. Nu-l expuneți la lumina directă a soarelui și la
alte surse de căldură.
• Dispozitiv numai pentru uz interior.
• Deconectați aparatul de la priză dacă dispozitivul nu va utilizat pentru o lungă
perioadă de timp.
• Protejați cablul de alimentare de marginile ascuțite și de alți factori care ar putea
duce la deteriorarea aparatului.
• Când deconectați cablul de alimentare al dispozitivului, prindeți și trageți de ștecher,
nu de cablu.
• Puneți dispozitivul într-un loc bine ventilat.
• Nu acoperiți oriciile de ventilație ale dispozitivului!
• Nu așezați obiecte grele pe dispozitiv.
• Nu utilizați acest dispozitiv dacă a fost deteriorat sau funcționarea sa este anormală.
• Nu încercați să reparați singur acest dispozitiv. În caz de deteriorare, contactați un
service autorizat pentru vericare sau reparații.
• Acest aparat poate utilizat de copii cu vârsta peste 8 ani și de persoane cu
capacități zice, senzoriale sau mentale reduse sau cu lipsă de experiență și
cunoștințe, doardacă sunt supravegheați și îndrumați de o persoană responsabilă
de siguranța lor într-un un mod prudent cu privire la toate măsurile de siguranță și
dacă acestea sunt înțelese și respectate. Copiii trebuie supravegheați pentru a vă
asigura că nu se joacă cu aparatul. Copiii nu trebuie să efectueze curățarea și
întreținerea dispozitivului fără supraveghere.
• Cablul de alimentare poate înlocuit doar într-un service autorizat.
• Deconectați întotdeauna produsul de la sursa de alimentare înainte de curățare.
• Curățați acest dispozitiv cu un material textil moale, ușor umezit. Nu utilizați agenți
chimici pentru a curăța acest dispozitiv.

RO RO
28 29
DESCRIEREA PRODUSULUI
1. Buton de alimentare
2. Canalul anterior
3. Următorul canal
4. Așaj
5. Port USB
6. Intrare antenă
7. Port Ethernet
8. Ieșire HDMI
9. Ieșire SCART
10. Cablu de alimentare
13245
TELECOMANDĂ
1. Buton Pornit/Oprit
2. Buton Redare/Pauză
3. Buton de oprire
4. Butonul piesa următoare
5. Butonul piesa anterioară
6. Butonul de înregistrare
7. Butonul de subtitrare
8. Buton Mute
9. Butonul de înregistrare audio
10. Buton roșu: PVR
11. Buton verde: raport imagine
12. Buton albastru: temporizator
13. Buton galben: raport imagine
14. Butonul meniu
15. Butonul de ieșire din meniu
16. Butonul OK
17. Taste de volum/direcție
18. Butoanele de schimbare a
canalului/direcției
19. Info program
20. Stația anterioară
21. EPG
22. Controlul volumului
23. Schimbați canalul
24. Teletext
25. Numere (0-9): Selectați canalul sau
opțiunea
26. Butonul TV/RADIO: Comutați între
canalele radio și cele TV
27. Butonul FAV: Canalul preferat
Butoane programabile
A. TV PORNIT / OPRIT
B. Selectarea sursei
C. Reduceți volumul televizorului
D. Creșteți volumul televizorului
E. Butonul SET
A
B C D E 1
5
4
8
9
13
15
16
17
20
23
21
24
25
27
2
3
6
7
10
14
18
19
22
26
11 12
6 7 98

RO RO
30 31
Antenă Alimenare
TV
Programarea butoanelor de control TV
1.Așezați telecomanda tunerului și telecomanda TV una spre cealaltă, la o distanță de
aproximativ 4 cm.
2.Apăsați și mențineți apăsat butonul SET, până când LED-ul roșu luminează mai
puternic.
3.Pe telecomanda tunerului, apăsați unul dintre butoanele programabile (în cadrul TV
CONTROL).
4.Apăsați butonul corespunzător de pe telecomanda TV de câteva ori.
5.Apăsați butonul SET, pentru a ieși din modul de asociere.
6.Funcția este atribuită butonului. Dacă butonul nu funcționează, încercați să repetați
pașii de mai sus.
CONECTAREA
• Pentru a obține rezoluție mai mare, conectați tunerul la televizor cu un cablu HDMI.
• Pentru a obține rezoluție standard, conectați tunerul la televizor cu un cablu SCART.
INSTALAREA BATERIILOR
1.Deschideți compartimentul pentru baterii.
2.Introduceți două baterii tip AA, respectând polaritatea
corectă.
3.Închideți compartimentul pentru baterii.
Note:
• Nu amestecați bateriile vechi cu cele noi.
• Dacă telecomanda nu va utilizată mult timp, scoateți
bateriiledin ea.
• Protejați telecomanda de lumina directă a soarelui și de
alte surse de căldură.
FUNCȚIONARE
1.Pentru a intra în meniul principal, apăsați butonul MENU.
2.Pentru a naviga în meniu, utilizați butoanele de volum și canal. Pentru a conrma
alegerile, apăsați butonul OK. Pentru a ieși dintr-un meniu, apăsați butonul Exit.
PORNIRE INIȚIALĂ
Dacă dispozitivul este pornit pentru prima dată (sau a fost efectuată resetarea din
fabrică), ecranul de congurare va așat pe ecran.
1.Selectați limba, țara și dacă antena este alimentată.
2.Apăsați butonul Începere. Tunerul va căuta acum canalele disponibile.
MENIU PRINCIPAL
Program
• Editare canale: Permite blocarea, ștergerea, omiterea, schimbarea numelor
canalelor și gestionarea listei de canale favorite. Apăsați butonul OK pentru a
previzualiza canalul selectat. Apăsați unul dintre butoane pentru a intra în modul de
editare a canalului:
• Apăsaţi butonul 1 pentru a activa modul de ştergere a canalului. Selectați canalele
pe care doriți să le ștergeți folosind butonul OK, apoi apăsați butonul EXIT pentru a
șterge aceste canale.
• Apăsaţi butonul 2 pentru a activa modul de schimbare a canalului. Utilizați butonul
OK pentru a selecta un canal pe care doriți să-l mutați, apoi utilizați butoanele Sus
și Jos pentru a muta canalul într-o nouă poziție. Apăsați butonul EXIT pentru a salva.
Notă: În acest mod, funcția LCN ar trebui să e dezactivată.
• Apăsaţi tasta 3 pentru a activa modul de ignorare a canalelor. Selectați canalele pe
care doriți să le omiteți folosind butonul OK. Apăsați butonul EXIT pentru a salva.
• Apăsați tasta 4 pentru a activa modul Channel Lock și introduceți parola (implicit:

RO RO
32 33
000000). Selectați canalele pe care doriți să le blocați folosind butonul OK. Apăsați
butonul EXIT pentru a salva.
• Apăsaţi butonul 5 pentru a activa modul Favorite. Selectați un canal cu butonul OK
și selectați lista. Apăsați butonul EXIT de două ori pentru a salva.
• Ghid de programe: funcție disponibilă și prin intermediul telecomenzii. Vă permite să
răsfoiți programele TV.
• Sortare: alegeți metoda de sortare a canalelor.
• LCN: Număr canal logic; sortează canalele după numărul lor.
• Interval de volum: setați volumul pentru toate canalele.
Imagine
• Raport de aspect, rezoluție, format TV: setări de așare. Notă: Rezoluția standard
pentru HDMI este 1080i, pentru SCART 576i.
• Setări OSD: setări de vizualizare informații pentru canalul selectat.
Căutare
Acest meniu vă permite să căutați și să salvați canale. Selectați modul, țara, puterea
antenei și opțiunea FTA (doar căutare gratuită de canale).
Ora
Acest meniu vă permite să setați data și ora, cronometrul de repaus și pornirea/oprirea
automată.
Temporizator:
• Apăsaţi butonul verde pentru a adăuga o nouă intrare la cronometru. Setați modul
(noticare sau înregistrare), tip, data și ora și expeditorul. Apăsați butonul EXIT
pentru a salva.
• Apăsaţi butonul roşu pentru a şterge setarea temporizatorului.
• Apăsaţi butonul galben pentru a edita temporizarea.
• Apăsați butonul albastru pentru a șterge toate intrările de temporizare.
Opțiuni
Setarea limbii, a subtitrarilor și a sunetului.
System
• Control parental:
◦ Accesați meniul „Control parental” pentru a-l activa (parola implicită este 000000).
Setați vârsta de la 4 la 18 ani.
◦ Pentru a modica opțiunile, accesați meniul de control al blocării (parola implicită
este 000000). Comutați între blocarea meniului (meniul Editare canal este protejat
de parolă) și blocarea canalului (canalele blocate necesită introducerea parolei).
Pentru a schimba parola, selectați opțiunea Modicare parolă.
• Resetarea la valorile implicite de fabrică: Resetați toate datele și reveniți la setările
din fabrică.
• Informații despre sistem: vizualizați informații despre sistem.
• Actualizare software: Instalați software nou. Atenție: Nu deconectați dispozitivul în
timpul actualizării.
• Control pornire: selectați acțiunea pe care doriți să o întreprindă dispozitivul după ce
este conectat la alimentare.
USB
• Media Center: Redă lme, muzică și imagini care se aă pe unitatea USB.
• Internet: aplicații meteo și YouTube (opțional).
SPECIFICAȚII
CARACTERISTICI PRINCIPALE
Asaj cu LED
Compatibil cu DVB-T2/DVB-T/DVB-C
Scanare automata /manuala
Redare media și PVR prin port USB 2.0
EPG 7 zile
Funcție temporizator
PVR program de inregistrare
Putere și calitate semnal
LCN (Număr logic de canale)
Control parental
Timer
Teletext
Listă canale favorite
Opțional: Vremea, Youtube
SISTEM
CPU: GX6702H5
Memorie internă: 32 Mb
RAM: 512 MB
Impedanta intrare: 75 Ohm
Frecventa de intrare: (VHF) 177,5~226,5 MHz; (UHF) 474~858 MHz
Rezoluție video: 1920 x 1080 px
Format video: Auto, 16:9, 4:3, LB, 4:3 PS
Decodare video: MPEG-2, MPEG-4, H.264, H.265
Formate acceptate: H.264, HEVC, MP3, MP4, MKV, JPEG, AVI

RO RO
34 35
Decodare audio: MPEG-1 Layer I/II, MPEG-2 layer I/II, AAC
Fisier sistem: FAT16, FAT32, NTFS
INTRĂRI/IEȘIRI
SCART
HDMI
USB 2.0
IEC conector pentru ANT-in
ALIMENTARE
Tensiune de intrare: 100-240 V~; 50/60 Hz
Telecomanda: 2 baterii AAA
Consum putere: Max. 7,5 W
Consum de putere în modul standby: Max. 1 W
PARAMETRI FIZICI
Dimensiuni: 131 x 78 x 30 mm
Lungime cablu alimentare: 1 m
Greutate: 230 g
Romania
Reciclarea corecta a acestui produs
(reziduuri provenind din aparatura electrica si electronica)
Marcajale de pe acest produs sau mentionate in instructiunile sale de folosire indica faptul ca
produsul nu trebuie aruncat impreuna cu alte reziduuri din gospod arie atunci cand nu mai este
in stare de functionare. Pentru a preveni posibile efecte daunatoare asupra mediului inconjurator
sau a san ata tii oamenilor datorate evacuarii necontrolate a reziduurilor, vă rugăm să separați
acest produs de alte tipuri de reziduuri si să-l reciclati in mod responsabil pentru a promova
refolosirea resurselor materiale. Utilizatorii casnici sunt rugati să ia legatura e cu distribuitorul de
la care au achizitionat acest produs, e cu autoritatile locale, pentru a primi informatii cu privire la
locul si modul in care pot depozita acest produs in vederea reciclarii sale ecologice. Utilizatorii
institutionali sunt rugati să ia legatura cu furnizorul și să verice condițiile stipulate in contractul
de vanzare. Acest produs nu trebuie amestecat cu alte reziduuri de natura comerciala.
Distribuit de Lechpol Electronic SRL, Republicii nr. 5, Resita, CS, ROMANIA.

www.rebelelectro.com
-
 1
1
-
 2
2
-
 3
3
-
 4
4
-
 5
5
-
 6
6
-
 7
7
-
 8
8
-
 9
9
-
 10
10
-
 11
11
-
 12
12
-
 13
13
-
 14
14
-
 15
15
-
 16
16
-
 17
17
-
 18
18
-
 19
19


w innych językach
- Deutsch: Cabletec DVB-T2 Benutzerhandbuch
- română: Cabletec DVB-T2 Manual de utilizare
Inne dokumenty
-
Cabletech URZ0328 Instrukcja obsługi
-
Cabletech URZ0336B Instrukcja obsługi
-
Kruger Matz KM0550 Instrukcja obsługi
-
Maximum XO-110T Instrukcja obsługi
-
-
Caliber PDVBT101 Instrukcja obsługi
-
Denver DVBS-202HD Instrukcja obsługi
-
Ferguson V22134LW instrukcja
-
OK B-D4 Instrukcja obsługi
-
Sharp LC-32CFG6352E Instrukcja obsługi