
LED-WAND-/DECKENLEUCHTE
/LED WALL OR
CEILING LIGHT/PLAFONNIER/APPLIQUE À LED
LED-WAND-/DECKENLEUCHTE
Montage-, Bedienungs- und Sicherheitshinweise
LED WALL OR CEILING LIGHT
Assembly, operating and safety instructions
PLAFONNIER/APPLIQUE À LED
Instructions de montage, d‘utilisation et consignes de sécurité
LED-WAND-/PLAFONDLAMP
Montage-, bedienings- en veiligheidsinstructies
NÁSTĚNNÉ/STROPNÍ LED SVÍTIDLO
Pokyny k montáži, obsluze a bezpečnostní pokyny
LAMPA ŚCIENNA/SUFITOWA LED
Wskazówki montażu, obsługi i bezpieczeństwa
IAN 396654_2110
NÁSTENNÉ/STROPNÉ LED SVIETIDLO
Pokyny pre montáž, obsluhu a bezpečnostné pokyny
LÁMPARA LED DE PARED/TECHO
Instrucciones de montaje, de uso y de seguridad
LED-V ÆG-/LOFTSLAMPE
Monterings-, betjenings- og sikkerhedshenvisninger
LAMPADA LED DA SOFFI
TT
O O DA PARETE
Istruzioni di montaggio, d’uso e di sicurezza
STENSKA/STROPNA LED-SVETILKA
Navodila za montažo, uporabo in varnostna navodila
LED FALI-/MENNYEZETI LÁMPA
Szerelési, használati és biztonsági tudnivalók

DE/AT/CH Montage-, Bedienungs- und Sicherheitshinweise Seite 5
GB/IE Assembly, operating and safety instructions Page 11
FR/BE Instructions de montage, d‘utilisation et consignes de sécurité Page 17
NL/BE Montage-, bedienings- en veiligheidsinstructies Pagina 24
PL Wskazówki montażu, obsługi i bezpieczeństwa Strona 30
CZ Pokyny k montáži, obsluze a bezpečnostní pokyny Strana 36
SK Pokyny pre montáž, obsluhu a bezpečnostné pokyny Strana 41
ES Instrucciones de montaje, de uso y de seguridad Página 47
DK Monterings-, betjenings- og sikkerhedshenvisninger Side 53
IT Istruzioni di montaggio, d’uso e di sicurezza Pagina 58
HU Szerelési, használati és biztonsági tudnivalók Oldal 64
SI Navodila za montažo, uporabo in varnostna navodila Stran 70

HG05024A
HG05024B
1
1
2
2
3
3
4
4
5
5
6
6
7
7
8
9
9


5 DE/AT/CH
Legende der verwendeten Piktogramme ............................................................ Seite 6
Einleitung .......................................................................................................................................... Seite 6
Bestimmungsgemäße Verwendung ..................................................................................................... Seite 6
Teilebeschreibung ................................................................................................................................ Seite 6
Technische Daten ................................................................................................................................. Seite 6
Lieferumfang ......................................................................................................................................... Seite 6
Sicherheit .......................................................................................................................................... Seite 7
Sicherheitshinweise .............................................................................................................................. Seite 7
Vor der Inbetriebnahme ..................................................................................................... Seite 8
Montage ............................................................................................................................................ Seite 8
Produkt ein-/ausschalten ................................................................................................... Seite 9
Wartung und Reinigung ...................................................................................................... Seite 9
Entsorgung ...................................................................................................................................... Seite 9
Garantie ............................................................................................................................................ Seite 9
Abwicklung im Garantiefall ................................................................................................................. Seite 10
Service .................................................................................................................................................. Seite 10
V1.0

6 DE/AT/CH
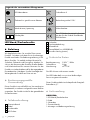
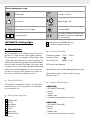
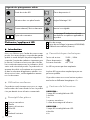
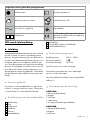
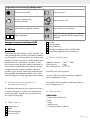
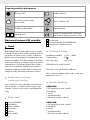
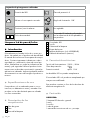
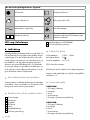
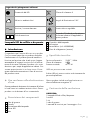
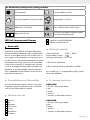
Legende der verwendeten Piktogramme
LED-Lebensdauer Schutzklasse II
Gebrauch in geschlossenen Räumen Beleuchtungswinkel 120 °
Wechselstrom/-spannung Nicht dimmbar
ON OFF Schaltzyklen Das CE Zeichen bestätigt Konformität
mit den für das Produkt zutreffenden
EU-Richtlinien.
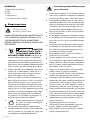
LED-Wand-/Deckenleuchte
Einleitung
Wir beglückwünschen Sie zum Kauf Ihres neuen
Produkts. Sie haben sich damit für ein hochwertiges
Produkt entschieden. Die Bedienungsanleitung ist Teil
dieses Produkts. Sie enthält wichtige Hinweise für
Sicherheit, Gebrauch und Entsorgung. Machen Sie
sich vor der Benutzung des Produkts mit allen Bedien-
und Sicherheitshinweisen vertraut. Benutzen Sie das
Produkt nur wie beschrieben und für die angegebenen
Einsatzbereiche. Händigen Sie alle Unterlagen bei
Weitergabe des Produkts an Dritte mit aus.
Bestimmungsgemäße
Verwendung
Dieses Produkt ist ausschließlich zur Verwendung im
Innenbereich, in trockenen und geschlossenen Räumen
vorgesehen. Das Produkt ist nicht für den gewerblichen
Einsatz bestimmt.
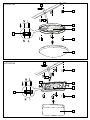
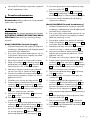
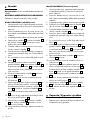
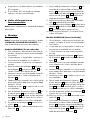
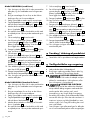
Teilebeschreibung
1 Gummischlauch
2 Dübel
3 Leuchtenteller
4 LED-Treiber
5 Schraube
6 Leuchtenabdeckung
7 Klemmblock
8 Feststellhebel (nur HG05024B)
9 Anschlussleitung (extern)
Technische Daten
Betriebsspannung: 230 V ~, 50 Hz
Schutzklasse: II/
Nennleistung: ca. 13 W
Die LEDs können nicht ersetzt werden.
Der LED-Treiber darf nur von einer fachkundigen
Person ausgetauscht werden.
Dieses Produkt enthält eine Lichtquelle der Energieef-
fizienzklasse „E“.
Lieferumfang
HG05024A:
1 LED-Wand-/Deckenleuchte
3 Dübel
3 Schrauben
1 Gummischlauch
1 Montage- und Bedienungsanleitung

7 DE/AT/CH
HG05024B:
1 LED-Wand-/Deckenleuchte
4 Dübel
4 Schrauben
1 Gummischlauch
1 Montage- und Bedienungsanleitung
Sicherheit
Sicherheitshinweise
LESEN SIE DIE ANLEITUNG VOR DER VERWEN-
DUNG DES ARTIKELS! BEWAHREN SIE ALLE
SICHERHEITSHINWEISE UND ANWEISUNGEN
FÜR DIE ZUKUNFT AUF!
LEBENS- UND
UNFALLGEFAHR FÜR KLEIN-
KINDER UND KINDER! Lassen
Sie Kinder niemals unbeaufsichtigt mit dem Ver-
packungsmaterial. Es besteht Erstickungsgefahr
durch Verpackungsmaterial. Kinder unterschätzen
häufig die Gefahren. Halten Sie Kinder stets
vom Produkt fern.
Dieses Produkt ist kein Spielzeug, es gehört nicht
in Kinderhände. Kinder können die Gefahren,
die im Umgang mit dem Produkt entstehen, nicht
erkennen.
Dieses Produkt kann von Kindern ab 8 Jahren
und darüber sowie von Personen mit verringerten
physischen, sensorischen oder mentalen Fähig-
keiten oder Mangel an Erfahrung und Wissen
benutzt werden, wenn sie beaufsichtigt oder
bezüglich des sicheren Gebrauchs des Produkts
unterwiesen wurden und die daraus resultierenden
Gefahren verstehen. Kinder dürfen nicht mit dem
Produkt spielen. Reinigung und Benutzerwartung
dürfen nicht von Kindern ohne Beaufsichtigung
durchgeführt werden.
Das Produkt ist ausschließlich für den
Betrieb im Innenbereich, in trockenen
und geschlossenen Räumen geeignet.
Lassen Sie das Produkt oder Verpackungsmaterial
nicht achtlos liegen. Plastikfolien/-tüten, Styropor-
teile etc. könnten für Kinder zu einem gefährlichen
Spielzeug werden.
Vermeiden Sie Lebensgefahr
durch elektrischen Schlag!
Vergewissern Sie sich vor der Benutzung, dass die
vorhandene Netzspannung mit der benötigten
Betriebsspannung des Produkts übereinstimmt
(siehe „Technische Daten“).
Überprüfen Sie vor jedem Netz anschluss das
Produkt und das Netzanschlusskabel auf etwaige
Beschädigungen. Ein beschädigtes Produkt be-
deutet Lebensgefahr durch elektrischen Schlag.
Verwenden Sie das Produkt nicht, wenn Sie
irgendwelche Beschädigungen feststellen.
Wenden Sie sich bei Beschädigungen, Reparature
n
oder anderen Problemen am Produkt an eine
Elektrofachkraft.
Öffnen Sie niemals eines der elektrischen Betriebs-
mittel oder stecken irgendwelche Gegenstände
in dieselben. Derartige Eingriffe bedeuten Lebens-
gefahr durch elektrischen Schlag.
Vermeiden Sie unbedingt die Berührung des
Produkts mit Wasser oder anderen Flüssigkeiten.
Für die Montage wenden Sie sich im Zweifels-
fall an einen qualifizierten Elektriker.
Verwenden Sie dieses Produkt nicht für Dimmer
und elektronische Schalter. Es ist nicht für diese
Zwecke geeignet.
Benutzen Sie das Produkt niemals in unmittelbarer
Nähe einer Badewanne, einer Dusche oder
eines Schwimmbeckens.
Blicken Sie nicht in den direkten oder reflektierten
Strahl des Produkts.
Falls Sie der direkte oder reflektierte Strahl des
Produkts ins Auge trifft, schließen Sie die Augen
bewusst und bewegen Sie den Kopf sofort aus
dem Strahl.
Für die Deckenmontage haben wir Montage-
material beigelegt, das für übliches, festes Mauer-
werk geeignet ist.
Prüfen Sie vor der Montage, ob die mitgelieferten
Montagematerialien für die Beschaffenheit der
Wand bzw. Decke geeignet sind, an der Sie
das Produkt anbringen wollen.
Montieren Sie das Produkt so, dass es vor
Spritzwasser und Verschmutzung geschützt ist.
Die LEDs sind nicht austauschbar.

8 DE/AT/CH
Sollten die LEDs am Ende ihrer Lebensdauer
ausfallen, muss das ganze Produkt ersetzt
werden.
Dieses Produkt darf nur mit dem eingebauten
LED-Vorschaltgerät verwendet werden.
Der LED-Treiber darf nur von einer fachkundigen
Person ausgetauscht werden.
Vor der Inbetriebnahme
Hinweis: Entfernen Sie sämtliches Verpackungs-
material vom Produkt.
Montage
Hinweis: Für die Montage benötigen Sie eine
Bohrmaschine.
VORSICHT! VERLETZUNGSGEFAHR! Ziehen
Sie die Bedienungsanleitung Ihrer Bohrmaschine
hinzu.
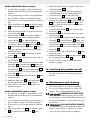
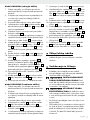
Modell HG05024A (runde Form)
1. Drehen Sie die Sicherung heraus bzw. schalten
Sie den Sicherungsautomaten aus und sichern
Sie den Stromkreis gegen unbeabsichtigtes Ein-
schalten.
2. Stellen Sie mit einem Metallprüfgerät sicher, dass
sich in den Bohrbereichen keine Kabel oder
Rohrleitungen befinden.
3. Wählen Sie gegebenenfalls eine andere Stelle
für die Montage.
4. Nehmen Sie die Leuchtenabdeckung 6 vom
Leuchtenteller 3 ab, indem Sie die Leuchtenab-
deckung 6 gegen den Uhrzeigersinn drehen.
5. Markieren Sie die Bohrbereiche anhand der
Schraublöcher im Leuchtenteller 3.
6. Bohren Sie mit einem 6 mm-Steinbohrer an den
gekennzeichneten Positionen je ein ca. 30 mm
tiefes Loch.
7. Stecken Sie je einen Dübel 2 in die gebohrten
Löcher.
8. Führen Sie die Anschlussleitung (extern) 9
durch den Gummischlauch 1 und das Loch
des Leuchtentellers 3 und platzieren Sie den
Leuchtenteller 3 an der Decke, sodass die
Schraublöcher deckungsgleich über den Bohr-
löchern liegen.
9. Befestigen Sie den Leuchtenteller 3 mit den
Schrauben 5 an der Decke.
10. Lösen Sie die Schrauben und öffnen Sie die
Abdeckkappe am LED-Treiber 4.
11. Befestigen Sie die Anschlussleitung (extern) 9
mithilfe eines Schraubendrehers am Klemm-
block 7. Beachten Sie die auf dem LED-Trei-
ber 4 angegebene Polarität. Stellen Sie sicher,
dass der Gummischlauch 1 die Anschlusslei-
tung (extern) 9 vollständig abdeckt.
12. Schrauben Sie die Abdeckkappe mittels der
Schraube wieder am LED-Treiber 4 fest.
13. Befestigen Sie die Leuchtenabdeckung 6 am
Leuchtenteller 3, indem Sie die Leuchtenab-
deckung 6 im Uhrzeigersinn drehen.
14. Drehen Sie die Sicherung wieder herein bzw.
schalten Sie den Sicherungsautomaten ein.
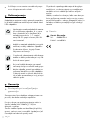
Modell HG05024B (quadratische Form)
1. Drehen Sie die Sicherung heraus bzw. schalten
Sie den Sicherungsautomaten aus und sichern
Sie den Stromkreis gegen unbeabsichtigtes
Einschalten.
2. Stellen Sie mit einem Metallprüfgerät sicher, dass
sich in den Bohrbereichen keine Kabel oder
Rohrleitungen befinden.
3. Wählen Sie gegebenenfalls eine andere Stelle
für die Montage.
4. Nehmen Sie die Leuchtenabdeckung 6 vom
Leuchtenteller 3 ab, indem Sie den Feststellhe-
bel 8 öffnen.
5. Markieren Sie die Bohrbereiche anhand der
Schraublöcher im Leuchtenteller 3.
6. Bohren Sie mit einem 6 mm-Steinbohrer an den
gekennzeichneten Positionen je ein ca. 30 mm
tiefes Loch.
7. Stecken Sie je einen Dübel 2 in die gebohrten
Löcher.
8. Führen Sie die Anschlussleitung (extern) 9
durch den Gummischlauch 1 und das Loch
des Leuchtentellers 3 und platzieren Sie den
Leuchtenteller 3 an der Decke, sodass die
Schraublöcher deckungsgleich über den Bohr-
löchern liegen.
9. Schrauben Sie den Leuchtenteller 3 mit den
Schrauben 5 an die Decke.
10. Lösen Sie die Schrauben und öffnen Sie die
Abdeckkappe am LED-Treiber 4.

9 DE/AT/CH
11. Befestigen Sie die Anschlussleitung (extern) 9
mithilfe eines Schraubendrehers am Klemm-
block 7. Beachten Sie die auf dem LED-Trei-
ber 4 angegebene Polarität. Stellen Sie sicher,
dass der Gummischlauch 1 die Anschlusslei-
tung (extern) 9 vollständig abdeckt.
12. Schrauben Sie die Abdeckkappe mittels der
Schraube wieder am LED-Treiber 4 fest.
13. Befestigen Sie die Leuchtenabdeckung 6 am
Leuchtenteller 3, indem Sie den Feststellhebel
8 schließen.
14. Drehen Sie die Sicherung wieder herein bzw.
schalten Sie den Sicherungsautomaten ein.
Produkt ein-/ausschalten
Schalten Sie das Produkt mit dem Wandschalter
ein bzw. aus.
Wartung und Reinigung
Lassen Sie das Produkt vollständig abkühlen.
Benutzen Sie keine Lösungsmittel, Benzin o. ä.
Das Produkt würde hierbei Schaden nehmen.
LEBENSGEFAHR DURCH
ELEKTRISCHEN SCHLAG! Schalten Sie vor
allen Arbeiten an dem Produkt den Stromkreis
am Sicherungskasten aus oder entfernen Sie
die Schraubsicherungen im Sicherungskasten.
STROMSCHLAGGEFAHR!
Aus Gründen der elektrischen Sicherheit darf
das Produkt niemals mit Wasser oder anderen
Flüssigkeiten gereinigt oder gar in Wasser ge-
taucht werden.
Verwenden Sie zur Reinigung nur ein trockenes,
fusselfreies Tuch.
Richten Sie den LED-Strahl niemals auf reflektie-
rende Flächen, Menschen oder Tiere. Andernfalls
können Augenreizungen und/oder Blindheit
bei Mensch und Tier die Folgen sein. Bereits ein
schwacher LED-Strahl kann zu Augenschäden
führen.
Setzen Sie nach der Reinigung die Sicherung
wieder ein oder schalten Sie den Leitungs-
schutzschalter wieder an.
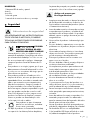
Entsorgung
Die Verpackung besteht aus umweltfreundlichen
Materialien, die Sie über die örtlichen Recyclingstellen
entsorgen können.
b
a
Beachten Sie die Kennzeichnung der
Verpackungsmaterialien bei der Abfall-
trennung, diese sind gekennzeichnet mit
Abkürzungen (a) und Nummern (b) mit
folgender Bedeutung: 1–7: Kunststoffe/
20–22: Papier und Pappe/80–98:
Verbundstoffe.
Das Produkt und die Verpackungs-
materialien sind recycelbar, entsorgen
Sie diese getrennt für eine bessere Ab-
fallbehandlung. Das Triman-Logo gilt nur
für Frankreich.
Möglichkeiten zur Entsorgung des aus-
gedienten Produkts erfahren Sie bei Ihrer
Gemeinde- oder Stadtverwaltung.
Werfen Sie Ihr Produkt, wenn es ausge-
dient hat, im Interesse des Umweltschutzes
nicht in den Hausmüll, sondern führen Sie
es einer fachgerechten Entsorgung zu.
Über Sammelstellen und deren Öffnungs-
zeiten können Sie sich bei Ihrer zuständigen
Verwaltung informieren.
Garantie
Das Produkt wurde nach strengen Qualitätsrichtlinien
sorgfältig produziert und vor Anlieferung gewissen-
haft geprüft. Im Falle von Mängeln dieses Produkts
stehen Ihnen gegen den Verkäufer des Produkts
gesetzliche Rechte zu. Diese gesetzlichen Rechte
werden durch unsere im Folgenden dargestellte
Garantie nicht eingeschränkt.
Sie erhalten auf dieses Produkt 3 Jahre Garantie ab
Kaufdatum. Die Garantiefrist beginnt mit dem Kauf-
datum. Bitte bewahren Sie den Original-Kassenbon
gut auf. Diese Unterlage wird als Nachweis für den
Kauf benötigt.

10 DE/AT/CH
Tritt innerhalb von 3 Jahren ab dem Kaufdatum dieses
Produkts ein Material- oder Fabrikationsfehler auf,
wird das Produkt von uns – nach unserer Wahl – für
Sie kostenlos repariert oder ersetzt. Diese Garantie
verfällt, wenn das Produkt beschädigt, nicht sachge-
mäß benutzt oder gewartet wurde.
Die Garantieleistung gilt für Material- oder Fabrika-
tionsfehler. Diese Garantie erstreckt sich nicht auf
Produktteile, die normaler Abnutzung ausgesetzt
sind (z. B. Batterien) und daher als Verschleißteile
angesehen werden können oder Beschädigungen
an zerbrechlichen Teilen, z. B. Schalter, Akkus oder
die aus Glas gefertigt sind.
Abwicklung im Garantiefall
Um eine schnelle Bearbeitung Ihres Anliegens zu
gewährleisten, folgen Sie bitte den folgenden Hin-
weisen:
Bitte halten Sie für alle Anfragen den Kassenbon
und die Artikelnummer (IAN 396654_2110) als
Nachweis für den Kauf bereit.
Die Artikelnummer entnehmen Sie bitte dem Typen-
schild, einer Gravur, auf dem Titelblatt Ihrer Bedie-
nungsanleitung (unten links) oder als Aufkleber auf
der Rück- oder Unterseite des Produkts.
Sollten Funktionsfehler oder sonstige Mängel auf-
treten, kontaktieren Sie zunächst die nachfolgend
benannte Serviceabteilung telefonisch oder per
E-Mail.
Ein als defekt erfasstes Produkt können Sie dann
unter Beifügung des Kaufbelegs (Kassenbon) und
der Angabe, worin der Mangel besteht und wann
er aufgetreten ist, für Sie portofrei an die Ihnen mit-
geteilte Service-Anschrift übersenden.
Service
Service Deutschland
Tel.: 0800 5435 111
E-Mail: [email protected]
Service Österreich
Tel.: 0800 292726
E-Mail: [email protected]
Service Schweiz
Tel.: 0800562153
E-Mail: [email protected]

11 GB/IE
List of pictograms used ......................................................................................................... Page 12
Introduction .................................................................................................................................... Page 12
Intended use ......................................................................................................................................... Page 12
Parts description ................................................................................................................................... Page 12
Technical data ...................................................................................................................................... Page 12
Scope of delivery ................................................................................................................................. Page 12
Safety .................................................................................................................................................. Page 13
Safety instructions ................................................................................................................................. Page 13
Before use ........................................................................................................................................ Page 13
Installation ...................................................................................................................................... Page 13
Switching the product on/off .......................................................................................... Page 14
Maintenance and cleaning ................................................................................................ Page 14
Disposal ............................................................................................................................................. Page 15
Warranty .......................................................................................................................................... Page 15
Warranty claim procedure .................................................................................................................. Page 15
Service .................................................................................................................................................. Page 16

12 GB/IE
List of pictograms used
LED lifespan Protection Class II
Use indoors Beam angle 120 °
Alternating current/voltage Not dimmable
ON OFF Switching cycles CE mark indicates conformity with
relevant EU directives applicable
for this product.
LED Wall Or Ceiling Light
Introduction
We congratulate you on the purchase of your new
product. You have chosen a high quality product.
The instructions for use are part of the product. They
contain important information concerning safety, use
and disposal. Before using the product, please famil-
iarise yourself with all of the safety information and
instructions for use. Only use the product as described
and for the specified applications. If you pass the
product on to anyone else, please ensure that you
also pass on all the documentation with it.
Intended use
This product is intended for indoor use in dry and
enclosed rooms only. The product is not intended
for commercial use.
Parts description
1 Rubber tube
2 Dowel
3 Base plate
4 LED driver
5 Screw
6 Light cover
7 Terminal block
8 Locking lever (HG05024B only)
9 Connection cable (external)
Technical data
Operating voltage: 230 V ~, 50 Hz
Protection Class: II/
Nominal power: approx. 13 W
LEDs cannot be replaced.
The LED driver can only be replaced by professional.
This product contains a light source of energy
efficiency class E.
Scope of delivery
HG05024A:
1 LED Wall/Ceiling light
3 Dowels
3 Screws
1 Rubber tube
1 Assembly and operating instructions
HG05024B:
1 LED Wall/Ceiling light
4 Dowels
4 Screws
1 Rubber tube
1 Assembly and operating instructions

13 GB/IE
Safety
Safety instructions
READ THESE INSTRUCTIONS BEFORE USING
THE PRODUCT! PLEASE KEEP ALL SAFETY IN-
STRUCTIONS AND INSTRUCTIONS FOR USE
FOR FUTURE REFERENCE!
DANGER TO
LIFE AND RISK OF ACCIDENT
FOR INFANTS AND CHILDREN!
Never leave children unsupervised with the pack-
aging material. The packaging material represents
a danger of suffocation. Children frequently
underestimate the dangers. Please keep the
product out of the reach of children at all times.
This product is not a toy. Keep away from children.
Children are not able to understand the dangers
that can arise when handling this product.
This product may be used by children aged
8 years and up, as well as by persons with
reduced physical, sensory or mental capacities,
or lacking experience and/or knowledge, so
long as they are supervised or instructed in the
safe use of the product and understand the as-
sociated risks. Do not allow children to play with
the product. Cleaning and user maintenance
should not be performed by children without
supervision.
This product is solely suitable for use
in dry, closed indoor spaces.
Do not allow the product or the packaging
materials to lie around unattended. Plastic film
or bags, Styrofoam etc. can turn into dangerous
toys for children.
Avoid the danger of
death from electric shock!
Verify the existing mains voltage corresponds
to the required voltage of the product (see
“technical data”) before using it.
Always check the product and the mains supply
for damage before connecting it to the mains.
A damaged product represents the danger of
death from electric shock.
Do not use the product if you detect any damage.
In the event of damage, repairs or other problems
with the product, please consult an electrician.
Never open any of the components of the elec-
trical equipment or insert any objects into the
same components. This will pose a risk of fatal
injury from electric shock.
Never allow the product to come into contact
with water or other liquids.
For installation, please contact qualified electrician
if you have any doubt.
Do not use this product for dimmers or electronic
switches. It is not suitable for these purposes.
Never use the product in immediate vicinity of
a bath, shower or swimming pool.
Do not look directly into the light or its reflection.
If direct or reflected light strikes your eyes, close
them and immediately move your head out of
the light.
We have included assembly material for ceiling
mounting suitable for the usual firm masonry.
Before installation, check whether the included
mounting material is suitable for the wall or
ceiling on which you are aiming to mount the
product.
Fit the product in such a way to ensure it is
protected from damp and dirt.
The LEDs are not replaceable.
If the LEDs fail at the end of their lives, the entire
product must be replaced.
The product is only suited for use with the built-in
LED control gear.
The LED driver can only be replaced by
professional.
Before use
Note: Remove all packaging materials from the
product.
Installation
Note: You will need an electric drill for the installation.
CAUTION! RISK OF INJURY! Please refer to
the operating instructions of your electric drill.

14 GB/IE
Model HG05024A (Round shape)
1. Unscrew the fuse and/or switch off the circuit
breaker and secure the circuit from accidental
starting.
2. Using a metal test instrument, ensure that there
are no cables or pipes in the drilling ranges.
3. If necessary, choose another place to install the
light.
4. Remove the light cover 6 from the base plate
3 by rotating the light cover 6 counterclock-
wise.
5. Mark the drilling ranges using the screw holes
in the base plate 3.
6. Using a 6 mm masonry drill, drill an approx.
30 mm deep hole into the marked positions.
7. Insert a dowel 2 into each drilled hole.
8. Guide the connection cable (external) 9
through the rubber tube 1 and the base plate
3 hole and place the base plate 3 on the
ceiling, so that the screw holes are congruent
with the drill holes.
9. Fix the base plate 3 to the ceiling using the
screws 5.
10. Release the screws and open the cover cap on
the LED driver 4.
11. Use a screwdriver to fasten the connection cable
(external) 9 to terminal block 7. Make sure
you follow the correct polarity which marked on
the LED driver 4. Ensure the rubber tube 1
should completely cover the connection cable
(external) 9.
12. Screw the cover cap to the LED driver 4 again
using the screw.
13. Attach the light cover 6 to the base plate 3
by rotating the light cover 6 clockwise.
14. Screw the fuse on and/or switch the circuit
breaker on again.
Model HG05024B (Square shape)
1. Unscrew the fuse and/or switch off the circuit
breaker and secure the circuit from accidental
starting.
2. Using a metal test instrument ensure the there
are no cables or pipes in the drilling ranges.
3. If necessary, choose nother place to install the
light.
4. Remove the light cover 6 from the base plate
3 by rotating the locking lever 8 open.
5. Mark the drilling ranges using the screw holes
in the base plate 3.
6. Using a 6 mm masonry drill, drill an approx.
30 mm deep hole into the marked positions.
7. Insert the dowel 2 into each drill hole.
8. Guide the connection cable (external) 9
through the rubber tube 1 and the base plate
3 hole and place the base plate 3 on the
ceiling, so that the screw holes are congruent
with the drill holes.
9. Screw the base plate 3 to the ceiling using
the screws 5.
10. Release the screws and open the cover cap on
the LED driver 4.
11. Use a screwdriver to fasten the connection cable
(external) 9 to terminal block 7. Make sure
you follow the correct polarity which marked on
the LED driver 4. Ensure the rubber tube 1
should completely cover the connection cable
(external) 9.
12. Screw the cover cap to the LED driver 4 again
using the screw.
13. Attach the light cover 6 to the base plate 3
by closing the locking lever 8.
14. Screw the fuse on and/or switch the circuit
breaker on again.
Switching the product on/off
Use the wall switch to switch the product on
and off.
Maintenance and cleaning
Allow the product to cool down completely.
Do not use solvents, benzene or similar sub-
stances. They could damage the product.
DANGER TO LIFE BY ELEC-
TRIC SHOCK! Before carrying out any tasks
on the product, switch off the electrical circuit at
the circuit breaker box or remove the fuse from
the fuse box.
RISK OF ELECTRIC SHOCK!
For electrical safety, never clean the product with
water or other liquids, or immerse it in water.
Only use a dry, lint-free cloth for cleaning.

15 GB/IE
Never aim the LED beam at reflective surfaces,
people or animals. Failure to observe this advice
may result in eye irritation and/or blindness in
humans and animals. Even a weak LED light
beam can cause eye damage.
After finished the maintenance and cleaning,
screw the fuse on and / or switch the circuit
breaker on again.
Disposal
The packaging is made entirely of recyclable
materials, which you may dispose of at local
recycling facilities.
b
a
Observe the marking of the packaging
materials for waste separation, which are
marked with abbreviations (a) and numbers
(b) with following meaning: 1–7: plastics/
20–22: paper and fibreboard/80–98:
composite materials.
The product and packaging materials
are recyclable, dispose of it separately
for better waste treatment. The Triman
logo is valid in France only.
Contact your local refuse disposal
authority for more details of how to
dispose of your worn-out product.
To help protect the environment, please
dispose of the product properly when it
has reached the end of its useful life and
not in the household waste. Information
on collection points and their opening
hours can be obtained from your local
authority.
Warranty
The product has been manufactured to strict quality
guidelines and meticulously examined before deliv-
ery. In the event of product defects you have legal
rights against the retailer of this product. Your legal
rights are not limited in any way by our warranty
detailed below.
The warranty for this product is 3 years from the d
ate
of purchase. The warranty period begins on the date
of purchase. Please keep the original sales receipt
in a safe location. This document is required as your
proof of purchase.
Should this product show any fault in materials or
manufacture within 3 years from the date of purchase,
we will repair or replace it – at our choice – free of
charge to you. This warranty becomes void if the
product has been damaged, or used or maintained
improperly.
The warranty applies to defects in material or manu-
facture. This warranty does not cover product parts
subject to normal wear, thus possibly considered
consumables (e.g. batteries) or for damage to frag-
ile parts, e.g. switches, rechargeable batteries or
glass parts.
Warranty claim procedure
To ensure quick processing of your case, please
observe the following instructions:
Please have the till receipt and the item number
(IAN 396654_2110) available as proof of pur-
chase.
You will find the item number on the rating plate, an
engraving on the front page of the instructions for
use (bottom left), or as a sticker on the rear or bot-
tom of the product.
If functional or other defects occur, please contact
the service department listed either by telephone or
by e-mail.
You can return a defective product to us free of charge
to the service address that will be provided to you.
Ensure that you enclose the proof of purchase (till
receipt) and information about what the defect is
and when it occurred.

16 GB/IE
Service
Service Great Britain
Tel.: 08000569216
E-Mail: [email protected]
Service Ireland
Tel.: 1800 200736
E-Mail: [email protected]

17 FR/BE
Légende des pictogrammes utilisés ........................................................................... Page 18
Introduction .................................................................................................................................... Page 18
Utilisation conforme ............................................................................................................................. Page 18
Descriptif des pièces ............................................................................................................................ Page 18
Caractéristiques techniques ................................................................................................................. Page 18
Contenu de la livraison ........................................................................................................................ Page 18
Sécurité .............................................................................................................................................. Page 19
Indications de sécurité ......................................................................................................................... Page 19
Avant la mise en service ...................................................................................................... Page 20
Montage ............................................................................................................................................ Page 20
Allumer / éteindre le produit ............................................................................................ Page 21
Entretien et nettoyage........................................................................................................... Page 21
Mise au rebut ................................................................................................................................ Page 21
Garantie ............................................................................................................................................ Page 21
Faire valoir sa garantie ........................................................................................................................ Page 22
Service après-vente .............................................................................................................................. Page 23

18 FR/BE
Légende des pictogrammes utilisés
Durée de vie des LED Classe de protection II
Utilisation dans une pièce fermée Angle d’éclairage 120 °
Courant alternatif /Tension alternative Intensité non réglable
ON OFF Cycles de commutation Le marquage CE indique la conformité
aux directives européennes applicables à
ce produit.
Plafonnier//applique à LED
Introduction
Nous vous félicitons pour l‘achat de votre nouveau
produit. Vous avez opté pour un produit de grande
qualité. Le mode d‘emploi fait partie intégrante de
ce produit. Il contient des indications importantes pour
la sécurité, l’utilisation et la mise au rebut. Veuillez
lire consciencieusement toutes les indications d‘utili-
sation et de sécurité du produit. Ce produit doit uni-
quement être utilisé conformément aux instructions
et dans les domaines d‘application spécifiés. Lors
d‘une cession à tiers, veuillez également remettre
tous les documents.
Utilisation conforme
Ce produit est exclusivement conçu pour un usage
intérieur dans des locaux fermés et secs. Le produit
n’est pas destiné à une utilisation commerciale.
Descriptif des pièces
1 Tuyau en caoutchouc
2 Cheville
3 Support du luminaire
4 Pilote LED
5 Vis
6 Cache du luminaire
7 Bloc de serrage
8 Levier de verrouillage (uniquement HG05024B)
9 Câble de raccordement (externe)
Caractéristiques techniques
Tension de service: 230 V ~, 50 Hz
Classe de protection : II/
Puissance nominale: env. 13 W
Les LED ne peuvent pas être remplacées.
Le pilote LED ne peut être remplacé que par une
personne qualifiée.
Ce produit contient une source lumineuse présen-
tant la classe d’efficacité énergétique «E».
Contenu de la livraison
HG05024A :
1 lampe LED murale/plafonnier LED
3 chevilles
3 vis
1 tuyau en caoutchouc
1 notice de montage et d‘utilisation
HG05024B :
1 lampe LED murale/plafonnier LED
4 chevilles
4 vis

19 FR/BE
1 tuyau en caoutchouc
1 notice de montage et d‘utilisation
Sécurité
Indications de sécurité
NOUS VOUS PRIONS DE LIRE ATTENTIVEMENT
LES INSTRUCTIONS AVANT TOUTE UTILISATION
DE L‘ARTICLE! CONSERVEZ TOUTES LES
CONSIGNES DE SÉCURITÉ ET L‘ENSEMBLE DES
INSTRUCTIONS AFIN DE POUVOIR LES CONSUL-
TER ULTÉRIEUREMENT!
DAN-
GER DE MORT ET RISQUE DE
BLESSURE POUR LES ENFANTS
ET LES ENFANTS EN BAS ÂGE! Ne jamais
laisser les enfants sans surveillance à proximité
de l’emballage. Il existe un risque d’étouffement
par le matériel d’emballage. Les enfants sous-
estiment souvent le danger. Toujours tenir l‘ap-
pareil à l‘écart des enfants.
Ce produit n‘est pas un jouet, il doit être tenu
hors de portée des enfants. Les enfants ne sont
pas conscients des dangers liés à la manipulation
du produit.
Ce produit peut être utilisé par des enfants âgés
de 8 ans et plus ainsi que par des personnes
ayant des capacités physiques, sensorielles ou
mentales réduites ou manquant d‘expérience ou
de connaissances, à la condition qu‘ils soient
surveillés ou s‘ils ont été informés de l‘utilisation
sûre du produit et s‘ils en comprennent les risques
liés à son utilisation. Les enfants ne doivent pas
jouer avec le produit. Le nettoyage et l‘entretien
du produit ne doivent pas être effectués par
des enfants laissés sans surveillance.
Ce produit est exclusivement conçu
pour un usage en intérieur, dans des
locaux fermés et secs.
Ne laissez pas le produit ou le matériel d‘em-
ballage traîner sans surveillance. Les films/les
sacs en plastique, les pièces en polystyrène,
etc. peuvent constituer des jouets dangereux
pour les enfants.
Prévention de risques mortels
par électrocution!
Avant l‘utilisation, vérifiez que la tension secteur
corresponde à la tension de service requise du
produit (voir „Caractéristiques techniques“).
Avant chaque branchement au secteur, contrôlez
le produit et le câble secteur afin de détecter
d‘éventuels endommagements. Un produit en-
dommagé implique un danger de mort par
électrocution.
Ne pas utiliser ce produit si vous constatez le
moindre dommage.
En cas de dommages et pour toute réparation
ou autres problèmes relatifs au produit, contac-
tez un électricien.
N‘ouvrez jamais les composants électriques et
n‘y insérez jamais d‘objets quelconques. De tel-
les interventions impliquent un danger de mort
par électrocution.
Évitez impérativement tout contact du produit
avec de l‘eau ou d‘autres liquides.
En cas de doute, adressez-vous à un électricien
qualifié.
N’utilisez pas ce produit pour des variateurs ni
des commutateurs électroniques. Il n‘est pas
adapté à ces usages.
N‘utilisez jamais le produit à proximité immédi-
ate d‘une baignoire, d‘une douche ou d‘une
piscine.
Ne pas regarder dans le faisceau direct ou
réfléchi du produit.
Si le faisceau du produit vise directement ou in-
directement un œil, immédiatement fermer l‘oeil
et détourner la tête du faisceau.
Nous avons joint du matériel d‘installation ap-
proprié pour installer le plafonnier sur un mur
solide commun.
Veuillez vérifier avant le montage si le matériel
de fixation livré est bien adapté au type de mur /
plafond sur lequel vous souhaitez monter le pro-
duit.
Montez le produit de telle sorte qu‘il soit pro-
tégé des éclaboussures et des salissures.
Les LED ne peuvent pas être remplacées.
Si les LED arrivent en fin de vie, l‘ensemble du
produit doit alors être remplacé.
Ce produit peut uniquement être utilisé avec un
ballast à LED intégré.

20 FR/BE
Le pilote LED ne peut être remplacé que par
une personne qualifiée.
Avant la mise en service
Remarque : Veuillez retirer tous les emballages
du produit.
Montage
Remarque : Une perceuse est requise pour le
montage.
ATTENTION! RISQUE DE BLESSURES ! Consul-
tez pour ceci le mode d‘emploi de votre perceuse.
Modèle HG05024A (forme ronde)
1. Enlevez le fusible ou coupez le disjoncteur, puis
protégez le circuit électrique contre une mise en
service involontaire.
2. Vérifiez avec un détecteur de métaux qu’aucun
câble ou tuyau ne se trouve dans les zones de
perçage.
3. Le cas échéant, choisissez un autre endroit pour
le montage.
4. Enlevez le cache du luminaire 6 du support
du luminaire 3 en faisant tourner le cache du
luminaire 6 dans le sens inverse des aiguilles
d‘une montre.
5. Marquez les endroits à percer à l‘aide des trous
de vis se trouvant dans le support du luminaire 3.
6. Percez un trou d’env. 30 mm avec un foret à
pierre de 6 mm aux endroits marqués.
7. Insérer une cheville 2 dans chaque trou percé.
8. Faites passer le câble de raccordement (externe)
9 dans le tuyau en caoutchouc 1 et le trou
du support du luminaire 3 et placez le support
du luminaire 3 au plafond de manière à ce que
les trous des vis recouvrent les trous de perçage.
9. Fixez le support du luminaire 3 au plafond à
l’aide des vis 5.
10. Desserrez les vis et ouvrez le capot de protection
sur le pilote LED 4.
11. À l’aide d’un tournevis, fixez le câble de raccor-
dement (externe) 9 sur le bloc de raccorde-
ment 7. Vérifiez la polarité de la pile indiquée
sur le pilote LED 4. Assurez-vous que le tuyau
en caoutchouc 1 recouvre entièrement le câble
de raccordement (externe) 9.
12. Vissez à nouveau fermement le capot de pro-
tection au pilote LED 4 au moyen de la vis.
13. Replacez le cache du luminaire 6 sur le sup-
port du luminaire 3 en faisant tourner le cache
du luminaire 6 dans le sens des aiguilles d‘une
montre.
14. Remettez en place le fusible et actionnez le
disjoncteur.
Modèle HG05024B (forme carrée)
1. Enlevez le fusible ou coupez le disjoncteur, puis
protégez le circuit électrique contre une mise en
service involontaire.
2. Vérifiez avec un détecteur de métaux qu’aucun
câble ou tuyau ne se trouve dans les zones de
perçage.
3. Le cas échéant, choisissez un autre endroit pour
le montage.
4. Enlevez le cache du luminaire 6 du support
du luminaire 3 en ouvrant le levier de verrouil-
lage 8.
5. Marquez les endroits à percer à l‘aide des trous
de vis se trouvant dans le support du luminaire 3.
6. Percez un trou d’env. 30 mm avec un foret à
pierre de 6 mm aux endroits marqués.
7. Insérer une cheville 2 dans chaque trou percé.
8. Faites passer le câble de raccordement (externe)
9 dans le tuyau en caoutchouc 1 et le trou
du support du luminaire 3 et placez le support
du luminaire 3 au plafond de manière à ce que
les trous des vis recouvrent les trous de perçage.
9. Fixez le support du luminaire 3 au plafond à
l’aide des vis 5.
10. Desserrez les vis et ouvrez le capot de protection
sur le pilote LED 4.
11. À l’aide d’un tournevis, fixez le câble de raccor-
dement (externe) 9 sur le bloc de raccorde-
ment 7. Vérifiez la polarité de la pile indiquée
sur le pilote LED 4. Assurez-vous que le tuyau
en caoutchouc 1 recouvre entièrement le câble
de raccordement (externe) 9.
12. Vissez à nouveau fermement le capot de pro-
tection au pilote LED 4 au moyen de la vis.
13. Fixez le cache du luminaire 6 au support du
luminaire 3 en fermant le levier de verrouil-
lage 8.
Strona się ładuje...
Strona się ładuje...
Strona się ładuje...
Strona się ładuje...
Strona się ładuje...
Strona się ładuje...
Strona się ładuje...
Strona się ładuje...
Strona się ładuje...
Strona się ładuje...
Strona się ładuje...
Strona się ładuje...
Strona się ładuje...
Strona się ładuje...
Strona się ładuje...
Strona się ładuje...
Strona się ładuje...
Strona się ładuje...
Strona się ładuje...
Strona się ładuje...
Strona się ładuje...
Strona się ładuje...
Strona się ładuje...
Strona się ładuje...
Strona się ładuje...
Strona się ładuje...
Strona się ładuje...
Strona się ładuje...
Strona się ładuje...
Strona się ładuje...
Strona się ładuje...
Strona się ładuje...
Strona się ładuje...
Strona się ładuje...
Strona się ładuje...
Strona się ładuje...
Strona się ładuje...
Strona się ładuje...
Strona się ładuje...
Strona się ładuje...
Strona się ładuje...
Strona się ładuje...
Strona się ładuje...
Strona się ładuje...
Strona się ładuje...
Strona się ładuje...
Strona się ładuje...
Strona się ładuje...
Strona się ładuje...
Strona się ładuje...
Strona się ładuje...
Strona się ładuje...
Strona się ładuje...
Strona się ładuje...
Strona się ładuje...
Strona się ładuje...
-
 1
1
-
 2
2
-
 3
3
-
 4
4
-
 5
5
-
 6
6
-
 7
7
-
 8
8
-
 9
9
-
 10
10
-
 11
11
-
 12
12
-
 13
13
-
 14
14
-
 15
15
-
 16
16
-
 17
17
-
 18
18
-
 19
19
-
 20
20
-
 21
21
-
 22
22
-
 23
23
-
 24
24
-
 25
25
-
 26
26
-
 27
27
-
 28
28
-
 29
29
-
 30
30
-
 31
31
-
 32
32
-
 33
33
-
 34
34
-
 35
35
-
 36
36
-
 37
37
-
 38
38
-
 39
39
-
 40
40
-
 41
41
-
 42
42
-
 43
43
-
 44
44
-
 45
45
-
 46
46
-
 47
47
-
 48
48
-
 49
49
-
 50
50
-
 51
51
-
 52
52
-
 53
53
-
 54
54
-
 55
55
-
 56
56
-
 57
57
-
 58
58
-
 59
59
-
 60
60
-
 61
61
-
 62
62
-
 63
63
-
 64
64
-
 65
65
-
 66
66
-
 67
67
-
 68
68
-
 69
69
-
 70
70
-
 71
71
-
 72
72
-
 73
73
-
 74
74
-
 75
75
-
 76
76


w innych językach
- italiano: LIVARNO 396654 Manuale del proprietario
- Deutsch: LIVARNO 396654 Bedienungsanleitung
- slovenčina: LIVARNO 396654 Návod na obsluhu
- français: LIVARNO 396654 Le manuel du propriétaire
- Nederlands: LIVARNO 396654 de handleiding
Powiązane artykuły
-
LIVARNO 353906 Instrukcja obsługi
-
-
-
-
-
-
-
-
-