Beko CEP 5302 B Instrukcja obsługi
- Kategoria
- Ekspresy do kawy
- Typ
- Instrukcja obsługi

User Manual
Manual Espresso Machine with
Integrated Milk Frother
CEP 5302 B
01M-8914073200-2723-07
01M-8915393200-2723-07
EN - DE - FR - TR - ES - PL - RO - IT - CS - SK - SR - AR

2 / EN Manual Espresso Machine with Integrated Milk Frother / User Manual
ENGLISH 3-17
DEUTSCH 18-35
FRANÇAIS 36-49
TÜRKÇE 50-67
ESPAÑOL 68-86
POLISH 87-103
ROMÂNĂ 104-122
ITALIANO 123-139
ČESKY 140-152
SLOVENSKÝ 153-166
СРПСКИ 167-180
CONTENTS

Please read this user manual first!
Dear Customer,
Thank you for selecting this Beko product. We hope that you get the best
results from your product, which has been manufactured to a high quality
with state-of-the-art technology. Please read this entire user manual and all
other accompanying documents carefully before using the product and keep
them as a reference for future use. If you pass on the product to someone
else, please give them the user manual as well. Please take into consideration
all warnings and information in the user manual.
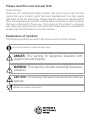
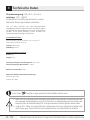
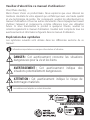
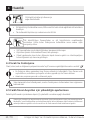
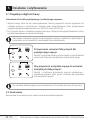
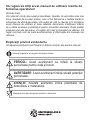
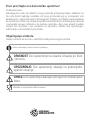
Explanation of symbols
The following symbols are used in the various section of this manual:
Important information or useful hints about usage.
DANGER: This warning for dangerous situations with
regard to life and property.
WARNING: This warning indicates potentially dangerous
situations.
CAUTION: This warning indicates the potential for material
damage.
Materials are suitable for food contact

4 / EN
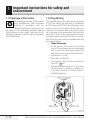
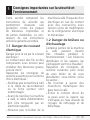
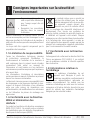
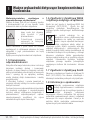
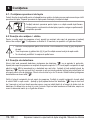
1 Important instructions for safety and
environment
Manual Espresso Machine with Integrated Milk Frother / User Manual
This section includes the safety
instructions that will help
providing protection against
personal injury and material
loss risks. Failure to follow these
instructions invalidates the
granted warranty.
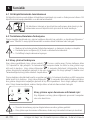
1.1 Danger of electric
current
Danger to life by electric current!
Contact with live wires or
components could lead to
serious injury or even death!
Observe the following safety
precautions to avoid electric
shocks:
• Do not use the coffee machine
if the connecting cable or mains
plug are damaged.
• Before reusing the coffee
machine, the mains cable
must be renewed by a qualified
electrician.
• Do not open the housing of
the coffee machine. Danger of
electric shock if live connections
are touched and/or the electrical
and mechanical configuration is
changed.
1.2 Danger of burning or
scalding
Parts of the coffee machine
can become very hot during
operation! Dispensed drinks and
escaping steam are very hot!
Observe the following safety
precautions to avoid burning/
scalding yourself and/or others:
• Do not touch either of the metal
sleeves on both coffee spouts.
• Avoid direct contact of the skin
with escaping steam or hot
rinsing, cleaning and descaling
water.
1.3 Fundamental safety
precautions
Observe the following safety
precautions to ensure safe
handling of the coffee machine:
• Never play with packaging
material. Risk of suffocation.
• Inspect the coffee machine for
visible signs of damage before
use. Do not use a damaged
coffee machine.

5 / EN
1 Important instructions for safety and
environment
Manual Espresso Machine with Integrated Milk Frother / User Manual
• If the supply cord is damaged,
it must be replaced by the
manufacturer or its agent or
similarly qualified person in
order to avoid hazard.
• Repairs to the coffee machine
must only be carried out by
an authorised specialist or by
the works customer service.
Unqualified repairs can lead
to considerable danger for the
user. They will also void the
warranty.
• Repairs to the coffee machine
during the warranty period
may only be carried out by
service centres authorised by
the manufacturer, otherwise
the warranty will become void
in the event of subsequent
damage.
• Defective parts may only be
replaced with original spare
parts. Only original spare parts
guarantee that the safety
requirements are met.
• Appliances can be used by
persons with reduced physical,
sensory or mental capabilities
or lack of experience and
knowledge if they have been
given supervision or instruction
concerning use of the appliance
in a safe way and understand
the hazards involved.
• This appliance can be used
by children aged from 8
years and above if they have
been given supervision or
instruction concerning use of
the appliance in a safe way and
if they understand the hazards
involved. Cleaning and user
maintenance shall not be made
by children unless they are older
than 8 and supervised. Keep the
appliance and its cord out of
reach of children aged less than
8 years.
• Children shall not play with the
appliance.
• This appliance is intended to be
used in household and similar
applications such as:
-staff kitchen areas in shops,
offices and other working
environments;
-farm houses;

6 / EN
1 Important instructions for safety and
environment
Manual Espresso Machine with Integrated Milk Frother / User Manual
-by clients in hotels, motels and
other residential environments;
-bed and breakfast type
environments.
• Protect the coffee machine
against the effects of weather
such as rain, frost and direct
sunlight. Do not use the coffee
machine outdoors.
• The appliance must not be
immersed.
• Do not clean the coffee machine
or accessories in a dish washer.
• Do not pour any other liquids
apart from water or place
foodstuffs into the water tank.
• Do not fill the water tank beyond
the maximum mark (lower edge
of the filling hole) (1.1 litres).
• Only operate the machine when
the waste container, drip tray and
the cup grate are fitted.
• Do not pull the cable to remove
the plug from the mains socket
or touch with wet hands.
• Do not hold the coffee machine
with the mains cable.
• Keep the appliance and its cord
out of reach of children aged less
than 8 years.
• Before removing the water tank
to fill or empty it, always turn the
machine off.
• Always place the unit on a flat,
stable, heat-resistant work
surface.
• Before brewing, the portafilter
must be turned to the right as
tight as possible to prevent the
portafilter from loosening due to
high pressure.
• Serious injury may result from
misuse. To protect against a
fire, electric shock or personal
injury, do not immerse cord,
electric plugs, heating base in
water or other liquids. Do not
operate any appliance with a
damaged cord or plug, after
the appliance malfunctions, or
is dropped or damaged in any
manner. Please contact the
manufacturer or his customer
service.
• Heating element surface is
subject to residual heat after
use, do not touch the hot

7 / EN
1 Important instructions for safety and
environment
Manual Espresso Machine with Integrated Milk Frother / User Manual
surface, use the handle or the
button. Always keep hands out
of container and machine while
in use and afterward to reduce
the risk of injury to persons.
• Coffee-maker shall not be
placed in a cabinet when in use.
1.4 Intended use
The manual espresso machine Beko is intended for
use in homes and similar applications, for instance
in staff kitchens, shops, offices and similar areas
or by customers in bed & breakfast, hotels, motels
and other living accommodation. This coffee
machine is not intended for commercial use. The
machine is only intended for preparing coffee and
heating milk and water. Any other use other than
previously stated is considered as improper use.
Danger resulting from improper use!
If not used for its intended purpose or used in any
other way, the coffee machine may be or become a
source of danger.
A
•Therefore, the coffee machine
may only be used for its
intended purpose.
•Observe the procedures
described in this user manual.
No claims of any kind will be accepted for damage
or injury resulting from use of the coffee machine
for other than its intended purpose.
The risk has to be borne solely by the machine
owner.
1.5 Limitation of liability
All technical information, data and instructions
on installation, operation and maintenance of
the coffee machine contained in these operating
instructions represent the current status at the
time of printing and are based on the best possible
knowledge gained by experience and knowhow.
No claims can be derived from the information,
illustrations and descriptions in this user manual.
The manufacturer assumes no liability for damage
or injury resulting from failure to observe the user
manual, use for other than the intended purpose,
unprofessional repairs, unauthorised modifications
or use of non-approved spare parts.
1.6 Compliance with the WEEE
Directive and Disposing of the
Waste Product:
This product complies with EU WEEE Directive
(2012/19/EU). This product bears a classification
symbol for waste electrical and electronic
equipment (WEEE).
This symbol indicates that this product
shall not be disposed with other
household waste at the end of its
service life. The used device must be
returned to an offical collection point for
the recycling of electrical and electronic devices.
To find these collection points, please contact your
local authority or retailer where the product was
purchased. Each household performs an important
role in the restoring and recycling of old appliances.
The appropriate disposal of used appliance helps
prevent potential negative consequences for the
environment and human health.
1.7 Compliance with RoHS
Directive
The product you have purchased complies with EU
RoHS Directive (2011/65/EU). It does not contain
harmful and prohibited materials specified in the
Directive.

8 / EN
1 Important instructions for safety and
environment
Manual Espresso Machine with Integrated Milk Frother / User Manual
1.8 Package information
The packaging materials of the product
were manufactured from recyclable
materials in accordance with our
National Environment Regulations. Do
not dispose of the packaging materials together
with domestic or other waste. Take them to the
packaging materials collection points designated
by local authorities
1.9 Plug Wiring
The moulded plug on this appliance incorporates
a 13 A fuse. Should the fuse need to be replaced
an ASTA approved BS1362 fuse of the same rating
must be used. Do not forget to refit the fuse cover.
In the event of losing the fuse cover, the plug must
not to be used until a replacement fuse cover has
been fitted. Colour of the replacement fuse cover
must be the same colour as that visible on the pin
face of the plug Fuse covers are availabe from any
good electrical store.
• Fiting a different plug
•As the colours of the wires in the mains
lead of this appliance may not correspond
with the coloured markings identifying the
terminals on your plug, proceed as follows:
•Brown cable = L (Live)
•Blue cable = N (Neutral)
•Green/yellow cable must be connected to
ground (E) line
•With the alternative plugs a 13 A fuse must
be fitted either in the plug or adaptore or
in the main fuse box. If in doubt contact a
qualified electrician.

9 / EN
Manual Espresso Machine with Integrated Milk Frother / User Manual
All declared values on the product and on the printed leaflets are picked up after laboratory measurements performed according
to related standarts. These values may differ upon usage and ambient conditions.
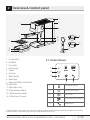
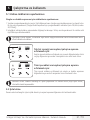
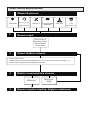
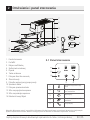
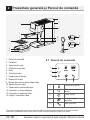
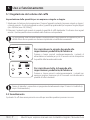
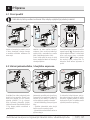
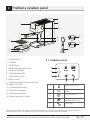
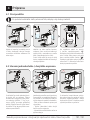
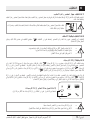
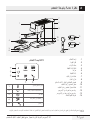
2 Overview & Control panel
1. Control panel
2. Portafilter
3. Cup holder
4. Drip tray grid
5. Floater
6. Drip tray
7. Water tank lid
8. Water tank
9. Steam/Hot Water Control Knob
10. Milk frother
11. Milk frother Cover
12. Single espresso basket
13. Double espresso basket
14. Coffee Scoop / Tamper
1
7
8
9
10
11
12
13
14
2
4
5
6
3
1
2
3
4 5
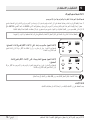
2.1 Control Panel
1Pre-heating indicator
2On/off & cancel button
3General error
4Cleaning and descaling button
5Steam button

10 / EN Manual Espresso Machine with Integrated Milk Frother / User Manual
3 Technical data
Power supply:
220-240 V~, 50-60 Hz
Power:
1376 - 1628 W
The right to make technical and design changes is
reserved.
All declared values on the product and on the
printed leaflets were obtained from laboratory
measurements performed according to the relevant
standards. These values may differ depending on
usage and ambient conditions.
Product Dimensions:
14,4 cm (Width) x 30,8 cm (Height) x 42,3 cm (Depth)
[Depth w/out portafilter 32,5 cm]
Weight: 3.85±0.5kg
Cable Length: >90 cm
Basket Capacities
Single: 8g
Double: 15g
Drip Tray Capacity: Up to 0.2 L
Water Tank Capacity: 1.1±5%L
Machine Pre-heating time: <55s
Volume of coffee (Default settings):
Espresso: 30-55ml
Double: 65-95ml
This button " " will light up as orange when machine needs descaling.
•If knob is in wrong position during machine turn on or if maximum frothing duration is
reached; the red error led will blink with the steam which means steam control knob (9)
should be rotated towards closed position.
•If there is an NTC error, the red error indicator will be lit and there will be no response if any
button is pressed. Call customer service for support.

11 / EN
Manual Espresso Machine with Integrated Milk Frother / User Manual
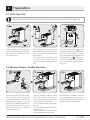
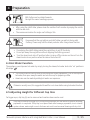
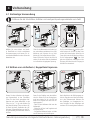
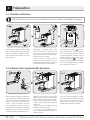
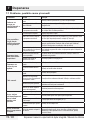
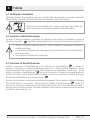
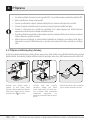
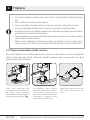
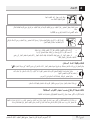
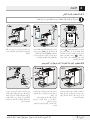
4 Preparation
4.1 First Time Use
Remove any protective films, stickers and any other packaging material from the appliance.
150mm 1
2
3
2
150mm
150mm
.
150mm
3
1
Choose a safe and stable surface with
an easily reachable power supply and al-
low the minimum distance from the si-
des of the machines.
Fill the water tank with fresh, cold pure
water at least up to the MIN marking and
at most up to the MAX marking. (Do not
add hot water)
Then insert tank on to the machine and
the other end of the power cord into a
wall socket with the suitable power vol-
tage.
The power on/off button " " on the
control panel will light up. Press that but-
ton to turn on the machine. Put a cup
right under the brewing head and press
the cleaning button " ". The machine
will sound one beep and start cleaning.
Once completed the machine will be re-
ady to use.
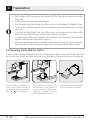
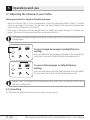
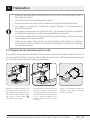
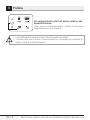
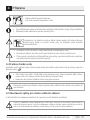
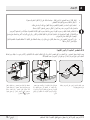
4.2 Brewing Single / Double Espresso
.
beeps
3
2
1
Place the single or double espresso bas-
ket into the filter holder. Fill the freshly
ground coffee powder into the filter with
measuring spoon (approx. 7-14g) and
use the spoon to flatten the excess pow-
der. With the tamping end of the spoon,
apply around 15 kg to push down the
powder even and firmly.
Install the portafilter under the coffee
outlet. Align it with the unlock symbol,
slide it into the groove, and slowly rotate
it to the right to the lock symbol.
- Place a coffee cup right under the cof-
fee outlet.
- Press the single or double button and a
beep will sound.
- Selected coffee will start blinking and
the beverage preparation will begin.
After brewing is completed, machine will
sound one beep and enter idle mode. Re-
move the portafilter clockwise. Clean the
portafilter and dry it after each use.

12 / EN Manual Espresso Machine with Integrated Milk Frother / User Manual
•Wait 5 seconds after brewing and then take out the filter. This will help remove the moving
filter easily.
•Coffee powder cannot be used after brewing.
•Use the handle extension to knock the coffee residue out while keeping the basket in place.
•To ensure your espresso stays at optimum temperature, we recommend that you preheat
your cups.
•To extract the fullest flavor from your coffee beans, we recommend using whole coffee
beans that have been freshly ground each time espresso is prepared.
•In addition to the coffee used, using fresh cold water that is free of chlorine, odors and other
impurities will help ensure the perfect espresso.
•Store your espresso grounds in an airtight container, and in a cool, dry place to retain the
flavor. Grounds should not be kept for long periods of time as the flavor will be reduced.
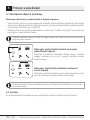
4.3 Preparing Frothy Milk for Coffee
In order to make beverages that require milk such as cappuccino, latte and more; milk frother should be
used to froth milk. Simply add frothed milk over one or two shots of espresso based on your preference.
.
Press milk frother icon and wait for milk
frother to be ready. While milk frother is
pre-heating the indicator lights will flash.
Once ready, " " will be constantly lit.
Place a milk filled cup or pitcher under
the milk frother. Turn the knob into on
position and froth until desired tempe-
rature/foam is obtained. To stop, turn
back the knob into initial position.
Pour the hot frothy milk onto the espres-
so. You can now enjoy your coffee!
4 Preparation

13 / EN
Manual Espresso Machine with Integrated Milk Frother / User Manual
4 Preparation
Milk frother can be rotated towards
the right for easier handling purposes.
•After using the milk frother, please clean the nozzle of milk residue by wiping the nozzle
with the wet cloth.
•The maximum duration for single use frothing is 90s.
Be aware that the cup/pitcher and milk frother can get hot during milk
frothing. Please only hold the black protector after using steam function.
•Considering the milk frothing inside the cup/pitcher, do not fill it entirely.
•Do not pull away the cup/pitcher without stopping the frothing process.
•Turn the steam knob into off position before turning off the device and do not turn the
steam knob into on position when the device the turned off.
4.4 Hot Water Function
The appliance can dispense hot water by simply turning the steam/hot water knob into "on" position in
idle stage " "
•This function can be used to heat up the cup before coffee preparation. First fill the cup with
hot water, then pour away the water and use this cup for preparing coffee.
•Americano can be made by adding hot water over espresso.
If steam is recently used, it is suggested to wait for cool-down before using hot water function.
4.5 Adjusting Height for Different Cup Size
For bigger cups, drip tray (6) can be removed and machine base can be used.
If drip dray is removed for bigger cups, it should be placed back into the machine right after beverage
preparation is completed. If drip tray is not placed back after beverage preparation, due to internal
system release, water might come to the base and would need a manual cleaning with dry cloth.

14 / EN Manual Espresso Machine with Integrated Milk Frother / User Manual
5 Operation and use
5.1 Adjusting the Volume of your Coffee
Setting amounts for Single & Double Espresso
1. Select the function that is to be reprogrammed. Press the appropriate button (single or double
espresso) and keep it held down. You will hear one beep. [single/double espresso programmable
amounts (min: 30/60ml, max: 50/100ml)]
2. Only let go of the button once the desired amount of coffee has passed through. You will hear two
beeps. This amount is now saved under the corresponding function.
The adjusted beverage settings will be saved to device memory for future use until resetted or
changed again.
To reset single beverage to default/factory
setting:
Press and hold down any beverage and power buttons together for
more than 3 seconds to reset the selected beverage amount.
To reset all beverages to default/factory
setting:
Press and hold down single and double espresso buttons together
for more than 3 seconds to reset the all beverage amount.
Standby time: The machine will automatically shut down after 29 minutes without any
operation (or after work).
5.2 Cancelling
On-off button should be pressed once to cancel any running process.

15 / EN
Manual Espresso Machine with Integrated Milk Frother / User Manual
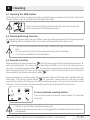
6.1 Cleaning the Milk Frother
Use the hot water function to remove any milk residue that may accumulate on the tip of the milk frother.
The milk frother cover can be detached and cleaned under water.
Clean inside the milk frother with wet cloth after each use to avoid milk
residue and ensure full frothing performance.
6.2 Cleaning/Rinsing Function
For cleaning the brewing head, place a container under the brewing head and press the cleaning button
" ". Cleaning will be completed within 16 seconds and the machine will be ready to use.
•If you do not use the machine for more than 5 consecutive days, rinse and drain the water
tank.
•Drip tray and its grid (6) (4) can be cleaned manually under clean water.
•Do not put the portafilter into the dishwasher.
6.3 Descale Function
When descaling is required, descale icon " " will light up as orange. Place a container that can hold 1.5L
under the brewing head. Pour water into the water tank until MAX level and mix with scale remover or
citric acid. Press & hold descale button " " for more than 3 seconds and you will hear two beep sounds
which indicates that the first cycle of descaling has begun. The first cycle will take around 15 minutes.
Once completed, the descale icon will turn white " ".
Empty and replace the container under the brewing head. Clean and fill water tank until MAX level with
clean water. Press & hold descale button " " for more than 3 seconds and you will hear two beep
sounds which indicates that the second cycle of descaling has begun. The second cycle will take around
6 minutes. Once all complete, the machine will go back to idle stage and will be ready to use.
To reset descale warning status:
Press and hold power and descale button together for more than
3 seconds.
•Descale is required after predefined brewing cycle.
•Resetting descaling warning status is not suggested for maintaining the best condition of
the appliance.
6 Cleaning

16 / EN Manual Espresso Machine with Integrated Milk Frother / User Manual
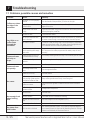
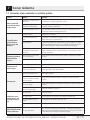
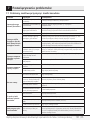
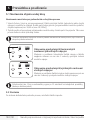
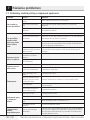
7.1 Problems, possible causes and remedies
Problem Cause Remedy
Coffee runs down
the side of the
portafilter.
Portafilter (2) is not properly
inserted. Turn the handle of the portafilter (2) further to the right.
Edge of sieve is not free of
ground coffee Turn off the machine, remove the portafilter (2) holder and clean the
edges of the sieve.
Screen inside brew head
is dirty. Clean the brew head using a wet cloth and run the cleaning function
without placing the portafilter.
Very little or no
coffee flows
through the
portafilter.
No water in tank. Fill the tank with water.
The screen inside the brew
head is blocked. Brew water through the screen without the portafilter (2) inserted. If
no water comes through, unscrew the screen, clean and replace.
The sieve is blocked. Correction: Clean the sieve, insert into the portafilter (2) and pump
water through without coffee. If no water comes through the sieve
call Customer Service to order a replacement sieve.
Pump does not work due to
device operating with empty
water tank.
Turn on the steam/hot water knob for 2 seconds and then turn it
off. Then press the coffee program and the water pump will work
normally.
Espresso brews
out only as
drops.
Coffee grounds are too fine
or packed down too firmly. Do not tamp coffee grounds so firmly. Use a coarser grind of coffee.
Machine blocked by calcium
deposits. Descale the appliance. See page 15.
Espresso brews
too quickly.
Ground coffee is too coarse. Use a finer grind.
Not enough coffee in the
sieve. Use more ground coffee.
No crema.
Coffee old or too dry. Use fresh coffee.
Coffee not pushed down
firmly enough. Water pushes
through the coffee too fast. Tamp coffee grounds more firmly. Use a finer grind.
Coffee too coarse. Use a conical burr grinder to obtain a finer and more consistent
grind.
Coffee blend not suited to
espresso coffee. Change brand of espresso.
Not enough froth
when frothing
milk.
Milk not fresh. Use fresh milk.
Milk not suitable. Check that the milk is suitable for frothing.
Milk was too warm from the
start. Use milk straight from the refrigerator (34°F).
Not enough milk to froth. Use more cold milk.
No steam from
milk frother.
Milk inlet hole is blocked. See “Cleaning the Milk Frother”. If it is clear of dried milk deposits
but no steam comes out, then use the descaling function. If the ap-
pliance is still blocked, call Customer Service.
7 Troubleshooting

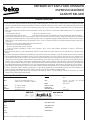
12 months breakdown and repair guarantee
Product Guarantee
Guarantor: Beko plc, 1 Greenhill Crescent, Watford, Hertfordshire. WD18 8UF
The guarantee does not in any way diminish your statutory or legal rights.
Your appliance has the benefit of our manufacturer’s guarantee which covers the product for 12 months
from the date of original purchase.
This gives you reassurance that if within that time, your appliance is proven to be defective because of
either workmanship or materials, we will at our discretion either repair or replace your appliance.
The appliance must be correctly installed, located and operated in accordance with the instructions
contained in the user manual.!The guarantor disclaims any liability for accidental or consequential damage.
The Guarantee is subject to the following conditions:
Documentary proof of the original purchase date is provided.
The appliance has been installed and operated correctly and in accordance with our operating and maintenance
instructions.
The appliance is used only on the electricity supply on the rating plate.
The appliance has only been used for normal domestic purposes.
The appliance has not been altered, serviced, dismantled or otherwise interfered with by any person.
The appliance is used in the United Kingdom or Republic of Ireland.
Any parts removed during repair work or any product that has been replaced becomes our property.
The guarantee is not transferrable if the product is resold.
The Guarantee does not cover:
Transit, installation or delivery damage.
Accidental damage.
Misuse or abuse.
Replacement of any consumable item or accessories. These include but are not limited to: plugs, cables, light bulbs,
knobs, filters and flaps.
Repairs or replacements required as a result of unauthorised repairs or inexpert installation that fails to meet the
requirements contained in the user guide or instruction book.
Repairs to products used in commercial or non-residential household premises.
How to obtain after sales service, help or general advice
Please keep your purchase receipt or other proof of purchase in a safe place as you will need to
show us this document if your product requires attention within the guarantee period.
Please also record your product details below, which will allow you to access our services more quickly and
help us identify your product. The model number is printed on the front of the user guide and the serial and
model number is shown on your products rating plate.
Model number
Serial number
Purchased from
Date of purchase
Please call our UK based Customer Service department if you need help or advice from us:
United Kingdom and Northern Ireland: 0333 207 9710
Republic of Ireland: 01 862 3411
You can also contact us through our website: www.beko.co.uk

Bitte lesen Sie zuerst dieses Handbuch!
Sehr geehrter Kunde,
vielen Dank, dass Sie sich für dieses Beko-Produkt entschieden haben. Wir
hoffen, dass Sie mit Ihrem Gerät, das mit hoher Qualität und modernster
Technologie hergestellt wurde, die besten Ergebnisse erzielen. Lesen Sie
bitte dieses Benutzerhandbuch und alle anderen mitgelieferten Dokumente
sorgfältig durch, bevor Sie das Gerät benutzen, und bewahren Sie sie als
Hinweis für den zukünftigen Gebrauch auf. Wenn Sie das Produkt an eine
andere Person weitergeben, geben Sie ihr bitte auch das Benutzerhandbuch
mit. Bitte beachten Sie alle Warnhinweise und Informationen in der
Bedienungsanleitung.
Erläuterung der Symbole
Die folgenden Symbole werden in verschiedenen Abschnitten dieses
Handbuchs verwendet:
Wichtige Informationen oder nützliche Hinweise zur Benutzung.
GEFAHR: Warnung vor gefährlichen Situationen in Bezug
auf Leben und Eigentum.
WARNUNG: Diese Warnung weist auf potenziell
gefährliche Situationen hin.
VORSICHT: Diese Warnung weist auf die Möglichkeit von
Sachschäden hin.
Die Materialien sind für den Kontakt mit Lebensmitteln geeignet
RECYCELTES und
RECYCELBARES
PAPIER

19 / DE
1 Wichtige Hinweise zur Sicherheit und zum
Umweltschutz
Manuelle Espressomaschine mit integriertem Milchaufschäumer / Bedienungsanleitung
Dieser Abschnitt enthält die
Sicherheitshinweise, die
zum Schutz vor Personen-
und Materialverlustrisiken
beitragen. Nichtbeachtung
dieser Anweisungen
macht die gewährte Garantie
ungültig.
1.1 Gefahr von elektrischem
Strom
Lebensgefahr durch
elektrischen Strom!
Kontakt mit stromführenden
Drähten oder Bauteilen kann zu
schweren oder sogar tödlichen
Verletzungen führen!
Beachten Sie die folgenden
Sicherheitsvorkehrungen, um
Stromschläge zu vermeiden:
• Verwenden Sie die
Kaffeemaschine nicht, wenn
das Verbindungskabel oder
der Netzstecker beschädigt
sind.
• Vor der Wiederverwendung
der Kaffeemaschine muss
das Netzkabel von einem
qualifizierten Elektriker
erneuert werden.
• Öffnen Sie nicht das Gehäuse
der Kaffeemaschine.
Stromschlaggefahr bei
Berührung unter Spannung
stehender Verbindungen
und/oder Änderung
der elektrischen und
mechanischen Konfiguration.
1.2 Verbrennungs- oder
Verbrühungsgefahr
Teile der Kaffeemaschine
können sich bei der Benutzung
stark erhitzen. Abgegebene
Getränke und austretender
Dampf sind sehr heiß!
Beachten Sie die folgenden
Sicherheitsvorkehrungen, um
Verbrennungen/Verbrühungen
von sich selbst und/oder
anderen zu vermeiden:
• Berühren Sie keine der
Metallhülsen an beiden
Kaffeeausläufen.
• Vermeiden Sie direkten
Hautkontakt mit
austretendem Dampf oder
heißem Spül-, Reinigungs-

20 / DE
1 Wichtige Hinweise zur Sicherheit und zum
Umweltschutz
Manuelle Espressomaschine mit integriertem Milchaufschäumer / Bedienungsanleitung
und Entkalkungswasser.
1.3 Grundlegende
Sicherheitsvorkehrungen
Beachten Sie die folgenden
Sicherheitsvorkehrungen,
um einen sicheren Umgang
mit der Kaffeemaschine zu
gewährleisten:
• Spielen Sie niemals mit
Verpackungsmaterial.
Erstickungsgefahr.
• Überprüfen Sie die
Kaffeemaschine vor
dem Gebrauch auf
sichtbare Anzeichen von
Beschädigungen. Verwenden
Sie keine beschädigte
Kaffeemaschine.
• Sollte das Netzkabel
beschädigt sein, muss es
durch den Hersteller oder
dessen Kundendienst oder
eine Person mit gleicher
technischer Qualifikation
ausgetauscht werden.
• Reparaturen an der
Kaffeemaschine dürfen nur
von einem autorisierten
Fachmann oder vom
Kundendienst durchgeführt
werden. Unqualifizierte
Reparaturen können zu
erheblichen Gefahren für den
Benutzer führen. Sie führen
auch zum Erlöschen der
Garantie.
• Reparaturen an der
Kaffeemaschine während der
Garantiezeit dürfen nur von
vom Hersteller autorisierten
Kundendiensten durchgeführt
werden, andernfalls erlischt
die Garantie bei späteren
Schäden.
• Defekte Teile dürfen nur durch
Originalersatzteile ersetzt
werden. Nur Originalersatzteile
garantieren, dass die
Sicherheitsanforderungen
erfüllt werden.
• Dieses Gerät kann von
Personen mit eingeschränkten
körperlichen, sensorischen
oder geistigen Fähigkeiten
oder fehlender Erfahrung
und Kenntnissen benutzt
werden, wenn sie in sicherer
Strona się ładuje...
Strona się ładuje...
Strona się ładuje...
Strona się ładuje...
Strona się ładuje...
Strona się ładuje...
Strona się ładuje...
Strona się ładuje...
Strona się ładuje...
Strona się ładuje...
Strona się ładuje...
Strona się ładuje...
Strona się ładuje...
Strona się ładuje...
Strona się ładuje...
Strona się ładuje...
Strona się ładuje...
Strona się ładuje...
Strona się ładuje...
Strona się ładuje...
Strona się ładuje...
Strona się ładuje...
Strona się ładuje...
Strona się ładuje...
Strona się ładuje...
Strona się ładuje...
Strona się ładuje...
Strona się ładuje...
Strona się ładuje...
Strona się ładuje...
Strona się ładuje...
Strona się ładuje...
Strona się ładuje...
Strona się ładuje...
Strona się ładuje...
Strona się ładuje...
Strona się ładuje...
Strona się ładuje...
Strona się ładuje...
Strona się ładuje...
Strona się ładuje...
Strona się ładuje...
Strona się ładuje...
Strona się ładuje...
Strona się ładuje...
Strona się ładuje...
Strona się ładuje...
Strona się ładuje...
Strona się ładuje...
Strona się ładuje...
Strona się ładuje...
Strona się ładuje...
Strona się ładuje...
Strona się ładuje...
Strona się ładuje...
Strona się ładuje...
Strona się ładuje...
Strona się ładuje...
Strona się ładuje...
Strona się ładuje...
Strona się ładuje...
Strona się ładuje...
Strona się ładuje...
Strona się ładuje...
Strona się ładuje...
Strona się ładuje...
Strona się ładuje...
Strona się ładuje...
Strona się ładuje...
Strona się ładuje...
Strona się ładuje...
Strona się ładuje...
Strona się ładuje...
Strona się ładuje...
Strona się ładuje...
Strona się ładuje...
Strona się ładuje...
Strona się ładuje...
Strona się ładuje...
Strona się ładuje...
Strona się ładuje...
Strona się ładuje...
Strona się ładuje...
Strona się ładuje...
Strona się ładuje...
Strona się ładuje...
Strona się ładuje...
Strona się ładuje...
Strona się ładuje...
Strona się ładuje...
Strona się ładuje...
Strona się ładuje...
Strona się ładuje...
Strona się ładuje...
Strona się ładuje...
Strona się ładuje...
Strona się ładuje...
Strona się ładuje...
Strona się ładuje...
Strona się ładuje...
Strona się ładuje...
Strona się ładuje...
Strona się ładuje...
Strona się ładuje...
Strona się ładuje...
Strona się ładuje...
Strona się ładuje...
Strona się ładuje...
Strona się ładuje...
Strona się ładuje...
Strona się ładuje...
Strona się ładuje...
Strona się ładuje...
Strona się ładuje...
Strona się ładuje...
Strona się ładuje...
Strona się ładuje...
Strona się ładuje...
Strona się ładuje...
Strona się ładuje...
Strona się ładuje...
Strona się ładuje...
Strona się ładuje...
Strona się ładuje...
Strona się ładuje...
Strona się ładuje...
Strona się ładuje...
Strona się ładuje...
Strona się ładuje...
Strona się ładuje...
Strona się ładuje...
Strona się ładuje...
Strona się ładuje...
Strona się ładuje...
Strona się ładuje...
Strona się ładuje...
Strona się ładuje...
Strona się ładuje...
Strona się ładuje...
Strona się ładuje...
Strona się ładuje...
Strona się ładuje...
Strona się ładuje...
Strona się ładuje...
Strona się ładuje...
Strona się ładuje...
Strona się ładuje...
Strona się ładuje...
Strona się ładuje...
Strona się ładuje...
Strona się ładuje...
Strona się ładuje...
Strona się ładuje...
Strona się ładuje...
Strona się ładuje...
Strona się ładuje...
Strona się ładuje...
Strona się ładuje...
Strona się ładuje...
Strona się ładuje...
Strona się ładuje...
Strona się ładuje...
Strona się ładuje...
Strona się ładuje...
Strona się ładuje...
Strona się ładuje...
Strona się ładuje...
Strona się ładuje...
Strona się ładuje...
Strona się ładuje...
Strona się ładuje...
Strona się ładuje...
Strona się ładuje...
Strona się ładuje...
Strona się ładuje...
Strona się ładuje...
-
 1
1
-
 2
2
-
 3
3
-
 4
4
-
 5
5
-
 6
6
-
 7
7
-
 8
8
-
 9
9
-
 10
10
-
 11
11
-
 12
12
-
 13
13
-
 14
14
-
 15
15
-
 16
16
-
 17
17
-
 18
18
-
 19
19
-
 20
20
-
 21
21
-
 22
22
-
 23
23
-
 24
24
-
 25
25
-
 26
26
-
 27
27
-
 28
28
-
 29
29
-
 30
30
-
 31
31
-
 32
32
-
 33
33
-
 34
34
-
 35
35
-
 36
36
-
 37
37
-
 38
38
-
 39
39
-
 40
40
-
 41
41
-
 42
42
-
 43
43
-
 44
44
-
 45
45
-
 46
46
-
 47
47
-
 48
48
-
 49
49
-
 50
50
-
 51
51
-
 52
52
-
 53
53
-
 54
54
-
 55
55
-
 56
56
-
 57
57
-
 58
58
-
 59
59
-
 60
60
-
 61
61
-
 62
62
-
 63
63
-
 64
64
-
 65
65
-
 66
66
-
 67
67
-
 68
68
-
 69
69
-
 70
70
-
 71
71
-
 72
72
-
 73
73
-
 74
74
-
 75
75
-
 76
76
-
 77
77
-
 78
78
-
 79
79
-
 80
80
-
 81
81
-
 82
82
-
 83
83
-
 84
84
-
 85
85
-
 86
86
-
 87
87
-
 88
88
-
 89
89
-
 90
90
-
 91
91
-
 92
92
-
 93
93
-
 94
94
-
 95
95
-
 96
96
-
 97
97
-
 98
98
-
 99
99
-
 100
100
-
 101
101
-
 102
102
-
 103
103
-
 104
104
-
 105
105
-
 106
106
-
 107
107
-
 108
108
-
 109
109
-
 110
110
-
 111
111
-
 112
112
-
 113
113
-
 114
114
-
 115
115
-
 116
116
-
 117
117
-
 118
118
-
 119
119
-
 120
120
-
 121
121
-
 122
122
-
 123
123
-
 124
124
-
 125
125
-
 126
126
-
 127
127
-
 128
128
-
 129
129
-
 130
130
-
 131
131
-
 132
132
-
 133
133
-
 134
134
-
 135
135
-
 136
136
-
 137
137
-
 138
138
-
 139
139
-
 140
140
-
 141
141
-
 142
142
-
 143
143
-
 144
144
-
 145
145
-
 146
146
-
 147
147
-
 148
148
-
 149
149
-
 150
150
-
 151
151
-
 152
152
-
 153
153
-
 154
154
-
 155
155
-
 156
156
-
 157
157
-
 158
158
-
 159
159
-
 160
160
-
 161
161
-
 162
162
-
 163
163
-
 164
164
-
 165
165
-
 166
166
-
 167
167
-
 168
168
-
 169
169
-
 170
170
-
 171
171
-
 172
172
-
 173
173
-
 174
174
-
 175
175
-
 176
176
-
 177
177
-
 178
178
-
 179
179
-
 180
180
-
 181
181
-
 182
182
-
 183
183
-
 184
184
-
 185
185
-
 186
186
-
 187
187
-
 188
188
-
 189
189
-
 190
190
-
 191
191
-
 192
192
-
 193
193
-
 194
194
-
 195
195
-
 196
196


Beko CEP 5302 B Instrukcja obsługi
- Kategoria
- Ekspresy do kawy
- Typ
- Instrukcja obsługi
w innych językach
- italiano: Beko CEP 5302 B Manuale utente
- Deutsch: Beko CEP 5302 B Benutzerhandbuch
- slovenčina: Beko CEP 5302 B Používateľská príručka
- français: Beko CEP 5302 B Manuel utilisateur
- Türkçe: Beko CEP 5302 B Kullanım kılavuzu
- română: Beko CEP 5302 B Manual de utilizare
Powiązane artykuły
Inne dokumenty
-
Philips HD8827/09 Instrukcja obsługi
-
Philips HD8829/09 Instrukcja obsługi
-
Zelmer ZCM4821B (CM4821) Instrukcja obsługi
-
-
Cecotec 20 MATIC Instrukcja obsługi
-
Siemens TE502206RW/08 Instrukcja obsługi
-
-