
Z31237A
Z31237B
LED UNDER-CABINET LIGHT
Assembly and safety advice
LED LÁMPA
Használati- és biztonsági utasítások
LED SVÍTIDLO POD SKŘÍŇKU
Pokyny k montáži a bezpečnostní pokyny
LED-UNTERBAULEUCHTE
Montage- und Sicherheitshinweise
LEDOW A LAMPKA
PODSZAFK OWA
Wskazówki dotyczące montażu oraz
bezpieczeństwa
LED SVETILKA ZA
PODVGRADNJO
Navodila za montažo in varnost
LED SVIETIDLO POD SKRINKU
Pokyny pre montáž a bezpečnosť
4
75470_livx_Unterbauleuchte_Cover_LB4.indd 4 14.08.12 08:28

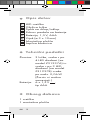
GB Assembly and
safety advice Page 5
PL Wskazówki dotyczące
montażu oraz
bezpieczeństwa Strona 17
HU Használati- és
biztonsági utasítások Oldal 31
SI Navodila za
montažo in varnost Stran 44
CZ Pokyny k montáži a
bezpečnostní pokyny Strana 59
SK Pokyny pre montáž
a bezpečnosť Strana 71
DE / AT / CH Montage- und
Sicherheitshinweise Seite 84
75470_livx_Unterbauleuchte_Cover_LB4.indd 5 14.08.12 08:28

3
Z31237B
Z31237A
Z31237A
Z31237B
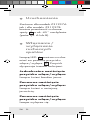
D
2
approx.14,6 cm
C
1
21
7
7 8
B
A
3
3
6

4
Z31237A
Z31237B
F
5
4
Z31237A
Z31237B
E
7
7
3
3

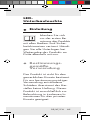
5 GB
Introduction
Intended use ...........Page 6
Parts description .....Page 6
Technical data ........ Page 7
Contents .................. Page 7
General Safety
Information ............Page 8
Battery safety
information ............Page 9
Use
Installation ..............Page 11
Before use ............... Page 12
Start-up .................... Page 12
Switching swivel
spots on / off ........... Page 13
Replacing batteries ...Page 13
Cleaning and
Care ...........................Page 14
Disposal ...................Page 14

6 GB
LED Under-cabinet
light
Introduction
Before using the
product, please
familiarise yourself
with all of the safety informa-
tion and instructions for use.
When passing this product on
to others, please also include
all the documents.
Intended use
The product is not intended for
commercial use. The manufac-
turer is not liable for damage
caused by improper use. This
product is only suitable for
private use to illuminate dry
indoor rooms.
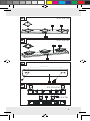
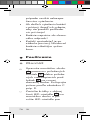
Parts description
1 LED light
2 Swivel spotlight

7 GB
3 On / Off switch
4 Battery compartment cover
5 Battery, 1.5 V, AAA
6 Screw (ø 3 x 10 mm)
7 Mounting plate
8 Self-adhesive pad
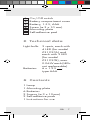
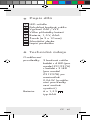
Technical data
Light bulb: 3 spots, each with
4 LED (for model
Z31237A) and
each with 3 LED
(for model
Z31237B), max.
0.06 W each (LEDs
not replaceable)
Batteries: 6 x 1.5 V ,
type AAA
Contents
1 Lamp
1 Mounting plate
6 Batteries
2 Screws (ø 3 x 10 mm)
2 Self-adhesive pads
1 Instructions for use

8 GB
General
Safety
Information
PLEASE READ THE INSTRUC-
TIONS PRIOR TO USE!
PLEASE KEEP THE INSTRUC-
TIONS FOR USE IN A SAFE
PLACE!
Check the product for
damage before use. Never
use a damaged product.
This product is not intended
for use by individuals
(including children) with
limited physical sensory or
mental capacity, or lacking
experience and / or skills
unless supervised by an
individual responsible for
their safety, or after being
instructed on product use.
Supervise children to en-
sure they do not play with
the product.
Never use the light if any
defects have been identi-
fied.
LED cannot be replaced.

9 GB
This light is solely
suitable for use
in dry, closed
indoor spaces.
Battery safety
information
WARNING!
RISK OF
FATAL INJU-
RIES! Batteries are not
intended for children. Do
not leave batteries lying
around. They may other-
wise be swallowed by chil-
dren or pets. If accidentally
swallowed seek immediate
medical attention.
EXPLOSION
HAZARD!
Never recharge
non-rechargeable batteries,
short-circuit and / or open
batteries.
EXPLOSION
HAZARD!
Never throw
batteries into fire or water.

10 GB
The batteries may other-
wise explode.
Keep batteries away from
children; do not throw into
fire, short-circuit or take them
apart.
Avoid contact with the skin,
eyes and mucous mem-
branes. In the event of
contact with battery acid,
thoroughly flush the affected
area with clean water and
seek immediate medical
attention.
If necessary, clean the bat-
teries and device contacts
before inserting batteries.
When inserting the battery
ensure the correct polarity!
This is indicated in the
battery compartment.
Only use the same type of
batteries.
Remove batteries from the
device after extended
periods of non-use.
Promptly remove drained
batteries from the product.
There is an increased risk
of leaks!

11 GB
Avoid extreme conditions
and temperatures which
may impact batteries, e.g
on radiators. Otherwise
there is an increased risk
of leaking.
Failure to follow safety
instructions may drain
batteries beyond their end
voltage. This will then pose
a risk of leaking.
If the batteries have leaked
inside the product, please
remove them immediately
to prevent product dam-
age!
Batteries do not belong in
household refuse!
The law requires every
consumer to properly
dispose of batteries.
Use
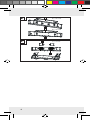
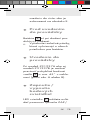
Installation
Secure the mounting plate
7 to a level wooden sur-
face using the screws 6 or
adhesive pads 8 included.

12 GB
Refer to figures C or D,
respectively.
Place the eyes on the bot-
tom part of the LED light 1
onto the mounting plate
and latch in the LED light,
sliding it sideways as illus-
trated in Figure E.
Before use
The batteries 5 are factory
installed.
Pull the two insulating strips
out of the two battery
compartments to activate.
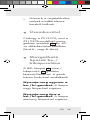
Start-up
For both model Z31237A and
Z31237B, the swivel spotlights
2 can be tilted approx. 45°
in any direction (see Fig. A or B).

13 GB
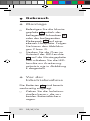
Switching swivel
spots on / off
The LED light 1 is controlled
using the On / Off switch 3.
This button has three settings:
Press on / off switch
once: high light output.
Press on / off switch
again: low light output.
Press the on / off switch
again: turns the light off.
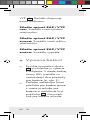
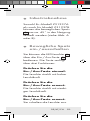
Replacing
batteries
Slide the mounting plate
7 and remove from the
bracket. There are two
battery compartments at
the rear centre of the LED
light (see Fig. F).
Press the handle on the
battery compartment slightly
toward the compartment
and lift the battery

14 GB
compartment cover 4 to
open the battery compart-
ment.
Insert batteries in the com-
partment as indicated.
Replace the battery cover
to close the battery com-
partment.
Apply light pressure until
the handle locks in again.
Cleaning and Care
Use a dry, soft and lint-free
cloth for cleaning and care.
Use a slightly dampened
cloth and a mild detergent
to remove stubborn dirt.
Disposal
The packaging is
made from eco-
friendly materials.
Dispose of packaging through
municipal recycling containers.

15 GB
Contact your municipality for
information on how to dispose
of the worn-out product.
To protect the envi-
ronment, please do
not dispose of the
Worn-out product in your
household waste, but dispose
of properly.
Contact your municipality for
information regarding collection
facilities and their opening
hours.
Defective or used batteries must
be recycled in accordance
with Directive 2006 / 66 / CE.
Return batteries and / or the
device to the recycling facilities
offered.
Pb
Environmental
damage due to
improper bat-
tery disposal!
Never dispose of batteries in
your household waste. They
may contain toxic heavy metals

16 GB
and are subject to hazardous
waste regulations. The chemical
symbols of the heavy metals
are: Cd = cadmium, Hg =
mercury, Pb = lead. Therefore
dispose of used batteries through
your municipal collection site.
EMC

17 PL
Instrukcja
Zastosowanie
zgodne z
przeznaczeniem........Strona 18
Opis części ................Strona 19
Dane techniczne .......Strona 19
Zawartość zestawu...Strona 20
Ogólne
wskazówki
dotyczące
bezpieczeństwa ......Strona 20
Wskazówki
bezpieczeństwa
dotyczące
baterii ...........................Strona 22
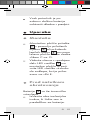
Użytkowanie
Montaż ....................... Strona 25
Przed
uruchomieniem ..........Strona 25
Uruchomienie ............Strona 26
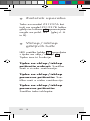
Włączanie /
wyłączanie
ruchomych spotów ...Strona 26
Wymiana baterii .......Strona 27
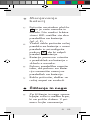
Czyszczenie i
konserwacja .............Strona 27
Utylizacja ....................Strona 28

18 PL
Ledowa lampka
podszafkowa
Instrukcja
Przed pierwszym
użyciem produktu
należy zapoznać
się ze wszystkimi wskazówkami
dotyczącymi obsługi i bezpie-
czeństwa. W przypadku prze-
kazania produktu innej osobie
należy dołączyć do niego całą
jego dokumentację.
Zastosowanie
zgodne z
przeznaczeniem
Produkt nie jest przeznaczony
do użytku komercyjnego.
Producent nie ponosi odpowie-
dzialności za szkody powstałe
wskutek używania produktu w
sposób niezgodny z jego
przeznaczeniem. Niniejszy
produkt nadaje się wyłącznie
do oświetlania suchych pomiesz-

19 PL
czeń wewnętrznych i jest prze-
znaczony do użytku prywatnego.
Opis części
1 Lampka diodowa
2 Ruchomy spot
3 Przycisk włącz/wyłącz
4 Pokrywa komory na baterie
5 Bateria, 1,5 V, AAA
6 Śruba (ø 3 x 10 mm)
7 Płyta montażowa
8 Płatki samoprzylepne
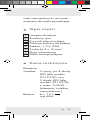
Dane techniczne
Elementy
świetlne: 3 spoty, po 4 diody
LED (dla modelu
Z31237A) i po
3 diody LED (dla
modelu Z31237B)
z maks. 0,06 W
(elementy świetlne
niewymienne.)
Baterie: 6 x 1,5 V ,
typ AAA

20 PL
Zawartość
zestawu
1 lampa
1 płyta montażowa
6 baterii
2 śrub (ø 3 x 10 mm)
2 płatki samoprzylepne
1 instrukcja obsługi
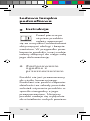
Ogólne
wska
zówki
dotyczące
bezpie-
czeństwa
PRZED UŻYCIEM NALEŻY
ZAPOZNAĆ SIĘ Z INSTRUK-
CJĄ OBSŁUGI! INSTRUKCJĘ
OBSŁUGI NALEŻY ZACHO-
WAĆ!
Przed użyciem należy
skon-
trolować produkt pod
kątem uszkodzeń. Nie
należy uruchamiać uszko-
dzonego produktu.
Urządzenie nie jest prze-
znaczone do użytku przez
osoby (włącznie z dziećmi)
Strona się ładuje...
Strona się ładuje...
Strona się ładuje...
Strona się ładuje...
Strona się ładuje...
Strona się ładuje...
Strona się ładuje...
Strona się ładuje...
Strona się ładuje...
Strona się ładuje...
Strona się ładuje...
Strona się ładuje...
Strona się ładuje...
Strona się ładuje...
Strona się ładuje...
Strona się ładuje...
Strona się ładuje...
Strona się ładuje...
Strona się ładuje...
Strona się ładuje...
Strona się ładuje...
Strona się ładuje...
Strona się ładuje...
Strona się ładuje...
Strona się ładuje...
Strona się ładuje...
Strona się ładuje...
Strona się ładuje...
Strona się ładuje...
Strona się ładuje...
Strona się ładuje...
Strona się ładuje...
Strona się ładuje...
Strona się ładuje...
Strona się ładuje...
Strona się ładuje...
Strona się ładuje...
Strona się ładuje...
Strona się ładuje...
Strona się ładuje...
Strona się ładuje...
Strona się ładuje...
Strona się ładuje...
Strona się ładuje...
Strona się ładuje...
Strona się ładuje...
Strona się ładuje...
Strona się ładuje...
Strona się ładuje...
Strona się ładuje...
Strona się ładuje...
Strona się ładuje...
Strona się ładuje...
Strona się ładuje...
Strona się ładuje...
Strona się ładuje...
Strona się ładuje...
Strona się ładuje...
Strona się ładuje...
Strona się ładuje...
Strona się ładuje...
Strona się ładuje...
Strona się ładuje...
Strona się ładuje...
Strona się ładuje...
Strona się ładuje...
Strona się ładuje...
Strona się ładuje...
Strona się ładuje...
Strona się ładuje...
Strona się ładuje...
Strona się ładuje...
Strona się ładuje...
Strona się ładuje...
Strona się ładuje...
Strona się ładuje...
Strona się ładuje...
Strona się ładuje...
-
 1
1
-
 2
2
-
 3
3
-
 4
4
-
 5
5
-
 6
6
-
 7
7
-
 8
8
-
 9
9
-
 10
10
-
 11
11
-
 12
12
-
 13
13
-
 14
14
-
 15
15
-
 16
16
-
 17
17
-
 18
18
-
 19
19
-
 20
20
-
 21
21
-
 22
22
-
 23
23
-
 24
24
-
 25
25
-
 26
26
-
 27
27
-
 28
28
-
 29
29
-
 30
30
-
 31
31
-
 32
32
-
 33
33
-
 34
34
-
 35
35
-
 36
36
-
 37
37
-
 38
38
-
 39
39
-
 40
40
-
 41
41
-
 42
42
-
 43
43
-
 44
44
-
 45
45
-
 46
46
-
 47
47
-
 48
48
-
 49
49
-
 50
50
-
 51
51
-
 52
52
-
 53
53
-
 54
54
-
 55
55
-
 56
56
-
 57
57
-
 58
58
-
 59
59
-
 60
60
-
 61
61
-
 62
62
-
 63
63
-
 64
64
-
 65
65
-
 66
66
-
 67
67
-
 68
68
-
 69
69
-
 70
70
-
 71
71
-
 72
72
-
 73
73
-
 74
74
-
 75
75
-
 76
76
-
 77
77
-
 78
78
-
 79
79
-
 80
80
-
 81
81
-
 82
82
-
 83
83
-
 84
84
-
 85
85
-
 86
86
-
 87
87
-
 88
88
-
 89
89
-
 90
90
-
 91
91
-
 92
92
-
 93
93
-
 94
94
-
 95
95
-
 96
96
-
 97
97
-
 98
98


w innych językach
- slovenčina: LIVARNO 75470 Návod na obsluhu
Powiązane artykuły
-
LIVARNO 270284 Instrukcja obsługi
-
-
-
-
-
-
-
-
-