Jonsered 560 Instrukcja obsługi
- Kategoria
- Kosiarki
- Typ
- Instrukcja obsługi
Niniejsza instrukcja jest również odpowiednia dla

PETROL
PETROL
WHEELED
WHEELED
ROT
ROT
AR
AR
Y
Y
LA
LA
WNMOWER
WNMOWER
SICHELMÄHER
SICHELMÄHER
MIT
MIT
BENZINMOT
BENZINMOT
OR
OR
T
T
ONDEUSE
ONDEUSE
THERMIQUE
THERMIQUE
T
T
OSAERBA
OSAERBA
A
A
SCOPPIO
SCOPPIO
CON
CON
RUOTE
RUOTE
CORT
CORT
ACÉSPED
ACÉSPED
ROT
ROT
A
A
TIVO
TIVO
DE
DE
GASOLINA
GASOLINA
A
A
RUEDAS
RUEDAS
M
M
Á
Á
QUINA
QUINA
ROT
ROT
A
A
TIV
TIV
A
A
DE
DE
CORT
CORT
AR
AR
REL
REL
V
V
A
A
A
A
GASOLINA
GASOLINA
B
B
ENZINE
ENZINE
W
W
IELMAAIER
IELMAAIER

ENGLISH 1-12
13-24
25-36
37-48
49-60
DEUTSCH
FRANÇAIS
ITALIANO
ESPAÑOL
61-72PORTUGUÊS
NEDERLANDS 73-84

Please Note :- This manual covers various products.
Please read the user instructions carefully to fully identify,
assemble and use the features that apply to your petrol
wheeled rotary lanwmower
Hinweis: Dieses Handbuch ist für verschiedene Produkte
bestimmt. Diese Betriebsanleitung muß sorgfältig
durchgelesen und die einzelnen Bestandteile, die auf Ihren
Rasenmäher zutreffen, identifiziert, zusammengesetzt und
verwendet werden.
Note: Ce manuel couvre plusieurs appareils. Veuillez lire
attentivement les instructions pour identifier, assembler et
utiliser les pièces de votre tondeuse thermique
Si prega di voler notare che questo manuale si occupa
di vari prodotti. Si prega di voler leggere con attenzione le
istruzioni d’uso per identificare, montare e usare a fondo le
caratteristiche corrispondenti al vostro tosaerba a scoppio
rotativo con ruote.
Nota:- Este manual cubre varios productos. Lea
cuidadosamente las instrucciones del usuario para identificar
totalmente, ensamblar y utilizar las caracteristicas aplicables
a su cortacésped rotativo de gasolina a ruedas.
Note que:- Este manual abrange vários produtos. Leia as
instruções do utilizador com cuidado para identificar, montar e
utilizar totalmente as características que se aplicam à sua
máquina rotativa de cortar relva a gasolina.
Let op: In deze handleiding worden verschillende producten
beschreven. U dient de handleiding dan ook in zijn geheel
grondig door te lezen voor identificatie, montage en het juiste
gebruik van de voorzieningen die van toepassing zijn op uw
Benzine Wielmaaier.

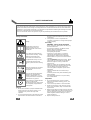
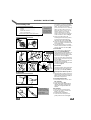
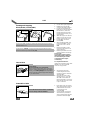
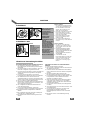
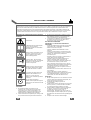
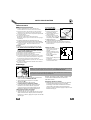
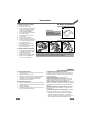
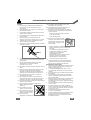
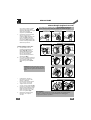
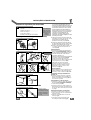
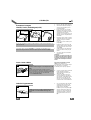
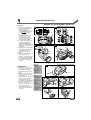
SAFETY PRECAUTIONS
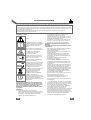
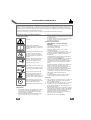
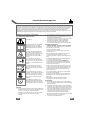
Explanation of Symbols on the Petrol Wheeled
Rotary Lawnmower
Warning
Read the user instructions
carefully to make sure you
understand all the controls and
what they do.
Always keep the lawnmower on
the ground when mowing. Tilting
or lifting the lawnmower may
cause stones to be thrown out
Keep bystanders away. Do not
mow whilst people especially
children or pets are in the mowing
area
Beware of severing toes or hands.
Do not put hands or feet near a
rotating blade.
Disconnect the spark plug before
attempting any maintenance,
cleaning or adjustment, or if you
are going to leave the lawnmower
unattended for any period.
Blade continues to rotate after the
machine is switched off.
Wait until all machine components
have completely stopped before
touching them.
General
1. Never allow children or people unfamiliar with
these instructions to use the mower. Local
regulations may restrict the age of the
operator.
2. Only use the lawnmower in the manner and for
the functions described in these instructions.
3. Never operate the lawnmower when you are
tired, ill or under the influence of alcohol, drugs
or medicine.
4. The operator or user is responsible for
accidents or hazards occurring to other people
or their property.
Fuel Safety
WARNING - Petrol is highly flammable
Preparation
1. Do not mow barefoot or in open sandals.
Always wear suitable clothing, gloves, and
stout shoes.
2. The use of ear protection is recommended.
2. Make sure the lawn is clear of sticks, stones,
bones, wire and debris; they could be thrown
by the blade.
3. Before using always visually inspect to see that
blades, blade bolts and cutter assembly are not
worn or damaged. Replace worn or damaged
blades together with their fixings in sets to
preserve balance.
4. Replace faulty silencers.
1
If not used properly this lawnmower can be dangerous! This lawnmower can cause serious injury to the
operator and others, the warnings and safety instructions must be followed to ensure reasonable safety
and efficiency in using this lawnmower. The operator is responsible for following the warning and safety
instructions in this manual and on the lawnmower.
Never use the mower unless the grassbox or guards provided by the manufacturer are in position.
- Wear protective clothing when handling any
fuels and lubricants.
- Avoid contact with skin. If affected, wash
liberally with soap and water.
- Remove petrol and engine oil before
transporting the product.
- Store fuel in a cool place in a container
specifically designed for the purpose. In
general plastic containers are unsuitable
- refuel outdoors only and do not smoke while
refuelling
- add fuel BEFORE starting the engine. Never
remove the cap of the fuel tank or add fuel
while the engine is running or when the
engine is hot
- if petrol is spilled, do not attempt to start the
engine but move the machine away from the
area of spillage and avoid creating any
source of ignition until petrol vapours have
dissipated
- replace all fuel tanks and container caps
securely
- move the product away from the fuelling area
before starting
- Fuel should be stored in a cool place away
from naked flames
GB
STOP

SAFETY PRECAUTIONS
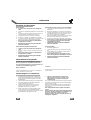
Use
1. Do not operate the engine in a confined space
where exhaust fumes (carbon monoxide) can
collect.
2. Use the lawnmower only in daylight or good
artificial light.
3. Avoid operating your lawnmower in wet grass,
where feasible.
4. Take care in wet grass, you may lose your
footing.
5. On slopes, be extra careful of your footing and
wear non-slip footwear.
6. Mow across the face of slopes, never up and
down.
7. Exercise extreme caution when changing
direction on slopes.
8. Mowing on banks and slopes can be
dangerous. Do not mow on banks or steep
slopes.
9. Do not walk backwards when mowing, you
could trip. Walk, never run.
10. Never cut grass by pulling the mower towards
you.
11. Release the Operator Presence control to stop
the engine before pushing the mower across
surfaces other than grass and when
transporting the lawnmower to and from the
area to be mowed.
12. Never operate the lawnmower with damaged
guards or without guards in place.
13. Do not overspeed the engine or alter governor
settings. Excessive speed is dangerous and
shortens lawnmower life.
14. Disengage all blade and drive clutches before
starting.
15. Always start the lawnmower carefully with feet
well away from the blades.
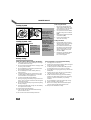
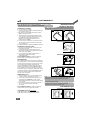
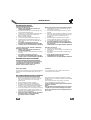
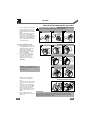
16. Do not tilt lawnmower
when starting the engine
17. Do not put hands near the
grass discharge chute
whilst engine is running.
18. Never pick up or carry a
lawnmower while the
engine is running
19. Spark plug wire may be hot - handle with care.
20. Do not attempt any maintenance on your
lawnmower when the engine is hot.
21. Release the Operator Presence Control, to
stop the engine, and wait until the blade has
stopped:-
22. Release the Operator
Presence Control, to stop the
engine, wait until the blade has
stopped and disconnect the
spark plug lead:-
23. Reduce the throttle setting during engine shut
down and, if the engine is provided with a shut-
off valve, turn the fuel off at the conclusion of
mowing.
Maintenance and storage
1. Keep all nuts, bolts and screws tight to be sure
the lawnmower is in safe working condition.
2. Check the grassbox/grassbag frequently for
wear or deterioration.
3 Replace worn or damaged parts for safety.
4. Only use the replacement blade, blade bolt,
spacer and impeller specified for this product.
5. Never store the lawnmower with fuel in the
tank inside a building where fumes can reach
an open flame or spark.
6. Allow the engine to cool before storing in any
enclosure.
7. To reduce fire hazard, keep the engine,
silencer, battery compartment and fuel storage
area free of grass, leaves or excessive grease.
8. If the fuel tank has to be drained, this should be
done outdoors.
9. Be careful during adjustment of the machine to
prevent entrapment of the fingers between
moving blades and fixed parts of the machine.
2
- before leaving the mower unattended
for any period;
- before refuelling
- before clearing a blockage;
- before checking, cleaning or working on
the appliance;
- if you hit an object. Do not use your
lawnmower until you are sure that the
entire lawnmower is in a safe operating
condition.;
- if the lawnmower starts to vibrate
abnormally. Check immediately.
Excessive vibration can cause injury.
GB

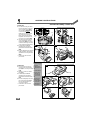
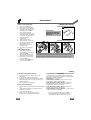
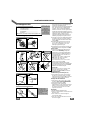
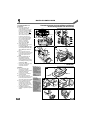
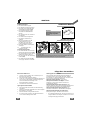
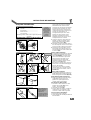
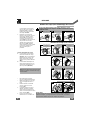
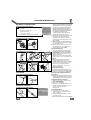
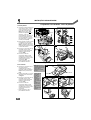
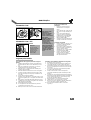
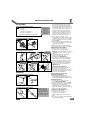
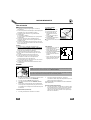
ASSEMBLY INSTRUCTIONS
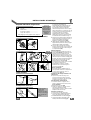
Your product is uniquely identified
by a silver and black product rating
label. To ensure you have full
product information when obtaining
spares or advice from one of our
approved service centres or if you
need to contact our customer
service department you should
make a note in the space provided
of the information shown in Fig A.
1. Select one of the holes in the
mounting plate and note its position,
as all four wheels will need to be
adjusted to the same position (B1).
2. Locate the fixing bolt through hole
in hub cap, wheel and selected hole
in mounting plate.
3. Turn the wheel hub in a clockwise
direction until the wheel assembly is
securely located to the deck (B2).
Lower Handles
1. If your product has Cutting Height
with levers (see Adjustment),
ensure the lever is at the Highest Cut
Height before following steps 2 & 3.
2. Insert each side of the lower handle
into deck as shown in Fig C1.
3. Push each side of the handle firmly
down until it is located securely into
the deck (C2).
4. Insert screw through the washer and
into holes using a pozidrive
screwdriver and tighten fully into deck
as shown in Fig C2.
Upper Handles
1. The upper handle should be fixed to
the lower handle using whichever
type of kit is provided (D, E and F).
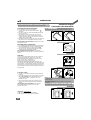
Handle Adjusters fitted to product
(G)
1. Adjust handle assembly to the most
comfortable operating position and
tighten handle adjuster knob (G) on
both sides of the product.
To insert the Brake Cable
1. Insert cable into hole in OPC lever
(H1) See USE.
2. Lock into position. (H2)
3. Fit the cables to the handles with the
cable ties provided, making sure the
cables are not trapped between the
handles.
Recoil Starter
1. Disconnect the spark plug lead.
2. Pull the OPC lever to release the
brake on the engine.
3. Extend the pull cord fully (J1).
4. Locate the cord in the pull cord
guide positioned on handle (J2).
3
Product Number..................
Model..................................
Serial..................................
Date of Purchase...............
Place of Purchase..............
•Please Keep as Proof of Purchase•
Product Rating Label
Wheel Assembly (where necessary)
B1
A
B2
Handles
C1 C2
F
D
E
KIT 3
KIT 1
KIT 2
Please also make
a note of the date
and place of
purchase before
you return your
guarantee card.
GB
G
Recoil Starter
J1
You must release
the brake by pulling
the OPC lever to the
handle before
pulling out the cord.
J2
lower handle
upper
handle
Brake Cable
H1 H2

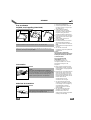
ASSEMBLY INSTRUCTIONS
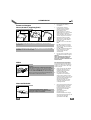
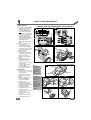
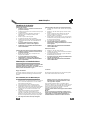
Plastic Box
1. Position the two grassbox
halves together and press
each location point (K1)
into position without
fully
connecting the clips.
When the location points
are matched correctly
firmly press the grassbox
together until all clips are
securely connected.(K2)
2. To attach the grassbox to
your lawnmower, lift the
safety flap (K3) and make
sure the discharge chute is
clean and free from debris.
3. Locate fully assembled
grassbox onto 2 location
points at the rear of the deck
(K3).
4. Locate safety flap onto the top
of the grassbox. Ensure the
grassbox is securely located.
(K4)
• Removal is the reverse
procedure.
Fabric Bag
1. Insert ‘U’ frame into top,
ensuring the small metal
pip (L2) is securely located
(L3).
2. Attach ‘U’ frame to fabric
bag (L4).
3. Locate fully assembled
grassbox onto 2 location
points at the rear of the deck
(L5).
4. Locate safety flap onto the
top of the grassbox.(L5)
Ensure the grassbox is
securely located.
• Removal is the reverse
procedure
4
Grassbox Assembly - Plastic Box
Please Note
Ensure no gap
remains
between the
safety flap and
the
grassbox/bag
Where grass
collection is
not required
you can use
the
lawnmower
without the
grassbox/bag.
Ensure the
safety flap is
fully closed
GB
L1
L2
L4
L5
Grassbox Assembly - Fabric Bag
fabric bag
‘U’ frame
top
K1
K3
K2
K4
location
point
clips
L3

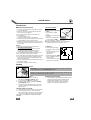
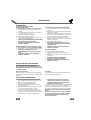
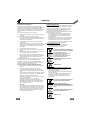
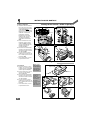
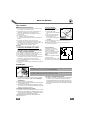
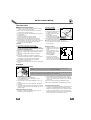
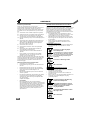
ENGINE NOTES
5
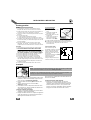
Oil and Petrol
Starting
Oil
1. Check oil level periodically and after every five
hours of operation.
2. Add oil as necessary to keep the level to the
FULL mark on the dipstick.
3. Use a good quality SAE 30 four stroke oil.
4. To fill with oil:-
a) Remove oil filler cap.
b) Fill to the FULL mark on the dipstick.
5. Change the oil after the first five hours operation
and thereafter every 25 working hours.
6. Always change the oil while the engine is warm -
but not hot - never attempt any maintenance on
a hot engine.
Petrol
1. Use fresh regular grade lead free petrol.
2. NEVER use leaded petrol.
Using leaded petrol will make the exhause
smoke and cause irreparable damage to
engines fitted with a catalytic converter.
3. Do not fill the fuel tank when the engine is hot.
4. Do not fill the fuel tank while smoking.
5. Do not fill the fuel tank while the engine is running.
6. To avoid introducing dirt into the fuel system,
wipe all grass and dirt from the petrol filler cap
before unscrewing it.
7. It is recommended that you fill the tank through a
funnel with a filter.
8. Wipe away spillages before starting.
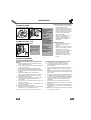
Tecumseh Vantage
To fill with oil
● Oil Capacity: 1 pint (0.6
litre)
a. Unscrew the oil filler
plug.
b. Remember to pour the oil
slowly.
c. Fill to the overflow point
in the oil fill hole (M1).
d. Install oil fill plug. Tighten securely.
● Change oil after the first 2 hours of operation
and then after every 25 working hours.
To drain oil.
• Disconnect spark plug
and allow engine exhaust
to cool.
• Turn machine on its side
with the exhaust
uppermost.
• Remove drain plug (M2).
• Place suitable container
under product.
• Turn machine back on its wheels and the oil will
drain into the container.
N
Briggs and Stratton Engines
1. Advance throttle to FAST or RUN as
illustrated in Throttle Control section.
2. Push primer bulb (N) firmly five times
3. Following instructions in the Use - starting
and stopping section.
4. If engine fails to start after three pulls of the
pull cord, push primer bulb three times and
repeat step 3.
Starting engine (Tecumseh)
1. Move throttle control to FAST or RUN position
2. Push primer three times. Wait about two
seconds between each push. In cold weather
(55
o
F/13
o
C or below) push primer five times.
DO NOT USE PRIMER TO RESTART WARM
ENGINE.
Starting engine thereafter
1. Move throttle control (if fitted) to RUN or FAST
position and push primer bulb firmly three
times before starting engine. (if engine
stopped because it ran out of fuel, refuel
engine - push primer bulb three times.
Priming is usually unnecessary when restarting a warm engine. However, cool
weather may require priming to be repeated.
Please Note:- When starting the engine for the first time, fill with oil and petrol
as described above in the Oil and Petrol section.
GB
M1
Tecumseh
Vantage
M2

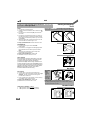
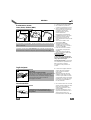
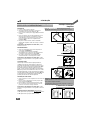
USE
PUSH
1. Connect the spark plug lead.
2. If fitted move the throttle control to the FAST
position.
3. Pull the OPC to the handle (O1), this releases
the brake.
4. Pull the recoil starter fully towards you until you
feel the full resistance, return the handle slowly
then pull the handle firmly towards you to its full
extent (O2).
5. After the engine has started, allow to run for 30
seconds before commencing to use.
To stop your lawnmower - release the OPC lever
POWERDRIVE
1. Follow the above procedure for Push
lawnmowers
2. Forward drive is engaged and disengaged with
the Powerdrive lever at the top of the handle
(O3).
3. Releasing the Powerdrive Lever stops the
forward drive automatically.
To stop your lawnmower - release the
Powerdrive lever, then the OPC lever.
DUAL SPEED
Before starting the engine for the first time, ensure free
movement of the rear wheels by moving the machine
backwards and forwards without operating the
powerdrive lever (P1). Whilst moving backwards and
forwards operate the gear change lever (P2) from low to
high speed, if the rear wheels lock, the cable will require
adjusting. Adjusting is achieved by turning the adjuster
(P3) left or right until the machine can be pulled
backwards without the wheels locking.
KEY START
1. Follow steps 1-3 for the Push lawnmower.
2. Turn the key and hold until the engine starts (Q1
and Q2). The key will return to the original
position when released.
3. If the engine fails to start when you turn the key
your battery may need charging.
To stop your lawnmower - release the
powerdrive lever, then the OPC lever.
THROTTLE CONTROL (if fitted)
1. R1 represents the FAST (run) position.
2. R2 represents the SLOW (idle) position.
6
Push
O1 O2
R1
O3
Q1 Q2
Please Note : Your upper handles may look different
from those shown but the procedure remains the same
Key Start
Only -
During
mowing,
your
engine will
recharge
the battery
The Powerdrive may be engaged by following steps 2-
3 in the Powerdrive section.
Powerdrive
Key Start
Throttle Control
R2
OPC Lever
Powerdrive
Lever
To start your petrol wheeled rotary lawnmower - after filling with
oil and petrol - See Engine Notes
Please note:- Your lawnmower can be started
manually by following steps 1-5 in the PUSH section
Starting and Stopping
GB
Dual Speed
1
2
1
2
3
P

USE
1. Connect the spark plug lead.
2. If fitted move the throttle
control to the FAST position.
3. Pull the recoil starter fully
towards you until you feel the
full resistance, return the
handle slowly then pull the
handle firmly towards you to
its full extent.
4. After the engine has started,
allow to run for 30 seconds
before commencing to use.
5. Pull the BBC arm to the
handle (S2).
6. While holding the BBC arm,
push forward BBC control
lever until a click is heard
(S3).
7. Release the BBC control
lever which will return to its
original position.
8. Releasing the BBC arm will
stop the blade from rotating.
Please note:
Leaving the engine running
without the blade rotating for
an extended length of time
could lead to the engine
overheating.
To stop the lawnmower -
release the powerdrive lever then
the BBC arm. Move throttle
control to stop position.
1. Start mowing from the
outside edge of the lawn,
mowing in strips in alternate
directions (T).
2. Mow twice a week in the
growing season, your lawn
will suffer if more that one
third of its length is cut at one
time and this may also result
in poor collection.
1. If the drive does not engage
when the powerdrive lever is
pulled towards the handle
screw adjuster anti-
clockwise (U).
2. Screw adjuster in opposite
direction if the powerdrive
does not disengage with the
powerdrive lever free (U).
7
Blade, Brake, Clutch (BBC)
How to Mow
S1
S3
Forward drive, If fitted, is engaged and disengaged with the Power
Drive lever at the top of the handle (S3).
If you have a BBC model you will be able to keep the engine running
while the brake is on.
T
Please Note:-
Do not overload your Lawnmower
When mowing in long thick grass a first cut
with the cutting height adjusted to its highest
setting, see Cutting Height, will help reduce
motor overload and will help prevent damage
to your lawnmower.
Ensure the Powerdrive cable is not twisted
and runs freely down the handles.
PowerDrive Cable
U
Starting and Stopping
S2
Power Drive
Lever if fitted
GB

ADJUSTMENT
If your lawnmower has wheel
hubs as illustrated in V1, the
height of cut is adjusted by
following steps V1- V3.
1. Remove the wheel by turning
the wheel hub in an
anticlockwise direction (V1)
and relocate in new hole (V2)
turning the wheel hub in a
clockwise direction to tighten
(V3). Repeat for other
wheels adjusting to the same
position.
Height of Cut Levers
1. If you have Height of Cut
levers (Figs. W), the height
of cut is altered by pulling the
adjustment lever away from
the location slots and moving
to the selected position (W1).
2. If your petrol wheeled rotary
is fitted with more than one
lever then these must be
adjusted to the same position
(W2 - W7).
• Disconnect spark plug and
allow engine exhaust to cool.
• Turn machine on its side with
the exhaust uppermost.
1. Remove grass from under
the deck with a brush (X1).
2. Using a soft brush - remove
grass clippings from all air
intakes, the discharge chute
and the grass box (X2).
3. Wipe over the surface of your
lawnmower with a dry cloth.
8
Cutting Height (with removal of wheels)
W2
W6
1
2
3
W1 W3
Levers fitted
Lowest Cut Height
Highest Cut Height
Levers fitted
Levers fitted
Levers Fitted
Central
Please Note : Your petrol wheeled
rotary may be fitted with a mixture of
cutting heights.
Cleaning
X2X1
IMPORTANT
Never use water for cleaning your lawnmower. Do not clean with
chemical, including petrol, or solvents - some can destroy critical
plastic parts.
If you have levers fitted to the wheel do not attempt to unscrew the
wheel hub. Use the levers to alter the height of cut.
Cutting Height (with Levers)
Wheel removal
Wheel removal Wheel removal
V3V1 V2
W7
Levers Fitted
Semi Central
GB
W4 W5
Lowest Cut Height
Highest Cut Height
Levers fitted
Levers fitted

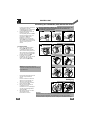
MAINTENANCE
Removing the Blade
• Disconnect spark plug and
allow engine exhaust to cool.
• Turn machine on its side with
the exhaust uppermost.
1. Use spanner to loosen blade
bolt by turning anti-clockwise
(Y1).
2. Remove the blade bolt, blade
and washer.(Y2)
3. Inspect for damage and
clean as necessary.
Fitting the Blade
1. Fit the blade to the machine
with the sharp edges pointing
away from the machine.
2. Re-fit the blade bolt through
the washer ensuring that the
side stamped with ‘0’ on the
washer is facing away from
the blade (Y2).
3. Hold firmly and tighten blade
bolt firmly with a spanner.
Do not over tighten.
9
Battery Safety
Cutting System
Cutting System - BBC
Y1
'0'
Y2
Y3
Always handle the
blade with care -
sharp edges could
cause injury.
USE GLOVES
Renew your metal
blade after 50 hours
mowing or 2 years
whichever is the
sooner - regardless
of condition.
If the blade is
cracked or
damaged replace it
with a new one.
Safety Procedures when Charging the Battery
1. Check the charger cable regularly for damage
or deterioration due to age.
2. Do not use the lawnmower if the charging cable
is not in good condition.
3. Do not attempt to charge other products with
the charger from this unit.
4. Do not attempt to use this battery with any
other charger.
5. Charging should only be carried out in a safe
location where neither battery nor cord cable
can be trodden on or tripped over.
6. Location should be well-ventilated.
7. During charging, the battery charger becomes
warm. This is normal and means the charger is
operating properly.
8. Do not cover the battery charger with anything
during charging.
9. Ensure that neither the charger nor the battery
are exposed to moisture.
10. Avoid extreme temperatures.
11. The charger will not operate below freezing
point nor above 40
o
C.
12. Do not short circuit the battery terminals.
General Guidance on Rechargeable Battery
1. Charging time is 24 hours.
2. Under normal usage the battery will be charged
during the running of the engine.
3. To keep in prime condition the battery should
be charged at least once every six months.
4. Exceeding the charging period may shorten the
battery life.
5. Protect electric cable. Never carry the battery
charger by the electric cable only.
6. If after an extended usage period the battery
quickly runs down after a full 24 hour charging
period, a replacement battery is probably
needed.
7. Do not attempt to open the main body casing.
8. Clean only with a dry soft cloth.
9. Never use a damp cloth or flammable liquids
such as petrol, white spirits, thinners etc.
10. Dispose of old batteries safely.
Please note
If you have a
machine fitted with
BBC then you must
remove both blade
bolts (Y3)
GB

MAINTENANCE
How to Charge the Battery
1. Stop your lawnmower.
2. Disconnect the spark plug.
3. Remove the cap from the
charging point at the bottom
of the wiring loom (Z1).
4. Plug charger lead into
connection on battery loom
5. Plug the battery charger into
a domestic electric socket.
6. Charging will then
commence.
7. Charge for 24 hours.
8. After charging, disconnect
the charger from the socket
and charging point.
9. Replace the cap on the
charging point.
10. The unit is now ready for
use.
Battery Replacement
1. The battery is located
underneath a cover behind
the engine (Z2).
2. Stop the lawnmower and
disconnect the spark plug.
3. Remove the screws from
the cover (Z3).
4. Remove cover (Z4) to gain
access to the battery.
10
Charging the Battery
Caring
Z1
IMPORTANT:-
Replacement batteries
will need to be charged
before use.
Wiring Loom
charging
point
cap
Battery Access
Z2 Z4Z3
Ensure that neither the charger nor the battery are exposed to moisture
The battery pack can be replaced by unclipping the battery from its
housing and disconnecting the battery pack from the battery leads.
battery
location
At the End of the Mowing Season
1. Replace blade, bolts, nuts or screws, if
necessary.
2. Clean your lawnmower thoroughly.
3. Ask your local Service Centre to clean the air
filter thoroughly and carry out any service or
repairs required.
4. Drain engine of oil and petrol.
Storing your Lawnmower
1. Do not store your lawnmower immediately after
use.
2. Wait until the engine has cooled to avoid a
potential fire hazard.
3. Clean your lawnmower
4. Store in a cool, dry place where your
lawnmower is protected from damage.
Engine Maintenance Schedule
Follow the hourly or calendar intervals, whichever
occur first. More frequent service is required when
operating in adverse conditions
First 5 hours - Change oil.
Every 5 hours or daily - Check oil level. Clean
finger guard. Clean around muffler.
Every 25 hours or every season - Change oil if
operating under heavy load or high ambient
temperature. Service air cleaner.
Every 50 hours or every season - Change oil.
Inspect spark arrester, if equipped.
Every 100 hours or every season - Clean cooling
system*. Replace spark plug.
* Clean more often under dusty conditions, or
when airborne debris is present or after
prolonged operation cutting tall, dry grass.
GB

MAINTENANCE
Engine Will Not Start
1. Ensure OPC Lever is in the start position.
2. Check that the control lever is in the 'Run'
position
3. Check that there is sufficient fuel in the tank
and the cap air vent is clear.
4. Remove and dry the spark plug.
5. Petrol may be stale. Replace.
6. Check that the blade bolt is tight. A loose bolt
could cause difficult starting.
7. If the engine will still not start, immediately
disconnect the spark plug lead.
8. CONSULT YOUR LOCAL APPROVED
SERVICE CENTRE.
Engine Will Not Turn Over (Electrostart only)
1. Ensure OPC Lever is in the start position.
2. Battery flat - start your lawnmower manually.
3. If the engine will still not turn over,
immediately disconnect the spark plug
lead.
4. CONSULT YOUR LOCAL APPROVED
SERVICE CENTRE.
Lack of Engine Power and/or Overheating
1. Check that the control lever is in the 'normal'
position.
2. Disconnect the spark plug lead and allow the
engine to cool down.
3. Clean grass clippings and debris from around
the engine and air inlets and the underside of
the deck including the chute and the fan.
4. Clean the engine air filter (Ask your local
Approved Service Centre to clean the engine
air filter thoroughly).
5. Petrol may be stale replace.
6. If the engine still lacks power and/or is
overheating, immediately disconnect the
spark plug lead.
7. CONSULT YOUR LOCAL APPROVED
SERVICE CENTRE.
Excessive Vibration
1. Disconnect the spark plug lead.
2. Check that the blade is correctly fitted see
page 9.
3. If the blade is damaged or worn replace it with
a new one.
4. If vibration persists, immediately
disconnect the spark plug lead.
5. CONSULT YOUR LOCAL APPROVED
SERVICE CENTRE.
11
Fault Finding
Engine Servicing & Guarantee
The engine fitted to your lawnmower is
guaranteed by the Engine Manufacturer. To
obtain further information contact your dealer
as detailed below
Briggs and Stratton
You may locate your nearest Authorised Briggs
and Stratton Service Dealer in the "Yellow Pages
TM
"
directory.
Tecumseh
A list of authorised Tecumseh Service Dealers is
given on the back of this book.
GB
Service Recommendations
1. We strongly recommend that your product is
serviced at least every twelve months, more
often in a professional application.
2. Always use genuine Spare Parts.
3. Prepacked spares are available from most
authorised stockists.
4. Further spares can be obtained by contacting
your local Approved Service Centre.
5. If you have a problem with your machine
contact your local Approved Service Centre
ensuring you have full details of your product
as described on the product rating label.
6. Should it be necessary for work to be
carried out by your Service Centre, it is
important to take your complete petrol
wheeled rotary lawnmower.
To obtain service on your product simply telephone
or visit your local Service Centre. Should you
require service under the terms of our guarantee
the Service Centre will require proof of purchase.
All of the centres stock genuine Spare Parts.
NOTE:
Our Service Repairers act on their own behalf
and are not empowered to commit or legally
bind Electrolux Outdoor Products in any
manner whatsoever.

MAINTENANCE
Guarantee and Guarantee Policy
If any part is found to be defective due to faulty
manufacture within one year of original purchase,
Electrolux Outdoor Products, through its
Authorised Service Repairers will effect the repair
or replacement to the customer free of charge
providing:
(a) The fault is reported directly to the Authorised
Repairer.
(b) Proof of purchase is provided.
(c) The fault is not caused by misuse, neglect or
faulty adjustment by the user.
(d) The failure has not occurred through fair wear
and tear.
(e) The machine has not been serviced or
repaired, taken apart or tampered with by any
person not authorised by Electrolux Outdoor
Products.
(f) The machine has not been used for hire.
(g) The machine is owned by the original
purchaser.
(h) The machine has not been used outside of the
country for which it was specified.
(i) The machine has not been used commercially.
* This guarantee is additional to, and in no way
diminishes the customers statutory rights.
Failures due to the following are not covered,
therefore it is important that you read the
instructions contained in this Operator's Manual
and understand how to operate and maintain your
machine:
Failures not covered by guarantee
* Replacing worn or damaged blades
* Failures as a result of not reporting an initial
fault.
* Failures as a result of sudden impact.
* Failures as a result of not using the product in
accordance with the instructions and
recommendations contained in this Operator's
Manual.
* Machines used for hire are not covered by this
guarantee.
* The following items listed are considered as
wearing parts and their life is dependent on
regular maintenance and are, therefore not
normally subject to a valid warranty claim:
Blades, drive belts.
* Caution!
Electrolux Outdoor Products does not accept
liability under the warranty for defects caused
in whole or part, directly or indirectly by the
fitting of replacement parts or additional parts
that are not either manufactured or approved
by Electrolux Outdoor Products, or by the
machine having been modified in any way.
ENVIRONMENTAL INFORMATION
Electrolux Outdoor Products are manufactured
under an Environmental Management System
(ISO 14001) using, where practical, components
manufactured in the most environmentally
responsible manner, according to company
procedures, and with the potential for recycling at
the end of the products’ life.
• Packaging is recyclable and plastic
components have been labelled (where
practical) for categorised recycling.
• Awareness of the environment must be
considered when disposing of ‘end-of-life’
product.
• If necessary, contact your local authority for
disposal information.
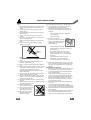
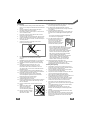
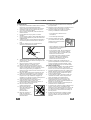
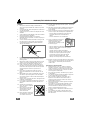
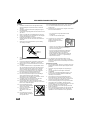
BATTERY DISPOSAL
• The battery should be taken to an Approved
Service Centre or your local Recycling Station.
DISPOSAL OF FUELS AND LUBRICATING OILS
• Wear protective clothing when handling any
fuels and lubricants.
• Avoid contact with skin.
• Remove petrol and engine oil before
transporting the product.
• Contact your local authority for information of
your nearest Recycling/Disposal Station.
12GB
Do NOT dispose of used battery with
household waste
Lead/Acid batteries can be harmful and
should be disposed of through the
recognised recycling facility in
accordance with European Regulation
Do NOT dispose of battery to water.
Do NOT incinerate
Do NOT dispose of used fuels/oils with
household waste
Waste fuels/oils are harmful, but can
be recycled and should be disposed of
through the recognised facilities.
Do NOT dispose of used fuels/oils to
water.
Do NOT incinerate

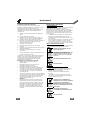
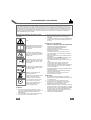
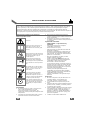
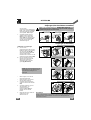
SICHERHEITSMAßNAHMEN
Erklärung der verschiedenen, am Sichelmäher
befindlichen Symbole
Achtung
Die Betriebsanleitung muß sorgfältig
durchgelesen werden, um sicherstellen
zu können, daß alle Steuerelemente
und deren Funktion verstanden
werden.
Der Rasenmäher muß während des
Mähens immer auf dem Boden bleiben.
Durch Kippen oder Anheben des
Rasenmähers können Steine
fortgeschleudert werden.
Es dürfen sich keine Personen in der
Nähe befinden. Es darf nicht gemäht
werden, wenn sich Personen,
insbesondere Kinder, oder Haustiere
im Mähbereich befinden.
Nehmen Sie sich davor in acht, daß der
Rasenmäher nicht in Ihre Zehen oder
Hände schneiden kann. Hände oder
Füße dürfen sich nicht in der Nähe des
rotierenden Messers befinden.
Die Zündkerzenzuleitung muß getrennt
werden, bevor Wartungsarbeiten,
Reinigungen oder Einstellungen
ausgeführt werden oder der
Rasenmäher unbeaufsichtigt bleibt.
Das Messer wird sich noch
weiterdrehen, nachdem die Maschine
ausgeschaltet wurde. Warten, bis alle
Maschinenteile zum vollständigen
Stillstand gekommen sind, bevor diese
berührt werden.
Gemäß den Vorschriften zur Lärmverhütung dürfen
Rasenmäher werktags nicht von 13.00 Uhr bis 15.00
Uhr und von 19.00 Uhr bis 7.00 Uhr und auch nicht an
Sonn- und Feiertagen verwendet werden. Bitte
beachten Sie außerdem mögliche zusätzliche örtliche
Vorschriften.
Allgemeines
1. Kinder oder Personen, die nicht mit der
ordnungsgemäßen Benutzung dieses Rasenmähers
vertraut sind, dürfen auf keinen Fall erlaubt sein, den
Rasenmäher zu benutzen. Örtliche Vorschriften
enthalten ggf. Altersbeschränkungen.
2. Den Rasenmäher in der in dieser Betriebsanleitung
beschriebenen Art und Weise und nur für die
vorgesehenen Funktionen verwenden.
3. Den Rasenmäher nie verwenden, wenn Sie müde
oder krank sind oder unter dem Einfluß von Alkohol,
Drogen oder Arzneimitteln stehen.
4. Der Bediener oder Benutzer ist für Unfälle anderer
Personen, und für die Gefahr, der sie oder deren
Eigentum ausgesetzt werden, verantwortlich.
Angaben zur Sicherheit bei der Verwendung von
Kraftstoff
ACHTUNG - Benzin ist leicht entzündbarPreparation
Vorbereitung
1. Nicht barfuß oder mit offenen Sandalen mähen.
Immer geeignete Kleidung, Handschuhe und feste
Schuhe tragen.
2. Es wird empfohlen, einen Ohrenschutz zu tragen.
3. Sicherstellen, daß keine Stecken, Steine, Knochen,
Draht oder Schutt auf dem Rasen liegen; sie könnten
durch das Messer fortgeschleudert werden.
4. Vor der Benutzung des Rasenmähers muß immer
eine Sichtprüfung ausgeführt werden, um
sicherstellen zu können, daß die Messer,
Messerbefestigungsschrauben und das Schneidwerk
nicht abgenutzt oder beschädigt sind. Abgenutzte
oder beschädigte Messer müssen zusammen mit
ihren Befestigungen als ganze Sätze ausgewechselt
werden, um das Gleichgewicht beizubehalten.
5. Fehlerhafte Schalldämpfer auswechseln.
13
Bei nicht ordnungsgemäßer Verwendung kann dieser Rasenmäher gefährlich sein! Dieser Rasenmäher kann den
Bediener und andere schwer verletzen; die Warnhinweise und Sicherheitsvorschriften müssen unbedingt beachtet
werden, damit eine angemessene Sicherheit und Leistung beim Gebrauch dieses Rasenmähers gewährleistet werden
kann. Der Bediener ist dafür verantwortlich, die in dieser Betriebsanleitung und am Rasenmäher gegebenen Warn- und
Sicherheitshinweise zu beachten.
Den Rasenmäher niemals verwenden, wenn die vom Hersteller gelieferte Grasauffangvorrichtung oder die
Schutzvorrichtungen nicht angebracht sind.
- Beim Umgang mit Kraftstoffen und Schmiermitteln
muß Schutzkleidung getragen werden.
- Hautkontakt vermeiden.
- Benzin und Motorenöl vor dem Transportieren des
Produkts ablassen.
- Kraftstoff an einem kühlen Ort in einem Behälter,
der speziell für diesen Zweck vorgesehen ist,
aufbewahren. Im allgemeinen sind Plastikbehälter
nicht geeignet.
- Nur draußen auftanken und während des
Nachfüllens nicht rauchen.
- Kraftstoff einfüllen, BEVOR der Motor gestartet
wird. Niemals den Einfüllverschluß entfernen oder
Kraftstoff einfüllen, während der Motor läuft oder
noch heiß ist.
- Falls Benzin verschüttet wird, darf der Motor nicht
gestartet werden. Die Maschine muß vom Bereich,
in dem das Benzin verschüttet wurde, entfernt
werden; es muß darauf geachtet werden, daß keine
Entflammungsmöglichkeit geschaffen wird, bis sich
die Benzindämpfe vollständig aufgelöst haben.
- Alle Kraftstofftank- und Behälterdeckel wieder an
ihrer korrekten Position anbringen.
- Den Rasenmäher vor dem Starten vom Bereich, an
dem er aufgetankt wurde, entfernen.
- Kraftstoff muß an einem kühlen Ort, weg von
offenen Flammen aufbewahrt werden.
D
STOP

SICHERHEITSMAßNAHMEN
Verwendung
1. Den Motor nicht in einem geschlossen Bereich laufen
lassen, wo sich Abgase (Kohlenmonoxid) ansammeln
können.
2. Den Rasenmäher nur bei Tageslicht oder guter
künstlicher Beleuchtung verwenden.
3. Rasenmäher sollten, wenn möglich, nicht in nassem
Gras verwendet werden.
4. In nassem Gras ist Vorsicht geboten, da Sie leicht
Ihren Halt verlieren können.
5. An Hängen muß sichergestellt werden, daß Sie einen
sicheren Halt haben und rutschfeste Schuhe tragen.
6. Hänge nie von oben nach unten, sondern immer quer
zum Hang mähen.
7. Seien Sie besonders vorsichtig, wenn Sie die
Richtung am Hang ändern.
8. Das Mähen an Bänken und Hängen kann gefährlich
sein. Mähen Sie nicht an Bänken oder steilen
Hängen.
9. Beim Mähen nicht rückwärtsgehen, da Sie stolpern
könnten. Beim Mähen nur gehen, niemals laufen.
10. Beim Mähen den Rasenmäher nie in Ihre Richtung
ziehen.
11. Die Bedienerpräsenzsteuerung (OPC) zum
Abschalten des Motors loslassen, bevor der
Rasenmäher über andere Oberflächen als Gras
geschoben oder zu und vom zu mähenden Bereich
transportiert wird.
12. Den Rasenmäher niemals mit beschädigten oder
nicht angebrachten Schutzvorrichtungen verwenden.
13. Den Motor nicht überdrehen oder die
Reglereinstellungen ändern. Eine übermäßige
Geschwindigkeit ist gefährlich und reduziert die
Benutzungsdauer des Rasenmähers.
14. Vor dem Starten alle Messer- und
Antriebskupplungen ausrücken.
15. Den Rasenmäher immer vorsichtig starten und dabei
sicherstellen, daß sich Ihre Füße weit weg von den
Messern befinden.
16. Den Rasenmäher beim Starten des Motors nicht
kippen.
17. Während der Motor läuft,
dürfen sich Ihre Hände
niemals in der Nähe der
Grasauslaßöffnung befinden.
18. Einen Rasenmäher niemals
anheben oder tragen, wenn
der Motor noch läuft.
19. Die Zündkerzenzuleitung kann heiß sein - deshalb ist
beim Umgang damit Vorsicht geboten.
20. Es dürfen keine Wartungsarbeiten an Ihrem
Rasenmäher ausgeführt werden, solange der Motor
noch heiß ist.
21. Zum Abschalten des Motors die
Bedienerpräsenzsteuerung loslassen und warten, bis
das Messer zum vollständigen Stillstand gekommen
ist:
22. Zum Abschalten des Motors die
Bedienerpräsenzsteuerung
loslassen und warten, bis das
Messer zum vollständigen
Stillstand gekommen ist und die
Zündkerzenzuleitung trennen:
23. Während der Motor abgestellt ist, die
Gashebeleinstellung reduzieren, und falls der Motor
mit einem Absperrventil versehen ist, die
Kraftstoffzufuhr nach dem Mähen abschalten.
Wartung und Lagerung
1. Alle Muttern, Bolzen und Schrauben müssen fest
angezogen sein, damit ein sicherer Betriebszustand
des Rasenmähers gewährleistet ist.
2. Die Grasauffangvorrichtung häufig auf Verschleiß
und schlechten Zustand überprüfen.
3. Abgenutzte oder beschädigte Teile müssen für einen
sicheren Zustand ausgewechselt werden.
4. Nur für dieses Produkt spezifizierte Messer,
Messerbefestigungsschrauben, Distanzscheiben und
Gebläserad beim Auswechseln verwenden.
5. Den Rasenmäher niemals mit Kraftstoff im Tank in
einem Gebäude abstellen, wo Dämpfe eine offene
Flamme oder einen Funken erreichen können.
6. Der Motor muß zuerst abgekühlt sein, bevor der
Rasenmäher in einen geschlossenen Bereich gestellt
wird.
7. Um die Brandgefahr zu reduzieren, müssen Motor,
Schalldämpfer, Gehäuse und
Kraftstoffaufbewahrungsbereich frei von Gras,
Blättern oder übermäßig viel Schmierfett gehalten
werden.
8. Falls der Kraftstofftank entleert werden muß, sollte
dies draußen geschehen.
9. Bei der Einstellung des Rasenmähers darauf achten,
daß Sie Ihre Finger nicht zwischen den beweglichen
Messern und feststehenden Teilen der Maschine
einklemmen.
14
- bevor der Rasenmäher unbeaufsichtigt bleibt;
- bevor Benzin nachgefüllt wird;
- bevor eine Blockierung entfernt wird;
- bevor der Rasenmäher überprüft oder gereinigt
wird oder Arbeiten daran ausgeführt werden;
- wenn Sie einen Gegenstand treffen. Der
Rasenmäher darf erst dann wieder verwendet
werden, wenn absolut sichergestellt wurde,
daß sich der gesamte Rasenmäher in einem
sicheren Betriebszustand befindet;
- wenn der Rasenmäher anfängt, ungewöhnlich
stark zu vibrieren. In diesem Falle muß er
sofort überprüft werden. Ein übermäßiges
Vibrieren kann Verletzungen verursachen.
D

MONTAGEANWEISUNGEN
Ihr Produkt ist durch ein silberfarbiges und
schwarzes Produkttypenschild
gekennzeichnet. Damit sichergestellt werden
kann, daß Sie über alle Produktangaben
verfügen, wenn Sie Ersatzteile bestellen
wollen, Rat von einer unserer zugelassenen
Kundendienstzentralen benötigen oder sich
mit Flymos eigener Kundendienstabteilung in
Verbindung setzen, sollten Sie im zur
Verfügung stehenden Platz Notizen der in
Abbildung A gezeigten Angaben machen.
1. Eines der Löcher in der Befestigungsplatte
auswählen und dessen Position notieren,
da alle vier Räder dieselbe Position haben
müssen (B1).
2. Die Befestigungsschraube durch das
Loch in der Radkappe, das Rad und
durch das ausgewählte Loch in der
Befestigungsplatte bringen.
3. Die Radnabe im Uhrzeigersinn drehen, bis
die Radeinheit sicher angebracht ist (B2).
Untere Griffe
1. Falls die Schnitthöhe Ihrer Maschine mit
Hebeln (siehe Einstellung) eingestellt
werden kann, muß sichergestellt werden,
daß die höchste Schnitthöheneinstellung
ausgewählt wurde, bevor Schritte 2 & 3
ausgeführt werden.
2. Jede Seite des unteren Griffs gemäß
Abb. C1 in die Haube schieben.
3. Jede Seite des Griffs fest
herunterdrücken, bis er sicher in der
Haube positioniert ist (C2).
4. Die Schraube mit Hilfe eines Kreuzkopf-
Schraubenziehers durch die Unterlegscheibe
und in die Löcher bringen und gemäß Abb.
C2 fest an der Haube anbringen.
Obere Griffe
1. Der obere Griff muß am unteren Griff
befestigt werden. Dazu wird der
gelieferte Kit (D, E und F) verwendet.
Bel angebrachten
Griffeinstellungvorrichtungen (G)
1. Die Griffeinheit in die Position bringen,
die für Sie am bequemsten ist und die
Griffeinstell-vorrichtungen (G) auf beiden
Seiten des Rasenmähers anziehen.
Einfügen des Bremskabels
1. Das Kabel in das Loch im OPC-Hebel
einfügen (H1). Siehe VERWENDUNG.
2. Das Kabel befestigen. (H2)
3. Die Kabel mit den gelieferten
Kabelbändern an den Griffen befestigen.
Dabei muß sichergestellt werden, daß
die Kabel nicht zwischen den Griffen
eingeklemmt werden.
Zugstarter
1. Die Zündkerzenzuleitung trennen.
2. Den OPC-Hebel ziehen, um die Bremse am
Motor zu lösen.
3. Das starterseil so weit wie möglich
herausziehen (J1).
4. Das seil an der das starterseil am Griff
festmachen (J2).
15
Produktnummer.........................
Modellnummer...........................
Seriennummer...........................
Kaufdatum.................................
Kaufort.......................................
•Bewahren Sie bitte einen Kaufnachweis auf•
Produkttypenschild
Radmontage (wo erforderlich)
A
Griffe
Machen Sie sich
bitte auch Notizen
über das
Kaufdatum und
den Kaufort, bevor
Sie Ihre
Garantiekarte
zurückschicken.
D
Die Bremse muß
durch Ziehen den
OPC-Hebels zum Griff
gelöst werden, bevor
die Schnur
herausgezogen wird.
Zugstarter
unterer Griff
oberer
Griff
B1 B2
F
D
E
KIT 3
KIT 1
KIT 2
G
J1
J2
Bremskabel
H1 H2
C1 C2

MONTAGEANWEISUNGEN
Grasauffangbehälter aus
Kunststoff
1. Die beiden Hälften des
Grasauffangbehälters
aufeinanderlegen und jeden
Positionierungspunkt (K1)
korrekt positionieren, ohne
die Klemmen vollständig
einrasten zu lassen. Wenn
die Positionierungspunkte
korrekt positioniert sind,
müssen die beiden Hälften
des Grasauffangbehälters
fest zusammengedrückt
werden, so daß alle
Klemmen vollständig
eingerastet sind. (K2)
2. Zur Befestigung der
Grasauffangvorrichtung am
Rasenmäher muß die
Schutzklappe (K3) angehoben
und sichergestellt werden, daß
die Auslaßklappe sauber und
frei ist.
3. Die zusammengesetzte
Grasauffangvorrichtung auf 2
Positionierpunkte hinten an
der Haube positionieren
(K3).
4. Die Schutzklappe über die
Grasauffangvorrichtung
positionieren. Dabei muß
sichergestellt werden, daß die
Grasauffangvorrichtung richtig
positioniert ist. (K4)
• Zum Ausbau muß das obige
Verfahren umgekehrt
ausgeführt werden.
Stoffsack
1. Den U-Rahmen oben
anbringen und dabei
sicherstellen, daß das kleine
Metallrohr (L2) sicher
positioniert ist. (L3)
2. ‘U’-Rahmen am Stoffsack
anbringen (L4).
3. Die zusammengesetzte
Grasauffangvorrichtung auf 2
Positionierpunkte hinten an
der Haube positionieren (L5).
4. Die Schutzklappe über die
Grasauffangvorrichtung
positionieren. Dabei muß
sichergestellt werden, daß
die Grasauffangvorrichtung
richtig positioniert ist.
• Zum Ausbau muß das obige
Verfahren umgekehrt ausgeführt
werden
Zusammensetzen der Grasauffangvorrichtung
-
Grasauffangbehälter aus Kunststoff
Hinweis: Es muß
sichergestellt
werden, daß kein
Zwischenraum
zwischen
Schutzklappe und
Grasauffangvorri
chtung
vorhanden ist.
Wenn kein
Grasauffang
erforderlich ist,
kann der
Rasenmäher ohne
Grasauffangvorrich
tung verwendet
werden. Dabei
muß sichergestellt
werden, daß die
Schutzklappe
vollständig
geschlossen ist.
D
Zusammensetzen der Grasauffangvorrichtung
- Stoffsack
K1
K3
K2
K4
Positionierungspunkt
Klemmen
L1
L4
L5
16
Stoffsack
‘U’-Rahmen
Deckel
L2
L3

17 D
ANGABEN ZUM MOTOR
Öl und Benzin
Starten Ihres Rasenmähers
Öl
1. Den Ölstand regelmäßig nach jeweils 5 Betriebsstunden
überprüfen.
2. Je nach Erfordernis Öl hinzufügen, um den Ölstand auf
der VOLL-Markierung am Pegelstab zu halten.
3. Ein hochwertiges SAE 30 Viertaktöl verwenden.
4. Wenn Öl nachgefüllt werden muß:
a) Den Öleinfüllverschluß entfernen.
b) Öl bis zur VOLL-Markierung am Pegelstab einfüllen.
5. Das Öl nach den ersten fünf Betriebsstunden und
danach nach jeweils 25 Betriebsstunden wechseln.
6. Das Öl immer dann wechseln, wenn der Motor noch
warm - jedoch nicht zu heiß - ist. Es dürfen niemals
Wartungsarbeiten bei heißem Motor ausgeführt werden.
Benzin
1. Frisches bleifreies Normalbenzin verwenden.
2. NIEMALS VERBLEITES BENZIN VERWENDEN
Bei Verwendung von verbleitem Benzin wird der
Auspuff rauchen; außerdem würde dies zu einer
irreparablen Beschädigung von Motoren, die mit
einem Katalysator versehen sind, führen.
3. Den Kraftstofftank nicht füllen, wenn der Motor heiß ist.
4. Während des Auffüllens des Tanks darf nicht geraucht
werden.
5. Den Kraftstofftank nicht füllen, während der Motor läuft.
6. Damit kein Schmutz in das Kraftstoffsystem gelangen
kann, muß Gras und Schmutz vom
Benzineinfüllverschluß entfernt werden, bevor dieser
aufgeschraubt wird.
7. Es wird empfohlen, den Tank über einen Trichter mit
Filter zu füllen.
8. Vor dem Starten des Motors muß verschüttetes Benzin
entfernt werden.
Tecumseh Vantage
Beim Einfüllen von Öl
● Fassungsvermögen für Öl:
0,6 Liter
a. Öleinfülldeckel abschrauben.
b. Öl immer langsam
einzufüllen.
c. Bis zum Überlaufpunkt im
Öleinfülloch füllen (M1).
d. Öleinfülldeckel wieder
einsetzen. Sorgfältig
festschrauben.
● Ölwechsel nach den ersten 2 Betriebsstunden, danach
alle 25 Arbeitsstunden.
Ablassen des Öls.
- Die Zündkerzenzuleitung
trennen und den Auspuff
abkühlen lassen.
- Den Rasenmäher auf die
Seite drehen; der Auspuff
muß sich dabei ganz oben
befinden.
- Die Ablaßschraube
entfernen. (M2)
- Einen geeigneten Behälter
unter den Rasenmäher
stellen.
- Den Rasenmäher wieder auf seine Räder stellen. Das
Öl wird dann in den Behälter laufen.
N
Briggs und Stratton Motoren
1. Den Gashebel auf SCHNELL oder LAUF gemäß den
gegebenen Anweisungen im entsprechenden
Abschnitt einstellen.
2. Den primer (N) fünfmal fest drücken.
3. Die Anweisungen im Abschnitt Verwendung -
Starten und Stoppen beachten.
4. Falls der Motor nach dreimaligem Ziehen des
starterseil noch immer nicht startete, muß der primer
dreimal gedrückt und Schritt 3 wiederholt werden.
Starten des Motors (Tecumseh)
1. Den Gashebel auf SCHNELL oder LAUF einstellen.
2. Den primer dreimal drücken. Zwischen jedem
Drücken ca. 2 Sekunden warten. Bei kaltem Wetter
(13°C oder darunter) muß der primer fünfmal
gedrückt werden.
DEN PRIMER NICHT ZUM ERNEUTEN STARTEN
EINES WARMEN MOTORS VERWENDEN.
Starten des Motors danach
1. Den Gashebel (falls installiert) auf LAUF oder
SCHNELL einstellen und den primer dreimal fest
drücken, bevor der Motor gestartet wird. (Falls der
Motor stoppte, da das Benzin ausging, muß der Tank
nachgefüllt und der primer dreimal gedrückt werden.)
Ein vorpumpen ist gewöhnlich nicht erforderlich, wenn ein warmer Motor erneut gestartet
wird. Bei kaltem Wetter muß das pumpen jedoch ggf. wiederholt werden.
Hinweis: Wenn der Motor zum ersten Mal gestarten wird, muß Öl und Benzin gemäß den
im Abschnitt Öl und Benzin gegebenen Anweisungen eingefüllt werden.
M1
Tecumseh
Vantage
M2
Strona się ładuje...
Strona się ładuje...
Strona się ładuje...
Strona się ładuje...
Strona się ładuje...
Strona się ładuje...
Strona się ładuje...
Strona się ładuje...
Strona się ładuje...
Strona się ładuje...
Strona się ładuje...
Strona się ładuje...
Strona się ładuje...
Strona się ładuje...
Strona się ładuje...
Strona się ładuje...
Strona się ładuje...
Strona się ładuje...
Strona się ładuje...
Strona się ładuje...
Strona się ładuje...
Strona się ładuje...
Strona się ładuje...
Strona się ładuje...
Strona się ładuje...
Strona się ładuje...
Strona się ładuje...
Strona się ładuje...
Strona się ładuje...
Strona się ładuje...
Strona się ładuje...
Strona się ładuje...
Strona się ładuje...
Strona się ładuje...
Strona się ładuje...
Strona się ładuje...
Strona się ładuje...
Strona się ładuje...
Strona się ładuje...
Strona się ładuje...
Strona się ładuje...
Strona się ładuje...
Strona się ładuje...
Strona się ładuje...
Strona się ładuje...
Strona się ładuje...
Strona się ładuje...
Strona się ładuje...
Strona się ładuje...
Strona się ładuje...
Strona się ładuje...
Strona się ładuje...
Strona się ładuje...
Strona się ładuje...
Strona się ładuje...
Strona się ładuje...
Strona się ładuje...
Strona się ładuje...
Strona się ładuje...
Strona się ładuje...
Strona się ładuje...
Strona się ładuje...
Strona się ładuje...
Strona się ładuje...
Strona się ładuje...
Strona się ładuje...
Strona się ładuje...
Strona się ładuje...
-
 1
1
-
 2
2
-
 3
3
-
 4
4
-
 5
5
-
 6
6
-
 7
7
-
 8
8
-
 9
9
-
 10
10
-
 11
11
-
 12
12
-
 13
13
-
 14
14
-
 15
15
-
 16
16
-
 17
17
-
 18
18
-
 19
19
-
 20
20
-
 21
21
-
 22
22
-
 23
23
-
 24
24
-
 25
25
-
 26
26
-
 27
27
-
 28
28
-
 29
29
-
 30
30
-
 31
31
-
 32
32
-
 33
33
-
 34
34
-
 35
35
-
 36
36
-
 37
37
-
 38
38
-
 39
39
-
 40
40
-
 41
41
-
 42
42
-
 43
43
-
 44
44
-
 45
45
-
 46
46
-
 47
47
-
 48
48
-
 49
49
-
 50
50
-
 51
51
-
 52
52
-
 53
53
-
 54
54
-
 55
55
-
 56
56
-
 57
57
-
 58
58
-
 59
59
-
 60
60
-
 61
61
-
 62
62
-
 63
63
-
 64
64
-
 65
65
-
 66
66
-
 67
67
-
 68
68
-
 69
69
-
 70
70
-
 71
71
-
 72
72
-
 73
73
-
 74
74
-
 75
75
-
 76
76
-
 77
77
-
 78
78
-
 79
79
-
 80
80
-
 81
81
-
 82
82
-
 83
83
-
 84
84
-
 85
85
-
 86
86
-
 87
87
-
 88
88


Jonsered 560 Instrukcja obsługi
- Kategoria
- Kosiarki
- Typ
- Instrukcja obsługi
- Niniejsza instrukcja jest również odpowiednia dla
w innych językach
- português: Jonsered 560 Manual do proprietário
Inne dokumenty
-
STERWINS DYM1563QN Instrukcja obsługi
-
Fieldmann FZR 4010-B Instrukcja obsługi
-
Fieldmann FZR 5124 BV Instructions For Use Manual
-
Fieldmann FZR 4617-BV Instrukcja obsługi
-
WOLF-Garten Power Edition 46 B Instrukcja obsługi
-
Ikra BRM 1446 SN TL, BRM 1448 SSM TL Instrukcja obsługi
-
-
Scheppach 5911247903 Instrukcja obsługi
-
Husqvarna 966842001 Instrukcja obsługi
-
LG AF115 Instrukcja obsługi