
English 04
Français 12
Deutsch 20
Italiano 27
Español 35
Polski 42
Norsk 49
Svenska 56

04
Contents
English
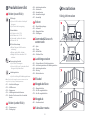
05 Restrictions
06 Product Overview
06 Installation
08 Connect to the App
08 Instructions
09 Routine Maintenance
10 Basic Parameters
11 Common Issues

05
Restrictions
WARNING
•For the purposes of recharging the battery, only use the detachable supply unit roborock CDZ12RR, CDZ20RR, AED06HRR or AED07HRR
provided with this product.
•Do not use this product on elevated surfaces without barriers such as the floor of a loft, an open-ended terrace, or on top of furniture.
•To prevent blocking the product and to avoid damage to valuables, remove lightweight items (such as plastic bags) and fragile objects (such
as vases) from the floor before cleaning.
•Do not place any object (including children and pets) on the product, whether it is in operation or not.
•Do not use the product on burning objects (such as cigarette butts).
•Do not use the product to clean hard or sharp objects (such as decoration wastes, glass and nails).
•Do not use the mopping module on carpets.
•The product must be switched off and the plug must be removed from the socket outlet when not in use, before cleaning or maintaining
the product.
•If placing the robot into storage, charge it fully and turn it off before placing it in a cool dry place. Recharge it at least every three months to
prevent the battery over discharging.

06
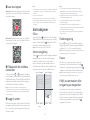
Installation
B
Important Information
Press any button to stop the robot during cleaning
or docking.
Dock
Spot Clean/Child Lock
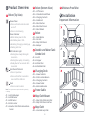
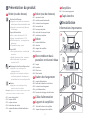
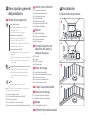
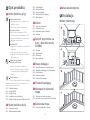
Product Overview
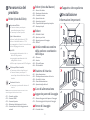
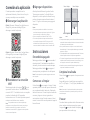
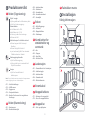
A
A1 Robot (Top View)
A2 Robot (Bottom View)
A3 Robot
•Press to return to dock
Note:
A1-1—Vertical Bumper
A1-2—LiDAR Sensor
A1-3—Wall Sensor
A1-4—Dock Locator
A1-5—Reactive Tech Obstacle Avoidance
Sensor
•Press to Spot clean
•Press and hold for 3 seconds to
turn on/off the child lock
A3-1—Reset Button
A3-2—Air Vent
A3-3—Mop Cloth Mount
A3-4—Bumper
•White: Battery level ≥ 20%
•Red: Battery level < 20%
•Breathing: Charging or starting up
•Flashing red: Error
Power Indicator
Power/Clean
•Press and hold to turn the robot
on or off
•Press to start cleaning
A2-1—Cliff Sensors
A2-2—Omnidirectional Wheel
A2-3—Charging Contacts
A2-4—Side Brush
A2-5—Main Brushes
A2-6—Main Brush Cover
A2-7—Main Wheels
A6 Power Cable
•Flashing blue slowly: Waiting for
connection
•Flashing blue quickly: Connecting
•Steady blue for five seconds: WiFi
connected
—WiFi Indicator Light A4 Dustbin and Water Tank
Combo Unit
A4-1—Latch
A4-2—Stopper
A4-3—Water Filter
A4-4—Washable Filter
A5 Charging Dock
A5-1—Power Indicator
A5-2—Dock Location Beacon
A5-3—Charging Contacts
A5-4—Power Socket
A5-5—Electrode Brushes
A7 Mop Cloth Mount
A7-1—Mop Cloth Attachment Slot
A7-2—Mop Cloth Mount Latches
A8 Mop Cloth
A8-1—Hook and Loop Pads
A9 Moisture-Proof Mat

07
The robot may not turn on when the battery is low. In
this case, place the robot directly onto the dock to charge.
Note:
Power on and charge the
robot
When using the robot for the first time, follow it
throughout its whole cleaning route and watch for potential
problems. The robot will be able to clean by itself in future uses.
Note:
1. Tidy cables and loose items from the
ground and move any unstable, fragile,
precious, or dangerous items to prevent
personal injury or property damage due to
items becoming tangled in, struck by, or
knocked over by the robot.
2. When using the robot in a raised area,
always use a secure physical barrier to
prevent accidental falls that may result in
personal injury or property damage.
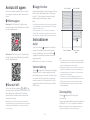
B1 Position the Charging
Dock
After fixing the charging dock in place, use
a dry cloth to clean the area where the
Moisture-Proof Mat will be located. Tear off
the double-sided tape at the bottom of the
Moisture-Proof Mat, and stick the mat on
the floor .
Notes:
•Always place the Moisture-Proof Mat on wooden floors.
•The Moisture-Proof Mat attaches best to smooth surfaces.
•When necessary, remove the double-sided adhesive tape
slowly to reduce residue glue.
B3 Attach the Moisture-Proof
Mat
B1-1 More than 0.5m (1.6ft)
B1-2 More than 1.5m (4.9ft)
Notes:
•Allow at least 0.5m (1.6ft) of clearance on each side, and
more than 1.5m (4.9ft) in front of the charging dock.
•If the power cable hangs vertical to the ground, it may
be caught by the robot, causing the charging dock to be
disconnected.
•The charging dock indicator is on when the charging dock is
electrified, and off when the robot is charging.
•Do not place the charging dock in places that are directly
exposed to sunlight, or block the location beacon. Otherwise
the robot may not be able to automatically return to the
charging dock.
Keep the Charging Dock on a level surface,
flat against a wall. Connect the power cable to
the Charging Dock and tidy cables from the
floor. To ensure a better user experience of
the mobile app, place the Charging Dock in
an area with good WiFi coverage.
Press and hold the button to power on
the robot. When the power light goes on,
place the robot on the dock to charge. Make
sure the charging dock power indicator
turns off and a “charging” voice alert sounds.
To maintain the performance of the high-
performance lithium-ion rechargeable battery
pack, keep the robot charged.
B2 Secure the charging dock
with the adhesive tape
Wipe the floor of the area where the
charging dock will be placed with a dry cloth,
then secure the dock in place using double-
sided tape at the bottom of the dock.
Note: When necessary, remove the double-sided adhesive
tape slowly to reduce residue glue.
B4 Mopping
To prevent excessive dirt buildup during first-time
use, floors should be vacuumed at least three times before
mopping.
Note:
B4-1—Press the latch and slide the
dustbin and water tank combo unit
backwards.
Notes:
•To prevent corrosion or damage, only use the Roborock
branded floor cleaner in the water tank.
•Do not use hot water as this may cause the tank to deform.
•When filling the water tank, tilt tank 30° to avoid wetting
the filter.
Remove the water tank stopper, fill the tank
with water, and close it tightly.
B4-2—Fill the water tank
Slide the water tank into the robot until you
hear it lock with a click.
B4-3—Reinstall the dustbin and water
tank combo unit
Wet the mop cloth and wring it until it stops
dripping, then slide it along the mop cloth
slot before sticking it firmly in place.
B4-4—Install the mop cloth
Only use the official Roborock mop cloth.
Note:
B4-6—Remove the mop cloth mount
Clean the mop cloth after 60 minutes of mopping to
maintain water flow and cleaning quality.
Note:
Slide the mount forwards along the bottom
of robot until it clicks in place.
B4-5—Install the mop cloth mount

08
Notes:
•To allow the robot to automatically vacuum and return to
the dock, start the robot from the dock. Do not move the
dock during cleaning.
•Cleaning cannot start if the battery level is too low. Allow the
robot to charge before starting the cleanup.
•If cleaning is completed in less than 10 minutes, the area
will be cleaned twice.
•If the battery runs low during the cleaning cycle, the robot
will automatically return to the dock. After charging, the
robot will resume where it left off.
•Before starting each mopping task, make sure that the mop
has been properly installed.
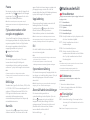
Zone 1 – Cleaned Zone 2 – Cleaned
Zone 4 – Next Zone Zone 3 – In Progress
When the robot returns to the dock after
cleaning, press the latches on both sides,
and slide the mop cloth mount backwards
to remove it.
Notes:
•Wash the mop cloth after each use, and regularly empty the
water tank of unused water.
•Remove the mop cloth mount when not mopping.
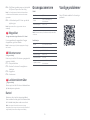
Connect to the App
This robot supports both Roborock and
Xiaomi Home apps. Choose the one that
best meets your needs.
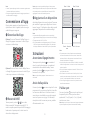
Option 1: Search for “Roborock” in the App
Store or Google Play or scan the QR code to
download and install the app.
❶ Download app
Option 2: Search for “Xiaomi Home” in the
App Store or Google Play or scan the QR
code to download and install the app.
Note: If you cannot connect to the robot due to your router
configuration, a forgotten password, or any other reason,
reset the WiFi and add your robot as a new device.
Press and hold the and buttons until
you hear the "Resetting WiFi" voice alert.
The reset is complete when the WiFi
indicator light flashes blue slowly. The robot
will then wait for a connection.
❷ Reset WiFi
❸ Add device
Note: The robot cannot be turned off when it is being charged.
Instructions
On/Off
Starting Cleaning
Press the button to start cleaning. The
robot will plan its cleaning route according
to its scan of the room. It splits a room into
zones, first draws out zone edges, and then
fills the zone in a zigzag pattern. In so
doing, the robot cleans all zones one by
one, efficiently cleaning the house.
Press and hold the button to turn on the
robot. The power indicator will turn on and
the robot will enter standby mode. Press
and hold the button to turn off the robot
and complete the cleaning cycle.
Open the Roborock App, tap the “Scan to
Connect” button or the “Search for device”
button, or open the Xiaomi Home app, tap
“+” in the top right corner and add the
device as instructed in the app.
Notes:
•The actual process may vary due to ongoing app updates.
Follow the instructions provided in the app.
•Only 2.4 GHz WiFi is supported.
•If the robot waits more than 30 minutes for a connection,
WiFi will be automatically disabled. If you want to
reconnect, reset the WiFi before proceeding.

09
Note: After spot cleaning, the robot will automatically return
to the starting point and enter Standby mode.
Press the button to start spot cleaning.
Cleaning range: The robot cleans a 1.5 m
(4.9 ft) x 1.5 m (4.9 ft) square area centered
on itself.
Spot Cleaning
Note: Placing a paused robot on the dock manually will end
the current cleanup.
When the robot is running, press any
button to pause it, press the button to
resume cleaning, and press the button to
send it back to the dock.
Pause
If the robot is paused for over 10 minutes, it
will go to sleep, and the power indicator will
flash every few seconds. Press any button
to wake the robot up.
Sleep
Notes:
•The robot will not go to sleep when it is charging.
•The robot will automatically shut down if left in sleep mode
for more than 12 hours.
The default Do Not Disturb (DND) period is
from 22:00 to 08:00. You can use the app to
disable the DND mode or modify the DND
period. When DND mode is activated, the
robot will not automatically resume cleanup,
the power indicator light will dim, and the
volume of the voice prompts will lower.
DND Mode
Child Lock
Press and hold the button to enable/
disable the child lock. You can also set it in the
app. Once enabled, the robot will not react to
button presses when it is stationary. When
the robot is cleaning or docking, press any
button to stop it.
Charging
After cleaning, the robot will automatically
return to the dock to charge.
In Pause mode, press the button to send
the robot back to the dock. The power
indicator will breathe as the robot charges.
Note: If the robot fails to find the dock, it will automatically
return to its starting location. Place the robot on the dock
manually to recharge.
Restore Factory Settings
If the robot does not function properly after
a system reset, switch it on. Press and hold
the button and at the same time, press
the Reset button until you hear the
“Restoring factory settings” voice prompt.
The robot will then be restored to factory
settings.
System Reset
If the robot does not respond when a
button is pressed or cannot be turned off,
reset the system. Press the latch to remove
the dustbin and water tank combo unit and
find the Reset button.Press the Reset
button, and the robot will reset
automatically.
Note: After resetting the system, scheduled cleaning, WiFi,
etc. will be restored to factory settings.
Error
If an error occurs, the power indicator will
flash red and a voice alert will sound.
Notes:
•The robot will go to sleep automatically if left in a
malfunctioning state for over 10 minutes.
•Placing a malfunctioning robot on the dock manually will
end the current cleanup.
* Clean every 2 weeks and replace every 6-12 months.
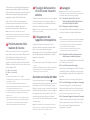
C1-1—Main Brush
C1-2—Main Brush Cover
C1-3—Latches
C1-4—Main Brush Bearing
C1-5—Main Brush Caps
C1-6—Turn over the robot and press the
latches to remove the main brush cover.
Remove the main brush and pull out
the main brush bearing.
C1-7—
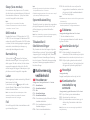
Routine Maintenance
C
C1 Main Brushes
To add water or clean the mop cloth, press
any button to stop the robot and remove
the mopping module. After adding water
or cleaning the mop cloth, reinstall the
mopping module and press the button
to continue.
Refilling the Water Tank or
Cleaning the Mop Cloth

10
Pull out the main brush caps.
After removing the tangled hair or
dirt at both ends of the main brush,
reinstall it, press on the main brush
cover to lock it in place.
C1-8—
C1-9—
Notes:
•Main brush should be wiped down with a wet cloth and left
to dry away from direct sunlight.
•Do not use corrosive cleaning fluids or disinfectants to
clean the main brush.
* Clean monthly and replace every 3-6 months.
1. Unscrew the side brush screw.
2. Remove and clean the side brush.
Reinstall the brush and tighten the screw.
C2 Side Brush
* Clean as required.
* Clean monthly.
Use a tool, such as a small screwdriver,
to pry out the axle and take out the
wheel.
The omnidirectional wheel bracket cannot be removed.
Note:
C3-1—
Clean the main wheels with a soft, dry cloth.
C3 Omnidirectional Wheel
C4 Main Wheels
Rinse the wheel and the axle with
water to remove any hair and dirt.
Dry and reattach the wheel, pressing
it firmly in place.
C3-2—
C5-5—Allow 24 hours for the filter to dry
thoroughly and reinstall it.
C5-1—Press the latch to remove the unit.
Remove the washable filter then
empty the dustbin.
C5 Dustbin and Water Tank
Combo Unit
* Clean weekly and replace the filter every 6-12 months
C5-2—Empty the water tank of unused water.
C5-3—Fill the dustbin with clean water and
gently shake it. Then pour out the
dirty water.
C5-4—Rinse the filter repeatedly and tap it to
remove as much dirt as possible.
To prevent blockage, only use clean water without any
cleaning liquid.
Note:
Do not touch the surface of the filter with your hands,
brush, or hard objects to avoid potential damage.
Note:
Purchase an additional filter and alternate if necessary. Note:
C6 Mop Cloth
* Clean after each use and replace every 3-6 months
Remove the mop cloth from mop cloth
mount. Clean the mop cloth and air-dry it.
A dirty mop will affect the mopping performance. Clean
it before use.
Note:
C7 Robot Sensors
Use a soft, dry cloth to wipe and clean all
sensors, including:
C7-1—Dock Locator
C7-2—Reactive Tech Obstacle Avoidance
Sensor
C7-3—Wall Sensor
C7-4—Cliff Sensors
* Clean monthly.
* Clean monthly.
Note: If the robot will be left unused for a long period, turn it
off and charge it at least every three months to avoid battery
damage caused by over-discharge.
Use a soft dry cloth to wipe the charging
contacts on the charging dock and the robot.
Battery
The robot is equipped with a built-in
high-performance lithium-ion rechargeable
battery pack. To maintain battery
performance, keep the robot charged
during normal use.
C8 Charging Contact Areas
Basic Parameters
Robot
Note: The serial number is on a sticker on the underside of
the robot.
< 6 hoursCharging Time
Q80ULLModel
14.4V/5200mAh (TYP)
lithium-ion battery
Battery
Rated Input
Charging Dock
14.4V/5200mAh (TYP)
lithium-ion battery
Charging Battery
CDZ12RR or CDZ20RR
Model
28WRated Power
100-240VACRated Input
20VDC 1.2A
Rated Output
50-60HzRated Frequency
20VDC 1.2A

11
Problem Solution
Common IssuesCommon Issues
Problem Solution
Unable to power on
•The battery level is low. Put the robot on the
charging dock and charge it before use.
•The battery temperature is too low or too high. Only
use the robot within the range of 4-40°C (39-104°F).
Unable to charge
•Check the power indicator light turns on and that
both ends of the power cable are properly connected.
•If contact is poor, clean the contact areas on the
charging dock and the robot.
Slow charging
•When used at high or low temperatures, the robot
will automatically reduce its charging speed to
extend battery life.
•The charging contacts may be dirty. Wipe them with
a dry cloth.
Unable to dock
•There are too many obstacles near the charging
dock. Move it to an open area.
•The robot is too far from the charging dock. Place it
closer and retry.
Abnormal behavior •Restart the robot.
Noise during
cleaning.
•The main brush, side brush, main wheels, or
omnidirectional wheel may be jammed. Turn off the
robot and clean them.
Unable to connect
to WiFi
•WiFi is disabled. Reset the WiFi and try again.
•The WiFi signal is poor. Move the robot to an area
with good WiFi reception.
•Abnormal WiFi connection. Reset the WiFi,
download the latest mobile app, and retry.
•Unable to connect to WiFi abruptly. There may
be an error with your router settings. Contact
Roborock customer service for additional support.
Poor cleaning
ability or dust
falling out
•The dustbin is full and needs emptying.
•The washable filter is blocked and needs cleaning.
•The main brush is jammed and needs cleaning.
Scheduled cleaning
is not working •Keep the robot charged. Scheduled cleaning can
only begin when the battery level is above 20%.
Is power always
being drawn when
the robot is on the
charging dock?
•The robot will draw power while it is docked
to maintain battery performance, but power
consumption is minimal.
Does the robot
need to be charged
for at least 16
hours the first three
times it is used?
•No, the robot can be used any time after it has been
fully charged.
No or little water
during mopping
•Check whether there is water in the water tank and
use the mobile app to set the water flow or check
the manual for full instructions on how to correctly
install the dustbin and water tank combo unit, mop
cloth mount and mop cloth.
Cleaning does
not resume after
recharging
•Make sure that the robot is not in DND mode. DND
mode will prevent cleanup. When cleaning a space
requiring a top-up charge, if the robot was placed
manually on the charging dock before it returned
to the dock automatically, it will not be able to
continue cleanup.
The robot cannot
return to the
charging dock after
spot cleaning or
when it has been
moved manually
•After spot cleaning or a significant position change,
the robot will re-generate the map. If the charging
dock is too far away, it may not be able to return to
recharge and must be placed on the charging dock
manually.
The robot has
begun to miss
certain spots
•The wall sensor or cliff sensors may be dirty. Wipe
them with a soft dry cloth.
It takes a long time
to fill the water tank •The water filter may be blocked and need cleaning.

12
Lisez attentivement ce manuel d’utilisation et ses schémas avant d’utiliser le produit et rangez-les
soigneusement pour référence future.
Roborock Q8 Max
Manuel d’utilisation de l’aspirateur robot
Français
Contenu
13 Restrictions
14 Présentation du produit
14 Installation
16 Connexion à l’application
16 Instructions
17 Entretien
19 Paramètres de base
19 Problèmes courants

13
Roborock Q8 Max
Manuel d’utilisation de l’aspirateur robot
Restrictions
AVERTISSEMENT
•N’utilisez que le bloc d’alimentation amovible Roborock CDZ12RR, CDZ20RR, AED06HRR ou AED07HRR fourni avec ce produit pour recharger la batterie.
•N’utilisez pas ce produit sur des surfaces en hauteur sans barrières, par exemple, sur le sol d’une mezzanine, une terrasse ouverte ou le dessus d’un meuble.
•Pour éviter de bloquer le produit et d’endommager des objets de valeur, retirez les objets légers (tels que des sacs plastiques) et les objets fragiles (tels que des
vases) du sol avant le nettoyage.
•Ne placez aucun objet et aucune personne (enfants et animaux compris) sur le produit, qu’il soit en fonctionnement ou non.
•N’utilisez pas le produit sur des objets brûlants (tels que des mégots de cigarette).
•N’utilisez pas le produit pour aspirer des objets durs ou tranchants (tels que des débris de décoration, du verre et des clous).
•N’utilisez pas le module Serpillière sur des moquettes.
•Avant de nettoyer ou d’entretenir le produit, il doit être éteint et sa fiche doit être débranchée de la prise électrique.
•Si vous rangez le robot, rechargez-le complètement et éteignez-le avant de le placer dans un endroit frais et sec. Rechargez-le au moins tous les trois mois pour
éviter que la batterie ne se décharge trop.

14
Appuyez sur n’importe quel bouton pour arrêter
le robot lorsqu’il nettoie ou revient à la station.
Station
Nettoyage localisé/Verrouillage enfant
Présentation du produit
A
A1 Robot (vue de dessus)
A3 Robot
•Appuyez sur ce bouton pour faire
revenir le robot à la station
Remarque :
A1-1 : pare-chocs vertical
A1-2 : capteur LiDAR
A1-3 : capteur de murs
A1-4 : localisateur de station
A1-5 : capteur d’évitement d’obstacles Reactive
Tech
•Appuyez sur ce bouton pour un
nettoyage localisé
•Appuyez sur ce bouton et maintenez-
le enfoncé pendant 3 secondes pour
activer/désactiver le verrouillage enfant
A3-1 : bouton Réinitialiser
A3-2 : aération
A3-3 : support de serpillière
A3-4 : pare-chocs
•Blanc : niveau de batterie ≥ 20 %
•Rouge : niveau de batterie < 20 %
•Effet de respiration : rechargement ou
démarrage
•Clignotement rouge : erreur
Voyant d’alimentation
Marche/Arrêt/Nettoyer
•Appuyez sur ce bouton et maintenez-le
enfoncé pour allumer ou éteindre le robot
•Appuyez sur ce bouton pour démarrer
un nettoyage
A2 Robot (vue de dessous)
A2-1 : capteurs de vide
A2-2 : roulette omnidirectionnelle
A2-3 : contacts de rechargement
A2-4 : brosse latérale
A2-5 : brosses principales
A2-6 : cache de la brosse principale
A2-7 : roulettes principales
•Lent clignotement bleu : en attente de
connexion
•Rapide clignotement bleu : connexion
•Bleu fixe pendant cinq secondes :
connecté au WiFi
— Voyant WiFi
A4 Bloc combinant bac à
poussière et réservoir d’eau
A4-1 : loquet
A4-2 : bouchon
A4-3 : filtre à eau
A4-4 : filtre lavable
A5 Station de chargement
A5-1 : voyant d’alimentation
A5-2 : balise de localisation de la station
A5-3 : contacts de rechargement
A5-4 : port d’alimentation
A5-5 : brosses de nettoyage des électrodes
A6 Câble d’alimentation
A7 Support de serpillière
A7-1 : fente de fixation de la serpillière
A7-2 : loquets du support de serpillière
A8 Serpillière
A8-1 : blocs auto-agrippants
A9 Tapis étanche
Installation
B
Informations importantes

15
Lorsque vous utilisez votre robot pour la
première fois, suivez-le attentivement tout au long de son
parcours de nettoyage en prenant garde aux problèmes
potentiels. Le robot pourra nettoyer seul lors des prochaines
utilisations.
Remarque :
Si nécessaire, retirez lentement le ruban adhésif
double face pour réduire les résidus de colle.
Remarque :
1. Rangez les câbles et objets détachés présents au
sol et déplacez tout objet instable, fragile, précieux
ou dangereux afin d’éviter toute blessure et tout
dommage matériel dus à des objets qui seraient
happés, heurtés ou renversés par le robot.
2. Lorsque vous employez ce robot dans une zone
surélevée, utilisez toujours une barrière de sécurité
physique pour empêcher les chutes accidentelles
qui pourraient entraîner des blessures ou des
dommages matériels.
B1 Positionnement de la
station de chargement
Gardez la station de chargement sur une surface
plane et à niveau contre un mur, Connectez le
câble d’alimentation à la station de chargement et
rangez les câbles présents au sol. Pour garantir
une meilleure expérience utilisateur avec
l’application mobile, placez la station de
chargement dans une zone disposant d’une bonne
couverture WiFi.
B1-1 Plus de 0,5 m (1,6 pi)
B1-2 Plus de 1,5 m (4,9 pi)
Remarques :
•Laissez au moins 0,5 m (1,6 pi) d’espace de chaque côté et
plus de 1,5 m (4,9 pi) devant la station de chargement.
•Si le câble d’alimentation est vertical par rapport au sol, il
risque d’être happé par le robot, ce qui peut entraîner un
débranchement de la station de chargement.
•Le voyant de la station de chargement est allumé lorsqu’il
est alimenté et éteint lorsque le robot charge.
•Ne placez pas la station de chargement à un endroit
directement exposé à la lumière du soleil et ne masquez
pas sa balise de localisation. Sinon, le robot risque de ne
pas réussir à revenir automatiquement à la station de
chargement.
Remarques :
•Installez toujours le tapis étanche en cas de sols en bois.
•Le tapis étanche adhère mieux aux surfaces régulières.
•Si nécessaire, retirez lentement le ruban adhésif double-
face pour réduire les résidus de colle.
Après avoir fixé la station de chargement en place,
utilisez un chiffon sec pour nettoyer la zone où sera
placé le tapis étanche. Retirez le ruban adhésif
double-face situé sous le tapis étanche, puis collez
le tapis au sol.
B3 Fixation du tapis étanche
Essuyez le sol de la zone où vous placerez la station
à l’aide d’un chiffon sec, puis fixez la station en
place en apposant du ruban adhésif double face au
bas de la station.
B2 Fixation de la station de
chargement à l’aide du
ruban adhésif
Il est possible que le robot ne s’allume pas
lorsque la batterie est faible. Dans ce cas, placez directement
le robot sur la station pour le recharger.
Remarque :
Appuyez sur le bouton et maintenez-le enfoncé
pour allumer le robot. Lorsque le voyant
d’alimentation s’allume, placez le robot sur la
station pour le recharger. Assurez-vous que le
voyant d’alimentation de la station de chargement
s’éteint et qu’une alerte vocale « Chargement en
cours » retentit. Pour conserver les hautes
performances de la batterie lithium-ion
rechargeable, gardez le robot chargé.
Allumage et rechargement
du robot
B4 Nettoyage à la serpillière
Pour éviter toute accumulation excessive de
saleté lors d’une première utilisation, les sols devraient
être aspirés au moins trois fois avant de les nettoyer à la
serpillière.
Remarque :
B4-1 : appuyez sur le loquet et faites glisser
le bloc combinant bac à poussière et
réservoir d’eau vers l’arrière.
Retirez le bouchon du réservoir d’eau, remplissez-le
d’eau, puis refermez-le fermement.
B4-2 : remplissez le réservoir d’eau vers l’arrière
Remarques :
•Pour éviter toute corrosion ou tout dommage, n’utilisez
que du nettoyant pour sols de marque Roborock dans le
réservoir d’eau.
•N’utilisez pas d’eau chaude car cela peut entraîner une
déformation du réservoir.
•Lorsque vous remplissez le réservoir d’eau, inclinez-le à 30°
pour éviter de mouiller le filtre.
Faites glisser le réservoir d’eau dans le robot
jusqu’à ce qu’il s’encliquette.
B4-3 : réinstallez le bloc combinant bac à
poussière et réservoir d’eau
Faites glisser le support vers l’avant le long du
dessous du robot jusqu’à ce qu’il s’encliquette en
place.
B4-5 : installez le support de serpillière
Nettoyez la serpillière après 60 minutes de son
utilisation par le robot pour préserver le débit d’eau et la
qualité de nettoyage.
Remarque :
Mouillez la serpillière et tordez-la jusqu’à ce qu’elle
cesse de goutter, puis faites-la glisser le long de la
fente de fixation avant de la faire fermement
adhérer en place.
B4-4 : installez la serpillière
N’utilisez que la serpillière Roborock officielle.Remarque :

16
Une fois que le robot est revenu à la station après
le nettoyage, appuyez sur les loquets qui se
trouvent des deux côtés, puis faites glisser le
support de serpillière vers l’arrière pour le retirer.
Remarques :
•Lavez la serpillière après chaque utilisation, et évacuez
régulièrement l’eau inutilisée du réservoir d’eau.
•Retirez le support de serpillière lorsque vous n’utilisez pas
cette fonction.
B4-6 : retirez le support de serpillière
Option 2 : recherchez « Xiaomi Home » sur l’App
Store ou sur Google Play ou scannez le code QR
pour télécharger et installer l’application.
Connexion à
l’application
Option 1 : recherchez « Roborock » sur l’App Store
ou sur Google Play ou scannez le code QR pour
télécharger et installer l’application.
❶ Télécharger l’application
Ce robot prend à la fois en charge les applications
Roborock et Xiaomi Home. Choisissez celle qui
correspond le mieux à vos besoins.
❷ Réinitialiser le WiFi
Appuyez sur les boutons et et maintenez-les
enfoncés jusqu’à ce que vous entendiez l’alerte
vocale « Réinitialisation du WiFi en cours ». La
réinitialisation est terminée lorsque le voyant WiFi
clignote lentement. Le robot sera alors en attente
de connexion.
Si vous ne parvenez pas à vous connecter au
robot en raison de la configuration de votre routeur, d’un mot
de passe oublié ou de toute autre raison, réinitialisez le WiFi
et ajoutez le robot comme nouvel appareil.
Remarque :
Remarques :
•Le véritable processus peut varier en raison des mises
à jour continues de l’application. Suivez les instructions
fournies dans l’application.
•Seul le WiFi 2,4 GHz est pris en charge.
•Si le robot est en attente d’une connexion depuis plus de
30 minutes, le WiFi sera automatiquement désactivé. Si
vous voulez vous reconnecter, réinitialisez le WiFi avant de
continuer.
❸ Ajouter l’appareil
Remarque : Le robot ne peut pas être éteint lorsqu’il est
en charge.
Instructions
Appuyez sur le bouton et maintenez-le enfoncé
pour allumer le robot. Le voyant d’alimentation
s’allumera et le robot entrera en mode Veille. Appuyez
sur le bouton et maintenez-le enfoncé pour
éteindre le robot et mettre fin au cycle de nettoyage.
Marche/Arrêt
Ouvrez l’application Roborock, appuyez sur le
bouton « Scanner pour connecter » ou le bouton «
Rechercher l’appareil », ou ouvrez l’application
Xiaomi Home, appuyez sur le « + » qui se trouve
dans le coin supérieur droit et ajoutez l’appareil en
suivant les instructions de l’application.
Appuyez sur le bouton pour démarrer le
nettoyage. Le robot planifiera son parcours de
nettoyage en fonction de son analyse de la pièce. Il
commence par diviser la pièce en zones, passe sur
les bords d’une zone puis la complète en y entrant
en zigzag. Il procède ainsi pour toutes les zones,
une par une, pour nettoyer efficacement votre
logement.
Démarrage du nettoyage
Zone 1 - Nettoyée
Zone 4 - Zone suivante
Zone 2 - Nettoyée
Zone 3 - En cours
Remarques :
•Pour permettre au robot d’aspirer et de revenir
automatiquement à sa station, mettez-le en marche à
partir de la station. Ne déplacez pas la station pendant le
nettoyage.
•Le nettoyage ne peut pas démarrer si le niveau de la
batterie est trop faible. Laissez le robot charger avant de
démarrer le nettoyage.
•Si le nettoyage est terminé en moins de 10 minutes,
l’espace sera nettoyé deux fois.
•Si le niveau de la batterie devient insuffisant durant le cycle
de nettoyage, le robot reviendra automatiquement à sa
station. Une fois rechargé, il reprendra là où il s’est arrêté.
•Avant de démarrer chaque nettoyage à la serpillière,
assurez-vous que la serpillière a été correctement installée.

17
Remarque : Après le nettoyage localisé, le robot reviendra
automatiquement à son point de départ et entrera en
mode Veille.
Appuyez sur le bouton pour démarrer un
nettoyage localisé.
Zone couverte par le nettoyage : le robot nettoie
une zone carrée de 1,5 m (4,9 pi) x 1,5 m (4,9 pi)
autour de lui.
Nettoyage localisé
Remarque : Si vous placez le robot en pause sur la station,
cela mettra fin au nettoyage en cours.
Lorsque le robot est en marche, appuyez sur
n’importe quel bouton pour le mettre en pause,
appuyez sur le bouton pour reprendre le
nettoyage ou appuyez sur le bouton pour le
renvoyer à la station.
Pause
Si le robot est en pause pendant plus de 10 minutes,
il se mettra en veille, et son voyant d’alimentation
clignotera toutes les quelques secondes. Appuyez sur
n’importe quel bouton pour le sortir de veille.
Pour ajouter de l’eau ou nettoyer la serpillière,
appuyez sur n’importe quel bouton pour arrêter le
robot et retirez le module de nettoyage à la
serpillière. Après avoir ajouté de l’eau ou nettoyé la
serpillière, réinstallez le module de nettoyage à la
serpillière et appuyez sur le bouton pour
continuer.
Veille
Remplissage du réservoir
d’eau ou nettoyage de la
serpillière
Remarques :
•Le robot ne se mettra pas en veille lorsqu’il sera en charge.
•Le robot s’éteindra automatiquement s’il reste en mode
Veille pendant plus de 12 heures.
Si le robot ne parvient pas à retrouver sa station,
il reviendra automatiquement à son point de départ. Placez
manuellement le robot sur la station pour le recharger.
Erreur
Si une erreur se produit, le voyant d’alimentation
clignotera en rouge et une alerte vocale se fera
entendre.
Remarques :
•Le robot se mettra automatiquement en veille s’il reste sur
un dysfonctionnement pendant plus de 10 minutes.
•Si vous placez manuellement le robot sur la station alors
qu’il est resté sur un dysfonctionnement, cela mettra fin au
nettoyage en cours.
Rechargement
Après le nettoyage, le robot reviendra
automatiquement à sa station pour se recharger.
En mode Pause, appuyez sur le bouton pour
renvoyer le robot à sa station. Lorsque le robot sera
en charge, le voyant d’alimentation présentera un
effet de respiration.
Remarque :
La période par défaut du mode Ne pas déranger
(NPD) est de 22 h 00 à 08 h 00. Vous pouvez utiliser
l’application pour le désactiver ou changer sa
période. Lorsque le mode NPD sera activé, le robot
ne reprendra pas automatiquement le nettoyage,
la luminosité du voyant d’alimentation sera réduite
et le volume des annonces vocales sera plus faible.
Mode NPD
Verrouillage enfant
Appuyez sur le bouton et maintenez-le enfoncé
pour activer/désactiver le verrouillage enfant. Vous
pouvez aussi le définir dans l’application. Une fois
cette fonction activée, le robot ne réagira plus aux
pressions sur les boutons lorsqu’il sera immobile.
Lorsque le robot nettoie ou revient à sa station,
appuyez sur n’importe quel bouton pour l’arrêter.
Restauration des
paramètres d’usine
Si le robot ne fonctionne pas correctement après
une réinitialisation système, allumez-le. Appuyez
sur le bouton , maintenez-le enfoncé, et dans le
même temps, appuyez sur le bouton Réinitialiser
jusqu’à ce que vous entendiez l’annonce vocale
« Restauration des paramètres d’usine ». Les
paramètres d’usine du robot seront alors restaurés.
Réinitialisation système
Si le robot ne répond pas aux pressions sur les
boutons ou ne peut pas être éteint, réinitialisez le
système. Appuyez sur le loquet pour retirer le bloc
combinant bac à poussière et réservoir d’eau et
localisez le bouton Réinitialiser.Appuyez sur le
bouton Réinitialiser et le robot se réinitialisera
automatiquement.
Remarque : Une fois le système réinitialisé, les paramètres
d’usine des nettoyages planifiés, du WiFi, etc. seront rétablis.
* Nettoyer toutes les 2 semaines et remplacer tous les 6
à 12 mois.
C1-1 : brosse principale
C1-2 : cache de la brosse principale
C1-3 : loquets
C1-4 : roulement de la brosse principale
C1-5 : capuchons de la brosse principale
C1-6 : retournez le robot et appuyez sur les loquets
pour retirer le cache de la brosse principale.
retirez a brosse principale et tirez sur le
roulement pour le sortir.
tirez sur les capuchons de la brosse
principale pour les sortir.
C1-8 :
C1-7 :
Entretien
C
C1 Brosses principales

18
* Nettoyer tous les mois et remplacer tous les 3 à 6 mois.
après avoir retiré les cheveux et saletés
entremêlés aux deux extrémités de la brosse
principale, réinstallez-la, puis appuyez sur
son cache pour la verrouiller en place.
C1-9 :
Remarques :
•Vous devez nettoyer la brosse principale à l’aide d’un chiffon
humide et la laisser sécher à l’écart de la lumière directe
du soleil.
•N’utilisez pas de désinfectants ou de liquides de nettoyage
corrosifs pour nettoyer la brosse principale.
1. Retirez la vis de la brosse latérale.
2. Retirez et nettoyez la brosse latérale. Réinstallez
la brosse et serrez la vis.
C2 Brosse latérale
* Nettoyer si nécessaire.
* Nettoyer tous les mois.
utilisez un outil, tel qu’un petit tournevis,
pour déloger l’axe et retirer la roulette.
Le support de la roulette omnidirectionnelle ne
peut pas être retiré.
Remarque :
C3-1 :
Nettoyez les roulettes principales à l’aide d’un
chiffon doux sec.
C4 Roulettes principales
rincez la roulette et son axe à l’eau pour retirer
tout cheveu et toute saleté. Laissez sécher et
réinstallez la roulette en appuyant fermement
dessus pour qu’elle se mette en place.
C3-2 :
C5-1 : appuyez sur le loquet pour retirer le bloc.
Retirez le filtre lavable, puis videz le bac à
poussière.
C5 Bloc combinant bac à
poussière et réservoir
d’eau
C3 Roulette
omnidirectionnelle
* Nettoyer toutes les semaines et remplacer le filtre tous
les 6 à 12 mois.
C5-2 : évacuez l’eau inutilisée du réservoir d’eau.
C5-3 : remplissez le bac à poussière d’eau propre et
secouez-le délicatement. Évacuez ensuite
l’eau sale.
C5-4 : rincez le filtre à plusieurs reprises et
tapotez-le pour éliminer autant de saleté
que possible.
N’utilisez que de l’eau propre sans liquide
nettoyant pour éviter toute obstruction.
Remarque :
C5-5 : laissez le filtre sécher complètement
pendant 24 heures, puis réinstallez-le.
Ne touchez pas la surface du filtre avec vos
mains, une brosse ou des objets durs pour éviter tout risque
de l’endommager.
Remarque :
Achetez un filtre supplémentaire et alternez si
nécessaire.
Remarque :
C6 Serpillière
* Nettoyer après chaque utilisation et remplacer tous les 3
à 6 mois.
Retirez la serpillière de son support. Nettoyez la
serpillière et laissez-la sécher à l’air libre.
Une serpillière sale nuira aux performances de
nettoyage. Nettoyez-la avant utilisation.
Remarque :
C7 Capteurs du robot
C8 Zones de contact de
rechargement
Utilisez un chiffon doux sec pour essuyer et
nettoyer tous les capteurs, notamment les
suivants :
C7-1 : localisateur de station
C7-2 : capteur d’évitement d’obstacles Reactive Tech
C7-3 : capteur de murs
C7-4 : capteurs de vide
* Nettoyer tous les mois.
* Nettoyer tous les mois.
Remarque : Si le robot ne sera pas utilisé pendant une
longue période, éteignez-le et rechargez-le au moins tous les
trois mois pour éviter que la batterie ne soit endommagée
par un déchargement excessif.
Utilisez un chiffon doux sec pour essuyer les
contacts de rechargement de la station de
chargement et du robot.
Batterie
Le robot est équipé d’une batterie lithium-ion
rechargeable très performante intégrée. Dans le
cadre d’une utilisation normale, gardez le robot
chargé pour préserver les performances de la
batterie.

19
Paramètres de base
Robot
Remarque :Le numéro de série figure sur un autocollant
apposé sous le robot.
< 6 heuresDurée de rechargement
Q80ULLModèle
14,4 V/5 200 mAh (TYP)
Batterie lithium-ion
Batterie
Entrée nominale
Station de chargement
14,4 V/5 200 mAh (TYP)
Batterie lithium-ion
Rechargement de la batterie
CDZ12RR ou CDZ20RR
Modèle
28 WPuissance nominale
100 - 240 VCAEntrée nominale
20 VCC, 1,2 A
Sortie nominale
50 - 60 HzFréquence nominale
Scannez le code QR ci-dessous pour consulter les
problèmes courants.
20 VCC, 1,2 A
Problèmes courants

20
Bitte lesen Sie dieses Benutzerhandbuch und die darin enthaltenen Diagramme sorgfältig durch,
bevor Sie das Produkt benutzen, und bewahren Sie es für späteres Nachschlagen sicher auf.
Roborock Q8 Max
Benutzerhandbuch für Roboter-Staubsauger
Deutsch
Inhalt
21 Einschränkungen
22 Produktübersicht
22 Installation
24 Mit der App verbinden
24 Anleitung
25 Wartungsroutine
26 Grundparameter
26 Häufige Probleme

21
Einschränkungen
WARNUNG
•Verwenden Sie zum Aufladen des Akkus nur das mit diesem Produkt mitgelieferte abnehmbare Netzteil roborock CDZ12RR, CDZ20RR, AED06HRR oder AED07HRR.
•Verwenden Sie dieses Produkt nicht auf hochgelegenen Flächen ohne Schutzbarrieren, wie z. B. auf dem Boden einer Galerie, einer offenen Terrasse oder auf Möbeln.
•Entfernen Sie vor der Reinigung leichte Objekte (z. B. Plastiktüten) und zerbrechliche Gegenstände (z. B. Vasen) vom Boden, um ein Verstopfen des Geräts und
Schäden an wertvollen Gegenständen zu vermeiden.
•Legen Sie keine Objekte auf das Gerät und halten Sie Kinder und Haustiere fern vom Gerät, unabhängig davon, ob es in Betrieb ist oder nicht.
•Verwenden Sie das Produkt nicht für brennende Gegenstände (z. B. Zigarettenstummel).
•Verwenden Sie das Produkt nicht zum Entfernen harter oder scharfer Gegenstände (z. B. Dekorationsreste, Glas und Nägel).
•Verwenden Sie das Wischmodul nicht auf Teppichen.
•Vor der Reinigung oder Wartung des Produkts muss das Produkt ausgeschaltet und der Netzstecker aus der Steckdose gezogen werden.
•Laden Sie den Roboter vor der Lagerung vollständig auf und schalten Sie ihn aus. Lagern Sie ihn an einen kühlen, trockenen Ort. Laden Sie ihn mindestens alle drei
Monate auf, um eine Tiefentladung des Akkus zu vermeiden.

22
Drücken Sie eine beliebige Taste, um den Roboter
während der Reinigung oder des Andockens anzuhalten.
Station
Punktreinigung/Kindersicherung
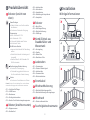
Produktübersicht
A
A2 Roboter (Ansicht von unten)
•Drücken zum Zurückkehren zur Station
Hinweis:
A1-1—Vertikaler Stoßfänger
A1-2—LiDAR-Sensor
A1-3—Wandsensor
A1-4—Dockingstationssucher
A1-5—Reactive Tech-Hindernisumgehungssensor
•Drücken für Punktreinigung
•3 Sekunden lang gedrückt halten zum
Ein-/Ausschalten der Kindersicherung
A3 Roboter
A3-1—Reset-Taste
A3-2—Entlüftungsöffnung
A3-3—Wischtuchhalterung
A3-4—Stoßfänger
•Weiß: Akkustand ≥ 20 %
•Rot: Akkustand < 20 %
•Pulsierend: Aufladen oder Starten
•Rot blinkend: Fehler
Stromanzeige
Power/Reinigen
•Gedrückt halten zum Ein-/Ausschalten
des Roboters
•Drücken zum Starten der Reinigung
Installation
B
Wichtige Informationen
•Langsam blau blinkend: Auf Verbindung
warten
•Schnell blau blinkend: Verbindung wird
hergestellt
•Dauerhaft blau für fünf Sekunden: Mit
WLAN verbunden
A4 Kombi-Einheit aus
Staubbehälter und
Wassertank
A1 Roboter (Ansicht von
oben)
A4-1—Verriegelung
A4-2—Stopfen
A4-3—Wasserfilter
A4-4—Waschbarer Filter
A5 Ladestation
A5-1—Stromanzeige
A5-2—Stations-Standortsignal
A5-3—Ladekontakte
A5-4—Stromanschluss
A5-5—Elektrodenbürsten
A6 Stromkabel
A7 Wischtuchhalterung
A7-1—Wischtuch-Befestigungsschlitz
A7-2—Wischtuchhalterungs-Verriegelungen
A8 Wischtuch
A8-1—Klettverschlussaufsätze
A9 Feuchtigkeitsschutzmatte
A2-1—Klippensensoren
A2-2—Rundlaufrad
A2-3—Ladekontakte
A2-4—Seitenbürste
A2-5—Hauptbürsten
A2-6—Abdeckung der Hauptbürste
A2-7—Haupträder
WLAN-Kontrollleuchte
Strona się ładuje...
Strona się ładuje...
Strona się ładuje...
Strona się ładuje...
Strona się ładuje...
Strona się ładuje...
Strona się ładuje...
Strona się ładuje...
Strona się ładuje...
Strona się ładuje...
Strona się ładuje...
Strona się ładuje...
Strona się ładuje...
Strona się ładuje...
Strona się ładuje...
Strona się ładuje...
Strona się ładuje...
Strona się ładuje...
Strona się ładuje...
Strona się ładuje...
Strona się ładuje...
Strona się ładuje...
Strona się ładuje...
Strona się ładuje...
Strona się ładuje...
Strona się ładuje...
Strona się ładuje...
Strona się ładuje...
Strona się ładuje...
Strona się ładuje...
Strona się ładuje...
Strona się ładuje...
Strona się ładuje...
Strona się ładuje...
Strona się ładuje...
Strona się ładuje...
Strona się ładuje...
Strona się ładuje...
Strona się ładuje...
Strona się ładuje...
Strona się ładuje...
Strona się ładuje...
-
 1
1
-
 2
2
-
 3
3
-
 4
4
-
 5
5
-
 6
6
-
 7
7
-
 8
8
-
 9
9
-
 10
10
-
 11
11
-
 12
12
-
 13
13
-
 14
14
-
 15
15
-
 16
16
-
 17
17
-
 18
18
-
 19
19
-
 20
20
-
 21
21
-
 22
22
-
 23
23
-
 24
24
-
 25
25
-
 26
26
-
 27
27
-
 28
28
-
 29
29
-
 30
30
-
 31
31
-
 32
32
-
 33
33
-
 34
34
-
 35
35
-
 36
36
-
 37
37
-
 38
38
-
 39
39
-
 40
40
-
 41
41
-
 42
42
-
 43
43
-
 44
44
-
 45
45
-
 46
46
-
 47
47
-
 48
48
-
 49
49
-
 50
50
-
 51
51
-
 52
52
-
 53
53
-
 54
54
-
 55
55
-
 56
56
-
 57
57
-
 58
58
-
 59
59
-
 60
60
-
 61
61
-
 62
62


Roborock Q8 MAX ROBOTSTØVSUGER, HVIT Instrukcja obsługi
- Typ
- Instrukcja obsługi
- Niniejsza instrukcja jest również odpowiednia dla
w innych językach
- italiano: Roborock Q8 MAX ROBOTSTØVSUGER, HVIT Manuale del proprietario
- Deutsch: Roborock Q8 MAX ROBOTSTØVSUGER, HVIT Bedienungsanleitung
- svenska: Roborock Q8 MAX ROBOTSTØVSUGER, HVIT Bruksanvisning
- français: Roborock Q8 MAX ROBOTSTØVSUGER, HVIT Le manuel du propriétaire
- dansk: Roborock Q8 MAX ROBOTSTØVSUGER, HVIT Brugervejledning
Powiązane artykuły
-
Roborock Q5 PRO ROBOTSTØVSUGER, SVART Instrukcja obsługi
-
-
-
-
Roborock S7 Max Ultra Instrukcja obsługi
-
Roborock Q Revo Instrukcja obsługi