
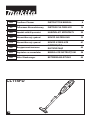
CL114FD
EN Cordless Cleaner INSTRUCTION MANUAL 8
PL Odkurzacz Akumulatorowy INSTRUKCJA OBSŁUGI 16
HU Vezeték nélküli porszívó HASZNÁLATI KÉZIKÖNYV 25
SK Akumulátorový vysávač NÁVOD NA OBSLUHU 33
CS Akumulátorový vysavač NÁVOD K OBSLUZE 41
UK Бездротовий пилосос ІНСТРУКЦІЯ З
ЕКСПЛУАТАЦІЇ 49
RO Aspirator cu acumulator MANUAL DE INSTRUCŢIUNI 58
DE Akku-Staubsauger BETRIEBSANLEITUNG 66

1
Fig.1
1
Fig.2
1
2
Fig.3
1
Fig.4
1
2
3
Fig.5
Fig.6
1
2
Fig.7
1
23
Fig.8
2

1
Fig.9
Fig.10
Fig.11
Fig.12
1
Fig.13
1
2
Fig.14
Fig.15
1
23
Fig.16
3

1
Fig.17
Fig.18
Fig.19
Fig.20
1
Fig.21
1
2
3
4
Fig.22
1
2
Fig.23
Fig.24
4

1
Fig.25
1
2
3
Fig.26
1
2
Fig.27
1
2
3
Fig.28
Fig.29
1
Fig.30
1
2
Fig.31
1
Fig.32
5

1
2
Fig.33
1
2
Fig.34
1
2
Fig.35
Fig.36
Fig.37
Fig.38
1
Fig.39
Fig.40
6

1
Fig.41
1
Fig.42
1
Fig.43
1
2
Fig.44
1
Fig.45
1
2
Fig.46
1
Fig.47
Fig.48
7

8ENGLISH
ENGLISH (Original instructions)
WARNING
• This appliance can be used by children aged from 8 years and above and persons with reduced physical, sen-
sory or mental capabilities or lack of experience and knowledge if they have been given supervision or instruc-
tion concerning use of the appliance in a safe way and understand the hazards involved.
• Children shall not play with the appliance. Cleaning and user maintenance shall not be made by children with-
out supervision.
• See the chapter “SPECIFICATIONS” for the type reference of the battery.
• See the sections “Removing built-in battery” and “Installing replacement battery” for how to replace the battery.
• The contained lithium-ion batteries are subject to the Dangerous Goods Legislation requirements. When dis-
posing the battery, remove it from the tool and dispose of it in a safe place. Follow your local regulations relat-
ing to disposal of battery.
• Under abusive conditions, liquid may be ejected from the battery; avoid contact. If contact accidentally occurs,
ush with water.
• If electrolyte gets into your eyes, rinse them out with clear water and seek medical attention right away. It may
result in loss of your eyesight.
• See the chapter “SPECIFICATIONS” for the type reference of the charger. For the purposes of recharging the
battery, only use the charger provided with the tool.
• See the section “Symbols” for the meaning of the symbols used for the tool.
• See the chapter “MAINTENANCE” for the appropriate details of precautions during user maintenance.
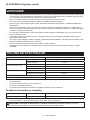
SPECIFICATIONS
Model: CL114FD
Capacity with a dust bag 500 ml
with a paper lter 330 ml
Continuous use
(with battery BL1020V)
3 (Max speed mode) Approx. 10 min
2 (High speed mode) Approx. 18 min
1 (Normal speed mode) Approx. 55 min
Overall length Cleaner body 458 mm
With extension wand and nozzle
983 mm
Net weight 1.1 kg
Rated voltage D.C. 10.8 V - 12 V max
• Due to our continuing program of research and development, the specications herein are subject to change
without notice.
• Specications may dier from country to country.
• The weight does not include accessories.
• For the purposes of recharging the battery, only use the charger provided with the tool.
Applicable battery cartridge and charger
Battery cartridge Battery charger Charging time (hours)
BL1020V DC1002 2.0
• Charging time varies by temperature (10°C (50°F) – 40°C (104°F)) that battery cartridge is charged at and con-
ditions of the battery cartridge, such as a battery cartridge which is new or has not been used for a long period
of time.
WARNING: Only use the battery cartridges and chargers listed above. Use of any other battery cartridges
and chargers may cause injury and/or re.

9ENGLISH
Symbols
The followings show the symbols which may be used
for the equipment. Be sure that you understand their
meaning before use.
Read instruction manual.
Detachable supply unit
Ni-MH
Li-ion
Only for EU countries
Due to the presence of hazardous com-
ponents in the equipment, waste electrical
and electronic equipment, accumulators
and batteries may have a negative impact
on the environment and human health.
Do not dispose of electrical and electronic
appliances or batteries with household waste!
In accordance with the European Directive
on waste electrical and electronic equipment
and on accumulators and batteries and
waste accumulators and batteries, as well as
their adaptation to national law, waste elec-
trical equipment, batteries and accumulators
should be stored separately and delivered
to a separate collection point for municipal
waste, operating in accordance with the
regulations on environmental protection.
This is indicated by the symbol of the
crossed-out wheeled bin placed on the
equipment.
Intended use
The appliance is intended for collecting dry dust.
SAFETY WARNINGS
Cordless cleaner safety warnings
WARNING: IMPORTANT! READ CAREFULLY
all safety warnings and all instructions BEFORE
USE . Failure to follow the warnings and instructions
may result in electric shock, re and/or serious injury.
1. Do not expose to rain. Store indoors.
2. Do not allow to be used as a toy. Close
attention is necessary when used by or near
children.
3. Use only as described in this manual. Use only
manufacturer's recommended attachments.
4. Do not use with damaged battery. If appliance
is not working as it should, has been dropped,
damaged, left outdoors, or dropped into water,
return it to a service center.
5. Do not handle appliance with wet hands.
6. Do not put any object into openings. Do not
use with any opening blocked; keep free of
dust, lint, hair, and anything that may reduce
air ow.
7. Keep hair, loose clothing, ngers, and all parts
of body away from openings and moving parts.
8.
Turn o all controls before removing the battery.
9. Use extra care when cleaning on stairs.
10. Do not use to pick up ammable or combusti-
ble liquids, such as gasoline, or use in areas
where they may be present.
11. Use only the charger supplied by the manufac-
turer to recharge.
12.
Do not pick up anything that is burning or smok-
ing, such as cigarettes, matches, or hot ashes.
13. Do not use without dust bag and/or lters in
place.
14. Do not charge the battery outdoors.
15. Recharge only with the charger specied by
the manufacturer. A charger that is suitable for
one type of battery pack may create a risk of re
when used with another battery pack.
16. Use power tools only with specically desig-
nated battery packs. Use of any other battery
packs may create a risk of injury and re.
17. When (the) battery pack is not in use, keep
it away from other metal objects, like paper
clips, coins, keys, nails, screws or other small
metal objects, that can make a connection
from one terminal to another.
18. Under abusive conditions, liquid may be
ejected from the battery; avoid contact. If con-
tact accidentally occurs, ush with water.
19. Do not use a battery pack or tool that is dam-
aged or modied. Damaged or modied batteries
may exhibit unpredictable behaviour resulting in
re, explosion or risk of injury.
20. Do not expose a battery pack or tool to re or
excessive temperature. Exposure to re or tem-
perature above 130 °C may cause explosion.
21. Follow all charging instructions and do not
charge the battery pack or tool outside the
temperature range specied in the instruc-
tions. Charging improperly or at temperatures
outside the specied range may damage the
battery and increase the risk of re.
SAVE THESE INSTRUCTIONS.
ADDITIONAL SAFETY RULES
1. Read this instruction manual and the charger
instruction manual carefully before use.
2. Do not pick up the following materials:
— Hot materials such as lit cigarettes or
spark/metal dust generated by grinding/
cutting metal
— Flammable materials such as gasoline,
thinner, benzine, kerosene or paint
— Explosive materials like nitroglycerin
— Ignitable materials such as Aluminum,
zinc, magnesium, titanium, phosphorus
or celluloid
— Wet dirt, water, oil or the like
— Hard pieces with sharp edges, such as
wood chips, metals, stones, glasses,
nails, pins or razors
— Powder to clot such as cement or toner
— Conductive dust such as metal or carbon
— Fine particle like concrete dust
Such action may cause re, injury and/or prop-
erty damage.

10 ENGLISH
3. Stop operation immediately if you notice any-
thing abnormal.
4. If you drop or strike the cleaner, check it care-
fully for cracks or damage before operation.
5. Do not charge the cleaner close to dangerous
ammable materials such as gasoline, gas,
paint or adhesives.
6. Do not charge the cleaner on papers, cloth,
carpet, vinyl, etc. This may cause a re.
7. Do not charge the cleaner in a dusty place.
8. Be sure no one is below when using the
cleaner in high locations.
9. Do not bring close to stoves or other heat
sources.
10. Do not block the intake hole or vent holes.
SAVE THESE INSTRUCTIONS.
IMPORTANT SAFETY
INSTRUCTIONS
FOR BUILT-IN BATTERY
1.
Before using built-in battery, read all instructions
and cautionary markings on (1) battery charger,
(2) battery, and (3) product using battery.
2. Do not disassemble built-in battery.
3. If operating time has become excessively
shorter, stop operating immediately. It may
result in a risk of overheating, possible burns
and even an explosion.
4. If electrolyte gets into your eyes, rinse them
out with clear water and seek medical atten-
tion right away. It may result in loss of your
eyesight.
5. Do not short the built-in battery:
(1) Do not touch the terminals with any con-
ductive material.
(2) Avoid storing built-in battery in a con-
tainer with other metal objects such as
nails, coins, etc.
(3) Do not expose built-in battery to water or
rain.
A battery short can cause a large current
ow, overheating, possible burns and
even a breakdown.
6. Do not store and use the tool and built-in bat-
tery in locations where the temperature may
reach or exceed 50 °C (122 °F).
7. Do not incinerate the built-in battery even if
it is severely damaged or is completely worn
out. The built-in battery can explode in a re.
8. Be careful not to drop or strike battery.
9. Do not use a damaged built-in battery.
10. The contained lithium-ion batteries are subject
to the Dangerous Goods Legislation require-
ments. When disposing the battery, remove it
from the tool and dispose of it in a safe place.
Follow your local regulations relating to dis-
posal of battery.
11. Use the batteries only with the products speci-
ed by Makita.
SAVE THESE INSTRUCTIONS.
Tips for maintaining maximum
battery life
1. Charge the built-in battery before completely
discharged.
Always stop tool operation and charge the
built-in battery when you notice less tool
power.
2. Never recharge a fully charged built-in battery.
Overcharging shortens the battery service life.
3. Charge the built-in battery with room tempera-
ture at 10°C - 40°C (50°F - 104°F). Let a hot
built-in battery cool down before charging it.
4. Charge the built-in battery once in every six
months if you do not use the tool for a long
period of time.
FUNCTIONAL
DESCRIPTION
CAUTION: Always be sure that the appliance
is switched o before adjusting or checking func-
tion on the appliance.
Charging the built-in battery
CAUTION: Only use genuine Makita batteries.
Use of non-genuine Makita batteries, or batteries that
have been altered, may result in the battery bursting
causing res, personal injury and damage. It will also
void the Makita warranty for the Makita product and
charger.
CAUTION: Always disconnect the charging
plug from the cleaner after charging.
CAUTION: Do not leave the charger in the
mains after disconnecting the appliance. Small
children may put the live plug in their mouth and
cause injury.
Charge the cleaner when using it for the rst time or
uncharged for a long time. Connect the charging plug to
the charging connector, then plug in the charger to the
power receptacle.
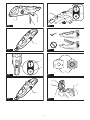
► Fig.1: 1. Charging connector
The battery power lamp lights up and the charging
starts. The light goes out after the charging is complete.
For more details, refer to the instruction manual of
battery charger.
► Fig.2: 1. Battery power lamp
NOTICE: The battery power lamp blinks and the
battery cannot be charged if the battery or cleaner
is exposed to extreme temperatures.

11 ENGLISH
NOTE: The cleaner cannot be controlled while being
charged. To start the cleaner, unplug the charger from
the power source, disconnect the charging plug from
the cleaner, and then push the ON/speed change
button.
NOTE: Under the following conditions, the battery is
about to reach its end of life (or damaged/malfunc-
tioned). Unplug the charger from the power supply,
then replace the battery.
• The battery power lamp goes out shortly after
you begin to charge the cleaner.
• The cleaner works only for a period shorter than
half of the normal operating time after the bat-
tery has been fully charged.
NOTE: The battery can be recharged up to approx-
imately 500 times. The rechargeable times vary
depending on the conditions under which the battery
has been charged and discharged.
Switch action
CAUTION: Always switch o the cleaner after
each use to prevent damage to the cleaner and to
extend the service life of the batteries.
To start the cleaner, simply push the ON/speed change
button. To switch o, push the OFF button.
You can change the cleaner speed in three steps by
pushing the ON/speed change button.
The rst push on this button is for high speed mode, the
second push for max speed mode and the third push for
normal speed mode. Each push on this button repeats
the high/max/normal speed cycle alternatively.
► Fig.3: 1. ON/speed change button 2. OFF button
Battery power lamp
When the remaining battery capacity gets low, the
battery power lamp blinks.
When the remaining battery capacity gets much lower,
the cleaner stops and the battery power lamp lights up
about 10 seconds. At this time, charge the battery.
Also when the battery gets overloaded or overheated,
the cleaner stops and the battery power lamp lights up
about 10 seconds. The cleaner does not actuate during
the lamp on.
► Fig.4: 1. Battery power lamp
NOTE: The time at which the battery power lamp start
blinking or lighting up depends on the temperature at
work place and the battery conditions.
Lighting up the lamp
CAUTION: Do not look in the light or see the
source of light directly.
To turn on the lamp, push the ON/speed change button.
Push the OFF button to turn o the lamp. During the
cleaner actuating, the lamp turns on.
► Fig.5: 1. ON/speed change button 2. OFF button
3. Lamp
ASSEMBLY
CAUTION: Always be sure that the appliance
is switched o before carrying out any work on
the appliance.
Dust bag and paper lter
Install either dust bag or paper lter before using cleaner.
Use the dust stopper when installing either dust bag or paper lter.
Dust bag are usable many times repeatedly by cleaning it out.
Paper lter is a throw-away type. Throw away the entire
paper lter without emptying when it has become full.
NOTICE: To prevent dust from getting into the
motor:
• Make sure that the dust bag or paper lter is
installed before use.
• Insert the dust stopper together with the
dust bag or paper lter all the way into the
slots when installing them.
• Do not use a broken or ripped bag.
Otherwise the motor may be broken.
NOTICE: Do not fold the cardboard at its open-
ing when installing the paper lter.
NOTICE: Never throw away the dust stopper
because it needs to be used repeatedly whenever
either the dust bag or the paper lter is used.
NOTICE: The paper lter for the cleaner is an
important component for maintaining the cleaner
performance. Using other than the genuine paper
lter may cause smokes or ignition.
NOTE: When the dust bag or the paper lter is not
installed in the cleaner, the front cover does not close
completely.
► Fig.6
Installing dust bag
Use the dust stopper when installing dust bag. Be
careful not to take the upper side for the lower side by
mistake because they are dierent each other.
► Fig.7: 1. Upper side of dust stopper 2. Lower side of
dust stopper
1. Insert the protrusion of the dust bag into the lower
groove on the dust stopper as shown in the gure.
► Fig.8: 1. Dust stopper 2. Lower groove 3. Dust bag
2.
There is no distinction between the upper and
lower sides of the dust bag. You may insert its protrusion
of either side into the lower groove of the dust stopper.
► Fig.9: 1. Lower groove
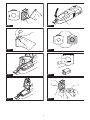
3. Overlap the frame of dust stopper with that of the
dust bag.
► Fig.10
4. Place the dust stopper and the dust bag together
into the cleaner cavity in the same direction of arrow on
the dust stopper. Insert them all the way into the slots in
the cleaner cavity.
► Fig.11

12 ENGLISH
5. Spread the cloth part of the dust bag inside the
cleaner.
► Fig.12
6. Close the front cover completely.
► Fig.13: 1. Front cover
Installing the paper lter
Use the dust stopper also when installing paper lter.
Be careful not to take the upper side for the lower side
by mistake because they are dierent each other.
► Fig.14: 1. Upper side of dust stopper 2. Lower side
of dust stopper
1. Unfold the entrance of the paper lter before
setting it on the dust stopper.
► Fig.15
2. Insert the protrusion of the paper lter into the
lower groove on the dust stopper as shown in the gure.
► Fig.16: 1. Dust stopper 2. Lower groove 3. Paper
lter
3. There is no distinction between the upper and
lower sides of the paper lter. You may insert its pro-
trusion of any side into the lower groove of the dust
stopper.
► Fig.17: 1. Lower groove
4. Overlap the frame of dust stopper with that of the
paper lter.
► Fig.18
5. Place the dust stopper and the paper lter
together into the cleaner cavity in the same direction of
arrow on the dust stopper. Insert them all the way into
the slots in the cleaner cavity.
► Fig.19
6. Spread the container part of the paper lter inside
the cleaner.
► Fig.20
7. Close the front cover completely.
► Fig.21: 1. Front cover
OPERATION
CAUTION: Do not move your face close to
the air vent when operating the cleaner. If foreign
objects are blown into eyes, it may result in personal
injury.
Installing or removing the cleaner
attachment
CAUTION: After installing an attachment,
check if it is securely installed. If the attachment
is installed imperfectly, it may come o and cause
personal injury.
CAUTION: Be careful not to hit your hand on
the wall etc. when removing the attachment.
When using attachment with lock function
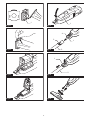
To install an attachment, insert it to the suction inlet of the
cleaner until it clicks. Make sure that the attachment is locked.
► Fig.22: 1. Suction inlet 2. Attachment with lock
function 3. Hook 4. Release button
NOTE: When installing the attachment with lock
function, be sure to align the release button with
the hook on the attachment. If they are not aligned,
the attachment will not be locked and may come o
from the cleaner.
To remove the attachment, pull it while pushing the
release button.
► Fig.23: 1. Release button 2. Attachment with lock
function
When using attachment without lock
function
CAUTION: To install an attachment without
lock function, twist and insert it in direction of the
arrow to secure the connection during use. To
remove the attachment, twist and extract it also in
direction of the arrow.
► Fig.24
Cleaning (Suction)
Nozzle
Attach the nozzle to clean o tables, desks, furniture,
etc. The nozzle slips on easily.
► Fig.25: 1. Nozzle
Nozzle + Extension wand (Straight pipe)
The extension wand ts in between the nozzle and the
cleaner itself. This arrangement is convenient for clean-
ing a oor in a standing position.
► Fig.26:
1. Cleaner body 2. Extension wand 3. Nozzle
Corner nozzle
Fit on the corner nozzle for cleaning corners and crev-
ices of a car seat or furniture.
► Fig.27: 1. Corner nozzle 2. Cleaner body
Corner nozzle + Extension wand
(Straight pipe)
In tight quarters where the cleaner itself cannot
squeeze in, or in high places hard to reach, use this
arrangement.
► Fig.28: 1. Corner nozzle 2. Extension wand
3. Cleaner body
Cleaning without nozzle
You can pick up powder and dust without nozzle.
► Fig.29
For picking up dust on a oor in a standing position, it is
convenient to attach the extension wand to the cleaner.
► Fig.30: 1. Extension wand

13 ENGLISH
Disposing of dust
CAUTION: Empty the cleaner before it
becomes too full, or the suction force weakens.
CAUTION: When closing the front cover, be
careful not to pinch your ngers.
NOTICE: Never throw away the dust stopper
because it should be used whenever either the
dust bag or the paper lter is used.
NOTICE: When the dust bag/paper lter is not
inside of the cleaner, the front cover does not
close completely. Do not force to close the front
cover. It may result in deforming or breakage of
the cleaner.
NOTICE: When disposing of dust, also clean the
room for the dust bag/paper lter. The remaining
dust and dirt in the room may cause the sponge lter
to be clogged or the motor to be damaged.
1. Push the button to open the front cover. Opening
it until a click is heard allows a positive stop at that
position.
► Fig.31: 1. Front cover 2. Button
2. Pull out both the orange-colored dust stopper and
dust bag/paper lter together at the same time.
► Fig.32: 1. Dust stopper
3. Perform the procedures below depending on the
dust container type:
When using the dust bag
Remove the dust stopper and empty the dust bag.
► Fig.33: 1. Dust stopper 2. Dust bag
When using the paper lter
Remove the dust stopper and dispose of the paper lter.
► Fig.34: 1. Dust stopper 2. Paper lter
4. Place the dust bag/new paper lter and dust stop-
per together into the cleaner and close the front cover.
NOTE: The cleaner is constructed in such a way that
the front cover comes o when trying to force the
front cover open at the angle of more than 90°. If the
front cover comes o, insert it into the front cover joint
in place.
► Fig.35: 1. Front cover 2. Front cover joint
MAINTENANCE
CAUTION: Always be sure that the appliance
is switched o before attempting to perform
inspection or maintenance.
To maintain product SAFETY and RELIABILITY,
repairs, any other maintenance or adjustment should
be performed by Makita Authorized or Factory Service
Centers, always using Makita replacement parts.
NOTICE: Never use gasoline, benzine, thinner,
alcohol or the like. Discoloration, deformation or
cracks may result.
After use
When storing or charging the cleaner, lock the nozzle
head, and hang it from a hook available in the market.
► Fig.36
CAUTION: Putting the cleaner against the
wall without any other support may cause the
cleaner to fall down and be damaged.
► Fig.37
Cleaning
Cleaner body
From time to time wipe o the outside (cleaner body) of
the cleaner using a cloth dampened in soapy water.
Clean out also the suction opening, dust bag/paper lter
mounting area and the dust stopper.
► Fig.38
Dust stopper
Wipe dust o from the dust stopper.
Remove dust and dirt on the sponge part by lightly
tapping it.
► Fig.39: 1. Sponge part
Dust bag
Wash the dust bag in soapy water when it is clogged
with dust and the cleaner power becomes weak. Dry it
out thoroughly before use. An insuciently dried bag
may cause poor suction and shorten the service life of
the motor.
► Fig.40
NOTE: Paper lter is a throw-away type.
When the sponge lter is clogged with dust, remove it
from the cleaner and then wipe it o or wash in water.
Removing and installing the sponge
lter
CAUTION: After cleaning sponge lter, be
sure to install it on the cleaner. If washed in water,
dry it up before installing. An insuciently dried
sponge lter may shorten the service life of the motor.
To remove the sponge lter, remove the dust bag or
paper lter and then pinch and take the sponge lter
out.
► Fig.41: 1. Sponge lter
To install the lter, press in the whole edge of the
sponge lter against the recessed wall inside the dust
bag/paper lter mounting area.
► Fig.42: 1. Recessed wall
The nozzle cleaning
(country specic)
When the nozzle brush gets dusty, clean up the dust
with adhesive tape.
► Fig.43: 1. Brush

14 ENGLISH
Wall mount for cordless cleaner
Optional accessory
NOTE: The screw to mount the holder is not included.
Prepare a screw which ts with the material to screw
into.
Attach the wall mount for cordless cleaner to a hard
wooden wall, beam or column, where the wall mount
for cordless cleaner can be rmly secured. Always be
sure that the wall mount for cordless cleaner is securely
attached before hanging the cleaner.
► Fig.44: 1. Wall mount for cordless cleaner 2. Plug
CAUTION: Do not hang the cleaner to the wall
mount violently or hang other appliances than the
cleaner.
NOTE: When you don’t charge the cleaner, the plug
can be stored on the wall mount for cordless cleaner
as illustrated.
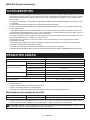
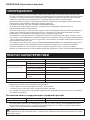
Troubleshooting
Before asking for repairs, check the following points.
Symptom Area to be investigated Fixing method
Weak suction power Is dust bag or paper lter full of dust ? Empty dust bag or paper lter.
Is dust bag clogged ? Dust down or wash the dust bag.
Is paper lter clogged ? Replace paper lter.
Is the battery cartridge discharged? Charge the battery cartridge.
Not working Is the battery cartridge discharged? Charge the battery cartridge.
Dust case cover does not close Is dust bag or paper lter set ? Set dust bag or paper lter.
NOTICE: Do not attempt to repair cleaner by yourself.
Disposing cleaner
A Li-ion battery is built in this cleaner. Always remove it
before disposing of the cleaner.
Removing built-in battery
CAUTION: Do not touch the terminals with
any conductive material.
CAUTION: Avoid storing battery unit in a
container with other metal objects such as nails,
coins, etc.
CAUTION: Do not expose battery unit to
water or rain.
CAUTION: Do not disassemble or alter bat-
tery unit.
CAUTION: The cleaner must be disconnected
from the supply mains when removing the battery.
1. To remove the rear cover, push it in the direction of
the arrow.
► Fig.45: 1. Rear cover
2. Slide the built-in battery halfway. Disconnect the
lead wires from the battery by slightly moving back the
battery while pressing the connector in the direction of
arrow as shown in the gure.
► Fig.46: 1. Connector 2. Lead wires
3. Then slide the battery unit out completely.
► Fig.47: 1. Battery unit
4. Put the removed battery unit in a carton box so
that it is not circuit-shorted.
Installing replacement battery
To install the replacement battery, follow the removal
procedure in reverse.
CAUTION: Route the lead so that it is com-
pletely stored inside the cleaner before putting
the rear cover back in the original position. Failure
to do this may damage the lead.
► Fig.48
After installing the battery (see "SPECIFICATIONS"),
charge the battery before use.

15 ENGLISH
OPTIONAL
ACCESSORIES
CAUTION: These accessories or attachments
are recommended for use with your Makita appli-
ance specied in this manual. The use of any other
accessories or attachments might present a risk of
injury to persons. Only use accessory or attachment
for its stated purpose.
If you need any assistance for more details regard-
ing these accessories, ask your local Makita Service
Center.
• Extension wand (Straight pipe)
• Nozzle
• Nozzle for carpet
• Shelf brush
• Corner nozzle
• Round brush
• Flexible hose
• Paper lter
• Wall mount for cordless cleaner
• Replacement battery
• Free nozzle
• Seat nozzle
• Crevice nozzle
• Cyclone attachment
NOTE: Some items in the list may be included in the
appliance package as standard accessories. They
may dier from country to country.

16 POLSKI
POLSKI (Instrukcja oryginalna)
OSTRZEŻENIE
• Niniejsze urządzenie może być użytkowane przez dzieci w wieku powyżej 8 lat oraz przez osoby niebędące w
pełni władz zycznych, poznawczych i umysłowych lub nieposiadające doświadczenia ani wiedzy, o ile osoba
odpowiedzialna za ich bezpieczeństwo zapewni odpowiedni nadzór i przekaże wskazówki dotyczące użytko-
wania urządzenia oraz zagrożeń z nimi związanych.
• Urządzenie nie jest przeznaczone do zabawy nim przez dzieci. Czyszczenie oraz konserwacja nie mogą być
przeprowadzane przez dzieci bez nadzoru.
• Informacje na temat zalecanych akumulatorów zawiera rozdział „DANE TECHNICZNE”.
• Sposób wymiany akumulatora opisano w punktach „Wyjmowanie wbudowanego akumulatora” i „Wkładanie
zamiennego akumulatora”.
• Stanowiące wyposażenie akumulatory litowo-jonowe podlegają przepisom dotyczącym produktów niebez-
piecznych. Jeśli zajdzie konieczność utylizacji akumulatora, należy wyjąć go z narzędzia i przekazać w bez-
pieczne miejsce. Postępować zgodnie z przepisami lokalnymi dotyczącymi usuwania akumulatorów.
• W niewłaściwych warunkach eksploatacji może dojść do wycieku elektrolitu z akumulatora. Nie należy go
dotykać. W razie przypadkowego kontaktu należy przemyć skażoną skórę wodą.
• W przypadku przedostania się elektrolitu do oczu przemyć je czystą wodą i niezwłocznie uzyskać pomoc lekar-
ską. Kontakt z elektrolitem może spowodować utratę wzroku.
• Informacje na temat zalecanych ładowarek zawiera rozdział „DANE TECHNICZNE”. W razie konieczności
naładowania akumulatora należy używać wyłącznie ładowarki dostarczonej z narzędziem.
• Informacje na temat znaczenia symboli zastosowanych na narzędziu zawiera punkt „Symbole”.
• Szczegółowe informacje na temat środków ostrożności podczas konserwacji wykonywanej przez użytkownika
zawiera rozdział „KONSERWACJA”.
DANE TECHNICZNE
Model: CL114FD
Pojemność z workiem na pył 500 ml
z ltrem papierowym 330 ml
Użytkowanie ciągłe
(z akumulatorem BL1020V) 3 (tryb maks. prędkości) Ok. 10 min
2 (tryb wysokiej prędkości) Ok. 18 min
1 (tryb normalnej prędkości) Ok. 55 min
Długość całkowita Korpus odkurzacza 458 mm
Z rurą przedłużającą i końcówką
983 mm
Masa netto 1,1 kg
Napięcie znamionowe Prąd stały 10,8 V–12 V maks.
• W związku ze stale prowadzonym przez naszą rmę programem badawczo-rozwojowym niniejsze dane mogą
ulec zmianom bez wcześniejszego powiadomienia.
• Dane techniczne mogą różnić się w zależności od kraju.
• Waga nie uwzględnia akcesoriów.
• W razie konieczności naładowania akumulatora należy używać wyłącznie ładowarki dostarczonej z
narzędziem.
Kompatybilne akumulatory i ładowarki
Akumulator Ładowarka akumulatorów Czas ładowania (godz.)
BL1020V DC1002 2,0
• Czas ładowania różni się w zależności od temperatury, w jakiej ładowany jest akumulator (10°C (50°F) – 40°C
(104°F)), a także od stanu akumulatora, np. od tego, czy akumulator jest nowy lub nie był używany przez dłuż-
szy czas.
OSTRZEŻENIE: Należy używać wyłącznie akumulatorów i ładowarek wymienionych powyżej.
Używanie innych akumulatorów i ładowarek może stwarzać ryzyko wystąpienia obrażeń ciała lub pożaru.

17 POLSKI
Symbole
Poniżej pokazano symbole, jakie mogą być zastoso-
wane na urządzeniu. Przed rozpoczęciem użytkowania
należy zapoznać się z ich znaczeniem.
Przeczytać instrukcję obsługi.
Dołączany zasilacz
Ni-MH
Li-ion
Dotyczy tylko państw UE
Z uwagi na obecność w sprzęcie nie-
bezpiecznych składników, zużyty sprzęt
elektryczny, elektroniczny, akumulatory
oraz baterie mogą powodować negatywny
wpływ na środowisko i zdrowie ludzi.
Nie wyrzucaj urządzeń elektrycznych,
elektronicznych lub akumulatorów wraz z
odpadami z gospodarstwa domowego!
Zgodnie z Europejską Dyrektywą w
sprawie zużytego sprzętu elektrycznego i
elektronicznego oraz dotyczącą akumula-
torów i baterii oraz zużytych akumulatorów
i baterii, a także dostosowaniem ich do
prawa krajowego, zużyte urządzenia
elektryczne, elektroniczne, baterie i
akumulatory, należy składować osobno i
przekazywać do punktu selektywnej zbiórki
odpadów komunalnych, działającego
zgodnie z przepisami dotyczącymi ochrony
środowiska.
Informuje o tym symbol przekreślonego
kołowego kontenera na odpady umiesz-
czony na sprzęcie.
Przeznaczenie
To urządzenie jest przeznaczone do odsysania suchego
pyłu.
OSTRZEŻENIA
DOTYCZĄCE
BEZPIECZEŃSTWA
Ostrzeżenia dotyczące
bezpieczeństwa dla odkurzacza
akumulatorowego
OSTRZEŻENIE: WAŻNE! UWAŻNIE
PRZECZYTAĆ wszystkie zasady bezpieczeństwa
i zalecenia PRZED UŻYCIEM. Niezastosowanie się
do wspomnianych ostrzeżeń i instrukcji może dopro-
wadzić do porażenia prądem elektrycznym, pożaru i/
lub poważnych obrażeń ciała.
1. Należy chronić przed deszczem.
Przechowywać w pomieszczeniu.
2. Nie pozwalać dzieciom bawić się urządzeniem.
Należy zachować szczególną ostrożność,
kiedy odkurzacz jest używany w pobliżu lub
przez dzieci.
3. Używać tylko zgodnie z niniejszą instrukcją.
Należy używać tylko akcesoriów zalecanych
przez producenta.
4. Nie używać urządzenia z uszkodzonym aku-
mulatorem. Jeśli urządzenie nie działa pra-
widłowo, zostało upuszczone, uszkodzone,
pozostawione na zewnątrz lub wpadło do
wody, należy je oddać do punktu serwisowego.
5. Nie wolno obsługiwać urządzenia mokrymi
dłońmi.
6. Nie wkładać żadnych przedmiotów w otwory
urządzenia. Nie używać urządzenia z zabloko-
wanymi otworami; usuwać pył, kłaczki, włosy
i wszystko, co może ograniczyć przepływ
powietrza.
7. Nie zbliżać włosów, luźnej odzieży, palców ani
innych części ciała do otworów i ruchomych
części.
8. Przed wyjęciem akumulatora należy wyłączyć
wszystkie elementy sterowania.
9. Zachować szczególną ostrożność podczas
sprzątania na schodach.
10. Nie używać do zbierania palnych lub łatwopal-
nych cieczy, takich jak benzyna, ani nie uży-
wać w miejscach, gdzie mogą występować.
11. Akumulator należy ładować wyłącznie
przy użyciu ładowarki dostarczonej przez
producenta.
12. Nie zbierać niczego, co się pali lub dymi, na
przykład papierosów, zapałek lub gorącego
popiołu.
13.
Nie używać bez założonych ltrów i/lub worka na pył.
14. Nie ładować akumulatora na zewnątrz.
15. Akumulator należy ładować wyłącznie przy
użyciu określonej przez producenta łado-
warki. Ładowarka przeznaczona do jednego typu
akumulatora może stwarzać zagrożenie poża-
rem, gdy będzie używana do ładowania innego
akumulatora.
16. Do zasilania elektronarzędzi używać tylko
specjalnie do tego celu przeznaczonych aku-
mulatorów. Używanie innych akumulatorów może
stwarzać ryzyko wystąpienia obrażeń ciała lub
pożaru.
17. Gdy akumulator nie jest używany, należy
zabezpieczyć go przed kontaktem z meta-
lowymi przedmiotami, takimi jak spinacze,
monety, klucze, gwoździe, wkręty lub inne
metalowe drobiazgi, które mogą powodować
zwarcie styków akumulatora.
18. W niewłaściwych warunkach eksploatacji
może dojść do wycieku elektrolitu z akumu-
latora. Nie należy go dotykać. W razie przy-
padkowego kontaktu należy przemyć skażoną
skórę wodą.
19. Nie używać uszkodzonego lub przerobionego
akumulatora ani narzędzia. Uszkodzone lub
przerobione akumulatory mogą działać w nieprze-
widywalny sposób i spowodować pożar, wybuch
lub obrażenia ciała.
20. Nie wystawiać akumulatora ani narzędzia na
działanie ognia ani nadmiernej temperatury.
Narażenie na ogień lub temperaturę wyższą niż
130°C może spowodować wybuch.

18 POLSKI
21. Przestrzegać wszystkich instrukcji ładowania
i nie ładować akumulatora ani narzędzia w
temperaturze wykraczającej poza zakres okre-
ślony w instrukcji. Nieprawidłowe ładowanie lub
temperatury wykraczająca poza określony zakres
mogą spowodować uszkodzenie akumulatora
oraz wzrost zagrożenia pożarem.
ZACHOWAĆ NINIEJSZĄ
INSTRUKCJĘ.
DODATKOWE ZALECENIA
DOTYCZĄCE BEZPIECZEŃSTWA
1. Przed rozpoczęciem pracy przeczytaj dokład-
nie niniejszy podręcznik obsługi oraz podręcz-
nik obsługi ładowarki.
2. Nie wciągać do urządzenia następujących
materiałów:
— substancji gorących, takich jak zapalony
papieros czy iskry/opiłki powstające w
wyniku szlifowania/cięcia metalu
—
substancji łatwopalnych, takich jak paliwo,
rozpuszczalniki, benzyna, nafta lub farby
— materiałów wybuchowych, jak
nitrogliceryna
—
substancji zapalnych, takich jak aluminium,
cynk, magnez, tytan, fosfor czy celuloid
— błota, wody, oleju itp.
— elementów twardych o ostrych brzegach,
takich jak wióry, metale, kamienie, szkło,
gwoździe, kołki czy żyletki
— drobnych pyłów, takich jak cement czy
toner drukarki
— substancji przewodzących, takich jak
opiłki żelaza czy pył węglowy
— drobnych cząstek, takich jak pył
betonowy
Takie działania mogą spowodować pożar,
obrażenia ciała i/lub straty materialne.
3. Natychmiast przerwać pracę po zauważeniu
jakiejkolwiek nieprawidłowości.
4.
Kiedy odkurzacz zostanie upuszczony lub ude-
rzony, to przed uruchomieniem należy spraw-
dzić, czy nie jest uszkodzony, pęknięty itd.
5. Odkurzacza nie należy ładować w pobliżu
niebezpiecznych, palnych substancji, takich
jak benzyna, gaz, lakiery i farby oraz kleje.
6. Odkurzacza nie należy ładować, kiedy jest
ułożony na papierze, tkaninie, dywanie, winylu,
itp., gdyż może to spowodować pożar.
7. Odkurzacza nie należy ładować w pomieszcze-
niach zapylonych.
8. W przypadku pracy na pewnej wysokości,
należy upewnić się, czy przypadkiem na dole
nie przebywają jakieś osoby.
9. Nie należy go zbliżać do pieców ani innych
źródeł ciepła.
10. Nie wolno zakrywać otworu wlotowego ani
otworów wentylacyjnych.
ZACHOWAĆ NINIEJSZĄ
INSTRUKCJĘ.
WAŻNE INSTRUKCJE
BEZPIECZEŃSTWA
DOTYCZĄCE WBUDOWANEGO
AKUMULATORA
1. Przed użyciem wbudowanego akumulatora
zapoznać się ze wszystkimi instrukcjami i
znakami ostrzegawczymi na (1) ładowarce aku-
mulatorów, (2) akumulatorze i (3) produkcie, w
którym będzie używany akumulator.
2. Wbudowanego akumulatora nie wolno
demontować.
3. Jeśli czas działania uległ znacznemu skróce-
niu, należy natychmiast przerwać pracę. Może
bowiem dojść do przegrzania, ewentualnych
poparzeń, a nawet eksplozji.
4. W przypadku przedostania się elektrolitu do
oczu przemyć je czystą wodą i niezwłocznie
uzyskać pomoc lekarską. Kontakt z elektroli-
tem może spowodować utratę wzroku.
5. Biegunów wbudowanego akumulatora nie
wolno zwierać:
(1) Nie dotykać styków materiałami przewo-
dzącymi prąd.
(2) Unikać przechowywania wbudowanego
akumulatora w pojemnikach z innymi
metalowymi przedmiotami, takimi jak
gwoździe, monety itp.
(3) Chronić wbudowany akumulator przed
deszczem i wodą.
Zwarcie prowadzi do przepływu prądu
elektrycznego o dużym natężeniu i prze-
grzania akumulatora, co w konsekwencji
może grozić poparzeniami, a nawet awa-
rią urządzenia.
6. Narzędzia i wbudowanego akumulatora nie
wolno przechowywać ani używać w miejscach,
w których temperatura osiąga bądź przekracza
50°C (122°F).
7. Wbudowanego akumulatora nie wolno spalać,
nawet jeśli jest poważnie uszkodzony lub cał-
kowicie zużyty. Wbudowany akumulator może
eksplodować w ogniu.
8. Chronić akumulator przed upadkiem i
uderzeniami.
9. Nie wolno używać uszkodzonego wbudowa-
nego akumulatora.
10. Stanowiące wyposażenie akumulatory litowo-
-jonowe podlegają przepisom dotyczącym pro-
duktów niebezpiecznych. Jeśli zajdzie koniecz-
ność utylizacji akumulatora, należy wyjąć go
z narzędzia i przekazać w bezpieczne miejsce.
Postępować zgodnie z przepisami lokalnymi
dotyczącymi usuwania akumulatorów.
11. Używać akumulatorów tylko z produktami
określonymi przez rmę Makita.
ZACHOWAĆ NINIEJSZĄ
INSTRUKCJĘ.

19 POLSKI
Wskazówki dotyczące zachowania
maksymalnej trwałości akumulatora
1. Wbudowany akumulator należy naładować
zanim zostanie do końca rozładowany.
Po zauważeniu spadku mocy urządzenia
należy przerwać pracę i naładować wbudo-
wany akumulator.
2. Nie wolno podejmować prób ładowania w pełni
naładowanego wbudowanego akumulatora.
Przeładowanie akumulatora powoduje skróce-
nie jego okresu eksploatacji.
3. Wbudowany akumulator należy ładować w
temperaturze pokojowej, w zakresie 10–40°C
(50–104°F). Jeżeli wbudowany akumulator jest
nagrzany, przed przystąpieniem do ładowania
należy poczekać, aż ostygnie.
4. Ładować wbudowany akumulator raz na sześć
miesięcy, jeśli narzędzie nie jest używane
przed długi okres.
OPIS DZIAŁANIA
PRZESTROGA: Przed rozpoczęciem regulacji
lub sprawdzeniem działania urządzenia należy
upewnić się, że jest ono wyłączone.
Ładowanie wbudowanego
akumulatora
PRZESTROGA: Używać wyłącznie oryginal-
nych akumulatorów rmy Makita. Używanie nie-
oryginalnych akumulatorów rm innych niż Makita lub
akumulatorów, które zostały zmodykowane, może
spowodować wybuch akumulatora i pożar, obrażenia
ciała oraz zniszczenie mienia. Stanowi to również
naruszenie warunków gwarancji rmy Makita doty-
czących produktu i ładowarki.
PRZESTROGA: Po ładowaniu należy zawsze
odłączać wtyczkę kabla ładowarki od odkurzacza.
PRZESTROGA: Nie pozostawiać ładowarki
podłączonej do gniazdka elektrycznego po
odłączeniu urządzenia. Małe dzieci mogą włożyć
wtyczkę do ust i odnieść obrażenia.
W przypadku pierwszego użycia lub po dłuższym okre-
sie nieładowania odkurzacz należy naładować. Włożyć
wtyczkę kabla ładowarki do złącza ładowania, a następ-
nie podłączyć ładowarkę do gniazdka elektrycznego.
► Rys.1: 1. Złącze do ładowania
Kontrolka zasilania akumulatora zapali się i rozpocznie
się ładowanie. Po całkowitym naładowaniu akumulatora
kontrolka zgaśnie. Dodatkowe informacje można zna-
leźć w instrukcji obsługi ładowarki.
► Rys.2: 1. Kontrolka zasilania akumulatora
UWAGA: Kontrolka zasilania akumulatora miga i
ładowanie akumulatora nie będzie możliwe, jeśli
akumulator lub odkurzacz jest wystawiony na
działanie ekstremalnie wysokich temperatur.
WSKAZÓWKA: W czasie ładowania sterowanie
odkurzaczem nie będzie możliwe. Aby uruchomić
odkurzacz, należy odłączyć ładowarkę od źródła
zasilania, odłączyć wtyczkę ładowarki od odkurzacza,
a następnie nacisnąć przycisk WŁ./zmiany prędkości.
WSKAZÓWKA: Poniżej przedstawiono warunki, w
których akumulator jest bliski zużycia (lub uszko-
dzony/zniszczony). Należy odłączyć ładowarkę od
źródła zasilania, a następnie wymienić akumulator.
• Kontrolka zasilania akumulatora gaśnie nie-
długo po rozpoczęciu ładowania odkurzacza.
• Czas działania odkurzacza jest krótszy niż
połowa normalnego czasu pracy po pełnym
naładowaniu akumulatora.
WSKAZÓWKA: Akumulator można ponownie łado-
wać około 500 razy. Liczba ponownych ładowań różni
się w zależności od warunków ładowania i rozładowy-
wania akumulatora.
Działanie przełącznika
PRZESTROGA: Po każdym użyciu odkurzacz
należy wyłączyć, aby uniknąć jego uszkodzenia i
wydłużyć okres eksploatacji akumulatorów.
Aby uruchomić odkurzacz, wystarczy nacisnąć przycisk
WŁ./zmiany prędkości. Aby go wyłączyć, należy naci-
snąć przycisk WYŁ.
Prędkość odkurzacza można ustawić na trzech pozio-
mach za pomocą przycisku WŁ./zmiany prędkości.
Pierwsze naciśnięcie tego przycisku wybiera tryb wyso-
kiej prędkość, drugie naciśnięcie wybiera tryb maks.
prędkości, a trzecie naciśnięcie przywraca normalną
prędkość. Każde naciśnięcie tego przycisku powta-
rza kolejność włączania wysokiej/maks./normalnej
prędkości.
► Rys.3: 1. Przycisk WŁ./zmiany prędkości
2. Przycisk WYŁ.
Kontrolka zasilania akumulatora
W przypadku obniżenia stanu naładowania akumula-
tora kontrolka zasilania zaczyna migać.
Jeśli stan naładowania akumulatora znacznie się
obniży, odkurzacz zostanie wyłączony w trakcie pracy, a
wskaźnik akumulatora zapali się na około 10 sekund. W
takiej sytuacji należy naładować akumulator.
Również w przypadku przeładowania lub przegrzania
akumulatora odkurzacz przestaje działać i kontrolka
zasilania akumulatora zapala się na około 10 sekund.
Odkurzacz nie włączy się, gdy świeci kontrolka.
► Rys.4: 1. Kontrolka zasilania akumulatora
WSKAZÓWKA: Moment, w którym kontrolka akumu-
latora zaczyna migać lub zapala się zależy od tempe-
ratury w miejscu pracy oraz od stanu akumulatora.

20 POLSKI
Włączanie lampki
PRZESTROGA: Nie patrzeć na światło ani
bezpośrednio na źródło światła.
Aby włączyć lampkę, należy nacisnąć przycisk WŁ./
zmiany prędkości. Aby wyłączyć lampkę, należy naci-
snąć przycisk WYŁ. Podczas uruchamiania odkurzacza
lampka świeci.
► Rys.5: 1. Przycisk WŁ./zmiany prędkości
2. Przycisk WYŁ. 3. Lampka
MONTAŻ
PRZESTROGA: Przed przystąpieniem do
jakichkolwiek prac przy urządzeniu należy upew-
nić się, że jest ono wyłączone.
Worek na pył i ltr papierowy
Przed rozpoczęciem użytkowania odkurzacza należy
założyć worek na pył lub ltr papierowy.
Bariery pyłu należy używać zarówno z workiem na pył,
jak i z ltrem papierowym.
Worek na pył można używać wielokrotnie po jego
wyczyszczeniu.
Filtr papierowy jest jednorazowego użytku. Kiedy ltr
się papierowy się zapełni, należy go wyrzucić bez
opróżniania.
UWAGA: Aby zapobiec przedostaniu się pyłu do
silnika:
• Przed przystąpieniem do użytkowania upew-
nić się, że worek na pył lub ltr papierowy są
założone.
• Włożyć barierę pyłu razem z workiem na pył
lub ltrem papierowym do oporu w szczeliny.
• Nie używać podartego lub przetartego
worka.
Może to doprowadzić do uszkodzenia silnika.
UWAGA: Wkładając ltr papierowy, nie zginać
kartonowej części przy jego wlocie.
UWAGA: Bariery pyłu nie wolno wyrzucać,
gdyż należy ją stosować zawsze i wielokrot-
nie, zarówno z workiem na pył, jak i ltrem
papierowym.
UWAGA: Filtr papierowy odkurzacza to istotny
element zachowania wydajności odkurzacza.
Użycie ltru papierowego innego niż oryginalny
może spowodować dymienie lub zapłon.
WSKAZÓWKA: Kiedy w odkurzaczu nie ma zało-
żonego worka na pył lub ltra papierowego, nie jest
możliwe całkowite zamknięcie przedniej pokrywy.
► Rys.6
Zakładanie worka na pył
Wkładając worek na pył, należy założyć także barierę
pyłu. Należy uważać, aby nie pomylić górnej strony
bariery pyłu z dolną, gdyż nie są one równe.
► Rys.7: 1. Górna strona bariery pyłu 2. Dolna strona
bariery pyłu
1. Włożyć występ worka na pył do dolnego rowka na
barierze pyłu, jak pokazano na rysunku.
► Rys.8:
1. Bariera pyłu 2. Dolny rowek 3. Worek na pył
2. Nie ma różnicy pomiędzy górną a dolną częścią
worka na pył. W dolny rowek bariery pyłu można wsu-
nąć występ worka znajdujący się z jednej lub drugiej
jego strony.
► Rys.9: 1. Dolny rowek
3. Ustawić ramki bariery pyłu i worka na pył, tak aby
zachodziły na siebie.
► Rys.10
4.
Włożyć barierę pyłu i worek na pył we wnękę odku-
rzacza zgodnie z kierunkiem strzałki na barierze pyłu.
Włożyć je całkowicie w szczeliny wnęki odkurzacza.
► Rys.11
5.
Rozłożyć w odkurzaczu tekstylną część worka na pył.
► Rys.12
6. Całkowicie zamknąć pokrywę przednią.
► Rys.13: 1. Przednia pokrywa
Wkładanie ltra papierowego
Wkładając ltr papierowy, należy założyć także barierę
pyłu. Należy uważać, aby nie pomylić górnej strony
bariery pyłu z dolną, gdyż nie są one równe.
► Rys.14: 1. Górna strona bariery pyłu 2. Dolna
strona bariery pyłu
1. Przed włożeniem ltra papierowego należy rozło-
żyć ltr u jego wlotu.
► Rys.15
2. Włożyć występ ltra papierowego do dolnego
rowka na barierze pyłu, jak pokazano na rysunku.
► Rys.16: 1. Bariera pyłu 2. Dolny rowek 3. Filtr
papierowy
3. Nie ma różnicy pomiędzy górną a dolną częścią
ltra papierowego. W dolny rowek bariery pyłu można
wsunąć występ ltra znajdujący się z jednej lub drugiej
jego strony.
► Rys.17: 1. Dolny rowek
4. Ustawić ramki bariery pyłu i ltra papierowego, tak
aby zachodziły na siebie.
► Rys.18
5.
Włożyć barierę pyłu i worek na pył we wnękę odku-
rzacza zgodnie z kierunkiem strzałki na barierze pyłu.
Włożyć je całkowicie w szczeliny wnęki odkurzacza.
► Rys.19
6. Rozłożyć w odkurzaczu papierową część ltra.
► Rys.20
7. Całkowicie zamknąć pokrywę przednią.
► Rys.21: 1. Przednia pokrywa
Strona jest ładowana ...
Strona jest ładowana ...
Strona jest ładowana ...
Strona jest ładowana ...
Strona jest ładowana ...
Strona jest ładowana ...
Strona jest ładowana ...
Strona jest ładowana ...
Strona jest ładowana ...
Strona jest ładowana ...
Strona jest ładowana ...
Strona jest ładowana ...
Strona jest ładowana ...
Strona jest ładowana ...
Strona jest ładowana ...
Strona jest ładowana ...
Strona jest ładowana ...
Strona jest ładowana ...
Strona jest ładowana ...
Strona jest ładowana ...
Strona jest ładowana ...
Strona jest ładowana ...
Strona jest ładowana ...
Strona jest ładowana ...
Strona jest ładowana ...
Strona jest ładowana ...
Strona jest ładowana ...
Strona jest ładowana ...
Strona jest ładowana ...
Strona jest ładowana ...
Strona jest ładowana ...
Strona jest ładowana ...
Strona jest ładowana ...
Strona jest ładowana ...
Strona jest ładowana ...
Strona jest ładowana ...
Strona jest ładowana ...
Strona jest ładowana ...
Strona jest ładowana ...
Strona jest ładowana ...
Strona jest ładowana ...
Strona jest ładowana ...
Strona jest ładowana ...
Strona jest ładowana ...
Strona jest ładowana ...
Strona jest ładowana ...
Strona jest ładowana ...
Strona jest ładowana ...
Strona jest ładowana ...
Strona jest ładowana ...
Strona jest ładowana ...
Strona jest ładowana ...
Strona jest ładowana ...
Strona jest ładowana ...
Strona jest ładowana ...
Strona jest ładowana ...
-
 1
1
-
 2
2
-
 3
3
-
 4
4
-
 5
5
-
 6
6
-
 7
7
-
 8
8
-
 9
9
-
 10
10
-
 11
11
-
 12
12
-
 13
13
-
 14
14
-
 15
15
-
 16
16
-
 17
17
-
 18
18
-
 19
19
-
 20
20
-
 21
21
-
 22
22
-
 23
23
-
 24
24
-
 25
25
-
 26
26
-
 27
27
-
 28
28
-
 29
29
-
 30
30
-
 31
31
-
 32
32
-
 33
33
-
 34
34
-
 35
35
-
 36
36
-
 37
37
-
 38
38
-
 39
39
-
 40
40
-
 41
41
-
 42
42
-
 43
43
-
 44
44
-
 45
45
-
 46
46
-
 47
47
-
 48
48
-
 49
49
-
 50
50
-
 51
51
-
 52
52
-
 53
53
-
 54
54
-
 55
55
-
 56
56
-
 57
57
-
 58
58
-
 59
59
-
 60
60
-
 61
61
-
 62
62
-
 63
63
-
 64
64
-
 65
65
-
 66
66
-
 67
67
-
 68
68
-
 69
69
-
 70
70
-
 71
71
-
 72
72
-
 73
73
-
 74
74
-
 75
75
-
 76
76


w innych językach
- slovenčina: Makita CL114FD Používateľská príručka
- română: Makita CL114FD Manual de utilizare
Powiązane dokumenty
-
Makita VC008G Instrukcja obsługi
-
Makita DVC157L Instrukcja obsługi
-
Makita CL108FD Instrukcja obsługi
-
Makita DVC861L Instrukcja obsługi
-
Makita BCL140 Instrukcja obsługi
-
-
-
-
Makita DC18RC Instrukcja obsługi
-
Makita BO4565 Instrukcja obsługi