Makita VC008G Instrukcja obsługi
- Kategoria
- Odkurzacze
- Typ
- Instrukcja obsługi

VC008G
EN Cordless Backpack Vacuum
Cleaner INSTRUCTION MANUAL 9
PL Akumulatorowy Odkurzacz
Plecakowy INSTRUKCJA OBSŁUGI 20
HU Vezeték nélküli háti porszívó HASZNÁLATI KÉZIKÖNYV 32
SK Plecniakový akumulátorový
vysávač NÁVOD NA OBSLUHU 43
CS Akumulátorový vysavač v
brašně na záda NÁVOD K OBSLUZE 54
UK Ранцевий акумуляторний
пилосос ІНСТРУКЦІЯ З
ЕКСПЛУАТАЦІЇ 65
RO Aspirator fără cablu de tip
rucsac MANUAL DE INSTRUCŢIUNI 77
DE Akku-Rucksackstaubsauger BETRIEBSANLEITUNG 88

2
3
2
1
Fig.1
1
2
Fig.2
1
2
Fig.3
21
Fig.4
1
2
Fig.5
1
2
Fig.6
1
Fig.7

3
1
2
Fig.8
Fig.9
2 3
1
Fig.10
1 1
2
2
Fig.11
2
1
Fig.12
1
2
Fig.13
1
2
3
Fig.14
1
234
Fig.15

4
2
1
3
Fig.16
1
Fig.17
1
2
3
3
Fig.18
1
Fig.19
1
4
2
3
Fig.20
1
2 3
Fig.21

5
1
2
Fig.22
1
3
2
Fig.23
1
2
4
3
Fig.24
Fig.25
1
2
Fig.26

6
1
2
Fig.27
1
3
2
Fig.28
1
3
4
2
Fig.29
Fig.30
Fig.31
2
1
Fig.32
1
Fig.33

7
1
Fig.34
Fig.35
2
4
3
1
Fig.36
Fig.37
4
3
21
Fig.38
1
2
3
Fig.39
1
Fig.40

8
2
3
1
4
Fig.41
2
1
Fig.42
1
2
Fig.43
1
2
Fig.44
2
1
3
Fig.45

9ENGLISH
ENGLISH (Original instructions)
WARNING
• This machine is not intended for use by persons including children with reduced physical, sensory or mental
capabilities, or lack of experience and knowledge.
• Children should be supervised to ensure that they do not play with the cleaner.
• See the chapter “SPECIFICATIONS” for the type reference of the battery.
• See the section “Installing or removing battery cartridge” for how to remove or install the battery.
• When disposing the battery cartridge, remove it from the tool and dispose of it in a safe place. Follow your local
regulations relating to disposal of battery.
• If the tool is not used for a long period of time, the battery must be removed from the tool.
• Do not short the battery cartridge.
• See the chapter “MAINTENANCE” for the appropriate details of precautions during user maintenance.
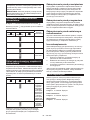
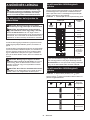
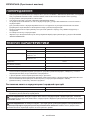
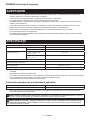
SPECIFICATIONS
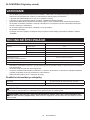
Model: VC008G
Capacity Filter bag 2.0 L
Dust bag 1.5 L
Maximum air volume With hose ø28 mm x 1.0 m 1.9 m3/min
With hose ø32 mm x 1.0 m 2.4 m3/min
Vacuum 18 kPa
Dimensions (L x W x H)
(excluding the harness, with BL4040)
233 mm x 150 mm x 375 mm
Rated voltage D.C. 36 V - 40 V max
Net weight 4.1 - 5.3 kg
• Duetoourcontinuingprogramofresearchanddevelopment,thespecicationshereinaresubjecttochange
without notice.
• Specicationsmaydierfromcountrytocountry.
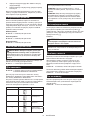
• The weight does not include accessories but battery cartridge(s). The lightest and heaviest combination weight
of the appliance and battery cartridge(s) are shown in the table.
• The length of supplied hose varies depending on the countries.
Applicable battery cartridge and charger
Battery cartridge BL4020 / BL4025 / BL4040 / BL4050F / BL4080F
Charger DC40RA / DC40RB / DC40RC
• Some of the battery cartridges and chargers listed above may not be available depending on your region of
residence.
WARNING: Only use the battery cartridges and chargers listed above. Use of any other battery cartridges
andchargersmaycauseinjuryand/orre.
WARNING: Do not use a corded power supply such as battery adapter or portable power pack with
this appliance.Thecableofsuchpowersupplymayhindertheoperationandresultinpersonalinjury.

10 ENGLISH
Symbols
The followings show the symbols which may be used
for the equipment. Be sure that you understand their
meaning before use.
Read instruction manual.
Take particular care and attention.
A representative battery applicable to this
product.
Ni-MH
Li-ion
Only for EU countries
Due to the presence of hazardous com-
ponents in the equipment, waste electrical
and electronic equipment, accumulators
and batteries may have a negative impact
on the environment and human health.
Do not dispose of electrical and electronic
appliances or batteries with household
waste!
In accordance with the European Directive
on waste electrical and electronic equip-
ment and on accumulators and batteries
and waste accumulators and batteries,
as well as their adaptation to national law,
waste electrical equipment, batteries and
accumulators should be stored separately
and delivered to a separate collection point
for municipal waste, operating in accor-
dance with the regulations on environmen-
tal protection.
This is indicated by the symbol of the
crossed-out wheeled bin placed on the
equipment.
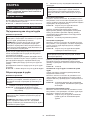
Intended use
The tool is intended for collecting dry dust. The tool
is suitable for commercial use, for example in hotels,
schools,hospitals,factories,shops,ocesandrental
businesses.
Noise
The typical A-weighted noise level determined accord-
ing to 60335-2-69:
Sound pressure level (LpA) : 72 dB (A)
Uncertainty (K) : 2.5 dB (A)
The noise level under working may exceed 80 dB (A).
NOTE: The declared noise emission value(s) has
been measured in accordance with a standard test
method and may be used for comparing one tool with
another.
NOTE: The declared noise emission value(s)
may also be used in a preliminary assessment of
exposure.
WARNING: Wear ear protection.
WARNING: The noise emission during actual
use of the power tool can dier from the declared
value(s) depending on the ways in which the
tool is used especially what kind of workpiece is
processed.
WARNING: Be sure to identify safety mea-
sures to protect the operator that are based on an
estimation of exposure in the actual conditions of
use (taking account of all parts of the operating
cycle such as the times when the tool is switched
o and when it is running idle in addition to the
trigger time).
Vibration
The vibration total value (tri-axial vector sum) deter-
mined according to 60335-2-69:
Work mode: operation without load
Vibration emission (ah) : 2.5 m/s2 or less
Uncertainty (K) : 1.5 m/s2
NOTE: The declared vibration total value(s) has been
measured in accordance with a standard test method
and may be used for comparing one tool with another.
NOTE: The declared vibration total value(s) may also
be used in a preliminary assessment of exposure.
WARNING: The vibration emission during
actual use of the power tool can dier from the
declared value(s) depending on the ways in which
the tool is used especially what kind of workpiece
is processed.
WARNING: Be sure to identify safety mea-
sures to protect the operator that are based on an
estimation of exposure in the actual conditions of
use (taking account of all parts of the operating
cycle such as the times when the tool is switched
o and when it is running idle in addition to the
trigger time).
EC Declaration of Conformity
For European countries only
The EC declaration of conformity is included as Annex A
to this instruction manual.
SAFETY WARNINGS
Cordless vacuum cleaner safety
warnings
WARNING: IMPORTANT! READ CAREFULLY
all safety warnings and all instructions BEFORE
USE. Failure to follow the warnings and instructions
mayresultinelectricshock,reand/orseriousinjury.
1. Before use, make sure that this cleaner must
be used by people who have been adequately
instructed on the use of this cleaner.

11 ENGLISH
2. Do not use the cleaner without the lter.
Replace a damaged lter immediately.
3. Do not attempt to pick up ammable materials,
re works, lighted cigarettes, hot ashes, hot
metal chips, sharp materials such as razors,
needles, broken glass or the like.
4.
NEVER USE THE CLEANER IN THE VICINITY
OF GASOLINE, GAS, PAINT, ADHESIVES OR
OTHER HIGHLY EXPLOSIVE SUBSTANCES.
The switch emits sparks when turned ON and
OFF. And so does the motor commutator during
operation. A dangerous explosion may result.
5. This cleaner is not suitable for picking up
hazardous dust.
6.
Never vacuum up toxic, carcinogenic, com-
bustible or other hazardous materials such as
asbestos, arsenic, barium, beryllium, lead, pes-
ticides, or other health endangering materials.
7. Never use the cleaner outdoors in the rain.
8. For Finland, this machine is not to be used
outdoors at low temperature.
9. Do not use close to heat sources (stoves, etc.).
10. Do not block cooling vents. These vents per-
mit cooling of the motor. Blockage should be
carefully avoided otherwise the motor will burn
out from lack of ventilation.
11. Keep proper footing and balance at all times.
12. Do not fold, tug or step on the hose.
13. Stop the cleaner immediately if you notice
poor performance or anything abnormal
during operation.
14. DISCONNECT THE BATTERIES. When not in
use, before servicing, and when changing
accessories.
15. Clean and service the cleaner immediately
after each use to keep it in tiptop operating
condition.
16. MAINTAIN THE CLEANER WITH CARE. Keep
the cleaner clean for better and safer per-
formance. Follow instructions for changing
accessories. Keep handles dry, clean, and free
from oil and grease.
17. CHECK DAMAGED PARTS. Before further use
of the cleaner, a guard or other part that is
damaged should be carefully checked to deter-
mine that it will operate properly and perform
its intended function. Check for alignment of
moving parts, binding of moving parts, break-
age of parts, mounting, and any other condi-
tions that may aect its operation. A guard or
other part that is damaged should be properly
repaired or replaced by an authorized service
center unless otherwise indicated elsewhere
in this instruction manual. Have defective
switches replaced by authorized service cen-
ter. Don’t use the cleaner if switch does not
turn it on and o.
18. REPLACEMENT PARTS. When servicing, use
only identical replacement parts.
19. When not in use, always store the cleaner
indoors.
20. Be kind to your cleaner. Rough handling can
cause breakage of even the most sturdily built
cleaner.
21. Do not attempt to clean the exterior or interior
with benzine, thinner or cleaning chemicals.
Cracks and discoloration may be caused.
22. Do not use cleaner in an enclosed space where
ammable, explosive or toxic vapors are given
o by oil-base paint, paint-thinner, gasoline,
some mothproong substances, etc., or in
areas where ammable dust is present.
23. Do not operate the cleaner while under the
inuence of drugs or alcohol.
24. As a basic rule of safety, use safety goggles or
safety glasses with side shields.
25. Use a dust mask in dusty work conditions.
26. This machine is not intended for use by per-
sons including children with reduced physical,
sensory or mental capabilities, or lack of expe-
rience and knowledge.
27. Children should be supervised to ensure that
they do not play with the cleaner.
28. Never handle battery(ies) and cleaner with wet
hands.
29. Use extreme caution when cleaning on stairs.
30. Do not use the cleaner as a stool or work
bench. The machine may fall down and may
result in personal injury.
Battery tool use and care
1. Recharge only with the charger specied by
the manufacturer. A charger that is suitable for
onetypeofbatterypackmaycreateariskofre
when used with another battery pack.
2. Use power tools only with specically desig-
nated battery packs. Use of any other battery
packsmaycreateariskofinjuryandre.
3. When battery pack is not in use, keep it away
from other metal objects, like paper clips,
coins, keys, nails, screws or other small metal
objects, that can make a connection from one
terminal to another. Shorting the battery termi-
nalstogethermaycauseburnsorare.
4. Under abusive conditions, liquid may be
ejected from the battery; avoid contact. If con-
tact accidentally occurs, ush with water. If
liquid contacts eyes, additionally seek medical
help.Liquidejectedfromthebatterymaycause
irritation or burns.
5. Do not use a battery pack or tool that is dam-
aged or modied.Damagedormodiedbatteries
may exhibit unpredictable behaviour resulting in
re,explosionorriskofinjury.
6. Do not expose a battery pack or tool to re or
excessive temperature.Exposuretoreortem-
perature above 130 °C may cause explosion.
7. Follow all charging instructions and do not
charge the battery pack or tool outside the
temperature range specied in the instruc-
tions. Charging improperly or at temperatures
outsidethespeciedrangemaydamagethe
batteryandincreasetheriskofre.
8. Do not use a corded power supply such as bat-
tery adapter or portable power pack with this
tool. The cable of such power supply may hinder
theoperationandresultinpersonalinjury.

12 ENGLISH
Service
1. Have your power tool serviced by a qualied
repair person using only identical replacement
parts. This will ensure that the safety of the power
tool is maintained.
2. Follow instruction for lubricating and chang-
ing accessories.
3. Keep handles dry, clean and free from oil and
grease.
Important safety instructions for
battery cartridge
1. Before using battery cartridge, read all instruc-
tions and cautionary markings on (1) battery
charger, (2) battery, and (3) product using
battery.
2. Do not disassemble or tamper with the battery
cartridge.Itmayresultinare,excessiveheat,
or explosion.
3. If operating time has become excessively
shorter, stop operating immediately. It may
result in a risk of overheating, possible burns
and even an explosion.
4. If electrolyte gets into your eyes, rinse them
out with clear water and seek medical atten-
tion right away. It may result in loss of your
eyesight.
5. Do not short the battery cartridge:
(1) Do not touch the terminals with any con-
ductive material.
(2) Avoid storing battery cartridge in a con-
tainer with other metal objects such as
nails, coins, etc.
(3) Do not expose battery cartridge to water
or rain.
A battery short can cause a large current
ow, overheating, possible burns and even a
breakdown.
6. Do not store and use the tool and battery car-
tridge in locations where the temperature may
reach or exceed 50 °C (122 °F).
7. Do not incinerate the battery cartridge even if
it is severely damaged or is completely worn
out. The battery cartridge can explode in a re.
8. Do not nail, cut, crush, throw, drop the battery
cartridge, or hit against a hard object to the
battery cartridge. Such conduct may result in a
re,excessiveheat,orexplosion.
9. Do not use a damaged battery.
10. The contained lithium-ion batteries are subject
to the Dangerous Goods Legislation require-
ments.
For commercial transports e.g. by third parties,
forwarding agents, special requirement on pack-
aging and labeling must be observed.
For preparation of the item being shipped, consult-
ing an expert for hazardous material is required.
Please also observe possibly more detailed
national regulations.
Tapeormaskoopencontactsandpackupthe
battery in such a manner that it cannot move
around in the packaging.
11. When disposing the battery cartridge, remove
it from the tool and dispose of it in a safe
place. Follow your local regulations relating to
disposal of battery.
12. Use the batteries only with the products
specied by Makita. Installing the batteries to
non-compliantproductsmayresultinare,exces-
sive heat, explosion, or leak of electrolyte.
13. If the tool is not used for a long period of time,
the battery must be removed from the tool.
14. During and after use, the battery cartridge may
take on heat which can cause burns or low
temperature burns. Pay attention to the han-
dling of hot battery cartridges.
15. Do not touch the terminal of the tool imme-
diately after use as it may get hot enough to
cause burns.
16. Do not allow chips, dust, or soil stuck into the
terminals, holes, and grooves of the battery
cartridge.Itmaycauseheating,catchingre,
burst and malfunction of the tool or battery car-
tridge,resultinginburnsorpersonalinjury.
17. Unless the tool supports the use near
high-voltage electrical power lines, do not use
the battery cartridge near a high-voltage elec-
trical power lines. It may result in a malfunction
or breakdown of the tool or battery cartridge.
18. Keep the battery away from children.
SAVE THESE INSTRUCTIONS.
CAUTION: Only use genuine Makita batteries.
Use of non-genuine Makita batteries, or batteries that
have been altered, may result in the battery bursting
causingres,personalinjuryanddamage.Itwill
also void the Makita warranty for the Makita tool and
charger.
Tips for maintaining maximum
battery life
1. Charge the battery cartridge before completely
discharged. Always stop tool operation and
charge the battery cartridge when you notice
less tool power.
2. Never recharge a fully charged battery car-
tridge. Overcharging shortens the battery
service life.
3. Charge the battery cartridge with room tem-
perature at 10 °C - 40 °C (50 °F - 104 °F). Let
a hot battery cartridge cool down before
charging it.
4. When not using the battery cartridge, remove
it from the tool or the charger.
5. Charge the battery cartridge if you do not use
it for a long period (more than six months).

13 ENGLISH
FUNCTIONAL DESCRIPTION
CAUTION: Always be sure that the appli-
ance is switched o and the battery cartridge is
removed before adjusting or checking function on
the appliance.
Installing or removing battery cartridge
CAUTION: Always switch o the tool before
installing or removing of the battery cartridge.
CAUTION: Hold the tool and the battery car-
tridge rmly when installing or removing battery
cartridge. Failure to hold the tool and the battery
cartridgermlymaycausethemtoslipoyourhands
and result in damage to the tool and battery cartridge
andapersonalinjury.
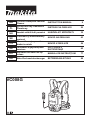
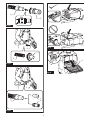
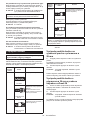
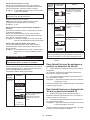
►Fig.1: 1. Red indicator 2. Button 3. Battery cartridge
To remove the battery cartridge, slide it from the tool
while sliding the button on the front of the cartridge.
To install the battery cartridge, align the tongue on the
battery cartridge with the groove in the housing and slip
it into place. Insert it all the way until it locks in place
with a little click. If you can see the red indicator as
showninthegure,itisnotlockedcompletely.
CAUTION: Always install the battery cartridge
fully until the red indicator cannot be seen. If not,
itmayaccidentallyfalloutofthetool,causinginjuryto
you or someone around you.
CAUTION: Do not install the battery cartridge
forcibly. If the cartridge does not slide in easily, it is
not being inserted correctly.
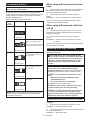
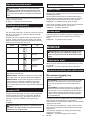
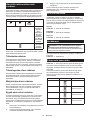
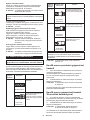
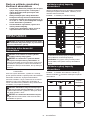
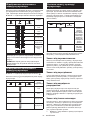
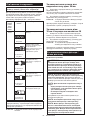
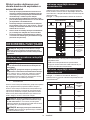
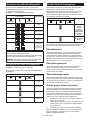
Indicating the remaining battery capacity
Press the check button on the battery cartridge to indi-
cate the remaining battery capacity. The indicator lamps
light up for a few seconds.
►Fig.2: 1. Indicator lamps 2. Check button
Indicator lamps Remaining
capacity
Lighted O Blinking
75% to 100%
50% to 75%
25% to 50%
0% to 25%
Charge the
battery.
The battery
may have
malfunctioned.
NOTE: Depending on the conditions of use and the
ambienttemperature,theindicationmaydierslightly
from the actual capacity.
NOTE:Therst(farleft)indicatorlampwillblinkwhen
the battery protection system works.
Indicating the remaining battery
capacity
►Fig.3: 1. Battery indicator 2. button
Press the button to indicate the remaining battery
capacities.
Battery indicator status Remaining
battery
capacity
On O Blinking
50% to 100%
20% to 50%
0% to 20%
Charge the
battery
Appliance / battery protection system
The appliance is equipped with appliance / battery
protectionsystem.Thissystemautomaticallycutso
power to the motor to extend appliance and battery
life. In this situation, the battery indicator lights up as
following table.
Battery indicator status Status
On O Blinking
Overload
protection
(battery) /
Overheat
protection
(battery) /
Overdis-
charge
protection
Overheat
protection
(appliance)
The appliance and the LED light will automatically stop
during operation if the appliance or battery is placed
under one of the following conditions:
Overload protection
When the appliance / battery is operated in a manner
that causes it to draw an abnormally high current, the
appliance automatically stops. In this situation, turn the
applianceoandstoptheapplicationthatcausedthe
appliance to become overloaded. Then turn the appli-
ance on to restart.

14 ENGLISH
Overheat protection
When the appliance / battery is overheated, the appli-
ance stops automatically. In this situation, let the appli-
ance / battery cool down before turning the appliance
on again.
Overdischarge protection
When the battery capacity becomes low, the appliance
stops automatically. If the product does not operate
even when the switches are operated, remove the bat-
teries from the appliance and charge the batteries.
Protections against other causes
Protection system is also designed for other causes that
could damage the appliance and allows the appliance to
stop automatically. Take all the following steps to clear
the causes, when the appliance has been brought to a
temporary halt or stop in operation.
1. Turntheapplianceo,andthenturnitonagainto
restart.
2. Charge the battery(ies) or replace it/them with
recharged battery(ies).
3. Let the appliance and battery(ies) cool down.
If no improvement can be found by restoring protection
system, then contact your local Makita Service Center.
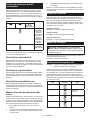
Adjusting belts
The tightness of the shoulder belts, upper and lower
beltscanbeadjusted.Putyourarmsthroughtheshoul-
derbeltsrstthenfastenthelowerandupperbelts.
To tighten, pull the end of the strap as illustrated. To
loosen, pull up the end of the fastener.
Lower belt
►Fig.4: 1. Strap 2. Fastener
Shoulder belts
►Fig.5: 1. Strap 2. Fastener
Upper belt
►Fig.6: 1. Strap 2. Fastener
Carrying hook
CAUTION: Use the hanging/mounting parts
for their intended purposes only. Using for unin-
tended purpose may cause accident or personal
injury.
Always grab the carrying hook when handling the vac-
uum cleaner body.
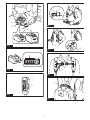
►Fig.7: 1. Carrying hook
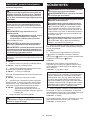
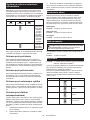
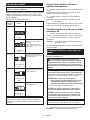
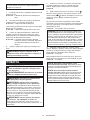
Switch action
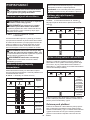
►Fig.8: 1. Suction power change button 2. ON/OFF
button
To start the cleaner, simply push the ON/OFF button. To
switcho,pushtheON/OFFbuttonagain.
You can change the suction power of the cleaner in
four steps by pushing the suction power change button.
Each push on this button repeats the 1 to 4 mode in a
cycle.
Level Indication Mode
1Quiet mode
2Normal speed
mode
3High speed mode
4Max speed mode
NOTE: You can change the suction power before
turning on the cleaner.
NOTE: The cleaner starts the operation with the
same suction power as the last operation.
NOTE: If you remove the battery immediately after
turningotheappliance,whilethemotorisrotating,
the cleaner may not start the operation with the same
suction power as the last operation.
LED light
LED light is installed in the head of the switch box
to ease the operations in dark places. Press and
hold buttontoturnthelighton.Toturno,pressand
hold button again.
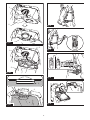
►Fig.9
CAUTION: Do not look in the light or see the
source of light directly. Never aim the light to
other people's eyes.
NOTE:TheLEDlightisautomaticallyturnedowhen
the vacuum cleaner is not operated for more than 10
minutes.
Hose band
Hose band can be used for holding the hose or free
nozzle.
To secure the hose to the vacuum cleaner body, pass
the hose band through the slot on the body. You can
attach the hose band on either side.
►Fig.10: 1. Hose band 2. Slot 3. Hose
The loop on the lower belt can be used for carrying
nozzles as illustrated.
►Fig.11: 1. Loop 2. Nozzles

15 ENGLISH
Hose hook
When you suspend the operation, the hook on the bent
pipe assembly can be used for hanging the wand on the
lower belt.
►Fig.12: 1. Hook 2. Lower belt
ASSEMBLY
CAUTION: Always be sure that the appli-
ance is switched o and the battery cartridge
is removed before carrying out any work on the
appliance.
Assembling hose
Insertthehosecuintothevacuumcleanerbodyand
turn it clockwise.
►Fig.13: 1.Hosecu2. Vacuum cleaner body
Using as a cleaner
Attaching bent pipe assembly
Optional accessory
NOTE: You don't need to perform this procedure
if your model comes with the bent pipe assembly
attached to the hose.
NOTE: There are two types of bent pipe assembly;
the one for slide-type extension wand and the one for
ring-type extension wand. If you prepare the bent pipe
assembly, choose the one for your desired extension
wand type.
The bent pipe assembly is used for connecting the
extension wand or nozzle for vacuum cleaning to this
product.
If you want to use this product as the vacuum cleaner,
attach the bent pipe assembly to the hose.
Toattach,unscrewthefrontcufromthehoseand
fasten the sleeve of bent pipe assembly onto the hose.
To remove, loosen the sleeve of bent pipe assembly
from the hose.
►Fig.14: 1. Hose 2. Bent pipe assembly 3. Sleeve
Assembling nozzle and wand
Optional accessory
NOTE: The type of the nozzle and wand included in
the product varies depending on countries. In some
countries, the nozzle and wand are not included.
1. Twist and insert the nozzle to the extension wand.
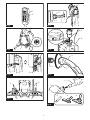
►Fig.15: 1. Extension wand 2. Free nozzle
3. T-shape nozzle 4. T-shape nozzle (slim)
NOTE: By twisting the nozzle while inserting, the noz-
zle can be attached to the extension wand securely.
NOTE: For the model with ø38 mm hose and front
cu38,attachthesuppliednozzletothealuminum
bending pipe / aluminum straight pipe.
2. Follow the procedures below, depending on the
type of the extension wand :
NOTE: The slide-type extension wand and the ring-
type extension wand are not compatible with each
other. If you want to change the slide-type extension
wand to the ring-type extension wand or vice versa,
change the bent pipe assembly also.
For the slide-type extension wand
Shoulder the vacuum cleaner body then insert the
extension wand into the bent pipe assembly until it
clicks. To disconnect, extract the extension wand with
pressing the button.
►Fig.16: 1. Bent pipe assembly 2. Button 3. Slide-
type extension wand
Thelengthofthewandcanbeadjusted.
Withpressingtheslidebutton,adjustthewandlength.
The length is locked when releasing the slide button.
►Fig.17: 1. Slide button
For the ring-type extension wand
Shoulder the vacuum cleaner body then twist and insert
the extension wand into the bent pipe assembly. To
disconnect, twist and extract it.
►Fig.18: 1. Bent pipe assembly 2. Ring-type exten-
sion wand 3. Free nozzle
NOTE: The free nozzle can be attached to the bent
pipe assembly without pipe lock directly.
Thelengthofthewandcanbeadjusted.
Loosentheringonthewandandadjustthewand
length. Tighten the ring at your desired length.
►Fig.19: 1. Ring
For the aluminum bending pipe / aluminum straight
pipe
(Onlyforthemodelwithø38mmhoseandfrontcu38)
Shoulder the vacuum cleaner body then twist and insert
thepipeintothefrontcu.Todisconnect,twistand
extract it.
►Fig.20: 1.Frontcu382. Aluminum bending pipe
3. Aluminum straight pipe 4. Nozzle
For the two aluminum straight pipes
Shoulder the vacuum cleaner body then twist and insert
the pipes. To disconnect, twist and extract it.
►Fig.21: 1. Bent pipe assembly 2. Aluminum straight
pipe 1 3. Aluminum straight pipe 2

16 ENGLISH
Connecting the tool
NOTE: If the bent pipe assembly is attached to the
hose, remove it beforehand.
To connect a tool to the cleaner, the dedicated hose
and/or additional parts are required. Depending on your
cleaner model, you need to replace the hose and/or
prepare additional parts.
Refer to the following table for details.
Supplied
hose
diameter
Hose end type Action
ø28 mm
without part
Attachthefrontcu.
with snap-on part
Replace the hose end
(snap-on part) with the front
cu.
The hose end can be removed
by turning it counterclockwise.
ø32 mm
with snap-on part
Replace the hose with the one
for dust extraction (ø28 mm,
withfrontcu).
ø38 mm
with snap-on part
Replace the hose with the one
for dust extraction (ø28 mm,
withfrontcu).
withfrontcu38
Attachthejoint22-38orthe
frontcu24.
NOTE:Alwaysuseasuitablefrontcu.Whenusing
thefrontcu24,attachittothefrontcu22thatis
connected to the hose.
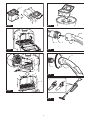
►Fig.22: 1.Frontcu222.Frontcu24
When using ø28 mm dust extraction
hose
1. Attachthefrontcutothehosefordustextraction.
Whenconnectingthefrontcu,makesurethatitis
securely screwed on the hose.
2. Connectthefrontcutothetool'sextraction
outlet.
►Fig.23: 1.Frontcu2. Extraction outlet 3. Hose
Thefrontcucanbedetachedbyturningitcounter-
clockwise while holding the hose.
When using ø38 mm hose with front
cu 38
1. Twistandinsertthejointorthefrontcutothe
inlet part on the hose, depending on the tool that you
are going to connect.
2. Connectthefrontcutothetool'sextraction
outlet.
►Fig.24: 1. Joint 2.Frontcu3. Extraction outlet
4. Hose
Toremovethejointandthefrontcu,followtheinstalla-
tion procedures in reverse.
Installing lter bag / dust bag
Optional accessory
CAUTION: Do not use a damaged lter bag.
Always use the vacuum cleaner with the lter bag
properly installed. Otherwise the vacuumed dust
or particles may be exhausted from the cleaner
and they may cause respiratory disease to the
operator.
NOTICE: When the lter bag is already full,
replace with new one. When the dust bag is
already full, empty it.Continuoususewiththelter
bag/dust bag full results in reduced suction power.
NOTICE: To prevent dust from getting into the
motor:
— Make sure that the lter bag/dust bag is
installed before use.
— Do not use a broken or ripped bag.
Otherwise the motor may be broken.
NOTICE: Do not fold the cardboard at its open-
ing when installing the lter bag/dust bag.
NOTICE: The lter bag/dust bag for the cleaner
is an important component for maintaining the
appliance performance. Using non-genuine lter
bag/dust bag may cause smoke or ignition.
NOTE:Whenthelterbag/dustbagisnotinstalledin
the cleaner, the front cover does not close completely.
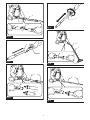
►Fig.25
1. Unlock the lever and open the dust box cover.
►Fig.26: 1. Lever 2. Dust box cover
2. Insertthelterbagintotheslitontheuppersideof
the room as illustrated.
►Fig.27: 1. Slit 2. Filter bag

17 ENGLISH
When using the dust bag, insert the brim of the dust bag
into the slit.
►Fig.28: 1. Slit 2. Brim 3. Dust bag
3. Aligntheholeofthelterbagwiththehosecu
and push the cardboard portion to the end. Make sure
thattherubberringonthelterbaggoesovertherim
onthehosecu.
►Fig.29: 1.Rubberringonthelterbag2. Rim on
thehosecu3. Cardboard portion of the
lterbag4.Hosecu
4. Lock the dust box cover certainly.
CAUTION: Be careful not to pinch your n-
gers when hooking the latch, and when closing
the dust box cover.
OPERATION
WARNING: Operators shall be adequately
instructed on the use of the vacuum cleaner.
WARNING: This vacuum cleaner is not suit-
able for picking up hazardous dust.
CAUTION: This cleaner is for dry use only.
CAUTION: Always insert the battery cartridge
all the way until it locks in place. If you can see the
red indicator on the upper side of the button, it is not
locked completely. Insert it fully until the red indicator
cannot be seen. If not, it may accidentally fall out of
thetool,causinginjurytoyouorsomeonearound
you.
CAUTION: During operation, be conscious
of the vacuum cleaner on your back. You may
lose your balance if the vacuum cleaner body bumps
against a wall or the hose is hooked by an obstacle.
1. Shoulder the vacuum cleaner body and fas-
tenlowerandupperbelts.Adjustthetightnessas
necessary.
►Fig.30
2. Press
button to start vacuuming. If you want
to change the suction power, press button until the
desired suction power is selected. Press button to
stop.
►Fig.31
During the operation, hook the switch box on the D-ring
or the loop on the lower belt. The hook can be slanted
for lighting forward when hooked on the loop.
►Fig.32: 1. D-ring 2. Loop
NOTE: The vacuum cleaner and the LED light will
automaticallyswitchesowhentheappliance/bat-
tery protection system works due to the overheat of
theappliance/battery,orthereducedair-owintothe
machinecausedbycloggedhose,pipe,lterorother
reasons. In this case, remove the cause of the prob-
lem before restarting. For more information, refer to
the section “Appliance / battery protection system”.
3. Replacethelterbagwhenitbecomesfull.Open
thelidandtakeoutthelterbag.Pullthestriponthe
sideoftheopeningtoshutthelterbaganddisposeof
thelterbaginwhole.
►Fig.33: 1. Strip
When using a dust bag, take out the dust bag and dis-
pose of the dust by releasing the latch.
►Fig.34: 1. Latch
NOTICE: Periodically check the lter bag if it is
full.Continuoususewiththelterbagfullresultsin
reduced suction power.
NOTICE: Do not use an used lter bag.Thelter
bagisdesignedforsingleuse.Usinglterbagrepeat-
edlymaycausecloggingofthelterandresultsin
damage to the cleaner. If you want to use the bag
repeatedly, use a dust bag.
MAINTENANCE
CAUTION: Always be sure that the appli-
ance is switched o and the battery cartridge is
removed before attempting to perform inspection
or maintenance.
NOTICE: Never use gasoline, benzine, thinner,
alcohol or the like. Discoloration, deformation or
cracks may result.
To maintain product SAFETY and RELIABILITY,
repairs,anyothermaintenanceoradjustmentshould
be performed by Makita Authorized or Factory Service
Centers, always using Makita replacement parts.
Cleaning the HEPA lter
CAUTION: Do not use the vacuum cleaner
without a HEPA lter or continue to use dirty or
damaged HEPA lter. Vacuumed dust or particles
may be exhausted from the cleaner and they may
cause respiratory disease to the operator.
NOTICE: To keep optimum suction power and
clean exhaust, clean the HEPA lter periodically. If
enough suction power is not obtained even after
the cleaning, replace the HEPA lter with new one.
NOTICE: To prevent the HEPA lter from being
damaged, do not use following tools and similar
items for cleaning :
— Air duster
— High pressure washer
— Tools made of hard materials such as a
metallic brush
1. Openthelidandtakeoutthelterbag.Release
thehookontheHEPAlterandremoveitfromthe
vacuum cleaner body.
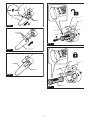
►Fig.35

18 ENGLISH
2.
BeatthedustofromtheHEPAlter.TheHEPA
ltercanbewashedwithwater.Rinseawaythedustand
particlesontheHEPAlterevery1or2month.Afterthat,
drytheHEPAltercompletelyinashadedandwell-venti-
lated place to prevent unpleasant odor or malfunctions.
3. ToinstalltheHEPAlter,insertthesidewithoutthe
apintotheholderthenpushtheHEPAlterdownward
untiltheapissecuredbytherib.
►Fig.36: 1. Holder 2.HEPAlter3. Rib 4. Flap
Cleaning the dust bag
Regularly clean the dust bag with soap and water. Turn
the dust bag inside out and remove the sticky dust.
Wash lightly by hand and rinse well with water. Dry
completely before installing to the vacuum cleaner.
►Fig.37
NOTICE: Wet dust bag lowers the vacuuming per-
formance as well as the life of the motor.
Clearing the clog
When clearing the clog, remove the hose or the exten-
sion wand, or the bent pipe assembly to check inside.
Removing/attaching the snap-on type bent pipe
assembly
To remove, pull the bent pipe assembly while pressing
both of the tab on the hose end.
To attach, insert the hose end into the bent pipe assem-
bly. Make sure that the tabs on the hose end snap into
the holes on the bent pipe assembly.
►Fig.38: 1. Hose end 2. Tab 3. Hole 4. Bent pipe
assembly
Removing/attaching the screw-in type bent pipe
assembly
To remove, loosen the sleeve of bent pipe assembly
from the hose.
To attach, fasten the sleeve of bent pipe assembly onto
the hose.
►Fig.39: 1. Hose 2. Bent pipe assembly 3. Sleeve
OPTIONAL
ACCESSORIES
CAUTION: These accessories or attachments
are recommended for use with your Makita tool
specied in this manual. The use of any other
accessories or attachments might present a risk of
injurytopersons.Onlyuseaccessoryorattachment
for its stated purpose.
If you need any assistance for more details regard-
ing these accessories, ask your local Makita Service
Center.
• Hose (for vacuum cleaner type)
• Hose (for dust extraction type)
• Extension wand
• Free nozzle
• T-shape nozzle
• Seat nozzle
• Corner nozzle
• Shelf brush
• Round brush
• Bent pipe assembly
• Filter bag
• Dust bag
• Frontcu
• HEPAlter
• Pipe
• Harness cover
• Cyclone attachment
• Makita genuine battery and charger
NOTE: Some items in the list may be included in the
tool package as standard accessories. They may
dierfromcountrytocountry.
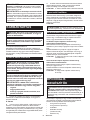
Cyclone attachment
NOTE: When using the cyclone attachment with this
appliance, the bent pipe is also required.
►Fig.40: 1. Cyclone attachment
About the cyclone attachment
Using the cleaner with the cyclone attachment installed
reduces the amount of dust that enters the dust bag,
which helps to prevent the suction force from weaken-
ing. In addition, cleaning after use is also simple.
CAUTION: Always be sure that the tool is
switched o and the battery cartridge is removed
before carrying out any work on the tool. If the
battery cartridge is left inserted, the cleaner may start
unexpectedlyandresultininjury.
CAUTION: Clean the mesh lter of the
cyclone attachment and the dust bag of the
cleaner unit when they become clogged.
Continued use in the clogged condition may result in
heating or smoke.
NOTICE: When the cyclone attachment is
attached, do not use the cyclone attachment in
the horizontal or upward facing condition. Doing
somaycausethemeshltertobecomeclogged.
NOTICE: Always use the cleaner with the dust
bag installed, even when using the cyclone
attachment. Using the cleaner without the dust bag
installed may result in a motor malfunction.
NOTE: Check that the cyclone attachment, cleaner,
and straight pipe are locked properly before use.
NOTE: Empty the dust case of the cyclone attach-
ment and the dust bag of the cleaner when dust has
accumulated. Continued use will result in weakened
suction force.
NOTE: You can use the cyclone attachment with or
without lock function.
NOTE: To install or remove the cyclone attachment,
refer to the section "Using as a cleaner".

19 ENGLISH
Disposing of dust
When dust has accumulated up to the full line of the
dust case, follow the procedure below and dispose of
the dust.
1. Holdthedustcasermly,pressandholdthetwo
buttons, and remove the dust case.
►Fig.41: 1. Full line 2. Dust case 3. Button (two
locations) 4.Meshlter
2. Dispose of the dust inside the dust case and
remove any dust and powder adhered to the surface of
themeshlter.
3. Insert the dust case all the way until the two but-
tons lock with a click.
►Fig.42: 1. Dust case 2. Button (two locations)
NOTE: Check that the cyclone attachment, cleaner,
and straight pipe are locked properly before restarting
operation.
NOTE: If the suction force does not recover even
after disposing of the dust and cleaning the mesh
lter,checkwhetherdusthasaccumulatedinthedust
bag of the cleaner or clogging has occurred.
Cleaning
Whenthedustcasebecomesdirtyorthemeshlteris
clogged, remove and wash them with water. (Refer to
“Disposing of dust” for the removal procedure.)
Dry the parts thoroughly before reinstallation and use.
►Fig.43: 1. Dust case 2.Meshlter
Whenthemeshltergetsdirtybadly,cleanitinthe
following procedures.
1. Turnthemeshltercounterclockwiseandremove
it while the hooks are unlocked.
►Fig.44: 1.Meshlter2. Hook
2. Removethedustonthemeshlterandthenwash
it with water. After that, dry it thoroughly.
3. Insertthemeshlterintothebasewhilethehooks
arealignedwiththeport.Turnthemeshlterclockwise
until the hooks are locked with a click. Make sure that
themeshlterisinstalledsecurely.
►Fig.45: 1.Meshlter2. Hook 3. Port

20 POLSKI
POLSKI (Instrukcja oryginalna)
OSTRZEŻENIE
• Tourządzenieniejestprzeznaczonedoużytkowaniaprzezosoby,wtymdzieci,oograniczonejsprawności
ruchowej,sensorycznejlubumysłowejorazosobynieposiadająceodpowiedniejwiedzyidoświadczenia.
• Należyzwracaćuwagę,abydzieciniebawiłysięodkurzaczem.
• Informacjenatematzalecanychakumulatorówzawierarozdział„DANETECHNICZNE”.
• Sposóbmontażuidemontażuopisanowpunkcie„Wkładanieiwyjmowanieakumulatora”.
• Jeślizajdziekoniecznośćutylizacjiakumulatora,należywyjąćgoznarzędziaiprzekazaćwbezpiecznemiej-
sce.Postępowaćzgodniezprzepisamilokalnymidotyczącymiusuwaniaakumulatorów.
• Jeślinarzędzieniebędzieużywaneprzezdłuższyczas,należywyjąćzniegoakumulator.
• Niedoprowadzaćdozwarciaakumulatora.
• Szczegółoweinformacjenatematśrodkówostrożnościpodczaskonserwacjiwykonywanejprzezużytkownika
zawierarozdział„KONSERWACJA”.
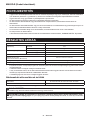
DANE TECHNICZNE
Model: VC008G
Pojemność Worekltracyjny 2,0 l
Woreknapył 1,5 l
Maks.przepływpowietrza Zwężemø28mmx1,0m 1,9 m3/min
Zwężemø32mmx1,0m 2,4 m3/min
Podciśnienie 18 kPa
Wymiary(dług.xszer.xwys.)
(bezuprzęży,zBL4040)
233 mm x 150 mm x 375 mm
Napięcieznamionowe Prądstały36V–40Vmaks.
Masa netto 4,1–5,3kg
• Wzwiązkuzestaleprowadzonymprzeznasząrmęprogramembadawczo-rozwojowymniniejszedanemogą
uleczmianombezwcześniejszegopowiadomienia.
• Danetechnicznemogąróżnićsięwzależnościodkraju.
• Waganieuwzględniaakcesoriów(opróczakumulatorów).Waginajlżejszychinajcięższychkombinacjiurzą-
dzenia z akumulatorami przedstawiono w tabeli.
• Długośćdostarczonegowężaróżnisięwzależnościodkraju.
Kompatybilne akumulatory i ładowarki
Akumulator BL4020 / BL4025 / BL4040 / BL4050F / BL4080F
Ładowarka DC40RA / DC40RB / DC40RC
• Pewnezwymienionychpowyżejakumulatorówiładowarekmogąbyćniedostępnewregioniezamieszkania
użytkownika.
OSTRZEŻENIE: Należy używać wyłącznie akumulatorów i ładowarek wymienionych powyżej.
Używanieinnychakumulatorówiładowarekmożestwarzaćryzykowystąpieniaobrażeńciałalubpożaru.
OSTRZEŻENIE: Z tym urządzeniem nie należy używać zasilaczy przewodowych, takich jak adapter
akumulatora czy przenośna jednostka zasilająca.Kabeltakiegozasilaczamożeutrudniaćpracęispowodować
obrażeniaciała.
Strona się ładuje...
Strona się ładuje...
Strona się ładuje...
Strona się ładuje...
Strona się ładuje...
Strona się ładuje...
Strona się ładuje...
Strona się ładuje...
Strona się ładuje...
Strona się ładuje...
Strona się ładuje...
Strona się ładuje...
Strona się ładuje...
Strona się ładuje...
Strona się ładuje...
Strona się ładuje...
Strona się ładuje...
Strona się ładuje...
Strona się ładuje...
Strona się ładuje...
Strona się ładuje...
Strona się ładuje...
Strona się ładuje...
Strona się ładuje...
Strona się ładuje...
Strona się ładuje...
Strona się ładuje...
Strona się ładuje...
Strona się ładuje...
Strona się ładuje...
Strona się ładuje...
Strona się ładuje...
Strona się ładuje...
Strona się ładuje...
Strona się ładuje...
Strona się ładuje...
Strona się ładuje...
Strona się ładuje...
Strona się ładuje...
Strona się ładuje...
Strona się ładuje...
Strona się ładuje...
Strona się ładuje...
Strona się ładuje...
Strona się ładuje...
Strona się ładuje...
Strona się ładuje...
Strona się ładuje...
Strona się ładuje...
Strona się ładuje...
Strona się ładuje...
Strona się ładuje...
Strona się ładuje...
Strona się ładuje...
Strona się ładuje...
Strona się ładuje...
Strona się ładuje...
Strona się ładuje...
Strona się ładuje...
Strona się ładuje...
Strona się ładuje...
Strona się ładuje...
Strona się ładuje...
Strona się ładuje...
Strona się ładuje...
Strona się ładuje...
Strona się ładuje...
Strona się ładuje...
Strona się ładuje...
Strona się ładuje...
Strona się ładuje...
Strona się ładuje...
Strona się ładuje...
Strona się ładuje...
Strona się ładuje...
Strona się ładuje...
Strona się ładuje...
Strona się ładuje...
Strona się ładuje...
Strona się ładuje...
-
 1
1
-
 2
2
-
 3
3
-
 4
4
-
 5
5
-
 6
6
-
 7
7
-
 8
8
-
 9
9
-
 10
10
-
 11
11
-
 12
12
-
 13
13
-
 14
14
-
 15
15
-
 16
16
-
 17
17
-
 18
18
-
 19
19
-
 20
20
-
 21
21
-
 22
22
-
 23
23
-
 24
24
-
 25
25
-
 26
26
-
 27
27
-
 28
28
-
 29
29
-
 30
30
-
 31
31
-
 32
32
-
 33
33
-
 34
34
-
 35
35
-
 36
36
-
 37
37
-
 38
38
-
 39
39
-
 40
40
-
 41
41
-
 42
42
-
 43
43
-
 44
44
-
 45
45
-
 46
46
-
 47
47
-
 48
48
-
 49
49
-
 50
50
-
 51
51
-
 52
52
-
 53
53
-
 54
54
-
 55
55
-
 56
56
-
 57
57
-
 58
58
-
 59
59
-
 60
60
-
 61
61
-
 62
62
-
 63
63
-
 64
64
-
 65
65
-
 66
66
-
 67
67
-
 68
68
-
 69
69
-
 70
70
-
 71
71
-
 72
72
-
 73
73
-
 74
74
-
 75
75
-
 76
76
-
 77
77
-
 78
78
-
 79
79
-
 80
80
-
 81
81
-
 82
82
-
 83
83
-
 84
84
-
 85
85
-
 86
86
-
 87
87
-
 88
88
-
 89
89
-
 90
90
-
 91
91
-
 92
92
-
 93
93
-
 94
94
-
 95
95
-
 96
96
-
 97
97
-
 98
98
-
 99
99
-
 100
100


Makita VC008G Instrukcja obsługi
- Kategoria
- Odkurzacze
- Typ
- Instrukcja obsługi
w innych językach
- slovenčina: Makita VC008G Používateľská príručka
- română: Makita VC008G Manual de utilizare
Powiązane artykuły
-
Makita DVC665 Instrukcja obsługi
-
-
Makita DVC157L Instrukcja obsługi
-
Makita DVC861L Instrukcja obsługi
-
-
Makita CL108FD Instrukcja obsługi
-
-
-
Makita UB100D Instrukcja obsługi
-